kismetquilts-blog
Kismet Quilts
A quilters paradise on Vancouver Island.
43 posts
Don't wanna be here? Send us removal request.
Last Seen Blogs
zuzuhe
Not compatible with humans

bigboi0097
Untitled

isnt-charming
dandelion

cosebellecoserare
Luxury Murano Glass
psychelis-new
psychelis
Text
Kokopelli

Today we're quilting Kokopelli ---one of our many unique long arm patterns -- onto a south western style quilt. After sizing these little guys up and starting the quilting process we began chatting about the many legends of the Kokopelli and we thought we would share one with you.
There are many myths of the famous Kokopelli. One of which is that he traveled from village to village bringing the changing of winter to spring; melting the snow and bringing about rain for a successful harvest. It is also said that the hunch on his back depicted the sacks of seeds and songs he carried. Legend also has it that the flute playing also symbolized the transition of winter to spring. Kokopelli’s flute is said to be heard in the spring’s breeze, while bringing warmth. It is also said that he was the source of human conception. Legend has it, everyone in the village would sing and dance throughout the night when they heard Kokopelli play his flute. The next morning, every maiden in the village would be with child.
0 notes
Text
The Bow Pillow
You know how much we LOVE Ann Kelle and when we found this adorable Bow Pillow tutorial we just couldn't resist making one....or three, out of her amazing remix collection.
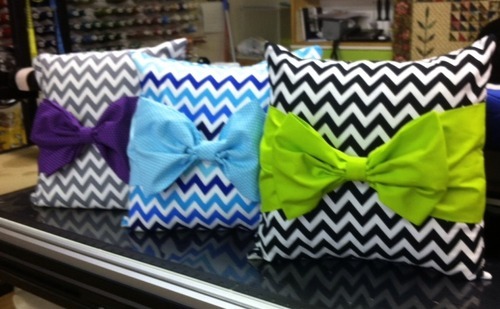
Then we had to put some kits together here in the shop so that you could get in on the fun! whip up these lovelies to add a bit of flare to your home. Perfect for a nursery, patio, office or living room.
Follow the link below to the tutorial.
http://www.annkelle.com/tutorial-the-bow-pillow/
Have fun! Happy Quilting!
0 notes
Text
Quilt-A-Long Step 7
Let's finish up this quilt!
Adding the borders;
From your left over white or background fabric, Cut 4 strips 2-1/2” x WOF for side borders and 3 strips 6-1/2” x WOF for top and bottom borders
Sew together the short ends of the two 2 -1/2" X WOF (42") border strips and sew to the left side of the quilt. Repeat for the right side.
Sew together the short ends of two 6 1/2" X WOF (42") border strips, and sew to the top of the quilt. Trim the excess, and sew the excess to the remaining border strip. Sew this strip to the bottom of the quilt.
Layer and quilt as desired. Bind with left over background fabric and enjoy your new quilt!
So glad to have had you participate in the quilt-a-long with us! We can't wait to see all of your finished work!! Remember to share your progress, photos, and stories with us on Facebook, Instagram, and Twitter using #kismetquiltalong
Stay tuned for more information on our Gloat and Tote Party next month where we can all share our finished quilts, share our experiences and have some fun!
Thanks again! Hope you had a fun filled World Wide Quilting Day!
0 notes
Text
Quilt-A-Long Step 6
Lets get the background sewn together!
Take the 13 white background strips and sew them to the sets of butterflies according to the diagram in step 5.
To create your columns, start by sewing the 44-1/2” strip to the bottom of your first column, then sewing a 44-1/2” strip to the bottom of the second column, then a 39” strip to the bottom of the third column, etc., until 9 strips of background fabric are sewn to the bottom of each column of butterflies except for the last column.
Go back and sew a 6” square to the top of the second column (skip column one!), then an 11-1/2” strip to the top of the third column, the 17”
strip to the top of the fourth column, etc., until your remaining 9 strips are sewn to the top of each column of butterflies.
Sew all 9 columns together, taking care to match up the seams and line up the butterflies in a cascading manner. Press your seams open.
0 notes
Text
Quilt-A-Long Step 5
Ok, everybody have their blocks sewn together? Can you see it starting to come together?
Lets sew our sets together! Take a look at the quilt diagram below,drum roll please......

each column of the quilt contains a vertical row of 4 or 5 blocks or "butterflies". Choose which "butterflies" you want to pair together --This is the fun part! --and then sew them together in a column, remembering to alternate the direction of the block.

Sew "butterflies" into 10 sets (with 5 butterflies in the first column and 4 in the rest)
From this point forward, it is best to press seams open to reduce the bulk when you nest the seams from the butterflies together.
0 notes
Text
How's everybody doing? I hope you have stopped for a bite of lunch --we can't have anyone's blood sugar dipping too low.
Don't forget to pop into the store this afternoon for a piece of cake and a cup of tea.
Shout-out to Debra Rees and group at Seameadows Farm! Keep us posted on your progress ladies!
And remember to share your progress, stories, and photos on Facebook, Instagram and Twitter usuing #kismetquiltalong
0 notes
Text
Are You Ready for Step 4?
Sew a 1 -1/2" x 6 -1/2" black strip between two sets of triangles that are the same colour. Press seams towards the black. Trim block to 6" x 6"
Repeat steps 1-3 to make 41 blocks

0 notes
Text
Quilt-A-Long Step 3!
Place the sewn charm on your cutting mat with the cut on the horizontal plane. Then place your ruler from the top corner to the bottom corner, across the vertical plane, and cut through both layers.
You will end up with two triangles that, once opened and pressed, look like this. Press seam allowances toward the background fabric.

Trim each section to 2 -3/4" x 6 -1/2" --You want to trim it on the point.

0 notes
Text
Quilt-A-Long Step Two!
Lets Sew!
Prepare the Charms - Cut a white 5" charm in half diagonally, from corner to corner, but keep the two halves together.
Pair a coloured 5" charm with one set of white triangles, right sides together, and then sew them together with a scant 1/4" seam around all four sides.
Don't forget to share your progress, stories and photos with us on Facebook. Instagram and Twitter using #kismetquiltalong
0 notes
Text
Let's Get Started! Quilt-A-Long Step One
Good morning friends. Happy World Wide Quilting Day! I hope you are in good company, have the kettle on and are ready for a day of sewing fun!
Just a couple of notes before we get started;
all seam allowances are 1/4" unless otherwise stated.
and please remember to measure twice and cut once!
Ok, lets get cutting!
From your black fabric
Cut 7 strips 1-1/2” x 42" or WOF (width of fabric)
-subcut each strip into 6 strips 1-1/2” x 6-1/2” (41 total).
From your white fabric
For blocks Cut 6 strips 5” x 42" or WOF (width of fabric), then subcut to make 41 squares 5” x 5”.
For Background: Cut 13 strips 6” x 42" or WOF, then subcut the strips as follows:
• Cut 2 strips 6” x 39” • Cut 2 strips 6” x 33-1/2” and 6” x 6”
• Cut 2 strips 6” x 28” and 6” x 11-1/2” • Cut 2 strips 6” x 22-1/2” and 6” x 17”
• Cut 1 strip 6” x 9”, & 3 strips 4”x 6” (sew these to 4 of the 6” x 42" or WOF strips to make longer strips.).
Don't forget to share your progress, stories and photos with us on Facebook, Instragram and Twitter using #kismetquiltalong
0 notes
Text
World Wide Quilting Day Quilt-a-long!
March 15th is Worldwide Quilting Day. The Kismet crew would love to spend the day quilting with all of you. Sadly our store isn’t large enough to host the party so we’re doing it online. We have chosen a bright pattern designed by Melissa Richie and hope that you will join us for a super-fun all day quiltal- ong. Rain from Timeless Treasures is our fabric choice (kits will be avail- able in the store). If you
prefer to choose your own fabrics, you will need one charm pack, one yard solid black fabric, and four yards of neutral background fabric, preferably white. Tune in at 10:00 am (the Quilting Hour) on Saturday March 15th for your first set of instructions. In keeping with the block party theme, invite your friends, put the kettle on and fire up your laptop! There’s nothing more ex- citing than starting a new project, especially if you’re doing it with a million of your closest friends.
0 notes
Text
Round Rag Rug
As promised, below is a link to a tutorial on the round rag rug. Enjoy!
http://goodtimesithinkso.blogspot.ca/2009/10/circular-crochet-rag-rug-instructions.html
0 notes
Text
Sue's Ginger Cookies
My goodness! Long time no post! The recipe for these delicious little bites was promised weeks ago and my apologies for the delay. So without further delay, here is the recipe for Sue's Ginger Cookies that we all enjoyed so much during Christmas in July.
1 1/2c Butter 1tsp Cloves
2c Sugar 4tsp Baking Soda
2 eggs, beaten 1tsp Salt
1c Molasses 2tsp Ginger
4 1/2c Flour 2tsp Cinnamon
Preheat oven to 350deg
Cream butter and sugar. Mix egg and molasses together and add to butter and sugar mixture. Add dry ingredients.
(This is a sticky dough. If it is too sticky add a little more flour. I find if I mix it and let it sit for about 10 min it is easier to handle)
Drop by teaspoonful or roll into small balls and flatten slightly with palm of your hand.
Bake for 10-15 minutes for a chewy cookie, a little longer if you like them crunchy.
Enjoy!
0 notes
Photo
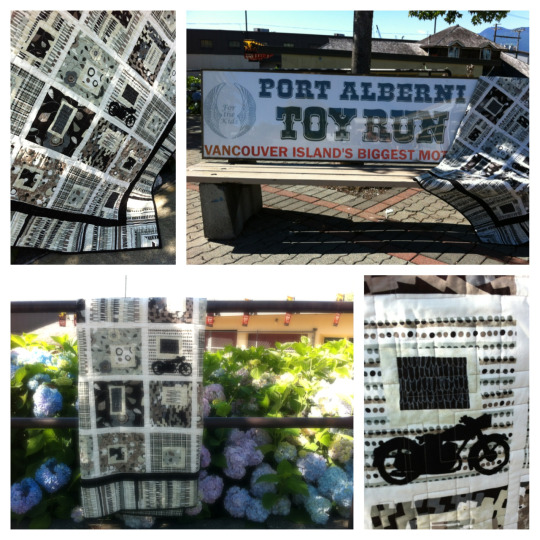
It's that time of year again! The community is gearing up for the Toy Run to come through the valley this September and the many volunteers are busy building awareness and raising funds to help support numerous local children's charities. Pictured above is the quilt we have donated this year for them to raffle. Buy your tickets and help support this wonderful charity that gives so much back to the community.
0 notes
Text
Kismet Quilts is proud to be part of the “community with a heart.” For that reason, we donate many quilts each year to local charities. Ty Watson House, a local palliative care facility that houses those with terminal illnesses, is one charity that we are pleased to continue to support.
It would be difficult to find someone in the community who is not familiar with the great care that the staff provides. That is why, this year, we were happy to donate three quilts to the house to help them raise money so they can continue to make the last days in a person’s life as comfortable and pleasant as possible. Ty Watson House provided care to two friends and former co-workers of Lynne’s; Lawrie MacNaughton and Vern Mitchell. As well, family friend, Michael Robert Henry spent his last days in the care of Ty Watson House. Kismet is proud to donate three quilts to Ty Watson House in honour of these three exceptional men.
Our donated quilts will be raffled off to help raise more funds to enable the Ty Watson House to continue to provide such good care.
To purchase a raffle ticket for the quilts, please visit the shop.
For more information on the Ty Watson House and to find out where you can purchase tickets to the gala please visit http://www.albernihospice.ca/
0 notes
Photo

Throughout history, mothers have been making quilts for their children. With Mother’s Day fast approaching, the Kismet crew are looking back and reflecting on the devoted mothers we have been privileged to know. These moms have spent many hours picking, cutting and stitching fabrics together to make quilts that will show the recipients how much they are loved.
One of the loving mothers we have had the honour to meet was Darlene Noiles. She had brought in a life size southern belle quilt top that she was unable to finish herself. When we had finished quilting it, Darlene was thrilled. Thrilled because she knew then she could continue doing the handwork she loved so much without having to worry about the quilting itself. She went on to make five more southern belle quilts. And we custom quilted each one for her in a pattern as different as the quilt itself.
Unfortunately, we lost Darlene to cancer shortly after she finished her last quilt. Before her passing, she was so very proud to present each of her six children - five daughters and one son - with a quilt. Rather than choosing their quilt for them, Darlene had each of children put on a blindfold and select a quilt without seeing them. Thanks Darlene for the wonderful memories. Your children were truly blessed to have such a caring Mother.
When we make and give quilts, we create heirlooms. Quilts are loved, cuddled and sometimes passed through many generations. My Mom always says ″wrap up in a quilt and know you are loved!″ Not quite as good as an up-close and personal hug, but a hug nonetheless.
2 notes
·
View notes