
nightphoto
Chasing Stars
7 week night photography journey
7 posts
Don't wanna be here? Send us removal request.
Last Seen Blogs
ottograph-amsterdam
OTTOGRAPH

weddingphotographersinchenn-blog
Wedding Photograpers
tpf1981
Untitled

pioneer-over-c
WHAT IS HERE WAS DANGEROUS AND REPULSIVE TO US.

terastalungrad
It's Lovely to Come Home
Photo

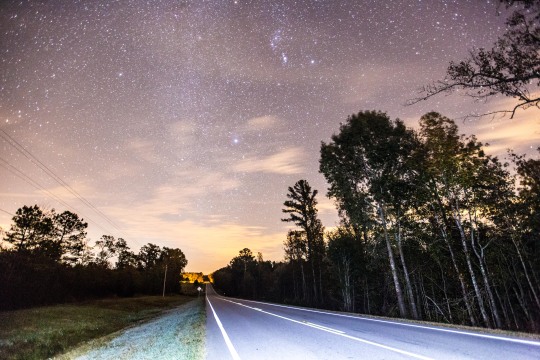
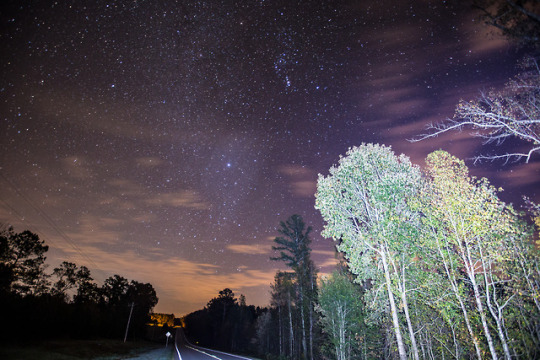
Celestial Whorls Over Georgia
0 notes
Text
Bringing It All Together
This week I worked on the final tweaks for the image and finally named the photo. Once I sat down again to work on editing after a few days away from the photo, I noticed so many more spots of light sky that were not removed with the Adobe Photoshop smart wand. The smart wand can be used in a few different ways, but I used it to try and pick up spots that matched the same color as a spot on the sky that I selected. This makes it easier to work around things such as trees. Since it did not grab everything, I used Adobe Lightroom and manually removed each spot. I used the clone stamp for this and would select a spot where there was a gap and pull from another tree spot to cover that spot. I easily removed over 200 different spots over the course of a few hours. Although tedious, this process is personally satisfying because I can see the image continue to improve. I kept looking at the before and after versions to see what spots continued to stand out, and then I removed those. Once I was satisfied with the spots, or lack of, I did one or two more tweaks with the lighting and decided the image was done. It is always such a relief to decide a major image like this is done.
As I began to think through different name options, I began to reflect on the practicum and the entire process. The process had more setbacks than I would have liked, and had I not been on a deadline, I would have continued to postpone the photoshoot until the conditions were right. However, despite the timeline and the issues with location, weather, the moon, and even coyotes – I was able to create a version of what I had in mind. The scene itself is not what I had envisioned. I had hopes for more nature or a lake, but given the circumstances I am happy with the final image. I managed to learn quite a lot about the vortex star trail process and am looking forward to trying it again! In theory I could find the right landscape at night and use the vortex stars I have already created and create another image.
For the title I wanted it to reflect the original goal (which I managed to maintain), which was creating a photo with vortex star trails. I thought through different synonyms for star trails, movement, symbolism, and vortex. I almost settled on Mufasa’s Return since Mufasa from the Lion King teaches Simba how the stars are old kings looking over for guidance and it appears that the stars are coming to Earth. However, I wanted something more specific to this project. Since the photoshoot took place in Georgia, which is where I grew up, I wanted to include that in the title. I decided to go with Celestial Whorls Over Georgia. This title sums up the focus of the sky, the vortex stars trails, and the location.
In this final post I will walk through some of the different steps and pair them with pictures.
This is the original image with no editing at all. Once again, the lighting in the foreground is from my flashlight. The exposure was 30 seconds long and I held the flashlight for about 3-4 seconds of that. ISO 8000, f/2.8, 16mm.
This next version has only basic light editing done. I enhanced the sky. At this point I was still hopeful that I would be able to digitally remove the clouds and use this sky. I then toned down the trees and street a little so that the focus is the sky.
Once I realized that I would not be able to remove the clouds, I went searching for old star photos that I had taken. I found this one that I took in Montana about 3 years ago. You can see some light pollution from the city on the left.
I cropped out the sky and digitally removed the light pollution and some of the trees. This was also a 30 second exposure. Once I isolated this, I worked on creating the vortex star trails. This took me more time than it should have, but next time I should have it down.

Once I had the vortex star trails, I worked on merging the two images together. First, I tried putting the sky on top and erasing the sky where the trees stuck up, however it did not work well, so I put another copy of the base image on top and deleted the original sky from it. This allowed the vortex to show from underneath. Here, I used the magic wand tool. I also created several versions of the star trails by changing the brightness and amount of color, but settled on this version.

This is the final version with the extra light spots removed. I once again toned down the brightness of the trees and the road to enhance the stars. Celestial Whorls over Georgia
0 notes
Text
The Editing Has Begun!
After the two intense and generally unsuccessful attempts at capturing a night shot last week, I was very nervous when I sat down at my computer to start editing. I decided not to look at the few images I did manage to capture on the back screen of the camera again and just wait until I was ready to edit. When I first uploaded the images, I was a bit disheartened. Not only were there more clouds than I remember, but the landscape itself was not particularly special. I had been hoping for a lake, or mountains, or something else unique. The travel and weather had put a hitch in that plan though. As I looked at the raw photos, I decided to proceed and do as best as possible within the circumstances. Even if the final result is not quite what I pictured at the start of this project, the editing is good practice for me and also a learning opportunity to work with the vortex star trails techniques.
The first thing I did was select my favorite shot. I did this by doing basic light editing to a few images and analyzing the sky and landscape. The image I originally had in mind (see image below) turned out to show much less sky and it felt more enclosed so I decided to go with another image. Once I adjusted the basic lighting in the image using Adobe Lightroom, I exported it and moved over to Adobe Photoshop. I prefer to use Lightroom for general editing and Photoshop for anything complex such as removing things from a photo or creating star trails. Once the photo was in Photoshop, I attempted to digitally remove the clouds from the image. This is done using the “clone stamp” tool which pulls pixels from another part of the photo and puts them where you want them. This is often what is used to remove things from a photo such as a dog leash or people in the background of a shot. The clone stamp can also be used to fix someone’s facial expressions (assuming there is another image to pull from). I attempted to remove the clouds three times, but I did not have enough cloud free sky to pull from and was unsuccessful.
Instead of quitting, I decided to use one of my old images of the night sky and impose that onto this landscape. I would have had to pull the sky out of the image to create the vortex star trails off one shot anyway. I went through some old photos and originally decided to go with the sky from my Mount Rainier Milky Way photoshoot. However, after working with the image it became clear that this would not be the ideal sky image for this endeavor. The Milky Way was so bright and the different colors in the sky would complicate the process. I found another photo that I took a few years ago in Washington State. I never did anything with this sky photo and it was fairly dark with a good amount of stars and best of all, no clouds. I cropped the landscape out of the photo and removed the small bit of orange hue and trees using the clone stamp tool. Then I began working on the star trails.
Since this was my first time attempting the vortex star trails, I used the video that I shared a few weeks ago to guide me through the process. For me, doing something so complicated is like following a recipe. I try to follow step by step until I understand the process a bit better and then I can begin to experiment a bit more. I went through the steps of creating a photoshop action and copying the action to create 80 layers (or essentially 80 new images). Exporting these layers take a while, so I used that time to take a break and rest my eyes. Once they were ready, I used the application Stacks (which I have used in the past) and started creating the star trails. However, I missed something in one of the steps and it would not process the images. This was extremely frustrating especially since I did not know where the mistake occurred. It felt like accidentally using one tablespoon instead of one teaspoon and now knowing why the food tastes bad.
I went back to the beginning and started the process again. I got to the exporting step and Photoshop said nope! I spent another hour re-doing the first half of the star trails process over and over following each step and not understanding why it would not work. Finally, after doing what I swear was the exact same thing for the tenth time, it worked. The benefit of that hour was that I learned which small BUTTON I did not know I needed to hit which caused the first issue in Stacks. I created all 80 layers again and after my second break for the export went back into Stacks for processing. This time it worked and I was so happy!
Once the star trails were created I put them into the photo. The next problem to deal with was the amount of trees in the photo. Usually, I would not share this issue with anyone, because it causes the viewer to look for signs of manipulation. Because tree branches and leaves create so many small gaps where light passes through, they can be challenging elements to work with. After roughly another two hours I managed to get the star trails imposed on the image. However, I was not thrilled with the overall lighting of the star trails. I opened the star trails alone on another page in Photoshop and began to manipulate them. I created three different versions and put them all onto the image with the landscape to compare. Once I picked my favorite version, I made a few more tweaks. I then imported the image back into Lightroom to do some more basic light editing with the vortex star trails and landscape finally combined. This is where I left off for the week. Once I spend so many hours looking at an image, I find that it is best to walk away and even take a few days before returning. Looking at the image with a fresh set of eyes can bring a new perspective. This time next week I will finalize the image and finally be able to share it!
0 notes
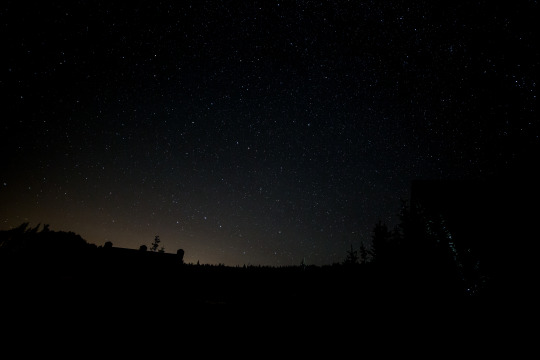
Photo
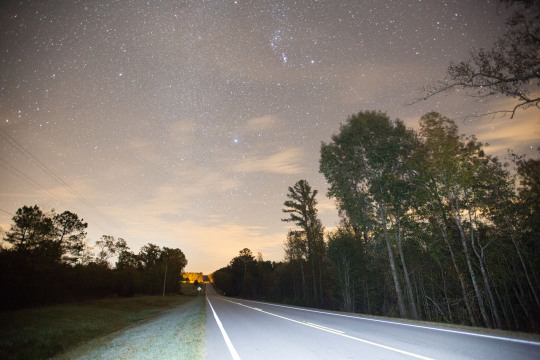
Sky photo before manipulation. The flashlight was used the light the trees. There are so many clouds though! :(
0 notes
Text
Clouds, Coyotes, and Cold
It was freezing cold and my husband and I had already been outside for the past six hours. We were visiting Georgia to see friends and go to the University of Georgia football game against Auburn University. Once the game finished (and UGA won!) we made our way through the 100,000 people to our car. We got in and started driving south. We were staying the night at my father-in-law’s house and there was a national forest on the way down to his house. The plan was to drive through there and find some nice scenery to use for the foreground of my photo. So far there had been so many complications that I was just keeping my fingers crossed for some better fortune tonight.
As we began driving I realized that I had forgotten to pack a flashlight. I know what you’re probably thinking, why would I need a flashlight after I just spent the past two weeks talking about how dark I need the area to be. Wouldn’t my phone be bright enough for us to set up? Ironically, while I need the surroundings to be really dark, I need a flashlight to do what’s called “painting with light.” I use the flashlight to light up the trees, ground, or whatever else I can find for the foreground. For this reason it needs to be a strong flashlight and a phone just won’t cut it. So before leaving Athens, we stopped at Walmart and ran in to find a flashlight and grab some food. Once that was done, we were on the road.
After about 45 minutes of driving we entered the national forest area. There were no cars around us, but it wasn’t as dark as I would have hoped. As we drove, the areas with farmland that were wide open and would have the nicest scenery were also lit up with lights around the homes or along the side of the road. We continued to drive and as we passed the river which I had been most hopeful for, we ran into the same lighting problem. As we continued to drive I began to notice clouds working their way in from the northwest. It became apparent that time was not on our side. We found a small area with some large trees that still allowed plenty of view of the sky. We found a safe place to pull over and I began to prepare my equipment. Since it was so cold I decided to get everything as ready as possible in the car to minimize my time outside.
As I put together the tripod we see bright blue lights pull up behind us. “Uh oh,” I thought. A police officer approached us and asked what we were up to. My husband explained that we were setting up for some night photography. He shined his bright light in my face and lap and I thought, “Where’s a flashlight when you need it!” He could see that I had camera equipment out and after asking a few questions and ensuring that we were okay and not up to anything bad, he continued on his way. Once my equipment was ready I went over and started testing the positioning of the camera. The easiest way to test this is to make the camera settings as open for light as possible and take a quick 4-5 second exposure image. With those settings the image would not be as high quality and ideal, but it quickly provides an example of what you can expect in terms of framing. The location was not what I had in mind, but with all the other issues, I was running low on options and time. Once I got a position that I was happy with, I corrected the settings and began to take longer 30 second exposures using the flashlight to brighten the trees. The clouds were continuing their move in and I was feeling thankful that I had found another method of creating the vortex star trails that did not require hours of images stacked together.
As I was working, my husband was on alert for any danger. We heard a coyote howl in the distance and I said, “Oh that’s kind of cool.” A few minutes later we heard what sounded like cheering not too far away. My husband and I looked at each other and thought that’s strange – we had not heard or seen any signs of a party. The cheering began to change and it became painfully clear that the sounds were morphing into howls. “Run!” my husband yelled. I grabbed the camera and we both sprinted for the car. This was not just a few coyotes, but was clearly a massive pack working their way in our direction. “No photo is worth being mauled!” I thought to myself. Once we were in the car my husband quickly drove away. I looked at my images and was disappointed – the lighting was not quite right, but even worse, the clouds had seeped into my frame. As we continued to drive south we searched for another location, but the clouds had made it clear that they wanted me to have no connection with the stars that night.
As I continued to study the forecast for New York, I was disheartened that rain and even snow were on the schedule for the entire week. I would have to see what I could do with the images that I did manage to capture. On Friday night, I looked out of our apartment window and saw the half-moon shining brightly down on me. I admired it for a moment before it dawned on me – if I can see the moon, that means that it is a clear night! I opened up the forecast and sure enough it had changed to clear skies for the next several hours. My husband I finished what we were working on and in the next hour headed out to our car. As we began to drive we decided to drive west towards New Jersey and Pennsylvania. We didn’t have too much of a plan on location, but figured the Delaware Water Gap would be a good spot. We did not make it very far before we realized that clouds were covering about three quarters of the sky. I pulled up radar maps and they didn’t show any clouds above us. I didn’t want to make us drive for two hours for nothing if the clouds would be there to stay. So we reluctantly turned around and went back home.
In the end, it was a less than ideal situation. Life, time, lights, and especially clouds got in the way. I managed to get some shots and next week when I begin to edit the photos, I will see if I was able to get anything of real value. This sort of flexibility with night photography is required and sometimes the stars line up, this time they didn’t. We will just have to wait and see what I can do with it!
0 notes
Text
Final Planning
This week I have been working to finalize the details for the photoshoot. There is so much planning that goes into creating an image like this, but flexibility is key. I have continued to look at different methods of the vortex photography to find what will be best. I found a YouTube video that walks you through how to create the vortex star trails off of one image in Photoshop. This could prove to be a useful technique in the event that the sky does not cooperate long enough to create hours of images to stack. I also found another article that walks through this process. I spent time this week continuing to research and ensure that I am prepared.
Since I would be out of town for the photoshoot, I also had to pack for it in advance. I included my camera which is a Canon 5D Mark III. For night photography, wide angle lenses are typically the most ideal. I packed my 16-35mm L lens. This lens can handle low light photography well with an f-stop setting of 2.8. I also packed my compact tripod. This tripod is not my favorite because it is not as sturdy, but with its size and weight it is ideal for travel. I am hoping that this is not an issue on the night of the photoshoot. I also packed an extra battery charger, and a remote for the camera. The remote is important because the motion of pushing the button on the camera can cause enough movement to blur the stars with such a long exposure.
As I continued to research, I spent much of my time trying to find an ideal location based on where I would be. I used apps such as Dark Sky to help me find darker areas in Georgia. As well, the app Stellarium is great for planning ahead to see where stars will be in the sky. This app allows you to customize based on time, date, and location and can pinpoint the location of the stars. I was able to put in a general area in middle Georgia, and put in November 11th at 1am to see where the stars would be. The last app that I used for research was GoSkyWatch. This app is similar to Stellarium. I also focused some of my attention on the weather. As I was planning, the forecast was showing overcast skies on Friday, November 9th and Sunday, November 11th, but clear skies on Saturday, November 10th. This is a good sign for the photoshoot on Saturday night, but also means that the clouds could change and affect the image. In order to create a photo like this, there needs to be no clouds in the sky. Finally, I saw that it is going to be freezing cold on Saturday night. The forecast has temperatures in the low 40s to high 30s which for me, makes things more difficult and obviously less pleasant.
Taking the dark skies into account and where I would be on Saturday night, I began to narrow down the location for the photoshoot. I decided to go with the Chattahoochee – Oconee National Forest. Since I do not know the area very well and will have a car, I’m going to be a bit flexible with the exact location within that area. There are a few small lakes and rivers which I prefer for the foreground, however I am not sure if there will be houses along the water which will have lights that would ruin the image. Looking at the land through a satellite map, it appears to be a mix of forest and farmland. There is a campground called the Oconee River Campground which could be a possibility. I am not sure if I would be able to find the campground and if it will be open to cars so late at night. If not, I am hoping to find a nice view along the side of the road.
As I continue to plan, it is clear that the flexibility on the day of is key. The skies and location will affect the image. If things do not come together, I will have to push back and do it on a weeknight back up near New York City. Wish me luck!
0 notes
Text
The Planning Begins!
The beginning of a major photography project is the most overwhelming part. When you begin to research it feels like there is too much information and too much to do. I love night photography, and used to do it more often. In my first 20 minutes of research I remembered why I stopped – oh yeah, because I moved to the brightest part of America. According to multiple dark sky maps, I am about a four hour drive from the nearest significant dark area. In order to really photograph the stars, it needs to be so dark that you can barely see your own hands. This includes city light in the distance. I’m pretty sure Time Square alone could ruin night photography for miles and miles. The other disadvantage I quickly remembered is the timing of my master’s program. Ideally I would have loved to photograph the Milky Way, but the best parts of it have basically gone into hibernation until next May. From November until May, the brightest parts of the Milky Way are in line with the Sun which means that it is impossible to see. There are other parts of the Milky Way that are visible of course, but they are not as striking and will not produce the same WOW factor in a photograph. Finally, I also realized that my current timeline will be fighting the moon’s phase. I had planned to have the photoshoot during week four, however the new moon falls during week three, so I may have to push the photoshoot up a few days to account for the moon’s brightness.
Taking the moon into account, my ideal date for the photoshoot will be on Saturday, November 10th. However, I will be in Georgia at that time. So, since light pollution is such an issue up north, I will plan to find a place in Georgia and bring my photography equipment with me for a photoshoot down south. If weather or any issues prevent the photoshoot during the weekend, I will have to push back to the following week (week four) and deal with the brightness of the moon.
As I mentioned, photographing the Milky Way is out, so I have decided to do another photo showing star trails. Star trails show the movement of our planet – as the stars appear to move across our skies. This can be achieved in two way:
1) The first method is a long exposure. The camera settings can affect how long the exposure needs to be before you will start to see movement in the stars. However, for a full sky to show a decent star trail you would ideally have the exposure open for at least one hour, but it could be up to several. This method has less work on the back end. However, the camera battery can be an issue and the image will tend to be noisier – or full of little specks.
2) The second method is a compilation of images taken back to back over a long course of time. This can be done with a remote that automatically takes the photos back to back so that the photographer does not have to sit and hit the shutter over and over. With this method the images are digitally stacked so that it shows the movements. There is more work on the back end, but I prefer this method. I find that this version produces more striking images and allows the photographer to have more control over the final result.
There is a technique of star trail photography called Vortex Star Trails which I have never tried before. It almost looks like the Stars are falling in a circular motion towards earth. Assuming that I can find the right conditions (clear and dark night for a long period of time), I will be attempting to create this version for the first time. I read through Mike Ver Sprill’s tutorial on how to create Vortex Stars. Trying something new in the night photography world can be nerve wracking and is a bit experimental throughout the photoshoot. I am hopeful that I will be able to get a great result! I will continue to finalize details next week and will post another blog to share my experiences!
0 notes