#'they're just npc's and all might is the final boss but before we take him on we need to get more health and exp and level up our party'
Text
I think if Izuku ever did an impression of Tomura, he would either get it almost exactly right or make video game references the whole time
#he'd either be like 'i basically hate everything. this society can't keep hiding behind a cheap smile anymore and its showing#and its all because of all might'#or#'they're just npc's and all might is the final boss but before we take him on we need to get more health and exp and level up our party'#whichever one he does - tomura is offended#tomura: i do not fucking sound like that#izuku: do too!#bnha#boku no hero academia#shigaraki and midoriya#mettys posts#metty posts#for the record this is a joke
30 notes
·
View notes
Text
so I beat BG3 finally and I have.... Opinions. This is going to be Very Long and full of spoilers, obviously, so fair warning
So to open with, I do really like Act 1 and 2. They have solid pacing and while Act 2 might be missing more side content, it does makes sense given the whole curse making it difficult to move freely without always having a torch out which can severely impact some builds. So I'm glad we don't spend very much time having to deal with that. (I am dual wielding thief rogue scum, so the torch was Agony)
I think Act 1 does an okay job leading you towards the goblin camp as the big end all of the story section while letting you also decide to hop into the Underdark for extra optional content. The Creche is kind of nightmarish depending on your choices, but I think it's still good content. I simply don't care for the Gith much as a people, but they're an important story beat so it's nice to get more of them before you delve into cursed lands. A1 has a nice balance of exploring and side content to do and I really never feel lost or in a lull. I have a goal and the freedom to do whatever else I want on my way to it. Plus the companions have a lot to say and a bunch of interactions together, especially if you change out a member periodically to trigger new ones.
Act 2 is a bit more rail road-y story wise, but you have the little side quests for Astarion and Shadowheart to pursue, helping Halsin, and a few npc quests to pick up or find. I think the inn defense is a bit of a nightmare because Jaheira will sometimes just nuke the tieflings for daring to be near an enemy, so trying to keep everyone alive is.... it can be a lot. But that's going to be more rng to blame than anything else I suppose. And like, if you don't care about saving everyone then it's a breeze I'm sure, I'm just a goody two shoes. The only bad time I really had in Act 2 was due to bugs, so that wasn't the story's fault! (I fell through the floor and only survived because of Thief's passive to reduce falling damage) Well, okay, the Nightsong fight also sucked. Shove being a bonus action is bullshit and also why would they make that such a problem on a floating rock? I had to redo that fight so, so many times to have my party all make it to round 2 without someone getting launched into the void. But otherwise! The build up to Ketheric and actual execution of his fight were all really good. (Well, I skipped phase 1 of his fight because funny persuasion, but I digress)
They really made you worried about Ketheric, showed how much power and sway he had over the land, especially by making him the source of the curse that was poisoning the land. They went in on making him the big dead boss you had to work to beat. I was excited to see what Gortash and Orin had working for them in Act 3!
But then I actually did Act 3, and man, you can feel the rush here. There's just so much squished into the city to the point where having it split in half doesn't help. The game can barely handle how much it has to always have loaded and moving. And the amount of story feels like they were going to have 4 Acts total, but then were told to push the game out and they just had to throw it all into one Act and hope. I think having Tav deal with either Gortash or Orin for Act 3 would have been better for the pacing and allowed for both of the villains to get proper sway over the city they were taking over.
Gortash has some sway with the Steel Watch stomping around, but they really aren't all that threatening unless you decide to slap one on the ass in the town square. You get a glimpse at what they really wanted to do with Gortash at his coronation, but it never really leaves Wyrm's Rock. Maybe it's because I was playing Rogue and sneaking past every locked door, but I never felt like Gortash was a threat. He was more like a snotty kid in the corner muttering rude names at you. The second he tries to go for you without the public eye around, he's dead. He doesn't even do a good job manipulating you. He's all about schemes and having power over people, but his solution when he sees Tav and the gang is to just... ask them to kill Orin for him and share in the power afterwards. Which would make sense if he hadn't led with the whole killing his last partner idea. Why should Tav trust him to hold up his end of the bargain if he clearly would rather rule solo? If Gortash has full control over the city, or the beginnings of it, shouldn't he be making connections with the big entities? Shouldn't he know more about the group of adventurers set on ruining his plans? He clearly can have Orin walk around the camp whenever he wants, so why isn't he turning any of the companions' baggage against them? He could link up with Cazador to send Astarion into a panic, snap up any stragglers of Karlach's friends to keep her from playing baseball with his head, tempt Gale with magical secrets and knowledge of Netherese. He had an in against Jaheira with Orin's shapechangers infiltrating the Harpers, but apparently they suck at their jobs because they got caught instantly, and also the game just shrugs and doesn't have us save the Harpers. Like, so many of the companions are linked to Baldur's Gate somehow and it isn't used to control them. If you take out the foundry, Gortash is just a guy in a booby trapped room with two goons. There is some poetic justice there about how the schemer is just a man at the end of the day, but Tav doesn't do anything to take his power away outside of getting rid of the mechs and maybe changing a single day's paper printing, if you were so inclined. We have no chance to stop the coronation, to break up the blackmailing and mind controlled nobility, hell he doesn't even make it hard to walk the streets if you betray him! He's supposed to be the schemer, the brains behind the operation, so why does he just sit in his castle and do nothing? He could enforce a curfew, forcing the gang underground and into back alleys. Like, I could see it making some builds more tedious to get around with, but they needed to show his power over the city somehow. The Steel Watch just don't cut it, in my opinion. (I also basically one shot him in his fight with 0 traps even going off so perhaps my opinion is colored by that experience)
Orin, then, well... she barely exists as a problem honestly. She steals a party member a few days after Gortash warns you about her, but the reveal just removes the taken character and you're left down a man. She's a serial killer, Bhaal's own unholy assassin who can change her shape as easy as one dons a cloak. So why does she let her ruse be revealed so easily? I think it would have been more compelling, more insidious if she were to take Tav's love interest (or highest approval companion) and just never reveal it's her. You could stumble across the real companion later, mayhaps fleeing from the cult in the sewers, and be forced to make the call on who's real and who's the fake. We have multiple forms of revival in the game, so you could make this hurt without actually losing a companion forever. You would never know when the switch happened and if you chose wrong, imagine how gut wrenching that would be! Instead her cult is more annoying than she is. The whole Sanctuary mechanic is tedious, the amount of the fuckers in the city begs belief, and having to try to save random npcs on a bloody note proves extremely annoying quickly. We don't know the npcs being targeted which is fine, but when I've restarted 3 times to try and distract the 8 assassins with my party so they don't hit the 50 health citizen 20 times, I start thinking the random shop keep might be better off dead. And it is doable, to save them, it just takes so much to pull it off. Again, maybe it's because I was going through the game determined to save everyone, or near enough, so what should have been moments of feeling helpless were more just a huge pain in the ass. The threat of Orin is too simple because they drop the doppleganger act so fast. Plus, she even offers to call off the killings if you take care of Gortash for her and then meet her for a duel! She solves herself. I think it's honestly a disservice to the idea of the character and she feels like a lot of the ideas behind her just weren't given the time they needed to pan out.
And then we move past them, to the Elder Brain. You spend all of Act 3 working your way up to either taking over this thing or killing it. And then you get stuck in extremely long mob fights for the next few hours before finally reaching the damn thing and it's both a dps check and a fucking heal check. The whole endeavor was a pure slog to me and making the summon allies a full action made it feel like it was just never worth it, I could dish out more damage with my own actions. Plus, the allies can't even follow you inside to deal with the brain so at best you use an action to summon hopeful meat shields. It feels like a poorer version of the defense of Denerim in DA:O. The other companions aren't shown doing anything, or even really hinted at doing anything except for like, 4 of them being at the rallying meeting. And the choice between supporting the Emperor or freeing Orpheus! It felts terrible either way! Support the entity keeping you safe, but lying the whole time who doesn't seem willing to talk about it's plans after dealing with the brain or free the trapped Prince of the Gith and hope he doesn't instantly kill you or lead his people to kill everyone in a war of conquest under a new name because you honestly have no idea what he'll do. It's shit either way.
The actual character endings are rather sparse. Also, fuck whoever thought it'd be funny to have Astarion running off screen if you destroy the brain and the vampire rules reassert themselves. You spend the whole game with him mentioning loving the sunlight and seeing the world how he used to. And then you make it a joke when he loses that? It's a heartbreaking moment and it was ruined by having it framed that way. It felt cruel.
I only got to see the epilogue with Astarion, because I romanced him, and Karlach returning to the Hells with Wyll and while they were both nice, they felt very short. I wanted to see what everyone would do, if the gang would stick together or stay in contact. How would they settle into the remains of the city, who would tag along if Tav decides to adventure on, do they have reunions or get togethers, do we get to have that party? It feels so rushed, like a lot was cut to ship the game out, and the companions all suffer for it. Granted this is if you destroy the brain. The endings where you take it over seem even shorter, albeit executed well for the power trip they're setting up, but you don't get much beyond that to my knowledge. (I haven't gone back to see all of them yet) I spent something like 130-140 hours in this one play through. You spend the whole game working up to this confrontation, this resolution, and it feels so truncated. Even just a still image of the landscape or characters with some text slapped on top to detail how they wrapped up the adventure would have been better than having 80% of the gang forgotten. I didn't take them all out into the world, finishing their personal quests, to have them be left behind like that. I love them all and I wanted to see their happy endings.
I loved my time in Faerun, despite it all, and I'm just a little disappointed with how the last act played out. I wish the game had been allowed more time to be finished, for the love and care that so clearly shines in Acts 1 and 2 to be allowed to flourish in Act 3. The people who made this game clearly care, and they had a story to tell, and it leaves a bitter taste behind that they so clearly were not permitted to tell it how they wanted to.
#I'm fresh off of beating it so I am Extremely Mad about that Astarion bit#I still have to do 2 endings and I want to revisit a specific other one because I accidentally skipped most of it#but this was my tadpole free playthrough and damn it if I wasn't going to see that through#and this is all my opinion! I'm sure a lot of people disagree or think otherwise#and that's fine I do really love this game#but that's why this upsets me too#my shit#bg3#if there are typos well I am sleepy and about to go to bed so lmao forgive me
6 notes
·
View notes
Text
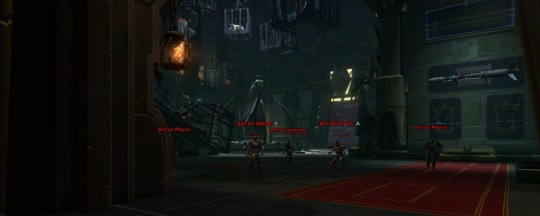
Rain Plays SWTOR: Spirit of Vengeance Survival Walkthrough
As we head toward 7.0, I thought it would be a good idea to check in with a Spirit of Vengeance Survival Guide, 2.0. I have my own feelings about SoV - namely that it's boring, tedious and was tuned way too high for a main story solo flashpoint - but let's move on to the actual guide.
This is a guide specifically for those of you who just want to get this flashpoint over with so you can move on.
I personally would advise trying to knock this flashpoint out of your story progression BEFORE 7.0. We have no idea how hard content is going to be once you lose some of your abilities and utilities, so if you have any characters who are planned to continue with the main story, I'd take them through now while you have all of the tools in your toolbox and are familiar with them.
After literally months of complaints the devs finally toned down this flashpoint to a more manageable level, but there are still a lot of mobs that hit hard, and it's still really long. When I went through with canon Viri and Lana at level 50, with Viri fully geared toward 306, I moved right along through the flashpoint without difficulty or deaths. It still took almost exactly an hour. It's even longer when you're contending with Rass Ordo and a lot of cut scenes.
You will want to gear as well as you can for this - you should not have to since this is a story/solo flashpoint in the main story, but it will help you here. Remember you DO NOT have to group to get good gear. There are numerous solo missions that will give you gear up to 306 - the Mek-Sha Tradehouse missions, Personal Conquest each week, solo flashpoints, including the Onderon weekly and daily missions. Other suggestions:
1. Buy and use the Supplied Kyrprax Command Stim, available at any medical droid in the flashpoint, including the one when you first land on Ship #1. If you're doing this as part of the main story, you unfortunately still have Rass Ordo as your companion. Rass Ordo, despite being influence level 25, still has the AI of a cardboard box. You'd be better off bringing along a Jawagram as your companion. This stim will up your presence for an hour and make him slightly less incompetent.
2. If you can, equip yourself with the Life Warden tactical. This tactical drops fairly frequently from personal conquest and other gold gear boxes. It essentially gives you an extra heal in a tight situation and can come in handy.
3. Medpac on your abilities bar. You hopefully won't need this, but have it handy just in case. You may want to invest in the Supplied Kyprax Med Unit medpac, which will heal you AND your companion.
Within the flashpoint, some general caveats. You're looking at quantity, not quality here. It's just a lot of NPCs piling in on you.
1. KILL THE HEALERS FIRST. KILL THE HEALERS FIRST. KILL THE HEALERS FIRST. Just about every mob here has healers. They have different names on each ship:
- Varad Churl
- Darmanda Medic
- Ashade Lorekeeper
If you don't kill the medics first the fights will be even more interminable. Get rid of them.
2. Remember there are kolto stations in a lot of the rooms, not just the boss areas.
3. Be very careful because there are a lot of mob groups close together. Watch where you are blasting/Force-whatevering because you don't want to pull more than one group at once.
4. Get your gear repaired as often as you can. If you've fought a tough mob and there's a medical droid nearby, go to it and patch up, even if it means you have to backtrack.
5. Get really familiar with any AOE (area of effect) skills you have. Know where they are on your abilities bar and how to use them. Given the mobs in this flashpoint, anything you have that can clobber several NPCs at once is welcome.
Now, here we go.
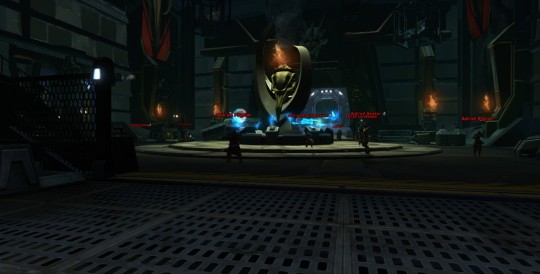
SHIP #1:
Banquet room: after you fight the first mob and take the elevator, you will find yourself in a large "banquet room" with a lot of mobs. Pick a straight line and go forward, taking care not to veer too far to the sides. If you wander, you'll invariably pull the mobs on the sides of the room.
The rest of this ship is pretty straightforward; it's just a lot of mob NPCs converging on you at once, over and over again.
Gorga Brak: Straightforward; stay out of the red circles. Be aware that Rass Ordo will helpfully stand in these circles and let Gorga set him on fire, so don't expect any help during the fight.
SHIP #2:
More of the same: lots of mobs, now with Dar'manda nameplates. The Dar'manda medics try to hide more than the healers on the other ships, sometimes even going behind crates or other barriers, so keep your eyes peeled for them.
First thing of concern here: after a few rooms of mobs, you will arrive at the notorious jumping puzzle. Just stay on the right side of the room and walk along the beam. There are a few jumps up onto pieces of metal but they are not hard, ambitious jumps. Otherwise you just have two places where you have to make sure your character drops down onto the beam and not into the flames. Angle your camera overhead so you can see what you are doing.
Now it's time to go through the notorious Room After The Kitchen. As the name would suggest, you will know this is coming when you go through the kitchen. All the NPCs in the kitchen are neutral; leave them alone and keep going. The next room is a ballroom and you will find a lot of mobs.

You can get through this room by fighting only two mobs IF you watch where you are fighting and blasting. I like to try to get the first mob up onto the stairs so there's less of a chance that anyone else in the room will be disturbed. Kill the medics first. Then go straight foward - right through the fountain - and up the stairs to the second mob. I again like to try to fight them in their alcove up the stairs so I don't pull the other NPCs in the room.
You will now go down some corridors with more mobs - the space is tight, which in a way is good because you can't aggro more than one mob unless you really try. If you are going for bonus missions there are some rooms here to visit off the main path. If you're just trying to get this damned flashpoint over, continue straight down the hall toward that green arrow.
After taking the elevator you'll get to the tether room, and a yellow message will flash onscreen about it. There will be a very large mob here with a lot of Dar'manda Commander silver NPCs. If Rass Ordo decides to up and die on you, it may be here. Remember there's a kolto station to the immediate right of where you walked into the room.
Click the blue box to release the tether. Do NOT get too close to the rancor in the cage, Goldie. Back when SoV was first released, she'd aggro on you even from in her cage, and you couldn't kill her or get out of combat. They seem to have fixed that bug, but you know how that goes.
Bask Sunn: Kill. The. Medics. First. After that, Bask Sunn has a wicked knockback, but he can't knock you *out* of the ship anymore. Remember Bask Sunn leaves a crate with your loot (look on the bridge), it's not on his person.
SHIP #3:
Your first challenge here will be another room with a lot of intense mobs. Take care not to pull more than one mob at once. Rass may decide to try to die here.
You will quickly reach the sniper room. It's a long room with two snipers by the far doorway, shooting at you. Don't try to engage them; just keep running forward. As you cross this room, you will drop through the floor. It's a long fall but you won't take any damage; it's what the game wants you to do.
Rass will not fall with you, and you will have a room of tentacles to fight on your own. Hit Unity and Heroic Moment BEFORE you fall, when you are still in the sniper room with Rass. You can use your HM abilities against the tentacles. If you really have trouble with them, try to get out of the garbage pit; you will find a kolto station at the top of the small ramp.
Now we come to...oh look, another room with a lot of mobs. They're so creative here. Do your best not to pull more than one at once, kill the medics, you know the drill by now.
Troya Ajak: No special tricks. Stay out of the red circles. Her songbird volley is nasty, but she's perhaps the easiest boss in this flashpoint.
FOURTH SHIP (The Spirit of Vengeance, I think?)
Thankfully this is almost a straight shot to the final boss encounter, and there's a medical droid just before it. You may wish to wait for your Heroic Moment to cool down if you have recently used it.
The silver NPC in the small mob right outside Heta Kol's area sometimes does not die. If you find that they keep recharging to full health, walk past them, put Rass on passive, and wait by the medical droid. They should eventually give up and go back to their original spots and you can go on.
Heta Kol: This fight has mercifully been toned down. There are two stages:
You'll fight Heta Kol straight on. She has a serious knockback, but there aren't any special tricks here.
1. Stage One: fight Heta.
2. Heta disappears and a mob appears at the bottom of the stairs. There are two medics, and the Commanders will have knockbacks to keep you from killing the healers.
3. After all the mob NPCs are defeated, Heta will return. Keep trying to hit her.
4. Heta disappears. This time there's a mob with two gold Varad NPCs and two weaker ones at the stairs, plus two silver Dar'manda snipers on the platform. If you have any AOE skills, make sure they are available here so you can take out as many as possible at once. You may wish to consider saving Heroic Moment for this point so you can use Orbital Strike if you have it. Rass Ordo loves to die at this point so be mindful of where your kolto stations are. You might need the kolto for him, even if you don't need it for you.
5. Heta Kol returns with a much more serious knockback and red circles of doom that increase in size and are hard to avoid. You're going to get thrown around a lot. ETA with thanks to @vespertine-legacy: The circles can be interrupted, which may make this fight easier.
And...you're done. Thank the stars.
36 notes
·
View notes
Last Seen Blogs

inechoingsilence
In Echoing Silence

getoffjaimesdick2k19
Jaime Did Nothing Wrong

promtad
Untitled

largerabbit
the largest rabbit in the world

kag3pro
^_−☆