#PCB Layout Experts
Text
PCB Designing Company in Gujarat
Innovative PCB solutions in Gujarat! Leading design company, expert in precision layouts for optimal performance. Elevate your electronics with us.Get more info and contact details in India.
#PCB Designing Company#Printed Circuit Board Design Services#PCB Layout Experts#Electronic Design and Manufacturing#Custom PCB Design Solutions#High-Quality PCB Prototyping#Gujarat PCB Fabrication
0 notes
Text
epomaker mini cat 64 build talk
ok i guess a couple people said theyd be interested so let's talk to most recent custom i did, for my friend @jowritesfantasy, of an epomaker mini cat 64.


the final build is an epomaker mini cat 64, with kailh box white v2 switches, and a great wave off of kanagawa (dark) cherry profile keycap set. total cost for what is essentially a full (budget) custom build is about $150USD without tax (off of bezoshell).
note: i am a vision-impaired hobbyist with shitty, shaky hands. i am by far not an expert. this is literally just "all the crap i've had to figure out from the ground up as a basic guide". there are more comprehensive references out there, and build guide videos for most custom kits, and do more research, not less, before building. nothing here is gospel and many people do it differently.
anyway, let's talk turkey.
BASIC GLOSSARY:
keyboard: the whole shebang. case, pcb, switch, caps, everything. the thing you type on.
case: the acrylic/aluminium/ceramic/whatever body that the pcb, switches, and keys live in.
pcb: the brain of the keyboard. you can have one where the switches must be soldered in, or you can have one where the switches can be hot swapped, which means you can change them out without any need to use a soldering iron. pcbs can be bought separately from cases.
group buy: when a bunch of people buy in to get a custom keyboard made by pooling resources up front.
switch: the mechanical switch that you solder or hot swap into a pcb to make the button press. there are thre (standard) types: linear, tactile, and clicky. switches work just fine without lubing. this is optional.
stabilizers/stabs: the support stabilizers for your wider keys that help keep them steady and don't let them wobble. there are two standard types—pcb mounted (screw-in, usually) and plate-mounted (click-in). please lube your stabs. krytox 205g0 is good. otherwise trust me, they will rattle. oh, god, will they fucking rattle.
keycaps: the thingy that goes on top of the switch that you actually press. they come in about a million profiles and in every possible permutation or color you can think of. if they're cherry/mx stem, they'll be compatible with most modern mechanical keyboard switches on the market.
QMK/VIA: software that lets you change what buttons on your keyboard do what.
keyboard %/keyboard #: how many keys are on the keyboard. the 64 mini cat has...64 keys. a 78ish key is the full f-row and most standard laptop keyboards. TKL is tenkeyless, or no numpad. 100%/180 is the entire keyboard, numpad and all. 40% is babymode aka "you like layers? i'll give you layers". each board has its use, everyone has their preferences.
ergo: a keyboard designed to be more ergonomic. ergo boards have different layouts and spacing and height. some are split, some aren't, these days one of the more standard ergo layouts is the alice/arisu. it's nice. i recommend it. (my custom is an alice)
custom: you build it, you decide everything you want on it, you buy all that shit, and you put it together.
prebuilt: open box, plug and play.
from the getgo, while epomaker does offer this for sale ready to plug and play, i knew we would not be buying this premade (both because i wanted to build it, the whole point was i wanted to build it and jo wanted it) and also, epomaker didn't offer clicky switches. jo's previous board had cherry/gateron (not clear which? one or the other) blues, which are the "standard" clicky switch: they're 65g actuation, they click, and there are better options. (note: this blog is a cherry mx hatezone. sorry.) i also knew that i was going to have to get a bit creative with VIA layers because jo works on spreadsheets and this is a 64 key board—no numpad. you kinda need a numpad for spreadsheets.
i didn't know much about clicky keys before this (i personally have sad shitty little goobaby hands that can barely even handle 43g linear switches and most people i know use tactiles), so i had to do a bit of research. you can hear (cherry only) sound profiles and comparison here, and this gives you a pretty standard idea of what mechanical switches sound like.
linear keys tend to be the lightest actuation, since they're for gaming most of the time; tactiles are all over the place and have the most options since theyre the most popular; clicky tend to be a little heavier overall. the "actuation" force in grams is how much pressure it takes to make a keypress go through, the "bottom out" is how much it takes to make the key hit the bottom of its arc. tactiles and clicky keys both make sounds/have texture bumps when the actuation of the key happens; linears you just push.
a short list selection:
cherry mx blue (the "standard" click): 60g actuation, 60g bottom out.
gateron blues (the original clone of the standard): 55g actuation.
cherry mx green/gateron green: 80g actuation, 90g bottom out
kailh box white v2: 45g actuation, 55g bottom out. (note: this is the same actuation/bottom out as the v1; the v2 has increased stability and stronger springs)
we ended up picking the kailh box white v2s because of comparative sound testing, the revision being even sturdier than the original box whites, they were on sale when we bought them and came in a closer to 64 switch pack, and they're about 65¢ a switch. not bad, all things considered. they're lighter than the standard mx blue, have a brighter, springier sound (even unlubed) and the "box" around the stem of the switch makes the connection between switch and keycap more reliable, which is a problem that happened to jo's old keyboard (the stem housing of the keycap broke; there's basically no way to get a replacement without shelling out a good bit of cash for an entire set, the box should help prevent that in the future).
the next thing was keycaps—you can do research about keycap profiles until the cows come home, but there's basically two types. "flat" keycaps are interchangeable per row (so work great if you aren't using a qwerty layout or you don't have a standard layout keyboard), "differentiated" have different heights per row (so work great if you have a hard time finding the right keys or are using a condensed keyboard model where you might get lost in the sauce if everything is the same).
the most common profile is cherry—if you want to find something super fun keycaps-wise, cherry is probably what you'll end up with. every keycap profile presents a slightly different sound because of how the plastic housing handles the noise of the switch (sa has more hollow thock; xda has a little more rumble because it's flat; cherry is a little snappier). frankly, imo, the texture/shape of the key is more the question to keep in mind (as well as the type of plastic they're made with—pbt is much, much more reliable). jo wanted dark wave with whale, we found dark wave with whale, it was cherry profile. success.
(note: knockoff keycaps can be a mixed bag—they use different fonts, the stems can be less reliable, even if they are doubleshot (two different kinds of plastic, layered on top of each other for more stability) and pbt. however, they're a lot more affordable. i like having more keycaps. im also cheap. that said, groupbuy or direct from source keycaps are also rad as hell. it's your call)
the epomaker mini cat is a hot-swap board, which means all that the switches had to do was to be popped into their housing. when popping switches into hotswap, always test the pcb beforehand. always. if you fuck up the pcb during switch installation, that is what it is, and you want to know if there's a problem before that happens. (shit can get weird. trust me. my custom pcb is currently getting replaced because of a freak usb-c daughterboard soldering incident that basically cannot be fixed, and everything worked fine in testing... but it's uncommon).
to build this board, i took it in a series of steps:
1: disassemble the entire board, flip the pcb (the "brain" of the keyboard) over, and manually test all the keys with a keyboard tester website and a paperclip. to test the diodes, you want to put your paperclip/tweezers/whatever into the outsides of the diode, not directly into the slot where your switch pins will go

you shouldn't need to shove. just set them there. your key tester should click, light up, or, if you're me, say "josh"
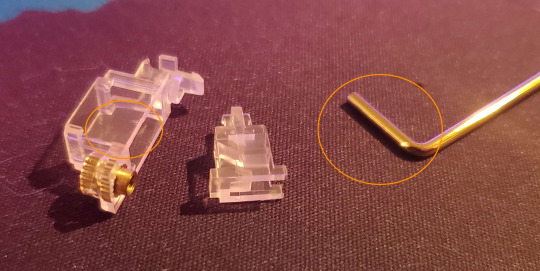
2: once i knew the pcb was good, it was time to disassembe the plate and the stabs. the stabs that came with the mini-cat 64 were plate-mounted and came unlubed, so i clicked them out with my tiny screwdriver, took them apart, and lubed them. if i had a buck for every stabilizer build and lube guide that actually refused to show the parts of a stabilizer, i'd have a lot of bucks, so here's some photos from me. these are akko transparent pink pcb-mounted, screw-in stabilizers. my hands are shaky as fuck so i apologize for any blurriness.

there are three basic components to the stabilizer—the bar, and the two-part housing. when you take a stabilizer apart, whether or not it's screw-in or clip-in, the bar clips and unclips, and the housing works the same.
less lube is always better (you can always add more): when lubing stabs, you want to lube the inside of the larger housing on the two wider portions and the back, where the smaller portion is levered up and down and will hit the plastic, and the part of the bar that goes into it. this is all the stuff that will click and clack if it touches each other.
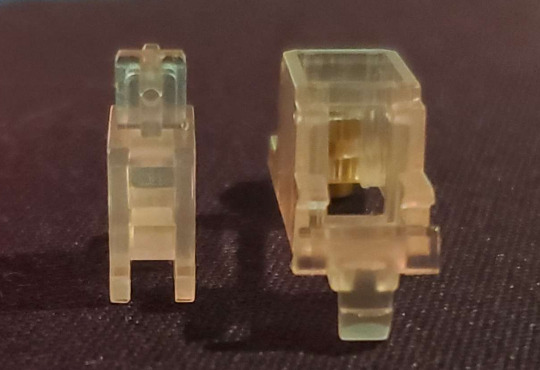
sorry this is a transparent stab so it's kind of hard to see, but when reassembling your stabilizers, the smaller piece will have one side with two holes, and one side with one hole. two holes goes in the front. business in the front, party in the back, whatever. you can see here where the clicky space thing that you click the stabilizer bar into.

i apologize for my shaky ass hands. sorry. the realy nice thing about transparent stabs, otoh, is you can see where the actual bar goes—it goes into the bottom of the two holes, so that the interior part of the housing is lifted up and down when the bar moves. that's it! click it in once it's in the right hole, you're done.
3: it is time to Insert the Switch. most switches tend to be plate-mounted. the "plate" is the part of the case that goes above the pcb, and is what aligns (and holds in) the switches, so that they land in the right spot. here's an example of a pcb and a plate

the plate fits on over the stabs, and then you have your "alignment" for your switches in place. now you know where your switches go, it's time to stick them in. the smaller, metal holes on each switch location are where the pins go—this is a "south facing" rgb pcb, meaning the pins go in up top, with the smd led (the little per-switch light) facing toward, not away from, the user. north-facing switches are more common. (for anyone curious, this is a mechloving adelais en ciel rv3 pcb, akko transparent pink screw-in stabs, and a switchcouture aluminium plate)
take your switch, align your pins, push in the side with the pins first to be sure they go into their sockets straight, and then push them the rest of the way in to click. hot swap sockets can be finnicky and a little fragile, so when installing switches into a hot swap pcb, you want to push straight down into something below—i.e., take the back off of the case and put the pcb flat on a soft, but sturdy, surface, like a deskmat. then click them in.
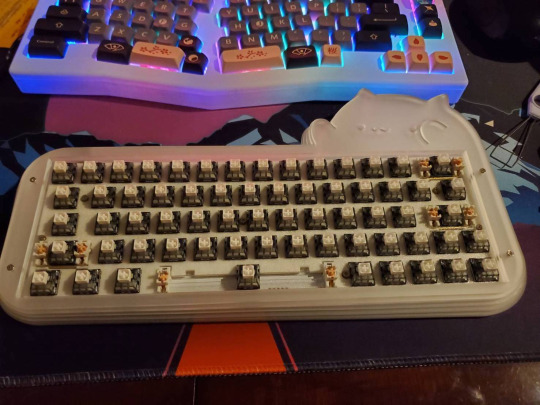
and now you've got a keyboard! time for the fun part. put those keycaps on and give it a test.
well, now you have a working keyboard. except for one small issue... the person using this keyboard needs a numpad! okay, so that means that you need to get CREATIVE.
all our keyboards have some level of "layer mapping"—shift + a = A. that's a layer, becuse it changes the key input. on my keyboard, because i use a mac with the extended international keyboard, alt + a = ¯. that's another layer. most people are more familiar with fn + 1 = f1. that's a layer.
for this keyboard, since jo needed a numpad, the way to do that is to make use of it being via compatible and to build that in as a layer. via is a great program (wish it worked with firefox!) in that it's as close to plug and play as you can really get for something like this. it's all overlay, you just click what you need. i am stupidbad at tech, and i can figure it out. let's take a look at the layers that are mapped into this keyboard:


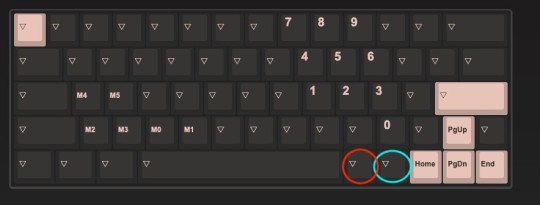
here we have layer 0 (the "home" layer, what the keyboard's base state is), layer 1 (the "modifier" layer), and layer 2 (the "spreadsheet") layer. i made a few changes after i took these screenshots pgup/dwn/home/end are on the modifier layer now and not just the spreadhseet layer), but this is pretty much the final version. in via, the upside-down triangle means that the button naturally defers down to the layer below it. this means, on all layers, the red circle is always the fn/modifier button. if you're on the spreadsheet layer and press fn+1, it will be f1, because that button is always fn.
the "modifier" layer came baked into the keyboard, since that's the way that the function row buttons/the keyboard light adjustment works. all i added was the blue "toggle" layer button, which, when pressed with the fn button, turns the spreadsheet layer on.
even more simply, if you push fn+ralt, it makes the keyboard be for spreadsheets.
on the spreadsheet layer, the right-hand side of the keyboard becomes a numpad, the arrows automatically work as up/down/home/end, and, most importantly, a/s/z/x/c/v are all macros. what those look like, in the via programming, is {KC_LCTL,KC_C} (that's "ctrl+c" as one button press), with the KC_[] changed out for the key you're swapping in as a shortcut. when on the spreadsheet layer, pressing "z" is the same as "ctrl/cmd+z" normally is—only now you only have to hit the button once. that's true for that entire set of macros. so, if you need to save? hit s. if you need to select all? hit a. if you need to cut? hit x. paste? hit v. there's no need to push ctrl at the same time—that's baked into the keys.
you can do this with any keyboard that is qmk/via compatible, by the way. it's fucking amazing. if you work on spreadsheets all the time? awesome. now you can numberpunch one-handed, and copy/paste/undo with the other, no need to use multiple keys.
the macro building and layering on via for this keyboard was waaaay better than what i did on my wife 1.0 (sorry, wife 1.0) and i'll be using the same setup on wife 2.0 (whenver wife 2.0 gets here). overall, this is honestly a really affordable custom board with a lot of adjustment options built in. it was a ton of fun to build, really simple and straightforward in terms of setup, and it's got bongocat on it.
also honestly if i had to get clickies, i'd do the box whites. they're really nice and dont make my fingers feel like they're about to break when typing.
#keycaps are for eating#next time whenever wife 2.0 comes in the mail i'll talk about all-custom builds i guess and more advanced via stuff#and keycap changing in and out#and what kind of screwdrivers you want#uh. and also aviator cables maybe i guess.
18 notes
·
View notes
Text
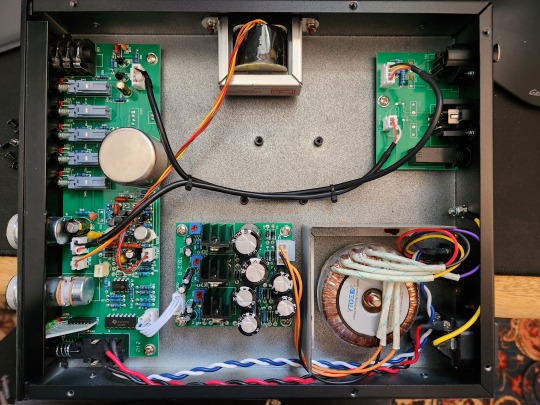
WA12 mkII mic preamp modifications
This is something I'd intended to post last year before the fire, but hadn't gotten around to. The WA12 is a pretty well-regarded budget mic preamp, being largely a clone of an API312 topology for under $500. I'm not a deep expert on the history of API or the 312 circuit, but the broad outline is there. Warm Audio opted to go with a Melcor 1731 style opamp here, instead of copying a later API 2520, but it's socketed and you can change it (if you do, see the note down at the bottom!). To their credit, they chose a vintage 1:8 input transformer ratio, rather than the 1:10 you see on modern APIs. It's a weird choice that the 'default' mode on this preamp (tone switch off) is 1:4, whereas 1:8 (tone switch on) is the more vintage-correct configuration, but whatever. This post references the current black-panel mkII version, which seems to have a slightly different PCB and layout than the orange-panel mkII.
What mystified me about the WA12 is the bizarre input impedance spec. Warm claims that it's 600 ohms, switchable to 150 ohms with the 'tone' switch on. What?? These are ridiculous numbers -- the vast majority of mics want to see a load of 1k or higher, and most mics will suffer pretty severe signal loss with loads under 600 ohms. And as it turns out, these numbers aren't even correct. It's pretty obvious that Warm just quoted the datasheet numbers from their OEM Cinemag input transformer. Cinemag specs their transformers by the expected source impedance on the primary winding, and translates that by the square of the turns ratio to the reflected source impedance on the secondary winding. So unless the secondary of this transformer is loaded with a 10k resistor, 600/150 ohms is NOT the input impedance of the circuit. Transformers don't have a fundamental impedance. They have an impedance ratio, which is the square of the turns ratio. The load you choose for the secondary is what determines the input impedance on the primary.
The stock input impedance I measured on the WA12 mkII is 1.05k, or 600 ohms with the tone switch in. That's actually fine, much more reasonable than the quoted specs. But it still doesn't add up -- if pushing the tone switch doubles the transformer turns ratio from 1:4 to 1:8 (and increases the gain by 6dB), then I should be seeing an impedance 4x lower when it's pushed, not slightly more than half. The other thing I noticed is that the input impedance measured 1.2k with the pad on, regardless of the tone switch position. A ha -- there's a parallel load on the primary side of the transformer that's loading down the input regardless of how the transformer itself is configured (beyond just the 6.81k phantom feed resistors, which have to be there).
Turns out, Warm wired the pad switch so that the pad resistors (a balanced voltage divider of three resistors: 620-140-620 ohms, R35/37/36) are strung across the input at all times -- whether the pad is on or not. The switch just connects the input transformer to either the outside of the network (off), or to the ends of the 140-ohm resistor in the middle (on). There's no need for that. It's worth looking at the way John Hardy wires their pad switches on the M2, since it's basically the same circuit topology. Without any extra parts, and by just changing how the DPDT switch connects to the two series resistors, the Hardy ensures that the pad is completely out of circuit when it's off, and presents no additional load to the mic.

I rewired the pad to according to the Hardy schematic. Boom, the input impedance was then 3.6k with the tone switch off, and 950 ohms with it on. Those numbers actually make sense. But it revealed a new problem -- the input impedance changed dramatically depending on what frequency I used to measure it (I had only used 1kHz up to this point). Specifically, it dropped to under 200 ohms at 10kHz! I felt that was unacceptable, so I started looking at the load on the transformer secondary.
(For our purposes, the load presented by the discrete opamp can be disregarded, since it's quite high, in the megohm range. I did all my measurements with the opamp removed from the socket.)
API 312s have a "zobel" network on the transformer secondary, which is there to damp the transformer's tendency to ring at high frequencies. On the 'canonical' schematic, the zobel network is a 5.1k resistor off the signal line, in series with a 220pf cap to ground. The zobel is in parallel with the secondary's load resistor -- not shown on the canonical schematic but typically found in the vast majority of old 312s -- which is typically 150k. Note that a 150k load on the secondary of a 1:8 transformer would reflect back to the primary as 150k/8^2 = 2.34k, or 150k/4^2 = 9.37k for 1:4! And in fact, 150k is what the WA12 mkII has (R13). So why was my input impedance still so much lower? The zobel network.
Turns out, Warm has a totally insane zobel network of 910 ohms (R14) in series with a 1.5nF (1500pf) capacitor (C19). That's not a zobel, that's just a straight up dump of treble frequencies. The zobel's turnover is so low that it's affecting the impedance across the entire audio band. It's honestly probably the single biggest factor in the "dark" sound of this preamp, and it's way worse with the tone switch in -- maybe that's why they called it a "tone" switch instead of an impedance switch or gain switch. The extreme values are just not necessary to get the (pretty decent) input transformer to behave.
I experimented extensively to find out what the optimal zobel network actually is for the WA12 mkII, and came up with 4.99k in series with 330pf. That's pretty similar to the canonical API spec. In fact, if there were no tone switch and this transformer could only be used at 1:8, the API values of 5.1k-220pf would be ideal. But the transformer performs significantly worse at 1:4 (again, odd that this is the default mode here), so something a little heavier was necessary. I also ended up reducing the load resistor from 150k to 100k, which helped damp ringing quite a bit. After these changes, there's near perfect square-wave performance in 1:8 (tone in) with a gentle roll-off above 20kHz and no peaking at all. At 1:4 (tone out), there's about 10% overshoot on square waves, but no ringing, and an innocuous +2dB peak at 27kHz that just adds a little bit of 'air' to the sound.

Now, the input impedance is 3.5k @ 1:4 (tone out) up to the top octave, where it drops to about 3k. At 1:8 (tone in), it's 1.05k and drops to 650 ohms at 20kHz. With the pad in, it's 1.2k in all modes and at all frequencies. Very nice! I now basically always leave the tone switch in, using the vintage-correct 1:8 input ratio, which has the best frequency and time-domain response, plus better SNR. If I want a little bit of extra 'air' in exchange for slightly worse time-domain performance and lower SNR, I turn the tone switch off and use 1:4.
If you're going to the trouble of doing this work (really just moving two resistors and replacing two other resistors and one capacitor), it's also a good idea to hand-match a new pair of phantom feed resistors for best common-mode noise rejection. I found the stock 6.8k parts in the WA12 mkII to be about 1.2% apart from each other, when the IEC phantom specification says that it should be less than 0.3%. I make it a habit to match pairs of 6.81k metal film resistors to within 1 ohm (<0.03%) when I'm working on mic preamps. No need to buy parts at those tolerances -- the absolute value isn't important, just find any two in a pile that are super close to each other in value.
Notes on changing the opamp
The stock Warm X1731 is fine. It really is! You're almost certainly not going to hear a difference by changing it to something else, except when driven into clipping or at the extremes of treble response. That said, I found something totally bizarre when I dropped a CA0252 opamp into the WA12. C21, the phase compensation capacitor in the opamp's feedback loop, is 12pf. 12pf is not doing anything in this circuit. The API 312 uses 120pf, 10x higher. I have no idea whether this was a board-stuffing error, a CAD/schematic typo that snuck into the BOM, or just a stupid design choice. It doesn't really pose problems with the stock 1731-style opamp, probably because that opamp has much more limited bandwidth than a 2520. But if you drop a 2520 into the circuit, you will get a huge peak of ultrasonic noise around 90kHz. This is enough to screw up your metering if you're recording at 96kHz or 192kHz ("why is my meter reading -30dBFS if I can't hear anything?"). It affects noise all the way down into the audible range, so you will also hear more background hiss with a 2520 opamp than the stock 1731, even if you can't hear the main problem up at 90kHz. The solution, of course, is just to change C21 to the API value of 120pf. You should do that anyway, even if you're not planning to change the opamp.
16 notes
·
View notes
Text
FinishLinePDS is a US based Product Development firm. We go beyond layout by complementing your team with experts, process, and reference designs that improve quality and decrease cost.
First, we do a complete review of the schematic and BOM. Independent reviews have been shown to decrease the number of “spins” substantially. This reduction in spins not only saves cost but decreases time to market.
For more information, visit: PCB Design and Layout Services
#PCB#PCBLayout#PCBDesign#ProductDevelopment#ProductDesign#EngineeringHelp#TechnologySolutions#Startups#BusinessStartups#TechStartups#SmallBusiness#SmallBusinesses#SmallBusinesstips#Startup#ProductDesigns#Innovation#InnovationDesign#Innovations#Entrepreneur#Entrepreneurs#Entrepreneurship#FinishLinePDS
2 notes
·
View notes
Text
How do PCBs automatically help power with conductive pathways for non-conductive substrates?
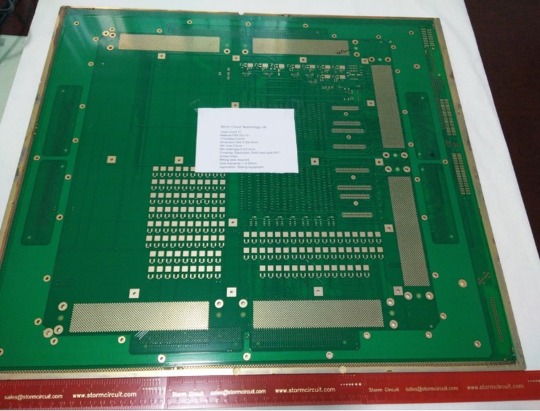
HDI 12-layer PCBs automatically powered to help are called PWB (Printed wiring boards), PCBs (Printed Circuit Boards) come accessible to automatically help and electrically be part of electric powered-powered utilization of conductive pathways, signal strains etched from copper sheets laminated onto a non-conductive substrate. Apart from being much less high priced and reliable, PCBs are used for immoderate-volume production, even though their price is higher than wire-wrapped circuits. Generally, a Printed Circuit Board’s format is ready vaguely. Important characteristic internal PCB circuit format this is carried out to define the functionality further of mechanical and electric-powered products. This microwave PCB Prototype plays a crucial element characteristic within the format and introduction of found-out circuit boards. The technique of the PCB prototype goes via immoderate situations the whole thing is checked on the equal time because the manufacturing is in a technique including the strains and leads. However, underneath any kind of failure within the prototype, a present-day modified prototype needs to be built.
How are PCB prototypes to scrutinize efficiencies?
The prototype is saved under scrutiny until it performs as required. In case of the unavailability of a prototype of the Printed Circuit Boards, there are various uncertain risks and inefficiencies worried about the mass production of circuit boards. These revisions additionally may be time-ingesting in complex systems and may include immoderate expenses. Also, if something is determined incorrectly with a circuit, it takes a while to localize it. Different ENEPIG PCB materials are used for sort of PCB specifications and techniques in PCB prototyping and production.

What are the power outputs of rigid-flex PCB?
To get wonderful consequences and outputs, you will be capable of creating or formatting a PCB with the utilization of
Using Polyimide for flexibility – Polyimide can keep a heat temperature, which makes it most suitable for use in electric insulation applications.
Arlon for Longer Life at Higher Temperatures – Arlon materials are useful for the PCB fabrication of immoderate ordinary overall performance and frequency-mounted found-out circuit production.
Isola Range for PCB prototype – Isola range is an immoderate ordinary overall performance pre-peg system.
UTILITIES AND FUNCTIONS
Its low dielectric consistency and dissipation element permit the growth of an appropriate cloth for designing broadband circuits.
Last phrase and conclusion Storm pcb.com are expert in digital layout and PCB assembly. They remodel your circuit concept into reality, seamlessly, economically, and successfully for exceptional circuit manufacturing for men or woman demand.
#HDI PCB#RF PCB#High frequencypcb#rigid-flexpcb#Large PCB#Metalcore PCB#ENEPIG PCB#Microwave PCB#10 layer PCB#12 layer PCB
7 notes
·
View notes
Text
Gaming Keyboards for Big Hands
Gaming Keyboards for Big Hands
Choosing the right gaming keyboard is crucial for gamers with big hands. The market offers a variety of options designed to provide comfort and improve gaming performance. A keyboard with larger keys, ample space between keys, and an ergonomic design can significantly enhance gaming sessions. It's important to consider the switch type, keycap size, and wrist support features. We explore a selection of keyboards that stand out for their suitability for gamers with big hands.
alt="A gaming keyboard illuminated with LED lights"
src="https://ae01.alicdn.com/kf/S613be4247adc4ef68d308139a2dd06a7I.jpg"
/>
Top Picks for Gamers with Big Hands
Extra-Large Mechanical Keyboards
Find More
>
Keyboards with Adjustable Key Spacing
Explore Options
>
Ergonomic Designs for Comfortable Use
Learn More
>
Keyboards with Programmable Keys
View Products
>
Durable Keyboards for Intense Gaming Sessions
Check Availability
>
LED Backlit Keyboards for Night Gamers
Discover Selection
>
class="o-ProductRoundup--image-advanced"
src="https://ae01.alicdn.com/kf/Sf75d6305d8124ec2a247b8d59d1385a7O.jpg"
alt="68 Keys Gaming Keyboard"
/>
68 Keys Gaming Keyboard
USB Wired Portable 20 RGB Backlight Keyboard for Windows Laptops Computer
>
class="o-ProductRoundup--review-advanced"
href="#product-4597d76a-c8c3-4ab7-a0c2-e089db5fedce"
>
src="https://ae01.alicdn.com/kf/H0f7f283a5527481a8018a3e58624cdd31.png"
alt="English Laptop keyboard for Asus TUF Gaming"
/>
For ASUS TUF Gaming Series
English Laptop keyboard for Asus TUF Gaming FX505 - US Backlit
>
href="#product-4597d76a-c8c3-4ab7-a0c2-e089db5fedce"
>
src="https://ae01.alicdn.com/kf/S639501bbf5c7405c923aa3eb093ec230b.jpg"
alt="CSTC40 40% Mechanical Keyboard PCB"
/>
CSTC40 RGB 40% Mechanical Keyboard
Hot Swappable PCB Programmed with VIA & VIAL software
>
href="#product-4597d76a-c8c3-4ab7-a0c2-e089db5fedce"
>
src="https://ae01.alicdn.com/kf/S5bc818ca10e14a6287d0a7d5f96d2f33b.jpg"
alt="AULA F2088 Mechanical Gaming Keyboard"
/>
AULA F2088 Keyboard
Full Key Programmable Macro Keyboard for Vast Gaming Experience
>
href="#product-4597d76a-c8c3-4ab7-a0c2-e089db5fedce"
>
src="https://ae01.alicdn.com/kf/S613be4247adc4ef68d308139a2dd06a7I.jpg"
alt="VIAL Programmable 42 Key Mechanical Split Keyboard Gaming DIY Kit"
/>
VIAL Programmable 42 Key Keyboard
Programmable Mechanical Split Keyboard Gaming DIY Based on QMK Hot swaps RGB Backlit Keypad Kit
>
href="#product-4597d76a-c8c3-4ab7-a0c2-e089db5fedce"
>
src="https://ae01.alicdn.com/kf/Sdbfdc5b053ea4e41ac05e6098a7e87d4s.jpg"
alt="Gaming Keyboard Russian EN Keyboard RGB Backlight"
/>
Gaming Keyboard for Big Hands
104 Keys USB Wired Gamer Keyboard with RGB Backlight for Tablet Desktop
>
href="#product-4597d76a-c8c3-4ab7-a0c2-e089db5fedce"
>
src="https://ae01.alicdn.com/kf/S613be4247adc4ef68d308139a2dd06a7I.jpg"
alt="VIAL Keyboard Programmable 42 Key Mechanical Split Keyboard"
/>
VIAL Keyboard Programmable 42 Key Programmable Mechanical Split Keyboard Gaming DIY Based on QMK Hot swaps RGB Backlit Keypad Kit
View More
Product Features:
42 Key Programmable Layout ideal for gamers with big hands
Mechanical switches for precision and durability
RGB Backlit for gaming in low light conditions
Possible Cons:
Might be too large for those with smaller hands
Programming knowledge needed for full functionality
Designed for expert gamers and DIY enthusiasts, this VIAL keyboard boasts a 42 key programmable layout, mechanical switches for increased longevity and precision, and customizable RGB backlighting. Its split design is aimed at offering ergonomic benefits, potentially making it a solid choice for gamers with big hands looking for comfortable gaming keyboards.
Connectivity:
Wired (USB)
Compatibility:
PC, Mac, Linux
Programmable:
Yes, via QMK software
src="https://ae01.alicdn.com/kf/Sf75d6305d8124ec2a247b8d59d1385a7O.jpg"
alt="68 Keys Gaming Keyboard"
/>
68 Keys Gaming Keyboard USB Wired Portable 20 RGB Backlight Keyboard for Windows Laptops Computer
View More
Product Highlights
Portable 68-Key Design perfect for gamers with big hands
20 RGB Backlight Modes to enhance your gaming experience
USB Wired for fast, reliable connections
Considerations
May not be suitable for users who prefer wireless keyboards
Limited key count might not be ideal for users requiring dedicated macro keys
This 68 Keys Gaming Keyboard is designed keeping in mind the needs of users with big hands, featuring a compact yet spacious layout that provides comfort during long gaming sessions. The vibrant 20 RGB backlight settings not only give it a stylish look but also ensure that the keys are visible in low light, enhancing the overall gaming atmosphere. USB wired connection guarantees minimal latency, making it a reliable option for competitive gaming.
Key Count
68
Backlight
20 RGB Modes
Connection Type
USB Wired
src="https://ae01.alicdn.com/kf/S639501bbf5c7405c923aa3eb093ec230b.jpg"
alt="CSTC40 40% hot Swappable Mechanical Keyboard RGB"
/>
CSTC40 40 RGB 40% hot Swappable Mechanical Keyboard PCB Programmed VIA VIAL software Macro Firmware rgb switch type c planck
View More
Product Highlights
40% compact layout
RGB backlighting
Hot swappable switches
Considerations
Might be too small for users with large hands
Requires getting used to the compact layout
The CSTC40 40 RGB Mechanical Keyboard is an excellent choice for gamers with big hands looking for a compact option without sacrificing performance. Its hot swappable feature and RGB backlighting not only provide flexibility but also add a stylish look to any gaming setup. However, it's crucial to note that the 40% compact layout might require some adjustment time for those not used to smaller keyboards.
Type
Mechanical Keyboard PCB
Compatibility
Hot Swappable switches
Software
Programmed VIA VIAL
src="https://ae01.alicdn.com/kf/Sdbfdc5b053ea4e41ac05e6098a7e87d4s.jpg"
alt="Gaming Keyboard Russian EN Keyboard RGB Backlight"
/>
Gaming Keyboard Russian EN Keyboard RGB Backlight Keyboard 104 Keys USB Wired Gamer Keyboard for Tablet Desktop
View More
Key Features
RGB Backlight for enhanced experience
104 Keys for full control
USB Wired for reliable connectivity
Cons
Might be large for users with smaller hands
Russian EN layout may require adaptation for some users
Designed with gamers in mind, this RGB Backlight Keyboard combines functionality and style. Its full 104 keys ensure you have every command at your fingertips, while the USB wired connection offers uninterrupted gaming sessions. Ideal for users with big hands, its ergonomic design provides comfort during extended use. However, its large size and Russian EN layout might require some adjustment for certain users.
Connection Type
USB Wired
Layout
Russian EN
Backlight
RGB
src="https://ae01.alicdn.com/kf/H0f7f283a5527481a8018a3e58624cdd31.png"
alt="English Laptop keyboard for Asus TUF Gaming FX Series"
/>
English Laptop keyboard for Asus TUF Gaming FX505 FX505G FX505D FX505GD FX505GE FX505GM FX505DY FX505DV fx505dt US Backlit
View More Details
Pros of English Laptop Keyboard for Asus TUF Gaming
Backlit for ease of use in low light conditions
Designed specifically for Asus TUF Gaming FX series laptops
US layout ideal for English-speaking users
Cons of English Laptop Keyboard for Asus TUF Gaming
May not be compatible with non-Asus laptops or other Asus models
Limited color options available
This backlit English laptop keyboard is specifically designed for Asus TUF Gaming FX series, providing an optimal gaming experience for English-speaking users with big hands. The backlit feature makes it easy to use in various lighting conditions, enhancing your gaming setup's aesthetics and functionality.
Compatibility
Asus TUF Gaming FX505, FX505G, FX505D, FX505GD, FX505GE, FX505GM, FX505DY, FX505DV, fx505dt
Layout
US
Feature
Backlit
src="https://ae01.alicdn.com/kf/S5bc818ca10e14a6287d0a7d5f96d2f33b.jpg"
alt="AULA F2088 Mechanical Gaming Full Key Programmable Macro Keyboard"
/>
AULA F2088 Mechanical Gaming Full Key Programmable Macro Keyboard
View more details
Key Features
Full key programmable via macro
Anti-ghosting technology for better gaming experience
Wire mixed light for an immersive gaming atmosphere
Cons
Might be bulky for users with smaller desks
Customization software may have a learning curve
The AULA F2088 Mechanical Gaming Keyboard is designed for gamers with large hands, offering a comfortable and responsive typing experience with its full key programmable macro keys and anti-ghosting switches. Its mixed light feature adds to the gaming mood, making it a great addition to any gaming setup.
Switch Type
Mechanical
Lighting
Mixed RGB
Keycap Material
Korea Russian Arabic cap
>
Gaming Keyboards for Big Hands
Finding the right gaming keyboard when you have big hands can be a bit of a challenge. Most keyboards seem to be designed with a one-size-fits-all approach, which doesn’t always work for those with larger hand sizes. The key to comfort and improved gaming performance for people with big hands is in the size of the keys, the spacing between them, and the overall design and ergonomics of the keyboard. In this guide, we’ll highlight some of the best gaming keyboards that cater specifically to gamers with big hands, ensuring a more comfortable and efficient gaming experience.
Keyboards with adjustable key sizes and spacing for custom comfort
Ergonomic designs that reduce strain during long gaming sessions
Models featuring mechanical keys for better tactile feedback and durability
Keyboards with programmable macros for enhanced gaming efficiency
Options that include backlit keys for late-night gaming sessions
It’s important to try out different keyboards to find what works best for your hand size and gaming style. Look for keyboards that offer a good balance between responsiveness and comfort. Many manufacturers are now recognizing the need for more inclusive designs, so there are plenty of options available on the market. Remember, investing in the right gaming keyboard can not only improve your gaming experience but also help prevent potential strain and fatigue, making it a crucial accessory for gamers with big hands.
Read the full article
0 notes
Text
The Hidden Potential Exploring PCB Reverse Engineering Services
In the digital era, innovation is the lifeblood of progress. As technology evolves at a staggering pace, companies are constantly seeking ways to stay ahead of the curve. One avenue that has gained significant traction is PCB reverse engineering—a process that unveils the secrets hidden within printed circuit boards (PCBs) to drive innovation, enhance competitiveness, and safeguard intellectual property.
At PCB Reverse Engineering, we specialize in providing cutting-edge PCB reverse engineering services tailored to the unique needs of our clients. With a team of seasoned experts armed with state-of-the-art tools and a passion for technological exploration, we are committed to delivering superior results that exceed expectations.
Understanding PCB Reverse Engineering:
PCB reverse engineering is a meticulous process that involves dissecting a circuit board to unveil its design, functionality, and underlying components. This intricate task requires a combination of technical expertise, analytical prowess, and attention to detail. Through reverse engineering, businesses can gain invaluable insights into the inner workings of electronic devices, paving the way for innovation, optimization, and improvement.
Our Approach:
At PCB Reverse Engineering, we understand that every project is unique, presenting its own set of challenges and opportunities. That's why we take a tailored approach to PCB reverse engineering, leveraging our expertise to develop customized solutions that align with our clients' objectives. Whether it's deciphering complex schematics, identifying obsolete components, or optimizing circuit designs, our team is equipped to handle projects of any scale or complexity.
Key Services:
PCB Analysis and Documentation: We conduct comprehensive analyses of PCBs to document their structure, layout, and functionality. Through meticulous inspection and testing, we uncover crucial insights that serve as the foundation for subsequent phases of the reverse engineering process.
Component Identification and Verification: Identifying and verifying components is a critical aspect of PCB reverse engineering. Our experts leverage a combination of advanced tools and techniques to accurately identify components, ensuring compatibility, reliability, and performance.
Schematic Reconstruction: Armed with detailed documentation and component data, we reconstruct schematics to map out the electrical connections and logic of the circuit. This step is essential for understanding the PCB's functionality and optimizing its design for improved performance.
Prototype Development: Once the reverse engineering process is complete, we offer prototype development services to bring concepts to life. Whether it's refining existing designs or creating new prototypes from scratch, our team works closely with clients to turn ideas into reality.
Benefits of PCB Reverse Engineering:
Investing in PCB reverse engineering offers a myriad of benefits for businesses across various industries:
Innovation: By gaining a deeper understanding of existing PCB designs, companies can identify opportunities for innovation and product enhancement.
Cost Savings: Reverse engineering allows businesses to breathe new life into obsolete or discontinued products by identifying alternative components or optimizing designs, thereby reducing the need for costly redesigns or replacements.
Competitive Advantage: By staying ahead of the curve and leveraging cutting-edge technology, companies can maintain a competitive edge in the marketplace and differentiate themselves from competitors.
Intellectual Property Protection: Understanding the intricacies of PCB designs enables companies to better protect their intellectual property and defend against unauthorized replication or infringement.
Why Choose PCB Reverse Engineering?
Expertise: Our team comprises seasoned professionals with years of experience in PCB reverse engineering and a proven track record of delivering exceptional results.
Technology: We leverage state-of-the-art tools, software, and techniques to ensure accuracy, efficiency, and reliability throughout the reverse engineering process.
Customization: We understand that every project is unique, which is why we offer tailored solutions designed to meet the specific needs and objectives of our clients.
Collaboration: We believe in fostering strong partnerships with our clients, working closely with them to understand their goals, address their challenges, and deliver results that exceed expectations.
Conclusion:
In an ever-evolving technological landscape, PCB reverse engineering emerges as a powerful tool for driving innovation, enhancing competitiveness, and unlocking hidden potential. At PCB reverse engineering , we are committed to helping businesses harness the power of reverse engineering to achieve their goals, overcome challenges, and chart a path toward success. Contact us today to learn more about our PCB reverse engineering services and discover how we can help your business thrive in the digital age.
#printed circuit boards#unlocking hidden potential#PCB reverse engineering#reverse engineering process#intellectual property#optimizing circuit designs#pcb design
0 notes
Text
What is USB PCB?
The USB PCB (Universal Serial Bus Printed Circuit Board) serves as the foundation for USB serial interface devices, enabling quick data transmission, easy interfacing, and hot-swapping capabilities. This technology has become increasingly popular due to its efficiency in document exchange, driving its widespread adoption across various industries. Here's an in-depth look at USB PCBs, their benefits, types, design components, and common issues:
Benefits of Using USB PCBs
Energy Efficiency: USB PCBs use power only for signaling and data transfer, drawing power from connected devices and ensuring efficient power consumption.
Ease of Use: These boards offer plug-and-play functionality, allowing users to easily connect and transfer data between devices.
Speed: USB PCBs facilitate high-speed data storage and transfer, enhancing overall operational efficiency.
Common Issues and Solutions
Connector Stability: Frequent plugging and unplugging can affect the stability of micro-connectors. Solutions include using plug helpers and neutral cure silicon rubber for reinforcement.
Compatibility: USB PCBs come in various types (USB-A, USB-B, USB-C, etc.), each with specific applications and connectors. Understanding the differences helps in selecting the right type for your needs.
Types of USB PCB Connectors
USB-A: Standard rectangular connector found on most USB cables and devices.
USB-B: Square-shaped connector, mainly used for printers and similar devices.
Mini-USB: Smaller connector type used in cameras, MP3 players, etc.
Micro-USB: Compact connector for portable devices like smartphones and headsets.
USB-C: Latest USB standard with a reversible connector and high data transfer speeds.
USB PCB Design Components
Shielding: Protects electrical signals from interference, especially in high-noise environments.
Power Connections: Provides power before data connectivity, ensuring devices are powered properly.
Polarization: Ensures connectors are connected in the correct orientation to prevent damage.
Strain Relief: Minimizes tension on connectors and prevents cord stress.
USB PCB Layout Design Considerations
Signal Routing: Keep differential signal lines short and avoid exceeding two via pairs on a differential line pair.
Impedance Matching: Ensure trace thickness and spacing match impedance requirements for high-frequency signals.
Power Trace Width: Use appropriate trace widths to support the required output current (usually 500mA).
USB PCBs find applications in various industries, including automotive (vehicle systems), communication (mobile phones, computers), medical (data transfer), and entertainment (media storage).
Conclusion
USB PCB technology continues to evolve, offering efficient data transmission and connectivity solutions. By understanding the different types, design considerations, and common issues, you can effectively leverage USB PCBs in your applications. For design-related queries or assistance, consider consulting with experts or contacting manufacturers like Highleap Electronic for support.
Highleap Electronic
0 notes
Text

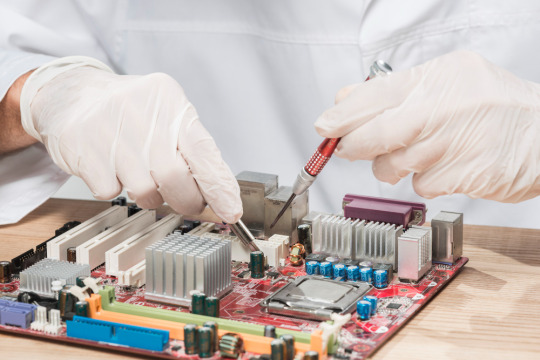
PCB Repairing Course In Delhi || 9319887726
Explore the complex world of electronics with the PCB (Printed Circuit Board) Repairing Course at Care Skills Academy in Delhi. This specialized program provides practical training and expert guidance to equip students with the skills required to effectively diagnose, repair, and troubleshoot various PCBs. From understanding circuit layout to using diagnostic tools and soldering techniques, students gain the practical knowledge needed to address PCB-related issues with confidence. Led by experienced instructors, this course ensures a comprehensive understanding of PCB repair techniques and industry-standard practices. Join us to unlock exciting opportunities in electronic repair and become a certified PCB repair technician

Duration: 30 Days
►Hands-on 100% practical knowledge
►All candidates Work on live project
►Job-oriented course
► Certification Course
Book Your Free Demo Class Call at 9319887726, 9319887728
0 notes
Text
Update Yourself Visit Origin Data Technology Resource Center
For both experts and fans, keeping up with the most recent products, trends, and reference designs is essential in the ever evolving field of electronics. With its Technology Resource Centre, Origin Data, a preeminent centre for the distribution of electronic components, provides a thorough answer to this requirement. This digital archive is a veritable gold mine of insightful materials, such as product showcases, Electronic components product articles, and reference designs that have been carefully chosen to meet the various needs and preferences of people and companies in the electronics sector.
At the heart of Origin Data's electronic components technical resources Center lies a commitment to empowering knowledge and fostering innovation. Through easy-to-navigate browsing and powerful search functionalities, users can delve into a vast collection of articles covering a myriad of topics relevant to electronic components and the broader electronics landscape. From in-depth technical analyses to insightful industry perspectives, the articles featured in the resource center provide valuable insights and expertise, helping readers stay abreast of emerging trends and advancements shaping the future of electronics.
Moreover, the Technology Resource Center serves as a gateway to explore product highlights, offering a comprehensive overview of the latest and most innovative electronic components available in the market. Whether it's breakthrough semiconductor technologies, cutting-edge passive components, or state-of-the-art connectors, users can discover product features, specifications, and applications to make informed decisions about their procurement needs. With Origin Data's commitment to partnering with top manufacturers worldwide, the resource center ensures access to a diverse range of high-quality products to suit various industry requirements.
In addition to articles and product highlights, the Technology Resource Center showcases the latest additions to Origin Data's inventory, allowing users to stay informed about new arrivals and groundbreaking innovations. By regularly updating its catalog with the most recent releases, Origin Data ensures that customers have access to the latest advancements in electronic components, enabling them to leverage cutting-edge technologies for their projects and endeavors.
Furthermore, the resource center offers a wealth of reference designs, providing users with practical insights and inspiration for their electronic design projects. Whether it's circuit schematics, PCB layouts, or application notes, the reference designs curated by Origin Data serve as valuable resources for engineers, designers, and hobbyists seeking guidance and best practices in electronic system development. By showcasing real-world examples and proven solutions, the reference designs empower users to accelerate their design process and overcome challenges with confidence.
Navigating through Origin Data's Technology Resource Center is not just about accessing information; it's about unlocking opportunities for growth, innovation, and collaboration within the electronics community. As a trusted partner in the industry, Origin Data is committed to fostering a culture of knowledge sharing and learning, where individuals and businesses can thrive and succeed in an ever-evolving technological landscape.
Origin Data's Technology Resource Center stands as a beacon of knowledge and innovation, providing a comprehensive platform for exploring articles, product highlights, the latest innovations, and reference designs related to electronic components and the electronics industry. By offering valuable insights, resources, and inspiration, the resource center empowers users to stay informed, make informed decisions, and push the boundaries of what's possible in the world of electronics. Whether you're a seasoned professional or an aspiring enthusiast, the Technology Resource Center invites you to embark on a journey of discovery and exploration, where knowledge is the key to unlocking endless possibilities.
Follow Us:
YouTube: https://www.youtube.com/@Origin_Data
Facebook: https://www.facebook.com/Origin-Data-Global-Limited-100878739724371
Witter: https://twitter.com/Origin_IC
Chinese website: https://www.origin-ic.com
Tiktok: https://www.tiktok.com/@origin_data
0 notes
Text
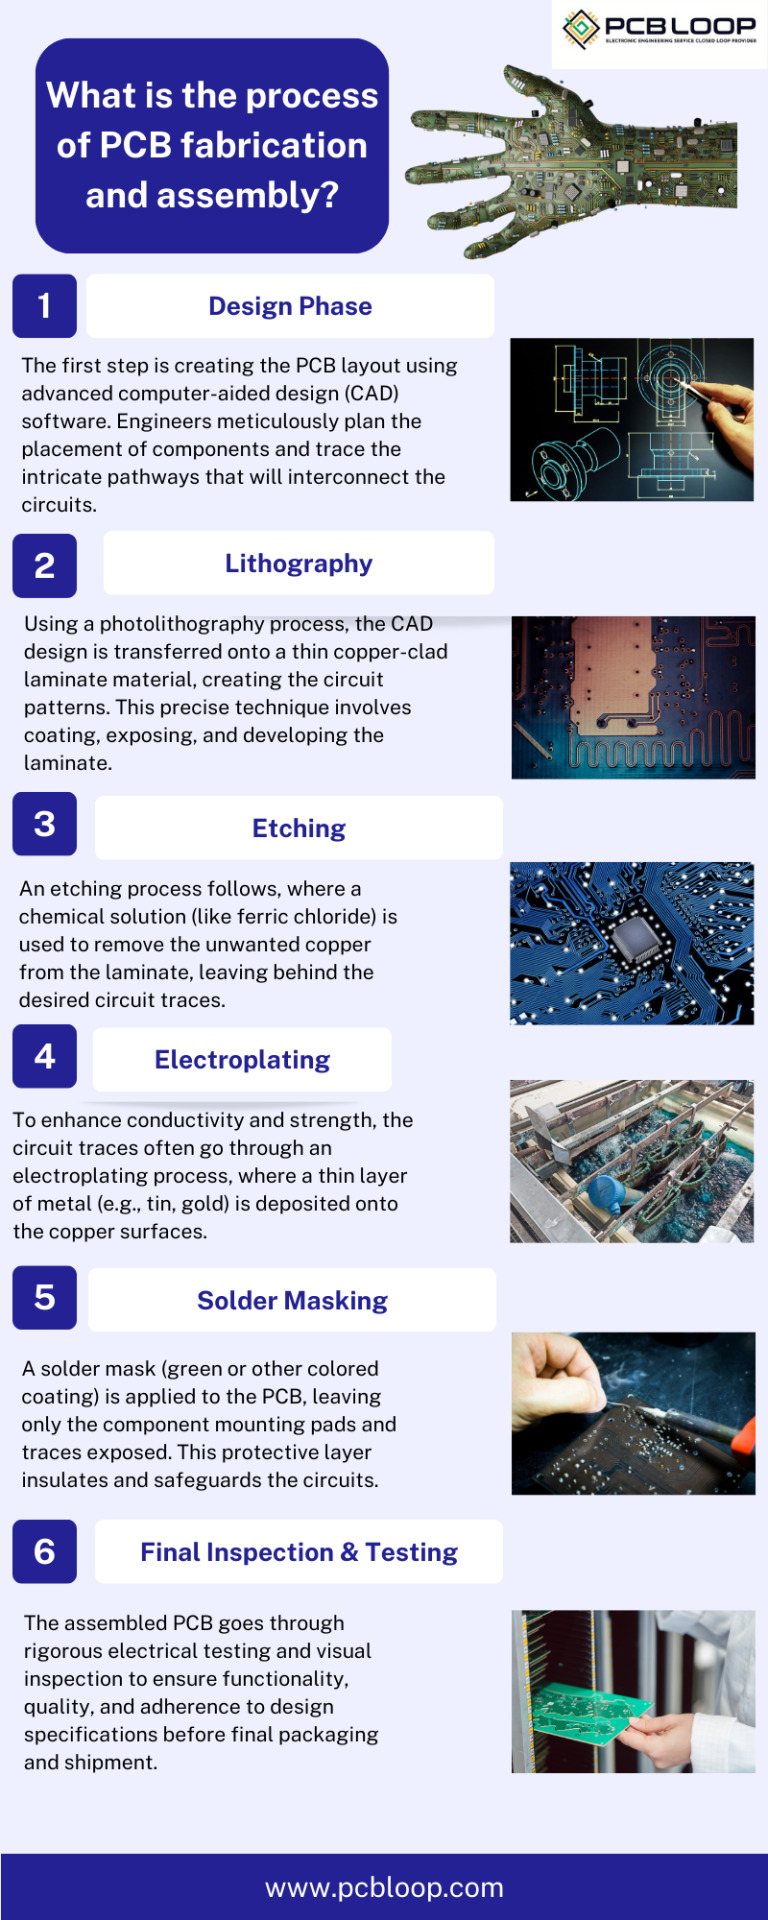
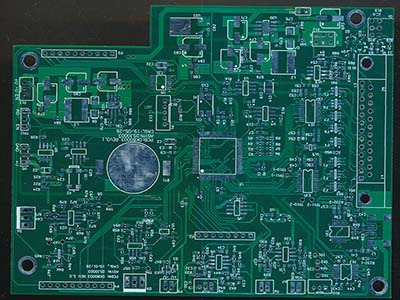
Making printed circuit boards (PCBs) involves several steps. PCBLOOP has been making good PCBs for over 20 years. We focus on giving our customers high-quality products, quick delivery, and good value. We're experts in PCBs and you can trust us. First, we plan the PCB fabricator's layouts carefully on computers. Then, we put the designs on thin copper sheets. Chemicals remove any extra copper, leaving only the circuit traces. Next, we add metal coatings to the circuits to make them stronger and better at conducting electricity. After that, we precisely attach tiny electronic parts to the boards using special soldering machines. Finally, we thoroughly test and check the completed PCBs to ensure they work perfectly. You can learn more about this process by reading our blog post.
1 note
·
View note
Text
youtube
Power Integrations Expert - Design Planar Transformers with Ease
https://www.futureelectronics.com/m/power-integrations . PI Expert now features a planar magnetics builder that creates an application-specific planar transformer design within minutes — completed with layer-by-layer printed circuit board (PCB) layouts, manufacturer-ready documentation and Gerber files. https://youtu.be/RhtXJI0SlrQ
#Power Integrations#PI Expert#planar magnetics builder#application-specific planar transformer design#layer-by-layer printed circuit boardlayouts#PCB. Gerber files#planar transformer design#Youtube
0 notes
Text
Five best quick’s SMD rework station for IC chip level under 15000

A budget of 15000 rupees should be allocated towards a decent SMD rework station (hot air gun) for IC work that takes temperature control, airflow, dependability, and user-friendliness into SMD. The following five choices are well-liked by users and provide good SMD rework performance:
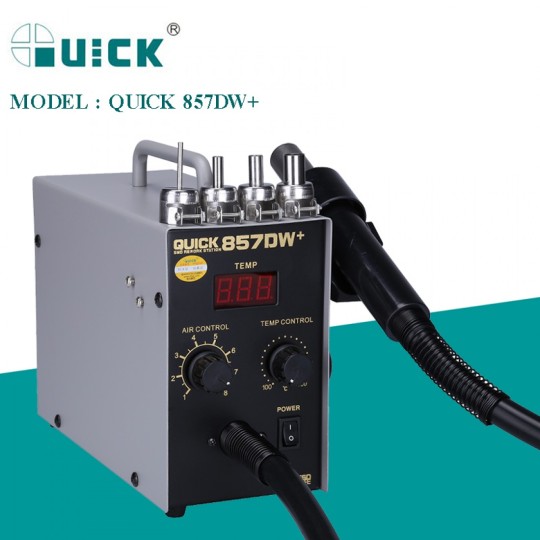
1. Quick 857DW+: The Quick 857DW+ is a popular choice among electronics enthusiasts and professionals for SMD rework due to its reliability and performance. Here are some key features of the Quick 857DW+ hot air rework station:
Digital Temperature Control: This feature provides exact temperature control so you can set and hold the right temperature for a variety of soldering tasks.
Adjustable Airflow: This feature offers flexibility and control throughout the rework process by allowing the airflow to be modified to meet various component types and soldering requirements.
Fast Heating: During soldering and de-soldering processes, the Quick 857DW+ heats up rapidly, cutting waiting times and improving efficiency.
Many Nozzles: Usually, it includes a selection of interchangeable nozzles in varying sizes and shapes so you may select the best one for certain parts and PCB layouts.
Reliability: Quick is renowned for making excellent soldering tools and the 857DW+ is no different. It is made to last and handle frequent use in work environments.
User-Friendly Interface: This interface is made to be simple to use and intuitive, so both novices and experts can utilize it.
Safety measures: To avoid overheating and guarantee safe operation, it frequently has safety measures such automatic cool-down and sleep mode.
2. Quick 2008: The Quick 2008 hot air SMD rework station is a popular choice among electronics enthusiasts and professionals for its reliability and performance. Here are some key features of the Quick 2008 hot air SMD rework station:
Temperature Control: You may precisely control the temperature with the Quick 2008, adjusting the heat to suit the needs of various components. In order to protect delicate ICs and other electronic components, this is essential.
Adjustable Airflow: This feature allows you to customize the airflow to fit different soldering operations and component sizes. Accurate soldering and effective heat transfer are made possible by this feature.
Digital Display: To facilitate precise monitoring and control of the soldering process, the station usually has a digital display that shows both the set temperature and real-time temperature measurements.
Fast Heating: The Quick 2008 is renowned for its quick heating capabilities, which let you to get the soldering temperature you need to achieve in a hurry. This enhances productivity and efficiency, particularly in work environments.
Reliability: Quick has a solid reputation for producing soldering equipment of the highest caliber. The Quick 2008 hot air SMD rework station is designed to endure heavy use and deliver reliable performance over an extended period of time.
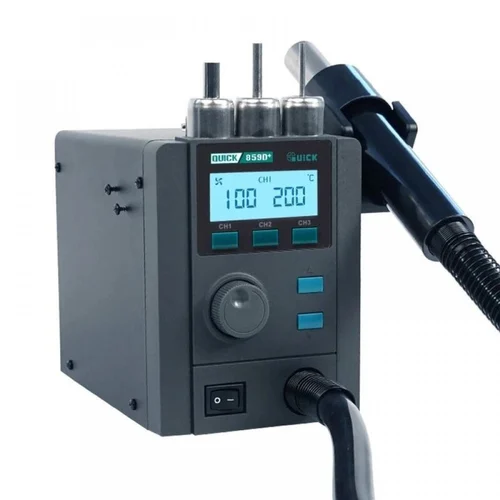
3. Quick 859D+: The Quick 859D+ is a popular choice among electronics enthusiasts and professionals for SMD rework. Here are some features and specifications of the Quick 859D+ hot air rework station:
Digital Temperature Control: With the Quick 859D+'s accurate digital temperature control, you can precisely tune the temperature for a variety of soldering activities and component kinds.
Adjustable Airflow: You can precisely direct the heat onto the component you're working on with its adjustable airflow settings. This function aids in preventing harm to nearby electronics and components.
Quick Heating: The Quick 859D+ heats up rapidly, cutting down on waiting times and increasing productivity for soldering and de-soldering.
LED Display: It has a visible LED display that indicates the airflow and temperature at any given time, making it simple to check and modify as necessary.
Versatility: A variety of SMD components, such as ICs, QFPs, SOICs, and more, can be used with this rework station. To fit a variety of component sizes and shapes, it has nozzle attachments.
Safety Features: To prevent overheating and safeguard both the operator and the equipment, the Quick 859D+ has automatic cool-down capabilities.
4. Quick 2008D+: The Quick 2008D+ is a popular choice among electronics enthusiasts and professionals for SMD rework. Here are some key features of this hot air rework station:
Digital Temperature Control: The Quick 2008D+ allows precise control over the temperature of the hot air gun, ensuring that you can set it to the optimal temperature for your specific soldering needs.
Adjustable Airflow: It offers adjustable airflow settings, allowing you to tailor the airflow to suit the size and type of component you're working with. This is crucial for preventing damage to sensitive components and achieving clean soldering results.
LCD Display: The station is straightforward to use and intuitive to manage thanks to its LCD display, which shows temperature settings and airflow levels in a clear and easy-to-read manner.
Fast Heating: The Quick 2008D+ is renowned for its quick heating capabilities, which let you start working right away without having to wait for the station to warm up to the right temperature.
Broad Range of Nozzles: It usually includes a number of replaceable nozzles to suit a range of component sizes and types, offering adaptability for a number of soldering jobs.
Reliability: Since quick is a reputable company that manufactures high-quality soldering tools, you can rely on the 2008D+ to be sturdy and dependable throughout time.
5. Quick 8786D+: The Quick 8786D+ is another popular choice for SMD rework stations. Here are some key features of this model:
Dual Functionality: The Quick 8786D+ is a versatile tool for a range of soldering and de-soldering operations, since it combines the functions of a hot air pistol and a soldering iron into one instrument.
Digital Temperature Control: The 8786D+, like other Quick models, has a digital temperature control that allows for exact temperature adjustment of the soldering iron and the hot air cannon. This lets you adjust the temperature to exactly the right value for your unique soldering needs.
Adjustable Airflow: The 8786D+'s hot air gun has adjustable airflow settings that let you tailor the airflow to fit a variety of component kinds and soldering jobs.
Soldering Iron Included: This station is a practical all-in-one solution for soldering and de-soldering activities because it includes a soldering iron.
LCD Display: The soldering iron and hot air gun temperature settings are displayed clearly and easily on the station's LCD display, which also offers other useful information.
Compact Design: The Quick 8786D+ is primarily made to be lightweight and compact, which makes it simple to stow and move around your workstation.
Reliability: Quick has a reputation for manufacturing high-quality, trustworthy soldering equipment, so you can count on the 8786D+ to hold up over time.
Please note that prices may vary depending on the seller, location, and any ongoing promotions or discounts. Additionally, it's always a good idea to check the latest prices and availability before making a purchase.
0 notes
Text
Explore Viasion's expert PCB design services. From concept to reality, trust us for high-quality and efficient printed circuit board design for your electronic projects.
0 notes
Text
PCB Layout Service in India
Transform your electronic dreams into reality with our top-notch PCB layout service in India at PCB Power. Our expert team ensures precision, efficiency, and innovation in crafting customized printed circuit board layouts. From concept to completion, trust us to optimize your PCB designs for peak performance.
1 note
·
View note
Last Seen Blogs

yaoioioay
The One Who Looks Over The Crowd

suuka-69
Sukaa-69

petkitsusa
Pet Kits USA

dakalister
Dakalister

bird-pinkxx
파사로 로사