#ServerAdmin
Text
SEO-Friendly Website Hosting and Management Services
When it comes to running a successful online business or website, search engine optimization (SEO) plays a crucial role. It helps improve your website’s visibility, drive organic traffic, and ultimately, boost your online presence. While many factors contribute to effective SEO, one element that often gets overlooked is the choice of website hosting and management services. In this article, we will explore the importance of SEO-friendly website hosting and management services and how they can benefit your online business.

The Impact of Website Hosting on SEO
Website hosting is the foundation upon which your online presence is built. It affects various aspects of your website’s performance, including page loading speed, uptime, security, and overall user experience. These factors have a direct impact on SEO, and here’s how:
Page Loading Speed: Search engines prioritize fast-loading websites, as they provide a better user experience. Slow-loading websites not only frustrate visitors but also result in higher bounce rates, which can negatively affect your search engine rankings.
Uptime: If your website frequently experiences downtime or is unavailable to users, search engines may perceive it as unreliable and lower its rankings. Choosing a reliable hosting provider ensures maximum uptime and minimizes the risk of website downtime.
Security: Website security is crucial for both user experience and SEO. Search engines prioritize websites that have robust security measures in place, such as SSL certificates and protection against malware and hacking attempts.
SEO-Friendly Hosting Features
When selecting a website hosting service, it’s important to consider the following SEO-friendly features:
Fast and Reliable Servers: Look for hosting providers that offer high-performance servers and have a reputation for speed and reliability. This ensures your website loads quickly, improving user experience and SEO.
Uptime Guarantee: Choose a hosting provider that guarantees a high uptime percentage, ideally 99.9% or higher. This ensures your website remains accessible to users and search engines at all times.
Server Location: If your target audience is in a specific region, consider choosing a hosting provider with servers located in that area. It helps reduce latency and improves website loading speed for visitors in that region.
Scalability: As your website grows, you’ll need the flexibility to scale your hosting resources. Look for providers that offer easy scalability options, allowing you to accommodate increased traffic without compromising performance.
SEO Tools and Integrations: Some hosting providers offer built-in SEO tools or integrations with popular SEO plugins. These features can help you optimize your website’s on-page elements, meta tags, XML sitemaps, and more.
The Importance of Website Management for SEO
Website management involves various tasks such as content updates, regular backups, security monitoring, and software updates. Proper website management not only ensures smooth operations but also has a positive impact on SEO:
Content Updates: Regularly updating your website with fresh, relevant, and high-quality content is vital for SEO. A good website management service can help you schedule and implement content updates, ensuring your website remains engaging for both users and search engines.
Security Monitoring: Proactive security monitoring is essentialto identify and address any vulnerabilities or security threats promptly. Regular scans and malware removal prevent potential SEO penalties due to compromised website security.
Software Updates: Keeping your website’s software, plugins, and themes up to date is crucial for security and performance. Outdated software can lead to compatibility issues, security vulnerabilities, and slower loading speeds.
Choosing SEO-Friendly Website Management Services
When selecting website management services, consider the following factors:
Content Management System (CMS): Ensure that the website management service supports popular and SEO-friendly CMS platforms like WordPress, Joomla, or Drupal. These platforms offer a range of SEO plugins and tools to optimize your website.
Backup and Recovery: Regular backups are essential to protect your website data. Choose a management service that offers automated backups and easy recovery options in case of any unforeseen incidents.
Security Measures: Look for a management service that includes robust security features such as firewall protection, malware scanning, and SSL certificate integration to keep your website secure from potential threats.
Technical Support: Ensure that the website management service provides reliable technical support to address any issues or concerns promptly. Quick resolution of technical problems can prevent prolonged website downtime and potential SEO consequences.
Conclusion
Choosing SEO-friendly website hosting and management services is crucial for the success of your online business. A fast, reliable, and secure hosting provider, coupled with effective website management, can significantly improve your website’s visibility, user experience, and search engine rankings. By paying attention to SEO-related factors when selecting these services, you lay a strong foundation for your website’s long-term success in the competitive online landscape

Source
#WebManagement#ServerHosting#WebsiteMaintenance#TechSupport#CloudHosting#DataCenter#ServerManagement#WebHosting#ITInfrastructure#WebsiteSecurity#ServerAdmin#HostingSolutions#WebsitePerformance#ServerMonitoring#WebDevelopment#CloudComputing#NetworkSecurity#DomainRegistration#BackupandRecovery#Cybersecurity
24 notes
·
View notes
Text
Einen Webserver mit Caddy unter Linux Ubuntu 22.04 installieren
In diesem Artikel zeige ich euch, wie Ihr mit dem Caddy-Webserver eine eigene Webseite unter Linux Ubuntu 22.04 (alternativ auch Debian 12) hosten und im Internet bereitstellen könnt. Caddy ist der einzige Webserver, der HTTPS vollständig automatisiert. Das bedeutet, dass er SSL/TLS-Zertifikate selbstständig implementiert und sich auch um deren Gültigkeit kümmert...[Weiterlesen]
0 notes
Photo

We're Hiring!!! #eagletechitsolutions #etschennai #ets #fullstackdeveloper #javadeveloper #desktopsupport #networkmarketing #networkengineer #linuxadministrator #penetrationtesting #webdeveloper #serveradmin #hrrecruiter #hrmanager https://www.instagram.com/p/Cjx96novKJz/?igshid=NGJjMDIxMWI=
#eagletechitsolutions#etschennai#ets#fullstackdeveloper#javadeveloper#desktopsupport#networkmarketing#networkengineer#linuxadministrator#penetrationtesting#webdeveloper#serveradmin#hrrecruiter#hrmanager
0 notes
Text
Apache web server doesn't allow me to refresh on /about but on localhost its working fine
I bundled up one of my projects and it works fine. However when hitting refresh on a route /about, it displays The requested URL /about was not found on this server.. However when I do it on my localhost off a web server it works fine on refresh and forward/back buttons. I'm using react-router for my client side routing.
Heres the client side routing but I doubt its the problem
Router.run(routes, Router.HistoryLocation, function (Handler) { React.render(<Handler/>, app); });
And my routes are just there:
let routes = (<Route> <Route name = "App" path="/" handler = {App}> <Route name="About" path="/about" handler = {About}/> <DefaultRoute name="Projects" handler = {Projects}/> </Route></Route> );
Heres the APACHE that I think i broke:
<Directory /var/www/> # This directive allows us to have apache2's default start page # in /apache2-default/, but still have / go to the right placeRequire all granted #RedirectMatch ^/$ /apache2-default/ </Directory>
kkotwal.me.conf:
<VirtualHost *:80> # The ServerName directive sets the request scheme, hostname and port that # the server uses to identify itself. This is used when creating # redirection URLs. In the context of virtual hosts, the ServerName # specifies what hostname must appear in the request's Host: header to # match this virtual host. For the default virtual host (this file) this # value is not decisive as it is used as a last resort host regardless. # However, you must set it for any further virtual host explicitly. # ServerName kkotwal.me ServerAlias www.kkotwal.me ServerAdmin webmaster@localhost DocumentRoot /var/www/kkotwal.me/public_html # Available loglevels: trace8, ..., trace1, debug, info, notice, warn, # error, crit, alert, emerg. # It is also possible to configure the loglevel for particular # modules, e.g. #LogLevel info ssl:warn ErrorLog ${APACHE_LOG_DIR}/error.log CustomLog ${APACHE_LOG_DIR}/access.log combined</VirtualHost>
https://codehunter.cc/a/reactjs/apache-web-server-doesnt-allow-me-to-refresh-on-about-but-on-localhost-its-working-fine
0 notes
Text
Welcome to our guide on how to install Zabbix Server 5.0 on CentOS 7 Server. Our previous guide was on the installation of How to Install Zabbix Server on Ubuntu. Zabbix is a powerful open source monitoring solution used to monitor server applications, systems, Network devices, Hardware appliances, IoT devices, e.t.c. Its backend is written in C and Java while the user web interface written in PHP.
Zabbix Architecture (Server & Client)
Zabbix works in a Client/Server model. The server communicates to the native software agents available for various Operating systems like Linux, NIX, and Windows. For systems without an agent, generic monitoring protocols such as Simple Network Management Protocol (SNMP) or Intelligent Platform Management Interface (IPMI) can be used.
Install Zabbix Server 5.0 on CentOS 7
Zabbix Server depends on the following software applications:
Apache web server
PHP with required extensions
MySQL/ MariaDB database server
MySQL or MariaDB can be a remote server, but php and httpd need to be installed on the Zabbix server. It is possible to run Apache web server in reverse proxy mode.
It is recommended to have SELinux in permissive mode unless you know how to fix its issues:
sudo setenforce 0
sudo sed -i 's/^SELINUX=.*/SELINUX=permissive/g' /etc/selinux/config
Step 1: Install and Configure Apache httpd server
Install Apache web server on CentOS 7 server by running the command:
sudo yum -y install httpd vim
After installing Apache, configure basic security by allowing Prod ServerTokens only on./etc/httpd/conf/httpd.conf Add the following line at the end of the file:
$ sudo vim /etc/httpd/conf/httpd.conf
ServerSignature Off
ServerTokens Prod
The directive ServerTokens configures what is returned as the Server HTTP response. Valid options are Full | OS | Minimal | Minor | Major | Prod.
Set ServerName:
$ sudo vim /etc/httpd/conf/httpd.conf
ServerName zabbix.example.com
Set Server Admin to receive an email in case of issues.
$ sudo vim /etc/httpd/conf/httpd.conf
ServerAdmin [email protected]
Restart apache web service after making the changes:
sudo systemctl restart httpd
If you have a firewalld firewall installed and enabled, allow access to port 443 and 80:
sudo firewall-cmd --add-service=http,https --permanent
sudo firewall-cmd --reload
Step 2: Install MariaDB Database server
Install MariaDB database server on CentOS 7 server using our guide:
How to Install MariaDB 10.x on CentOS 7
Once Database server is installed, you need to create a database for Zabbix user:
export zabbix_db_pass="StrongPassword"
mysql -uroot -p Users > Admin > Password > Change Password
Configure Monitoring Target host
Now that we have our Zabbix server ready for monitoring, you can start configuring first monitoring target host. By default, Zabbix server is added to monitoring.
To add other host devices, login to Zabbix admin dashboard with the username admin and click on Configuration > Hosts.
After a few minutes, monitoring data will start flowing in, to check host graphs go to Monitoring > Screens > Server name.
0 notes
Text
Free teamspeak server hosting 2016

Free teamspeak server hosting 2016 update#
Free teamspeak server hosting 2016 license#
Free teamspeak server hosting 2016 download#
May 20 11:13:19 ubuntu2004 ts3server_minimal_runscript.sh: token=a4KYsOm0ixyWAf+rNsVmG95MlNfVjYYdl6EUR5Bq May 20 11:13:19 ubuntu2004 ts3server_minimal_runscript.sh: also check the doc/privilegekey_guide.txt for details. May 20 11:13:19 ubuntu2004 ts3server_minimal_runscript.sh: serveradmin rights for your virtualserver. Loaded: loaded (/lib/systemd/system/rvice disabled vendor preset: enabled)Īctive: active (running) since Thu 11:13:18 UTC 5s ago Now, check the status of the TeamSpeak service with the following command: systemctl status ts3server Next, start the TeamSpeak service and enable it to start at system reboot: systemctl start ts3server Save and close the file then reload the systemd service with the following command: systemctl daemon-reload You can create it with the following command: nano /lib/systemd/system/rviceĮxecStart=/home/teamspeak/ts3server_minimal_runscript.shĮxecStop=/home/teamspeak/ts3server_startscript.sh stopĮxecReload=/home/teamspeak/ts3server_startscript.sh restart Next, you will need to create a systemd service file to manage the TeamSpeak service. Next, exit from the TeamSpeak user with the following command: exit Create a Systemd Service File for TeamSpeak
Free teamspeak server hosting 2016 license#
Next, create a blank license file with the following command: touch. Next, remove the downloaded file with the following command: rm -rf teamspeak3-server_linux_amd64 teamspeak3-server_linux_amd64-3.13.5.tar.bz2 Next, copy all contents from the extracted directory to the TeamSpeak home directory: cp teamspeak3-server_linux_amd64/* -R /home/teamspeak/
Free teamspeak server hosting 2016 download#
Once the download is completed, extract the downloaded file with the following command: tar xvfj teamspeak3-server_linux_amd64-3.13.5.tar.bz2 Once the user is created, switch the user to TeamSpeak and download the latest version of the TeamSpeak server using the following command: su - teamspeak You can create a new user with the following command: adduser -disabled-login teamspeak
Free teamspeak server hosting 2016 update#
You can do this by running the following commands: apt-get update -yīefore starting, you will need to create a separate user to run TeamSpeak server. Additionally, replace ‘root’ with the username of the admin account if necessary.īefore starting, you have to make sure that all Ubuntu OS packages installed on the server are up to date. You will need to replace ‘IP_Address’ and ‘Port_number’ with your server’s respective IP address and SSH port number. Log in to the Server & Update the Server OS Packagesįirst, log in to your Ubuntu 20.04 server via SSH as the root user: ssh -p Port_number Access to the root user account (or access to any account with root privileges).An Ubuntu 20.04 VPS (we’ll be using our SSD 2 VPS plan).Create a Systemd Service File for TeamSpeak.Log in to the Server & Update the Server OS Packages.
0 notes
Link
#Extend #HardDisk #DiscoDuro #LVM #Linux #Ubuntu #Video #HowTo #storage #Almacenamiento #Administración #Servidores #ServerAdmin #Server #Administration #Admin
Cuando se trata la administración de Discos en Sistemas operativos Linux, es muy importante saber el tipo de formato que se le dará, es altamente recomendado utilizar formato LVM, ya que se crean discos (o almacenamiento) dinámicos, debido a que es posible extender las unidades lógicas, agregando más discos duros. Todo este proceso se realiza "en caliente" y, por tanto, transparente a los usuarios.
https://goo.gl/H9VxfL
#Linux#LVM#ubuntu#video#Howto#storage#Almacenamiento#Administración#Servidores#Servers#ServerAdmin#Server#Admin#Tutorial#technology#teaching
1 note
·
View note
Photo

Are you looking for fully managed Shopware Cloud Hosting Services?
LeasePacket specializes in providing complete managed web hosting services for businesses. The certified experts in our company will review your application infrastructure and construct your architecture based on detailed diagrams, cost models, and best practices.
For more Info:-
Mail:- [email protected]
Website:- www.leasepacket.com
Contact:- +91-76159 52893
#shopware#shopwarecloudhosting#cloud#cloudhosting#cloudhostingservices#hosting#hostingservices#hostingprovider#hostingweb#hostingcompany#hostingservice#webhosting#webhostingservices#webhostingcompany#webhostingprovider#websitehosting#serveradmin#leasepacket#cloudservices
0 notes
Text
Instalar TeamSpeak Server en Ubuntu 20.04

Instalar TeamSpeak Server en Ubuntu 20.04 y versiones superiores.
TeamSpeak es una solución VoIP multiplataforma ampliamente utilizada en juegos online. Los usuarios del juego, lo usan para comunicarse con sus compañeros de equipo con una seguridad extrema.
Debemos destacar, que además de permitir tus comunicaciones a través de voz, también se permiten mensajes de texto. Viene con muchas características de tipo empresarial, entre las que se incluyen: privacidad incorporada, calidad de voz excelente, sistema de permisos avanzado, sonido muy bueno, conectividad móvil y muchas más.
En este artículo, veremos cómo instalar tu propio servidor TeamSpeak en Ubuntu 20.04, ya sea en un VPS, servidor dedicado o servidor local.
Comunidad de ayuda TeamSpeak
Instalar TeamSpeak Server en Ubuntu 20.04
Iniciamos sesión sudo.
sudo su
Actualizamos nuestro Ubuntu 20.04.
apt update
apt full-upgrade
Agregamos el usuario teamspeak.
adduser --disabled-login teamspeak
Si quieres puedes agregar tus datos, aunque no es obligatorio.
root@SoloLinux-demo:~# adduser --disabled-login teamspeak
Adding user `teamspeak' ...
Adding new group `teamspeak' (1000) ...
Adding new user `teamspeak' (1000) with group `teamspeak' ...
Creating home directory `/home/teamspeak' ...
Copying files from `/etc/skel' ...
Changing the user information for teamspeak
Enter the new value, or press ENTER for the default
Full Name :
Room Number :
Work Phone :
Home Phone :
Other :
Is the information correct?
root@SoloLinux-demo:~#
Ahora cambiamos de usuario y, descargamos la última versión de la herramienta. A día de hoy tenemos disponible la versión 3.13.6, pero es interesante que revises si existe otra más nueva en su sitio oficial.
su - teamspeak
wget https://files.teamspeak-services.com/releases/server/3.13.6/teamspeak3-server_linux_amd64-3.13.6.tar.bz2
Descomprime el archivo descargado.
tar xvfj teamspeak3-server_linux_amd64-3.13.6.tar.bz2
Imagen de ejemplo.
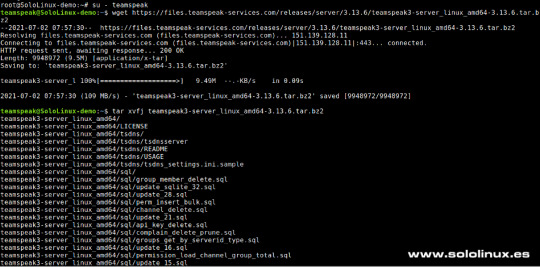
Descargar y descomprimir TeamSpeak
Copia el contenido al directorio de inicio.
cp teamspeak3-server_linux_amd64/* -R /home/teamspeak/
Puedes borrar el archivo descargado anteriormente.
rm -rf teamspeak3-server_linux_amd64 teamspeak3-server_linux_amd64-3.13.6.tar.bz2
Creamos la licencia.
touch .ts3server_license_accepted
Salimos del usuario.
exit
Bien, ahora creamos un servicio systemd.
nano /lib/systemd/system/ts3server.service
Copia y pega lo siguiente.
Description=Teamspeak Service
Wants=network.target
WorkingDirectory=/home/teamspeak
User=teamspeak
ExecStart=/home/teamspeak/ts3server_minimal_runscript.sh
ExecStop=/home/teamspeak/ts3server_startscript.sh stop
ExecReload=/home/teamspeak/ts3server_startscript.sh restart
Restart=always
RestartSec=15
WantedBy=multi-user.target
Guarda el archivo y cierra el editor. Recargamos systemd, e iniciamos y habilitamos el servicio.
systemctl daemon-reload
systemctl start ts3server
systemctl enable ts3server
Imagen de ejemplo.

Habilitar el servicio
Para saber que todo funciona correctamente, verificamos el servicio.
systemctl status ts3server
Ejemplo...
root@SoloLinux-demo:~# systemctl status ts3server
● ts3server.service - Teamspeak Service
Loaded: loaded (/lib/systemd/system/ts3server.service; enabled; vendor preset: enabled)
Active: active (running) since Fri 2021-07-02 08:13:26 UTC; 5min ago
Main PID: 440 (ts3server)
Tasks: 21 (limit: 19660)
Memory: 24.5M
CGroup: /system.slice/ts3server.service
└─440 ./ts3server
Jul 02 08:13:27 SoloLinux-demo ts3server_minimal_runscript.sh: serveradmin rights for your virtualserver. please
Jul 02 08:13:27 SoloLinux-demo ts3server_minimal_runscript.sh: also check the doc/privilegekey_guide.txt for details.
Jul 02 08:13:27 SoloLinux-demo ts3server_minimal_runscript.sh: token=PfJ5VvctpE5fZ6lD3OVadnKlCqLOm0KAGHP86+M0
También puedes verificar los puertos utilizados por la herramienta.
ss -antpl | grep ts3server
Imagen de ejemplo.
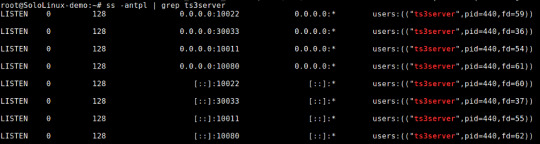
Puertos de TeamSpeak
Debes crear una contraseña para el admin de TeamSpeak, así que sigue los pasos indicados a continuación.
systemctl stop ts3server
su - teamspeak
Ejecuta este script, sin olvidar la contraseña deseada al final del comando.
./ts3server_startscript.sh start serveradmin_password=MiContraseña
Detenemos el script y salimos del usuario.
./ts3server_startscript.sh stop
exit
Iniciamos el servicio de nuevo.
systemctl start ts3server
Ejemplo de la secuencia de comandos.
root@SoloLinux-demo:~# systemctl stop ts3server
root@SoloLinux-demo:~# su - teamspeak
teamspeak@SoloLinux-demo:~$ ./ts3server_startscript.sh start serveradmin_password=123456789
Read the full article
#Apache#InstalarTeamSpeak#juegosonline#serveradmin#serviciosystemd#servidordedicado#servidorHTTP#servidorlocal#servidorTeamSpeak#systemd#TeamSpeak#TeamSpeakServer#TeamSpeakServerenUbuntu20.04#ts3wi#Ubuntu20.04#usuarioteamspeak#voip#vps
0 notes
Photo

Productive (8th Day)
I was taught by Sir James Andrew D. Atos how to reformat HASEE and ASUS office laptops. It requires the use of a bootable hard drive. Drivers were installed as well as other applications needed.

Another accomplished task was the installation of softwares (MS Office, SocPen, Abode Reader) at Community Based Services Unit (CBSU) , Conference Room , Human Resource Management and Development Division (HRMDD).

In the afternoon, Sir Carmelo discussed about Server Administrator. Topics talked about were about common administration tasks, problems encountered as a server administrator. He also discussed about Domain Name System (DNS), Dynamic Host Configuration Protocol (DHCP), and Active Directory. He contrasted Domain Administrator Accounts and Local Accounts and its significance in the establishment of password. He also mentioned about Network management protocol – Windows Registry Editor (regedit), System Utility - System Configuration (msconfig), Configuration manager - Group Policy Editor (gpedit.msc) and Run command for user accounts and groups using lusrmgr.msc.
0 notes
Text
Website Content Management System (CMS) Support: Empowering Your Online Presence
Creating and managing a website can be a daunting task, especially for those without technical expertise. However, with the advent of Content Management Systems (CMS), the process has become significantly more accessible and efficient. CMS platforms provide users with a user-friendly interface that allows them to build, edit, and maintain their websites without any coding knowledge.

One crucial aspect of CMS platforms that contributes to their popularity is the extensive support they offer. CMS support services play a vital role in ensuring a smooth and seamless experience for website owners, enabling them to maximize the potential of their online presence. Let’s delve into the various ways CMS support empowers website owners:
1. Technical Assistance and Troubleshooting
Technology can be unpredictable, and even the most robust CMS platforms may encounter occasional issues. Whether it’s a plugin conflict, server error, or theme compatibility problem, CMS support teams are there to help resolve technical challenges. They possess the expertise to diagnose and troubleshoot issues promptly, saving website owners valuable time and effort.
2. Platform Updates and Security Patches
CMS platforms continually evolve to provide enhanced features, improved performance, and increased security. However, keeping up with updates can be overwhelming for website owners focused on their core business. CMS support services ensure that the platform is regularly updated with the latest versions, security patches, and bug fixes. This proactive approach minimizes vulnerabilities and protects websites from potential cyber threats.
3. Customization and Design Guidance
A visually appealing and user-friendly website is crucial for attracting and retaining visitors. CMS support teams can assist website owners in customizing their websites, suggesting suitable themes, layouts, and designs that align with their brand identity and objectives. They provide valuable guidance on optimizing website performance and enhancing the user experience, resulting in a polished and professional online presence.
4. Training and Documentation
Many CMS platforms offer extensive functionality, and understanding all their features can be overwhelming for beginners. CMS support services provide comprehensive training and documentation resources to help website owners navigate the platform with ease. They offer tutorials, video guides, and documentation that empower users to make the most of the CMS’s capabilities, enabling them to manage their websites efficiently.
5. Scalability and Future Growth
As your online presence expands, your website requirements may change. CMS support teams are well-equipped to handle scalability challenges, ensuring that your website can accommodate increased traffic, functionality, and content. They assist in optimizing website performance, implementing caching mechanisms, and exploring plugins and modules that can enhance scalability. With CMS support, your website can grow alongside your business, adapting to your evolving needs.
In conclusion, CMS support services are indispensable for website owners seeking to establish and maintain a successful online presence. From technical assistance to design guidance and scalability support, CMS support teams empower website owners to focus on their core business while ensuring that their websites operate seamlessly. With CMS support, you can unleash the full potential of your website and connect with your target audience effectively.

source
#WebManagement#ServerHosting#WebsiteMaintenance#TechSupport#CloudHosting#DataCenter#ServerManagement#WebHosting#ITInfrastructure#WebsiteSecurity#ServerAdmin#HostingSolutions#WebsitePerformance#ServerMonitoring#WebDevelopment#CloudComputing#NetworkSecurity#DomainRegistration#BackupandRecovery#Cybersecurity
21 notes
·
View notes
Text
Prometheus Installation: Komplettanleitung für Linux Ubuntu 22.04 und Debian 11
In diesem Tutorial installieren wir Prometheus auf einen Linux-Server mit Ubuntu 22.04 oder alternativ Debian 11. Prometheus ist eine Open-Source-Monitoring- und Alarmierungsplattform für die Überwachung von Microservices und Linux-basierten Hostsystemen. Prometheus verwendet für die...[Weiterlesen]
0 notes
Text
::Shockwave, you read? Rodimus told me you had Kaon. Is he hurt bad? I can get supplies and meet you at Swerve's.::
@serveradmin-shockwave
8 notes
·
View notes
Text
Running django and flask on same apache server
I am trying to run to run django and flask on the same apache server.
WSGISocketPrefix /var/www/wsgi<VirtualHost *:80> ServerAdmin [email protected] ServerName domain.com ServerAlias www.domain.com DocumentRoot /var/www/ LogLevel warn WSGIDaemonProcess apache processes=2 maximum-requests=500 threads=1 WSGIProcessGroup apache Alias /media /var/www/media/ WSGIScriptAlias / /var/www/djangoapps/django.wsgi WSGIScriptAlias /app1 /var/www/flaskapps/app.wsgi</VirtualHost>
The first WSGIScriptAlias runs a django app in the root: domain.com.
The second instance of WSGIScriptAlias needs to run a flask app in a subdomain: app1.
But since the main site sits over django, when I try to hit: domain.com/app1, django's urls.py tries to handle that url command. But urls.py should not handle it, since its an independent flask app.
Any ideas how can I go about it?
https://codehunter.cc/a/flask/running-django-and-flask-on-same-apache-server
0 notes
Text
In this guide, I’ll show you how to deploy Grafana behind Nginx and Apache web server to proxy all access requests. This configuration assumes you have a ready Grafana installation, refer to our guide on how to Install Grafana:
Install Grafana on Ubuntu | Debian
Install Grafana on CentOS Linux
Once you have Grafana install Nginx Web Server.
### Install Nginx on Ubuntu | Debian ###
$ sudo apt update
$ sudo apt install nginx
### Istall Nginx on CentOS ###
$ sudo yum -y install epel-release
$ sudo yum -y install nginx
Start and enable nginx service:
sudo systemctl enable nginx
sudo systemctl start nginx
Grafana behind Nginx
If you are using Nginx as your web server, the configuration will differ from one for Apache. Create nginx configuration file with content like below.
server {
listen 80;
root /usr/share/nginx/www;
index index.html index.htm;
location /
proxy_pass http://localhost:3000;
proxy_set_header Host $host;
proxy_set_header X-Real-IP $remote_addr;
proxy_set_header X-Forwarded-For $proxy_add_x_forwarded_for;
If you have ssl enabled, add:
listen 443 ssl;
ssl_certificate /certpath
ssl_certificate_key /certkeypath
Confirm configuration syntax and restart nginx:
$ sudo nginx -t
nginx: the configuration file /etc/nginx/nginx.conf syntax is ok
nginx: configuration file /etc/nginx/nginx.conf test is successful
$ sudo systemctl restart nginx
Grafana behind Apache
In case you are running an Apache web server, you can add a VirtualHost with a configuration similar to below:
DocumentRoot /var/www/html/
ServerAdmin [email protected]
ServerName grafana.domain.com
ProxyPreserveHost On
ProxyPass / http://localhost:3000/
ProxyPassReverse / http://localhost:3000/
ErrorLog logs/grafana_error_log
TransferLog logs/grafana_access_log
Confirm that configuration is fine and restart apache server:
$ sudo apachectl -t
Syntax OK
Check other articles on Grafana:
Monitor Apache Kafka with Prometheus and Grafana
How To Monitor Etcd Cluster with Prometheus and Grafana
How to Monitor Linux Server with Netdata and Grafana
0 notes
Note
"I will talk about it if prompted" well then, more info about eret and their outfits? 👀
okay. so. this is not actually about any outfits in particular but rather clothing as a symbolism for control. i'm gonna point out a couple passages from to me, i say and talk about what they represent
He'd challenged Ranboo to a duel, like a dumbass, because he'd been high on adrenaline and fear and he'd kept looking up to see Eret, beautiful and terrifying in their highest platforms and most formal wear, looking less like a king and more like the ServerAdmin that they truly are.
doomsday is. well. doomsday. half of control is appearances. eret dresses formally and wears platforms (and unmentioned but her hair is ornately braided) for her greatest act of violence so that she appears just as powerful as her actions make her out to be. most of the people there are her enemies. she cannot let her guard down, and the stiff formality and controlled expression is her guard.
even eretsmp!eret's daily wear is formal. she's often wearing heels or platforms and towers over everyone else. she is the ServerAdmin. she is in control.
but. around someone she trusts? around foolish?
their crown and sunglasses are sitting in the sand beside them, their typical platforms exchanged for a worn pair of sneakers, their shirt untucked.
the crown is quite possibly the biggest symbol of control. when eret is wearing it, she is thinking about the Server as a whole, about what is best for it, about what actions she has to take to protect the whole. and, well, before doomsday,
"i'm doing the right thing." eret tells themself, crown on their head, tnt in their hand.
in conclusion: the more formal they look, the less they trust you. nobody except foolish knows eret owns sneakers.
#i might be incoherent i just. clothing and hair as symbolisms for control go brrr#> eretsmp au <#> asks <
2 notes
·
View notes
Last Seen Blogs

ondk
NEONE

manandbag
Man And Bag

teyanataylorgang
Teyana Taylor

lordmo
BLOOD AND THUNDER, SKITTLES AND BEER

ask-bucko
Cats Rule Squirrels Drool