#Top 10 Best Food Processors September 8
Photo

Just Pinned to Top 10 Best Food Processors: Bowl scraper attachment: Special attachment scrapes the sides of the bowl to keep ingredients close to the blades for more even results and to save you time when chopping or pureeing — no need to stop and remove the lid to use a spatula 10 cup capacity: The generous 10 cup bowl can handle large volumes of foods without having to stop to empty it Large feed chute: Can fit large foods like a whole block of cheese for quick, easy processing and less prep time https://ift.tt/2Zfkbzv
0 notes
Text
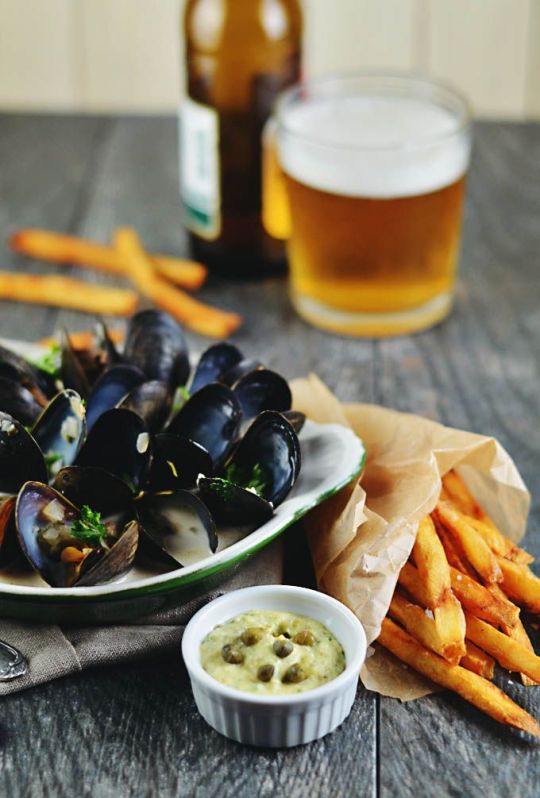
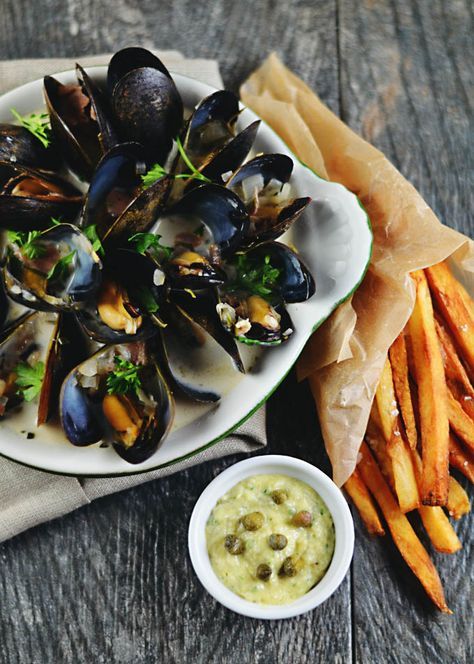
Beer-Braised Mussels And Belgian Fries With Sauce Gribiche
Belgium’s coastline stretches along the North Sea, known for some of the world’s finest seafood—including mussels. Moules frites—plump, briny mussels accompanied by crispy twice-fried potatoes, is the closest thing to the country’s national dish. To round out our tour of Belgium, I’m cooking up my version: Beer-Braised Mussels and Fries with Sauce Gribiche.
Mussels are a favorite in Belgium, and for good reason. They’re inexpensive, easy to cook and widely available when in season, from September through March. You can find them in the humblest family-owned seafood shack, where the use of cutlery is optional, to the white-table-clothed, Michelin-starred restaurants of Brussels.

My First Time
I first tried mussels on a family vacation in Montreal. With great gusto, my mother suggested that we order moules frites to share as an appetizer. The mussels came only in one size—a kilo. As Americans, we didn’t have a firm grasp of the metric system, and didn’t realize quite what we were in for—2.2 pounds of mussels.
A large bucket arrived at our table, overflowing with the bizarre bivalves, and we were stunned. I was brave enough to go first, and gingerly plucked a shell from the bowl. I scooped up a shellful of broth, loosened the meat of the mussel with my fork and plopped the whole thing into my mouth. It tasted okay, but I wasn’t sure about the texture. My mom tried one, and definitely wasn’t impressed. We looked at each other in dismay and ate a few more mussels each before giving up. We finished the frites with no problem, of course. To this day, my mother will never touch mussels again. I, on the other hand, have grown to love them, and will usually order them whenever they’re on the menu.
The most widely available mussels in the United States—even in landlocked Nebraska—are blue mussels from Prince Edward Island, Canada. P.E.I. mussels are easy to find, economical and consistently plump and flavorful. Another favorite are sweet and tender New Zealand green-lipped mussels.
Beer-Braised Mussels with Pommes Frites and Sauce Gribache requires a few steps and is best reserved for a weekend. But the payoff of salty, perfectly crisp fries paired with sweet, briny mussels and a tangy, creamy dipping sauce is oh-so-worth the effort.
Preparing the Pommes Frites
This dish requires some special equipment for frying, either a large, heavy-bottom pot or dutch oven and a deep-frying or candy thermometer, or a deeper fryer. The first step is preparing the Belgian-style fries, or pommes frites. A starchy potato, such as the Russet, works best. Wash and peel your potatoes and cut them into even matchsticks. I used a Williams Sonoma’ Multi-Chopper for the task and slammed my finger at least once in the process. A sharp knife and a little patience will also do the trick, but the key is to cut the potatoes as evenly as possible. Rinse the cut potatoes with cold water until it runs clear, and then place in a bowl, cover with water and ice and allow to sit for at least 30 minutes, up to two days.
The First Fry
Belgian fries undergo a two-fry process. The first fry cooks the inside of the potato and can be done up to two hours ahead. The second fry gives the potatoes their irresistible golden color and crispy texture.
For the first fry, heat oil in a large Dutch oven to 325 degrees. Remove the potato pieces from the ice water and pat dry. Fry in batches until potatoes are soft, limp and just starting to turn a pale blond color, about 6 to 8 minutes. Drain the blanched fries on paper towels. Return the oil to 325 degrees and continue to fry in batches, until all potato pieces are blanched. Cover the fries with paper towels and allow to rest at least 10 minutes, up to two hours. Do not discard the vegetable oil; you’ll use it again for the second fry. Next, on to the mussels.
Buying Fresh Mussels
The most important thing about buying mussels is to ensure they’re alive and as fresh as possible. I recommend buying a minimum of one pound of mussels per person. Live mussels will keep their shells tightly closed. If any are open, gently tap them on a firm surface. If the shells close, the mussel is alive; if it remains open, discard it. If you return from the store with your mussels on ice, place them in a colander over a plate and refrigerate. If left in melting ice, the mussels can drown.
Sauce Gribiche is a creamy, tangy and rich French sauce—a perfect foil to hot and salty pommes frites. Make the sauce up to a day ahead by putting mayonnaise, chopped pickles, dijon mustard, hardboiled eggs, capers and fresh herbs in a food processor and blending until smooth. A pinch of salt and pepper will balance the tanginess and acidity.
Final Fry and Braising the Mussels
Getting perfectly crispy fries and plump, tender mussels requires a bit of kitchen choreography. A little bravery doesn’t hurt either. First, preheat your oven to 250 degrees so you’ll have a nice warm place to park the fries as they come out of the fryer.
Next, assemble your mise-en-place to avoid an emotional meltdown once the cooking begins. Chop shallots, garlic and bacon and carefully measure the beer, broth, cream and butter for the mussels. Have a few springs of rosemary and thyme standing by. Set a large stock pot on the stove for your mussels. Prepare your dutch oven or deep fryer for the pommes frites’ second fry, reheating the oil back to 325 degrees.
Wait until just before cooking to clean your mussels. Rinse the mussels under cold running water and clean with a repurposed toothbrush or small kitchen brush to remove dirt or debris. Using a knife or a firm grip, gently remove the beard of the mussel.
If you have a sous chef or willing partner, now’s the time to employ his or her help. It’s easiest for one person to fry the potatoes while the other tends to the mussels. In batches, fry the blanched potato pieces a second time until golden brown and crispy, about 3-5 minutes. Remove from the oil, transfer to a paper-towel lined baking tray and season immediately with sea salt. Place in the oven to keep warm. Heat the oil back to 325 degrees and continue frying in batches, until all potato pieces are fried.
To make the mussels, sauté the bacon in olive oil until crispy. Remove from the pan and gently sauté the shallots and garlic for a few minutes, until translucent. Add the beer and broth, and bring to a boil. Top with the mussels and fresh herbs, and then cover and cook. Shake the pot vigorously every two minutes, until mussels are hot and open, about 7 to 8 minutes. Remove mussels from the pan into a serving bowl. Discard any that do not open. Then, return the pot to the stove, lower the heat and whisk in the cream and butter. Season to taste and pour the unctuous-beer-laden sauce over the mussels. Garnish with a shower of chopped chives or parsley.
youtube
Serve the Beer-Braised Mussels and Fries immediately with the Sauce Gribiche and a freshly cracked Belgian beer. After the salt and fat send a rush of dopamine to your cooking-addled brain and your nerves settle, you’ll discover that there’s nothing better than freshly fried pommes frites and succulent beer-braised mussels. Those Belgians definitely know a thing or two.
1 note
·
View note
Text
The Best Phones for Xbox Game Pass and xCloud (for Every Budget)
August 10, 2020 4:12 PM EST
With iPhones blocking Project xCloud from the App Store, what are the best phones in 2020 to take advantage of Xbox Game Pass Ultimate?
Xbox Game Pass Ultimate with its xCloud game streaming will not be heading to the iOS app store, leaving many iPhone-carrying Xbox players out in the cold. According to Statista, in the US alone, over 45% of smartphone owners are using an iteration of Apple’s iPhone. At almost 50% market share, chances are that just about half of Xbox owners are likely using Apple’s best selling product. This means that a good portion of people picking up Xbox Series X, will not get to enjoy what’s slated to be a tent-pole service for Xbox and their larger strategy moving forward as a company.
This latest spat between the Microsoft Xbox and Apple App Store policy is leaving Xbox players (who use iPhones) in a precarious position. Do they stay in Apple’s blue iMessage bubble? Or do they venture out to green(er?) Android pastures and enjoy Xbox Game Pass Ultimate streaming when it launches this fall?
If you’re currently an iPhone user who’s thinking of making the switch to Android, we’re setting you up with what we think are the very best Android phones for Xbox Game Pass Ultimate regardless of your budget.
youtube
1. Samsung Galaxy Note 20 Ultra 5G || Starting at $1,299.99
Xbox Game Pass Ultimate’s cloud gaming had its official coming-out party during Samsung’s Unpacked alongside the Note 20 Ultra 5G debut. This marketing move made it the default “go-to” device to usher in the new service. For those unfamiliar, Samsung’s Galaxy Note line is the tech giant’s yearly “everything but the kitchen sink” device. With an annual fall release cadence, Samsung’s Note line historically enhances or iterates on most features from it’s “little brother” the ‘Galaxy S’ while tossing in the largest displays, fastest processors available, largest batteries (usually), and even a stylus (because, why not?).
This year, the Galaxy Note 20 Ultra 5G features the Snapdragon 865+ processor, 12gb of ram, 128gb of storage (which is also expandable), both sub-6 and millimeter-wave 5G radios for all US carriers, a 4,500 mAh battery, and a 6.9″ AMOLED 2X display that supports dynamic 120hz refresh rates. It definitely leads the pack with its audacious price tag, but if we’re being honest, you’re probably not finding another Android phone that checks as many boxes as the Note 20 Ultra 5g.
2. Samsung Galaxy S 20 || Starting at $999.99

The Galaxy S line is Samsung’s annual iPhone competitor. Like the iPhone, Samsung’s Galaxy S is made in various sizes, configurations, and price points in hopes of its phones finding a home in as many pockets as possible. This year’s phone, the ‘S 20’ made a gamble on 5G by placing Qualcomm’s pricier 5G radios in its entire line up. This move drove up the price of its entry model significantly. This price jump brought it up to a thousand bucks or right in line with Apple’s ‘Pro’ offering, and a whole $300 more than 2020’s best selling phone (globally) the iPhone 11.
Like it’s Note 20 big brother, the S 20 is no slouch on paper. It features a Snapdragon 865 processor, 12gb of ram, 128gb of storage, sub-6 5G, a 4,000 mAh battery, and a 6.2″ AMOLED display with support of 120hz at 1080p. Also, like the Note, it’s price tag will have most thinking twice before purchasing; however, with the device approaching the 6th-month mark since release, you can (usually) find reasonable offers and discounts from the various US carriers, especially if you’re switching.
3. OnePlus 8 5G || Starting at $699.99

OnePlus made a name for itself among Android enthusiasts who were looking for a no-frills and no-compromise experience, without having to shell out half of a mortgage payment to get one. In its early days, OnePlus was among the first OEMs to sell phones with AMOLED displays, coupled with the latest processors, running a bloatware-free version of Android, and keeping all of that below $400. Going the route of becoming the value smartphone champion created an army of raving OnePlus fans and Android faithfuls.
While the company has shown no signs of slowing down, sometimes going as far as releasing 2 flagship devices per year, its prices have almost caught up to the Apples and Samsungs of the world. Again, they’re still the value player here. But unfortunately ‘value’ in the world of smartphones now floats around a little over half a grand. For that much green, what do you get? The OnePlus 8 5G features a Snapdragon 865 processor, 8gb of ram, sub-6 5G, a 4,300 mAh battery, and a 6.5″ AMOLED display with a 120hz refresh rate. You might have just experienced some déjà vu, reading about the S20 before this phone and that’s a good thing considering the savings between the two.
4. Google Pixel 4a || Starting at $349.99

Android needed it’s own iPhone SE and Google delivered it with the Pixel 4a. Let’s be crystal clear here: like the SE, this phone is not going to win any arms race. But what it lacks in horsepower, it will deliver in overall user experience. And that’s not just for this year and next — like most Android phones — but it’s a 3rd (and maybe/hopefully even a 4th) year as Google treats all of its Pixel phones to a minimum of 36 months of software support and updates. It’s an unheard-of feat in the Android ecosystem that can make purchasers of even the most high-end Samsung phones jealous.
If you plan on using your phone for real-life things like photos of your pets and your food, then you should know that you’re also getting Google’s (arguably) unmatched camera with all of the computational photography software tricks found in high-end Pixel phones. At $349 this phone might be a better buy than a dedicated point and shoot camera, that’s how confident I am with Google’s top-notch photography software. Luckily, Xbox Game Pass Ultimate’s magic mostly happens in the cloud, so while the Pixel 4a will not be the snappiest of the bunch on this list, it will still get the job done. So what’s under the hood? The Pixel 4a features a Snapdragon 730 processor (sorry, no 5G here folks), 6gb of ram, 128gb of storage, and a 5.8″ display. Oh right, and again, it’s only $349.
There are many more Android phones to choose from but the list above is comprised of what we think are the very best phones at their given price points. If you’re already an Android user, you probably already had your mindset on your next phone before you clicked through to see our list. If you’re an iPhone user who was looking forward to Xbox Game Pass Ultimate’s game streaming you have another important decision to make before you even entertain this list of phones mentioned here.
Here’s what it all boils down to: are you ready to venture away from iMessage, Facetime, (and maybe even the Apple watch you’re presently wearing) to enjoy some video games on the go? While to most — a phone, is a phone, is a phone — to others, there’s serious ‘green bubble’ shaming out there in the world and the FOMO of not having those Apple iPhone-only services like iMessage and Facetime can (unfortunately) be another burden altogether.
Project xCloud is officially being unveiled on September 15th, and anyone with Xbox Game Pass Ultimate will have a front-row seat. If you haven’t picked up a subscription already, you can grab it on Amazon to help support DualShockers.
August 10, 2020 4:12 PM EST
from EnterGamingXP https://entergamingxp.com/2020/08/the-best-phones-for-xbox-game-pass-and-xcloud-for-every-budget/?utm_source=rss&utm_medium=rss&utm_campaign=the-best-phones-for-xbox-game-pass-and-xcloud-for-every-budget
0 notes
Text
Oreo Dirt Layer Cake
September 10, 2018
Layers of rich chocolate cake, chocolate pudding, crushed oreo cookies and chocolate whipped cream make up this extraordinary dirt cake!
There was never any doubt in my mind what kind of cake I was going to make my three year-old boy for his birthday last month. He is all about cars, trucks, tractors, and anything that goes, and I knew I wanted to incorporate them into the celebration somehow. Then one day while watching him dig with his tractors in the dirt in the backyard, the idea for this cake came to me.
Of course, a dirt cake!
I baked up layers of my favorite chocolate cake and my boys helped crush up the oreos. For the filling I decided to keep it simple and use a boxed instant pudding mix, but I’ve included instructions for a homemade pudding if that more your style. I frosted the whole thing with chocolate whipped cream and decorated it with crushed oreos, chocolate rocks, and mini tractors. And my big three year-old loved it!
What is a dirt cake?
A “dirt cake” is a dessert made of crushed chocolate sandwich cookies, chocolate pudding, and usually something creamy like whipped cream or cool whip. The crushed cookies create a topping that looks like dirt! It can take many forms, like a layered trifle, individual cup servings, or a sheet cake.
Turn it into a tractor excavation site!
You of course can serve this delicious cake is it is, without any additional decorations or toppings. But if you’d like to recreate this look, here’s what you’ll need, plus a few tips(some affiliate links below).
Mini tractors— I found a set at Target, but you can also find them online. Make sure they are clean if you’re not using brand new!
Chocolate rocks— Many grocery stores sell them, look for them in the bulk or specialty candy sections. Or you can also find them online.
Get creative with other edible and non-edible decorations!
Arrange crushed cookies in a mound on top of the cake and around the base of the cake. Decorate with chocolate rocks, tractors, etc. as desired.
Shop tools for this recipe
get the recipe
Yield: 8 or 9-inch layer cake
Prep Time: 30 minutes
Cook Time: 30 minutes
Total Time: 2 hours (includes chill time)
Layers of rich chocolate cake, chocolate pudding, crushed oreo cookies and chocolate whipped cream make up this extraordinary dirt cake!

Ingredients:
Chocolate Cake:
1 1/4 cup (295 ml) hot coffee or water
1 cup (110 grams) unsweetened cocoa powder
2 1/2 cup (330 grams) all-purpose flour
1 1/4 teaspoon (5 grams) salt
2 1/2 teaspoon (11 grams) baking soda
2 cups (400 grams) sugar
3 large eggs
1 1/4 cups (282 grams) sour cream
1 cup + 2 tablespoons (267 milliliters) vegetable oil
Chocolate pudding filling:
3.5 oz package instant chocolate pudding, plus ingredients listed on box
OR
1 3/4 cup (415 ml) whole milk
1/3 cup (65 grams) granulated sugar
1/4 cup (20 grams) unsweetened cocoa powder
3 tablespoons (20 grams) cornstarch
Pinch of salt
2 large egg yolks
1 teaspoon vanilla extract
Oreo "dirt":
1 regular package (14 oz package or similar) chocolate sandwich cookies, like Oreos
Chocolate whipped cream:
1 cup (250 ml) heavy whipping cream
1/2 cup chocolate pudding (from above)
Directions:
To make the cake:
To make the cake, preheat oven to 350 degrees F. Butter and flour 2 8-inch or 9-inch cake pans (see Notes) and line bottoms with parchment paper. See my full tutorial on how to prep cake pans.
In a bowl, whisk together the coffee and cocoa powder until no lumps remain. Set aside. In another bowl, sift together the flour, salt, and baking soda.
In a large bowl, beat the sugar and eggs together until smooth and pale yellow in color. Stir in the sour cream, followed by the vegetable oil. Add the flour mixture all at once and stir until combined. Stir in the cocoa mixture and mix until smooth.
Divide the batter evenly between the prepared cake pans and bake until a toothpick inserted into the center comes out clean, about 25-35 minutes. Let cool in the pan for 10 minutes, then remove and place on a wire rack to cool completely.
For best results, completely chill cake layers before assembly.
To make the pudding:
If using instant pudding, follow instructions on box.
OR if making homemade pudding, in a medium saucepan over medium low heat, combine the milk, sugar, cocoa, cornstarch and sugar, and stir until smooth. Heat mixture until it just begins to steam.
In a medium bowl, whisk together the egg yolks. Slowly add the milk mixture to the egg yolks in a small stream while whisking constantly. When fully combined, pour back into the saucepan.
Place over medium heat and cook until thickened, about 4-5 minutes, while stirring constantly. Remove from heat and add vanilla extract. Chill in the fridge for at least 1 hour.
To make oreo dirt:
Use food processor to crush whole sandwich cookies into crumbs (do not remove filling). You can also place cookies in a ziplock bag and crush with a rolling pin.
To make chocolate whipped cream:
With an electric mixer, beat whipping cream to stiff peaks.
Fold in 1/3 to 1/2 cup of the chocolate pudding, until desired color, flavor, and consistency is reached.
To assemble cake:
Place one cake layer on a cake stand or plate. Cover with approximately 1/2 cup chocolate pudding. Sprinkle with some oreo dirt.
Repeat with remaining layers.
Carefully frost cake with chocolate whipped cream.
Decorate cake tops and sides with remaining oreo dirt, or as desired.
Chill for at least 1 hour before serving. Cake can be assembled up to 24 hours in advance and stored in the fridge.
Notes:
I like to use Hershey's instant chocolate pudding.
Can use Cool Whip in place of whipped cream if desired.
This cake can be baked in either 8 or 9-inch round pans. 8-inch will be taller, 9-inch will be wider and shorter. You can use 2 or 3 pans, depending on the look you’re going for: double layer (2 pans), triple layer (3 pans), or quadruple layer (2 pans, then slice each layer in half). Baking times will vary slightly. These are the pans I use.
stay connectedGet New Recipes via Email:

Source: https://www.completelydelicious.com/oreo-dirt-layer-cake/
0 notes
Text
On days like these
“On days like these when skies are blue and fields are green” it’s hard to imagine that we were ever in winter or in early Spring. That there were ever days when the trees were bare, the vineyards grey and empty. The cherries in our garden have come and gone, the strawberries are retreating, the peonies struggling with the heat. White asparagus is becoming a distant memory and the broad beans are starting to wilt. Right now I’m drinking an iced, herbal tea – a real summer drink. Our tomatoes are just around the corner, as are the plums and peaches. Does life really go this fast? Did spring really happen?
I guess it did because I have photographic evidence. Many weeks ago, just when we were getting very tired of winter, I planned a little spring blogpost. To celebrate early spring and all it brings. The cherry blossoms were at their best and I was playing with a few little recipes I wanted to share. A lot of our energy has been devoted to other things lately, workshop season, developing our new website, travelling. But here it is finally, a little souvenir of spring, of cherry blossoms before they were fruits, of branches before they were green. And two recipes that don’t really rely on seasonal ingredients so they can be made any time of the year. Two crumbles of very different origins.
The opening lines of this blog post are borrowed from the song “On days like these” which features during the opening credits of the film “The Italian job”(written by none other than Quincy Jones). It’s played a big part in our lives recently as my husband loves it (too much). Recently he drove to Holland to pick up our brand new Bracco Italiano puppy and according to him he listened to the song on repeat the whole way up and down Europe. Which probably means close to a thousand times. From an Ipod without headphones or speakers (which probably mean he didn’t really hear it very well – that Land Rover is loud). I’m very glad I wasn’t on that trip but how glad am I that we got that dog. So beautiful and heartwarming. We let him sleep in our bed the other night which is the first time that has ever happened. You’ll see a lot of Monte Cristo in the future.
RUE LOUDENNE
I have been talking a lot about our new online magazine over the past year, made a few announcements that haven’t really come true. But now we’re ready. Within very few weeks we’ll be up and running. First a soft opening over the summer and then in full force from September onwards. This is not a hoax 🙂 You can find us at www.rueloudenne.com The title is borrowed from our address, a simplified version.
We think of our house as a home and haven for our family but it’s also very much a house of food. A place where food, good produce & cooking is of the highest importance. I have been thinking about it for a while now, because people sometimes ask me, what is my message, what am I trying to do, to achieve? Of course I’m very fond of France, proud of it’s culinary traditions and happy to live here. I’m thrilled if people come to our beautiful region because they’ve found out about it through me. I love it when people like my recipes, find my books useful or entertaining. But none of that is really my message.
The one point I would most like to get across is this. Cook real food, then sit down with your family and eat it. Simple as that. Of course it’s fun to get a little elaborate or go to lenghts sourcing the finest produce, even growing it yourself. But cooking doesn’t need to fancy or expensive to serve its purpose. A thoughtful, simple meal, enjoyed with your kids at the end of the day has never been more necessary or more in danger. The family meal needs a home. Rue Loudenne will do its best. But ours is not a preaching site, there are no taboos, no food snobbery, no exclusivity. It’s a “house” of food which is open to everyone who likes to eat and cook.
Rue Loudenne will have entries 2-3 times a week, not just from me but from my friends, from my husband and from all sorts of people I admire and like. We will broaden our horizons, travel a bit. Recipes will be more accessible and better filed (so you can find all recipes for artichokes when they are in season etc). We’ll have current information about our events and activities, such as workshops, our future farmers market, pop-ups and special events we are planning. We’ll have an online shop, we’ll produce more things to sell ourselves. There will be a wine corner, a dog corner. Maybe even a cocktails corner.
Mostly we’ll be there regularly and it will all be delicious.
As for my beloved Manger it will not cease to exist but it will take on a less prominent role. We won’t change a thing but posts will be less frequent (ehrm if that’s possible). My idea is to do 4 posts a year, to celebrate each season. I have always adored writing and cooking for Manger but while our format has proven popular and successful it also comes with restraints. There are times when I simply want to share a lunch I just made, a story I heard.
Manger has brought us together and given me so many opportunities. Without her (of course she’s a girl) I wouldn’t have done any of the things I’ve done, no cookbooks, no rue Loudenne, no tv show.
She will forever be honorary chair lady of the food board – queen of my kitchen.
Merci my friend …
ps Very soon we’ll be announcing the workshop dates for 2018. As always we’ll shake things up a little bit, try new things. I hope you will like what we’re offering.
The girls dresses are from Marie Puce Paris.
Leeks with hazelnuts and goat’s cheese crumble
25 g/ 5 ounces hazelnuts, ground coarsely
6 medium-sized leeks, washed and trimmed
2 garlic cloves, sliced finely
1 tablespoon salted-butter
1/2 glass glass of white wine
1/2 glass chicken or vegetable stock
230 g/ 8 ounces goat cheese (choose a firmer one, in the style of a brie)
Two shallots, sliced fried until golden and crispy
Olive oil
A handful of salad (I used shiso salad)
Coarse sea-salt and freshly ground black pepper
Trim the dark green tops of the leeks and the roots and remove the outer layer from each one. Rinse under cold water. In a large pot, heat the olive oil and butter over medium heat. Add the garlic and cook for a minute or two. Add the leeks, season with salt and pepper, and cook for 5 minutes. Pour in the stock, then the wine and simmer to reduce, about 2-3 minutes. Lower the heat, cover and cook until the leeks are tender, about 10 minutes.
In another pan, sauté the shallots in olive oil until golden and crispy. Set aside.
Make the crumble:
In a food processor, combine the hazelnuts and goat’s cheese, add a tablespoon of olive oil, salt and pepper. Pulse a few seconds until you get a crumble.
In a small bowl,make the vinaigrette. Whisk together the olive oil, mustard and vinegar. Season with salt and pepper.
Place the leeks in an oven-proof dish, and place the crumble on top. Place under the grill for a few minutes until golden. Pour the leek stock into a deep plate or bowl, transfer the golden leeks with the crumble, into the bowl, and scatter the salad (optional) and shallots all over. Drizzle with the vinaigrette and serve immediately.
Cod with gratinée chorizo
(for 6 people)
6 cod fillets
230 g/ 8 ounces chorizo
45 g/ 1/2 cup tablespoons grated Parmesan cheese
45 g/ 3/4 cup tablespoons of breadcrumbs
15 g/ unsalted butter
Olive oil
Piment d’Espelette
Coarse sea-salt and freshly ground black pepper
Preheat the oven to 400F/200°C
Fry the chorizo in a pan and cook on a medium heat until it becomes golden, about 3 to 4 minutes. Set aside.
In a food processor, combine chorizo with parmesan and breadcrumbs. Add softened butter and pulse until you get a crumbled mixture.
Place the cod filets on a baking dish, generously smooth the crumbled chorizo mixture on the cod and place the dish in the fridge for 30 minutes.
Transfer the fish in the preheated oven for 10 to 12 minutes, until the cod is cooked through and the chorizo is golden and sizzling. Sprinkle a dash of piment d’Espelette and a drizzle of olive oil.
Serve immediately.

Source: http://mimithorisson.com/2017/06/11/on-days-like-these/
0 notes
Text
the most delicious cheese & onion quiche
September in Heritage month in South Africa and the focus is all around where we come from and for me, this translates into the types of recipes I grew up with that make me remember my late mother. I wanted to make something using Cheddar and butter that immediately transported me back to my childhood and a recipe my mom would make, and cheese and onion quiche is one of those dishes. Nothing complicated, just the sweetness of butter-braised onions and the sharpness or mature Cheddar baked into a quiche, which was so very popular in the seventies.
My mom died when I was 18 so I couldn’t get her recipe nor could I find it in any of her recipe books she kept, but when I think of iconic South African cooks and heritage recipes I immediately turn to one of my many Ina Paarman cookbooks for inspiration. In her book ‘Cook with Ina Paarman’ which I have owned for as long as I can remember, she has a recipe for cheese & onion quiche and it’s exactly how I remember my mom’s version tasting. I’m not sure if she would have added cheese to her quiche pastry, but since you want to make this as cheesy as possible it is the right way to go. The pastry is, in fact, the same recipe Ina uses for her cheese straws, so whatever is left over from making the quiche (it makes a little more than the recipe requires) – bake up a few straws. I added finely chopped rosemary and thyme to give the pastry and the quiche a slight herbaceous note.
Kerrygold is an Irish butter and cheese producer that make the most delicious products using milk from cows that freely graze on all that lush green grass. It’s packed with creaminess and is of top quality like all their products which are produced in Ireland and imported to over 90 countries in the world. I am obsessed with aged Cheddar and there 24 months aged Cheddar is the one I go for. It’s also the one I used in this recipe because the cheese is such a central flavour component of this quiche, you don’t want to skimp and use anything but the best. Kerrygold products do not contain any artificial additives and only use natural ingredients “Because Taste is Everything”
I wish my mom was still around so she could see what I do now, I know she would be very proud.
Please let me know in the comments below what recipe reminds me of YOUR heritage?
Recipe – makes one 25cm quiche (slightly adapted from Ina Paarman)
Cheese Pastry
250g flour
pinch of cayenne
1 tsp salt
2 tsp chopped herbs (rosemary & thyme) – optional
1 tsp Dijon mustard
150gm Kerrygold butter
1 cup (100g) grated Kerrygold 24 month mature Cheddar
1 egg yolk
¼ cup cold water
Cheese & onion quiche filling
2 large brown onions chopped
1 Tbsp olive oil
2 Tbsp Kerrygold butter
1 – 2 cloves garlic, crushed
2 large free-range eggs
½ cup crème fraiche
½ cup milk
¼ tsp cayenne pepper
1tsp Dijon mustard
1/2 tsp salt
¼ tsp ground white or black pepper
1 cup grated 24 months mature Kerrygold Cheddar
Preheat the oven to 180C / 350 F.
You can make this by hand using a pastry cutter or in a food processor.
Sift the flour and add this to the bowl of the food processor with the salt and cayenne and give it a 3-second mix.
Add the rest of the ingredients except the water and process briefly until just blended. Add the cold water while the motor is running and until the mixture just comes together into a dough. Tip this onto a well-floured surface and knead briefly to form a ball of dough.
Roll this out to about 3mm thick and line the base of a 25cm quiche tin (this will be a little over half the dough). Allow some of the dough to hang over the sides and then trim. It will shrink back during baking. Prick the surface area of the pastry with a fork.
Blind bake the pastry case by scrunching up a piece of baking paper then placing this on top of the pastry. The scrunching makes it easier to reach into the corners. Fill the case with any dried bean, rice or pasta (or pastry beans if you have these) and then bake for 10 minutes. Remove from the oven and remove the paper and filling. Return the pan to the oven and bake for a further 5 – 8 minutes until it has crisped up and starts turning a golden brown.
While the pastry is baking blind, make your filling for the quiche.
Heat the butter and olive in a non-stick frying pan and once it starts bubbling add the onion and sauté them for about 10 minutes over a low heat and until the onions are soft but not brown. Do not caramelize them. Add the garlic and set aside
In a bowl whisk the eggs with the crème Fraiche, milk and spices.
When the pastry comes out the oven, sprinkle ¾ of the cheese across the base then spread the onion mix on top of that. Gently our over the egg mixture and finally sprinkle the remaining cheese over the quiche. Bake for 35 minutes until golden brown and firm.
*This post is proudly sponsored by Kerrygold
Find me on Instagram

Source: https://drizzleanddip.com/2018/09/04/the-most-delicious-cheese-onion-quiche/
0 notes
Photo

Just Pinned to Top 10 Best Food Processors: Frozen blending and perfect, even chopping 2 conveniently sized jars; Easy to use : Ergonomic operation with one touch pulsing creates an easy to use and safe product Anti spill splash guard, easy flip pour spout, and no slip base; 2 cup processor minces, dices, chops, blends and purees Includes: 400 watt power pod, 48 ounce Pitcher, stacked blade assembly, pitcher splash guard, 16 ounce Chopper bowl, chopping blade assembly, chopper splash guard https://ift.tt/325pzHb
0 notes
Link
WASHINGTON–(BUSINESS WIRE)–Amid the chaos of getting kids out the door in the morning and taming
the hangry monsters that get off the bus in the afternoon, parents may
be overlooking a critical part of setting their kids up for success
during the school year: a nutrient-rich diet. One out of two kids ages 9
and up are not getting enough calcium, vitamin D and potassium –
nutrients they need to grow, learn and play. And, most kids younger than
nine are falling short on vitamin D and potassium.
Milk is the top food source for calcium, vitamin D and potassium, which
is why experts, including pediatricians, recommend real dairy milk as
part of kids’ diets to ensure they have nutrients they need to be set up
for success.
“As a mom, I know the chaotic reality that going back-to-school brings,
but as a doctor, I know the most important thing I can do for my kids is
make sure they’re eating and drinking the right things each day,” said
Dr. Tanya Altmann, pediatrician, best-selling author and nationally
recognized parenting expert. “As parents, we don’t always know what our
kids are eating and drinking once we send them out the door, which makes
getting in a nutritious snack more important than ever. When my kids
come home from school tired and hungry, I pour a glass of milk with
their snack. It’s my secret weapon to helping them get nutrients they
may have otherwise missed.”
Why Experts Recommend Milk
Experts recommend that kids 4-8 should get 2½ servings of milk or milk
products each day and kids 9 and up should be getting 3 servings each
day. But by the time kids are nine, three out of four are falling short
on the recommended amount of milk and milk products. In fact, kids ages
nine and up average a little more than one 8-ounce serving of milk per
day. 1
Three of the nutrients in milk – calcium, vitamin D and potassium – are
so important for kids’ growth and development that the Dietary
Guidelines for Americans identified them as nutrients of public
health concern because many Americans, including school-aged kids, are
not consuming enough.2 Missing these important nutrients
during critical growing years could have serious long-term implications,
including a child not reaching their full height potential, an increase
in stress fractures during adolescence, and a greater chance of
osteoporosis as an adult.3, 4, 5, 6
Experts also agree that milk remains a great way for kids to get their
bone-building nutrients – even more so than non-dairy milks fortified
with calcium, which don’t have the same nutritional value as real milk.7
Only real dairy milk offers a full array of bone-building nutrients –
calcium, vitamin D, potassium, protein and phosphorus – for only about
25 cents a glass.
Substituting milk with non-dairy calcium sources like fortified soy milk
and leafy greens can lead to gaps in other key nutrients like protein,
vitamin D, phosphorus, riboflavin, potassium, magnesium, vitamin A and
vitamin B12.8
Tame the Hangry
The good news is that serving milk isn’t a food battle moms have to
fight. Kids love milk, in fact 41 percent of kids would drink more milk.
When kids come home from school, they can seem like hangry monsters,
looking for the closest snack to keep their hunger at bay. By pouring a
glass of milk alongside afternoon snacks, moms can feel good knowing
their kids are getting nutrients they need.
Back to School Confessions
To kick off the new school year, the Milk Processor Education Program
(MilkPEP) is encouraging moms to share their own back to school-related
confessions for the chance to win a school year’s supply of milk for
their family. To enter, parents can post their confessions to Instagram
or Twitter, tagging @MilkLife and using #BackToSchool and #contest in
the caption.
The contest runs from August 10 – September 30, 2018 and is open to
parents or legal guardians of grade school-aged kids who are residents
of the fifty (50) United States or the District of Columbia and are at
least 18 years or older. For full rules, visit https://milklife.com/page/milk-back-school-contest-official-rules.
For more on the nutritional reality kids today are facing and tips for
taming after-school hunger, visit PourMoreMilk.com.
About MilkPEP
MilkPEP, Washington, D.C., is funded by the nation’s milk companies, who
are committed to educating consumers about the many nutritious benefits
of milk and ensuring all children have access to fresh, wholesome milk.
The MilkPEP Board runs marketing programs, including Milk Life, a
multi-faceted campaign highlighting the important role milk plays in
helping families reach their full potential, Milk It! a campaign for
kids built around their love of milk, and Built with Chocolate Milk,
which inspires athletes to perform at their best and recover with lowfat
chocolate milk. For more information, go to milklife.com
and builtwithchocolatemilk.com.
1 National Dairy Council. NHANES 2011-2014. Data Source:
Centers for Disease Control and Prevention, National Center for Health
Statistics, National Health and Nutrition Examination Survey Data.
Hyattsville, MD: U.S. Department of Health and Human Services. http://www.cdc.gov/nchs/nhanes.htm
2 U.S. Department of Agriculture and U.S. Department of
Health and Human Services. Dietary Guidelines for Americans, 2015. 8th
Edition, 2015.
3 Wiley AS. Does milk make children grow? Relationships
between milk consumption and height in NHANES 1999-2002. American
Journal of Human Biology. 2005;17:425-441.
4 Ruffing JA, et al. Determinants of bone mass and bone size
in a large cohort of physically active young adult men. Nutrition &
Metabolism. 2006;3:14.
5 Rockell JE, Williams SM, Taylor RW, Grant AM, Jones IE,
Goulding A. Two-year changes in bone and body composition in young
children with a history of prolonged milk avoidance. Osteoporosis
International. 2004;16:1016-1023.
6 Goulding A, Rockell JE, Black RE, Grant AM, Jones IE,
Williams SM. Children who avoid drinking cow’s milk are at increased
risk for prepubertal bone fractures. Journal of the American Dietetic
Association. 2004;104:250-253.
7 Golden NH, Abrams SAl. Optimizing Bone Health in Children
and Adolescents. Pediatrics. 2014;134:e1229-e1243.
8 Fulgoni VL, Keast DR, Auestad N, Quann EE. Nutrients from
dairy foods are difficult to replace in diets of Americans: food pattern
modeling and an analysis of the National Health and Nutrition
Examination Survey 2003-2006. Nutrition Research. 2011;31:759-765.
If you enjoyed this post, you should read this: You Can Keep The Weight Off By Using These Tips
from https://ift.tt/34au82x
0 notes
Text
On days like these
“On days like these when skies are blue and fields are green” it’s hard to imagine that we were ever in winter or in early Spring. That there were ever days when the trees were bare, the vineyards grey and empty. The cherries in our garden have come and gone, the strawberries are retreating, the peonies struggling with the heat. White asparagus is becoming a distant memory and the broad beans are starting to wilt. Right now I’m drinking an iced, herbal tea – a real summer drink. Our tomatoes are just around the corner, as are the plums and peaches. Does life really go this fast? Did spring really happen?
I guess it did because I have photographic evidence. Many weeks ago, just when we were getting very tired of winter, I planned a little spring blogpost. To celebrate early spring and all it brings. The cherry blossoms were at their best and I was playing with a few little recipes I wanted to share. A lot of our energy has been devoted to other things lately, workshop season, developing our new website, travelling. But here it is finally, a little souvenir of spring, of cherry blossoms before they were fruits, of branches before they were green. And two recipes that don’t really rely on seasonal ingredients so they can be made any time of the year. Two crumbles of very different origins.
The opening lines of this blog post are borrowed from the song “On days like these” which features during the opening credits of the film “The Italian job”(written by none other than Quincy Jones). It’s played a big part in our lives recently as my husband loves it (too much). Recently he drove to Holland to pick up our brand new Bracco Italiano puppy and according to him he listened to the song on repeat the whole way up and down Europe. Which probably means close to a thousand times. From an Ipod without headphones or speakers (which probably mean he didn’t really hear it very well – that Land Rover is loud). I’m very glad I wasn’t on that trip but how glad am I that we got that dog. So beautiful and heartwarming. We let him sleep in our bed the other night which is the first time that has ever happened. You’ll see a lot of Monte Cristo in the future.
RUE LOUDENNE
I have been talking a lot about our new online magazine over the past year, made a few announcements that haven’t really come true. But now we’re ready. Within very few weeks we’ll be up and running. First a soft opening over the summer and then in full force from September onwards. This is not a hoax 🙂 You can find us at www.rueloudenne.com The title is borrowed from our address, a simplified version.
We think of our house as a home and haven for our family but it’s also very much a house of food. A place where food, good produce & cooking is of the highest importance. I have been thinking about it for a while now, because people sometimes ask me, what is my message, what am I trying to do, to achieve? Of course I’m very fond of France, proud of it’s culinary traditions and happy to live here. I’m thrilled if people come to our beautiful region because they’ve found out about it through me. I love it when people like my recipes, find my books useful or entertaining. But none of that is really my message.
The one point I would most like to get across is this. Cook real food, then sit down with your family and eat it. Simple as that. Of course it’s fun to get a little elaborate or go to lenghts sourcing the finest produce, even growing it yourself. But cooking doesn’t need to fancy or expensive to serve its purpose. A thoughtful, simple meal, enjoyed with your kids at the end of the day has never been more necessary or more in danger. The family meal needs a home. Rue Loudenne will do its best. But ours is not a preaching site, there are no taboos, no food snobbery, no exclusivity. It’s a “house” of food which is open to everyone who likes to eat and cook.
Rue Loudenne will have entries 2-3 times a week, not just from me but from my friends, from my husband and from all sorts of people I admire and like. We will broaden our horizons, travel a bit. Recipes will be more accessible and better filed (so you can find all recipes for artichokes when they are in season etc). We’ll have current information about our events and activities, such as workshops, our future farmers market, pop-ups and special events we are planning. We’ll have an online shop, we’ll produce more things to sell ourselves. There will be a wine corner, a dog corner. Maybe even a cocktails corner.
Mostly we’ll be there regularly and it will all be delicious.
As for my beloved Manger it will not cease to exist but it will take on a less prominent role. We won’t change a thing but posts will be less frequent (ehrm if that’s possible). My idea is to do 4 posts a year, to celebrate each season. I have always adored writing and cooking for Manger but while our format has proven popular and successful it also comes with restraints. There are times when I simply want to share a lunch I just made, a story I heard.
Manger has brought us together and given me so many opportunities. Without her (of course she’s a girl) I wouldn’t have done any of the things I’ve done, no cookbooks, no rue Loudenne, no tv show.
She will forever be honorary chair lady of the food board – queen of my kitchen.
Merci my friend …
ps Very soon we’ll be announcing the workshop dates for 2018. As always we’ll shake things up a little bit, try new things. I hope you will like what we’re offering.
The girls dresses are from Marie Puce Paris.
Leeks with hazelnuts and goat’s cheese crumble
25 g/ 5 ounces hazelnuts, ground coarsely
6 medium-sized leeks, washed and trimmed
2 garlic cloves, sliced finely
1 tablespoon salted-butter
1/2 glass glass of white wine
1/2 glass chicken or vegetable stock
230 g/ 8 ounces goat cheese (choose a firmer one, in the style of a brie)
Two shallots, sliced fried until golden and crispy
Olive oil
A handful of salad (I used shiso salad)
Coarse sea-salt and freshly ground black pepper
Trim the dark green tops of the leeks and the roots and remove the outer layer from each one. Rinse under cold water. In a large pot, heat the olive oil and butter over medium heat. Add the garlic and cook for a minute or two. Add the leeks, season with salt and pepper, and cook for 5 minutes. Pour in the stock, then the wine and simmer to reduce, about 2-3 minutes. Lower the heat, cover and cook until the leeks are tender, about 10 minutes.
In another pan, sauté the shallots in olive oil until golden and crispy. Set aside.
Make the crumble:
In a food processor, combine the hazelnuts and goat’s cheese, add a tablespoon of olive oil, salt and pepper. Pulse a few seconds until you get a crumble.
In a small bowl,make the vinaigrette. Whisk together the olive oil, mustard and vinegar. Season with salt and pepper.
Place the leeks in an oven-proof dish, and place the crumble on top. Place under the grill for a few minutes until golden. Pour the leek stock into a deep plate or bowl, transfer the golden leeks with the crumble, into the bowl, and scatter the salad (optional) and shallots all over. Drizzle with the vinaigrette and serve immediately.
Cod with gratinée chorizo
(for 6 people)
6 cod fillets
230 g/ 8 ounces chorizo
45 g/ 1/2 cup tablespoons grated Parmesan cheese
45 g/ 3/4 cup tablespoons of breadcrumbs
15 g/ unsalted butter
Olive oil
Piment d’Espelette
Coarse sea-salt and freshly ground black pepper
Preheat the oven to 400F/200°C
Fry the chorizo in a pan and cook on a medium heat until it becomes golden, about 3 to 4 minutes. Set aside.
In a food processor, combine chorizo with parmesan and breadcrumbs. Add softened butter and pulse until you get a crumbled mixture.
Place the cod filets on a baking dish, generously smooth the crumbled chorizo mixture on the cod and place the dish in the fridge for 30 minutes.
Transfer the fish in the preheated oven for 10 to 12 minutes, until the cod is cooked through and the chorizo is golden and sizzling. Sprinkle a dash of piment d’Espelette and a drizzle of olive oil.
Serve immediately.
Source: http://mimithorisson.com/2017/06/11/on-days-like-these/
0 notes
Text
Chipotle Quinoa Burgers added to Google Docs
Chipotle Quinoa Burgers
.lst-kix_list_2-6 > li:before{content:"■ "}.lst-kix_list_2-7 > li:before{content:"■ "}ul.lst-kix_list_1-0{list-style-type:none}.lst-kix_list_2-4 > li:before{content:"■ "}.lst-kix_list_2-5 > li:before{content:"■ "}.lst-kix_list_2-8 > li:before{content:"■ "}.lst-kix_list_3-0 > li:before{content:"● "}ul.lst-kix_list_5-7{list-style-type:none}ul.lst-kix_list_5-8{list-style-type:none}.lst-kix_list_3-1 > li:before{content:"○ "}.lst-kix_list_3-2 > li:before{content:"■ "}ul.lst-kix_list_5-5{list-style-type:none}ul.lst-kix_list_3-7{list-style-type:none}ul.lst-kix_list_5-6{list-style-type:none}ul.lst-kix_list_3-8{list-style-type:none}.lst-kix_list_4-0 > li{counter-increment:lst-ctn-kix_list_4-0}ul.lst-kix_list_1-3{list-style-type:none}ul.lst-kix_list_3-1{list-style-type:none}.lst-kix_list_3-5 > li:before{content:"■ "}ul.lst-kix_list_5-0{list-style-type:none}ul.lst-kix_list_1-4{list-style-type:none}ul.lst-kix_list_3-2{list-style-type:none}ul.lst-kix_list_1-1{list-style-type:none}.lst-kix_list_3-4 > li:before{content:"■ "}ul.lst-kix_list_1-2{list-style-type:none}ul.lst-kix_list_3-0{list-style-type:none}ul.lst-kix_list_5-3{list-style-type:none}ul.lst-kix_list_1-7{list-style-type:none}.lst-kix_list_3-3 > li:before{content:"■ "}ul.lst-kix_list_3-5{list-style-type:none}ul.lst-kix_list_5-4{list-style-type:none}ul.lst-kix_list_1-8{list-style-type:none}ul.lst-kix_list_3-6{list-style-type:none}ul.lst-kix_list_5-1{list-style-type:none}ul.lst-kix_list_1-5{list-style-type:none}ul.lst-kix_list_3-3{list-style-type:none}ul.lst-kix_list_5-2{list-style-type:none}ul.lst-kix_list_1-6{list-style-type:none}ul.lst-kix_list_3-4{list-style-type:none}.lst-kix_list_3-8 > li:before{content:"■ "}.lst-kix_list_4-0 > li:before{content:"" counter(lst-ctn-kix_list_4-0,decimal) ". "}.lst-kix_list_4-1 > li:before{content:"○ "}.lst-kix_list_3-6 > li:before{content:"■ "}.lst-kix_list_3-7 > li:before{content:"■ "}.lst-kix_list_4-4 > li:before{content:"■ "}.lst-kix_list_4-3 > li:before{content:"■ "}.lst-kix_list_4-5 > li:before{content:"■ "}.lst-kix_list_4-2 > li:before{content:"■ "}.lst-kix_list_4-6 > li:before{content:"■ "}ol.lst-kix_list_4-0{list-style-type:none}.lst-kix_list_5-0 > li:before{content:"● "}.lst-kix_list_4-8 > li:before{content:"■ "}.lst-kix_list_5-3 > li:before{content:"■ "}.lst-kix_list_4-7 > li:before{content:"■ "}.lst-kix_list_5-2 > li:before{content:"■ "}.lst-kix_list_5-1 > li:before{content:"○ "}ul.lst-kix_list_4-8{list-style-type:none}.lst-kix_list_5-7 > li:before{content:"■ "}ul.lst-kix_list_4-6{list-style-type:none}.lst-kix_list_5-6 > li:before{content:"■ "}.lst-kix_list_5-8 > li:before{content:"■ "}ul.lst-kix_list_2-8{list-style-type:none}ul.lst-kix_list_4-7{list-style-type:none}ul.lst-kix_list_2-2{list-style-type:none}ul.lst-kix_list_4-1{list-style-type:none}.lst-kix_list_1-0 > li:before{content:"● "}ul.lst-kix_list_2-3{list-style-type:none}.lst-kix_list_5-4 > li:before{content:"■ "}ul.lst-kix_list_2-0{list-style-type:none}ul.lst-kix_list_2-1{list-style-type:none}ul.lst-kix_list_4-4{list-style-type:none}.lst-kix_list_5-5 > li:before{content:"■ "}ul.lst-kix_list_2-6{list-style-type:none}ul.lst-kix_list_4-5{list-style-type:none}.lst-kix_list_1-1 > li:before{content:"○ "}.lst-kix_list_1-2 > li:before{content:"■ "}ul.lst-kix_list_2-7{list-style-type:none}ul.lst-kix_list_4-2{list-style-type:none}ul.lst-kix_list_2-4{list-style-type:none}ul.lst-kix_list_4-3{list-style-type:none}ul.lst-kix_list_2-5{list-style-type:none}.lst-kix_list_1-3 > li:before{content:"■ "}.lst-kix_list_1-4 > li:before{content:"■ "}.lst-kix_list_1-7 > li:before{content:"■ "}ol.lst-kix_list_4-0.start{counter-reset:lst-ctn-kix_list_4-0 0}.lst-kix_list_1-5 > li:before{content:"■ "}.lst-kix_list_1-6 > li:before{content:"■ "}.lst-kix_list_2-0 > li:before{content:"● "}.lst-kix_list_2-1 > li:before{content:"○ "}.lst-kix_list_1-8 > li:before{content:"■ "}.lst-kix_list_2-2 > li:before{content:"■ "}.lst-kix_list_2-3 > li:before{content:"■ "}
Let me just intro this by saying: I love this recipe.
I love all our recipes, but this is one that just fits perfectly into my real life, again, and again, and again.
Veggie burgers can be hit or miss, I know. I’m not a fan of bean-heavy burgers, so please hear me right off the bat: I am not going to over-bean you with this quinoa burger.
Instead, I’m going to give you a stupidly easy burger that is heavy and solid but not too dense (seriously, pinky promise, the beans are under control!), crispy but not crumbly, and nicely meaty-looking… with all of the smoky good flavor, all of the yumminess, and none of the meat.
How These Quinoa Burgers Come Together
We are working with primarily three things:
Quinoa – the star
Black beans – just enough to help it hold
Savory, smoky chipotle flavor – the thing that keeps you coming back for more.
Once you add something crunchy / binding (like panko or oats), and something wet / binding (egg or flax egg), and a few pinches of spices, you are certifiably in chipotle quinoa burger business.
These quinoa burgs can be made in minutes with just five-ish ingredients, and honestly, considering the minimal effort plus the excellent, versatile, and healthyish results, it’s a real weeknight unicorn.
All The Toppings, Of Course
Toppings – I mean, toppings are your business. They are pretty much limitless and you can be as wild and free as you want here.
But my favorite toppings, personally, are smashed avocado, spicy mayo, thick slices of tomato, crunchy lettuce, and a crown of pickled red onion.
Pop it on a brioche bun and you have juicy, saucy, crispy quinoa burger perfection. Yay meatless!
Common Questions About These Quinoa Burgers Can you freeze these burgers?
Yes, the burgers can be frozen after cooking. If reheating from frozen, here are three different methods:
OVEN: 350 degrees for 15 minutes
MICROWAVE: 1.5 minutes
STOVETOP: 6-7 minutes, flip halfway through (you may need to add a bit of water to the pan and cover to heat them all the way through).
Can you make these burgers gluten-free?
Yes! Oats work well as a panko substitute.
Can you make these burgers vegan?
Yes, the flax egg worked well as a regular egg substitute.
Chipotle Quinoa Burgers
Author: Lindsay
Prep Time: 15 minutes
Cook Time: 10 minutes
Total Time: 25 minutes
Yield: 4
Print Recipe Pin Recipe Description
Chipotle Quinoa Burgers – veggie burgers you’ll want to make again and again! Filling but not too dense, crispy but not crumbly, and with all the smokiness and yumminess with none of the meat.
Ingredients
1/2 cup uncooked quinoa
1 can black beans, rinsed and drained
1–2 chipotle peppers
1/2 teaspoon each: garlic powder, onion powder, chili powder, cumin
1 egg, beaten
1 teaspoon salt
1/4 cup panko breadcrumbs
Instructions Video On Off
Quinoa: Cook quinoa according to package directions. Allow to cool.
Mix: Place black beans, quinoa, chipotles, and spices, in a food processor. Pulse just a few times, enough to make the mixture sticky and well-mixed but not completely pureed. Ideally there will be some chunks of black beans still intact.
Add egg and panko: Transfer mixture to a bowl. Using a spoon or your hands, mix with egg and panko. Form into 4 thick burgers.
Fry burgers: Heat a generous swish of olive oil over medium high heat (nonstick pan works best here). Add burgers to the pan and fry for a few minutes on each side, flipping carefully to keep them intact, until they are golden brown and crispy on the outside.
Serve: Serve on buns with spicy mayo, avocado, lettuce, tomato, pickled red onion, whatever suits your fancy!
Equipment
Large Skillet
Buy Now →
Food Processor
Buy Now → Notes
The equipment section above contains affiliate links to products we use and love!
Category: Dinner
Method: Stovetop
Cuisine: American
Keywords: quinoa burgers, chipotle burgers, vegetarian burgers, healthy burger
Did you make this recipe?
Tag @pinchofyum on Instagram and hashtag it #pinchofyum
Recipe Card powered by
The post Chipotle Quinoa Burgers appeared first on Pinch of Yum.
via Pinch of Yum https://pinchofyum.com/chipotle-quinoa-burgers Nhà hàng Hương Sen chuyên buffet hải sản cao cấp✅ Tổ chức tiệc cưới✅ Hội nghị, hội thảo✅ Tiệc lưu động✅ Sự kiện mang tầm cỡ quốc gia 52 Phố Miếu Đầm, Mễ Trì, Nam Từ Liêm, Hà Nội http://huongsen.vn/ 0904988999 http://huongsen.vn/to-chuc-tiec-hoi-nghi/ https://trello.com/userhuongsen
Created September 10, 2020 at 04:37PM
/huong sen
View Google Doc Nhà hàng Hương Sen chuyên buffet hải sản cao cấp✅ Tổ chức tiệc cưới✅ Hội nghị, hội thảo✅ Tiệc lưu động✅ Sự kiện mang tầm cỡ quốc gia 52 Phố Miếu Đầm, Mễ Trì, Nam Từ Liêm, Hà Nội http://huongsen.vn/ 0904988999 http://huongsen.vn/to-chuc-tiec-hoi-nghi/ https://drive.google.com/drive/folders/1xa6sRugRZk4MDSyctcqusGYBv1lXYkrF
0 notes
Photo

Just Pinned to Top 10 Best Food Processors: 250-watt food processor with 3-cup plastic work bowl . Cord length : 36 Inches included components: Food Preparation;Food Processors;food-processors https://ift.tt/2Fgc3aC
0 notes
Photo

Just Pinned to Top 10 Best Food Processors: Prep the freshest ingredients: A powerful 450 watt motor and 2 speeds plus pulse control save you time and money Simple to assemble and use: Stack and snap design requires no difficult twisting or locking; A simple function guide is printed on the food processor for ease of use Stainless steel blades: S-blade and reversible slice/shred disc chop, slice, shred, mix and puree just about anything Large feed chute: Big mouth feed chute fits whole foods for quick, easy processing and less prep time https://ift.tt/2ZdNd2A
0 notes
Photo

Just Pinned to Top 10 Best Food Processors: 72 ounce total crushing pitcher pulverizes ice to snow in seconds for creamy frozen drinks and smoothies; 2 horsepower Eight cup food processor bowl provides perfect, even chopping and makes up to 2 pounds of dough in 30 seconds Two 16 ounce Nutri Ninja cups with to go lids are perfect for creating personalized, nutrient rich drinks to take on the go https://ift.tt/35dHM7k
0 notes
Photo

Just Pinned to Top 10 Best Food Processors: Interchangeable 450-watt power pod 48 oz. pitcher for frozen blending and smoothies 40 oz. bowl for food processing and meal preparation 16 oz. chopper bowl for even chopping All jars include convenient storage lids, are dishwasher safe, and are BPA free Includes: 450-Watt Power Pod, 48 oz. Pitcher, 16 oz. Chopper Bowl, and a 40 oz. Processor Bowl with Splash Guard and (2) Storage Lids https://ift.tt/3bAqrXv
0 notes
Photo

Just Pinned to Top 10 Best Food Processors: 3.5 cup work bowl features a locking blade, handle and pour spout for easy serving. Master tasty dressings and sauces with the drizzle basin. 2 speeds and pulse operation give you precise control to produce coarse or fine results. Compact and lightweight, the mini food processor is the perfect size for everyday use in the kitchen. Easy to clean, dishwasher-safe work bowl, lid and blade. https://ift.tt/3h3aNFa
0 notes
Photo

Just Pinned to Top 10 Best Food Processors: Includes stainless-steel slicing disc, shredding disc, and new chopping blade Product Built to North American Electrical Standards 14-cup Lexan work bowl; extra-large feed tube; small and large pushers.Everything except the base is dishwasher safe Spatula, instruction/recipe booklet. Detachable Disc Stem MC Cubic Feet: 1.14 Note:* Shredding and slicing blades are not adjustable. * The bowl and work bowl cover must be securely locked into position for the motor to operate. https://ift.tt/2R4fVhH
0 notes
Last Seen Blogs

el3rod
العروض el3rod

via-onlineshop
VIA Onlineshop

blogheavenseo
blogheavenseo

bukimevieningi
Untitled

appscharger
Apps Charger