#my desire to be in the same loop as big ccs is so strong i want to cry
Text
I want to be friends with big creators because they would be fun to talk to and i need more extroverted friends but the problem is i have no way of doing that without being Just Another Fan and honestly I really am Just Another Fan
#ro talks about dumb shit#mcyt#my desire to be in the same loop as big ccs is so strong i want to cry#i really want to be a creator like them#and i know i will never be their friends in this lifetime because hoping otherwise would be foolish and shallow of me#but i still wish i had friends like that#i crave to be known because once I'm known i can make sure that I'm making others smile#and if I'm friends with big ccs then my chances of becoming known increase and my reach becomes bigger#and then we're all happy#the ccs have a new friend i have new friends and i also get to spread more joy to more people#but wishful thinking is dangerous and i shouldn't indulge myself in trying lest my desires get irreparablly denied#so I'll be quiet and respectful and wait until I'm forgotten and try to be satisfied with the smiles i caused along my way#sorry for my tag rant i have a lot of feelings about shit
33 notes
·
View notes
Text
gifmaking tutorial
As requested, here's a tutorial on how I make my gifs. Everyone's process is a little different, and mine changes from time to time, so it'll take some experimenting to find the settings that you like best. I’ll also link this tutorial here by Em, who is way more thorough than I’ll probably be, so check that out! The tutorial will be found in the read more below (apologies if it doesn’t work on mobile - this is a screenshot heavy piece of text).
My process uses Vapoursynth and Photoshop CS5 (I’m ancient I know!!). Avisynth is also another popular option if you already have that, but it’s been a while since I’ve used it. After the frames have been loaded into Photoshop, I then sharpen and colour my gifs before exporting. Some people will also use Topaz to clean up their gifs, but unfortunately that does not work well on my laptop. I use a Windows computer, so things may look slightly different if you’re using a Mac.
STEP ONE ⤅ Downloading your video
To start off, find the highest quality possible of the video that you want to gif from. If it’s a stage, I highly recommend using ts files, which are much better quality than the versions you’ll find on Youtube. Ts files can be found on a variety of website such as 4sashi, kpop24hours (requires membership) and on Twitter. Here is an additional resource for finding ts files and downloading videos. For non-stages, 1080p will work best, though 2k and 4k are absolutely lovely and I would highly recommend those if they’re available.
STEP TWO ⤅ Run your video through Vapoursynth
You can install Vapoursynth following this tutorial. Vapousynth is essentially a program that will crop and compress your video files without losing any quality. It also has built-in sharpen and denoise functions that can take over the functions of Topaz.
To start the process, you’ll drag your video onto the vapourscript and see a pop-up from Command Prompt. It will prompt you to enter two numbers: the first is the timestamp on the video for the start time for your gif (mine was at 3 min, 27 seconds). After pressing enter, it will then prompt you to enter the duration of the moment you want to gif (mine is 3 seconds). If you’re using Avisynth, the second prompt will be the second time stop (when you want the moment to end). I find that sometimes adding an extra second will help me capture the entire moment, but it’s up to your own discretion.

Once you press enter a third time, the command prompt will run and then a pop-up will appear on your browser. You can then adjust several settings, including gif size, preprocessor, denoise filters and sharpening. There’s a lot of freedom here to choose what you’d like to do.
In terms of gif size, you can pick any height that you think looks good but the widths that are optimized on Tumblr go as follows:
1 gif per row: 540px width
2 gifs per row: 268px width (I tend to use the default 350px for height when making these)
3 gifs per row: 178px width (it’s funky here because the middle gif is 178px while the two on the side are 177px each, so you have to crop off a pixel later)
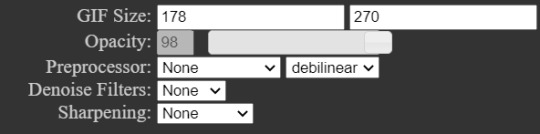
For the purposes of this tutorial, I’ll be making 178px gifs. The next option is preprocessor. This option will alter how the video renders. There are two main options - 30 or 60 - and this will refer the number of frames per second you’ll obtain. For live performance gifs, qtgmc 60 slow is generally the option I choose as it gives better quality frames (especially with a lot of movement) but you may find that qtgmc 30 slow is sufficient. For non ts files, I typically do not use any preprocessor settings.
Most of the time, I don’t use denoise or sharpening filters as I prefer to do my sharpening and denoise in Photoshop. When I do choose to use denoise and sharpening, these are the settings I use. I don’t have a particular reason, but just that I like the way the gifs look. You can experiment with the settings to see what you like, and it can also vary with the gif.

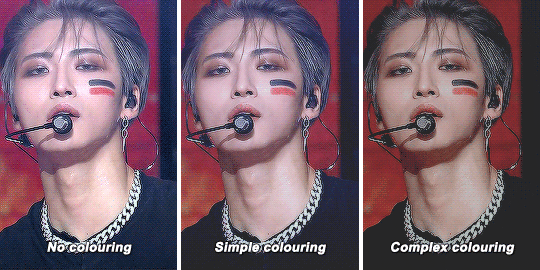
The difference between having those sharpening/denoise settings vs. doing it in Photoshop vs. no sharpening/denoise can also be seen with the three gifs below (note that I've coloured them, which we’ll get into a bit later). As you can probably tell, there’s not a HUGE difference in quality between the three because ts files tend to be already be very high quality but I would always recommend sharpening as it can make a very big difference in the quality of your gifs!

After choosing the settings you want, you’ll then paste them into the VapouSynth Editor (which should’ve automatically popped up at the same time as the browser setting adjuster). For the purposes of this tutorial, I have chosen not to sharpen and denoise. You will copy paste the code from the browser (found at the right side) into the editor. My code was 4 lines and goes in between the code from the 11th line and 22nd line (yours should as well, though the line numbers may not match up - just make sure they say the same thing!)

You’ll then want to hover on the script on the top bar and click on “Encode video”.
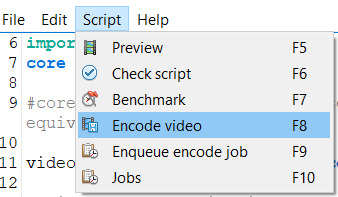
Once you click encode video, another box will pop up. Here, you’ll want to make one adjustment (shown in purple), before pressing start. At the header bar, you’ll want to exchange the preset “No header” for the Y4M option. After you’ve done that, you can press start found below (also highlighted in purple).
Congrats! You’ve finally finished processing your video!
STEP THREE ⤅ Make the gif in Photoshop
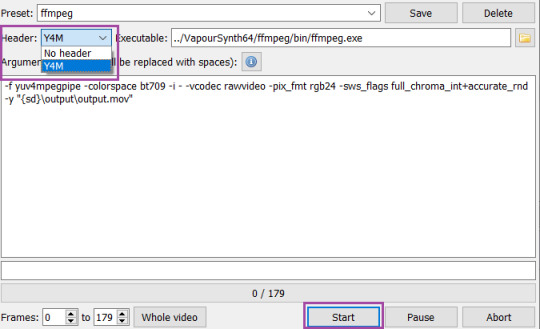
To important the frames into Photoshop, you’ll click File (top bar) > import > video frames to layers. Your output file from vapousynth should be found in the VapourSynth64Portable folder (based on where you first saved it) > gifs > output. Finally, click on the output.mov file to select it. You will then get a pop-up that looks like the following. I always keep these settings, though sometimes people will use limit to every 2 frames, but I find that will make your gifs look choppy.
Based on the way your Photoshop layout is set up, the following steps may be found in different places than they’re found on my screen. You’ll want to have animation turned on (can be turned on under the windows dropdown menu, and just click on animation to turn on the frame view). If your bar is on the bottom of the screen, in the bottom right corner, you should press on the button (convert to timeline animation). I’ve highlighted the button in blue.
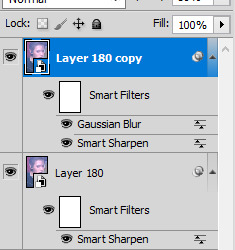
After converting to timeline, I select all the frames in the layers window (can also be turned on in the windows dropdown menu and selecting layers). Then, right click and and press convert to smart object. This will turn all your layers into a single object so you can edit all the layers at once rather than having to edit each layer separately.
After your smart object is created, I like to sharpen. I have an action, but to recreate the same effect, you will need to (1) duplicate the smart object (right click on the smart object > duplicate layer) (2) smart sharpen both smart objects with the following settings and then (3) put a gaussian blur only on the top layer with 1.0px. Both smart sharpen and gaussian blur can be found under the filter dropdown menu (filter > sharpen > smart sharpen or filter > blur > gaussian blur).

Depending on the quality of the video, if I find the sharpening too strong, I will sometimes change the radius to 0.3 or 0.2 (a higher number = more sharpening). Finally, set the top layer to 50% opacity (I go anywhere from 35% to 50% depending on how “soft” I want the sharpening to look. A higher opacity for the top layer will create a softer look). When I finish this step, my layers will usually look like this. And good news: your basic gif is done!
STEP FOUR ⤅ Colouring
Before you save the gif, you may want to colour the gif to make the colours look the way you want. This step is super subjective and every CC will colour differently - it’s why it’s so fun to see multiple sets of the same moment giffed, because each CC will colour a little differently!
I’m not a colouring expert at all, but I’ll put a basic skeleton of the way I colour below and show you the difference between no colouring, a basic colouring, and a more complex colouring. Another fun thing about colouring is that it can also make your gif look much sharper and higher quality depending on what you do.
To access the possibilities for colouring, you’ll want to go the adjustments window (once again can be accessed in the window dropdown menu and selecting adjustments). As you can tell, there’s a ton of adjustment options, which may seem overwhelming. You should definitely experiment to find that looks best to you! I usually go in the following order: curves (red), colour balance (orange), hue/saturation (yellow), selective colour (green), levels (blue) and finally exposure (purple). I won’t attempt to explain what each one does (there’s tons of tutorials out there!), but note that sometimes you’ll want to use an adjustment more than once to get the effect you desire. Layering of multiple of these adjustment layers is what will create a more complex colouring that you will find you like more. I also haven’t mentioned some of the other options, but definitely explore them all to figure out what you like!
STEP FIVE⤅ Saving your gif!
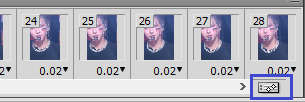
We finally made it to the end! To save your gif, head into the file dropdown menu and select save for web and devices. There’s a lot settings you can fiddle around with here in order to save the best possible gif, but these are typically the settings I go with. The most important to note in the top right corner with selective and pattern selected (play around with those as you may find that the other settings will look better based on the gif!). Also make sure colors is at 256 (maximum) as having less than 256 colours can make your gif look patchy. At the bottom right, make sure you’ve selected looping options: forever to make sure the gif will loop. Finally, at the bottom left, you can see the size of the gif in megabytes. Note that Tumblr will allow gifs up to 10mb to be uploaded, but gifs will typically look best when under 3mb (though debatable).

Press save and you’re done! Note that sometimes after you’ve saved, the timing of the gif will be either too fast or slow. You may need to reopen the gif again and adjust the timing. I find that if you’re using 60fps, 0.02-0.03s generally looks best, while 0.04-0.05 will look best when using 30fps or with a preprocessor. Try them out and see what looks right to you.
Congrats on making it through this tutorial and taking the time to make gifs. Making gifs you find nice won’t always come easily or with the first try, but keep going and you’ll eventually find a way that works for you that you’ll be happy with. As always, if you have any questions, feel free to stop by and ask me and I’ll do my best to help. Almost every CC will be happy to share tips and advice as well, so don’t be afraid to reach out to the people whose gifs you love.
#gif tutorial#tutorial#mine#*tutorial#omg this took so long i hope this helps though anon!!#if there are any mistakes or grammar issues please let me know i'm too tired to read this over again LMAO#again everyone has different processes so this may not be something that works for you
99 notes
·
View notes
Text
Chris CC.
Her eyes widened as she peeled back the door to find herself surrounded by a sea of flowers. Mouth agape, she stooped down to her knees, gently clutching at a brightly coloured tulip, squeezing her eyes shut as she inhaled.
Letting out a satisfied sigh of pleasure, she lowered the tulip back in place. Her gaze fell on a dark shadow just ahead, crouched down in the middle of all the beautiful flowers, back hunched over, clearly struggling with something on the floor.
Her eyes roamed over the muscular build and broad shoulders knelt in front of her, a knowing smile slipping in to place. She'd recognize him anywhere, even in the dark.
She waited a beat, until it became apparent he was oblivious to her presence. A coy smile toyed her lips, as she quietly tiptoed over to him.
"I knew today was going to be a big day for both of us, but I didn't realise you were planning on proposing at the end of this." She lowered herself, pressing her body against his back, whispering into his ear.
He flinched, an audible gasp echoing in the quiet calm of the night.
"I wasn't...my shoelace...you want a ring?" Chris stuttered, cheeks flushed a deep red, as he scrambled to his feet, unsure where to look.
She let out a hearty chuckle, straightening herself up as his eyes continued to dart around uncertainly.
Taking a step towards him, she reached for his hand, pulse quickening as his fingers curled around her own.
"Relax Chris, I'm just messing with you."
A look of relief washed over him, his eyes finally settling on hers.
She peeked down at their entwined fingers, Chris's thumb stroking over the same spot rhythmically.
"Well look at that, turns out you didn't mess it up that night after all." She smirked.
Chris blew out a puff of air, clouds swirling in front of them in the winter chill.
"You've got to tell me, did I screw up? Did I say something stupid?"
"Well...Just that you have a thing for my Mum and this was all just a ploy to get close to her."
His mouth dropped open, the ability to speak momentarily escaping him.
"Yeah i'm screwing with you again, it's too much fun! You were golden Chris, nothing to worry about. It seems the worst you can do when you text a girl after a few drinks is call her beautiful. I'll just have to ply you with alcohol when I'm feeling down from now on."
His hands dipped underneath her baggy Christmas jumper, travelling the length of her body, fingers slowly stroking past her ticklish spot underneath her ribs, before settling on her hips.
Gently bumping their foreheads together, his voice came out in a soft whisper, lips just inches away from hers.
"That wasn't the alcohol talking."
She angled her head, biting down on her bottom lip, the urge to kiss him growing more intense with every passing second.
A low growl escaped Chris's mouth, as he swiped her bottom lip with his thumb.
"You are beautiful."
Her eyes fell to the floor, watching as her feet anxiously shuffled on the spot.
"Hey." He gently pushed her chin up, urging her to look at him, as his fingers tenderly stroked the side of her face.
"You know I never got over you? I've been living this lie, pretending everything is okay between us. But how can it be? We never had the chance to grow together, we just seemed to give up. I figured you were just messing around and never saw us as being serious, but I always wanted more. I thought I'd be fine as long as I still had you in my life in some way."
Chris paused, raising her hand and kissing each knuckle, eyes never leaving hers.
"But it's killing me wondering 'what if?'. I want to put everything I have into this. Into you. Into us."
Her lips crashed down onto his with searing desire, as she walked Chris backwards, mouths never parting.
His tongue teasingly flicked over her own, before expertly meandering across the inside of her mouth. She let out a small protesting moan as he broke away, only to moan more intensely as his teeth grazed her neck. Running her hands through his hair, she felt a shiver course through her as he continued to nip and suck at her neck.
"Chris..."
Pressing a final sloppy kiss over a reddened patch of skin on her neck, he wrapped his arms around her from behind, chin resting on her shoulder, their hands tightly clasped together.
"Sorry, I've just waited so long to do that, got a bit carried away!"
She gave a small laugh, once more distracted as she turned her attention back to the flowers surrounding them.
"You know I had my suspicions when Edgar left those beautiful flowers."
"I arranged them myself."
She nodded her head in response.
"And obviously as you live with me you had easy access."
Chris stifled a snort.
"I haven't committed to anything yet, there's still time to change my mind!" She teased, pressing her backside into him, smirking as he let out a small moan.
"You must have had a favourite day, spill Powell!"
He paused for a moment, thinking over the weeks.
"I'll go with the dress. You looked even more beautiful than I could have imagined. And I was so worried that I'd messed up that night. I woke up the next morning realising just how much I needed you."
"Who knew you were so smooth? She grinned.
"Want to know what my second favourite day was?" He asked, his strong arms squeezing her tightly from behind.
"Sure."
"Look up."
Her head snapped up obediently, eyes falling on the sprig of mistletoe hanging above them.
Turning herself around in his embrace, she looped her arms around the back of his neck, drawing his face down closer to hers.
"How did that line go again? To make all my Christmas wishes come true..."
"All I need is a kiss from you." Chris muttered, tongue gliding over his lips in anticipation.
"Well I wouldn't want to disappoint you at Christmas..." She grinned, closing the distance between them.
Her tongue traced over the path his had previously left, before her lips joined his in a lingering kiss. Chris trailed a hand through her hair, grabbing a fistful and gently tugging, all the while his lips worked on deepening the kiss.
"There's just one more thing I forgot to mention before." She gasped for air as she managed to tear herself apart from Chris and his delectable lips.
"What's that?"
"You aren't the only one you know. Everything you just told me, is the same way I feel about you. I want to give us a chance and..." She broke off, chin wobbling, a shaky breath escaping.
"And?"
"I love you Chris.' She whispered cautiously.
Placing a hand either side of her face, his fingers gently caressed her cheek.
"Well that's good to hear."
"That's...Uh...What?" Her face crinkled up in confusion, his response taking her by surprise.
"That's good to hear. Because...you aren't the only one you know. Everything you just told me, is the same way I feel about you."
She sniffed, a watery smile in place as stray tears slid down her face.
"I love you too beautiful."
[MASTERLIST.]
23 notes
·
View notes
Last Seen Blogs

ltfitness24
Untitled

1187vapor
1187 VAPOR

al3x4-al0
Al3x4.al0 ♡
yo-dj-pump-this-party
Get Munk’d

adersky
SCRYTHE