#should I also just recreate this tutorial with tag ids?
Text
I realized that the updated Tag Search function makes it way easier to attempt to parallel search relationships including a specific character.
This method works better for characters who are not glitter and shipped with every person and creature and object under the sun.
This tutorial is written for people not familiar with tag ids. If you know how tag ids work, you should read the last two paragraph of this tutorial first.
You can find the Tag Search by looking at the menu at the top of the AO3 page that’s off to the left side.
Click Search and click Tag (the third option from the top).

Type in your character. If the character only ever appears in one fandom, you also include that. If the character you want to search as a very common name, you will probably have to include a fandom to avoid pulling in unrelated tags. Do not include more than one fandom otherwise the result will only pull up any tags that exist in all the fandoms you listed.
Select Relationship for type
Select Canonical
Hit Search Tags

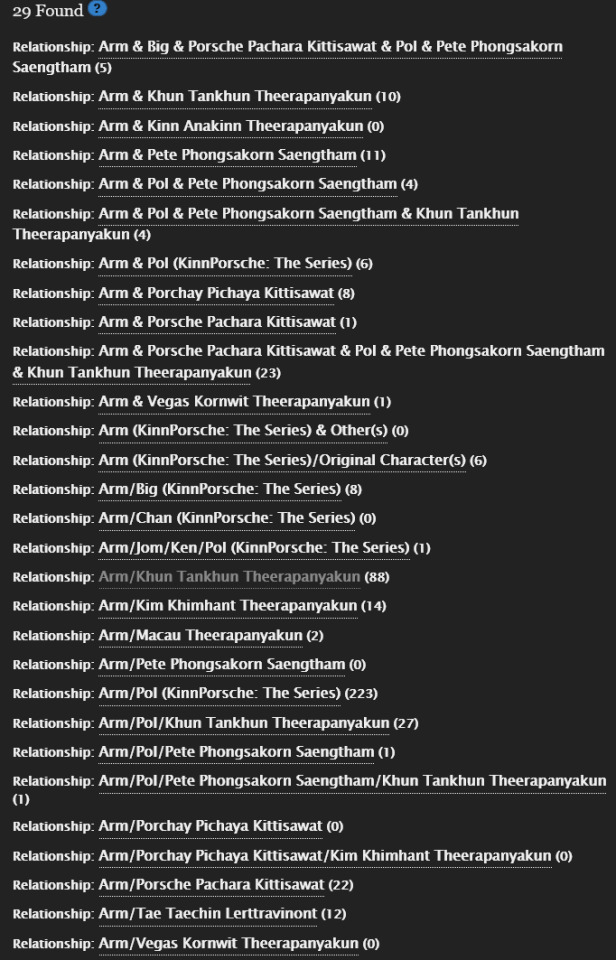
The results should pull up every relationship that includes that character for that specific fandom or if you did not restrict by fandom, every relationship that has character with an identical name to the character you’re searching for.
For the character I picked, “Arm”, there are 29 results.
Open the Work Search page in a new tab or window. You can find a link in the same menu as Tag Search.
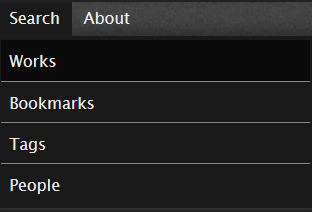
Or you can also open it through button labeled Work Search beside the Tag Search heading.

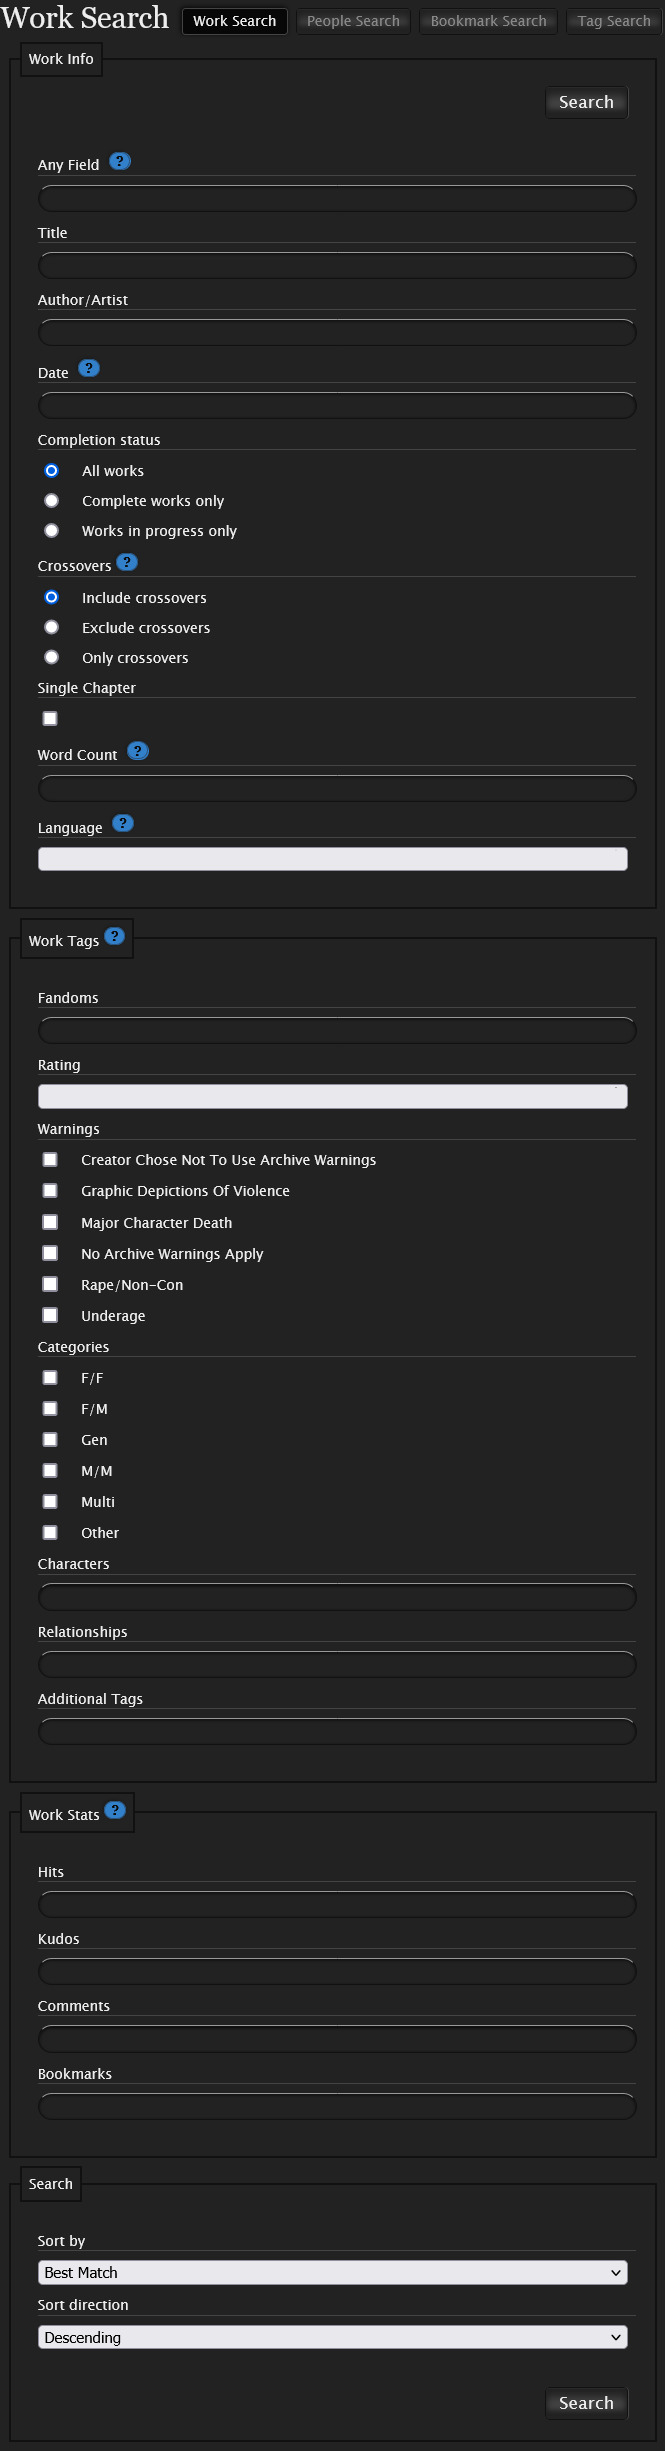
On the Work Search page, find the Any Field box.
This next part will be time-consuming but you will need to format all the relationships you want to parallel search like this: "X/Y" OR "X & A" OR "B & Z".
The tags need to match how they were shown on the Tag Search page. Each relationship needs to be placed between straight quotes. Curly quotes will break this search. Between each relationship tag, there needs to be an OR in all caps, but not one at the start or end.
After you’ve formatted things like this you can paste it into the Any Field box. (You could have just composed your search in there but if you’re parallel searching many relationship tags, doing it in notepad or something may make it easier to see what you’ve already included.)
There are filter options on this page. If you want to sort by completed or such, this is the point you need to do it at this point. This kind of search does not allow you to filter after you have clicked search. Unlike filtering on a specific tag, there is no filtering sidebar. A few other caveats:
If you want to exclude tags, you will have to input them into the Any Field box alongside the relationship tags. Those excluded tags will need to be formatted like such: - "tag 1" - "tag 2"
Basically they just need a minus sign in front of them. You do not need to include OR between them.
If you include more than one tag in the Character, Relationship, or Additional Tag boxes, the search will only bring up results that match all of your search parameters. So if you inputted “Fluff” and “High School” into the Additional Tag field, it would only bring up works that have both the “Fluff” and “High School” tag as well as any of the relationship tags in the Any Field.
I just want search for every work that includes Arm so I have no other filtering added. It looks like something below.
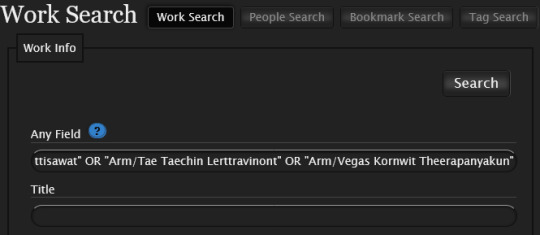
Once you’ve finished setting up your search, click the search button.
In the case of my search, I only set it up to pull up any of the 29 relationship tags I found that included Arm. When I saved this screenshot, there were 412 results.

A few important things to note. While AO3 doesn’t really restrict how many text characters you put into the Any Field box, most browsers have a limit. So if you want to parallel search a lot of relationship or any tags in fact, you may run into your browser breaking your search.
If you’re searching a high number of tags, it’s better to use tag ids instead because they’re shorter and so you’ll be able to include way more information with less text characters. The tutorial works similarly except the list will be formatted like such: filter_ids:123 OR filter_id:456
You will not need to put quotes around a tag id. To find a tag id, you can open a specific tag and look at its RSS Feed, or by using the following script: https://greasyfork.org/en/scripts/29917-ao3-display-tag-id
#AO3#archiveofourown#Tutorial#should I also just recreate this tutorial with tag ids?#wick meta#I cannot find the readmore function anymore so sorry everyone
527 notes
·
View notes
Text
Fandom Userscript Cookbook: Five Projects to Get Your Feet Wet
Target audience: This post is dedicated, with love, to all novice, aspiring, occasional, or thwarted coders in fandom. If you did a code bootcamp once and don’t know where to start applying your new skillz, this is for you. If you're pretty good with HTML and CSS but the W3Schools Javascript tutorials have you feeling out of your depth, this is for you. If you can do neat things in Python but don’t know a good entry point for web programming, this is for you. Seasoned programmers looking for small, fun, low-investment hobby projects with useful end results are also welcome to raid this post for ideas.
You will need:
The Tampermonkey browser extension to run and edit userscripts
A handful of example userscripts from greasyfork.org. Just pick a few that look nifty and install them. AO3 Savior is a solid starting point for fandom tinkering.
Your browser dev tools. Hit F12 or right click > Inspect Element to find the stuff on the page you want to tweak and experiment with it. Move over to the Console tab once you’ve got code to test out and debug.
Javascript references and tutorials. W3Schools has loads of both. Mozilla’s JS documentation is top-notch, and I often just keep their reference lists of built-in String and Array functions open in tabs as I code. StackOverflow is useful for questions, but don’t assume the code snippets you find there are always reliable or copypastable.
That’s it. No development environment. No installing node.js or Ruby or Java or two different versions of Python. No build tools, no dependency management, no fucking Docker containers. No command line, even. Just a browser extension, the browser’s built-in dev tools, and reference material. Let’s go.
You might also want:
jQuery and its documentation. If you’re wrestling with a mess of generic spans and divs and sparse, unhelpful use of classes, jQuery selectors are your best bet for finding the element you want before you snap and go on a murderous rampage. jQuery also happens to be the most ubiquitous JS library out there, the essential Swiss army knife for working with Javascript’s... quirks, so experience with it is useful. It gets a bad rap because trying to build a whole house with a Swiss army knife is a fool’s errand, but it’s excellent for the stuff we're about to do.
Git or other source control, if you’ve already got it set up. By all means share your work on Github. Greasy Fork can publish a userscript from a Github repo. It can also publish a userscript from an uploaded text file or some code you pasted into the upload form, so don’t stress about it if you’re using a more informal process.
A text editor. Yes, seriously, this is optional. It’s a question of whether you’d rather code everything right there in Tampermonkey’s live editor, or keep a separate copy to paste into Tampermonkey’s live editor for testing. Are you feeling lucky, punk?
Project #1: Hack on an existing userscript
Install some nifty-looking scripts for websites you visit regularly. Use them. Ponder small additions that would make them even niftier. Take a look at their code in the Tampermonkey editor. (Dashboard > click on the script name.) Try to figure out what each bit is doing.
Then change something, hit save, and refresh the page.
Break it. Make it select the wrong element on the page to modify. Make it blow up with a huge pile of console errors. Add a console.log("I’m a teapot"); in the middle of a loop so it prints fifty times. Savor your power to make the background wizardry of the internet do incredibly dumb shit.
Then try a small improvement. It will probably break again. That's why you've got the live editor and the console, baby--poke it, prod it, and make it log everything it's doing until you've made it work.
Suggested bells and whistles to make the already-excellent AO3 Savior script even fancier:
Enable wildcards on a field that currently requires an exact match. Surely there’s at least one song lyric or Richard Siken quote you never want to see in any part of a fic title ever again, right?
Add some text to the placeholder message. Give it a pretty background color. Change the amount of space it takes up on the page.
Blacklist any work with more than 10 fandoms listed. Then add a line to the AO3 Savior Config script to make the number customizable.
Add a global blacklist of terms that will get a work hidden no matter what field they're in.
Add a list of blacklisted tag combinations. Like "I'm okay with some coffee shop AUs, but the ones that are also tagged as fluff don't interest me, please hide them." Or "Character A/Character B is cute but I don't want to read PWP about them."
Anything else you think of!
Project #2: Good Artists Borrow, Great Artists Fork (DIY blacklisting)
Looking at existing scripts as a model for the boilerplate you'll need, create a script that runs on a site you use regularly that doesn't already have a blacklisting/filtering feature. If you can't think of one, Dreamwidth comments make a good guinea pig. (There's a blacklist script for them out there, but reinventing wheels for fun is how you learn, right? ...right?) Create a simple blacklisting script of your own for that site.
Start small for the site-specific HTML wrangling. Take an array of blacklisted keywords and log any chunk of post/comment text that contains one of them.
Then try to make the post/comment it belongs to disappear.
Then add a placeholder.
Then get fancy with whitelists and matching metadata like usernames/titles/tags as well.
Crib from existing blacklist scripts like AO3 Savior as shamelessly as you feel the need to. If you publish the resulting userscript for others to install (which you should, if it fills an unmet need!), please comment up any substantial chunks of copypasted or closely-reproduced code with credit/a link to the original. If your script basically is the original with some key changes, like our extra-fancy AO3 Savior above, see if there’s a public Git repo you can fork.
Project #3: Make the dread Tumblr beast do a thing
Create a small script that runs on the Tumblr dashboard. Make it find all the posts on the page and log their IDs. Then log whether they're originals or reblogs. Then add a fancy border to the originals. Then add a different fancy border to your own posts. All of this data should be right there in the post HTML, so no need to derive it by looking for "x reblogged y" or source links or whatever--just make liberal use of Inspect Element and the post's data- attributes.
Extra credit: Explore the wildly variable messes that Tumblr's API spews out, and try to recreate XKit's timestamps feature with jQuery AJAX calls. (Post timestamps are one of the few reliable API data points.) Get a zillion bright ideas about what else you could do with the API data. Go through more actual post data to catalogue all the inconsistencies you’d have to catch. Cry as Tumblr kills the dream you dreamed.
Project #4: Make the dread Tumblr beast FIX a thing
Create a script that runs on individual Tumblr blogs (subdomains of tumblr.com). Browse some blogs with various themes until you've found a post with the upside-down reblog-chain bug and a post with reblogs displaying normally. Note the HTML differences between them. Make the script detect and highlight upside-down stacks of blockquotes. Then see if you can make it extract the blockquotes and reassemble them in the correct order. At this point you may be mobbed by friends and acquaintainces who want a fix for this fucking bug, which you can take as an opportunity to bury any lingering doubts about the usefulness of your scripting adventures.
(Note: Upside-down reblogs are the bug du jour as of September 2019. If you stumble upon this post later, please substitute whatever the latest Tumblr fuckery is that you'd like to fix.)
Project #5: Regular expressions are a hard limit
I mentioned up above that Dreamwidth comments are good guinea pigs for user scripting? You know what that means. Kinkmemes. Anon memes too, but kinkmemes (appropriately enough) offer so many opportunities for coding masochism. So here's a little exercise in sadism on my part, for anyone who wants to have fun (or "fun") with regular expressions:
Write a userscript that highlights all the prompts on any given page of a kinkmeme that have been filled.
Specifically, scan all the comment subject lines on the page for anything that looks like the title of a kinkmeme fill, and if you find one, highlight the prompt at the top of its thread. The nice ones will start with "FILL:" or end with "part 1/?" or "3/3 COMPLETE." The less nice ones will be more like "(former) minifill [37a / 50(?)] still haven't thought of a name for this thing" or "title that's just the subject line of the original prompt, Chapter 3." Your job is to catch as many of the weird ones as you can using regular expressions, while keeping false positives to a minimum.
Test it out on a real live kinkmeme, especially one without strict subject-line-formatting policies. I guarantee you, you will be delighted at some of the arcane shit your script manages to catch. And probably astonished at some of the arcane shit you never thought to look for because who the hell would even format a kinkmeme fill like that? Truly, freeform user input is a wonderful and terrible thing.
If that's not enough masochism for you, you could always try to make the script work on LiveJournal kinkmemes too!
64 notes
·
View notes
Text
Recreating the CodePen Gutenberg Embed Block for Sanity.io
Chris recently put out a neat CodePen Embed Block for the Gutenberg editor in WordPress. It allows you to embed a Pen just by dropping in its URL. From there, you get access to control the size, theme, and the default tabs that render on initial load. Super neat!
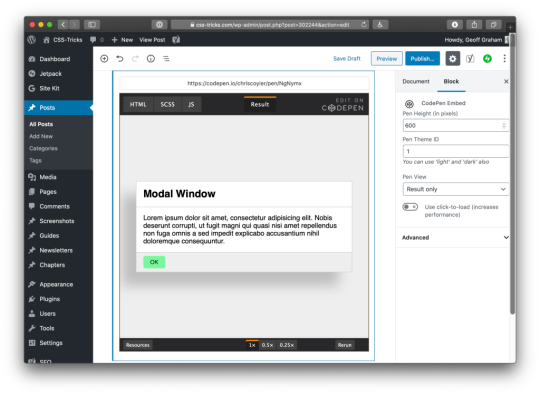
Having a live preview of the embedded Pen while writing is so handy!
But it got me thinking: How difficult would it be to recreate it with Sanity Studio’s Portable Text editor? (Spoiler: Not that difficult). Since I already knew how to do it, it took me under seven minutes from start to finish. This tutorial takes you through how to get up and running with a studio, and how to add the schemas and the custom preview component for a CodePen embed.
So this is me recreating @chriscoyier’s CodePen Gutenberg Block for @sanity_io’s rich text editor in less than 7min (3x video). Best thing is, you actually just store the structured data, making it queryable, future proof, and easy to integrate with whatever frontend you prefer. https://t.co/psPn6NtPjz pic.twitter.com/6aSGKerHfO
— knut (in SF 🇺🇸) (@kmelve) January 18, 2020
That felt so cool that I want to teach you how to do it as well. Let's dive right into it.
Getting Sanity Studio up and running locally
First, you'll need to install Sanity Studio locally on your machine. In this tutorial we will be using the blog studio that you can initiate from the command line, but you can also check out the different starters on sanity.io/create. You should be able to tag along with one of those too.
This tutorial assumes that you have a bit of knowledge of JavaScript. It will use a bit of React, but only a small part. You should have installed node and npm if you haven't already.
Oh, and you'll want the Sanity CLI, which you can snag with the command line:
npm install --global @sanity/cli
Once the installation is done, you can initiate a new Sanity Studio with a new project by running the command sanity init. It will let you log in with your Google or GitHub account (or make a new account with an email/password). Give your project a name and follow the instructions. When given the options for a project template, choose the blog one:
? Select project template Movie project (schema + sample data) E-commerce (schema + sample data) ❯ Blog (schema) Clean project with no predefined schemas
After completing the steps, change directory (cd) into the new project folder and open it in your favorite code editor. To start the developer server that will also hot reload your studio when you make changes, run sanity start. To stop this server, you press ctrl + C in most command line tools.
Adding the schemas for a CodePen embed
Schemas define which document types that are available in the Studio, and which input fields they have. These schemas are defined in JavaScript objects that you import into the schemas.js file, where they are exported as a function that the Studio translates into its UI. There's a lot you can do with these schemas, but in this tutorial, we will keep it reasonably simple.
Start with adding a new file inside /yourproject/schemas called codepen.js. Then type in this code:
export default { name: "codepen", type: "object", title: "CodePen Embed", fields: [ { name: "url", type: "url", title: "CodePen URL" } ] };
Then you can go to /yourproject/schemas/schema.js and add the following two lines of code to it:
import createSchema from "part:@sanity/base/schema-creator"; import schemaTypes from "all:part:@sanity/base/schema-type"; import blockContent from "./blockContent"; import category from "./category"; import post from "./post"; import author from "./author"; import codepen from "/codepen.js"; //
So what did we just do? Well, we have now made this CodePen object available as a type in other schemas in the Studio. In other words, you can now add type: 'codepen' to get those fields anywhere else in the schema code where you add fields. Adding this type to the rich text field is also our next step. Hang on!
Adding the CodePen field to the rich text editor
Before diving into the code bit, let us take a step back and look at what is going on in terms of the data formats we operate with, and how WordPress and Sanity differ slightly.
While Gutenberg stores rich text as JSON in its runtime (which is great!), what developers end up dealing with is mostly this content as HTML and JSON objects inside of HTML comments.
Sanity stores and distributes rich text content as Portable Text, which developers then serializes in their frontends. That means that you get fine-grained control over how rich text content is rendered by letting you use custom components for your favorite framework, either it's React, Vue, Svelte, or .NET, PHP, or even Markdown.
In other words, you store your content as structured data in Sanity’s backend, and then decide how you want to use the data inside your frontend components. But enough exposition, let's get back to the code!
Open /schemas/blockContent.js and notice that it's of the type array. Yes, rich text is an array of different types, where one of them has to be of the block type (in which text paragraphs are stored). So the simplest way of making rich text is the following schema definition:
export default { name: "body", type: "array", title: "Body", of: [ { type: "block" } ] };
Now, blockContent.js has a bunch of more stuff. You can see styles, lists, marks, and so on. All defining which properties should be available for the author. In the top array, there are two types block and image. We are going to add the third one, codepen:
export default { title: "Block Content", name: "blockContent", type: "array", of: [ { type: "block" // ... }, { type: "image", options: { hotspot: true } }, { type: "codepen" } ] };
Save the file, and that's it! If you now run sanity start in your command line (assuming you haven't already), and open the Studio on https://localhost:3333, you should be able to find your new field in the rich text editor under the "post" type:
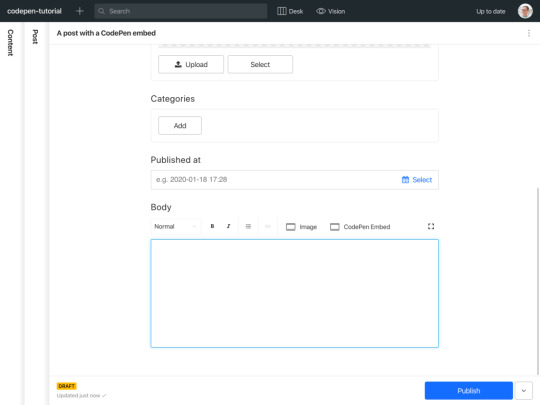
If you try out the new button, you'll get a modal with the URL field that you defined in the previous section. Feel free to add the URL from a cool CodePen that you have found. We will use this one from the legendary Sara Drasner; it's pretty cool.
CodePen Embed Fallback
Just showing the URL value in the editor isn't especially inspiring, though. So let's go ahead and add the actual CodePen embed so we can interact with it directly in the editor!
Adding the CodePen embed as a preview
Open /yourproject/schemas/codepen.js again. Now we are going to make a small React component for our preview. Start by importing React in the top, and the boilerplate for the React component that we will turn into the embed:
import React from "react"; const CodePenPreview = ({ value }) => { return <pre>{JSON.stringify(value, null, 2)}</pre>; }; export default { name: "codepen", type: "object", title: "CodePen Embed", fields: [ { name: "url", type: "url", title: "CodePen URL" } ] };
The JSON.stringify stuff is a temporary little way of outputting the incoming data in a readable manner. You could also use console.log(value), but who has time to open the developer console?
Now you must tell Sanity how to use this component for the preview. As well as which of the fields in the object it should select for the value in the preview component.
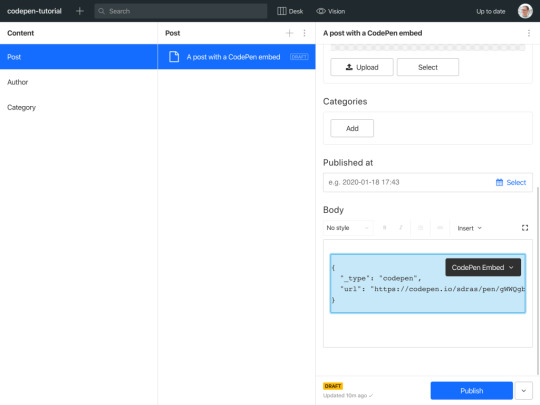
import React from "react"; const CodePenPreview = ({ value }) => { return <pre>{JSON.stringify(value, null, 2)}</pre>; }; export default { name: "codepen", type: "object", title: "CodePen Embed", preview: { select: { url: "url" }, component: CodePenPreview }, fields: [ { name: "url", type: "url", title: "CodePen URL" } ] };
The editor should look something like this after you saved your changes:
Cool! Now we want to take the url value and somehow integrate it with a CodePen embed. The easiest way to go about this is to fit the markup for CodePen’s iFrame embed, and fit into our preview component in React.
The original iFrame element will look like this:
<iframe height="265" style="width: 100%;" scrolling="no" title="React Animated Page Transitions" src="https://codepen.io/sdras/embed/gWWQgb?height=265&theme-id=dark&default-tab=js,result" frameborder="no" allowtransparency="true" allowfullscreen="true"> See the Pen <a href='https://codepen.io/sdras/pen/gWWQgb'>React Animated Page Transitions</a> by Sarah Drasner (<a href='https://codepen.io/sdras'>@sdras</a>) on <a href='https://codepen.io'>CodePen</a>. </iframe>
If we paste this snippet into our preview component, it will almost work. In order to make it JSX-compatible you'll have to some few changes to some of the HTML-attributes. Make sure that you change:
style="width: 100%;" to style=
frameborder="no" to frameBorder="no"
allow-transparency="true" to allowTransparency
allow-fullscreen="true" to allowFullScreen
You can remove the content (links, etc.) inside of the iframe, because it isn't particularly useful inside the studio. What we should end up with is something like this:
import React from "react"; import Codepen from "react-codepen-embed"; const CodePenPreview = ({ value }) => { return ( <iframe height="265" style= scrolling="no" title="React Animated Page Transitions" src="https://codepen.io/sdras/embed/gWWQgb?height=370&theme-id=dark&default-tab=js,result" frameBorder="no" allowTransparency allowFullScreen />); }; // ...
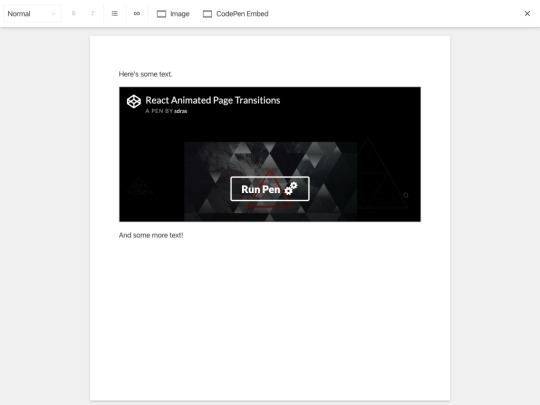
When saved, we should be able to see the CodePen embed inside the rich text editor:
Notice that the iFrame has an embed URL with some parameters for how it should be displayed. Of course, we could've asked someone to dive into CodePen to obtain this URL, but it's probably better for to use the regular one. We'll take the effort to reassemble into what we need:
The last part is to take the URL from the field, and get the hash and user out of it.
We split the URL string on forward slashes into an array. Then we use array destructuring to assign the different array elements to a variable. Since we only need the user and the hash we leave the other positions empty. This method isn't bulletproof, as it assumed a specific format for the URL, but it works for this example. Then we reassemble the embedUrl by using template literals.
import React from "react"; const CodePenPreview = ({ value }) => { const { url } = value; const splitURL = url.split("/"); // [ 'https:', '', 'codepen.io', 'sdras', 'pen', 'gWWQgb' ] const [, , , user, , hash] = splitURL; const embedUrl = `https://codepen.io/${user}/embed/${hash}?height=370&theme-id=dark&default-tab=result`; return ( <iframe height="370" style= scrolling="no" title="CodePen Embed" src={embedUrl} frameBorder="no" allowTransparency allowFullScreen /> ); }; // ...
Save the changes and voilá; we're pretty much done with the custom CodePen block!
Taking it further
Now, you probably noticed that Chris had put more settings into his custom block. Nothing is stopping us from doing the same! If we look up the documentation for the React CodePen embed component that we installed, we'll find a table of properties that it can take. We can add these as fields in the schema definition. For example, if we wanted to add the themeId, we could do it as follows:
import React from "react"; import Codepen from "react-codepen-embed"; const CodePenPreview = ({ value }) => { const { url, themeId = "dark" } = value; // <= add themeId here, default it to "dark" const splitURL = url.split("/"); // [ 'https:', '', 'codepen.io', 'sdras', 'pen', 'gWWQgb' ] const [, , , user, , hash] = splitURL; const embedUrl = `https://codepen.io/${user}/embed/${hash}?height=370&theme-id=${themeId}&default-tab=result`; // <= add themeId here return ( <iframe height="370" style= scrolling="no" title="CodePen Embed" src={embedUrl} frameBorder="no" allowTransparency allowFullScreen /> ); }; export default { name: "codepen", type: "object", title: "CodePen Embed", preview: { select: { url: "url", themeId: "themeId" // <= add themeId here }, component: CodePenPreview }, fields: [ { name: "url", type: "url", title: "CodePen URL" }, // Add the new field below { name: "themeId", type: "string", title: "Theme ID", description: 'You can use "light" and "dark" also.' } ] };
Conclusion
We just looked at how schemas for Sanity Studio work, and learned how to make previews for custom components to boot! Hopefully, you now know enough to make pretty much any custom component with a preview using these same principles. If you do, I would love to know about it either on Twitter or in the comments.
The post Recreating the CodePen Gutenberg Embed Block for Sanity.io appeared first on CSS-Tricks.
Recreating the CodePen Gutenberg Embed Block for Sanity.io published first on https://deskbysnafu.tumblr.com/
0 notes
Text
Content Marketer of the Year Shares the REI Story
Leadership. It’s a lively mix of team building, innovation, excellence, humility, and results. These are just a few of the characteristics we look for when selecting the finalists for CMI’s Content Marketer of the Year award. As we begin to unveil our 2018 finalists in the coming weeks, we want to give you a closer look at last year’s honoree.
Paolo Mottola, managing editor at REI Co-op and the 2017 Content Marketer of the Year, has demonstrated again and again how content can drive more than interest and engagement – it can drive action.
If you #OptOutside, you probably already believe REI’s brand promise that a “life outdoors is a life well lived.” But even occasional hikers and those whose adventures are limited to chaperoning Girl Scout campouts find REI’s content inviting, approachable, educational, creative, and bold.
That’s the result of a deliberate strategy designed “to get more people understanding that the outdoors is accessible for all,” Paolo says.
HANDPICKED RELATED CONTENT: 5 Steps to Strategically Reboot Your Brand’s Content Marketing
Mix and match content types, formats, and levels
And it explains why you won’t see models or stock photos dressing up REI’s content. “We express that through our members and we shine a light on their real stories,” Paolo says. This kind of authenticity is palpable to experienced and amateur recreation lovers. Not everyone’s ready for content on how to run 100 miles and not everyone needs a tutorial on how to build a fire, but Paolo and team make sure they offer information for both groups and everyone in between.
REI doesn’t use models or stock photos in its #content. Authenticity is a must, says @paolojr.
Click To Tweet
REI’s content mix includes everything from blog posts to video how-to’s and from short films to, more recently, podcasts. The brand launched two shows this year, Wild Ideas Worth Living and Take It From Me.
“There’s a ‘share of ear’ we want to be a part of, and the intimacy of long-form audio creates a lot of different opportunities, more than we have with video or the written word,” Paolo says.
Wild Ideas is a traditional interview format with REI’s host, Shelby Stanger, talking with “outstanding outdoorspeople.”
//html5-player.libsyn.com/embed/episode/id/6646397/height/90/theme/custom/autoplay/no/autonext/no/thumbnail/yes/preload/no/no_addthis/no/direction/forward/render-playlist/no/custom-color/87A93A/
Take It From Me also uses an interview format, but with a creative twist. Paolo describes it as a “relay race,” where the interviewee in one episode becomes the interviewer in the following episode.
//html5-player.libsyn.com/embed/episode/id/6391119/height/90/theme/custom/autoplay/no/autonext/no/thumbnail/yes/preload/no/no_addthis/no/direction/backward/render-playlist/no/custom-color/87A93A/
HANDPICKED RELATED CONTENT: Podcasting Pioneers Explain Value of Audio Content and Rookie Mistakes to Avoid
Stand for something
While much of REI’s content resonates with a wide audience of adventurers, some of its boldest initiatives have been designed to expose – and celebrate – specific audiences taking part in outdoor experiences.
#OptOutside
You need look no further than social media to see both newbies and pros proudly tagging their content with #OptOutside. The hashtag started on Black Friday 2015 when REI invited the nation to reconnect with their families and friends instead of shopping for holiday deals. REI closed its doors and paid employees not to work but to enjoy the day outside.
It wasn’t a one-time publicity stunt. The company has shut its doors every Black Friday since. In 2017, an estimated 8 million people took part, according the company’s 2017 Stewardship Report, which details REI’s sustainability efforts, political activism, gender equality strategies, and nonprofit support.
8 M people took part in #OptOutside. @REI’s invitation to do outdoors on #BlackFriday. @EditorStahl
Click To Tweet
In early 2017, REI’s film about Brothers of Climbing documented the organization’s mission to increase diversity in outdoor adventures. As BOC co-founder Mikhail Martin says in an interview in REI’s Co-Op Journal, “We want to bring the community together. We want to see people of color experience a higher level of comfort in the outdoors. We want to hear more children saying they want to be rock climbers instead of the typical basketball or football player.”
youtube
HANDPICKED RELATED CONTENT: How REI Is Unlocking the Power of Long-Form Video
#ForceofNature
More recently, REI tackled how women are represented outdoors, through an initiative called Force of Nature, which, as REI CEO Jerry Stritzke wrote in an April 2017 post, “claims the outdoors as a place to opt out of cultural pressures to conform – the ‘supposed-to’s’ and ‘shoulds’ that underpin outdated stereotypes – especially for women.”
The initiative grew out of a survey REI commissioned in early 2017. The results were predictable in one sense: 85% of women surveyed said they “believe the outdoors positively affects mental health, physical health, happiness, and overall well-being,” and 70% reported that being outdoors is liberating.
But it also revealed that most of the women who responded lacked a female outdoor role model – and most believed men’s outdoor interests are taken more seriously.
To “create real change right now,” as Jerry put it, the company pledged to put “women – of all ages, races, sizes, gender expressions – front and center in all we do.” REI also developed a $1 million grant to support nonprofit organizations that create outdoor opportunities for women.
Paolo’s team’s job was to mine for women’s stories – and women storytellers – to bring more balance to the content showing up in outdoor media. “It wasn’t a challenge to make that shift given all the amazing work women are doing in the outdoors,” he says.
The initiative resulted in films and blog articles shining a spotlight on women’s outdoor experiences, as well as a steady stream of social media content. For those who want more interactive experiences, REI launched 1,000 classes and events for women.
youtube
Although increased sales weren’t the main goal, the company’s been rewarded for its efforts: After the Force of Nature launch, its women’s business grew 20 percent year over year.
“Even before the research study, REI had an internal team working for a year to prepare and to evaluate the company’s gender equality practices. In 2015, the REI Foundation made a $1.5 million gift to the Outdoor Industries Women Coalition (today called Camber Outdoors) and the co-op led a CEO pledge to bring more women into the outdoor industry.
“At every step of the creative process we became more and more excited about what we were putting out into the world, and we saw people respond – from selfies with our catalog to seeing orange Force of Nature bandanas out on the trail to this day,” Paolo says. “We are really proud of the work.”
HANDPICKED RELATED CONTENT: How Content Influences the Purchasing Process: Tips for Content Marketers [Research]
Build the right crew
Though the Content Marketing Institute honored Paolo with its 2017 Content Marketer of the Year award, he’s quick to point out that his team does “kick-ass work” and deserves credit for the high-quality, creative content REI produces.
Most people on the REI content marketing team have journalism degrees, and many come with brand experience from working with companies such as Starbucks, Razorfish, and Uber.
“We look for people who have the skills and mindset of journalists because we have to deliver content at a standard set by publishers and in service of our members,” he says. “Our teams know how to identify a story and report on it with fact-checking and a multi-source approach at pace.”
.@REI’s @paolojr looks to hire people who have the skills & mindset of journalists for the #content team.
Click To Tweet
At the same time, the team understands what it means to work for a retail brand. “We know – and want our readers to know – we’re serving a different kind of purpose than a traditional publisher. Sometimes we’re part of the story itself. What’s most important is that we’re transparent with readers in our role and the stories we cover.”
The feeling is mutual. “Paolo’s strongest asset is probably his attention to detail,” says Joe Crosby, content marketing manager at REI. “I don’t mean crossing t’s and dotting i’s, though it’s that, too. It’s his attention to macro trends in media, advertising, and technology. It’s his attention to what’s going on in other parts of our business, and how it’s all translated through a channel strategy. He’s constantly learning about what’s going on inside our walls and out, and I think that drives his sense of innovation – but never innovating for innovation’s sake. Innovating for the business and, most importantly, the customer.”
Adds Joe, “When people talk about REI content marketing, they often talk about the exposure of our films or some of our contributions to important brand moments like Force of Nature or #OptOutside. But what they don’t know is that Paolo started this team from scratch just a few years ago, with basically a rudimentary blog and no films.”
HANDPICKED RELATED CONTENT:
How to Train a Journalist in Content Marketing
An Easy-to-Apply Framework to Build Your (New or Mature) Content Marketing Team
Decide to lead
While Paolo sees a lot of content marketing peers working hard to enhance their skills, he’d like to encourage more to progress in their careers. “Content is a leading channel for marketing. Do emerging content leaders want to accelerate their program’s authority? Affect the way to engage with customers? The opportunity is now,” he says. “It’s time to rise to the challenge.”
Who is rising to the challenge? Find out in the coming weeks as we profile the 2018 Content Marketer of the Year finalists.
Want to make sure you’re one of the first to read about the 2018 Content Marketer of the Year finalists? Sign up for CMI’s daily newsletter.
You can witness the naming of the 2018 Content Marketer of the Year – and spend a few days learning from experts to improve your content marketing leadership skills so you could be a Content Marketer of the Year one day. Attend Content Marketing World Sept. 4-7 in Cleveland, Ohio. Register today using code BLOG100 to save $100.
Cover image by Joseph Kalinowski/Content Marketing Institute
The post Content Marketer of the Year Shares the REI Story appeared first on Content Marketing Institute.
Content Marketer of the Year Shares the REI Story syndicated from https://hotspread.wordpress.com
0 notes
Photo

Testing Data-Intensive Code With Go, Part 3
Overview
This is part three out of five in a tutorial series on testing data-intensive code with Go. In part two, I covered testing against a real in-memory data layer based on the popular SQLite. In this tutorial, I'll go over testing against a local complex data layer that includes a relational DB and a Redis cache.
Testing Against a Local Data Layer
Testing against an in-memory data layer is awesome. The tests are lightning fast, and you have full control. But sometimes you need to be closer to the actual configuration of your production data layer. Here are some possible reasons:
You use specific details of your relational DB that you want to test.
Your data layer consists of several interacting data stores.
The code under test consists of several processes accessing the same data layer.
You want to prepare or observe your test data using standard tools.
You don't want to implement a dedicated in-memory data layer if your data layer is in flux.
You just want to know that you're testing against your actual data layer.
You need to test with a lot of data that doesn't fit in memory.
I'm sure there are other reasons, but you can see why just using an in-memory data layer for testing may not be enough in many cases.
OK. So we want to test an actual data layer. But we still want to be as lightweight and agile as possible. That means a local data layer. Here are the benefits:
No need to provision and configure anything in the data center or the cloud.
No need to worry about our tests corrupting the production data by accident.
No need to coordinate with fellow developers in a shared test environment.
No slowness over the network calls.
Full control over the content of the data layer, with the ability to start from scratch any time.
In this tutorial we'll up the ante. We'll implement (very partially) a hybrid data layer that consists of a MariaDB relational DB and a Redis server. Then we will use Docker to stand up a local data layer we can use in our tests.
Using Docker to Avoid Installation Headaches
First, you need Docker, of course. Check out the documentation if you're not familiar with Docker. The next step is to get images for our data stores: MariaDB and Redis. Without getting into too much detail, MariaDB is a great relational DB compatible with MySQL, and Redis is a great in-memory key-value store (and much more).
> docker pull mariadb ... > docker pull redis ... > docker images REPOSITORY TAG IMAGE ID CREATED SIZE mariadb latest 51d6a5e69fa7 2 weeks ago 402MB redis latest b6dddb991dfa 2 weeks ago 107MB
Now that we have Docker installed and we have the images for MariaDB and Redis, we can write a docker-compose.yml file, which we'll use to launch our data stores. Let's call our DB "songify".
mariadb-songify: image: mariadb:latest command: > --general-log --general-log-file=/var/log/mysql/query.log expose: - "3306" ports: - "3306:3306" environment: MYSQL_DATABASE: "songify" MYSQL_ALLOW_EMPTY_PASSWORD: "true" volumes_from: - mariadb-data mariadb-data: image: mariadb:latest volumes: - /var/lib/mysql entrypoint: /bin/bash redis: image: redis expose: - "6379" ports: - "6379:6379"
You can launch your data stores with the docker-compose up command (similar to vagrant up). The output should look like this:
> docker-compose up Starting hybridtest_redis_1 ... Starting hybridtest_mariadb-data_1 ... Starting hybridtest_redis_1 Starting hybridtest_mariadb-data_1 ... done Starting hybridtest_mariadb-songify_1 ... Starting hybridtest_mariadb-songify_1 ... done Attaching to hybridtest_mariadb-data_1, hybridtest_redis_1, hybridtest_mariadb-songify_1 . . . redis_1 | * DB loaded from disk: 0.002 seconds redis_1 | * Ready to accept connections . . . mariadb-songify_1 | [Note] mysqld: ready for connections. . . .
At this point, you have a full-fledged MariaDB server listening on port 3306 and a Redis server listening on port 6379 (both are the standard ports).
The Hybrid Data Layer
Let's take advantage of these powerful data stores and upgrade our data layer to a hybrid data layer that caches songs per user in Redis. When GetSongsByUser() is called, the data layer will first check if Redis already stores the songs for the user. If it does then just return the songs from Redis, but if it doesn't (cache miss) then it will fetch the songs from MariaDB and populate the Redis cache, so it's ready for the next time.
Here is the struct and constructor definition. The struct keeps a DB handle like before and also a redis client. The constructor connects to the relational DB as well as to Redis. It creates the schema and flushes redis only if the corresponding parameters are true, which is needed only for testing. In production, you create the schema once (ignoring schema migrations).
type HybridDataLayer struct { db *sql.DB redis *redis.Client } func NewHybridDataLayer(dbHost string, dbPort int, redisHost string, createSchema bool, clearRedis bool) (*HybridDataLayer, error) { dsn := fmt.Sprintf("root@tcp(%s:%d)/", dbHost, dbPort) if createSchema { err := createMariaDBSchema(dsn) if err != nil { return nil, err } } db, err := sql.Open("mysql", dsn+"desongcious?parseTime=true") if err != nil { return nil, err } redisClient := redis.NewClient(&redis.Options{ Addr: redisHost + ":6379", Password: "", DB: 0, }) _, err = redisClient.Ping().Result() if err != nil { return nil, err } if clearRedis { redisClient.FlushDB() } return &HybridDataLayer{db, redisClient}, nil }
Using MariaDB
MariaDB and SQLite are a little different as far as DDL goes. The differences are small, but important. Go doesn't have a mature cross-DB toolkit like Python's fantastic SQLAlchemy, so you have to manage it yourself (no, Gorm doesn't count). The main differences are:
The SQL driver is "http://ift.tt/1kNPaoi".
The database doesn't live in memory, so it is recreated every time (drop and create).
The schema must be a slice of independent DDL statements instead of one string of all statements.
The auto incrementing primary keys are marked by AUTO_INCREMENT.
VARCHAR instead of TEXT.
Here is the code:
func createMariaDBSchema(dsn string) error { db, err := sql.Open("mysql", dsn) if err != nil { return err } // Recreate DB commands := []string{ "DROP DATABASE songify;", "CREATE DATABASE songify;", } for _, s := range (commands) { _, err = db.Exec(s) if err != nil { return err } } // Create schema db, err = sql.Open("mysql", dsn+"songify?parseTime=true") if err != nil { return err } schema := []string{ `CREATE TABLE IF NOT EXISTS song ( id INTEGER PRIMARY KEY AUTO_INCREMENT, url VARCHAR(2088) UNIQUE, title VARCHAR(100), description VARCHAR(500) );`, `CREATE TABLE IF NOT EXISTS user ( id INTEGER PRIMARY KEY AUTO_INCREMENT, name VARCHAR(100), email VARCHAR(100) UNIQUE, registered_at TIMESTAMP, last_login TIMESTAMP );`, "CREATE INDEX user_email_idx ON user (email);", `CREATE TABLE IF NOT EXISTS label ( id INTEGER PRIMARY KEY AUTO_INCREMENT, name VARCHAR(100) UNIQUE );`, "CREATE INDEX label_name_idx ON label (name);", `CREATE TABLE IF NOT EXISTS label_song ( label_id INTEGER NOT NULL REFERENCES label (id), song_id INTEGER NOT NULL REFERENCES song (id), PRIMARY KEY (label_id, song_id) );`, `CREATE TABLE IF NOT EXISTS user_song ( user_id INTEGER NOT NULL REFERENCES user (id), song_id INTEGER NOT NULL REFERENCES song (id), PRIMARY KEY (user_id, song_id) );`, } for _, s := range (schema) { _, err = db.Exec(s) if err != nil { return err } } return nil }
Using Redis
Redis is very easy to use from Go. The "http://ift.tt/2q2TWuR" client library is very intuitive and faithfully follows the Redis commands. For example, to test if a key exists, you just use the Exits() method of the redis client, which accepts one or more keys and returns how many of them exist.
In this case, I check for one key only:
count, err := m.redis.Exists(email).Result() if err != nil { return err }
Testing Access to Multiple Data Stores
The tests are actually identical. The interface didn't change, and the behavior didn't change. The only change is that the implementation now keeps a cache in Redis. The GetSongsByEmail() method now just calls refreshUser_Redis().
func (m *HybridDataLayer) GetSongsByUser(u User) (songs []Song, err error) { err = m.refreshUser_Redis(u.Email, &songs) return }
The refreshUser_Redis() method returns the user songs from Redis if they exist and otherwise fetches them from MariaDB.
type Songs *[]Song func (m *HybridDataLayer) refreshUser_Redis(email string, out Songs) error { count, err := m.redis.Exists(email).Result() if err != nil { return err } if count == 0 { err = m.getSongsByUser_DB(email, out) if err != nil { return err } for _, song := range *out { s, err := serializeSong(song) if err != nil { return err } _, err = m.redis.SAdd(email, s).Result() if err != nil { return err } } return } members, err := m.redis.SMembers(email).Result() for _, member := range members { song, err := deserializeSong([]byte(member)) if err != nil { return err } *out = append(*out, song) } return out, nil }
There is a slight problem here from a testing methodology point of view. When we test through the abstract data layer interface, we have no visibility into the data layer implementation.
For example, it's possible that there is a big flaw where the data layer completely skips the cache and always fetches the data from the DB. The tests will pass, but we don't get to benefit from the cache. I'll talk in part five about testing your cache, which is very important.
Conclusion
In this tutorial, we covered testing against a local complex data layer that consists of multiple data stores (a relational DB and a Redis cache). We also utilized Docker to easily deploy multiple data stores for testing.
In part four, we will focus on testing against remote data stores, using snapshots of production data for our tests, and also generating our own test data. Stay tuned!
by Gigi Sayfan via Envato Tuts+ Code http://ift.tt/2BhZmbJ
0 notes
Last Seen Blogs