#signaturepad
Text
Customised leather signature pad

https://www.aquaholic.com.sg/f-b-promos/leather-signature-pad/
0 notes
Photo

HUION 420 Professional Graphics Drawing Tablet #SignaturePad #DigitalPen Tblet (Perfect for osu) with Gift Ten Pen Nibs #PlasmarIdeas #Escritores #Compositores #Charlas #Redaccion #Estudiantes #backtoschoolshopping (en República Dominicana) https://www.instagram.com/p/CTGLMRGsqvj/?utm_medium=tumblr
#signaturepad#digitalpen#plasmarideas#escritores#compositores#charlas#redaccion#estudiantes#backtoschoolshopping
0 notes
Photo
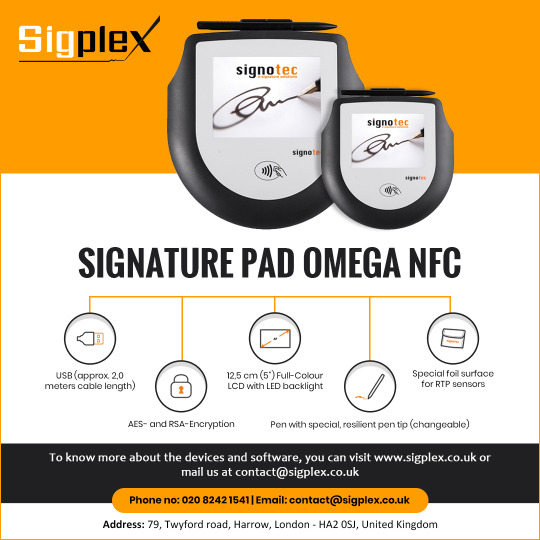
Signature Pad Omega NFC - Sigplex
E-signature pad is used to capture signatures into online/electronic documents without any print, copy or scan of the document. Esignature devices validate the identity and verify authenticity of a document.
Read more - https://www.sigplex.co.uk/colour-lcd-pad-omega-nfc.html
Call 020 8242 1541 for more details.
E-mail us at : [email protected]
#Sigplex#signaturepad#digitalsignaturedevice#signaturepadonline#electronicsignature#digitalsignature#london#uk#Omega NFC
0 notes
Photo

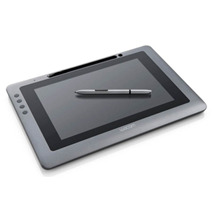
Wacom STU-540/541 Signature Pad Distributor In UAE and Middle East at eTOP Solution. As our most advanced and robust premium signature pads, the Wacom STU-540/541 feature a 5" high-resolution color screen with hardened cover glass for superb durability. ( Visit Now: https://bit.ly/2LrApOX ) Order Now with eTOP SOLUTION in UAE Market like Dubai, Fujairah, Sharjah, Ajman, Abu Dhabi, Ras Al Khaimah and Umm Al Quwain. eTOP Solution extended services includes in countries like Algeria, Angola, Botswana, Ethiopia, Ghana, Kenya, Libya, Nigeria, Rwanda, South Africa, Tanzania, Tunisia, Uganda, Bahrain, Cyprus, Egypt, Jordan, Kuwait, Lebanon, Oman, Qatar, Saudi Arabia, Turkey, United Arab Emirates, Yemen, Other African & Asian Countries. #wacom #STU541 #SignaturePad #SignaturePadstu541 #stu541SignaturePad #wacomsignature541 #premiumsignaturepads https://www.instagram.com/p/B5s4XTzp45h/?igshid=iaq696p9b7ya
#wacom#stu541#signaturepad#signaturepadstu541#stu541signaturepad#wacomsignature541#premiumsignaturepads
0 notes
Photo

Wacom STU-530 Signature Pad Flat, robust and secure With its 5" high resolution color LCD screen that accommodates signatures and promotional messages. ( Visit: https://bit.ly/367CFTE ) the Wacom STU-530 signature pad is ideal for use at POS or customer-facing counters. It offers an exceptionally comfortable signing experience with an improved, thin design and a low-profile surface. Available at Wacom Middle East supplier in UAE Market like Dubai, Fujairah, Sharjah, Ajman, Abu Dhabi, Ras Al Khaimah and Umm Al Quwain. eTOP Solution extended services includes in countries like Algeria, Angola, Botswana, Ethiopia, Ghana, Kenya, Libya, Nigeria, Rwanda, South Africa, Tanzania, Tunisia, Uganda, Bahrain, Cyprus, Egypt, Jordan, Kuwait, Lebanon, Oman, Qatar, Saudi Arabia, Turkey, United Arab Emirates, Yemen, Other African & Asian Countries #Wacom #STU530 #SignaturePad #stu530Flat #stulcd #stusignaturepad #wacomsignaturepad #wacomstu530 #WacomSTU530 #SignProPDF https://www.instagram.com/p/B5s2xhbFUDM/?igshid=xru2mgnukykj
#wacom#stu530#signaturepad#stu530flat#stulcd#stusignaturepad#wacomsignaturepad#wacomstu530#signpropdf
0 notes
Photo
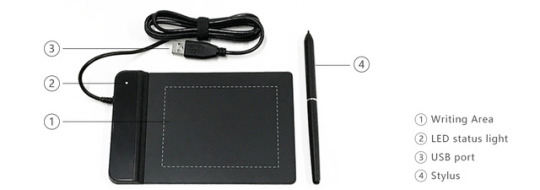
The #Huahui PT1 is their excellent E-Signature Tablet. It adopts the leading electromagnetic and pressure-sensing technologies, which provides stable product performance with low consumption. Through the information like the signature path with x/y coordinates, pressure and timeline provided by its internal dynamic depot, the PT1 can capture the legally enforceable bioinformation of users. As an input device of hand-writing signature, the PT1 is portable to operate and widely used in multi-scenes and industries such as Telecom communication, insurance, E-payment, bank, law firm, E-government, etc.
See product here: http://huahuico.com/pt1/
0 notes
Link
0 notes
Text
Angular Components For Digital Signatures - SignaturePad
Angular Components For Digital Signatures – SignaturePad
The SignaturePad provides components and utils for digital signatures that allow you to draw smooth signatures based on HTML5 canvas and uses variable width Bézier curve interpolation.
Installation:
$ npm install angular-signature-pad --save
Usage:
Import the SignaturePad into your app module.
import { AngularSignaturePadModule } from 'angular-signature-pad'; @NgModule({ imports: [ ...…
View On WordPress
0 notes
Photo

HUION 420 Professional Graphics Drawing Tablet #SignaturePad #DigitalPen Tblet (Perfect for osu) with Gift Ten Pen Nibs #PlasmarIdeas #Escritores #Compositores #Charlas #Redaccion #Estudiantes #backtoschoolshopping (en Santo Domingo, Dominican Republic) https://www.instagram.com/p/CTGLB7xs-64/?utm_medium=tumblr
#signaturepad#digitalpen#plasmarideas#escritores#compositores#charlas#redaccion#estudiantes#backtoschoolshopping
0 notes
Photo

Signature Pad Sigma - Sigplex
We have a solution to your online document signature problem. With our digital signature pads now you can capture your original signature for the digital documents like word, pdf files.
Visit: https://www.sigplex.co.uk/lcd-pad-sigma-without-backlight.h…
Call: 020 8242 1541
Email: [email protected]
#sigplex#digitalsignature#signaturepad#electronicsignature#electronicsignaturefree#createdigitalsignature#electronicsignaturepdf#createelectronicsignature#sigma#digital#sign#uk#pdf
0 notes
Link
Sigplex offers electronic signature pads, digital signature software's to capture and verify electronic signatures in digital documents like pdf, word. Products are available to purchase from Sigplex website only.
0 notes
Text
How To Create A SignaturePad Application Using Xamarin.Forms
In this article, we will discuss about how to create an SignaturePad Application using Xamarin.Forms.So, let us dive into the article.SignaturePad is used for taking signatures in digital way i.e., through electronic devices like Mobiles. This is digital signature is used to take digital signature on the docs like PDF, Word,... Now, we will see how to develop a SignaturePad.
source https://www.c-sharpcorner.com/article/how-to-create-a-signaturepad-using-xamarin-forms/
from C Sharp Corner https://ift.tt/2M6K93F
0 notes

Text
How To Create A SignaturePad Application Using Xamarin.Forms
In this article, we will discuss about how to create an SignaturePad Application using Xamarin.Forms.So, let us dive into the article.SignaturePad is used for taking signatures in digital way i.e., through electronic devices like Mobiles. This is digital signature is used to take digital signature on the docs like PDF, Word,... Now, we will see how to develop a SignaturePad.
from C-Sharpcorner Latest Content https://ift.tt/2vJXbci
0 notes
Text
Ionic 3 and Angular 4:Create a Welcome Page with Login and Logout.
Most of the mobile applications starts with welcome page with login and signup buttons. A proper login or signup redirects to application home page and there you can navigate to different pages and finally you can end up with a logout action. Today’s tutorial is all about this. Here I am using AngularJS 4 and Ionic 3. The combination of AngularJS and Ionic in handling login is a straight forward process. This design is already explained in my previous posts using
ReactJS navigations
. Lets see how to set a starting page using Ionic 3 and AngularJS4 and learn basic understanding of how the navigation works.
Video Tutorial
Ionic 3 and Angular 4 Create a Welcome Page with Login and Logout.
VIDEO
Install NodeJS
You need node.js to create a development server, download and install the latest version.
Installing Ionic and Cordova
You will find these instructions in Ionic Framework installation document..
$ npm install -g cordova ionic
$ ionic start --v2 YourAppName tabs
$ cd YourAppName
$ npm install
$ ionic serve
Open your web browser and launch your application at http://localhost:8100.
Generate Ionic Pages
You have to create a pages for welcome, login and signup models. The following ionic command help you to created automatically.
$ ionic g page welcome
$ ionic g page login
$ ionic g page signup
app.module.ts
Now got src/app/app.module.ts and import Welcome, Login and Signup pages.
import { NgModule, ErrorHandler } from '@angular/core';
import { BrowserModule } from '@angular/platform-browser';
import { IonicApp, IonicModule, IonicErrorHandler } from 'ionic-angular';
import { MyApp } from './app.component';
import { Welcome } from '../pages/welcome/welcome';
import { Login } from '../pages/login/login';
import { Signup } from '../pages/signup/signup';
import { AboutPage } from '../pages/about/about';
import { ContactPage } from '../pages/contact/contact';
import { HomePage } from '../pages/home/home';
import { TabsPage } from '../pages/tabs/tabs';
import { StatusBar } from '@ionic-native/status-bar';
import { SplashScreen } from '@ionic-native/splash-screen';
import { SignaturePadModule } from 'angular2-signaturepad';
@NgModule({
declarations: [
MyApp,
AboutPage,
ContactPage,
HomePage,
Welcome,
Login,
Signup,
TabsPage
],
imports: [
BrowserModule,
IonicModule.forRoot(MyApp)
],
bootstrap: [IonicApp],
entryComponents: [
MyApp,
AboutPage,
ContactPage,
HomePage,
Welcome,
Login,
Signup,
TabsPage
],
providers: [
StatusBar,
SplashScreen,
{provide: ErrorHandler, useClass: IonicErrorHandler}
]
})
export class AppModule {}
app.component.ts
Modify root page configuration, just replace tabsPage with Welcome.
import { Component } from '@angular/core';
import { Platform } from 'ionic-angular';
import { StatusBar } from '@ionic-native/status-bar';
import { SplashScreen } from '@ionic-native/splash-screen';
import { Welcome } from '../pages/welcome/welcome';
@Component({
templateUrl: 'app.html'
})
export class MyApp {
rootPage:any = Welcome; // Replace tabsPage with Welcome
constructor(platform: Platform, statusBar: StatusBar, splashScreen: SplashScreen) {
platform.ready().then(() => {
statusBar.styleDefault();
splashScreen.hide();
});
}
}
Theme - variables.scss
Go to src -> theme and modify brand colors.
$colors: (
primary: #2A2C43,
secondary: #677077,
lightprimary: #B5B5B7,
light: #f4f4f4,
dark: #222,
energy: #f2b632
);
$toolbar-background: color($colors, primary);
welcome.html
Design welcome page with Ionic components, for more understanding please watch the video tutorial.
<ion-content padding id="welcome">
<img src="assets/imgs/logo.png" class="logo"/>
<ion-grid>
<ion-row>
<ion-col>
<h1>Welcome to Your App</h1>
</ion-col>
</ion-row>
</ion-grid>
<ion-grid >
<ion-row>
<ion-col center text-center>
<button ion-button full color="success" (click)="signup()">Sign up</button>
</ion-col>
</ion-row>
<ion-row>
<ion-col center text-center>
<button ion-button full color="lightText" (click)="login()">Log in</button>
</ion-col>
</ion-row>
</ion-grid>
</ion-content>
welcome.ts
Controls for login and signup button actions, using this.navCtrl.push redirecting to different pages.
import { Component } from '@angular/core';
import { NavController } from 'ionic-angular';
import { Login } from '../login/login';
import { Signup } from '../signup/signup';
@Component({
selector: 'page-welcome',
templateUrl: 'welcome.html',
})
export class Welcome {
constructor(public navCtrl: NavController) {
}
login(){
this.navCtrl.push(Login);
}
signup(){
this.navCtrl.push(Signup);
}
}
welcome.scss
SASS nested for welcome page design.
page-welcome {
#welcome{
background: color($colors, energy);
h1{
font-size: 52px;
margin-top:50px
}
.marginTop{
margin-top:150px;
}
.logo{
height: 100px;
}
}
}
login.ts
Login page is redirecting to TabsPage, this page is configured with home, contact and about pages.
import { Component } from '@angular/core';
import { NavController } from 'ionic-angular';
import { TabsPage } from '../tabs/tabs';
@Component({
selector: 'page-login',
templateUrl: 'login.html'
})
export class Login {
constructor(public navCtrl: NavController) {
}
login(){
// Your app login API web service call triggers
this.navCtrl.push(TabsPage, {}, {animate: false});
}
}
home.html
Home page with logout buttons.
<ion-header>
<ion-navbar>
<img ion-right src="assets/imgs/bananalogo.png" class="navbarLogo" />
<ion-title>Home</ion-title>
</ion-navbar>
</ion-header>
<ion-content padding>
<h2>Welcome to Banana Project</h2>
<button ion-button color="primary" (click)="logout()">Logout</button>
</ion-content>
home.ts
Logout action to navigation to Welcome page.
import { Component } from '@angular/core';
import { NavController, App } from 'ionic-angular';
@Component({
selector: 'page-home',
templateUrl: 'home.html'
})
export class HomePage {
constructor(public navCtrl: NavController, public app: App) {
}
logout(){
// Remove API token
const root = this.app.getRootNav();
root.popToRoot();
}
}
Build iOS App
Following commands for executing Xcode build, watch the video tutorial you will understand more.
$ cordova add platform ios
$ ionic build ios
Build Android App
Open Android build using Android SDK>
$ cordova add platform android
$ ionic build android
Video Tutorial
Ionic 3 and Angular 4 Create a Welcome Page with Login and Logout.
VIDEO
via 9lessons Programming Blog http://ift.tt/2sff8PO
0 notes
Last Seen Blogs

cazawonke
CAZAWON

todayontumblr
Today on Tumblr

lia1010
Plaif _l

churcheternallife
WICCAN HOUSE / WICCAN KEY
notniyo
The vessel hath spoken.