#since I got photoshop cs6 back in the day I still have it and use it occasionally
Note
Hey um I'm staring to draw and I wad wondering if you had a suggestion on what app to use on computer because I have ibis paint and I don't want to get the premium because it expressive so if you have a suggestion that would help a lot thxs
I don't have a whole lot of knowledge about other programs, I definitely wouldn't recommend the one I started with, but I've heard FireAlpaca is a pretty good free one! I've also heard people mention Krita, but I don't know much about that one.
#ive mostly used photoshop and clip studio paint over the years#csp my beloved#since I got photoshop cs6 back in the day I still have it and use it occasionally#like I was using it to split the XYLiro pages for posting since it was a lot easier to do it in ps instead of csp
26 notes
·
View notes
Text
hey it’s a tutorial on how i make gifs
its a long one
carly, what programs do i need?
what a good question! basically, you need a program to record video (if you’re making gifs of video games), a program to take frames of the video you recorded (or the movie or show you’re giffing because you can do that too, obviously), and a graphic processing program (it’s photoshop, you need photoshop)
also if you’re recording your own game footage you need a computer capable of running that game well. ideally you want medium to high settings at 60fps (this varies; like you want to record, say, skyrim at high settings and probably modded, but newer games like mass effect andromeda, just medium-high settings should be fine!)
for video recording, i strongly recommend:
nvidia shadowplay
i think you can only use this if you have an nvidia graphics card. it’s very good because it automatically records at 60fps and at up to 4k (so like it’s good for taking regular video for video purposes also) and it starts up very quickly (so when you hit record, it’s only a few seconds before it starts recording). in-game, you hit alt+f9 to start recording.
xbox game dvr
i used this for a long time and it’s perfectly satisfactory, and great if you don’t have an nvidia graphics card. it comes with windows 10. you need to go into windows settings and set the quality to High and the framerate to 60fps. the only drawback is that it takes a hot minute to start up the first time you use it in a gaming session (like 10-30 seconds) and there are some games it won’t open over (i had issues with both assassin’s creed odyssey and far cry 5). in-game, you hit ctrl+alt+r to start recording.
for frame-taking:
gomplayer
has a slightly imprecise method of screenshotting, that is you have to time your “burst capture” while the video is playing - you can’t find the spot you want, pause it, start your capturing, and then play the video to have it start at an exact moment. however it really captures every frame and i’ve never had any issues with it. best advice is to record more frames than you need to and delete the ones you don’t need in windows explorer or photoshop. to open the screen-capture window, you hit ctrl+g
potplayer
i used this one for a long time, too! it does what i said gomplayer doesn’t do, which means you can pause it and start screencapturing and it’ll start from where you paused it when you hit play. i’ve had a few issues with it not actually capturing every frame even when i have it set to do so. but that might be just me. to open the screen capture window, you hit ctrl+g
for graphic handing:
photoshop. specifically cs5 -- that’s what i’ve used for about half a decade. i’m sure a lot of the steps are similar in cs6 and cc but i’ve never used either of them and i can’t help you learn those.
that’s it. no other options.
okay great!!!!!!! you got ur software set up. now what???
if you want to make gifs of video games where you use your own footage, read this bit. if not skip down to the next header.
at the most basic level, with creative cropping, you don’t really have to do anything more than record the screen of the game you’re playing. for a lot of games, this is what you have to do (dragon age origins and 2, stardew valley, etc). HOWEVER. there are ways to get different shots in some games and i’ll take you through skyrim/fallout 4 and dragon age inquisition (and i think other frostbite engine games?) if you have questions about other games you’re welcome to ask!
bethesda products (skyrim and fallout 4 mainly)
bethesda is very nice and includes console commands that let you get some good cinematic shots in their base games. these are the same for both skyrim and fallout 4 because they’re the same engine.
tfc
your bread and butter, baby. this is “toggle free camera” or “toggle fly camera” -- it detaches you from your character basically, and you can fly around. if you are in third person when you enter the console command, your character will remain visible and you can take pictures of them. in first person, theyre not. (also, drawn weapons will disappear in first person). note that in fallout 4 third person, your character will continue to rotate/strafe as you move the camera.
you can add a 1 to the end of the command (tfc 1) and it will also freeze time. this is good for taking screenshots, not gifs
entering tfc again will turn it off
tm
‘toggle menu’ -- this turns off the hud, including the crosshair. this is. very important. you don’t want the menu in ur gifs ok.
it also hides the console window! so it may be a little confusing. but generally if the grass/water/dust is moving, the console window isn’t open.
typing tm again will reenable the menus
sucsm #
the default free cam is very fast and imprecise. i usually use sucsm 1 to slow down the speed at which the camera moves.
sgtm #
set global time multiplier. this one isn’t hugely necessary but i still find myself using it sometimes. default is 1. you can set it to, like sgtm .01 to basically freeze the game while you get the camera into position if you’re trying to capture an action. also sometimes if i think things are moving too fast or too slow i’ll change the timescale. MAKE SURE you set it back to 1 when you’re done!
i Heavily suggest, especially for skyrim, that you use an ENB if your computer can handle it. it makes the game look nice, but it also usually includes depth of field which i am an absolute slut for. if not, use the mod dynavision for a DoF effect (available for both skyrim and fo4!)
and then you just have fun with it. getting good shots takes some practice. play with it. i tend to record long sessions (~5-10 minutes) with a LOT of different shots to pick from when i watch it back.
frostbite engine (dragon age inquisition and mass effect andromeda, notably)
here’s where we use the Cinematic Tools, lads! these are a little more difficult. note that there are ct for a lot of games that i don’t play but i’m assuming they work the same. i’ve also never used CT in andromeda but it’s the same engine so they also probably work the same. so i’m mainly talking about DA:Inquisition.
OKAY SO. start the game. load ‘er up. you want to run origin and DAI as admin, and then once you’re in game, start the CT as admin, too. the controls window will open, and then another command prompt type window will open and hack into the matrix. you don’t have to do anything with it, but note that if you close the command prompt window, it will close the game.
okay! party time. there are lots of other tutorials on using the CT, btw, so if i don’t explain it sufficiently you can either ask me or look up other tutorials.
first, i usually take gifs of characters in DAI, which means i wait until cutscenes so we can see them talking or making faces or whatever. you can also do scenery gifs or whatever!
so we’re in a cutscene. first and foremost check “freeze time” and then “enable”. set up your shots. start recording. THEN uncheck “freeze time”. that’s all in the “free camera” tab of the CT and technically all you need. But wait, there’s more. we’ve got two other tabs!
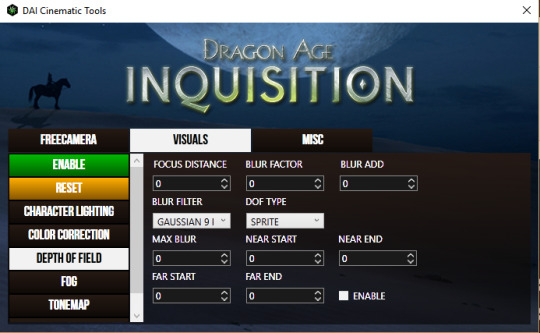
in this tab, I most often use “depth of field” because we’ve already established that i love a strong DoF. all these things are a little hard to understand and mostly require a lot of messing around.
focus distance
pretty self explanatory -- it’s the distance from the camera that objects will be in focus. for portraits, i usually have it at 1.125.
blur factor
how blurry the stuff that’s out of focus will be. i usually set it somewhere between 4 and 7, though you can go higher or lower. dealer’s choice.
blur add
makes everything blurry regardless of focus. don’t use it.
blur filter
i almost always set it to gaussian 9 but it doesn’t make that much of a difference.
dof type
always set it to sprite
max blur
i absolutely do not know what this does and don’t use it.
near start/end
with this you can kind of expand “focus distance” to include more varied distances. i usually don’t mess with this and i suggest you don’t.
far start/end
most useful in outdoor scenes. usually it’ll be set to like 100, meaning that there’s a gradient way out to the most blurred parts. if you bring it lower, the gradient distance gets shorter, so the background gets blurrier closer to your focus. what i set it to depends entirely on the scene. just try messing with it and see what it does for you.
make sure you hit the green enable button on the left and Also tick “enable” on the DOF screen to use it.
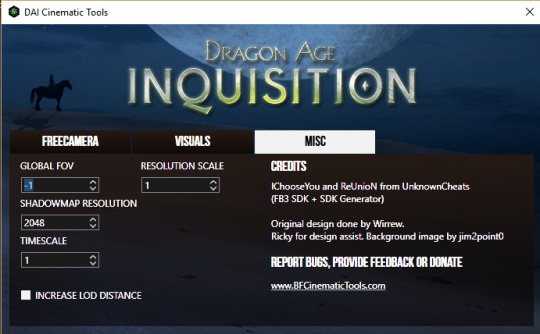
this tab is a little more useful for screenshotting but i’ll include it since i’m going over the CT anyway. i have never messed with global fov or timescale BUT
shadowmap resolution
i usually set it down to 512 for smooth, soft, realistic shadows. otherwise they look kinda stripey.
resolution scale
NOT FOR GIFS. do not use this for gifs. but DEFINITELY do use it for screencaps. set it to two (i’ve had my computer freeze from trying to set it to 4, so like, be careful). it basically doubles the resolution of everything on screen and makes it very pretty but it’ll ruin your framerate so don’t try to record with it.
okay, I’ve got my footage, now what!
now we’re gonna open it in whichever player you picked.
GOMPLAYER:
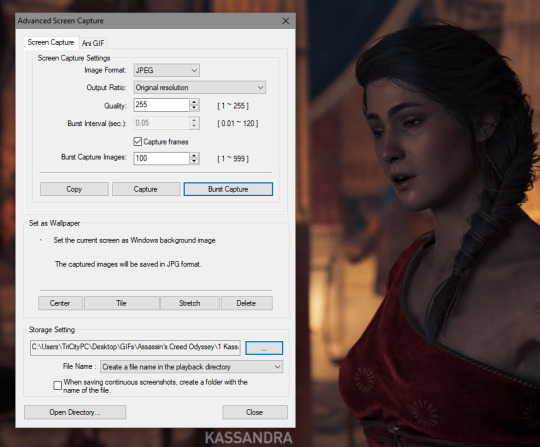
for gomplayer, you’re going to press ctrl + g to bring up the screencapture window. i Don’t remember what the original settings are, but you wanna make sure your quality is set to 255 (highest) and that it’s set to original resolution.
now the slightly hard part. you gotta hit “burst capture” while the video is playing, so it’s slightly imprecise. for that reason i have the number (burst capture images) set much higher than i’ll use, so that i make up for the imprecision. after you capture, go in and delete the frames you don’t need, either in windows explorer or after you’ve loaded them into photoshop.
POTPLAYER:
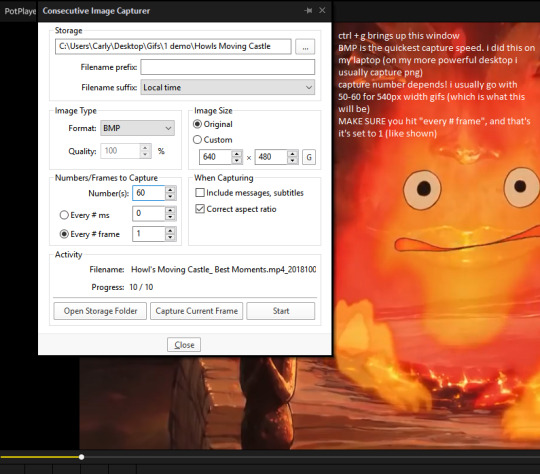
just pause your video, hit ctrl+g, copy my settings, click start, and then play your video. potplayer will capture every frame.
i should have mentioned this earlier but you have to have a folder to save your screencaps in. i usually organize by GIFS>game name># what its a gif of>a numbered folder for each gif in the set. but it’s up to you. just probably don’t save to your desktop or wherever the default location is.
AND NOW THE FUN PART!!
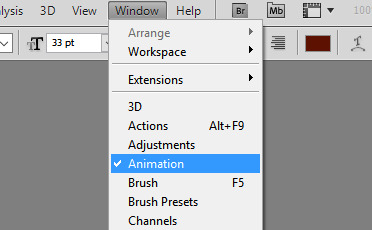
open photoshop!!! if it’s your first time here, go to window>animation so that you’ll. have the animation window open.
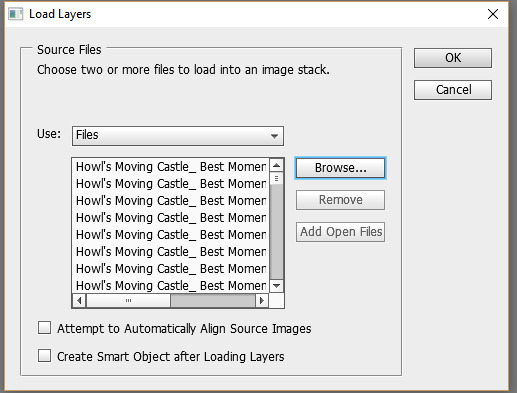
now go file > load files into stack > browse, and find the frames we just took. select em all. click ok.
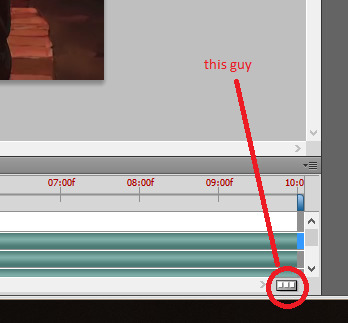
you’re probably going to start off in timeline view. we don’t want that yet. click the box in the bottom right corner that looks like multiple little boxes to switch to frame view.
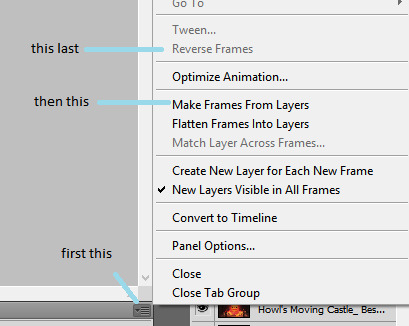
in frame view, click the menu box thing. and click “make frames from layers” and then “reverse frames”
now select all your frames, and on any one of them, select the arrow next to “0.0 sec” (this is the frame delay). select “other”
what you set the frame delay to depends on what your footage frame delay originally was. if you’re using game footage, it was probably 60fps, in which case you should set the delay to 0.04 sec. if it was 30 fps, I usually go 0.06 to 0.08. play around with it and decide which you like best. there’s a play button so you can see how the delay looks before you continue.
now we switch back over to timeline view. so click the same button as we used to get to frame view.
now select all your layers, in the layer panel. right click on them and click “convert to smart object”
here is usually where I do my scaling/cropping. tumblr photoset sizes are 540px for full width, 268 for 2 wide, and 177 for 3 wide. KEEP IN MIND when making especially 540px gifs that the size limit is 3mb. so you can’t make them super tall or super long (time-wise).
the gif of calcifer i’m making is going to be 540x250. make use of set image size (ctrl + alt + i) and canvas size (ctrl + alt +c). set the width of 540 with image size and then crop the canvas to your desired height with canvas size.
okay! technically we can be done. this is what my gif looks like right now:

however i like to color and edit mine. yknow. here are my sharpening settings. I cannot help you with coloring because i’m bad at it. at best i will suggest you look at and download resource colorings from blogs like itsphotoshop
anyway, to sharpen: filter>sharpen>smart sharpen
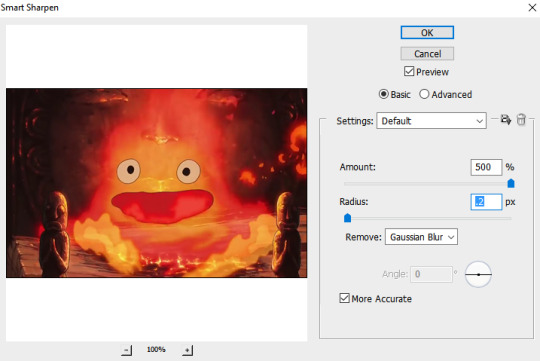
and then apply your coloring. and save with ctrl + alt + shift + s, or just file > save for web and devices. set your file type to GIF. two things to look at:
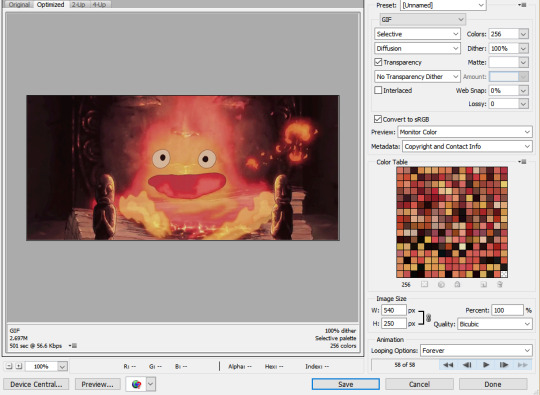
1) MAKE SURE YOU SET THE LOOPING OPTIONS TO “FOREVER”. i put this in caps because I am an idiot who messed this up all the time when i first started.
2) keep an eye on your file size!! if it’s over 3mb (mine, down in the left corner, says it’s 2.697, so it’s fine) then you can try to reduce the number of colors. but don’t go below 128 colors, because then it starts to look bad. instead you can try reducing the height or going back and cutting down the number of frames (so basically remaking the gif again :( ).
okay great, click save. save it. you’re done. here’s our calcifer.

and that’s it! i hope this made sense and like. absolutely ask if you have questions.
#i have been meaning to do this for. months. and finally got around to it these last few weeks!!!!#boy i really hope this all makes sense#carly tells tales#i'm not kidding this is really long. click read more at your own risk.
5 notes
·
View notes
Text
Photoshop HDR
Hi! Today I am going to show you, how to create a HDR image on Photoshop.
I originally wrote this tutorial for Photoshop CS3, within the years since then, Photoshop has gotten some of huge upgrades within the HDR space, and that we square measure currently at Photoshop CC. I actually have conjointly learned an excellent deal additional regarding the topic, thus i made a decision it had been time for AN update.
What is HDR and why will we would like it?
I n this tutorial we'll take a glance at HDR photography. HDRI (High Dynamic vary Imaging) was originally employed in 3D and is currently fully force in photography. primarily it’s the method of taking multiple exposures and merging them along into one thirty two bit image. Let Maine explain:
Watch the HDR Intro video that explains what HDR is
A camera is capable of capturing a restricted quantity of tones in an exceedingly single picture (we decision this dynamic vary, the vary of tones that may hold detail between pure black and pure white). generally we tend to sacrifice parts in an exceedingly picture once we set the cameras exposure. we tend to meter for the foremost vital a part of the scene. for instance let’s check out the series of pictures I shot at the Bradburry building in l. a. . the middle image could be a typical exposure, showing a median metering to supply the foremost detail potential. Notice that the detail outside the door is lost as a result of it’s too bright. conjointly the detail on the support rail is lost as a result of it’s too dark. once you square measure at the situation, you're able to see of these detail together with your eye, this is often be} as a result of the human eye will see a bigger vary of tones than the camera can capture on the detector or film in an exceedingly single photograph.
The solution is to require quite one photograph and bracket the photos. Shoot a standard exposure (center image), then under-expose (left) to capture the highlights outside the windows and over-expose (right) to capture shadow detail. Finally, merge these photos along to supply one image with a bigger vary of tones that may currently show all the small print within the shadows and highlights.
This tutorial can show you the way to complete this method with the minimum fuss.
This tutorial can work for all versions, together with CS6 and HDR in Photoshop CC. In Photoshop CC Camera Raw was supplemental as AN choice, and Lightroom 6/CC will currently merge HDR additional that here too.
I have conjointly simply supplemental a tutorial on HDR in private Raw (Photoshop CC 2015) (See bottom of this page for AN updated HDR resource list)
Tips for photographing HDR
First we'd like to capture our supply pictures with our camera. Technically you'll got to shoot a minimum of two photos with totally different exposure settings to form a HDR. I in person get smart results from three shots. i prefer to over expose and beneath expose by a pair of stops every. i do know this is often an even bigger bracket than some individuals square measure comfy with, except for the kind of HDR pictures i prefer to form (cityscapes), this works nice. If you’re shooting individuals, you'll wish to scale back this to single stops.
Sometimes you would like to capture quite three exposures. It extremely depends on what quantity distinction is in your scene. For the instance of the Bradburry building, I captured a series of images within a dark building in l. a. with a sunny day outside a glass window. I required seven photots with a pair of stops apart so as to capture the whole dynamic vary of that scene. you may be able to capture a lower distinction enviroment like a foggy day in an exceedingly single frame. however another time, for the bulk of HDR photography three shots square measure sometimes good. I set the camera for automotive vehicle Exposure Bracket and a couple of stops + and -. ensure that you just solely modification the shutter speed. If you alter the aperture, the depth of field also will modification, manufacturing unwanted blurring in your final composite. Use a stand if you'll, otherwise support yourself on a wall or solid object to scale back movement between frames.
Note: For real HDR, you shouldn’t use one raw image and exposure it many times as some individuals recommend. this is often supernumerary, as you'll use the Shadow and Highlight recovery and adjustment brush in private Raw or Lightroom to bring out identical quantity of detail within the picture. conjointly there has been information current, victimisation the term “Single Image HDR”. this is often referred to as pseudo-HDR. You can’t get HDR (HIGH Dynamic Range) from one SDR (STANDARD dynamic Range) picture. It’s like “single speaker stereo”, the digital informaition simply isn’t there. you'll apply a tone-mapped result to one image for a raunchy feel. It’s psudo HDR, however to not be confused with true HDR.
For additional details see the total four.5 hour video HDR and Photoshop
HDR in Photoshop tutorial
Step 1
Start with three pictures. One traditional exposure, the second underexposed and also the third overexposed. during this case I used a pair of stop bracketing. As I shoot plenty of town scapes I will escape with a pair of stops, as a result of I’m in the main shooting flat surfaces and adornment and posterization isn’t such a tangle. If your shooting rounded and arced surfaces you'll wish to lower your bracketing to urge drum sander gradients, though there's plenty of overlap already within the tones as a good DSLR camera will capture around eleven Stops of exposure.
I set the bracketing on my camera to a pair of stops. Then I set the shooting mode to burst. once I hold the shutter down, three photos are captured. I shoot within the RAW format for the widest potential dynamic vary. you'll still produce HDR if your camera doesn’t support RAW, however bear in mind a jpg is barely AN 8-bit file.
Make sure you shoot in Aperture Priority or in Manual. you wish to bracket the exposure time, not the Aperture. If you alter the aperture, the depth of field won’t be consistent and you’ll get blurring. conjointly avoid any moving subjects within the picture or you’ll get “ghosting” wherever one thing is barely in one frame and can seem terribly strange within the final. If you check out the 3 image that I used here, the center image features a ton of detail. However, the small print within the shadows square measure lost within the boats and also the town lights square measure too bright and lose detail data. The left image is beneath exposed to choose up the small print within the highlights like the buildings within the background. the proper hand picture is over exposed by a pair of stops to choose up the detail within the shadows, like the hulls of the boats and water reflections.
chi-boatExample
Step 2
Time to merge the photos along into one thirty two bit image. (Note: you'll currently do HDR in Lightroom 6/CC, tutorial here)
Choose File>Automate >Merge to HDR professional. This works on Photoshop CS2 – CS6 (CS2 Doesn’t have automotive vehicle align and it’s referred to as “Merge to HDR on versions older than CS5). opt for either pictures or folder. I organize every set of photos in its own folder thus I used the folder choice. choose your photos to merge. activate automotive vehicle Align in Photoshop CS3+. Click OK. (Photoshop uses Auto-align technology that even permits you to form HDR while not the utilization of a tripod!)
Step 3
Your pictures can currently be unified into one picture. you'll shut down individual photos by international organisation checking their boxes on the left filmstrip. If you get some blurring caused by camera shake within the longest exposure, you'll wish to show off that picture. If there's ghosting due to movement, click the box: take away Ghosts.
(When the mode is at sixteen or eight bit you'll see settings like this, if thirty two bit is chosen, it'll appear as if step 4)
Step 4
The unified result's a floating-point thirty two bit image. Change the mode to 32 bit. You can view the available tones by sliding the White Point slider. Note, this slider doesn’t change the image, it is there for you to examine the range of tones, because a monitor is incapable of displaying all the tonal detail in a 32-bit file all at once.
Note: In Photoshop CC there is a new option. “Complete Toning in Adobe Camera Raw” This option isn’t in CS6. If you are on Photoshop CS6 and lower, jump to step 5 right now.
If you are on CC and the “Complete Toning..” button is turned on, you won’t be able to move the slider. Click the option off and you will be able to move the slider and continue with the rest of the tutorial just like in CS6.
However, when the option is turned on, you will be able to use Camera Raw for the Tone Mapping instead of the HDR Pro settings. In this case, skip to step 8b.
However, I recommend learning both methods as they each have merit. The HDR Pro tone mapping (step 5+) will give you more control and enable you to create a surreal effect as well as powerful HDR controls. ACR (Camera Raw) has the advantage of being able to do very realistic HDR tonemapping without too much effort.
Step 5
You could do your tonemapping right now if you like, but I like to save a 32bit negative. Click OK to merge the photos into a 32 bit image. Now is a good time to save your file. Save as a psd, tif or open EXR.
If {you square measure|you're} operating with 3D and are wanting HDRI for IBL lighting, enviroments etc, save as open EXR as Maya and alternative 3D packages acknowledge this format. (you square measure finished here, photographers scan on).
Get in-the-know!
Join our list to receive additional tutorials and recommendations on Photoshop. Get exclusive tutorials, discounts and also the free super guides. No spam, all content, no quite once per week.
PhotoshopCAFE most well-liked List | no spam guarantee
Get your free seventy seven page CS6 Superguide
Step 6
In order to use the photos, you’ll got to convert them to sixteen or eight bit pictures. once we convert them we'll produce what I decision interpretations of the picture. the explanation I say this is often as a result of we've unlimited ways in which we will create the picture look. whereas we've this vast dynamic vary offered in thirty two bit, we'll now not have those choices when conversion. continuously work from the saved thirty two bit version, and so convert and save versions (personal interpretations). Avoid overwriting the thirty two bit image, it’s our master and that we might want to travel back to that repeatedly.
Choose Image>Mode>16 bit (or eight bit). currently we tend to get to play with some fun choices. You’re currently at the tone mapping a part of the method. this is often be} were all the power can ooze.
(If you wish to form the changes while not changing, opt for view>32 Bit Preview choices. you'll use many of Photoshop’s tools within the Image>Adjustments menu. the foremost vital of those is that the Exposure control)
You’ll see AN HDR Toning panel (HDR Conversion for versions before CS5). Exposure and Gamma is that the choice. Best thanks to approach this? Set the gamma 1st, then regulate the exposure to suit. If you wish a picture with millions of distinction, lower the gamma. for fewer distinction raise the gamma. Finally, regulate the exposure to urge the specified brightness. If you wish additional management, scan on… otherwise press okay to convert.
newHDR3
Step 7
Change the tactic to native Adaption. (There square measure four offered ways, however these square measure the sole a pair of with user input).
With native Adaption, you get some advanced Tone Mapping sliders and you'll regulate the curves. the utilization of curves is nonmandatory as they permit you to fine tune the opposite settings. Set these such as you would usually add curves, however don’t be afraid to clip the bar graph slightly. you'll clip as a result of you’re operating with a bigger dynamic vary than you’re wont to. Bring out the detail within the image, however don’t forget to place some shadow in there or it'll look washed out and pretend.
Edge Glow
Once your proud of the curve, regulate the radius and strength sliders to form positive there are not any halos within the picture. (Badly reborn HDR pictures have a glow round the areas of distinction.) The radius controls the mask blur whereas the strength decides however robust to use the result.
Tone and Detail
Gamma: this is often wherever you management the distinction. Extremes square measure washed out or super punchy.
Exposure: Controls the brightness.
Detail:This sharpens or softens the looks.
Advanced
Shadow: exposes details in darkest components of the photograph.
Highlight: Recovers detail within the brightest areas of the photograph.
Vibrance: This makes the picture additional colourful while not over saturating square measureas that are already colourful. (It’s smart).
Saturation: will increase or decreases the quantity of color. take care to not over saturate the colours as a rule. (Of course all rules will be broken on occasion).
Click okay to convert.
newHDR4
Step 8
Here we've a unified image from HDR. Photoshop is nice for manufacturing terribly realistic HDR pictures.
HDR, Lightroom and Camera RAW, (Photoshop CC)
A new development within the latest unharness of Lightroom. 4.2+ and Camera Raw in Photoshop CC, is that the ability to figure with thirty two bit pictures. this is often marvellous as a result of you'll use the adjustment brush to fine tune areas of the photograph whereas operating in an exceedingly thirty two bit enviroment. The image below shows the results of operating with the adjustment brush in Lightroom. Notice however i used to be able to craft the image. (The same is feasible with ACR). scan on for instructions…
In step 4, we tend to square measure within the Merge to HDR panel.
1. opt for thirty two bit from the Mode dropdown menu if it's in eight or sixteen bit mode.
2. activate the “Complete Toning in Adobe Camera Raw button”. The button at the lower right can modification from OK, to Tone in ACR.
3. Click the Tone in ACR button. THe image can currently open in private Raw. you'll perform all the same old changes that you just would neutralise Camera Raw, with the luxurious of engaged on a thirty two bit HDR image that has far more availible detail within the highlights and shadows.(Take advantage of the shadow and highlight sliders). See ACR Tutorial here
4. Click ok when Finished.
5. The image will still be in 32-bit mode. If you want to do further tonemapping, you can jump back to step 5 of this tutorial and work on your photo with the advanced tone mapping tools in Photoshop. Yes, you can double tone map an image with great results.
If you are happy with the current results and finished working on the tonal adjustments of the image, you just need to convert to 8 or 16 bit and finish off like you noramally would on a regular LDR (Low Dynamic Range) image. Choose Image>Mode> 8 or 16 bit. The tone mapping options will pop up, to keep the appearance exactly as it was in Camera Raw, choose Exposure and Gamma as the Method. Set the Exposure to 0 and the gamma to 1. Click ok and your image is done. Congratulations. (I know there is a lot to it, my 4.5 hour DVD makes it very easy to understand).
Note: If you can’t get the HDR Toning tools to open in Photoshop CC that’s because of a preference seting. Choose your preferences>File Handling. There is an option that says “Use Adobe Camera Raw to Convert Ducuments from 32 bit to 16/8 bit” If this is on, when you choose File>Mode you will see Camera Raw. If the Option is Off, Photoshop will use the standard HDR Toning options.
Lightroom
(More info and free video on editing HDR in Lightroom and/or ACR)
In order to work with a 32 bit file in Lightoom, you must do the following.
Screen Shot 2014-05-05 at 11-1.44.01 AM1. Merge to HDR as mentioned earlier in this tutorial.
2. Save as 32 bit file, be careful to save as a TIF, it will only work with a Tiff.
3. Import back into Lightroom
4. Use the adjustments as you would normally, but enjoy a lot more control and larger range of tones than before.
Step 9
If your desiring a more surreal result there are different plug-ins that you can use. My favorite is Photomatix pro from HDRsoft. You can just get the tone mapping plug in for Photoshop which works great.
Use the coupon code photoshopcafe to save 15% on Photomatix plugin and Photomatix pro
Using photomatix tone mapping plugin allows you to get highly detailed textures in your photographs. You merge in Photoshop as shown in this tutorial. Then choose Filter>Photomatix to apply tone mapping. Convert and save as normal.
Step 10
This image shows an image after tone mapping using Photomatix pro.
youtube
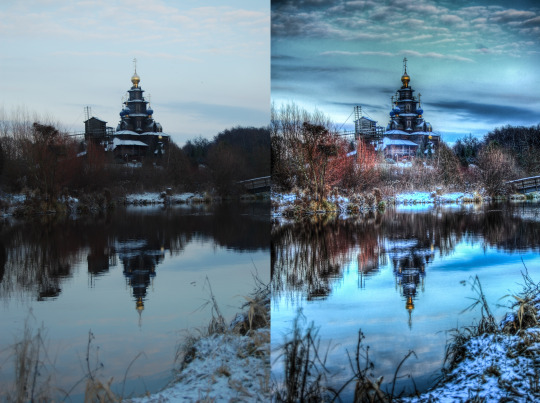
Step 11
Here you can see comparisons between a single image, subtle Photoshop HDR and a radical Photomatix effect Whatever result your after, hopefully this tutorial has helped demystify the HDR process.
I hope you enjoyed this tutorial!
2 notes
·
View notes
Text
My Photography Journey (Part2)
It took me another year after the charity event I did another photography work. Being a mother with no family around was always the problem with me. Until a client contacted to ask me if I do make up as well. In my big imagination, I thought it was possible to be a "One-man band”. I believe if I could do make up on people/clients, I would not need to pay a Make-up Artist. Once again, I enrolled myself in Belfast Metropolitan College-Titanic Quarter doing Level 2 NVQ in Nail Services, Beauty and Make-up. A year after I successfully gained my certificates and thought I was ready for the world. But unfortunately I was wrong, the money that a client paid me is enough for the time I did their make-up never mind doing the photoshoots after. And to be honest, it did put me off a little bit doing other photography work with make-up. After that, I decided to try assisting a well established photographer. I sent out a few applications but only one was interested and got back to me.
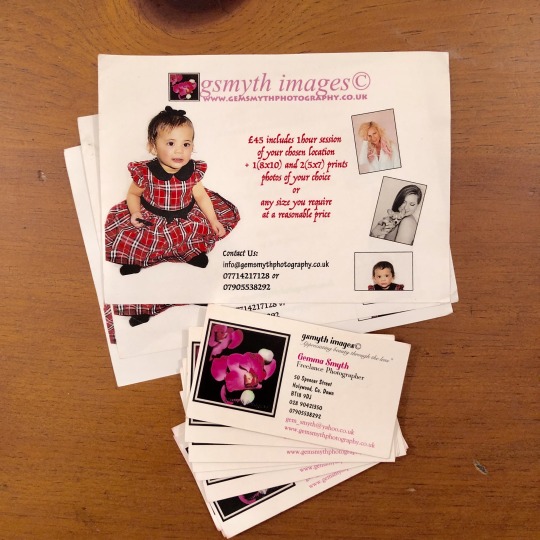
When I finally got to do it, I was totally disillusioned assisting other photographers and made up my mind that I need to be my own boss one way or another. This is when I started planning my next move which was doing freelance in Photography. I designed my own calling cards, flyers and bought photography equipment to make it happen. I was never disappointed and in fact it made me have more of a desire with photography.
I was doing okey but the reality of photography is like a nail technicians job you have to keep up with what is popular and what is in-demand. We have to reinvent ourselves to keep up with it. That is when I enrolled myself in Ulster University in Belfast to once again reinvent and discover my utmost potential in the Photography field. I’m excited to find out what the coming years can offer me in discovering what other hidden creativity I have. So far, we have amazing instructors who are willing to share their years of experience just for us to be equipped and competitive in the real world of today’s photography.
My Professional Practice
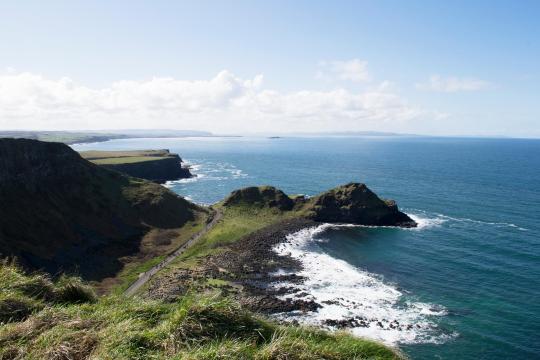
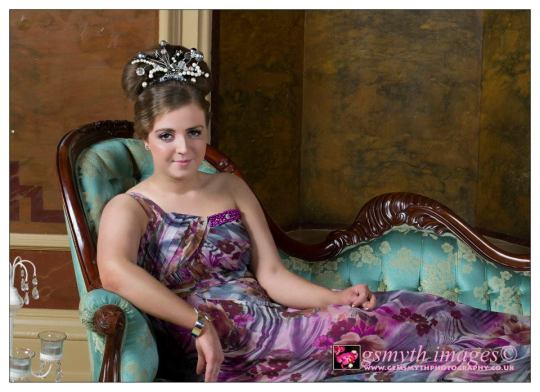
I am a visual type of person. When I’m reading an article I prefer to see photos to give me the real feel or understanding of what it is about. Before I decided to focus on Portrait Photography, I have given myself the chance to explore other types of photography like landscape, fine art, product(Commercial Photography), Architecture, Fashion and other things. But I keep going back to the Portrait Photography. Sample of my work as follows;
Landscape (The Giant Causeway)
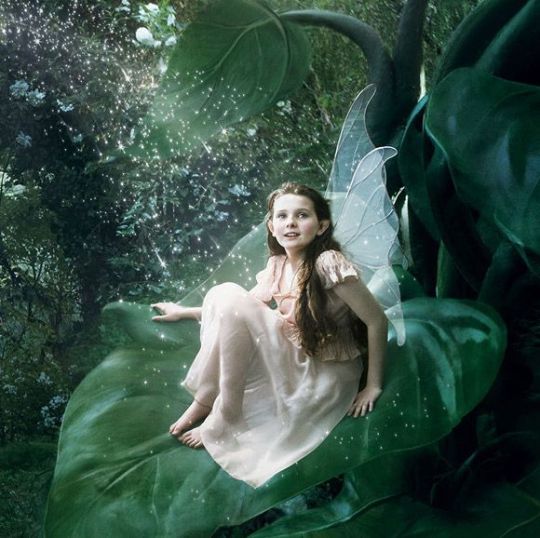
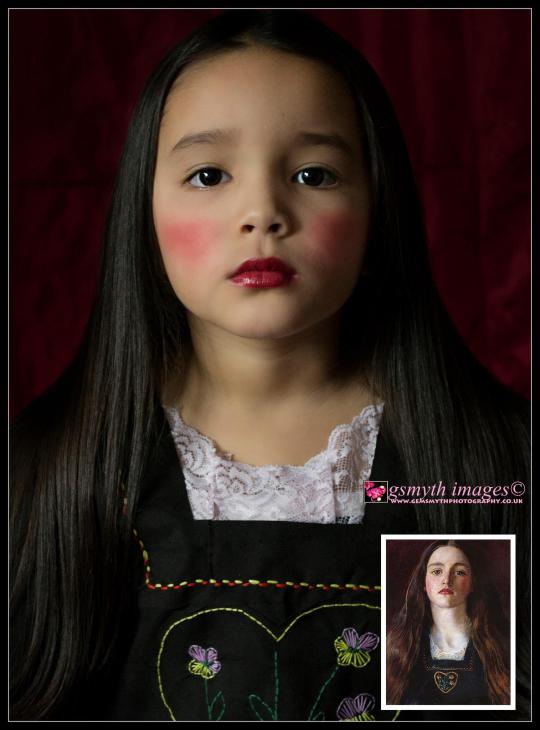
Fine Art
I got my inspiration from Annie Leibovich “Fairies” on this. Probably as a mother I was drawn to this kind of work. It encourages me to learn more about Photoshop, I started from the CS5 to the CS6 and never looked back. In fact, it introduced me to use Actions, I purchased Florabella Actions which I love to use every time I do portraits.


Fashion
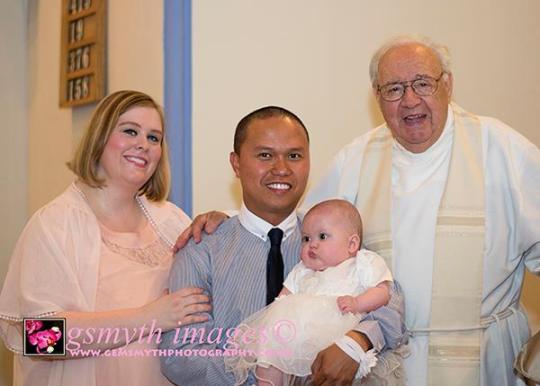
Event (Christening)
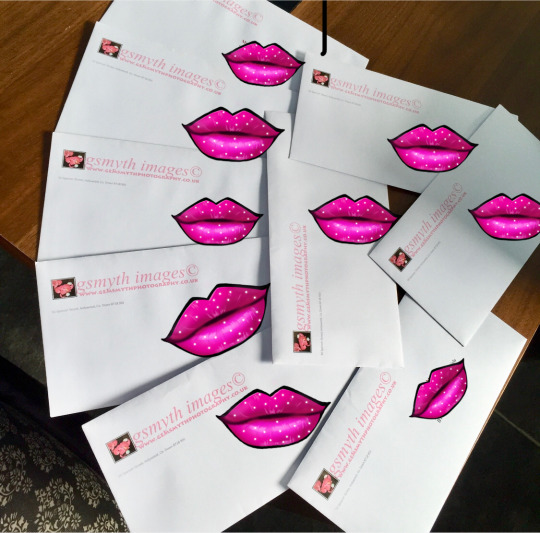
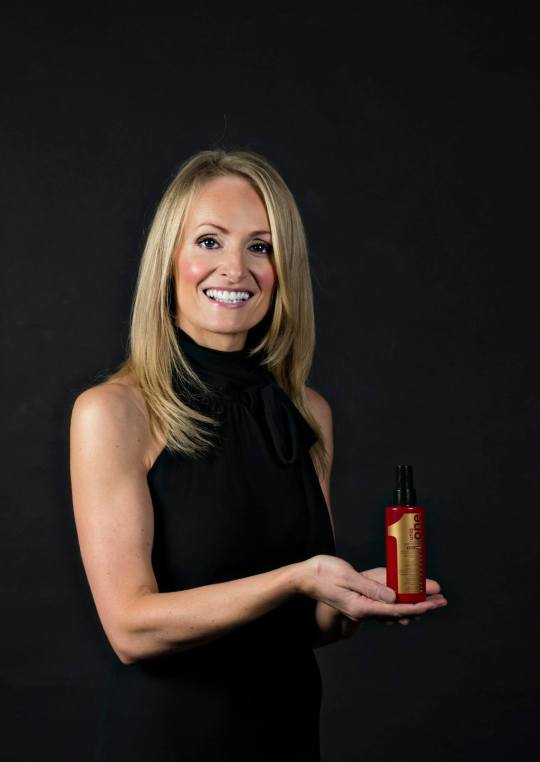
Product

I have a lot to be thankful for in my HND years. I learned so much that I was able to face people as I had confidence completing a photoshoot. I was also taught on how to make business plan and explore funding and Grants to start my Freelance journey. But since I didn't really need much funding as I got most of the equipment I needed, I did not go a head with any of the funding and grants that were available.
Business Planning ( From my HND instructor Gordon Ashbridge)
A business needs money for starting up
Equipment, workplace, marketing costs
Cash to pay bills & keep business going
Well prepared
How you intend to operate your businessfinancial forecast is a must
financial forecast is a must
*Your Own Money
You will need to use your own money for set-up or running costs
Even if you have finance from investors or banks
No worries over repaying your own investment or investors withdrawing support
DISADVANTAGES
Potential to LOSE a LOT... your house and personal possessions
Spending more than you really have...
NEED not WANT...
Personal Savings
Windfall
Cashing In
Wages (Part Time work)
*Finance from Family and Friends
This is common... looking to friends & family for support at start-up or additional funding exampole new equipment
Works well BUT..
Everyone involved needs to understand precisely what involved... esp the risks
short or long term, why you need it, how long you need it for
short term - tide the business over until a customer pays their bill
longer term - buying or leasing capital asset
PROs
more likely to spend time considering their involvement
lower interest rates
more flexibility
profits shared with family or friends
CONs
risk if business fails, relationships
may want a say in your business
Protecting Relationship (Finance from Family and Friends)
Honesty
Dichotomy of Business & Relationship
the Business Plan
Formalise the arrangements
*Borrow from a Bank
the Business Plan
How much? When? Purpose?
Repayment?
short or longer term loans
short term - Overdraft or Trade credit
medium term- 3-5yrs eg car or equipment
longer term- buying property
Borrow from a Bank (what the Bank will look for)
track record & credit history for you & the business
management
the Business Plan
Commitment
SECURITY - they want their money back
They will investigate the market
short and longer term loansshort term - Overdraft or Trade credit
medium term - 3-5yrs
eg car or equipment
longer term - buying property
Consider COMMERCIAL LENDERS
eg Insurance companies and building societies
May get a better deal, lower interest rates
Generally less restrictive eg poor credit
*Attract Outside Investors
selling shares in the business to...
BUSINESS ANGELS?
VENTURE CAPITALISTS - £3million +
(Business Angels)
private individuals who invest in start-ups and young companies...
in exchange for a share in the company's equity
investment range £10,000 - £750,000
free to make investment decisions quickly
no need for collateral ie personal assets
access to investor’s knowledge & contacts
better discipline dueto outside scrutiny
mentoring and skills from your angel
no repayments or interest
thresholds of invested money
takes longer to find a suitable investor
giving up a share of your business
*Qualify for a Grant or Government Support
very cheap financing
often comes with business advice or subsidised consultancy
There is a lot of competition for grant schemes
Check out government support for business
*Community Development Finance Institutions
Sustainable, indepentent organisations established to develop and create wealth within disadvantaged communities or markets, providing capital & support to the individual, micro enterprises and small businesses
*Check on the Community Development Finance Associations website
new business - may be eligible for tax breaks
eg lower tax or National Insurance contributions
HMRC-Benefits and Responsibility
https://www.gov.uk/government/organisations/hm-revenue-customs
Working for yourself
If you start working for yourself, you’re classed as a sole trader. This means you’re self-employed - even if you haven’t yet told HM Revenue and Customs (HMRC).
Running a business
You’re probably self-employed if you:
run your business for yourself and take responsibility for its success or failure
have several customers at the same time
can decide how, where and when you do your work
can hire other people at your own expense to help you or to do the work for you
provide the main items of equipment to do your work
are responsible for finishing any unsatisfactory work in your own time
charge an agreed fixed price for your work
sell goods or services to make a profit (including through websites or apps)
Many of these also apply if you own a limited company but you’re not classed as self-employed by HMRC. Instead you’re both an owner and employee of your company.
You can be both employed and self-employed at the same time, for example if you work for an employer during the day and run your own business in the evenings.
You can check whether you’re self-employed:
online
by phone
Selling goods or services
You could be classed as a trader if you sell goods or services. If you’re trading, you’re self-employed.
You’re likely to be trading if you:
sell regularly to make a profit
make items to sell for profit
sell online, at car boot sales or through classified adverts on a regular basis
earn commission from selling goods for other people
are paid for a service you provide
You’re probably not trading if you sell some unwanted items occasionally or you don’t plan to make a profit. You can’t use any losses you make as part of a hobby to reduce your tax bill.
Contact HMRC for advice if you’re not sure whether you’re trading.
Register as self-employed
You’ll need to register for Self Assessment if any of the following apply:
you earned more than £1,000 from self-employment between 6 April 2017 and 5 April 2018
you need to prove you’re self-employed, for example to claim Tax-Free Childcare
you want to make voluntary Class 2 National Insurance payments to help you qualify for benefits
You must also follow certain rules on running and naming your business.
If you don’t need to register, you can still make voluntary Class 2 National Insurance payments - for example to make sure you get the full State Pension.
Other ways to work for yourself
There are other business structures apart from being a sole trader. For example, you can:
become a partner in a business partnership
set up your own limited company
#personalblog#photographyjourney#passion#favouritethingtodo#mumof3#momof3#findingmyself#studentmum#studentmom#maturestudent#mumandwife#momandwife#universitylife#philippines#northernireland#belfast#professionalpractice#submission
0 notes
Text
Demystifying the Design Process with Sketch
For non-designers, there is often a level of mysticism around the way we work. In your job, it may well be your responsibility to brief a designer, but as for what happens in between that stage and finally seeing the fruits of their labour – well, this may be rather alien. While it’s not necessarily important to know the ins and outs of this (in a similar way that I can’t claim much knowledge for what our developers do code-side), this post aims to demystify the process and shed light on one of my favourite design programs at the moment, and equip you with good reason to convince any digital or web designer you work with to pick it up if they don’t use it already. Not to mention that having a top-level overview of design software makes it a whole lot easier to communicate with those that do use it.
If the above doesn’t quite apply to you, don’t click off just yet; there is still value to be had if you are:
A designer – learn how this program and accompanying tools can improve the way you work.
A jack-of-all-trades – discover how you can improve the design aspect of your role
A manager – as if by magic find out how to streamline your team and processes
Still here? Great, let’s begin.
Disclaimer: This is not an advertorial.
While it would be nice to have been sponsored to write this post, it’s worth clarifying first of all that any hints of sales chatter that may ensue should just be read as pure enthusiasm for the product.
So, to cut to the chase, my most-recommended piece of design software at the moment is Sketch. It’s my partner in design if you will. I started using it around two years ago and haven’t looked back since. Before getting on to the ‘why?’ and ‘how?’ though, let’s briefly touch upon what it actually is (and isn’t) for those in the dark.
Sketch? What’s that?
On paper Sketch is a ‘proprietary vector graphics editor’. From a user perspective though, it’s essentially a blank canvas in which you can design and create anything from a macro website right down to the nitty-gritty aspects of a user-interface.
Rather than just rattle through more points about what Sketch is and what it’s capable of, I want to throw in a quick lowdown as to what it isn’t:
It isn’t anything to do with SketchUp (which happens to be a 3D graphics modelling programme) so best not to get them confused.
It isn’t an illustration, photomanipulation or text-setting tool – these are best left to Adobe Illustrator, Photoshop and InDesign, respectively.
It isn’t going to work in Windows/Linux etc. – sorry! It’s an Apple macOS-only program; though the benefit of this being that it’s incredibly well-designed and intuitive for Mac users.
It isn’t going to break the bank! Sure, it was the free trial that roped me in to give it a go, but it was the very reasonable price tag that converted me to a paying user.
Life before Sketch
Before Sketch came along, my go-to design programme had always been Adobe Illustrator. Illustrator and I go way back, to my teen years, before I ever thought of myself as a designer. Over the years I’ve built up a bank of knowledge and can convincingly say that I now have a pretty good understanding of its features, and am more than happy to sing its praises over the likes of Photoshop. Similarly, when I joined Distilled, the other designers here were also keen advocates of Illustrator, and so it never occurred to me to question the process. Until one day I was chatting with a designer from another company, and on finding out our process, looked at me with incredulity and asked: “You use Illustrator for web build design?!” To be fair to us, there are plenty of designers who did, and still, do this. But importantly, this set the wheels in motion for me to look beyond our tried and tested tools. After some research it seemed a lot of people in the design community were raving about Sketch – this relative ‘new kid on the block’; so I set myself the task of using it for the next project I was assigned to.
I was immediately sold; and here are three reasons why you should be too.
1. Designed for digital, with a kickass online community to match
Unlike Illustrator, Sketch is designed for digital-first use cases in mind. With that comes an understanding that us digital folk want things done fast, we want them now. The time it took for me to go from deciding to try it out, to downloading, installing and opening the app, was less than five minutes. Anyone who has ever tried to get Illustrator on their machine before can relate to how amazed I was at the speed. That’s not a surprise, considering the app itself comes in only at 45.2mb, in comparison to Illustrator CS6 at 259.8mb.
Sketch’s UI is laid out in a clean, modular fashion, with no potential for toolbars to become unwieldy and disparate (which I’m definitely guilty of in Illustrator), and this ease of use if further reflected in the way the programme operates:
No matter how intuitive a tool is, questions are bound to crop up when you start doing more complex things. Luckily I quickly learnt what a great online community Sketch has fostered. My favourite forum is sketchtalk.io where you can generally expect pretty fast response rates.
Not only is this community great in sharing knowledge on a case-by-case basis, there are also those who eagerly contribute by writing plugins (often open source and free to use) which enhance the capabilities of Sketch. For example, just the other day I came across AnimateMate, allowing users to create simple animations. This is just one example amongst many. Usually, if I know something I specifically want to do that isn’t natively built into Sketch, I’ll consult Google – ‘[blank] plugin for Sketch’. Or, I might occasionally browse directories like this and this to discover new goodies.
All in all, the payback far outweighs the minimal learning curve of familiarising yourself with slightly different keyboard shortcuts.
2. Save time (and money) by streamlining the route from design to development
Prior to Sketch, my process from taking a design into development typically looked like this:
Create layouts in Illustrator.
Write up a detailed spec document for the developer, including aspects such as font weights and sizing, and hex code colours to name but a few.
Export a series of flat image or PDF from Illustrator for the dev and manually save any assets they might need, e.g. icons, images or logos.
Dev then goes away and uses the above to code and build by eye to match the design.
Expect a few feedback rounds on getting sizings, padding etc spot on.
Instead, my process is cut pretty much in half and now consists of just three steps:
Create layouts in Sketch.
Export layouts into Zeplin (third party plugin) project.
Invite developer to the Zeplin project (which literally just takes seconds).
Zeplin is my second most favoured tool when it comes to design. Its saved me hours by eliminating the need to do a write up a spec, manually export assets and cuts down the back and forth with developers by a mile. In fact, it almost deserves another post all to itself, but in the meantime, they’ve got the ground covered in a couple of quick overviews as to how Zeplin is good for designers and also developers.
If I still haven’t convinced you yet, just know that a lot of these new time-saving tools only support Sketch and not Illustrator ;-)
3. Work with a tool that’s as agile and iterative as you
Sketch is an app that’s constantly improving and pushing out updates. There’s even a part of their site dedicated to showcasing the latest changes. From a user perspective, I love this – it shows that I’m getting a product that’s at the forefront of technologies. And of course, it’s not cumbersome to update, no machine restarts etc. The majority of them are done in the time it takes to go make a brew. Given that there’s not a single day in which the digital landscape isn’t changing, it’s great to know that the tool you’re working with is also changing and improving with it.
In fact, as much as it is about delivering the best user offering, it is a market as competitive as any other. As well as die-hard Illustrator and Photoshop fans to try and lure away, there are others trying to steal market share, for example, Adobe XD and soon-to-be InVision Studio. The Sketch folk know they can’t rest on their laurels, and I’m looking forward to another year of great updates fuelled by a dose of healthy competition.
Closing thoughts
To summarise, Sketch has revolutionised the way I approach design, forcing me to think more about the power of automation and in turn benefiting from that with shortcuts that don’t compromise on quality. I urge anyone working with designers to get them to give it a go. And with a one-month free trial, there’s really no excuse.
Demystifying the Design Process with Sketch was originally posted by Video And Blog Marketing
0 notes
Text
Demystifying the Design Process with Sketch
For non-designers, there is often a level of mysticism around the way we work. In your job, it may well be your responsibility to brief a designer, but as for what happens in between that stage and finally seeing the fruits of their labour – well, this may be rather alien. While it’s not necessarily important to know the ins and outs of this (in a similar way that I can’t claim much knowledge for what our developers do code-side), this post aims to demystify the process and shed light on one of my favourite design programs at the moment, and equip you with good reason to convince any digital or web designer you work with to pick it up if they don’t use it already. Not to mention that having a top-level overview of design software makes it a whole lot easier to communicate with those that do use it.
If the above doesn’t quite apply to you, don’t click off just yet; there is still value to be had if you are:
A designer – learn how this program and accompanying tools can improve the way you work.
A jack-of-all-trades – discover how you can improve the design aspect of your role
A manager – as if by magic find out how to streamline your team and processes
Still here? Great, let’s begin.
Disclaimer: This is not an advertorial.
While it would be nice to have been sponsored to write this post, it’s worth clarifying first of all that any hints of sales chatter that may ensue should just be read as pure enthusiasm for the product.
So, to cut to the chase, my most-recommended piece of design software at the moment is Sketch. It’s my partner in design if you will. I started using it around two years ago and haven’t looked back since. Before getting on to the ‘why?’ and ‘how?’ though, let’s briefly touch upon what it actually is (and isn’t) for those in the dark.
Sketch? What’s that?
On paper Sketch is a ‘proprietary vector graphics editor’. From a user perspective though, it’s essentially a blank canvas in which you can design and create anything from a macro website right down to the nitty-gritty aspects of a user-interface.
Rather than just rattle through more points about what Sketch is and what it’s capable of, I want to throw in a quick lowdown as to what it isn’t:
It isn’t anything to do with SketchUp (which happens to be a 3D graphics modelling programme) so best not to get them confused.
It isn’t an illustration, photomanipulation or text-setting tool – these are best left to Adobe Illustrator, Photoshop and InDesign, respectively.
It isn’t going to work in Windows/Linux etc. – sorry! It’s an Apple macOS-only program; though the benefit of this being that it’s incredibly well-designed and intuitive for Mac users.
It isn’t going to break the bank! Sure, it was the free trial that roped me in to give it a go, but it was the very reasonable price tag that converted me to a paying user.
Life before Sketch
Before Sketch came along, my go-to design programme had always been Adobe Illustrator. Illustrator and I go way back, to my teen years, before I ever thought of myself as a designer. Over the years I’ve built up a bank of knowledge and can convincingly say that I now have a pretty good understanding of its features, and am more than happy to sing its praises over the likes of Photoshop. Similarly, when I joined Distilled, the other designers here were also keen advocates of Illustrator, and so it never occurred to me to question the process. Until one day I was chatting with a designer from another company, and on finding out our process, looked at me with incredulity and asked: “You use Illustrator for web build design?!” To be fair to us, there are plenty of designers who did, and still, do this. But importantly, this set the wheels in motion for me to look beyond our tried and tested tools. After some research it seemed a lot of people in the design community were raving about Sketch – this relative ‘new kid on the block’; so I set myself the task of using it for the next project I was assigned to.
I was immediately sold; and here are three reasons why you should be too.
1. Designed for digital, with a kickass online community to match
Unlike Illustrator, Sketch is designed for digital-first use cases in mind. With that comes an understanding that us digital folk want things done fast, we want them now. The time it took for me to go from deciding to try it out, to downloading, installing and opening the app, was less than five minutes. Anyone who has ever tried to get Illustrator on their machine before can relate to how amazed I was at the speed. That’s not a surprise, considering the app itself comes in only at 45.2mb, in comparison to Illustrator CS6 at 259.8mb.
Sketch’s UI is laid out in a clean, modular fashion, with no potential for toolbars to become unwieldy and disparate (which I’m definitely guilty of in Illustrator), and this ease of use if further reflected in the way the programme operates:
No matter how intuitive a tool is, questions are bound to crop up when you start doing more complex things. Luckily I quickly learnt what a great online community Sketch has fostered. My favourite forum is sketchtalk.io where you can generally expect pretty fast response rates.
Not only is this community great in sharing knowledge on a case-by-case basis, there are also those who eagerly contribute by writing plugins (often open source and free to use) which enhance the capabilities of Sketch. For example, just the other day I came across AnimateMate, allowing users to create simple animations. This is just one example amongst many. Usually, if I know something I specifically want to do that isn’t natively built into Sketch, I’ll consult Google – ‘[blank] plugin for Sketch’. Or, I might occasionally browse directories like this and this to discover new goodies.
All in all, the payback far outweighs the minimal learning curve of familiarising yourself with slightly different keyboard shortcuts.
2. Save time (and money) by streamlining the route from design to development
Prior to Sketch, my process from taking a design into development typically looked like this:
Create layouts in Illustrator.
Write up a detailed spec document for the developer, including aspects such as font weights and sizing, and hex code colours to name but a few.
Export a series of flat image or PDF from Illustrator for the dev and manually save any assets they might need, e.g. icons, images or logos.
Dev then goes away and uses the above to code and build by eye to match the design.
Expect a few feedback rounds on getting sizings, padding etc spot on.
Instead, my process is cut pretty much in half and now consists of just three steps:
Create layouts in Sketch.
Export layouts into Zeplin (third party plugin) project.
Invite developer to the Zeplin project (which literally just takes seconds).
Zeplin is my second most favoured tool when it comes to design. Its saved me hours by eliminating the need to do a write up a spec, manually export assets and cuts down the back and forth with developers by a mile. In fact, it almost deserves another post all to itself, but in the meantime, they’ve got the ground covered in a couple of quick overviews as to how Zeplin is good for designers and also developers.
If I still haven’t convinced you yet, just know that a lot of these new time-saving tools only support Sketch and not Illustrator ;-)
3. Work with a tool that’s as agile and iterative as you
Sketch is an app that’s constantly improving and pushing out updates. There’s even a part of their site dedicated to showcasing the latest changes. From a user perspective, I love this – it shows that I’m getting a product that’s at the forefront of technologies. And of course, it’s not cumbersome to update, no machine restarts etc. The majority of them are done in the time it takes to go make a brew. Given that there’s not a single day in which the digital landscape isn’t changing, it’s great to know that the tool you’re working with is also changing and improving with it.
In fact, as much as it is about delivering the best user offering, it is a market as competitive as any other. As well as die-hard Illustrator and Photoshop fans to try and lure away, there are others trying to steal market share, for example, Adobe XD and soon-to-be InVision Studio. The Sketch folk know they can’t rest on their laurels, and I’m looking forward to another year of great updates fuelled by a dose of healthy competition.
Closing thoughts
To summarise, Sketch has revolutionised the way I approach design, forcing me to think more about the power of automation and in turn benefiting from that with shortcuts that don’t compromise on quality. I urge anyone working with designers to get them to give it a go. And with a one-month free trial, there’s really no excuse.
from Digital Marketing https://www.distilled.net/resources/demystifying-design-with-sketch/
via http://www.rssmix.com/
0 notes
Text
IOANA-ALEXANDRA OROIAN
TÂRGU-MUREȘ // ROMANIA
T: (+40) 754 980 166
P: http://alexandrasadmissionportfolio.tumblr.com
Dear Members of the Admission Committee,
My name is Ioana-Alexandra Oroian, I’m a 20 year old girl from Romania, and I wish to apply to your Bachelor Degree’s Program in Graphic Storytelling. But most importantly, I truly wish to become a comic book artist.
My journey with art began when I was a young child and I could hold up a pencil in my hands. Most of my family describe their earliest memories of me always being with my nose in a coloring book, lost in a world of my own. At the age of 5, my curious nature led me to an old dusty cardboard box my parents had kept from their teenage years. There I would have found my first comic book which was Rune Andréasson’s ‘Bamse’. That discovery ended kindling a long lasting passion for the genre. Although I couldn’t properly read yet, I was so fascinated and amazed how I could still easily understand what was happening through the pictures.
After starting up school, like most children, I loved drawing and would engage in it in my free time as well, but unlike most of my classmates, my drive never faded and I didn’t put the pencil down. During middle school, I stumbled upon the Japanese anime and manga, especially through Masashi Kishimoto’s ‘Naruto’ and Rumiko Takahashi’s ‘InuYasha’. My style has been heavily influenced by their work. During this time I started nesting a love for literature as well, which would let me start writing short stories. My biggest influences come from the fantasy genre, with the likes of J.R.R. Tolkien’s ‘Lord Of The Rings’ trilogy or G.R.R. Martin’s ‘A Song Of Ice And Fire’ saga.
Unfortunately I grew up and still live in a small town, where the ‘starving artist’ mentality still prevails heavily. Because of this, I have always been pressured into picking a safer route in life and was persuaded into thinking that my passion for art remain at a mere past time. Due to lack of encouragement and being afraid to admit what I truly wanted, I chose not to attend a high school specialized in arts. However, even in a normal high school, my identity as the ‘art kid’ never left me; moreover, it found ways to return to me. As Jeff Goldblum’s famous quote from Jurassic Park goes ‘life finds a way’, in my case art found a way to slip back within the cracks.
My high school years ended up shaping me and introducing me to the world of graphic storytelling. In the 9th grade, I was honored to participate in a workshop held by one of Romania’s pioneer in the comic book industry, Puiu Manu. It began with a very basic introduction to figure drawing and story-boarding, and ended up with a regional contest called ‘Festivalul Benzilor Desenate’ where I managed to place first. As a result Mr. Manu advised me to pursue my passions, something I ended up wishing I would’ve followed more thoroughly. After that experience I started digging into the Romanian comic book scene, where I ultimately found ‘HAC!’ a monthly magazine that uses the beloved story of ‘Harap Alb’ as its starting point. The story deeply routed in our national folklore and the beautiful artwork of Andrei Moldovan and Daniel Rosa Durán still inspire and motivate me greatly.
Among other works that I hold dear, I would definitely include the following; the movie ‘Pan’s Labirynth’ directed by Guillermo del Toro for its breath-taking scenic atmosphere, beautiful music score and the tragically bitter-sweet story of Ofelia; the video game ‘Life Is Strange’ developed by Dontnod Entertainment for the way it made me conscious of the consequence of my actions in a way I think no other media can make you aware of. I especially related with Kate’s story line since I personally have personally been struggling with mental health issues as well. Finally I would mention Alan Moore and David Lloyd’s graphic novel ‘V for Vendetta’, as I loved the whole orwellian feeling the universe gave me and to this day I’m very fond of the complexity of its characters and the way the story line unravels around collective consciousness.
On the other hand, there are also a few works that I haven’t particularly resonated well with. I believe hate is a rather powerful word to describe it but I was never pleased with the creative risk and liberty the developers of the 4th installment of Heroes of Might and Magic took, namely the changes in game play, story line and graphics. In my opinion, the developers deviated too much from the original universe. Here I may also add the movie adaptation of the Max Payne game series, directed by John Moore. I believe the movie subtracted important story line plots in favor of more action scenes that were poorly executed to begin with and ultimately didn’t do the original video game any justice.
In the summer between the 10th and 11th grade I participated in a student exchange program at the University College London, for a period of two weeks. It was by far one of the best traveling experiences I have ever had and it hugely fueled my desire to study abroad. It helped improve my English speaking skills and I learned how to take care of myself on my own, considering it was the first time going abroad without my family or friends.
However, the biggest turning point for me, when deep down inside, I knew that being a comic book artist was my path in life, was when one of my good friends from high school got sick. Seeing her so miserable prompted me to do something, and I did what I do best. I drew her a short silly comic strip with our favorite characters from a video game we were playing at the time. I tried making the comic humorous and eventually ending on a sweet note. I handed her the drawing, and I watched her reactions closely. Her eyes started to glimmer; she laughed for the first time that day, and ended up thanking me with a big smile on her face. Until that point I’ve never felt a greater satisfaction. Knowing that something you crafted ended up brightening someone’s day. The fact that even for just a little bit I managed to make someone go through a cycle of emotions is a feeling I can’t describe in words but I know it’s the closest it can ever get to real magic.
However, by the end of the 12th grade I sadly got diagnosed with clinical depression and social anxiety. I am writing this as I believe it was a great factor that influenced and dictated my course of action the following years after I graduated from high school in 2015. No matter how much everything was prompting me to pursue a career in the art industry, I was not ready to take a leap of faith. In my then mental state I decided to take some time off before my big step, in order to put my life together. At first I was frustrated and confused, and to a certain degree lonely, as most of my friends moved out of the country or to other cities to study. I ended up retreating to a world of my own, in the silence and comfort of my drawings. No matter how sparsely I did it, for me, drawing always added an irreplaceable healing factor. But as time went by I realized that I either take the risk of trying to be happy or remain sorrowful for not allowing myself to even try.
I began by getting a job as a bartender to learn to be more responsible and earn something for myself. Then I wanted to prove that art was still worth it for me. I created a social media account, on Instagram, without telling any of my friends or family (to avoid any subjectivity), too see the genuine reaction complete strangers have. Overwhelmed by the positive feedback I got, I became fueled by a strong motivation to pursue my dreams and finally take the next step forward.
I began searching for universities and colleges around Europe, since in Romania there is no such specific degree that can cater to my needs in a professional matter. I then came across The Animation Workshop, which I immediately felt like it’s the place where I could learn how to master the craft of graphic storytelling and discover new people and a friendly ambiance I can prosper in.
My biggest wish and aspiration is to become a comic book artist that can make a difference in people’s lives. Either by freelancing or working for a company, I want to remind people with my through my art or characters, that life is worth living and hope for the better is something invaluable. I am very interested in investing in the therapeutic side that art can provide, and I believe the genre is one of the best media to achieve something in that regard.
The way I see it, as time goes by, the comic book industry will become one of the biggest pinnacles for freedom of expression, being able to tackle any kind of subject, be it purely fictional or even real, raising awareness of everyday social and political matters. For me this is very important as I believe in the beauty of diversity and the importance of art in our everyday lives.
Regarding my skills, I am currently very comfortable with working in traditional media, especially with materials such as COPIC markers, watercolors and colored pencils. I invested in a small Wacom Bamboo tablet in order to begin taking small steps in the digital area as well. It feels very overwhelming but by using online tutorials, I reached a beginner to medium level in Photoshop CS6. Being a self-taught artist has it’s limitations, as I’ve come do find out. I’m aware of the fact that I lack a solid foundation, and my style does not leave my comfort zone, but I am willing to learn and adapt, and most importantly, for everything that I’m missing I can guarantee that I will do my best through perseverance and hard work.
To finance my studies, I’ve saved up some money from my high school graduation, and most of my salary from my current job goes to my university fund in order to be able to pay for my expenses if I were to move to Viborg. If I’ll still be struggling with money I have my family’s financial support as well.
In the end, I believe the above letter will help you discover what kind of individual I am, and why I believe The Animation Workshop is where I can begin my career and follow my dreams.
As such, I sincerely hope, from the bottom of my heart that I can be part of your Graphic Storytelling Class of 2017.
Yours truly,
Alexandra
0 notes
Text
Demystifying the Design Process with Sketch
For non-designers, there is often a level of mysticism around the way we work. In your job, it may well be your responsibility to brief a designer, but as for what happens in between that stage and finally seeing the fruits of their labour – well, this may be rather alien. While it’s not necessarily important to know the ins and outs of this (in a similar way that I can’t claim much knowledge for what our developers do code-side), this post aims to demystify the process and shed light on one of my favourite design programs at the moment, and equip you with good reason to convince any digital or web designer you work with to pick it up if they don’t use it already. Not to mention that having a top-level overview of design software makes it a whole lot easier to communicate with those that do use it.
If the above doesn’t quite apply to you, don’t click off just yet; there is still value to be had if you are:
A designer – learn how this program and accompanying tools can improve the way you work.
A jack-of-all-trades – discover how you can improve the design aspect of your role
A manager – as if by magic find out how to streamline your team and processes
Still here? Great, let’s begin.
Disclaimer: This is not an advertorial.
While it would be nice to have been sponsored to write this post, it’s worth clarifying first of all that any hints of sales chatter that may ensue should just be read as pure enthusiasm for the product.
So, to cut to the chase, my most-recommended piece of design software at the moment is Sketch. It’s my partner in design if you will. I started using it around two years ago and haven’t looked back since. Before getting on to the ‘why?’ and ‘how?’ though, let’s briefly touch upon what it actually is (and isn’t) for those in the dark.
Sketch? What’s that?
On paper Sketch is a ‘proprietary vector graphics editor’. From a user perspective though, it’s essentially a blank canvas in which you can design and create anything from a macro website right down to the nitty-gritty aspects of a user-interface.
Rather than just rattle through more points about what Sketch is and what it’s capable of, I want to throw in a quick lowdown as to what it isn’t:
It isn’t anything to do with SketchUp (which happens to be a 3D graphics modelling programme) so best not to get them confused.
It isn’t an illustration, photomanipulation or text-setting tool – these are best left to Adobe Illustrator, Photoshop and InDesign, respectively.
It isn’t going to work in Windows/Linux etc. – sorry! It’s an Apple macOS-only program; though the benefit of this being that it’s incredibly well-designed and intuitive for Mac users.
It isn’t going to break the bank! Sure, it was the free trial that roped me in to give it a go, but it was the very reasonable price tag that converted me to a paying user.
Life before Sketch
Before Sketch came along, my go-to design programme had always been Adobe Illustrator. Illustrator and I go way back, to my teen years, before I ever thought of myself as a designer. Over the years I’ve built up a bank of knowledge and can convincingly say that I now have a pretty good understanding of its features, and am more than happy to sing its praises over the likes of Photoshop. Similarly, when I joined Distilled, the other designers here were also keen advocates of Illustrator, and so it never occurred to me to question the process. Until one day I was chatting with a designer from another company, and on finding out our process, looked at me with incredulity and asked: “You use Illustrator for web build design?!” To be fair to us, there are plenty of designers who did, and still, do this. But importantly, this set the wheels in motion for me to look beyond our tried and tested tools. After some research it seemed a lot of people in the design community were raving about Sketch – this relative ‘new kid on the block’; so I set myself the task of using it for the next project I was assigned to.
I was immediately sold; and here are three reasons why you should be too.
1. Designed for digital, with a kickass online community to match
Unlike Illustrator, Sketch is designed for digital-first use cases in mind. With that comes an understanding that us digital folk want things done fast, we want them now. The time it took for me to go from deciding to try it out, to downloading, installing and opening the app, was less than five minutes. Anyone who has ever tried to get Illustrator on their machine before can relate to how amazed I was at the speed. That’s not a surprise, considering the app itself comes in only at 45.2mb, in comparison to Illustrator CS6 at 259.8mb.
Sketch’s UI is laid out in a clean, modular fashion, with no potential for toolbars to become unwieldy and disparate (which I’m definitely guilty of in Illustrator), and this ease of use if further reflected in the way the programme operates:
No matter how intuitive a tool is, questions are bound to crop up when you start doing more complex things. Luckily I quickly learnt what a great online community Sketch has fostered. My favourite forum is sketchtalk.io where you can generally expect pretty fast response rates.
Not only is this community great in sharing knowledge on a case-by-case basis, there are also those who eagerly contribute by writing plugins (often open source and free to use) which enhance the capabilities of Sketch. For example, just the other day I came across AnimateMate, allowing users to create simple animations. This is just one example amongst many. Usually, if I know something I specifically want to do that isn’t natively built into Sketch, I’ll consult Google – ‘[blank] plugin for Sketch’. Or, I might occasionally browse directories like this and this to discover new goodies.
All in all, the payback far outweighs the minimal learning curve of familiarising yourself with slightly different keyboard shortcuts.
2. Save time (and money) by streamlining the route from design to development
Prior to Sketch, my process from taking a design into development typically looked like this:
Create layouts in Illustrator.
Write up a detailed spec document for the developer, including aspects such as font weights and sizing, and hex code colours to name but a few.
Export a series of flat image or PDF from Illustrator for the dev and manually save any assets they might need, e.g. icons, images or logos.
Dev then goes away and uses the above to code and build by eye to match the design.
Expect a few feedback rounds on getting sizings, padding etc spot on.
Instead, my process is cut pretty much in half and now consists of just three steps:
Create layouts in Sketch.
Export layouts into Zeplin (third party plugin) project.
Invite developer to the Zeplin project (which literally just takes seconds).
Zeplin is my second most favoured tool when it comes to design. Its saved me hours by eliminating the need to do a write up a spec, manually export assets and cuts down the back and forth with developers by a mile. In fact, it almost deserves another post all to itself, but in the meantime, they’ve got the ground covered in a couple of quick overviews as to how Zeplin is good for designers and also developers.
If I still haven’t convinced you yet, just know that a lot of these new time-saving tools only support Sketch and not Illustrator ;-)
3. Work with a tool that’s as agile and iterative as you
Sketch is an app that’s constantly improving and pushing out updates. There’s even a part of their site dedicated to showcasing the latest changes. From a user perspective, I love this – it shows that I’m getting a product that’s at the forefront of technologies. And of course, it’s not cumbersome to update, no machine restarts etc. The majority of them are done in the time it takes to go make a brew. Given that there’s not a single day in which the digital landscape isn’t changing, it’s great to know that the tool you’re working with is also changing and improving with it.
In fact, as much as it is about delivering the best user offering, it is a market as competitive as any other. As well as die-hard Illustrator and Photoshop fans to try and lure away, there are others trying to steal market share, for example, Adobe XD and soon-to-be InVision Studio. The Sketch folk know they can’t rest on their laurels, and I’m looking forward to another year of great updates fuelled by a dose of healthy competition.
Closing thoughts
To summarise, Sketch has revolutionised the way I approach design, forcing me to think more about the power of automation and in turn benefiting from that with shortcuts that don’t compromise on quality. I urge anyone working with designers to get them to give it a go. And with a one-month free trial, there’s really no excuse.
0 notes
Last Seen Blogs

swiftchinasourcingonline
Swift China Sourcing

nichohell76
Falooda

freakierfuck
Freaky

thekashyap-blog
mobo gamer
