
foodshowxyz
The FoodShow
Delicious food brought to you daily
94 posts
Don't wanna be here? Send us removal request.
Last Seen Blogs

ninjaboffin
The Incomplete Journal of a Boffin

opposing
traverse.

gomorsel
GoMorsel

phantim5
The Hashassin Den

looolbith
Untitled
Text
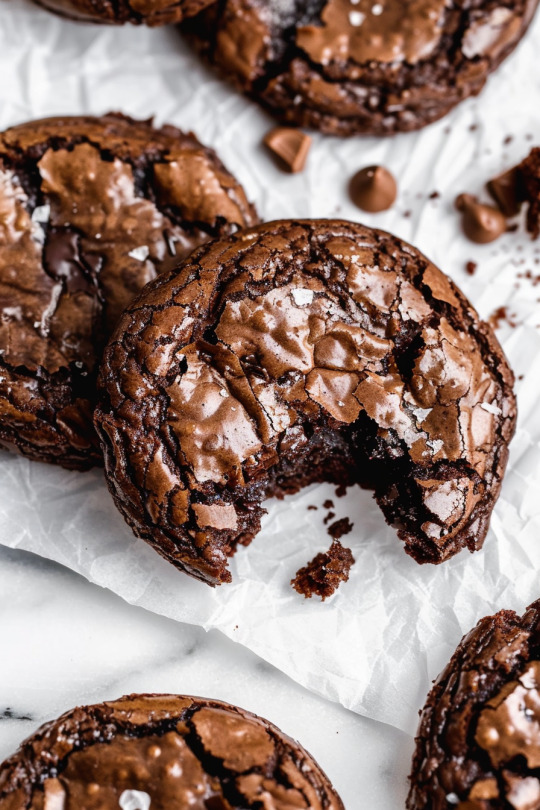
Fudgy Brownie Cookies with Crackly Tops 🍪✨
Ingredients:
140g semisweet or dark chocolate, finely chopped 🍫
113g unsalted butter 🧈
1 large egg, room temperature 🥚
1 large egg yolk, room temperature
150g granulated sugar
55g packed light brown sugar
1 teaspoon vanilla extract
60g all-purpose flour
25g unsweetened cocoa powder
1/4 teaspoon baking powder
1/4 teaspoon salt
Optional: Flaky sea salt for sprinkling
Instructions:
Melt chocolate and butter: In a heatproof bowl set over a saucepan of simmering water (or in the microwave), melt the chocolate and butter together, stirring until smooth. Remove from heat and let cool slightly.
Whisk eggs and sugars: In a separate bowl, whisk together the egg, egg yolk, granulated sugar, and brown sugar until light and fluffy.
Combine wet ingredients: Pour the cooled chocolate mixture into the egg mixture and whisk until combined. Stir in the vanilla extract.
Fold in dry ingredients: In a separate bowl, whisk together the flour, cocoa powder, baking powder, and salt. Gradually fold the dry ingredients into the wet ingredients until just combined. Do not overmix.
Chill the dough: Cover the bowl with plastic wrap and chill the dough in the refrigerator for at least 2 hours, or up to overnight. Chilling the dough is essential for creating the crackly tops.
Preheat oven: Preheat the oven to 175°C (160°C Fan). Line baking sheets with parchment paper.
Shape and bake cookies: Scoop rounded tablespoons of dough onto the prepared baking sheets, spacing them about 5cm apart. Sprinkle with flaky sea salt, if using.
Bake: Bake the cookies for 10-12 minutes, or until the edges are set and the tops are crackly. The centers will still be soft.
Cool: Let the cookies cool on the baking sheets for a few minutes before transferring them to a wire rack to cool completely.
Tips:
Use high-quality chocolate for the best flavour.
Don't overbake the cookies; they should be slightly underdone in the center so they remain fudgy.
If you don't have flaky sea salt, you can use regular sea salt or kosher salt.
These cookies are best enjoyed the day they are baked, but they can be stored in an airtight container at room temperature for up to 3 days.
Enjoy! 🍪
#recipe#homemade#foodshow#cookies#fudge#sweets#home made food#baked#bakery#food photography#food blogs#delicious#breakfast#cake#dessert#food pics#food#foodie#foodporn#foodgasm#chocolate#baking#make this go viral#food show
12 notes
·
View notes
Text
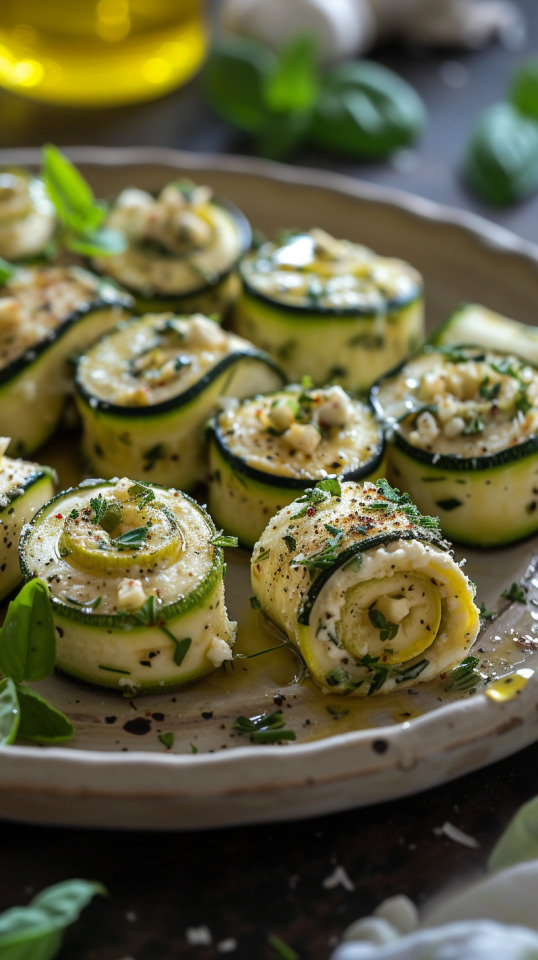
Zucchini Rolls with Ricotta and Herbs 🌿🧀
Ingredients:
2 medium zucchini
1 cup whole milk ricotta cheese
1/4 cup grated Parmesan cheese, plus more for topping
2 tablespoons chopped fresh herbs (such as basil, chives, mint, or parsley)
1 garlic clove, minced
1 tablespoon lemon juice
Salt and black pepper to taste
Olive oil, for drizzling
Instructions:
Prepare the zucchini: Wash and trim the ends of the zucchini. Using a mandoline or a sharp knife, slice the zucchini lengthwise into thin, even strips.
Grill or roast the zucchini: Preheat a grill or grill pan to medium heat. Brush the zucchini slices lightly with olive oil and grill for 1-2 minutes per side, or until slightly softened and grill marks appear. Alternatively, you can roast the zucchini slices in a preheated oven at 400°F (200°C) for 5-7 minutes.
Make the filling: In a bowl, combine the ricotta cheese, Parmesan cheese, chopped herbs, minced garlic, lemon juice, salt, and pepper. Mix well.
Assemble the rolls: Lay a zucchini slice on a flat surface. Spread a spoonful of the ricotta mixture onto the zucchini slice. Starting from one end, roll up the zucchini tightly. Repeat with the remaining zucchini slices and filling.
Serve: Arrange the zucchini rolls on a serving plate. Top with additional grated Parmesan cheese and a drizzle of olive oil. Serve immediately or chill for later.
Tips:
You can adjust the amount of herbs and garlic to your liking.
If you don't have a grill or grill pan, you can also pan-fry the zucchini slices in a skillet with a little olive oil.
For a more intense flavor, you can add a pinch of red pepper flakes to the ricotta mixture.
Serve the zucchini rolls as an appetizer, side dish, or light lunch. They also make a great addition to a cheese or charcuterie board. 🧀🍇
#recipe#homemade#foodshow#food pics#food blogs#food#delicious#food photography#food porn#zucchini#ricotta#make thi#foodie#foodporn
35 notes
·
View notes
Text
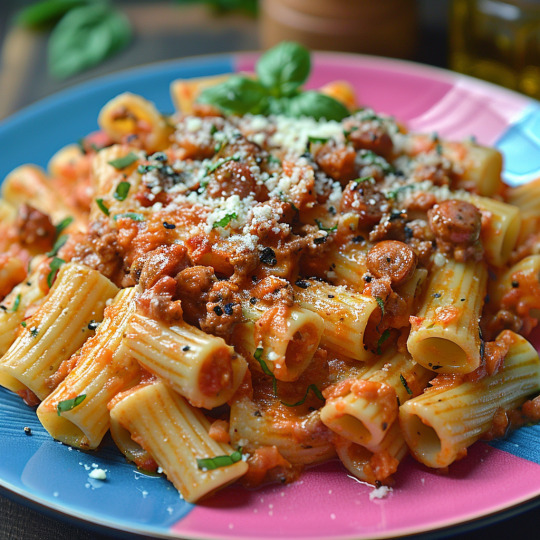
Spicy Italian Sausage Rigatoni with Tomato Basil Sauce 🌶️🍅🌿
This flavorful dish combines spicy Italian sausage with a rich tomato basil sauce, all tossed with perfectly cooked rigatoni pasta. Get ready for a taste explosion!
Ingredients:
1 pound rigatoni pasta 🍝
1 pound spicy Italian sausage, casings removed 🌶️
1 tablespoon olive oil
1/2 onion, diced 🧅
3 cloves garlic, minced 🧄
1 (28-ounce) can crushed tomatoes 🥫
1/2 cup chopped fresh basil 🌿
1 teaspoon dried oregano 🌿
1/2 teaspoon red pepper flakes (adjust to taste) 🌶️
Salt and black pepper to taste
Grated Parmesan cheese for serving 🧀
Instructions:
Cook the pasta: Bring a large pot of salted water to a boil. Add the rigatoni and cook according to package directions for al dente pasta. Drain and set aside.
Sauté the sausage: While the pasta is cooking, heat the olive oil in a large skillet over medium heat. Add the sausage and cook, breaking it up with a spoon, until browned and cooked through. Remove the sausage from the skillet and set aside.
Sauté the aromatics: In the same skillet, add the onion and cook until softened, about 5 minutes. Add the garlic and cook for another minute until fragrant.
Make the sauce: Add the crushed tomatoes, basil, oregano, red pepper flakes, salt, and pepper to the skillet. Bring to a simmer and cook for 15-20 minutes, or until the sauce has thickened slightly.
Combine everything: Return the cooked sausage to the skillet and stir to combine. Add the cooked rigatoni and toss to coat in the sauce.
Serve: Divide the pasta among plates and top with grated Parmesan cheese. Garnish with additional fresh basil if desired.
Tips:
For a creamier sauce, stir in a 1/2 cup of heavy cream after adding the crushed tomatoes.
If you don't have fresh basil, substitute with 1 tablespoon of dried basil.
Add a pinch of sugar to the sauce to balance the acidity of the tomatoes.
Serve with a side of crusty bread to soak up the delicious sauce! 🥖
#italian#food#foodie#food photography#foodporn#food recipes#italian food#recipe#delicious#food pics#homemade#pasta#rigatoni#foodshow#food blogs#food photoshoot#yummy food#italian pasta#tomato#basil#home cooking#make this go viral
43 notes
·
View notes
Text
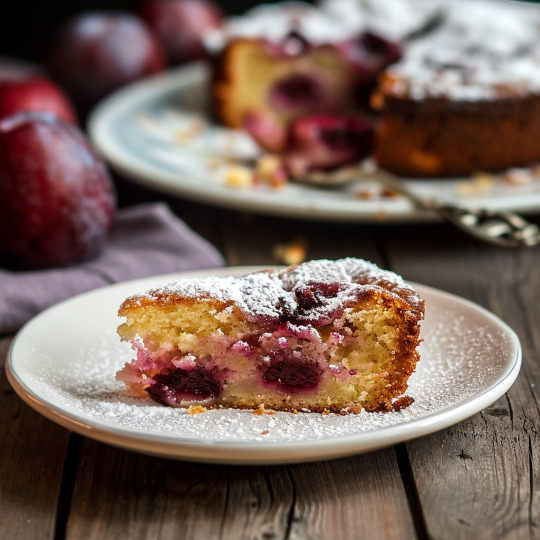
Plum Cake
🍰 Plum Cake Recipe 🍰
🛒 Ingredients
Cake Base:
200 g plain flour 🌾
2 tsp baking powder 🥄
1/4 tsp salt 🧂
150 g granulated sugar 🍚
120 g unsalted butter, softened 🧈
2 large eggs 🥚🥚
1 tsp vanilla extract 🍦
120 ml milk 🥛
Plums:
6-8 ripe plums, halved and pitted 🍑
Topping:
2 tbsp granulated sugar 🍚
1 tsp ground cinnamon 🌿
30 g sliced almonds (optional) 🌰
🥄 Instructions
Prepare the Oven and Pan:
Preheat the oven to 180°C (350°F). 🌡️
Grease a 23 cm (9-inch) springform or round cake pan, and line the bottom with parchment paper. 🧈📄
Mix the Dry Ingredients:
In a medium bowl, whisk together the flour, baking powder, and salt. 🌾🥄🧂
Cream the Butter and Sugar:
In a large mixing bowl, cream the softened butter and sugar together until light and fluffy. 🧈🍚
Add Eggs and Vanilla:
Beat in the eggs, one at a time. 🥚🥚
Add the vanilla extract and mix well. 🍦
Incorporate the Dry Ingredients and Milk:
Gradually add the flour mixture to the butter-sugar mixture, alternating with the milk. Begin and end with the flour mixture. 🌾🥛
Mix until just combined.
Assemble the Cake:
Pour the batter into the prepared pan and smooth the surface. 📄
Arrange the halved plums, cut side up, over the batter in a circular pattern. 🍑
Prepare the Topping:
Mix the sugar and cinnamon in a small bowl. 🍚🌿
Sprinkle the sugar-cinnamon mixture over the plums. 🍑
If using, sprinkle sliced almonds over the top. 🌰
Bake:
Bake in the preheated oven for 45-50 minutes, or until a toothpick inserted into the cake comes out clean. ⏲️
Cool and Serve:
Allow the cake to cool in the pan for 10 minutes. ❄️
Remove the sides of the springform pan (if using), and transfer the cake to a wire rack to cool completely. 🌬️
Serve at room temperature, optionally with whipped cream or ice cream. 🍦🍨
#cake#food#food blogs#delicious#recipe#daily recipe#recipes#dessert#food pics#torta#homemade#foodshow#breakfast#food photography#food blog#baking#sweet food#yummy food#food porn
20 notes
·
View notes
Text

Thank you @sweetgreenfrogs and everyone who got me to 3000 reblogs!

Double strawberry cream cheesecake cupcakes
1K notes
·
View notes
Text
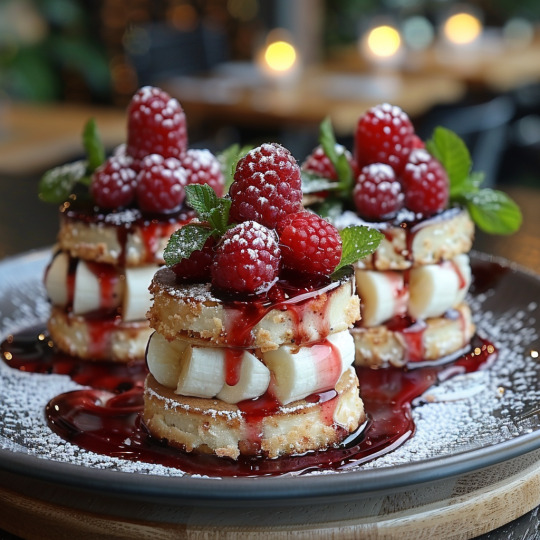
Home made pancakes with freshly cut banana slices, raspberry and strawberry compote!
#pancakes#food#food blogs#delicious#recipe#food pics#homemade#foodshow#dessert#cake#breakfast#home made pancakes#delicious recipes#yummy#try this#healthy baking#healthy#organic
14 notes
·
View notes
Text
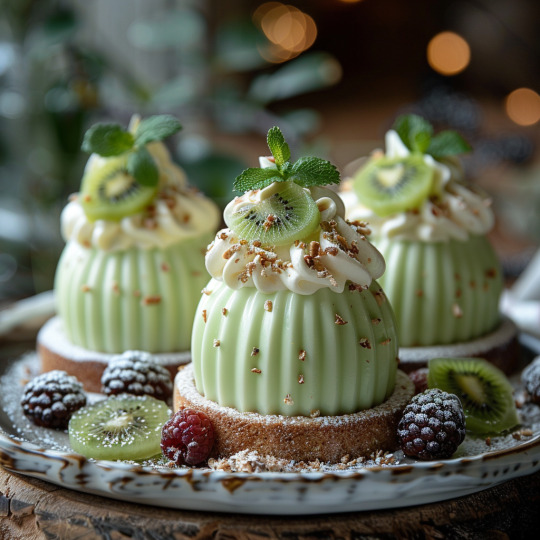
Home made vanilla, pistachio and hazelnut pannacotta sitting on a crunchy biscuit layer
#food#food blogs#delicious#recipe#food pics#homemade#foodshow#cake recipe#dessert#cake#pistachio#vanilla#pannacotta#breakfast#yummy#so yummy
14 notes
·
View notes
Text
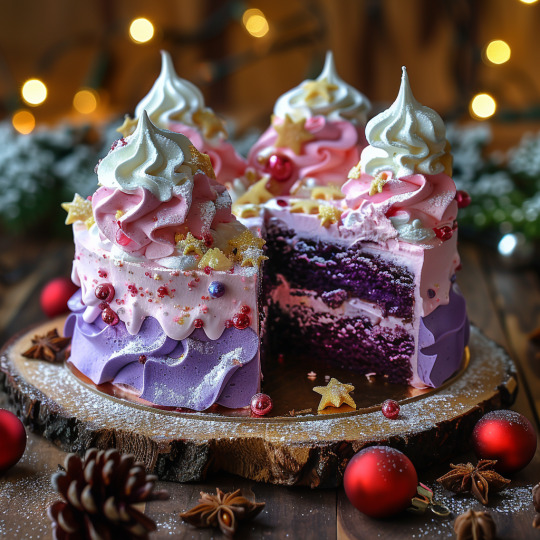
Enchanted Winter Berry Cake
Ingredients:
For the Purple Sponge Cake:
4 large eggs
250 grams of granulated sugar
250 grams of all-purpose flour
1 teaspoon of baking powder
120 ml of whole milk
120 ml of vegetable oil
1 teaspoon of vanilla extract
Purple food coloring (gel works best)
For the Italian Meringue:
4 large egg whites
250 grams of granulated sugar
60 ml of water
A pinch of cream of tartar
For the Whipped Cream Frosting:
600 ml of heavy cream
2 tablespoons of powdered sugar
1 teaspoon of vanilla extract
Pink food coloring
For the Decoration:
Edible pearls and glitter
Sugared berries (cranberries, blueberries, raspberries)
Candied lemon peel, finely chopped
Edible gold stars
Instructions:
1. Bake the Purple Sponge Cake:
Preheat your oven to 175°C (350°F). Grease and line three 18 cm (7-inch) cake pans.
In a bowl, beat eggs and sugar until fluffy and light in color.
Sift together flour and baking powder. Gradually add to the egg mixture.
Mix milk, oil, vanilla extract, and purple food coloring in a separate bowl. Then fold into the batter until uniform.
Divide the batter evenly between the pans and bake for about 25 minutes or until a toothpick comes out clean.
Let the cakes cool completely after baking.
2. Prepare the Italian Meringue:
Place sugar and water in a saucepan over medium heat, stirring until the sugar dissolves.
Once the sugar syrup reaches 115°C (239°F), start whipping the egg whites with the cream of tartar until soft peaks form.
When the syrup reaches 121°C (250°F), slowly pour it into the egg whites while continuing to whip until glossy and cool.
3. Make the Whipped Cream Frosting:
Whip the heavy cream with powdered sugar and vanilla extract until soft peaks form.
Take a portion of the whipped cream and mix with pink food coloring for the colored layers.
4. Assemble the Cake:
Trim the tops of the cakes to level them if needed. Place one layer on a cake stand.
Spread pink whipped cream on the first layer, then add the second layer and repeat.
Frost the outside of the cake with the white whipped cream, smoothing it out.
5. Decorate the Cake:
Pipe Italian meringue on top in tall swirls to create a dramatic effect.
Decorate with sugared berries, edible pearls, and glitter.
Add bits of candied lemon peel around the edges for a zesty touch and place gold stars sporadically for a magical finish.
6. Serve:
Chill the cake for at least 1 hour to set the frosting and meringue before serving.
Slice with a hot knife to get clean cuts and serve this enchanting dessert.
#purple#pink#cake#Enchanted Winter Berry Cake#food#delicious#food blogs#recipe#food pics#homemade#foodshow#dessert#daily recipes#daily recap#food photography#food photoshoot#food photo blog#food blog
39 notes
·
View notes
Text

Velvet Berry Gala Cake
Ingredients:
For the Red Velvet Cake:
240 ml of buttermilk
1 teaspoon of white vinegar
1 teaspoon of vanilla extract
2 large eggs
60 ml of red food coloring
240 grams of all-purpose flour
200 grams of granulated sugar
1 teaspoon of baking soda
1 teaspoon of cocoa powder
1/2 teaspoon of salt
115 grams of unsalted butter, at room temperature
For the Cream Cheese Frosting:
450 grams of cream cheese, softened
225 grams of unsalted butter, softened
500 grams of powdered sugar, sifted
1 teaspoon of vanilla extract
For the Decoration:
Fresh strawberries, halved and dusted with powdered sugar
Edible gold stars
Orange and blue candy floss
Edible glitter or candy sparkles
Assorted cookies for the side (choose your favorite, such as shortbread or sugar cookies)
Instructions:
1. Bake the Cake:
Preheat your oven to 175°C (350°F). Grease and flour two 20 cm (8-inch) round cake pans.
In a bowl, mix together the buttermilk, vinegar, vanilla extract, eggs, and red food coloring.
In a separate bowl, sift together the flour, sugar, baking soda, cocoa powder, and salt.
Cream the butter until smooth, then gradually add the dry ingredients alternating with the wet ingredients, starting and ending with the dry.
Divide the batter between the cake pans and bake for 25-30 minutes, or until a toothpick inserted into the center comes out clean.
Let the cakes cool in the pans for 10 minutes, then transfer them to wire racks to cool completely.
2. Make the Cream Cheese Frosting:
Beat the cream cheese and butter together until creamy.
Gradually add the powdered sugar and beat until smooth.
Stir in the vanilla extract.
3. Assemble the Cake:
Once cooled, slice each cake horizontally to create four layers.
Place one layer on a cake stand and spread with frosting.
Repeat with remaining layers and cover the entire cake with a thin layer of frosting for the crumb coat. Chill for 15 minutes.
Apply a final thick layer of frosting, smoothing the sides with a spatula.
4. Decorate the Cake:
Gently press the edible gold stars into the frosting around the cake.
Carefully place the candy floss on top of the cake for a whimsical effect.
Add the strawberries, arranging them beautifully on top.
Sprinkle the entire cake with edible glitter or candy sparkles for a little shine and sparkle.
5. Serve:
Arrange a selection of your favorite cookies around the base of the cake for an extra treat.
Slice and serve the cake at room temperature to appreciate all its flavors.
#food pics#homemade#foodshow#recipe#delicious#food#food blogs#dessert#cake#breakfast#desert#cakes#cake recipe#Velvet Berry Gala Cake#food photography#food blog#food blogger#yummy yum yum#recipes#chocolate#so yummy
41 notes
·
View notes
Text

Fantasy Berry Meringue Layer Cake
Ingredients:
For the Cake Layers:
300 grams of all-purpose flour
300 grams of granulated sugar
1 teaspoon of baking powder
1/2 teaspoon of baking soda
A pinch of salt
4 large eggs
240 ml of buttermilk
120 ml of vegetable oil
2 teaspoons of vanilla extract
Food coloring in violet, blue, and pink
For the Meringue:
4 large egg whites
200 grams of caster sugar
1 teaspoon of cornstarch
1 teaspoon of white vinegar
1 teaspoon of vanilla extract
For the Whipped Cream Frosting:
500 ml of heavy cream
50 grams of powdered sugar
1 teaspoon of vanilla extract
For the Garnish:
Fresh strawberries, halved
Fresh blueberries
Fresh raspberries
Edible gold leaf (optional)
Edible pearls or colored sprinkles
Instructions:
1. Make the Cake Layers:
Preheat your oven to 175°C (347°F). Grease and line three 20 cm (8 inch) cake pans.
In a large bowl, whisk together the flour, sugar, baking powder, baking soda, and salt.
In another bowl, beat the eggs, buttermilk, oil, and vanilla extract until well combined.
Gradually add the wet ingredients to the dry ingredients, mixing until just combined.
Divide the batter into three bowls. Color each one with a different food coloring.
Pour the batter into the prepared pans and bake for 25-30 minutes, or until a toothpick inserted into the center comes out clean.
Let the cakes cool in the pans for 10 minutes, then transfer to a wire rack to cool completely.
2. Prepare the Meringue:
Whisk the egg whites until soft peaks form.
Gradually add the sugar, cornstarch, vinegar, and vanilla extract, and continue to whisk until stiff peaks form.
Transfer the meringue into a piping bag fitted with a large star nozzle.
3. Make the Whipped Cream Frosting:
Whip the heavy cream with powdered sugar and vanilla extract until stiff peaks form.
Keep the frosting chilled until you're ready to assemble the cake.
4. Assemble the Cake:
Place one cake layer on a serving plate and spread a layer of whipped cream frosting over it.
Top with the second cake layer and spread another layer of whipped cream.
Add the final cake layer and cover the entire cake with a thin layer of whipped cream, smoothing it out. This is your crumb coat.
Chill the cake in the refrigerator for 30 minutes.
5. Decorate the Cake:
After chilling, cover the cake with another layer of whipped cream frosting, creating a smooth surface or swirling texture as you prefer.
Pipe meringue peaks on the top of the cake.
Garnish the cake with fresh berries, edible pearls, and gold leaf if using.
6. Final Touches:
Use a culinary torch to lightly toast the meringue peaks until golden.
Drizzle some melted white chocolate or a fruit coulis over the meringue and berries for extra decadence.
7. Serve:
Let the cake set in the fridge for at least an hour before serving.
Slice and enjoy your Fantasy Berry Meringue Layer Cake!
#cake#rainbow#meringue#layred cake#delicious recipes#cake recipe#foodie#recipe#food blogs#food pics#homemade#foodshow#dessert#food#foodporn#baking#cooking#creamy#daily recipe#food photography#food blog
34 notes
·
View notes
Text
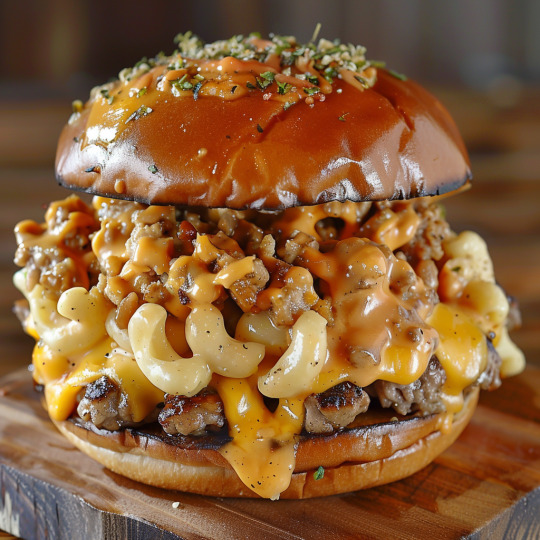
Mac Daddy Melt
#food#delicious#food blogs#recipe#food pics#homemade#foodshow#dessert#burger#Mac Daddy Melt#mac and cheese
30 notes
·
View notes
Text

Home baked calzone
Ingredients:
For the Dough:
500 grams of all-purpose flour, plus extra for dusting
1 teaspoon of salt
7 grams of instant yeast (1 sachet)
1 tablespoon of olive oil, plus extra for greasing
300 ml of warm water
For the Filling:
250 grams of ricotta cheese
100 grams of mozzarella cheese, shredded
50 grams of Parmesan cheese, grated
100 grams of cooked ham, diced
2 teaspoons of dried oregano
Salt and pepper to taste
Optional: other fillings like sautéed vegetables, cooked sausage, or pepperoni slices
For Brushing:
1 egg, beaten
A pinch of salt
Sesame or poppy seeds (optional)
For Serving:
Fresh basil or parsley, chopped
A handful of cherry tomatoes, halved
Instructions:
1. Prepare the Dough:
In a large mixing bowl, combine the flour and salt.
In a separate bowl, mix the yeast with warm water and let it sit for a few minutes.
Make a well in the center of the flour and pour in the olive oil and yeast mixture.
Gradually mix the flour into the wet ingredients until a dough begins to form.
Knead the dough on a floured surface for about 10 minutes, or until it's smooth and elastic.
Place the dough in a lightly oiled bowl, cover with a cloth, and let it rise in a warm place for about 1 hour or until it has doubled in size.
2. Prepare the Filling:
In a bowl, combine the ricotta, mozzarella, and Parmesan cheese.
Add the diced ham and oregano, then season with salt and pepper. Mix well.
3. Assemble the Calzones:
Once the dough has risen, punch it down and divide it into 4 equal pieces.
On a floured surface, roll out each piece into a circle about 20 cm in diameter.
Spread a portion of the filling on one half of each circle, leaving a margin around the edge for sealing.
Fold the dough over the filling to create a half-moon shape. Pinch and roll the edges together to seal.
Transfer the calzones to a baking sheet lined with parchment paper.
4. Prepare for Baking:
Preheat your oven to 220°C (428°F).
Brush the tops of the calzones with the beaten egg. Sprinkle with a pinch of salt and seeds if using.
With a sharp knife, make a few small slits on the top of each calzone to allow steam to escape.
5. Bake the Calzones:
Bake in the preheated oven for 15-20 minutes, or until they are golden brown and the filling is bubbly.
#italian#calone#food#delicious#food blogs#recipe#food pics#homemade#breakfast#foodshow#dinner ideas#food ideas#recipe ideas#delicious recipes#foodie#food photography#baking#cooking
311 notes
·
View notes
Text

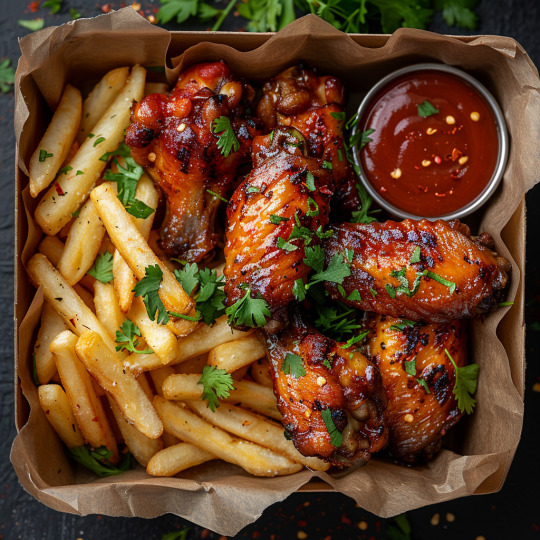
fried chicken wings with sauce and fries
#fried chicken wings with sauce and fries#food#delicious#food blogs#recipe#food pics#homemade#foodshow#food photography#foodie#fried chicken#lunch#food ideas#recipe ideas#what's for dinner
27 notes
·
View notes
Text

Chocolate cream puffs stuffed with white cream
#food#chocolate cake#cream#delicious#food blogs#recipe#food pics#homemade#breakfast#cake#dessert#foodshow#coconut#chocolate#baking
11 notes
·
View notes
Text

Thank you @dreamingineuphoria and everyone who got me to 2000 reblogs!
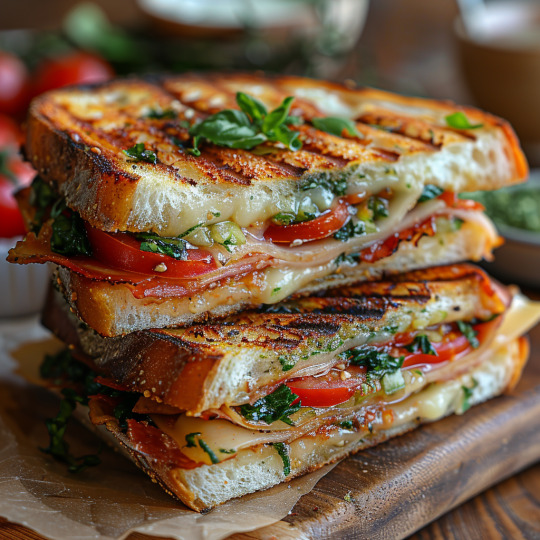
Home made grilled sandwich filled with zucchini, prosciutto, sliced beef tomatoes and cheese
2K notes
·
View notes
Text
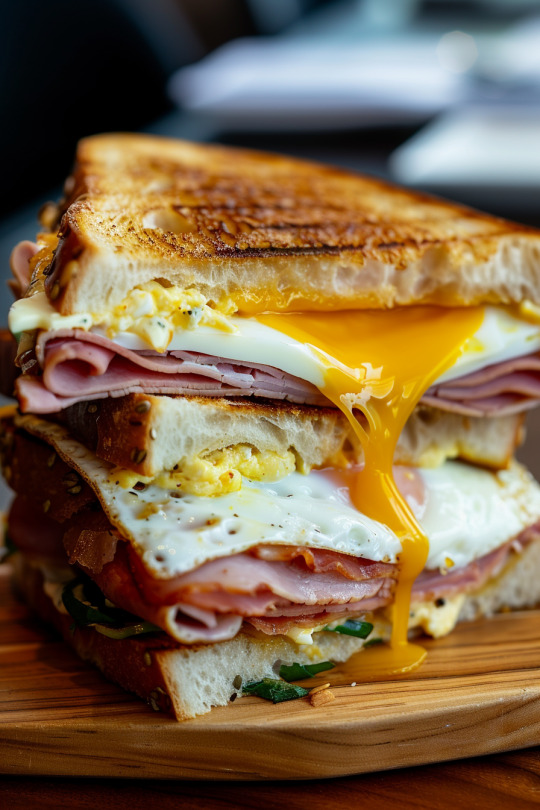
Ham, cheese and melty egg sandwich
#food#food blogs#big sandwich#egg sandwich#cheese sandwich#delicious#food pics#homemade#foodshow#breakfast#so yummy
18 notes
·
View notes
Text
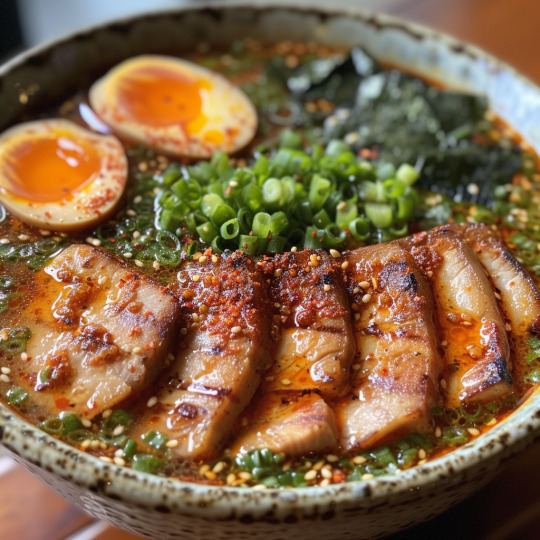
Spicy Chashu Ramen with Soft Boiled Egg (Serves 2)
Ingredients:
Ramen Broth (store-bought or homemade - chicken or pork recommended)
For the Chashu Pork:
1 lb boneless pork belly
4 cloves garlic, smashed
1 inch ginger, peeled and sliced
½ cup soy sauce
¼ cup mirin
2 tablespoons sake
2 tablespoons brown sugar
4 cups water
Ramen noodles (fresh or dried according to package instructions)
2 large eggs
1 can (14 oz) bamboo shoots, sliced
4 scallions, thinly sliced (separate white and green parts)
2 sheets nori, cut into thin strips
Chili oil (to taste)
Instructions:
Marinate the Chashu Pork: In a large pot, combine garlic, ginger, soy sauce, mirin, sake, brown sugar, and water. Bring to a simmer, then reduce heat and simmer for 5 minutes. Add pork belly and ensure it's submerged in the marinade. Cover and refrigerate for at least 4 hours, or ideally overnight.
Cook the Chashu Pork: Bring the marinade in the pot to a simmer. Cover and simmer for 1.5-2 hours, or until pork is very tender. Remove pork and let cool slightly in the marinade. Once cool enough to handle, thinly slice the pork belly against the grain. Reserve the remaining marinade for later.
Soft Boil the Eggs: Place eggs in a pot and cover with cold water. Bring to a boil, then immediately remove from heat and cover for 7 minutes for a runny yolk, or 9 minutes for a slightly firmer yolk. Drain hot water and run cold water over the eggs to stop the cooking process. Peel and set aside.
Prepare the Ramen: Cook ramen noodles according to package instructions. While noodles are cooking, heat reserved marinade in a saucepan.
Assemble the Ramen: Divide broth between two serving bowls. Add cooked ramen noodles, then top with sliced chashu pork, bamboo shoots, white parts of scallions, and a soft-boiled egg (cut in half if desired). Drizzle with chili oil to taste.
Garnish and Serve: Top each bowl with green parts of scallions and nori strips. Enjoy immediately!
Tips:
Leftover chashu pork can be stored in the marinade in the refrigerator for up to 3 days.
For a richer broth, you can add a tablespoon of butter or sesame oil to each bowl before serving.
Want to make your own chili oil? Simply infuse neutral oil with crushed red pepper flakes for a few days.
Experiment with other toppings! Popular options include corn, bean sprouts, wood ear mushrooms, and seaweed salad.
#recipe#food#food pics#delicious#food blogs#homemade#ramen noodles#japanese#foodshow#food photography#food recipes#recipes#so yummy
46 notes
·
View notes