#3mm hook
Text
holy shit why is old furniture so heavy i think i pulled every single muscle in my side
11 notes
·
View notes
Text
Won the yarn chicken battle (got more rows than I expected out of this), lost the yarn chicken war (couldn't do the full eight rows)
#i used this yarn on a shawl where i know i didnt bother to weave all the ends in yet#gonna see if i can get something from there#crochet#insane how much yarn crochet uses#bruh this was a full metre and i couldnt do 46 stitches with a 3mm hook
15 notes
·
View notes
Text
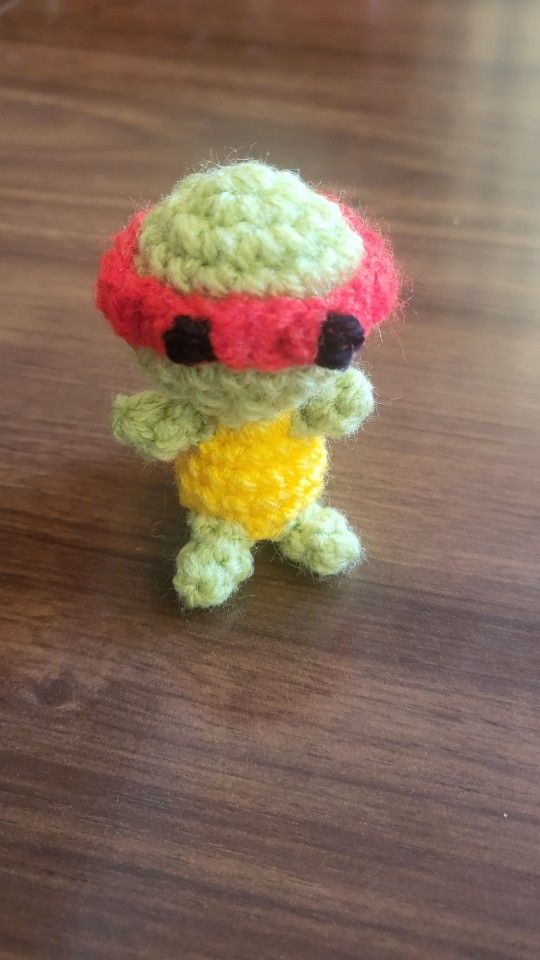
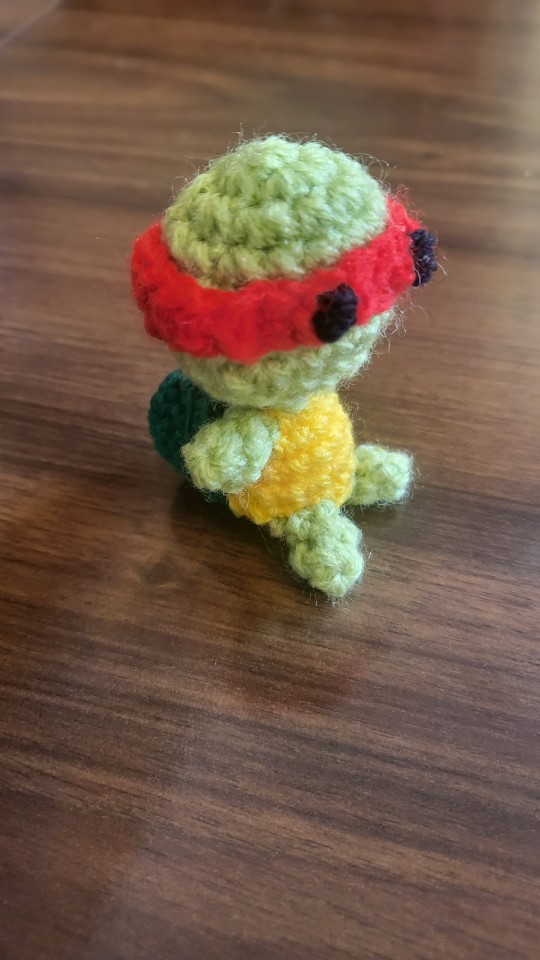
Little Raphael Amigurumi using Ami Amour's Ninja Turtle pattern, last minute gift for a friend
#crochet#amigurumi#tmnt#raphael#I used dk yarn with a 3mm hook so the proportions are not quite there#but only took me like 2hr so I'll take it#from pattern
5 notes
·
View notes
Text
i dont mind having to wait for packages cuz i believe in patience is a virture etc etc but im literally nose pressed against the window whispering packidge rn because i started a crochet shawl the other day with some blue variegated yarn my cousin bought me and ive used 300g so far so i ordered more and its not coming till the 12th so my project is sitting there unfinished. torturous
#i probably should have used a bigger crochet hook size to make it tho cuz the yarn calls for a 5.5mm hook but i didnt HAVE one at the time#so i used a 3mm which. means i probably used up more yarn than i needed to but now ive just got to commit and finish it with the 3mm hook i#im using mostly triple crochets so hopefully it balances out though#emi's meandering jotts#crochet#im going to do a pom-pom yarn edging on it when i finish 😁#the colours change slowly enough to create this cool check but quick enough to also kind of marble it. its very cool i will take a photo#when its done 👍
10 notes
·
View notes
Text
I kinda want to take my crochet Slowpoke with me in Italy (currently finishing him, he's getting his lil' paws stitched on his body)
... but that boy is FAT and I'm taking the bus ?? is that even a good idea?????
#he's... so fat#I love him#but he's def on the bigger side lmao#seeing people's tiny amigurumi - looking at mine#shaking my head like I can't believe it#(but I can despite using a 3mm crochet hook)
2 notes
·
View notes
Text
trying really hard to apply the idea of Make Bad Art to amigurumi
the problem is that it's hammered in really hard that you Absolutely Cannot let Any filling show through, and keeping that kinda tension completely destroys my hands. like to the point where i haven't been able to do anything for the past week and i Know my current amigurumi project is partly to blame for that bc it has been Exhausting
but i wanna make things. and in this case it means i gotta make them badly
#rip current project youre gonna get tension switched halfway through#at least its assembled from pieces so#im gonna finish the current piece someday with tight tension#and then loosen up for the rest#and just deal with how it ends up looking#chatter tag#'oh just go down a hook size then!' if i go down another hook size the yarn literally wont stay on the hook anymore#i was not made to crochet aran weight yarn with a 3mm hook. i am not doing that#i have a love-hate relationship with amigurumi but my current project is so cute and i want it to exist#i have both my current projects just sitting on my desk and theyre haunting me#even when my hands recover i wont be able to work on them bc i need to catch up on homework :(#this is mainly me trying to untangle my thoughts tbh#(other current project is a shawl with very gay motivations behind it)
3 notes
·
View notes
Text
What do you mean I have to use different hooks for different yarn weights????
You can tear my bright orange 4.5mm hook out of my cold dead hands
#unfortunately the holes un the fabrick look bad so ill have to downgrade to like... a 3mm hook#which is also orange by luck of the draw#is mise an crann#crochet
3 notes
·
View notes
Text
aughhhh motherfucker and i still havent decided if i wanna return my crochet hooks and apparently the window is closing like. tomorrow. so i need to decide.
#WAAAAAH.#its gonna be such a hassle but i am really mad that the 3mm is defective...#it's my only 3mm tunisian hook too so its not like id be able to use an alternative if/when a project comes up that needs one#but god its gonna be so much. bc i dont have transportation so i dunno how im gonna ship it.
0 notes
Text
teehee added the buttons :3

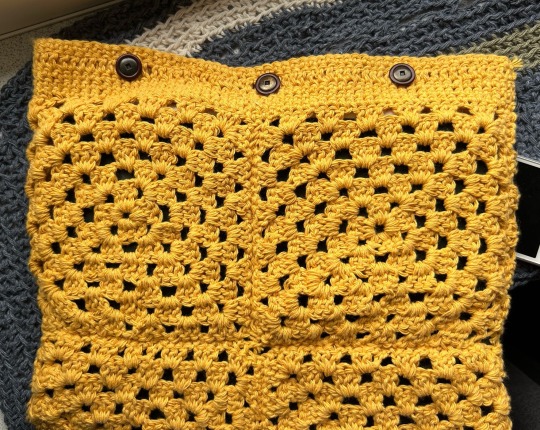
#stream#yippee !!! hooray !!! it’s completed !!!!!!!#i made a BAG that i can USE#so proud of myself#bought the buttons from the local shop in the market love her she’s a sweetheart#the big ones are like idk ‘load bearing’ & the small ones are the ones that i actually open & close#this was all done w a 3mm crochet hook lol#i didn’t like the cinching too much but now i’m happy w it bc it gives it such a nice shape + a snug fit means it’s IN !!!!#the ipad gives it more structure in itself#so the slouch isn’t as pronounced so it’s like just the top that’s a bit slouchy which i LOVE
0 notes
Text
Calling all chronic creatives - here's how to up your crochet game!
I'm an avid crocheter, but holding the hook for long periods of time became exhausting and painful. Being chronically ill, losing the ability to enjoy my hobbies was tough for me accept.
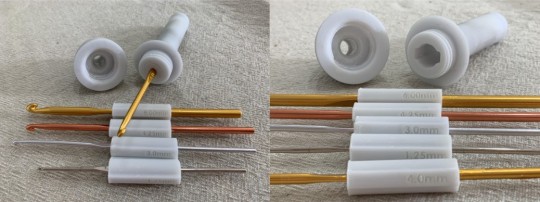
My husband took me to the craft store and we purchased a ergonomic crochet handle. This handle needed to fit my criteria;
able to hold a variety of hook sizes
hold up to high tension crochet projects (I do a lot of amigurumi crochet, which you need to complete with tight tension)
reduce my wrist/hand pain
reduce the amount of grip strength needed to hold the hook to avoid fatigue
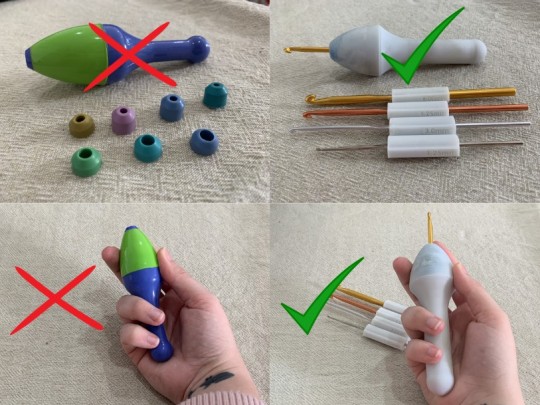
This ergonomic crochet handle *seemed* to tick all these boxes. It was quite an expensive purchase and to be honest, I was disappointed in it in all aspects.
The purchased handle uses small rubber stoppers to hold the crochet hook in place, but as you are crocheting the hook works loose and spins around inside it. The handle itself was too small, making it painful to hold. I had to use a lot of grip strength to keep it in my hand, which is what I was trying to avoid by purchasing the darn thing. The little knobbly bit at the end really dug into my hand and hurt. It was so annoying to use and I gave up on it altogether after three days of using it (not to mention one of the rubber pieces broke apart within hours).
I expressed my disappointment to my husband, and he decided to come to my rescue! Over the course of a week, he designed me his own ergonomic crochet handle in a computer program called CAD. He then printed it out using his 3D printer. I can't even begin to tell you how much I love this new handle - its a game changer!
During the design process, he took into consideration all of my complaints about the disappointing handle and my criteria that I had listed. The handle he designed is bigger, so it uses less grip strength to hold it in place which also reduces my pain.
Instead of using rubber stoppers like the other handle, he designed a 'lock and key' system for keeping the crochet hooks in place and it works fabulously! The hook never moves and I'm really rough with my crochet hooks. It holds up to my high tension crochet projects and I have completed many amigurumi with it, even small, intricate items. Since it is designed with the lock and key system, my husband was easily able to print different keys to be able to hold multiple sizes. I've got keys ranging from 1.25mm all the way up to 6mm!
I can now crochet for hours on end and I swear my crochet skills have gotten so much better.
After expressing my delight at the crochet handle my husband designed for me, both him and I want others to be able to experience the freedom that I now have when crocheting. With chronic illnesses, its important for you to be able to continue with your passions as much as possible, so we have decided to make this crochet handle a sellable physical item for others to enjoy.
Here's the link to purchase one if you would like to give it a go!
Each crochet handle will come with the hook sizes;
1.25mm
2mm
3mm
4mm
4.25mm
5mm
6mm
If you want other hook sizes, send us a message and we can design one.
The cost of the handle and keys covers the cost of the 3D printing material, we are not making a profit off of this because we want as many people suffering from chronic illness to be able to enjoy crocheting again. We are happy to post internationally as we are based in New Zealand, send us a message before purchasing so that I can get you the cost of shipping.
I hope you will love this crochet handle and hook set as much as I have!
#cfs/me#chronic fatigue#chronic illness#chronically ill#me cfs#myalgic encephalomyelitis#spoonie#chronic fatigue syndrome#chronic pain#mobility#mobility aid#crochet#crocheting#amigurumi#yarn crafts#yarn#hobbies#creativity#life hacks#hobby#craft
11K notes
·
View notes
Text
Don't talk to me or my son ever again!
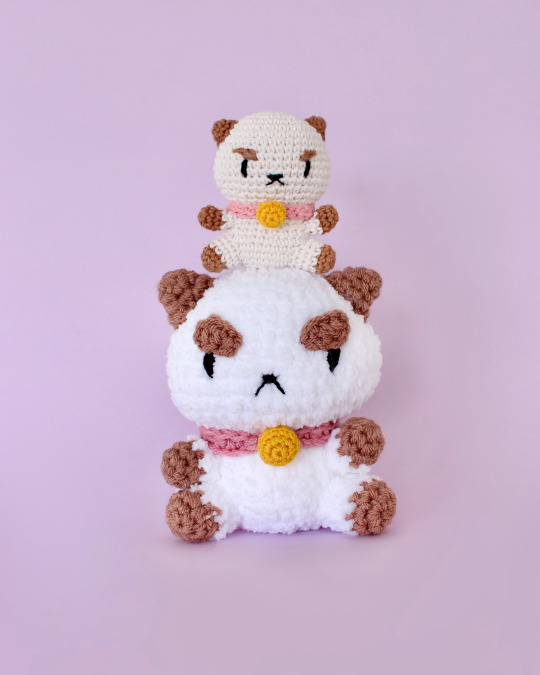
I've been really enjoying season 2 of Bee and PuppyCat since it landed on Netflix a couple of weeks ago, and I wanted to try and make a bigger, fluffier version of my free PuppyCat pattern!
This guy is made with a bulky weight chenille yarn I bought at my local Spotlight for the white fuzzy bits (Bella Baby - Baby Chenille) and some DK yarn doubled up for the brown, since I can't seem to find this colour in chenille anywhere. I crocheted the regular pattern with a 6mm crochet hook - and you can see the difference the chunkier yarn and hook make! The smaller version is made with DK yarn and a 3mm crochet hook.
You can find the pattern here!
689 notes
·
View notes
Text
10 rows in on Klaziena by Kristen Bishop (free pattern on Ravelry)
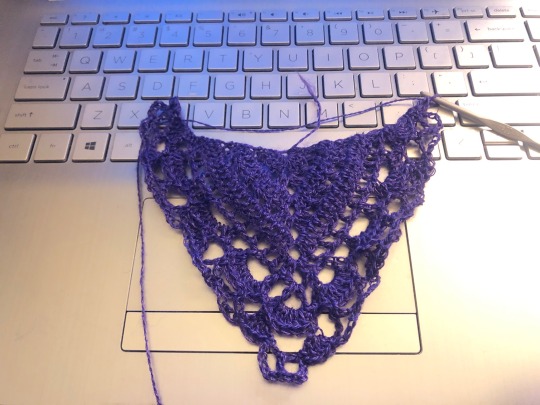
This yarn is ever so faintly less slinky in purple rather than white, but still delightful to work with. I cannot be grateful enough to my most recent commissioner, who picked out the white yarn for their skulls shawl and broke me out of a yarn habit.
3mm hook. Laptop keyboard for scale.
I think someday soon I might succumb to The Fiber Madness and start a piece made with a tiny hook from silk thread….
97 notes
·
View notes
Text
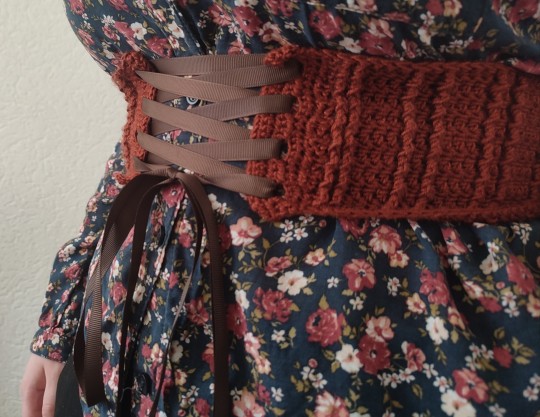
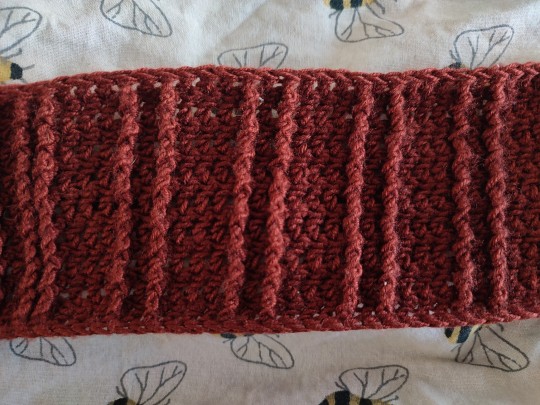
i made another one of these corset belts! i made most of it at the end of february and then. stopped
but it's done now! i think this will be one of my most versatile ones, because of the solid colour and not tooo exciting pattern, it goes with many tops. sometimes i need to learn that fun yarn doesn't equal fun garment i'll wear lots
the pattern is actually pretty much the same as my first corset belt, which is unwearable because i used a 4mm hook and with the strain that the fabric gets you need to be using a hook that's as small as possible for the yarn you're working with, which in this case means a 2.5. a 3mm also gets the job done alright, but 2.5 i do think is an improvement
i used 42 grams of durable comfy for this
if you'd like a full writeup of how i make these, let me know and i'll try to . get that post done
#bis arts#art#crochet#artists on tumblr#my art#yarn#fibercraft#fibrecrafts#traditional art#corset#corset belt#cottagecore#crochet cottagecore
21 notes
·
View notes
Text
pattern tester call!
long shot, but I'm gonna try my luck on here too anyway
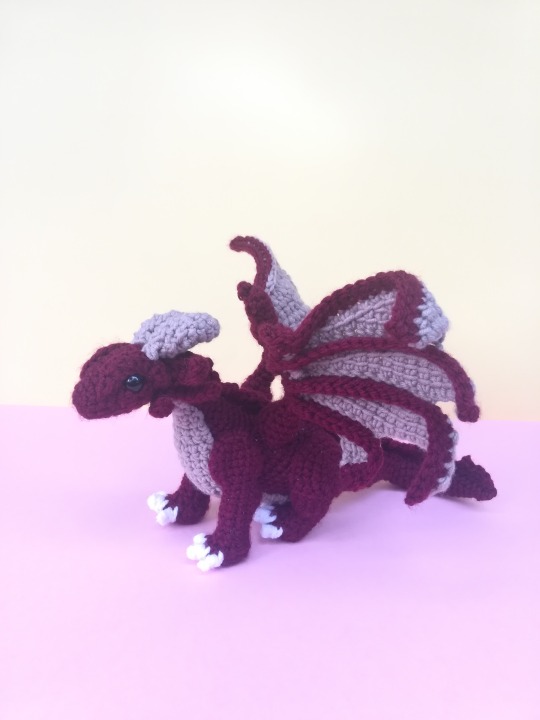
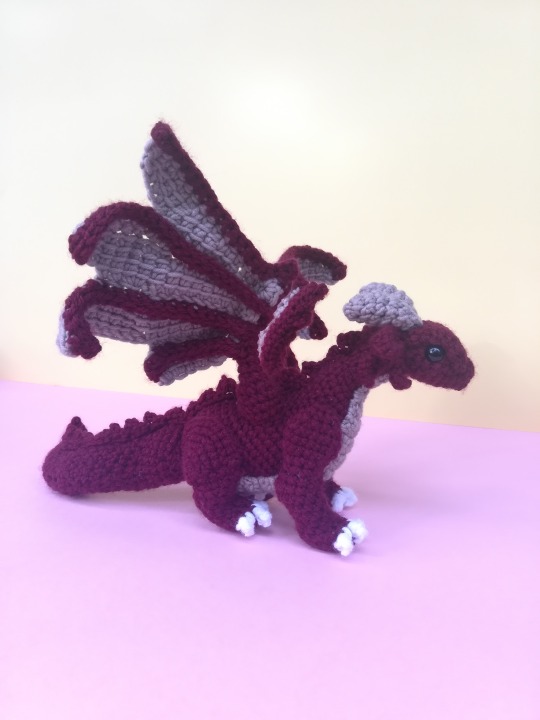
Hi, I’m looking for people willing to test my pattern for a semi-realistic dragon plushie. I don’t have a set number of testers in mind, but any help is appreciated!
I’m looking for feedback on whether or not the pattern is easy to follow, and if there’s any areas that require more clear explanations. There might also be stitch count mistakes in some rounds/rows, so I’d appreciate feedback on that as well. I’m attaching links for pictures of the finished plushie.
Requirements and info under a cut:
Being able to complete the project within the next three weeks (deadline: May 5). I can be flexible with the deadline if that doesn’t work for anyone, but ideally I’d want to post this pattern sometime in May).
Providing feedback.
being an intermediate level crocheter. This project has several areas that would prove difficult for a beginner.
Ideally, not being familiar with tunisian crochet. The majority of the pattern uses normal crochet stitches, but the wings are made with a mix of regular crochet and tunisian simple stitches. I included detailed photo tutorials for them, but I want to test if the pattern is understandable for someone who never used tunisian crochet stitches before.
not sharing or redistributing the pattern
willingness to give me an email address for us to communicate
What you’ll need:
a 3 mm and a 4 mm hook.
stuffing
your preferred stitch markers
a yarn needle (better if curved)
one pair of 10 mm safety eyes
fabric pins
DK acrylic yarn in 2 main colors (I used red and light brown) + scraps of a third (I used white) for the claws. No need for a specific brand of yarn. I used almost an entire 50gr skein of red with 140m/153yds of mileage. You need less than half of that in brown.
about 20 cm of sturdy wire. Anything between 1.8mm and 2mm should work.
Notes:
This pattern uses the yarn under method of crocheting for the majority of the piece except the wings, which are worked with the yarn over method. The 4mm hook listed is only for the wings, belly patch and the spine frills. The rest of the pattern uses a 3mm hook.
Using DK yarn, the dragon measures roughly 26 cm long and 14 cm tall, and has a wingspan of about 24 cm.
Please let me know if anyone is willing to help! Participants will receive a copy of the pattern by email. I can’t offer monetary compensation but I will email you a copy of the revised pattern once it’s done.
#crochet#crochet pattern#dragon#dragon plushie#dragon amigurumi#crochetblr#pattern testers#thyandra's crocheting adventures
20 notes
·
View notes
Text
While I aimlessly attempt removing battery acid from PBJ, enjoy this:
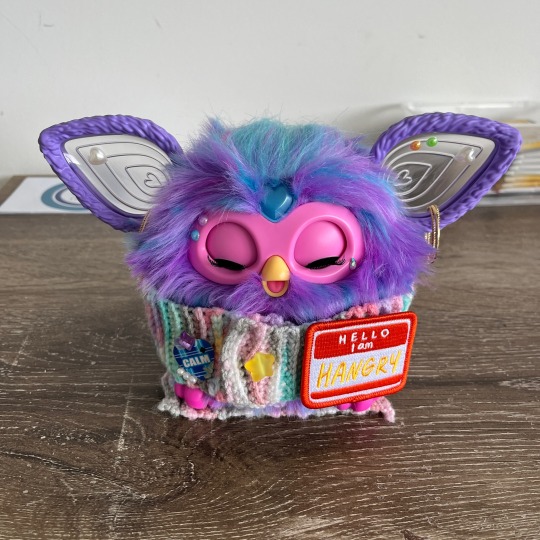
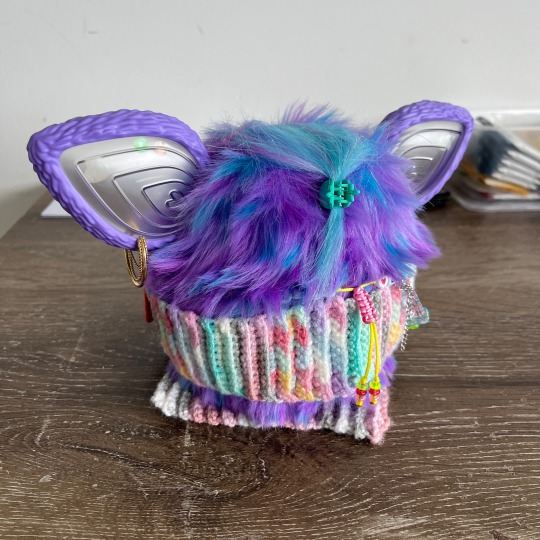
Yes, a very basic Furby 2023 sweater! (Featuring a very funny patch)
It is basically a very narrow and long baby blanket with a button hole and a button, but below comes the pattern for anyone’s reference:
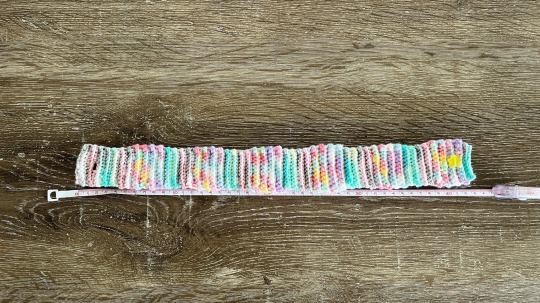
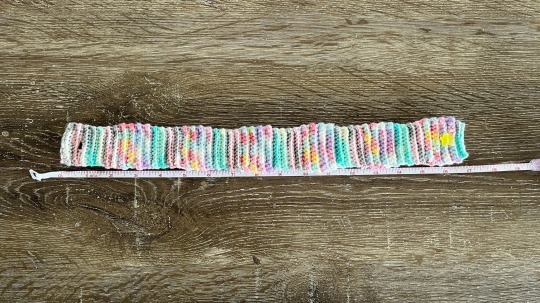
The final product is roughly 43 cm or 17 in long.
I used a mixture of 2mm and 3mm yarn (unintentionally) and a 4mm hook.
There are 4 different yarns I alternate in between.
The Jargon
ch: Chain
sc: Single crochet
ss: Slip stitch
What I did
ch 11
(sc 11 ch 1)*3 rows
sc 4 ch 3 sc 4 ch 1 - Creating button holes
sc 11 ch 1
From here on repeat (sc 11 ch 1) “mindlessly”. I do 4 rows for each yarn and a total of 6 reps for alternating between the 4 colors.
The button is sewn in the middle of the third last row of the repeating part (which is the fifth last row of sc’s)
After this section do two more rows of (sc 11 ch 1)
Finish with ss 11
#allfurby#furby#safefurby#furby 2023#shaggy the boi#furby resources#furblr#random rat rattle#yarn shenanigans
48 notes
·
View notes
Text
Nomai (Outer Wilds) Pattern

Solanum, my beloved! (just kidding!) I am so happy to share this pattern for the Nomai from Outer Wilds - it is a bit of an involved pattern, and probably not for beginners, but I will do my best to explain what I did! Please feel free to message me if you have questions. As always, if you use this pattern, please link back to my page, and tag me here on tumblr or @ erin.gurumi on instagram! I love to see what people make!
Technical stuff:
I used a 3mm crochet hook and these yarns:
Loops and Threads Impeccable in Walnut Tweed (horns)
Red Heart Super Saver in Warm Brown (face)
Red Heart Super Saver in Cream (hair)
Red Heart Super Saver in Paddy Green (space suit)
Red Heart Super Saver in Gold (trim)
Raspberry scrap yarn (glove/shoulder/thigh)
White scrap yarn (boots)

^Head:
Rather than the usual amigurumi method of starting from the top/bottom of the head, I started from the front of the face and worked toward the back - this let me make the back of the head in the cream color to better match those ancient Nomai murals!
6 sc in a magic circle in Warm Brown
inc 6x to make 12 stitches
(1 sc, inc) 6x to make 18 stitches
(2 sc, inc) 6x to make 24 stitches
(3 sc, inc) 6x to make 30 stitches
1 row of 30 stitches
Add eyes (I used 12 mm cat eye safety eyes), and nose/mouth (you can do embroidery, paint, etc... I used marker!)
Switch to Cream, 8 rows of 30 stitches
(3sc, dec) 6x to make 24 stitches
(2sc, dec) 6x to make 18 stitches
(sc, dec) 6x to make 12 stitches
dec, until closed, stuff and finish off
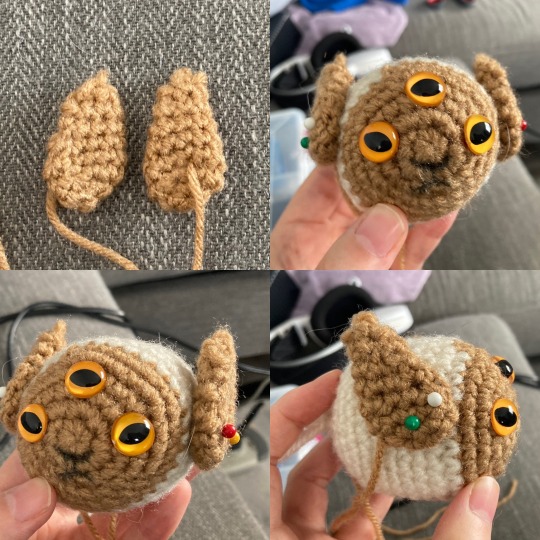
^Ears:
Make two of these of course! To make a teardrop shape like this I start with a round amigurumi shape then kind of flatten it down -
6 sc in a magic circle in Warm Brown
inc 6x to make 12 stitches
dec 1x to make 11 stitches
dec 1x to make 10 stitches
dec 1x to make 9 stitches
from here, decrease until the shape is closed, then add one sc to the top to make it extra pointy - flatten the drop and attach to the sides of the head!
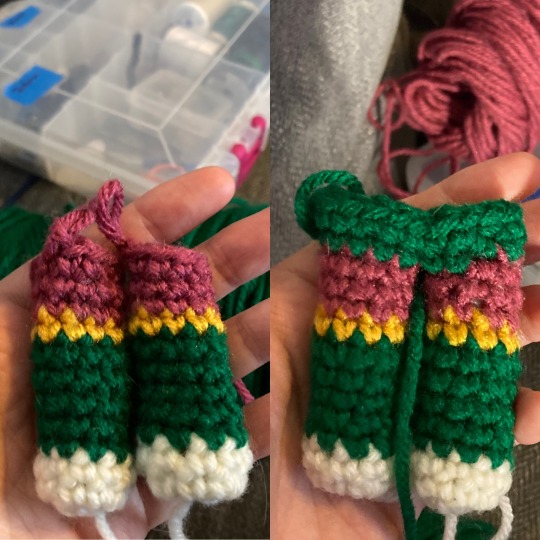
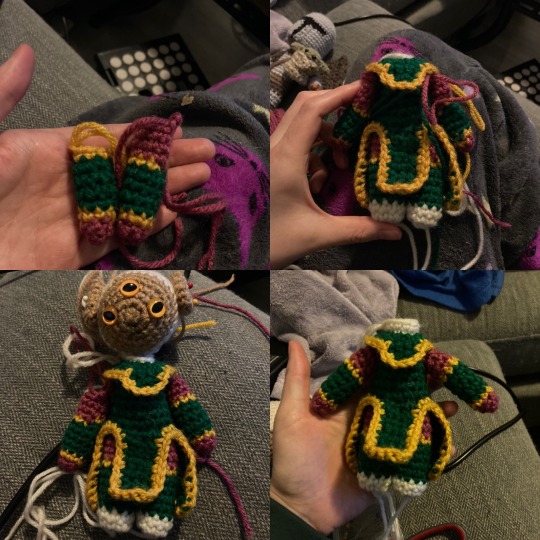
^Legs/torso
This is the usual method I use to make "standing" humanoid amigurumi, where you make two legs and then connect them by crocheting around them - this time it was a bit more involved because of the many color changes and doing a couple rows of crocheting in the back loops so that I was able to attach her tabards and collar
6 sc in a magic circle in White
inc 2x then (inc, sc)4x to make 10 stitches
1 row of 10 stitches in White
change to Green, 5 rows of 10 stitches
change to Gold, 1 row of 10 stitches
change to Raspberry, 3 rows of 10 stitches
Stuff and finish off one leg, stuff and keep the other leg
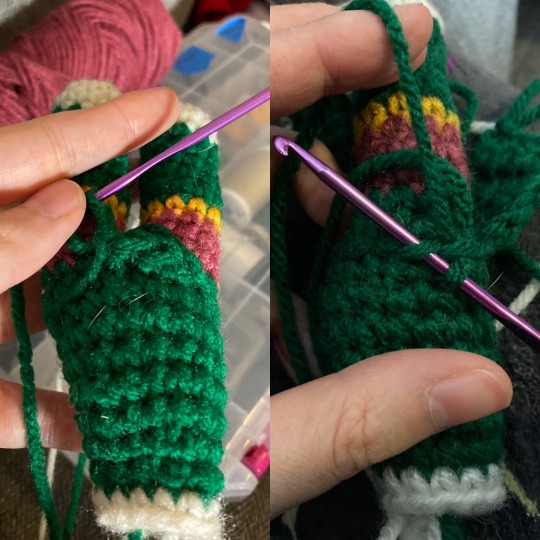
Torso:
As I'm making the torso, rather than counting how many stitches until I get to a dec, I just eyeball where the decrease will go (for example, in the center of the back, or behind a leg)
On right leg, color change from Raspberry to Green, chain 1, slip stitch into left leg, sc around both legs (~20 stitches - if it ends up more, just decrease in back to that)
1 row of 20 stitches
1 row of 20 stitches in back loops (important for adding the tabards!)
1 row of 18 (one dec behind each leg)
1 row of 17 (dec in back)
1 row of 16 (dec in back)
1 row of 15 (dec in back)
1 row of 13 (one dec in front, one in back)
1 row of 12 (dec in front)
change to Cream, 1 row of 12 in back loops (important for adding the collar!)
1 row of 12
Finish leaving a long tail for connecting the head
^Front Tabard
This is where it gets a little wonky, as I was really just eyeballing the widths of the front and back tabards and using what I had available in terms of the backloops. I also found that crocheting one way resulted in the "flaps" tending to point upward rather than downward, but... I'm not sure if it has to do with how you hold your hook?
Holding ami upside down, attach yarn by right leg with a slip stitch, sc 4
turn, sc 4 (repeat 11x, or however long you want the tabard to be)
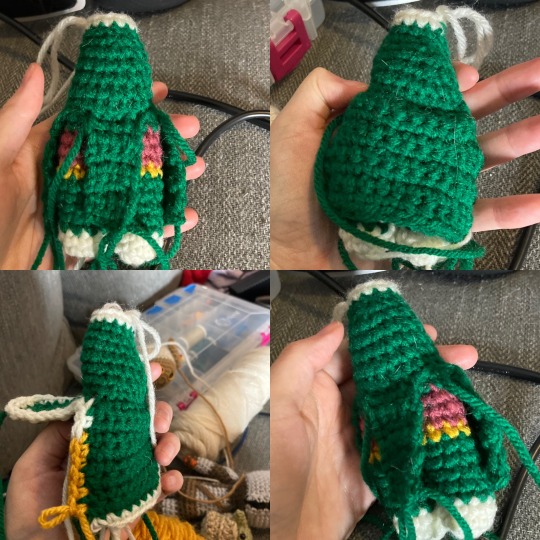
^ Back tabard:
You know, I realized part way through that in the back of the Nomai space suits, they actually have two separate bits of fabric (it's super hard to tell from the front!) So I think if you wanted you could make it more accurate you can split the rest of the back loops in half and do this twice, it is basically the same as the front!
Holding ami upside down, attach yarn by left leg with a slip stitch, sc ~13
turn, sc 13 (repeat 13x, or however long you want the tabard to be)
After finishing both the front and back tabards, I crocheted around it with the Gold yarn. Just slip stitch the yarn into one of the stitches (it looks like I started in the back left corner) and crochet around, possibly going into the back loops at the waist if you need to! In the bottom left pic you can see I tried with a White trim first and didn't like it, so I switched to the Gold!
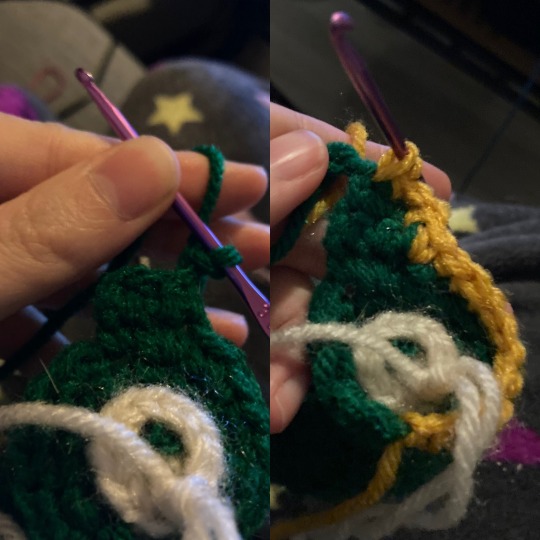
^Collar:
Quite similar to the tabards, except that I went around the neck a couple times to make the shoulder and back collar before starting to crochet back and forth to make the longer front piece.
Start with ami upside down, attach yarn at ami's right shoulder, sc around the back loops (12 stitches)
On second round, increase in every sc, (24ish) -
Stop when you are where you want the collar's front piece to start (I would say ~ 2 stitches past the center of chest) chain 1 and turn, sc 3ish across (or however many you want , chain 1 turn, sc across again (only two rows tall).
Attach Gold in the back and add trim similar to the tabards
^Arms:
Straightforward, but a bit of a pain due to all the color changes in such a small space! Believe in yourself!
6 sc in a magic circle in Raspberry
1 row of 6 stitches in Raspberry
change to Gold, (inc, 2 sc)2x to make 8 stitches
change to Green, 4 rows of 8 stitches
change to Gold, 1 row of 8 stitches
change to Raspberry, 3 rows of 8 stitches
At this point I attached the arms to the body, saving the head for later (I probably could have attached the head now, I just didn't want to while experimenting with her antlers and hair)
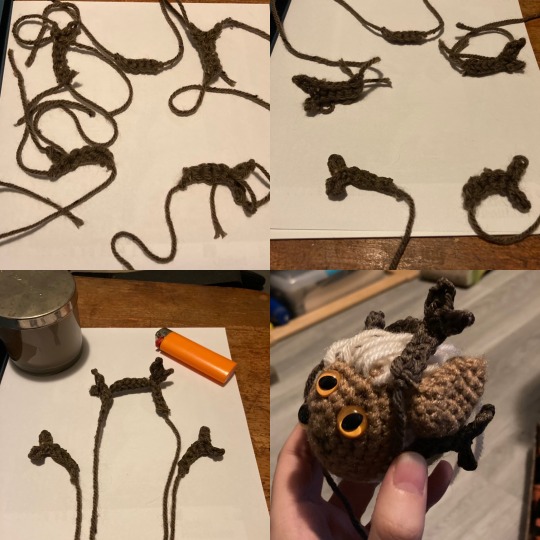
^Antlers:
I was surprised at how not-bad these turned out, as I really was winging it... I used the foundation single crochet (fsc) stitch (look up tutorials for this!) and some futzing with the orientation of the pieces to make the "branches" - I honestly don't know how necessary it is, but here's what I did:
Lower antlers (make 2):
5 fsc, turn piece upside down, 2 fsc
finish off and re-attach yarn with slip stitch at turning point, 1 fsc
Upper antlers (make 2):
8 fsc
finish off and re-attach yarn with slip stitch 2 stitches from end, 1 fsc
Upper connector (make 1):
5 fsc, leave tails for connecting
I used a candle to VERY CAREFULLY burn the fuzz off the antlers, so they would be a bit smoother and shinier. If you want to do this, please be cautious, mindful of the type of fiber your yarn is made of, and if you are little, have an adult help!
I then attached the connector to the two upper antlers (just using the tails and knotting them together, but I am sure a dab of hot glue or fabric glue would work fine!) and attached all antlers to the brown yarn of the face, then finally attached the head to the body! As for weaving in ends, ugh I just tried to tie them off and hide them as best as possible!
Adding hair: I reached the image limit, but adding hair is pretty straight forward - What I do is cut lengths of yarn ~2x as long as I want the hair to be (in this case about 7 inches), and then use the crochet hook to thread them through a stitch. If you want them to be more secure, you can tie a knot, but I never bother since my plushies aren't handled very heavily. Since the back of the head was already done in Cream, I didn't feel like I needed to add hair until all the surface was hidden, so I just added until I liked how it sat! Make sure you add hair under her chin for a cute lil goat beard!
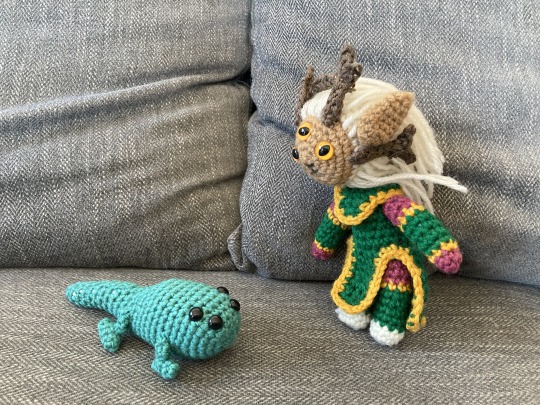
PHEW! That is a lot! Let me know if you try this pattern, especially if something seems unclear or wrong/missing, as I am not sure I did a great job explaining all of it! And please, tag me here or @ erin.gurumi on instagram if you end up making her, I would love to see! Outer Wilds is such a special game and I am very happy with how she turned out! Good luck!
#amigurumi#crochet#diy#crochetpattern#freecrochetpattern#yarn#plushie#cute#kawaii#free crochet pattern#stuffie#outerwilds#outer wilds#solanum#nomai#long post#longpost
491 notes
·
View notes
Last Seen Blogs


foryourmajesty
flung out of space
alphacentauries
a place to belong, to find a new home

xstoned-and-broke
need a reason to exist