#it's there but not a bootable disk
Text
bashing my head against the wall trying to figure out how 16yo lem installed a whole different operating system on a laptop that won't recognise my usb as a bootable disk
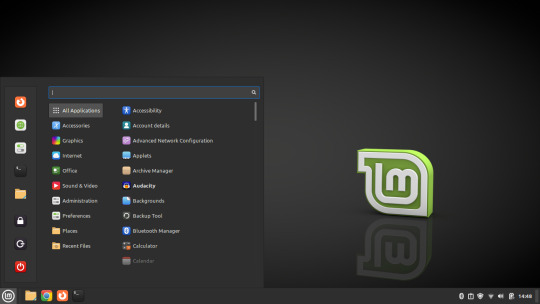
#mine#it's my dad's old notebook circa ~2002 that I stole when he jumped out the window#it runs ubuntu 14 which I'm trying to replace w puppy linux#unfortunately I'm stuck at the grub menu bc it won't recognise my pen drive#I checked on my main laptop. it boots up fine. it even shows up as a boot option on dad's notebook#but I can't find it in grub and have to use the commandline to find it#it's there but not a bootable disk#screaming and crying and throwing up#I don't understand what I'm doing wrong the bios is in legacy mode and it didn't have an option for efi/uefi to toggle#I think it's too old idk#the pen drive is old too I've had it since hs. I formatted it properly as fat32#trying to research this is giving me a headache too much of it is windows which isn't applicable#and what is ux based is going way over my head so idk what to do#I might try a different usb but I don't know where I put my other one 🙃
4 notes
·
View notes
Text
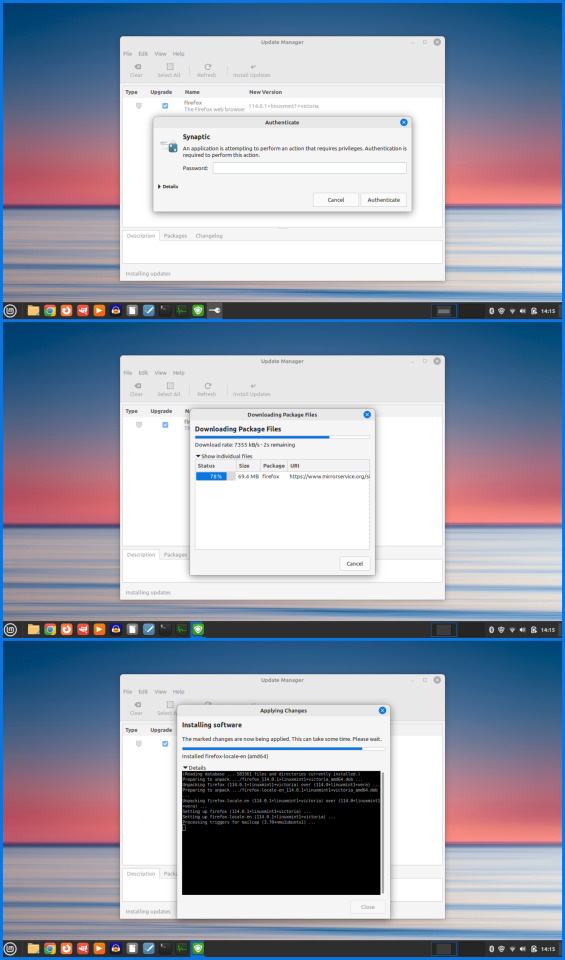
I am having an absolute shit of a time with one of my new pc components & have been troubleshooting and painstakingly moving shit around for literally 7 and a half hours now but NO progress at all -_-
#don’t bother reading these tags actually they’re long and incomprehensible#my new motherboard is UEFI not BIOS so my usual SSD is apparently not a valid bootable drive. so I had to fucking..#make an installable windows 10 drive out of a usb using my shitass slow half-dead laptop which took 2 hours#then install it on my new M2 to use that for booting instead of the SSD#but I don’t wanna deal with fresh windows 10 and all the messing with settings bullshittery#so I tried cloning my SSD system to my new M2#but it won’t work while I’m currently hosting windows on that M2.. you have to clone a drive to another drive while not using either#so I tried installing windows on one of my hard disk drives so that I could boot from that & deal with the other two#but incredibly. even tho it’s UEFI and therefore the right type of drive for this#it still doesn’t count as bootable and does not show up in the boot priority list#so I was like ok whatever. and formatted the HDD and cloned the SSD to it#but now the partitions are all fucked up and idk what to do with partitions they’re fucked#I hate windows so much I hate it soooo so much#I just wanna play warframe is that so goddamn hard to ask??#I should’ve just manually moved things bit by but & dealt with the sucky experience of personalising windows#bc it almost definitely would’ve taken less time#I feel like this is even less fun but if I do manage it it’ll be better than the alternative#I literally JUST had to do a fresh windows install 4 months ago and I don’t wanna do it again this soon.. I’ve not recovered from it yet..
18 notes
·
View notes
Text
Repair Your PC and Access Your Data with Active@ Data Studio
Active@ Data Studio provides you with a useful set of tools for accessing your data and repairing your PC in the event that Windows fails to start up and you cannot find any other way to access your data.
#disk utilities#disk manager#partition manager#partition recovery#bootable usb#burn cd#burn dvd#burn iso#cd burner#dvd burner#iso burner#clone disk#file recovery#data recovery#undelete#password recovery#backup#backup software#backup and restore#data backup#winpe#disk burner#burn disk#boot disk#erase disk#erase hard drive#wipe disk#disk image#create partition#unformat
0 notes
Text
man i just cannot stay up til 3 am like i used to
#anyway i installed el capitan on my imac but i forgot most things arent supported by it anymore#sierra is like the oldest one you can have now#it's really fast tho so i might just live with it#find a way to get a vpn on there and use it for fun stuff idk#but i want to try installing sierra but my usb for the bootable disk is now like 'thats an invalid volume' which it ISNT#so maybe ive just totally abused this usb drive its corrupted now or something#and i have another one i could use but i lost it !!!!#so i might pick up a brand new one#i say im tired but i keep doing it. i have learned a lot in this process
0 notes
Text
Convert iso to bootable usb mac os disk utility

CONVERT ISO TO BOOTABLE USB MAC OS DISK UTILITY HOW TO
CONVERT ISO TO BOOTABLE USB MAC OS DISK UTILITY FOR MAC OS X
CONVERT ISO TO BOOTABLE USB MAC OS DISK UTILITY MAC OS X
PowerISO will show the progress information during conversion.Īfter the dmg file has been converted successfully, you should receive a message, 'Converting image file completes successfully'.Ĭopyright 2004-2020 Power Software Ltd. To convert it to iso file, please follow the steps,Ĭhoose the source DMG file you want to convert.Ĭlick 'OK' button to start converting dmg file to iso. You can open dmg file, convert it to iso file, or burn it to a CD / DVD disc. On Windows PC, it is very convenient to manipulate dmg files with PowerISO. Most of Mac operating systems and applications are distributed in dmg files. You are here: Tutorials > Convert DMG to ISOĭmg file is the disc image file which is widely used by Mac systems. In earlier times, all you needed to do was to convert that InstallESD.dmg into an ISO and you could install OS X in VMWare from s. For some reason, Apple decided that the InstallESD.dmg that comes with the Mavericks Install as downloaded from the App Store shouldnt be a bootable DVD image anymore. How to create a Bootable MacOS Catalina.ISO image on a Mac? Step 1: Download MacOS Catalina.app from App Store into Applications. MacOS Catalina.ISO is needed for installing Catalina into a virtual machine using VMWare and Virtual box and other purposes. This quick instruction will help any-one to make a Bootable MacOS Catalina Installer.ISO and.DMG images in MacOS and Windows. If we explain what is the DMG file briefly, the DMG file extension only is used on the Apple MacOS systems. After that, you can boot the PC that needs to install an OS from the bootable USB flash drive and then start system recovery. Just go to the Tools page, click Media Builder, choose your USB flash disk and create USB boot disk from ISO.
CONVERT ISO TO BOOTABLE USB MAC OS DISK UTILITY MAC OS X
Apple Mac OS X uses the files with.dmg extensions to install a software. After finishing the system image backup, you can go to create a bootable USB drive. Just as the ISO file use in Windows system installations, the files with DMG extension also use on Mac systems. In this case, you will need to convert it back to the DMG format for the installation. Simply pick the source (.CDR image) and destination (target USB disk. CDR image to make a working bootable USB disk drive from Windows. Attach the USB Flash drive to your Mac and open Disk Utility (found in Applications > Utilities). However, it's helpful when your own system is a Windows PC and you want to burn the DMG file to a USB drive. CDR disk image burned to USB all we need to do is to use a disk-cloner utility, for testing this I used the excellent, free HDD Raw Copy Tool to clone the Apple Mac OS bootable Disk Warrior. Remember, even if you convert the DMG to ISO, it's still Mac-compatible only, so you can't use it to install the program on a Windows system.
CONVERT ISO TO BOOTABLE USB MAC OS DISK UTILITY HOW TO
Here’s how to convert a DMG file into an ISO file that can be mounted on a Windows PC. For more information and complete instructions please see this topic. Special utility from cvad & russian MAC community for new hackintosh users.
CONVERT ISO TO BOOTABLE USB MAC OS DISK UTILITY FOR MAC OS X
The DMG image format is by far the most popular file container format used to distribute software on Mac OS X. Make bootable USB Flash Disk for MAC OS X with Latest Clover bootloader revision fast and easy by one click under OS Windows.
0 notes
Text
TRANSCRIBED THIS!
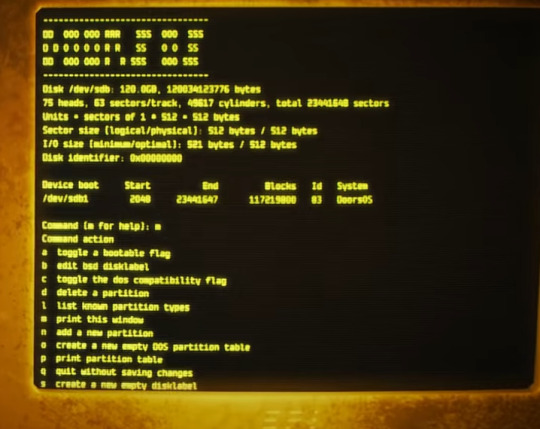
DD 000 RRR SSS 000 SSS D D 0 0 0 0 R R SS 0 0 SS DD 000 000 R R SSS 000 SSS
disk /dev/sdb: 120.0GB. 120034123776 bytes
75 heads, 63 sectors/track, 49617 cylinders, total 23441648 sectors
Unit - sectors of 1 - 512 - 512 bytes
Sector size [logical/physical]: 512 bytes / 512 bytes
I/0 disk [minimum/optional]: 521 bytes / 512 bytes
Disk identifier: 0x00000000
Device boot Start End Blocks Id System
/dev/sdbi 2048 23441647 117219800 83 Doors05
Command: [? for help]: ?
Command action
a toggle a bootable flag
b edit bsd disklabel
c toggle the dos compatible file
d delete a partition
l list known partition types
m print this window
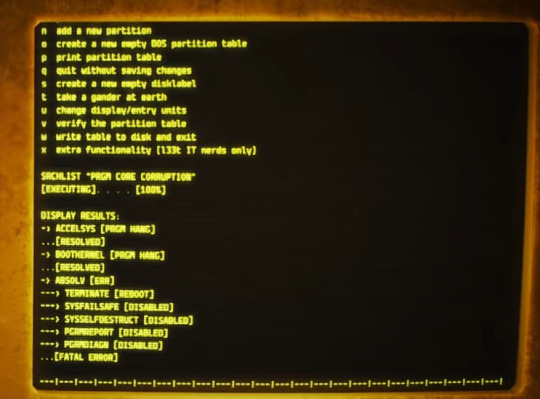
n add a new partition
o add a new DDS partition table
p print partition table
q quit without saving changes
s create a new empty disklabel
t take a gander at earth
u change display/entry units
v verify the partition table
w write table to disk and exit
x exit functionality [l33t IT nerds only]
SRCHLIST "PRGR(or PRGM) CORE CORRUPTION"
[EXECUTING] . . . . [100%]
DISPLAY RESULTS:
-> ACCELSYS [PRGR HANG]
. . . [RESOLVED]
-> BOOTKERNEL [PRGR HANG]
. . . [RESOLVED]
-> ABSOLV [ERR]
---> TERMINATE [REBOOT]
---> SYSFAILSAFE [DISABLED]
---> SYSSELFDESTRUCT [DISABLED]
---> PGRMREPORT [DISABLED]
----> PRGMDIAGN [DISABLED]
. . . [FATAL ERROR]
42 notes
·
View notes
Note
You are the mutual I know who uses linux, and I have a half-broken dinosaur of a laptop I want to see if linux would make usable again.
Its 8+ years old, cannot connect to the internet for a reason that may be software related or might not(its a mystery), and has other various issues.
My use of it would Primarily be as a on-the-go text & html editor and if I can get the internet running on it then also firefox as well. Maybe some offline emulation of some older games or a simple linux supported drawing program but that isnt essential.
The question is Thus: If I download a linux mint installer and copy to a flashdrive(presuming you can download the file without it starting to set up the OS instantly), is that all thats necessary to upload linux mint onto a laptop that has no internet capabilities?
Also which version of linux mint should I use? I see there are several. This laptop 3 years ago ran windows 10 ok enough to boot up chrome and use the internet, but now it takes like 15 mins to finish loading enough that you can open programs, as a metric.
Thanks and hope you have a nice day!
Yes, most linux distros will run on a machine that age, and with a surprising degree of vitality. Game emulation should work just fine, unless the computer was very low power even for 2015.
On a mech that old, I'd suggest just checking if the tiny wire for the wifi card has popped loose over time. They are snap-on wire heads that don't lock, so especially with laptops, disconnections like that happen.
Your wifi card should look a lot like this:

I've circled the two tiny ports, and drawn arrows to identify which cables. The whole wifi card will be about an inch across, and is the ONLY thing that uses those kind of wires, so it's very identifiable.
Linux mint is designed to install offline, and includes a wide variety of open source and generic drivers for just.... so much hardware. When you begin installation, it will ask you if you want to use, "third party, private and proprietary drivers." If you say yes, it will want an internet connection to download those drivers. If you say no, it will install entirely offline without issue.
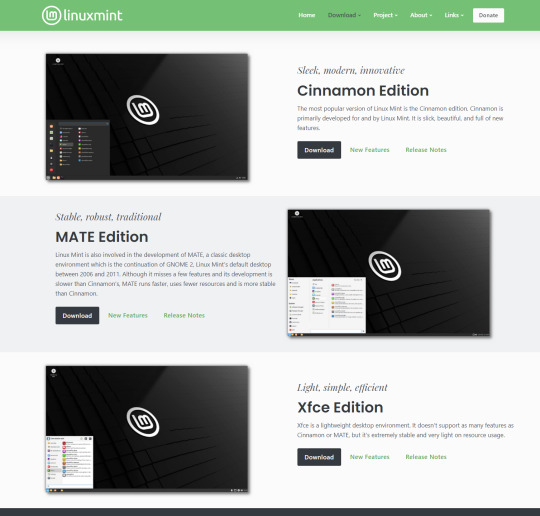
As for which version: the only difference is the visuals. I, personally, like XFCE because it has very minimal visual noise. Everything is simple rectangles with sharp corners and clear boundaries. This lack of visual flair also means it uses the least resources to run the OS, leaving more hardware power available for actual tasks. However, it's a very intimidating desktop. If you liked Windows XP but haven't enjoyed much since, grab XFCE.
If you are a Mac/apple user, I actually recommend Kubuntu instead of Mint, because it has the most similar interface visually and will cause the least transition pains. Kubuntu has equally if not even more robust hardware support to Mint, as both of them are built on top of the Ubuntu framework.
For everyone else, I suggest starting with Mint Cinnamon. I have actually, with no reservations, had way better results teaching confused retirees to run Cinnamon than Windows or Mac. It's a very user friendly interface.
The start bar search, for example, literally just shows results for files/programs installed to your computer, none of this bs about integrated web searching.
As for installation tools:
You must burn the ISO file to the flashdrive as a bootable disk, rather than simply copying the file to it. I'm sure you know that; it's the same for installing windows. But! People often forget that detail and wonder why their computer keeps booting to windows instead of the installation media.
I personally use LiLiUSB because I'm stuck mentally in the year 2014 which is when it stopped updating. For a more sane approach, try Balena Etcher. Or whatever bootable drive software you like; it doesn't really matter. You just need to make the drive bootable before installation.
47 notes
·
View notes
Text
Shoutout to Linux for being capable of telling me when I need to insert a bootable floppy disk, instead of booting from my EFI system partition.
5 notes
·
View notes
Text

Guess who just remembered that best girl GUM exists?!
(boring sort-of related story below)
Holy hell this one. I don't usually get into this kind of personal stuff online, but I originally posted this picture yesterday, but took it down because I really didn't like it. Chalk it up to insecurities and PTSD of people actually harassing me over my bad art in the past (which itself is worth an entire post on its own). Since yesterday, I've made a lot of minor adjustments and I'm much happier with how this looks now.
You'd think these fixes would be easy -- and you'd be right, except that my computer completely screwed up last night. As a result, I had to make the last updates to Gum on my MacBook.
Lesson to Linux users: DON'T OPEN KRITA DURING AN UPDATE. This choice may have singlehandedly wasted my weekend, as I'm currently in the process of backing EVERYTHING up to my external HDD so that I can upgrade to the newest Manjaro and fix my GRUB, because even the GRUB settings aren't working anymore. I don't know for sure how I'm going to fix this other than reinstalling, but I'm just glad to be savvy enough to get all my files back before something else could happen. Best-case scenario now is I'll have to reinstall Manjaro and also reinstall GRUB, after which GRUB will be able to determine which disks on my system are bootable.
So when it comes to kernel-related updates, you should do what Windows XP users did when installing anything: turn off all other programs until the update is done. I could blame the fact that my PC is 7 years old (custom built, received several upgrades since), but the only way I can justify this entire conundrum is by saying that I was on Linux kernel 5.15 when the newest is version 6.2 or something. But that's less of a justification and more of a cope.
#jet set radio art#jet set radio fanart#jet set radio gum#jet set radio future#jet grind radio#artists on tumblr#character art#female character#jet set radio#sega#sega dreamcast#fan art#fandom#video games#video game art#artwork#digital art#made with krita#skatergirl#punk girl#spraypaint
9 notes
·
View notes
Text
So I just took the LSAT today and to be completely honest… wasn’t as bad as I thought it’d be. Somehow finished every section with time leftover to doublecheck my work! Feeling pretty good about it 🥰 even though I pulled an all-nighter before it and still haven’t slept… 🫠
Not intentionally, mind you—LSAC’s new online LSAT Proctor software isn’t compatible with the new MacOS Sonoma 14.0… so spent all night trying to learn how to downgrade my MacOS version in order to download the testing/proctoring software before my 7am exam.
Turns out, on silicon-chip Macs (M1+), you can’t just simply downgrade or restart/reboot your laptop to the software it originally came in. That’s apparently only an available option on Intel Macs.
Instead, if you have a silicon Mac, you have to go through the complicated process of:
1. Backing up your Mac using Time Machine on some other external hard drive or disk (since downgrading completely wipes your startup disk and erases all data)
2. Setting up a Bootable Installer—also on an external hard drive (separate)
3. Downloading the version software from Apple’s App Store (the easiest part of the entire process! Though, of course, you can’t even run it until you’ve done everything else first)
4. Using the Terminal app and running the specific (in my case, Ventura) command as found on Apple’s website and proceeding with the rest of the commands to get it working.
which… don’t get me started on figuring out how to set up a Bootable Installer. This was all completely foreign to me and honestly I was two “error” messages away from a complete mental breakdown.
At 5am, I gave up and woke up my poor friend to beg her to let me use her laptop for my LSAT.
If anyone can send me a crash course on using the Macbook’s Terminal app, it would be more than welcomed!
At this point, I gotta set up a Bootable Installer just for the spite of it. Never letting myself get blindsided like this again! Will always have a backup version. Learned my lesson lol
#macos sonoma#lsat#technology#programming#coding#macos#macos 14#LSAC#silicon#macbook#personal#lialifelounge
3 notes
·
View notes
Text
cara menginstall windows di komputer anda.
halo semua perkenalkan nama saya bintang,kali ini saya akan meng share cara menginstall windows di komputer anda,okey sebelumnya apakah kalian sudah pernah menginstall windows?jika kalian belum pernah menginstall windows sebelumnya anda bisa mencoba nya di virtual box/mesin virtual.Tapi kali ini topik saya bukan tentang menginstall windows di mesin virtual,kali ini saya akan membahas tentang penginstall an windows langsung di komputer kalian.
Pertama kalian dapat menyiapkan flashdisk,apakah kalian tau guna flashdisk dalam penginstallan windows kali ini?ya,flashdisk ini berperan sebagai tempat kita menyimpan file windows,tapi apakah kita hanya perlu menginstall file windows lalu menyimpan nya di flash disk dan berharap si komputer kita langsung bisa mendetect file tersebut?oh tentu tidak semudah itu ferguso. Sebelum kita siap menginstall,kita harus membuat flash disk kita menjadi bootable,bagaimana caranya? kalian bisa menggunakan software atau aplikasi bernama rufus,mungkin ada aplikasi atau softwrae lain tapi saya hanya berpengalaman menggunakan rufus,saya tidak tahu apakah mekanisme nya akan sama jika kalian menggunakan aplikasi yang berbeda. Jika memang kalian ingin menggunakan aplikasi lain kalian bisa mencari referensi mengenai hal ini selain di blog saya, dan maaf juga jika penjelasan saya sedikit sulit atau saya tidak pandai merangkai kata kata yang pas agar mudah di mengerti. Sudah sudah ayo kita lanjut ke menu hidangan utama, setelah kalian sudah menginstal rufus,pasang flashdisk kalian dan buka aplikasi rufusnya,*warning : sebelum kalian membuat bootable flash disk kalian,kalian harus memastikan bahwa flashdisk kalian tidak terdapat file penting,karna saat melakukan bootable,flashdisk akan terformat dan semua file di dalamnya akan hilang,ingat itu. ohiya kalian bisa menyiapkan file iso windows dengan mengunduhnya di website,kalian ketik saja di search bar "media creation tool".websitenya ada di paling atas daftar pencarian,setelah itu kalian cari sendiri saja ya caranya,panjang banget soalnya klo dijelasin,durasi bos durasi,cara menginstal rufusnya juga kalian cari sendiri saja ya,kita akan langsung ke cara mengbootable dan penginstallan saja,gasss.
ayo kita buka file rufus nya
kira kira seperti itulah tampilan awal rufusnya,dan kalian lihat flash disk saya sudah ter detect oleh rufus,kita lanjut.

yang saya lingkari silahkan kalian klik dan pilih file iso windows yang tadi kalian unduh,lalu untuk partition scheme nya gpt/mbr kalian pilih sesuai tipe dari pc/laptop kalian,banyak tutorial cara ngecek nya kalian bisa cari ga ush manja.
kalian bisa klik start untuk memulai proses bootablenya,tunggu sampai loadingnya menjadi ready,seperti pict dibawah.
flash disk sudah menjadi bootable,langsung kita gas ke pc yang akan di install.
masuk ke bios komputer kalian,cara masuknya?saat prooseng booting kalian bisa klik f2,f3,f12,atau delete tergantung seri pc kalian,setiap pc bisa berbeda beda ya man teman.

kurang lebih beginilah tampilan bios komputer saya,bisa saja berbeda dengan kalian,menyesuaikan saja yaa.

setelah kalian masuk ke bios kalian bisa masuk ke menu boot,lalu pilih boot option #1,klik dan pilih uefi:sanDisk,jika tadi kalian memilih mbr makan pilih yang ada tulisan sanDisk saja,karna saya pakai gpt,jadina seperti itu.klik enter dan kita lanjut.

setelah kalian klik enter,kalian bisa save dan exit disini saya menggunakan f10 untuk save & exitnya,untuk kalian menyesuaikan saja ya. setelah ini kita akan me restart pc kita.

dan kita sudah masuk ke menu penginstallan windows,huhhh cape juga guys ngetik panjang lebar seperti ini,karna sudah panjang kali lebar saya menjelaskan, kita lanjut part 2 saja yaa,dan jika kalian tidak sabar,kalian bisa mencari tutorial dalam tahap ini,mudah kok guys. see uu>>>
4 notes
·
View notes
Photo
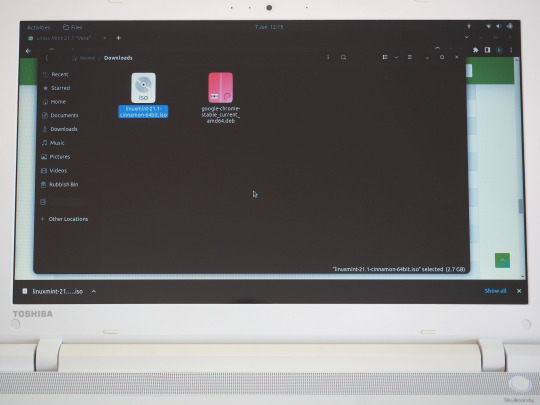


07.06.23
Linux Laptop Install 6
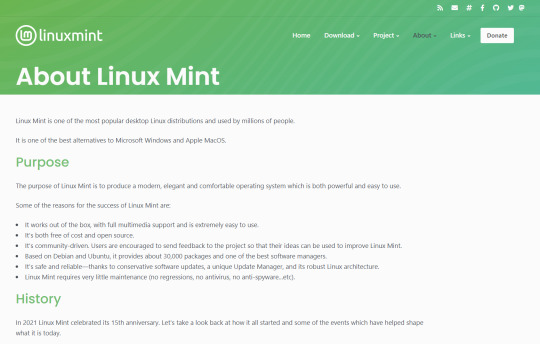
After trying Ubuntu 22.04 on this laptop, I decided to try a different distro. I chose to install Linux Mint 21.1 Cinnamon desktop edition.
Linux Mint is a Linux distribution based on Ubuntu (which is in turn based on Debian), bundled with a variety of free and open-source applications. It is available with a range of desktop environments including Cinnamon, MATE and XFCE. It uses the Debian package manager and optionally Flatpak to install applications. The Linux Mint project was created by Clément Lefèbvre.
See Wikipedia for more information:
https://en.wikipedia.org/wiki/Linux_Mint
I downloaded the Mint ISO file from:
https://linuxmint.com/download.php
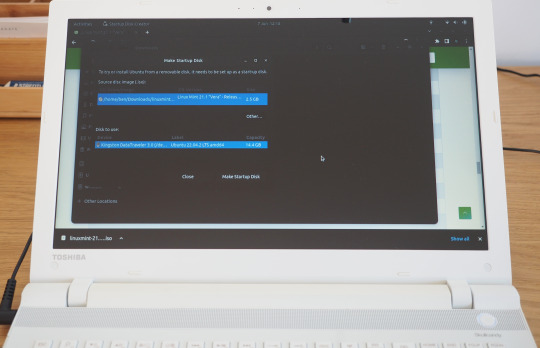
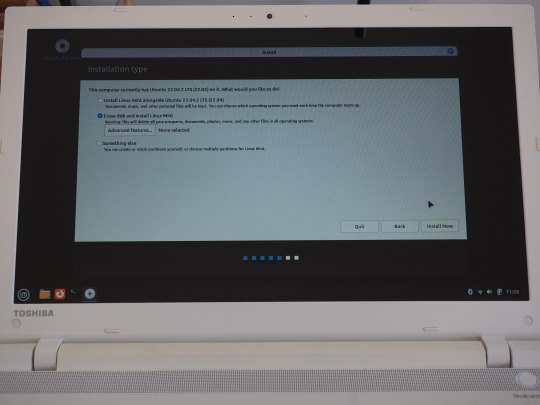
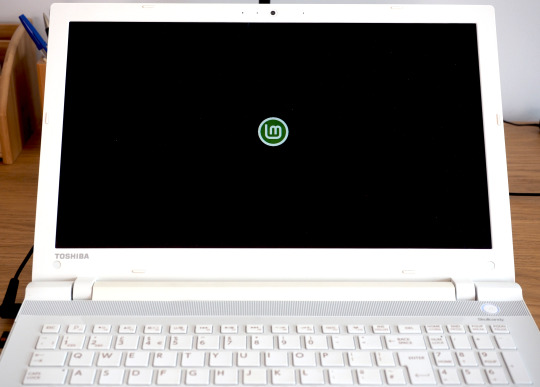
I created a bootable Linux Mint USB stick using Ubuntu's Start-up Disk Creator. I then used the USB stick to install Linux Mint replacing the previous Ubuntu installation. I decided to name the laptop ‘Manfred’ during the early part of the set-up.
The installation went very smoothly and once it had installed, I used the Update Manager to check for updates.
I checked the Driver Manager to see if there were any required drivers for the laptop. It found that no new drivers were needed.
3 notes
·
View notes
Text
How do I download Windows 10 on my Mac for free without Boot Camp?
Macs don't come with a Windows 10 installation disc, so if you want to install it on your Mac, you'll need to use Boot Camp. But there's a way to install Windows 10 without using Boot Camp: by downloading and installing it through the Windows 10 Creators Update. This is free, and it doesn't require any extra hardware or software.
How to install Windows 10 on a Mac using Boot Camp?
If you have a Mac and you want to install Windows 10 on it using Boot Camp, here's how to do it. First, make sure your Mac is running macOS High Sierra or later. If it isn't, you can update your Mac software by going to the App Store and clicking Updates in the toolbar.

Then, download and install the Windows 10 ISO file. Next, open Boot Camp Assistant, which is in the utility folder of your Applications folder. In Boot Camp Assistant, click Continue and then select "Create a Windows 10 installer disk." When the process is finished, insert the disk into your Mac. Restart your computer while holding down the Option key. In the Startup Manager window that appears, select the disk with the Windows logo on it and click Start-Up. After your computer has restarted, follow the instructions on-screen to complete the installation of Windows 10 and you know more details https://today4pc.com/ from this blog website.
Download the Windows 10 ISO file
Microsoft Windows 10 is the latest release of the Microsoft Windows operating system. Windows 10 ISO file is the official disc image of Windows 10 and can be used to install or reinstall Windows 10 on a PC. The ISO file can also be used to create a bootable USB drive or DVD.
Install Boot Camp drivers
If you're running a Mac and don't have Boot Camp installed, you can still download and install Windows 10 using a free tool called Parallels Desktop. This software will allow you to use your Mac's resources to run Windows 10, instead of having to use up all the RAM in your computer. After downloading and installing Parallels Desktop, open it up and click on the "Install Windows 10" button. You'll then be asked to create a new account or sign into an existing one.
Partition of your Mac's hard drive
Windows 10 is one of the most popular operating systems on the market. It is available both as a free download for individual users, and as part of a subscription package for businesses. If you want to install Windows 10 on your Mac without using Boot Camp, there are several methods you can use.
Start the Windows 10 installation process
Windows 10 is a personal computer operating system developed and released by Microsoft as part of the Windows NT family of operating systems.

It was announced in September 2014 and released in July 2015. Windows 10 introduces what Microsoft describes as "a new generation of Windows", with a focus on "enabling more personal computing experiences" across different devices.
Conclusion
In the conclusion of an article, the author typically summarizes the main points that were made and provide a final thought on the topic. In some cases, the conclusion may also provide readers with information on what they can do to learn more about the subject matter or how they can get involved in the discussion.
2 notes
·
View notes
Link
Active@ Data Studio presents the ultimate set of tools for many different kinds of jobs such as data recovery, secure data erasure, disk imaging and backup. The latest version adds even more utilities to Boot Disk: Far, Notepad++, and WinMerge.
#disk utilities#disk manager#partition manager#partition recovery#bootable usb#burn cd#burn dvd#burn iso
0 notes
Text
MiniTool ShadowMaker 4.5.0 Free Download
Download MiniTool ShadowMaker 4.5.0
Download from official Site
Free Download MiniTool ShadowMaker Editions: Pro, Pro Ultimate, Business, Business Deluxe for Windows
MiniTool ShadowMaker offers efficient file, folder, and partition backups for Windows users.
Overview of MiniTool ShadowMaker
Looking for robust data protection and disaster preparedness? MiniTool ShadowMaker provides reliable data backup and recovery for your computer. This powerful software facilitates easy file, system, and disk/partition backups with a user-friendly interface and rapid performance. It supports full, differential, incremental, and scheduled backups, allowing you to tailor your backup strategy to your needs.
To enhance data security, MiniTool ShadowMaker offers comprehensive backup options and a WinPE bootable rescue media, which can restore your operating system to its previous state, even if it fails to boot.
Features of MiniTool ShadowMaker
- User-Friendly Interface: Intuitive design makes it easy to create and manage backups without technical expertise.
- Scheduled Backups: Automatically schedule backups to ensure continuous data protection.
- Incremental and Differential Backups: Supports both backup types to save time and storage space.
- Disk Cloning: Easily clone your hard drive for upgrades or replacements.
- Disaster Recovery: Restore your system in case of any issues.
Technical Details and System Requirements
- Supported OS: Windows 11, Windows 10, Windows 8.1, Windows 7
- RAM: 2 GB RAM (4 GB recommended)
- Free Hard Disk Space: 2 GB or more
Frequently Asked Questions
Q: How does MiniTool ShadowMaker work?
A: MiniTool ShadowMaker creates backups of your data and system, allowing you to select specific files and folders for backup. You can schedule automatic backups to keep your data protected. The disaster recovery feature helps restore your system in case of an emergency.
Q: Is MiniTool ShadowMaker easy to use?
A: Yes, it has a user-friendly interface that makes backup creation and management simple, even for those without technical knowledge.
Q: Does MiniTool ShadowMaker support incremental and differential backups?
A: Yes, it supports both incremental and differential backups, helping save time and storage space.
Q: Can I use MiniTool ShadowMaker to clone my hard drive?
A: Yes, it includes a disk cloning feature that simplifies upgrading or replacing your current drive.
Conclusion
MiniTool ShadowMaker is a reliable and easy-to-use solution for data backup and disaster recovery. Its comprehensive features and intuitive interface make it an excellent choice for safeguarding your data and preparing for potential problems.
Read the full article
0 notes
Text
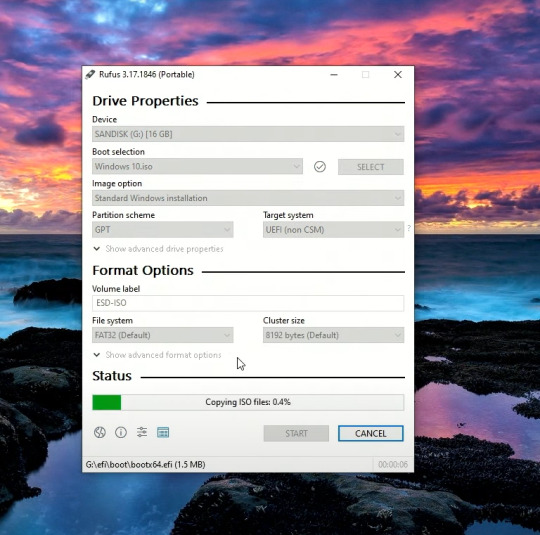
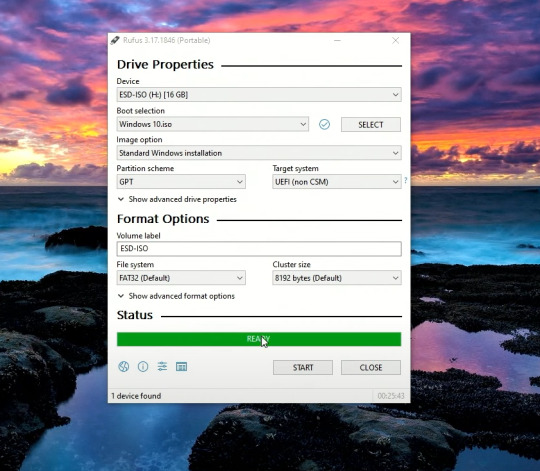
HOW TO USE RUFUS STEP BY STEP ?
Sure, here's a step-by-step guide on how to use Rufus to create a bootable USB drive:
Download Rufus: First, download the Rufus software from the official website or another trusted source. You can find the latest version of Rufus at: Rufus Official Website
Insert USB Drive: Insert the USB flash drive into an available USB port on your computer. Note that Rufus will format the USB drive during the process, so make sure to back up any important data on the drive before proceeding.
Run Rufus: Double-click on the Rufus executable file that you downloaded to launch the application. You may need to grant administrative privileges if prompted.
Select USB Drive: In Rufus, under the "Device" section, select the USB drive you want to use from the drop-down menu. Make sure you choose the correct drive, as all data on the selected drive will be erased.
Select Bootable Disk Image: Under the "Boot selection" section, click on the "Select" button and navigate to the location of the bootable disk image (ISO file) that you want to use. Select the ISO file and click "Open".
Partition Scheme and File System: Rufus will automatically detect the optimal partition scheme and file system based on the selected ISO file. However, you can customize these settings if necessary. For most installations, the default settings should work fine.
Volume Label and Bootable Disk Name: You can optionally set a volume label (name) for the USB drive in the "Volume label" field. This will be the name displayed for the USB drive in File Explorer. You can also change the name of the bootable disk if desired.
Start Creation Process: Once you have configured all the settings, click on the "Start" button to begin the process of creating the bootable USB drive. Rufus will display a warning message indicating that all data on the selected USB drive will be erased. Click "OK" to proceed.
Wait for Completion: Rufus will now start the process of formatting the USB drive and copying the contents of the ISO file to the drive. This may take some time depending on the size of the ISO file and the speed of your USB drive.
Completion: Once Rufus has finished creating the bootable USB drive, you will see a "READY" message indicating that the process is complete. You can now safely eject the USB drive from your computer.
That's it! You've successfully created a bootable USB drive using Rufus. You can now use this USB drive to boot your computer and install the operating system or run other tools as needed.
0 notes
Last Seen Blogs

genderpunks
genderpunks

lux-morningstar
Et Lux Facta Est

he-who-knows-9999-things
Untitled

fictionallybliss
yay for fiction

poisonedivyss
ivy