#orange alt 1.5
Note
Hey, have there ever been any orange alts for K. Howard? I tried searching the blog, but it's a struggle on mobile lol
Several actors have gone on for Howard in an orange alt costume, but none have had a Howard variation.

L-R: Courtney Stapleton (courtneyjstapes), Hana Stewart (colletteguitart), Harriet Watson (harrietwatson92), Chiara Assetta (chiara_assetta)
Thank you for searching too - tumblr search does suck and I’ve been trying to figure out ways around that 😅 but difficult to do much to fix it
#six the musical#courtney stapleton#hana stewart#harriet watson#chiara assetta#orange alt#orange alt 1.0#orange alt 2.0#orange alt 1.5#orange alt 2.5#orange alt 1.5.1#orange alt 2.5.1#orange alt 2.5.2#six costumes#six alternates#six musical#six west end#six uk tour#six australia
32 notes
·
View notes
Text
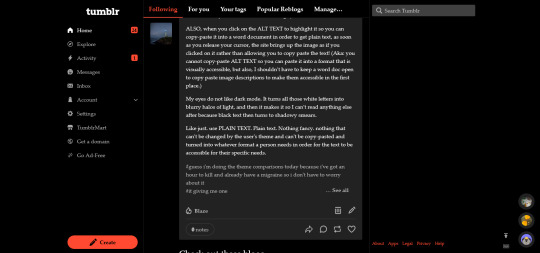
tumblr themes and why my eyes hate them 3/4 (Halloween themes here)
(blah blah blah this is just my eyes and other people have their own needs, the images are just descriptions without text transcribed because the words aren't important)
Tumblr Theme Ghost
[id: tumblr theme ghost, dark gray text on white for the post, light gray on white for the tags, the entire back ground is white. id]
my biggest problem is the processing of when you've reached a new post with this theme. on the others there is a change in color and a visual separation between posts. on this there is just the usernames and the like/reblog/etc thing which doesn't register to me as readily as a new post.
also the gray on somethings is washed out and not enough contrast. (1/2)
[id: tumblr theme ghost alt id box, white text on medium gray.]
still does the too bright stuff of white on black for me. might work on a different theme. (.5/1)
[id: tumblr theme ghost messenger, yours are white on black, the other persons are black on light gray. end id]
if you include usernames you don't need to make the people's messages different colors. also the left and right aligned makes them easy to distinguish. (0/1)
Tumblr Theme Ghost: 1.5/4
Tumblr Theme Vampire:
[id: tumblr theme vampire, with white text on gray, a black background and red accents for notifications and such. end id]
This has darkmode... and changes the font to a serif font. Which depending on your brain may make it better or worse. It's just a blur to me so it doesn't matter either way bc I can't read it. (0/2)

[id: tumblr theme vampire alt text, black serif text on white.]
still has the serifs, guess they're more thematically vampireish. Can read it though so, it gets points. (1/1)
[id: tumblr theme vampire messenger: yours are black serif text on red, the others are white on dark gray. messenger background is a darker gray. end id]
i feel like the red is off color for a true vampire vibe. Can't read it though so no points. (0/1)
Tumblr Theme Vampire: 1/4
Tumblr Theme Pumpkin:
[id: tumblr theme halloween with bright orange text on orange-black posts, black site background and purple highlights. end id]
Yeah I can't read that, but it spoopy. (0/2)
[id: tumblr theme pumpkin alt text: black text on bright orange background. end id]
I like my orange in pumpkins not on things I'm meant to read. :< (0/1)
[id: tumblr theme pumpkin messenger, your replies are black on yellow-orange, the other person's are bright orange on orange-gray. end id]
why did they add in the yellow-orange and not reuse the purple? it would have looked better. Still be unusable for me. (0/1)
Tumblr Theme Pumpkin: 0/4
Part 1, Part 2, Part 4
3 notes
·
View notes
Text
FLASH WARNING
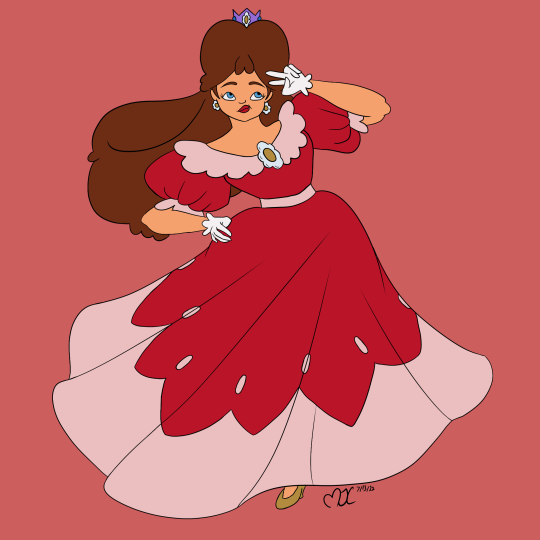
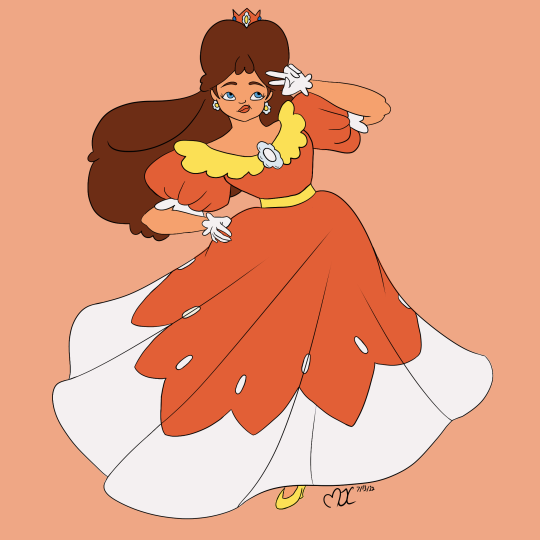
Classic Daisy is Best Daisy!! 💛🤍💛🤍
So... if you don't follow smash bros mods, there's this mod called Smash 1 who's adding Daisy to the 1.5 update and it's got me a little excited. That on top of me just always wondering, What would Daisy's alts be in Melee?
So the first five (classic, lavender, Blue, Green, red) I believe is what she would have if she was in Melee. The following 3 (orange, cyan, black) I thought of, if Melee had 8 colors to choose from like Ultimate and Smash 4.
I also added a sped up video of me making the drawings, also, there is a flash warning because near the end I flip through the various layers.
Colors:
Yellow - original
Lavender - Mario Tennis 64 Alt
Blue - NES Open Tournament Golf Start screen
Green - Original Gameboy Screen colors
Red - "ports" of Super Mario Land's Daisy sprites on the Gameboy Color and Super Gameboy, also doubles as Pauline
Orange - Based on Azalea, Daisy's unconfirmed sister and Beta design for Modern Daisy
Cyan - Based on the classic version of Captain Syrup, as that would've been her then design
Black - Evil Daisy from the KC Super Mario Kun Comics in Japan, acts as a counterpart to Peach's white


7 notes
·
View notes
Text
SSBU: Flow with the Current
The trailer starts with the iconic Smash symbol, which then fades away, cutting to some sort of polar beach. An orange splat of ink is seen, before a squid-like humanoid comes out of it. The being turns out to be the Inkling Girl who’s trying to navigate through the beach while trying not to fall in the water. As Inkling carries on, she accidentally bumps into Ridley. Ridley begins to chase her. Inkling begins to panic, firing off ink from her Splattershot, which unfortunately doesn’t deter the Cunning God of Death as he smashes each iceberg Inkling hops off of. Inkling makes it onto shore, but Ridley catches up to her, ready to fire his Plasma Breath. Inkling readies her Splattershot, but it’s empty. But, before Ridley can fire off, he steps onto a small black spine, which electrocutes him. Then, all of a sudden, a small black and yellow creature crawls up to the duo and begins to eat a bit of seaweed that was on the sandy ground between them.

“PINCURCHIN GETS TO THE POINT!”
Inkling sees Pincurchin and falls in love with how adorable it is. After being shocked at the revelation, Ridley attempts to skewer the Inkling. Pincurchin thinks it’s one being attacked, and fires off a massive current of electricity, sending the space dragon flying. Inkling lets out a happy “Woomy!” as Pincurchin saved her. The trailer then cuts to gameplay footage of Pincurchin fighting the other characters. After unleashing its Final Smash as it Dynamaxes and uses Max Lightning on the opponent, the Smash logo is shown, and the trailer ends with the screen fading to black and the copyright information is shown on screen
Character Name: Pincurchin
Character Series: Pokemon
Boxing Ring Title: The Sea Urchin Pokemon
Debut Appearance & Date: Pokemon Sword and Shield (11/15/19)
In-Series Description: Pincurchin is an Electric type Pokemon that lives in the chilly waters of the Galar region. This Pokemon stores electricity in each spine, which flows from the tip of each one. If one gets broken off, it will still continue to emit electricity for three hours. It feeds on seaweed, using its teeth to scrape it off rocks
ALTERNATE COSTUMES
Default Colour: Black and Yellow
Alt Colour 1: Black and Orange (Shiny)
Alt Colour 2: Black and Pink (Pyukumuku)
Alt Colour 3: Blue and Yellow (Grapploct)
Alt Colour 4: White and Light Blue (Snom)
Alt Colour 5: Sage Green and Light Brown
Alt Colour 6: Red and White
Alt Colour 7: Purple and Black
Kirby Hat: Top of Pincurchin’s head with mouthparts and spines
ENTRANCE
Pincurchin comes out of a Pokeball and its spines light up for a bit
TAUNTS
Up Taunt: Pincurchin raises up and lights its spines up in a display of intimidation
Side Taunt: Pincurchin dozes off for a bit before waking up all startled
Down Taunt: Pincurchin shakes it spines in a chill manner
GIMMICK: Electric Surge
Whenever Pincurchin uses Charge, its electric based moves get an extra boost. This increases the power of some of Pincurchin’s specials (Zing Zap and Discharge) and most of its regular attacks.
GENERAL ATTRIBUTES
. Weight: Light
. Number of Jumps: 2
. Can crawl
. Speed: Is a bit slow despite being very small and light
ATTACKS
Jab/Jab Combo: Pincurchin headbutts a couple of times before firing an electrically charged spine
Dash Attack: Pincurchin rolls like a ball of electricity
Side Tilt: Pincurchin fires off a small stream of boiling water (Based on Scald)
Up Tilt: Pincurchin raises the spines on top of its body, which then become venomous (Based on Poison Jab. This won’t be the only time where this move will be utilized in Pincurchin’s moveset)
Down Tilt: Pincurchin spins low to the ground while giving off an electric current
Side Smash: Pincurchin fires off a stream of rapid poisonous spikes from its mouth. This attack can deal extra damage to an opponent. (Based on Toxic Spikes)
Up Smash: Pincurchin fires off a beam of electricity from its spine upward
Down Smash: Pincurchin summons a powerful lightning bolt from the sky which strikes downward, similar to Pikachu and Pichu’s down special (Based on Thunder, which is the down special for both Pikachu and Pichu, in fact)
Neutral Air: Pincurchin covers itself with poison which rains off its body. This attack can deal extra damage if an opponent is covered with the poison gunk (Based on Venom Drench)
Front Air: Pincurchin dashes forward while riding on a wave, similar to Squirtle’s side special (Based on Surf)
Back Air: Pincurchin spins in a horizontal direction with its spines facing out
Up Air: Pincurchin spins vertical while the spines face upward
Down Air: Pincurchin flips upside down and crashes down with the might of a lightning bolt
Grab: Pincurchin lodges onto the opponent with its spines
Pummel: Pincurchin electrocutes the opponent a couple times
Front Throw: Pincurchin fires a barrage of spines, sending the opponent forward (Based on Pin Missile)
Back Throw: Pincurchin jumps upside down and lands onto the opponent, causing them to fall backwards
Up Throw: Pincurchin unleashes a discharge, sending the opponent skyward (Based on Discharge)
Down Throw: Pincurchin spins with the opponent in town and crashes them into the ground with a lightning bolt
SPECIALS
Neutral Special: Poison Jab
Pincurchin’s spines begin to glow purple before it fires one after another. This attack has no cooldown and can be spammed, along with the resulting venom dealing 1.5% extra damage after the initial hit
Side Special: Bubble Beam
Pincurchin fires off a small stream of concentrated bubbles. This attack can also deal a bit of knockback damage if it connects with an opponent
Up Special: Zing Zap
Pincurchin zip upwards in a set direction as a small trail of electricity follows behind it. This attack can be buffed with Charge, making Pincurchin go higher if this attack is used while fully charged
Down Special: Charge/Discharge
Pincurchin begins to charge up electricity. This buffs all of its moves that uses electricity, and if disturbed while using Charge or fully charged for more than 5 seconds, Pincurchin will fire off a powerful electrical current
FINAL SMASH
Max Lightning: Pincurchin will use Discharge, which will flash the screen. Pincurchin then Dynamaxes and appears in the background as its spines glow in a threatening display, causing a massive thundercloud to appear. The cloud then unleashes a wicked lightning strike onto the stage which deals massive damage towards anyone caught in the strike.
VICTORY
Victory Theme: Victory! (Pokemon) (https://www.youtube.com/watch?v=kGPHtS1kFZ8)
Victory Animation 1: Pincurchin fires off a lightning bolt from its spines before falling asleep
Victory Animation 2: Pincurchin chews happily on a piece of seaweed
Victory Animation 3: Pincurchin lights its spine up in victory
#pokemon#pokemon sword and shield#pincurchin#smash bros#super smash bros ultimate#inkling#ridley#Ultra Ramblings
1 note
·
View note
Text
Gold Star Wire Hoop with colorful beads
These earrings are created with a small ring made of golden brass wire and colored wooden beads.
The wooden beads give the earrings a light bohemian style that looks amazing with any outfit!!
Light Gold Brass Charm
Choose the color you like most among the 5 available Five colors Available: Black, Wine-Red, Orange, Green and Cream
Sizes info:
-Hoop circumference: 1 inch (2.5 cm)
-Total height size with star charm: 1.5 inch (3.8 cm)
-Beads size: 0.2 inch (5 mm)
Gold Loop Earrings
Star Boho Earrings
Wood Bead Earrings
Bohemian Jewelry
Wood Beads color options
St-Patrick!
Gold Star Wire Hoop
Gold Star Wire Hoop
Gold Loop Earrings, Star Boho Earrings, Wood Bead Earrings, Bohemian Jewelry, Gold Hoop, Gift for Her Gold Star Wire Hoop with colorful beads These earrings are created with a small ring made of golden brass wire and colored wooden beads.
1 note
·
View note
Text
AndaSeat Mask 2 Gaming Desk Review: A Superior Surface for Your Gaming Rig
AndaSeat Mask 2 Gaming Desk
7.50 / 10
Read Reviews
Read More Reviews
if (window.reviewItemsImgs == undefined) { window.reviewItemsImgs = []; } window.reviewItemsImgs['1Img1'] = "" <div class=\"body-img responsive-img img-size-review-item\" > <figure> <picture> <!--[if IE 9]> <video style=\"display: none;\"><![endif]--> <source media=\"(min-width: 1024px)\" sizes=\"755px\" srcset=\"https:\/\/static0.makeuseofimages.com\/wordpress\/wp-content\/uploads\/2021\/08\/andaseat-mask2-gaming-desk-not-assembled.jpg?q=50&fit=contain&w=755&h=430&dpr=1.5\"\/> <source media=\"(min-width: 768px)\" sizes=\"943px\" srcset=\"https:\/\/static0.makeuseofimages.com\/wordpress\/wp-content\/uploads\/2021\/08\/andaseat-mask2-gaming-desk-not-assembled.jpg?q=50&fit=contain&w=943&h=540&dpr=1.5\"\/> <source media=\"(min-width: 481px)\" sizes=\"727px\" srcset=\"https:\/\/static0.makeuseofimages.com\/wordpress\/wp-content\/uploads\/2021\/08\/andaseat-mask2-gaming-desk-not-assembled.jpg?q=50&fit=contain&w=727&h=425&dpr=1.5\"\/> <source media=\"(min-width: 0px)\" sizes=\"440px\" srcset=\"https:\/\/static0.makeuseofimages.com\/wordpress\/wp-content\/uploads\/2021\/08\/andaseat-mask2-gaming-desk-not-assembled.jpg?q=50&fit=contain&w=440&h=250&dpr=1.5\"\/> <!--[if IE 9]><\/video><![endif]--> <img width=\"1680\" height=\"840\" alt=\"andaseat mask2 gaming desk not assembled\"\/> <\/picture> <\/figure><\/div>""; Read More Reviews
if (window.reviewItemsImgs == undefined) { window.reviewItemsImgs = []; } window.reviewItemsImgs['1Img2'] = "" <div class=\"body-img responsive-img img-size-review-item\" > <figure> <picture> <!--[if IE 9]> <video style=\"display: none;\"><![endif]--> <source media=\"(min-width: 1024px)\" sizes=\"755px\" srcset=\"https:\/\/static0.makeuseofimages.com\/wordpress\/wp-content\/uploads\/2021\/08\/andaseat-mask2-gaming-desk-frame-built.jpg?q=50&fit=contain&w=755&h=430&dpr=1.5\"\/> <source media=\"(min-width: 768px)\" sizes=\"943px\" srcset=\"https:\/\/static0.makeuseofimages.com\/wordpress\/wp-content\/uploads\/2021\/08\/andaseat-mask2-gaming-desk-frame-built.jpg?q=50&fit=contain&w=943&h=540&dpr=1.5\"\/> <source media=\"(min-width: 481px)\" sizes=\"727px\" srcset=\"https:\/\/static0.makeuseofimages.com\/wordpress\/wp-content\/uploads\/2021\/08\/andaseat-mask2-gaming-desk-frame-built.jpg?q=50&fit=contain&w=727&h=425&dpr=1.5\"\/> <source media=\"(min-width: 0px)\" sizes=\"440px\" srcset=\"https:\/\/static0.makeuseofimages.com\/wordpress\/wp-content\/uploads\/2021\/08\/andaseat-mask2-gaming-desk-frame-built.jpg?q=50&fit=contain&w=440&h=250&dpr=1.5\"\/> <!--[if IE 9]><\/video><![endif]--> <img width=\"1680\" height=\"840\" alt=\"andaseat mask2 gaming desk frame built\"\/> <\/picture> <\/figure><\/div>""; Read More Reviews
if (window.reviewItemsImgs == undefined) { window.reviewItemsImgs = []; } window.reviewItemsImgs['1Img3'] = "" <div class=\"body-img responsive-img img-size-review-item\" > <figure> <picture> <!--[if IE 9]> <video style=\"display: none;\"><![endif]--> <source media=\"(min-width: 1024px)\" sizes=\"755px\" srcset=\"https:\/\/static0.makeuseofimages.com\/wordpress\/wp-content\/uploads\/2021\/08\/andaseat-mask2-gaming-desk-rgb-panels-installed.jpg?q=50&fit=contain&w=755&h=430&dpr=1.5\"\/> <source media=\"(min-width: 768px)\" sizes=\"943px\" srcset=\"https:\/\/static0.makeuseofimages.com\/wordpress\/wp-content\/uploads\/2021\/08\/andaseat-mask2-gaming-desk-rgb-panels-installed.jpg?q=50&fit=contain&w=943&h=540&dpr=1.5\"\/> <source media=\"(min-width: 481px)\" sizes=\"727px\" srcset=\"https:\/\/static0.makeuseofimages.com\/wordpress\/wp-content\/uploads\/2021\/08\/andaseat-mask2-gaming-desk-rgb-panels-installed.jpg?q=50&fit=contain&w=727&h=425&dpr=1.5\"\/> <source media=\"(min-width: 0px)\" sizes=\"440px\" srcset=\"https:\/\/static0.makeuseofimages.com\/wordpress\/wp-content\/uploads\/2021\/08\/andaseat-mask2-gaming-desk-rgb-panels-installed.jpg?q=50&fit=contain&w=440&h=250&dpr=1.5\"\/> <!--[if IE 9]><\/video><![endif]--> <img width=\"1680\" height=\"840\" alt=\"andaseat mask2 gaming desk rgb panels installed\"\/> <\/picture> <\/figure><\/div>""; Read More Reviews
if (window.reviewItemsImgs == undefined) { window.reviewItemsImgs = []; } window.reviewItemsImgs['1Img4'] = "" <div class=\"body-img responsive-img img-size-review-item\" > <figure> <picture> <!--[if IE 9]> <video style=\"display: none;\"><![endif]--> <source media=\"(min-width: 1024px)\" sizes=\"755px\" srcset=\"https:\/\/static0.makeuseofimages.com\/wordpress\/wp-content\/uploads\/2021\/08\/andaseat-mask2-gaming-desk-surface.jpg?q=50&fit=contain&w=755&h=430&dpr=1.5\"\/> <source media=\"(min-width: 768px)\" sizes=\"943px\" srcset=\"https:\/\/static0.makeuseofimages.com\/wordpress\/wp-content\/uploads\/2021\/08\/andaseat-mask2-gaming-desk-surface.jpg?q=50&fit=contain&w=943&h=540&dpr=1.5\"\/> <source media=\"(min-width: 481px)\" sizes=\"727px\" srcset=\"https:\/\/static0.makeuseofimages.com\/wordpress\/wp-content\/uploads\/2021\/08\/andaseat-mask2-gaming-desk-surface.jpg?q=50&fit=contain&w=727&h=425&dpr=1.5\"\/> <source media=\"(min-width: 0px)\" sizes=\"440px\" srcset=\"https:\/\/static0.makeuseofimages.com\/wordpress\/wp-content\/uploads\/2021\/08\/andaseat-mask2-gaming-desk-surface.jpg?q=50&fit=contain&w=440&h=250&dpr=1.5\"\/> <!--[if IE 9]><\/video><![endif]--> <img width=\"1680\" height=\"840\" alt=\"andaseat mask2 gaming desk surface\"\/> <\/picture> <\/figure><\/div>""; Read More Reviews
if (window.reviewItemsImgs == undefined) { window.reviewItemsImgs = []; } window.reviewItemsImgs['1Img5'] = "" <div class=\"body-img responsive-img img-size-review-item\" > <figure> <picture> <!--[if IE 9]> <video style=\"display: none;\"><![endif]--> <source media=\"(min-width: 1024px)\" sizes=\"755px\" srcset=\"https:\/\/static0.makeuseofimages.com\/wordpress\/wp-content\/uploads\/2021\/08\/andaseat-mask2-gaming-desk-top-view.jpg?q=50&fit=contain&w=755&h=430&dpr=1.5\"\/> <source media=\"(min-width: 768px)\" sizes=\"943px\" srcset=\"https:\/\/static0.makeuseofimages.com\/wordpress\/wp-content\/uploads\/2021\/08\/andaseat-mask2-gaming-desk-top-view.jpg?q=50&fit=contain&w=943&h=540&dpr=1.5\"\/> <source media=\"(min-width: 481px)\" sizes=\"727px\" srcset=\"https:\/\/static0.makeuseofimages.com\/wordpress\/wp-content\/uploads\/2021\/08\/andaseat-mask2-gaming-desk-top-view.jpg?q=50&fit=contain&w=727&h=425&dpr=1.5\"\/> <source media=\"(min-width: 0px)\" sizes=\"440px\" srcset=\"https:\/\/static0.makeuseofimages.com\/wordpress\/wp-content\/uploads\/2021\/08\/andaseat-mask2-gaming-desk-top-view.jpg?q=50&fit=contain&w=440&h=250&dpr=1.5\"\/> <!--[if IE 9]><\/video><![endif]--> <img width=\"1680\" height=\"840\" alt=\"andaseat mask2 gaming desk top view\"\/> <\/picture> <\/figure><\/div>""; Read More Reviews
if (window.reviewItemsImgs == undefined) { window.reviewItemsImgs = []; } window.reviewItemsImgs['1Img6'] = "" <div class=\"body-img responsive-img img-size-review-item\" > <figure> <picture> <!--[if IE 9]> <video style=\"display: none;\"><![endif]--> <source media=\"(min-width: 1024px)\" sizes=\"755px\" srcset=\"https:\/\/static0.makeuseofimages.com\/wordpress\/wp-content\/uploads\/2021\/08\/andaseat-mask2-gaming-desk-front-left-view.jpg?q=50&fit=contain&w=755&h=430&dpr=1.5\"\/> <source media=\"(min-width: 768px)\" sizes=\"943px\" srcset=\"https:\/\/static0.makeuseofimages.com\/wordpress\/wp-content\/uploads\/2021\/08\/andaseat-mask2-gaming-desk-front-left-view.jpg?q=50&fit=contain&w=943&h=540&dpr=1.5\"\/> <source media=\"(min-width: 481px)\" sizes=\"727px\" srcset=\"https:\/\/static0.makeuseofimages.com\/wordpress\/wp-content\/uploads\/2021\/08\/andaseat-mask2-gaming-desk-front-left-view.jpg?q=50&fit=contain&w=727&h=425&dpr=1.5\"\/> <source media=\"(min-width: 0px)\" sizes=\"440px\" srcset=\"https:\/\/static0.makeuseofimages.com\/wordpress\/wp-content\/uploads\/2021\/08\/andaseat-mask2-gaming-desk-front-left-view.jpg?q=50&fit=contain&w=440&h=250&dpr=1.5\"\/> <!--[if IE 9]><\/video><![endif]--> <img width=\"1680\" height=\"840\" alt=\"andaseat mask2 gaming desk front left view\"\/> <\/picture> <\/figure><\/div>""; Read More Reviews
if (window.reviewItemsImgs == undefined) { window.reviewItemsImgs = []; } window.reviewItemsImgs['1Img7'] = "" <div class=\"body-img responsive-img img-size-review-item\" > <figure> <picture> <!--[if IE 9]> <video style=\"display: none;\"><![endif]--> <source media=\"(min-width: 1024px)\" sizes=\"755px\" srcset=\"https:\/\/static0.makeuseofimages.com\/wordpress\/wp-content\/uploads\/2021\/08\/andaseat-mask2-gaming-desk-orange-lcd-lighting.jpg?q=50&fit=contain&w=755&h=430&dpr=1.5\"\/> <source media=\"(min-width: 768px)\" sizes=\"943px\" srcset=\"https:\/\/static0.makeuseofimages.com\/wordpress\/wp-content\/uploads\/2021\/08\/andaseat-mask2-gaming-desk-orange-lcd-lighting.jpg?q=50&fit=contain&w=943&h=540&dpr=1.5\"\/> <source media=\"(min-width: 481px)\" sizes=\"727px\" srcset=\"https:\/\/static0.makeuseofimages.com\/wordpress\/wp-content\/uploads\/2021\/08\/andaseat-mask2-gaming-desk-orange-lcd-lighting.jpg?q=50&fit=contain&w=727&h=425&dpr=1.5\"\/> <source media=\"(min-width: 0px)\" sizes=\"440px\" srcset=\"https:\/\/static0.makeuseofimages.com\/wordpress\/wp-content\/uploads\/2021\/08\/andaseat-mask2-gaming-desk-orange-lcd-lighting.jpg?q=50&fit=contain&w=440&h=250&dpr=1.5\"\/> <!--[if IE 9]><\/video><![endif]--> <img width=\"840\" height=\"1680\" alt=\"andaseat mask2 gaming desk orange lcd lighting\"\/> <\/picture> <\/figure><\/div>""; Read More Reviews
if (window.reviewItemsImgs == undefined) { window.reviewItemsImgs = []; } window.reviewItemsImgs['1Img8'] = "" <div class=\"body-img responsive-img img-size-review-item\" > <figure> <picture> <!--[if IE 9]> <video style=\"display: none;\"><![endif]--> <source media=\"(min-width: 1024px)\" sizes=\"755px\" srcset=\"https:\/\/static0.makeuseofimages.com\/wordpress\/wp-content\/uploads\/2021\/08\/andaseat-mask2-gaming-desk-blue-lcd-lighting.jpg?q=50&fit=contain&w=755&h=430&dpr=1.5\"\/> <source media=\"(min-width: 768px)\" sizes=\"943px\" srcset=\"https:\/\/static0.makeuseofimages.com\/wordpress\/wp-content\/uploads\/2021\/08\/andaseat-mask2-gaming-desk-blue-lcd-lighting.jpg?q=50&fit=contain&w=943&h=540&dpr=1.5\"\/> <source media=\"(min-width: 481px)\" sizes=\"727px\" srcset=\"https:\/\/static0.makeuseofimages.com\/wordpress\/wp-content\/uploads\/2021\/08\/andaseat-mask2-gaming-desk-blue-lcd-lighting.jpg?q=50&fit=contain&w=727&h=425&dpr=1.5\"\/> <source media=\"(min-width: 0px)\" sizes=\"440px\" srcset=\"https:\/\/static0.makeuseofimages.com\/wordpress\/wp-content\/uploads\/2021\/08\/andaseat-mask2-gaming-desk-blue-lcd-lighting.jpg?q=50&fit=contain&w=440&h=250&dpr=1.5\"\/> <!--[if IE 9]><\/video><![endif]--> <img width=\"840\" height=\"1680\" alt=\"andaseat mask2 gaming desk blue lcd lighting\"\/> <\/picture> <\/figure><\/div>""; Read More Reviews
if (window.reviewItemsImgs == undefined) { window.reviewItemsImgs = []; } window.reviewItemsImgs['1Img9'] = "" <div class=\"body-img responsive-img img-size-review-item\" > <figure> <picture> <!--[if IE 9]> <video style=\"display: none;\"><![endif]--> <source media=\"(min-width: 1024px)\" sizes=\"755px\" srcset=\"https:\/\/static0.makeuseofimages.com\/wordpress\/wp-content\/uploads\/2021\/08\/andaseat-mask2-gaming-desk-red-lcd-lighting.jpg?q=50&fit=contain&w=755&h=430&dpr=1.5\"\/> <source media=\"(min-width: 768px)\" sizes=\"943px\" srcset=\"https:\/\/static0.makeuseofimages.com\/wordpress\/wp-content\/uploads\/2021\/08\/andaseat-mask2-gaming-desk-red-lcd-lighting.jpg?q=50&fit=contain&w=943&h=540&dpr=1.5\"\/> <source media=\"(min-width: 481px)\" sizes=\"727px\" srcset=\"https:\/\/static0.makeuseofimages.com\/wordpress\/wp-content\/uploads\/2021\/08\/andaseat-mask2-gaming-desk-red-lcd-lighting.jpg?q=50&fit=contain&w=727&h=425&dpr=1.5\"\/> <source media=\"(min-width: 0px)\" sizes=\"440px\" srcset=\"https:\/\/static0.makeuseofimages.com\/wordpress\/wp-content\/uploads\/2021\/08\/andaseat-mask2-gaming-desk-red-lcd-lighting.jpg?q=50&fit=contain&w=440&h=250&dpr=1.5\"\/> <!--[if IE 9]><\/video><![endif]--> <img width=\"840\" height=\"1680\" alt=\"andaseat mask2 gaming desk red lcd lighting\"\/> <\/picture> <\/figure><\/div>""; Read More Reviews
if (window.reviewItemsImgs == undefined) { window.reviewItemsImgs = []; } window.reviewItemsImgs['1Img10'] = "" <div class=\"body-img responsive-img img-size-review-item\" > <figure> <picture> <!--[if IE 9]> <video style=\"display: none;\"><![endif]--> <source media=\"(min-width: 1024px)\" sizes=\"755px\" srcset=\"https:\/\/static0.makeuseofimages.com\/wordpress\/wp-content\/uploads\/2021\/08\/andaseat-mask2-gaming-desk-cup-holder-in-use.jpg?q=50&fit=contain&w=755&h=430&dpr=1.5\"\/> <source media=\"(min-width: 768px)\" sizes=\"943px\" srcset=\"https:\/\/static0.makeuseofimages.com\/wordpress\/wp-content\/uploads\/2021\/08\/andaseat-mask2-gaming-desk-cup-holder-in-use.jpg?q=50&fit=contain&w=943&h=540&dpr=1.5\"\/> <source media=\"(min-width: 481px)\" sizes=\"727px\" srcset=\"https:\/\/static0.makeuseofimages.com\/wordpress\/wp-content\/uploads\/2021\/08\/andaseat-mask2-gaming-desk-cup-holder-in-use.jpg?q=50&fit=contain&w=727&h=425&dpr=1.5\"\/> <source media=\"(min-width: 0px)\" sizes=\"440px\" srcset=\"https:\/\/static0.makeuseofimages.com\/wordpress\/wp-content\/uploads\/2021\/08\/andaseat-mask2-gaming-desk-cup-holder-in-use.jpg?q=50&fit=contain&w=440&h=250&dpr=1.5\"\/> <!--[if IE 9]><\/video><![endif]--> <img width=\"1680\" height=\"840\" alt=\"andaseat mask2 gaming desk cup holder in use\"\/> <\/picture> <\/figure><\/div>""; Read More Reviews
if (window.reviewItemsImgs == undefined) { window.reviewItemsImgs = []; } window.reviewItemsImgs['1Img11'] = "" <div class=\"body-img responsive-img img-size-review-item\" > <figure> <picture> <!--[if IE 9]> <video style=\"display: none;\"><![endif]--> <source media=\"(min-width: 1024px)\" sizes=\"755px\" srcset=\"https:\/\/static0.makeuseofimages.com\/wordpress\/wp-content\/uploads\/2021\/08\/andaseat-mask2-gaming-desk-cup-holder-empty.jpg?q=50&fit=contain&w=755&h=430&dpr=1.5\"\/> <source media=\"(min-width: 768px)\" sizes=\"943px\" srcset=\"https:\/\/static0.makeuseofimages.com\/wordpress\/wp-content\/uploads\/2021\/08\/andaseat-mask2-gaming-desk-cup-holder-empty.jpg?q=50&fit=contain&w=943&h=540&dpr=1.5\"\/> <source media=\"(min-width: 481px)\" sizes=\"727px\" srcset=\"https:\/\/static0.makeuseofimages.com\/wordpress\/wp-content\/uploads\/2021\/08\/andaseat-mask2-gaming-desk-cup-holder-empty.jpg?q=50&fit=contain&w=727&h=425&dpr=1.5\"\/> <source media=\"(min-width: 0px)\" sizes=\"440px\" srcset=\"https:\/\/static0.makeuseofimages.com\/wordpress\/wp-content\/uploads\/2021\/08\/andaseat-mask2-gaming-desk-cup-holder-empty.jpg?q=50&fit=contain&w=440&h=250&dpr=1.5\"\/> <!--[if IE 9]><\/video><![endif]--> <img width=\"1680\" height=\"840\" alt=\"andaseat mask2 gaming desk cup holder empty\"\/> <\/picture> <\/figure><\/div>""; Read More Reviews
if (window.reviewItemsImgs == undefined) { window.reviewItemsImgs = []; } window.reviewItemsImgs['1Img12'] = "" <div class=\"body-img responsive-img img-size-review-item\" > <figure> <picture> <!--[if IE 9]> <video style=\"display: none;\"><![endif]--> <source media=\"(min-width: 1024px)\" sizes=\"755px\" srcset=\"https:\/\/static0.makeuseofimages.com\/wordpress\/wp-content\/uploads\/2021\/08\/andaseat-mask2-gaming-desk-front-view.jpg?q=50&fit=contain&w=755&h=430&dpr=1.5\"\/> <source media=\"(min-width: 768px)\" sizes=\"943px\" srcset=\"https:\/\/static0.makeuseofimages.com\/wordpress\/wp-content\/uploads\/2021\/08\/andaseat-mask2-gaming-desk-front-view.jpg?q=50&fit=contain&w=943&h=540&dpr=1.5\"\/> <source media=\"(min-width: 481px)\" sizes=\"727px\" srcset=\"https:\/\/static0.makeuseofimages.com\/wordpress\/wp-content\/uploads\/2021\/08\/andaseat-mask2-gaming-desk-front-view.jpg?q=50&fit=contain&w=727&h=425&dpr=1.5\"\/> <source media=\"(min-width: 0px)\" sizes=\"440px\" srcset=\"https:\/\/static0.makeuseofimages.com\/wordpress\/wp-content\/uploads\/2021\/08\/andaseat-mask2-gaming-desk-front-view.jpg?q=50&fit=contain&w=440&h=250&dpr=1.5\"\/> <!--[if IE 9]><\/video><![endif]--> <img width=\"1680\" height=\"840\" alt=\"andaseat mask2 gaming desk front view\"\/> <\/picture> <\/figure><\/div>""; Read More Reviews
if (window.reviewItemsImgs == undefined) { window.reviewItemsImgs = []; } window.reviewItemsImgs['1Img13'] = "" <div class=\"body-img responsive-img img-size-review-item\" > <figure> <picture> <!--[if IE 9]> <video style=\"display: none;\"><![endif]--> <source media=\"(min-width: 1024px)\" sizes=\"755px\" srcset=\"https:\/\/static0.makeuseofimages.com\/wordpress\/wp-content\/uploads\/2021\/08\/andaseat-mask2-gaming-desk-with-atari-vcs.jpg?q=50&fit=contain&w=755&h=430&dpr=1.5\"\/> <source media=\"(min-width: 768px)\" sizes=\"943px\" srcset=\"https:\/\/static0.makeuseofimages.com\/wordpress\/wp-content\/uploads\/2021\/08\/andaseat-mask2-gaming-desk-with-atari-vcs.jpg?q=50&fit=contain&w=943&h=540&dpr=1.5\"\/> <source media=\"(min-width: 481px)\" sizes=\"727px\" srcset=\"https:\/\/static0.makeuseofimages.com\/wordpress\/wp-content\/uploads\/2021\/08\/andaseat-mask2-gaming-desk-with-atari-vcs.jpg?q=50&fit=contain&w=727&h=425&dpr=1.5\"\/> <source media=\"(min-width: 0px)\" sizes=\"440px\" srcset=\"https:\/\/static0.makeuseofimages.com\/wordpress\/wp-content\/uploads\/2021\/08\/andaseat-mask2-gaming-desk-with-atari-vcs.jpg?q=50&fit=contain&w=440&h=250&dpr=1.5\"\/> <!--[if IE 9]><\/video><![endif]--> <img width=\"1680\" height=\"840\" alt=\"andaseat mask2 gaming desk with atari vcs\"\/> <\/picture> <\/figure><\/div>""; Read More Reviews
Shop Now
The AndaSeat Mask 2 gaming desk makes for an excellent addition to smaller gaming rooms. If you've crammed your setup into a corner, then you'll appreciate it's smaller stature. That isn't to say the Mask 2 lacks real estate; it doesn't. Thanks to a selection of space-saving features, AndaSeat's gaming desk offers plenty of room for small to modest-sized gaming rigs. If you have a bigger gaming setup, though, you might want to explore AndaSeat's larger variant, the Eagle 2.
Key Features
Gaming desk
RGB lights
Convenience features
Capacitive controls for lights
Specifications
Brand: AndaSeat
Dimensions: 47 x 23 x 29 inches
Connectivity: USB (powers RGB lights)
Weight Capacity: 330 lbs
Height Adjustable: No
Materials: Plastic, steel, and laminated MDF
Pros
Plenty of room for smaller gaming rigs
Great for general office use
RGB lights!
Sleek, stylish finish
Cons
Anti-skid surface doesn't always prevent skidding
Might not have enough room for larger gaming rigs
Optical mice aren't great with the tabletop pattern
Buy This Product
AndaSeat Mask 2 Gaming Desk other
Shop
// Bottom
The AndaSeat Mask 2 gaming desk is an excellent surface upon which to plant modest gaming rigs. As such, thanks to its smaller stature, it makes a great gaming desk if you struggle for space in your game room.
You can buy the AndaSeat Mask 2 now and (at the time of writing) it is available for $239.99; a huge saving on the $499 MSRP. Want to know more about the AndaSeat Mask 2 gaming desk? Then I'll begin.
Assembling the Desk
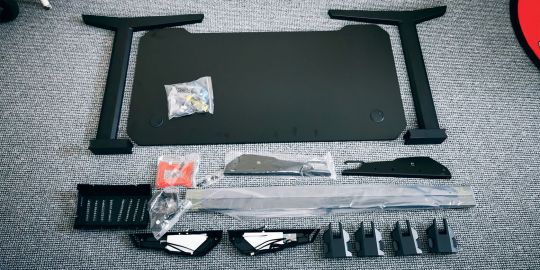
No, this isn't some lame joke based around the Ant-Man gaming chair you've probably spotted in the image gallery (I saved all of those lame jokes for my review of the Ant-Man chair). I'm just going to talk about putting the desk together.
The AndaSeat Mask 2 is very easy to put together. Providing, that is, you're not an idiot like me who put the frame together firmly before realizing I'd positioned the cross supports back to front. Idiocy aside, I had no problem assembling the desk.
There aren't too many components to wrangle with; although you may require two people to lift the desktop into place and also to maneuver the desk into position once you've erected it. The only other piece of advice I can offer is to use a cordless screwdriver to assemble it; it will cut the build time down significantly if you're not manually fastening screws into place.
So, building the desk doesn't pose a problem and is a 45-minute job at most. How about the looks department?
Add Style to Your Gaming Room
Image Gallery (3 Images)
Expand
Expand
Expand
Close
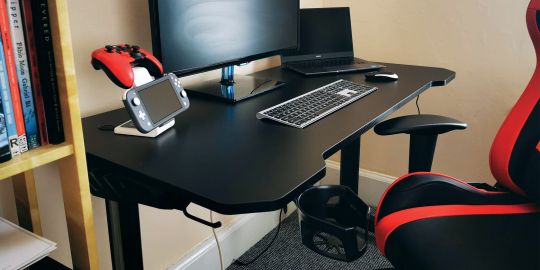
The Andaseat Mask 2 is a simple yet stylish gaming desk. It doesn't have a huge number of bells and whistles, but it looks pretty cool, nonetheless.
The legs are inverted T-shapes, with silver feet that have rubberized grips, preventing the desk from sliding around smoother floors. The outer face of the legs boast transparent plastic strips. These glow with RGB light when you power the table, and accentuate the etched AndaSeat logo that both plastic strips carry. Both legs also have a headset/headphone hook.
The table is made of MDF (Medium Density Fibre) wood and has a sleek black laminated surface. This surface has a pleasing carbon fiber textured appearance, which looks a bit Mission Impossible, in an understated way. The underside of the desk carries a cup-holder at the left, and toward the back of the underside is the cable tray.
The desk surface is also ergonomic, as it features a cut-out at the center that allows you to bring your mouse and mouse pad within closer reach. If you game for prolonged periods, you'll appreciate that extra inch when you're supporting your elbow with your gaming chair's armrest.
The RGB panels on each leg are a nice touch. They're not overstated, and the light they emit isn't so bright as to have you straining your eyes as you game or work. They add a more subdued ambience to a space, rather than being garish and offensive.
Other than that, there isn't a vast amount to say, appearance-wise. It looks like a gaming desk!
A Simple, Functional, Gaming Desk
The AndaSeat Mask 2 gaming desk isn't without bells and whistles, but it isn't overloaded with features like some gaming desks on the market.
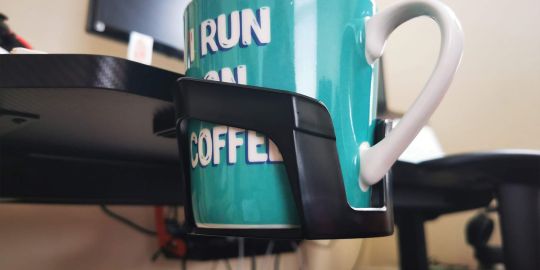
You have the cup-holder, which features a neat cut-out that allows you to place a coffee mug in the holder. This means your morning cup of joe can rest easy, without your clumsy elbows and swipe-y hands sending it tumbling to carpet-staining doom.
As mentioned, both legs carry headset or headphone holders. These comprise a hook with a rubber end, suspending your cans below the desk. As there are two, you can use either as you see fit, or both if you like to use separate headphones for music and gaming.
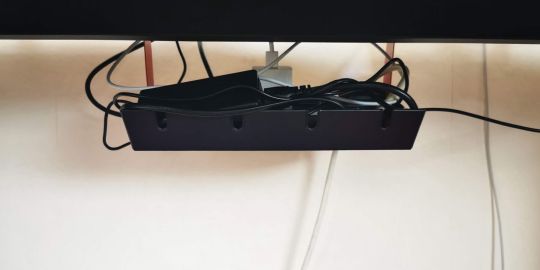
The cable tray is great. As you can see, it prevents a plethora of disgustingly messy wires from ensnaring my feet like some sort of sentient vine every time I shift position. It also hides them out of view, so my OCD can forget about them while I do my work or have some time with the Atari VCS. As I'm not a PC gamer, I don't have a great deal to plug in below my desk, meaning the cable tidy works perfectly.
One minor issue I have is the table surface itself. AndaSeat says this is anti-skid, but it is so smooth that anything without grips can slide around fairly easily; at least, in my experience. Most peripherals come with anti-skid measures on their bases anyway, so this isn't a massive problem.
Where this lack of anti-skid might cause an issue is if you forget you've got a cup-holder and accidentally place your smooth-bottomed glass of water on the desk surface, only to send it flying at terminal velocity when a nine-year-old 1080 no scopes you on Warzone and you throw your arms around angrily.
Likewise, optical mice don't like the pattern on the surface of the desk. Because the pattern causes light to refract in alternate directions, the mouse cursor will jump around uncontrollably. NOT what you want during competitive play. Thankfully, you can easily resolve this with a mouse mat.
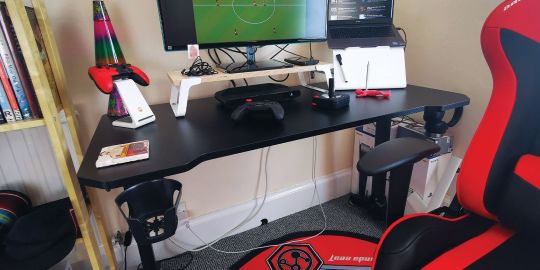
While they are also an aesthetic feature, the extended sections, on either side of the desk, are a godsend if you like your gaming setup to support your body in all the right places. You can rest your elbows on your chair arms and bring your mouse mat and mouse closer to the end of the chair's armrests, extending that support across the full length of your forearm.
Thanks to the cup holder and headset hooks, you can free up a lot of space on top of your desk, meaning a clutter-free experience (or more room to place other gaming devices). This makes the desk functional in a smaller setting and for a less expansive gaming setup.
If you stream, or have other ephemera on your desk that can't go anywhere else when gaming, consider a larger AndaSeat desk. The AndaSeat Eagle 2 gaming desk is a good idea for more expansive gaming rigs, as it is 55 inches wide compared to the Mask 2's 47 inches.
If you're a taller gamer, then the lack of height adjustability might mean the desk becomes uncomfortable for you, particularly if it means you are craning over your keyboard or mouse to play.
Should You Buy the AndaSeat Mask 2 Gaming Desk?
If you are looking for something stylish and simple, with a little extra RGB to add to your current setup, then yes. Especially at the offer price quoted at the time of writing.
The desk is not overbearingly large, so it will suit smaller gaming rooms while providing enough space for small to moderate gaming setups. If you use a desk for console gaming, you're definitely onto a winner with the Mask 2. If you have a massive gaming PC and huge monitor, with a microphone and camera for streaming, and other gaming gubbins like speakers, then you might want to seek the roomier Eagle 2.
AndaSeat Mask 2 Gaming Desk Review: A Superior Surface for Your Gaming Rig published first on http://droneseco.tumblr.com/
0 notes
Text
New Post has been published on All about business online
New Post has been published on http://yaroreviews.info/2021/01/tribune-publishing-to-review-aldens-buyout-offer
Tribune Publishing to Review Alden's Buyout Offer
Tribune publishes nine papers, including the New York Daily News.
Photo: Spencer Platt/Getty Images
By
Lukas I. Alpert
Close
Lukas I. Alpert
Jan. 1, 2021 11:28 am ET
Tribune Publishing Co. TPCO 7.11% said it appointed a special committee to review a buyout bid proposed by its largest shareholder, New York hedge fund Alden Global Capital LLC.
Alden, which already owns a 32% stake, said Thursday it was interested in acquiring the rest of the publishing company for $14.25 a share, valuing Tribune at $521 million. The Wall Street Journal first reported Alden’s plans late Wednesday. The offer drove Tribune’s stock up 7.1% on Thursday to $13.70.
Tribune, which publishes nine papers, including the Chicago Tribune, the New York Daily News and the Baltimore Sun, said it had named three independent members of its board to the special committee to explore Alden’s offer, and had engaged Lazard LAZ 0.62% as its financial adviser and Davis Polk & Wardwell LLP as its legal counsel.
“No assurance can be given that Alden’s proposal, or any other transaction, will be consummated,” Tribune said in a statement Thursday evening.
Alden also controls MediaNews Group, a private company that owns some 60 daily newspapers around the country, including the Denver Post, San Jose Mercury News and Orange County Register. The hedge fund has a reputation for making deep cost cuts at titles it acquires.
A deal would have far-reaching implications for an industry beset by sharp declines in revenue over the past 20 years that have led to a wave of consolidation and cost cuts. Between 2008 and 2019, the industry shed 51% of its newsroom jobs, according to the Pew Research Center.
A transaction is complicated by a standstill agreement Alden had signed at the beginning of 2020 in exchange for a third seat out of seven on Tribune’s board. The agreement expires after June of this year, so any deal to increase the stake would need a signoff from the board and the support of two-thirds of the company’s shareholders.
Newsletter Sign-up
Deals Alert
Major news in the world of deals and deal-makers.
The publishing company’s second-largest shareholder, with about 25%, is Patrick Soon-Shiong, a billionaire biotech investor who in 2018 bought the Los Angeles Times from Tribune for $500 million. He declined to comment on Alden’s offer.
Tribune’s third-largest shareholder, Florida investor Mason Slaine, who owns about 8% of the company, said he found the bid to be “unattractive at that price” as it represented less than three times the business’ annual cash flow. “I would need to see more, but I believe it’s probably just an opening gambit,” he said in an interview.
Media analyst Doug Arthur of Huber Research Partners LLC said in a note that the offer was “significantly too low” based on the company’s earnings before interest, taxes, depreciation and amortization. He said a price range of between $16 and $17 a share was more on target.
In a filing with the Securities and Exchange Commission, Alden co-founder Randall Smith said the hedge fund had been in contact with an outside investor who was interested in certain Tribune properties, and Alden requested the board’s permission to explore a joint transaction with him.
The investor, Stewart Bainum Jr., a former Maryland politician and chairman of Choice Hotels International Inc., operator of hotel chains such as Comfort Inn and Econo Lodge, didn’t respond to a message seeking comment.
Write to Lukas I. Alpert at [email protected]
Copyright ©2020 Dow Jones & Company, Inc. All Rights Reserved. 87990cbe856818d5eddac44c7b1cdeb8
Appeared in the January 2, 2021, print edition as ‘Tribune Publishing To Review Buyout Offer.’
0 notes
Text


Hana Stewart (orange alt, West End), Collete Guitart (black alt/swing, West End), and Zara MacIntosh (pink alt, West End) photo shoot day photo drop
Hana Stewart is wearing her Parr outfit, Zara MacIntosh is in Howard, and Collette Guitart is less clear but seems to be in her Seymour variation. Here is a separate post about Cherelle Jay (teal alt)
Pictured:
1st+2nd: Collette Guitart, Hana Stewart, Zara MacIntosh, and Cherelle Jay (9 Dec 2020, @/cherellejay)
3rd+4th: Hana Stewart and Collette Guitart (9 Dec 2020, @/hanastewart_95)
5th+6th: Hana Stewart (9 Dec 2020, @/hanastewart_95)
7th+8th: Zara MacIntosh (9 Dec 2020, @/hanastewart_95)
#hana stewart#collette guitart#zara macintosh#six west end#six the musical#six alternates#six costumes#six makeup#orange alt#pink alt#black alt#orange alt 2.0#orange alt 2.6#six costume refs#orange alt 2.6.1#pink alt 1.0#pink alt 1.5#pink alt 1.5.1#black alt 3.0#black alt 3.3#black alt 3.3.1#katherine howard#jane seymour#catherine parr
47 notes
·
View notes
Text
The Photoshop Interface
Note: All interface elements in this article refer to Adobe Photoshop CC 2019 20.0.6 release
Adobe Photoshop has many different interface elements to help you create a wide variety of imagery. This chapter will cover the most-used key elements that are employed by the creatives chronicled in this book. Once you have a clear understanding of these fundamental tools and principles, you will be better prepared to tackle similar projects on your own. Here are the topics covered in this chapter:
1.Launching Photoshop and Deleting Settings
2.Start Workspace/Welcome Screen
3.Menus and Panels
4.Workspaces
5.Tools
6.Adjustments
7.Selections and Masks
8.Saving and Exporting
I have provided an example image to illustrate the application of these fundamental tools and controls.
Launching Photoshop and Deleting Settings
We’ll begin by launching Photoshop, setting it to its default layout by doing the following: Holding down ⌘-⌥⇧(Command-Option-Shift on Mac,Control-Alt-Shift on PC), Click on the Photoshop icon in the Dock(Mac) or in Shortcuts(PC) until it launches with the following message appearing in a pop-up window:”Delete the Adobe Photoshop Settings File?” (Figure 1.1)
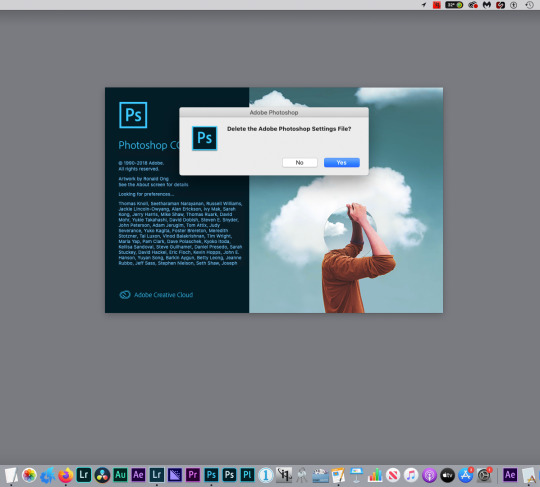
Figure 1.1 Delete settings
Once you click on “Yes”, the Start Workspace/Welcome Screen appears.(Figure 1.2)There are several options that appear for accessing images and creating new ones, as well as stock and tutorial resources. Adobe has their own Stock and Font services, provided as part of your Creative Cloud subscription.
Start Workspace/Welcome Screen
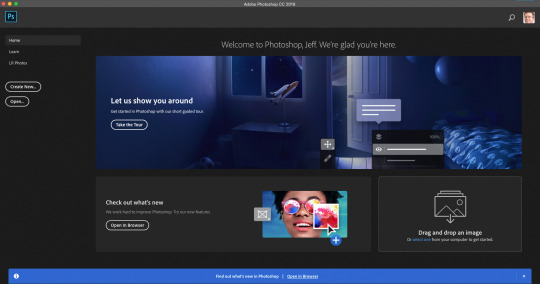
Figure 1.2 Start Workspace
HOME: Main Page, shows all elements in this screenshot
LEARN: Tutorial videos and interactive tour
LR PHOTOS: Access images from Adobe Photoshop Lightroom Catalog
CREATE NEW: Make a new image file, web page template, video clip using presets, templates or custom settings
OPEN: Navigate to any Photoshop-compatible file stored anywhere on your computer, hard drives, memory card or the Creative Cloud
Menus and Panels
Photoshop’s Menu bar(Figure 1.3 ), provides access to a wide variety of commands, organized by their main functions. The Mac menu bar is shown here. It differs from the PC menu bar in that a PC does not have the “Apple” icon, nor does it have a Photoshop CC menu. Items that are found under the Photoshop CC menu, such as Preferences, are instead found under the Edit menu on the PC. Otherwise, most, if not all Menu items are identical on both platforms, Let’s begin with the File menu. Then Choose File>Open (⌘-O on Mac or Control-O on PC.) Fig. 1.4 Shows the image in the Essentials(default) Workspace. Workspaces are simply a particular arrangement of select Panels. Panels contain elements such as Tools, Layers, Properties, Color Swatches, Image Libraries, etc. several of which are visible in Fig. 1.4.

Figure 1.4 Menu Bar
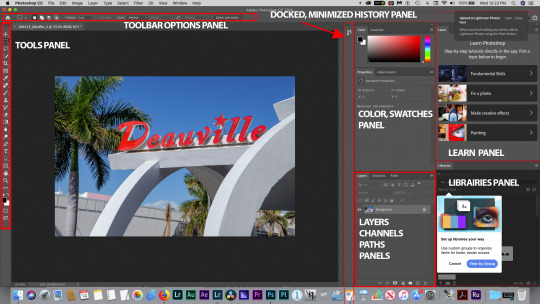
Figure 1.4 Essentials Workspace Panels
Workspaces
As you can see in the Fig 1.4 Screenshot, some panels contain other panels tabbed together in a Panel Group, Such as Layers, and Paths. These tabs may be un-docked at any time by clicking and dragging on the tab. They can also be minimized into icons in a single column, as with the History panel shown here. This default workspace can thus be rearranged to your liking, and that new arrangement can be saved as your own custom Workspace if desired. That option is found under Window>Workspace>New Workplace. You can name the new Workspace anything you want. This is a particularly useful feature if you have to share a computer in your work environment, because you can always reset the Workspace to your custom one at any time(Window>Workspace>Reset Workspace name) In this current Workspace, the panels that are visible are key Panels used on most documents and images in Photoshop, hence they are”Essentials”. Let’s look at the ones we’ll use in making some modifications to this image file. First we’ll look at the Tools Panel, Fig 1.5.
Tools
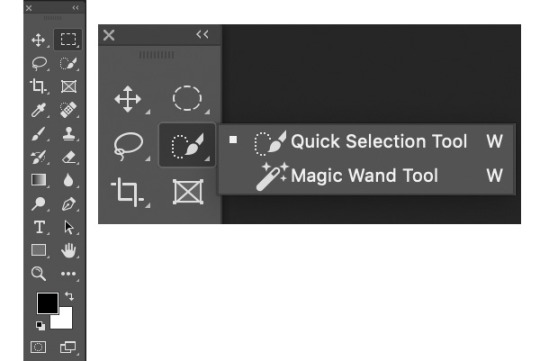
Figure 1.5 Tools Panel Figure 1.6 Flyout Menu
The Tools panel, in Fig.1.5, can be viewed as a long single column, as in Fig.1.4, or as two columns, as shown here. Clicking on the double arrows at the top right of the panel expands it into two columns. The Tools are grouped by their general functions, from top to bottom. Each Tool that has a small arrow at the bottom right has additional Tools associated with it in a flyout menu. See the example in Figure 1.6.
You’ll note that the Tool name appears, as well as a keyboard shortcut at the far right of the flyout menu. Tools have single-letter keyboard shortcuts-this tool’s is simply”W”. Both tools have the same shortcut, so the way to access a specific tool when there are multiple options like this one is to add the Shift key to the shortcut(Shift-W in this case). If there are several options under the tool flyout menu, repeating the Shift-W shortcut here will cycle through the available tools in that menu. As another example, the Lasso Tool, has 3 options which can be accessed by Shift-L, as L is the shortcut for that tool. For this image processing exercise we’ll use the Quick Select Tool(W) to make what are known as Selections. Selections are used to isolate parts of images to make modifications to just those areas that have been “Selected” using one of several tools and/or methods designed for that purpose. After we make an initial global adjustment to this image, we’ll use Selection tools to isolate and modify specific areas further.
But first, let’s begin with a very basic image adjustment, Brightness/Contrast. In the screenshots from the Image menu, (Figure 1.7, Figure 1.8)select Image>Adjustments>Brightness/Contrast.
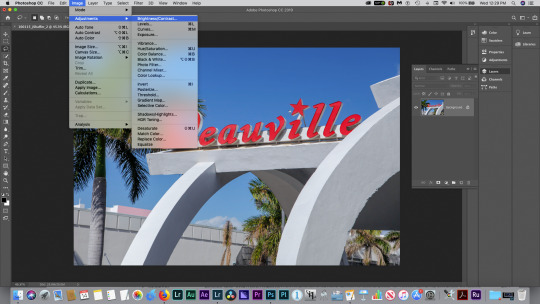
Figure 1.7 Brightness/Contrast
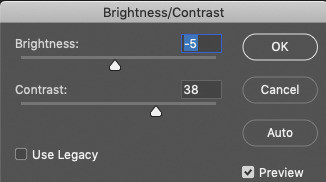
Figure 1.8 Brightness/Contrast dialog
Adjusting the sliders while observing the changes on the image arrived at the number settings above. This image edit is considered a Destructive edit, since pixel values are altered, and if the image were saved now and closed, permanently altered. This can sometimes present problems, though, should the image need to be re-adjusted. Some of the image information has been lost in the process. However, you do have a Non-Destructive alternative method to achieve the same result. You can use what is known as an Adjustment layer. You’ll use one of these to adjust the color intensity in this image-A Hue/Saturation adjustment layer. Hue is the actual shade of a color, which we assign a name such as red, green, blue, orange, etc. Saturation is the intensity of that color-the brilliance and purity of that color. We can adjust both parameters, as well as the lightness, in all colors at once, or individually selected colors, once this adjustment layer is applied. To add it, you have a couple of options-go to Layer>New Adjustment Layer>Hue/Saturation in the top menu, or as in the screenshot(Figure1.9), open the Adjustments panel by clicking on the icon at the bottom of the Layers panel as shown, and choose Hue/Saturation from the Icons that are visible in that panel. A third option would be to click and hold on that black-and-white circle icon, and choose the adjustment you want from the pulldown menu.(Figure 1.10) Photoshop has many ways to access the same commands and options-this provides you with a workflow that suits your particular preferences. As this article points out, Photoshop is used many ways by many different creatives, so having the ability to perform tasks different ways is ideally suited to different workflows.
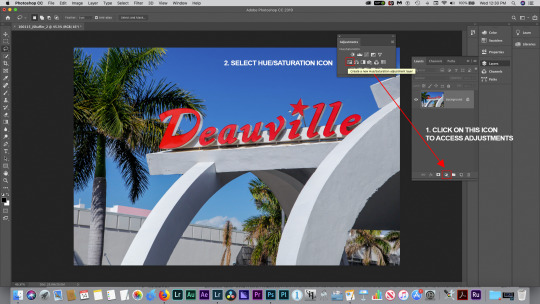
Figure.1.9 Hue/Saturation adjustment layer
Adjustments
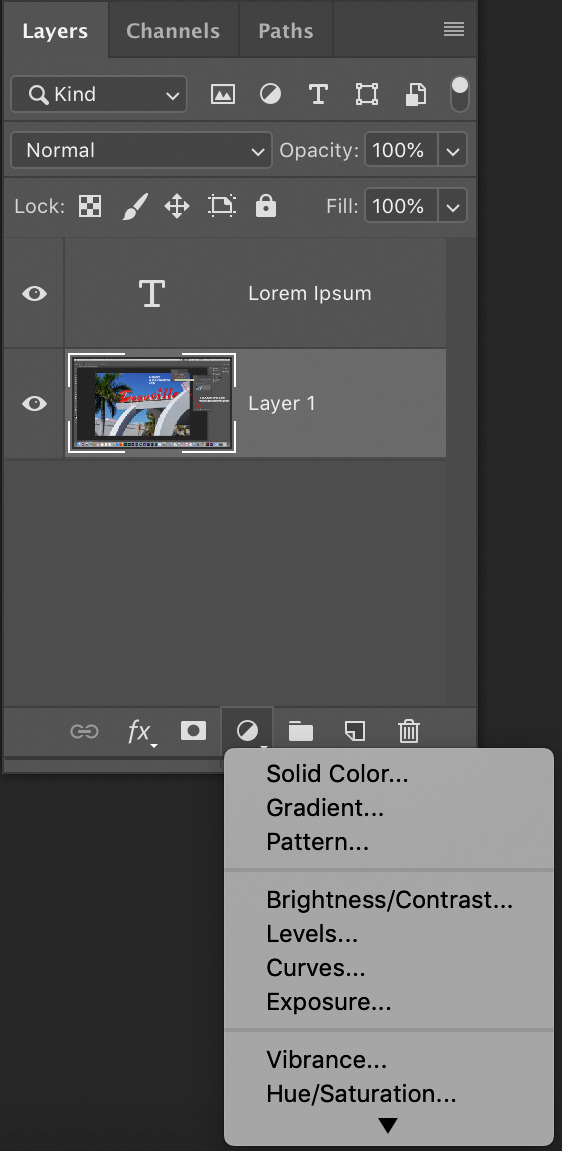
Fig.1.10 Hue/Saturation adjustment layer pulldown
Figure 1.11 shows that a Hue/Saturation adjustment layer has been created on top of the Background layer. Figure 1.11 also shows the result of double-clicking on the Hue/Saturation layer thumbnail, which makes its Properties panel visible to make the adjustment.
Adjustment layers affect all layers below them in the layer stack, unless you limit them to affect only a single layer, by “clipping” the adjustment to a specific layer. (Figure 1.12) Clicking the icon indicated “clips’ the layer to the layer below. In this case, there is currently only one layer, so “clipping” it is not necessary.
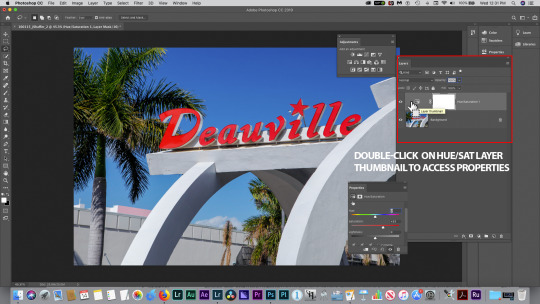
Figure.1.11 Hue/Saturation adjustment layer properties
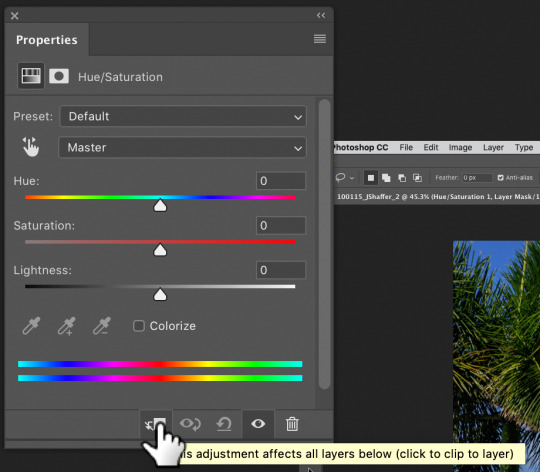
Figure 1.12 Clipping an adjustment layer
Once the Properties panel is revealed, its default settings can be modified with the Hue, Saturation, and Lightness sliders.
The “Master”Pulldown menu option would enable the sliders to affect all colors simultaneously. Specific ranges of colors may also be selected from the pulldown menu. In Figure 1.13, and Figure 1.14, Cyans have been adjusted in both Saturation and Lightness sliders. Figure 1.5 is a comparison view, with the Layer Visibility icon “eyeball” deactivated by clicking on it. You can see the sky in particular is less saturated and bright in that example.
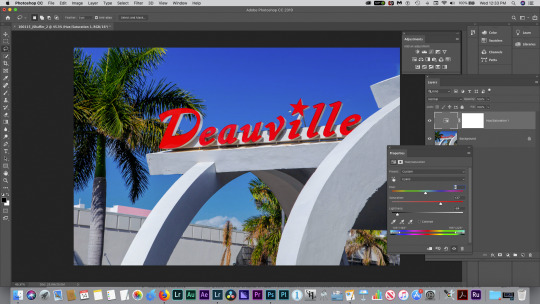
Figure 1.13 Hue/Saturation Properties Cyan
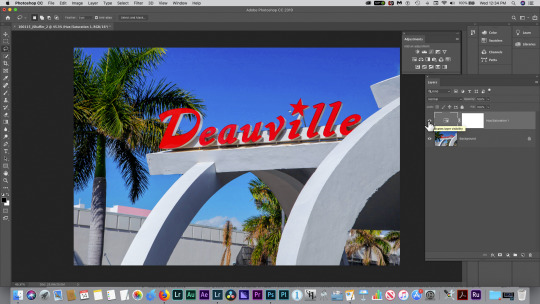
Figure 1.14 Hue/Saturation Cyan Adjust Result
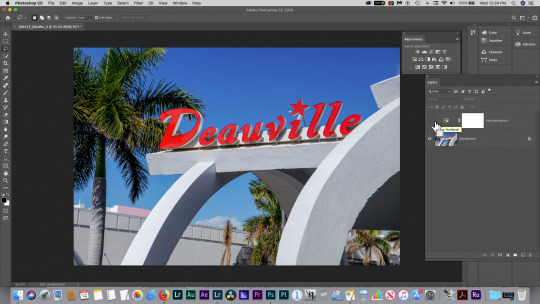
Figure 1.15 Hue/Saturation Adjustment Visibility Disabled
Selections and Masks
As mentioned previously, Selections are a method for isolating an area of an image to perform an edit on just that area, and leave the rest of the image unaffected by that edit.You can do that with this image by choosing the Quick Select tool(shortcut W). It is a brush-based tool, meaning that brush size settings will determine the selection area size of that tool. The default brush size is 30 pixels, which will suffice for this exercise. The tool has a built-in tolerance, which means the range of similar pixel values the tool will select at a given brush size. Click and drag with the tool over the concrete supports underneath the word”Deauville” in the image. The tones of the gray concrete are similar enough that the tool should create”marching ants” around the supports. These “marching ants” indicate the area currently isolated by the selection. If needed, clicking and dragging in additional areas will add to that which is currently selected.The next step will be to make an edit to that selection Figure 1.16 illustrates the result of the selection process.
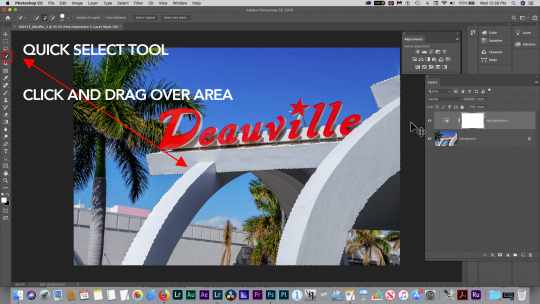
Figure 1.16 Quick Select Tool
Next, if you add a Color Balance adjustment layer while the selected area is currently active, a Layer Mask will be created , linked to the Color Balance adjustment layer, as shown in Figure 1.17.
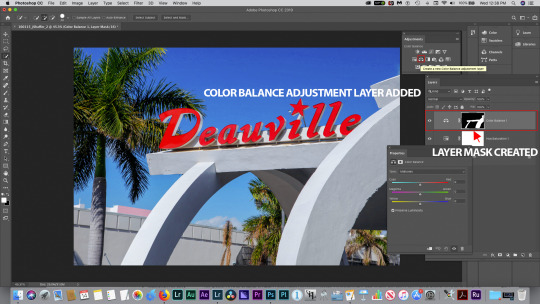
Figure 1.17 Color Balance Layer Mask
In Figure 1.18 You’ll note that the Layer Mask is a black and white representation of your original “marching ants” selection area. Black represents the area concealed from the adjustment effect, and white represents the area revealed, and thus changed, by the effect. A good mnemonic for Layer Masks is”Black conceals, White reveals”. You will also note that the Layer mask has a chain link icon next to the icon for the adjustment layer, in this case represented by scales(Color Balance).

Figure 1.18 Color Balance Layer Mask detail
The Properties panel for Color Balance defaults to Midtone adjustments, but we’ll pull down to adjust Highlights, which will have greater effect on the light-colored concrete. See Figure 1.19.
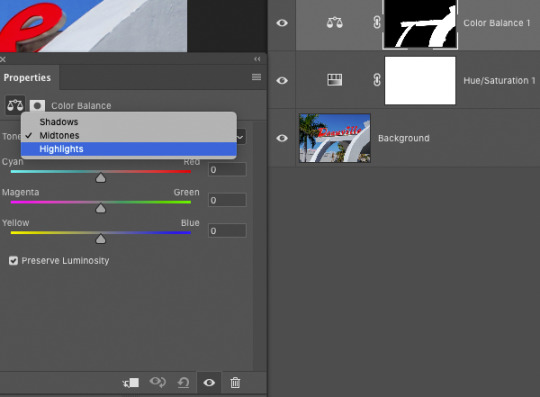
Figure 1.19 Color Balance Highlights
Moving the top slider towards Cyan results in a shifting of the concrete towards that color. See Figure 1.20 and 1.21
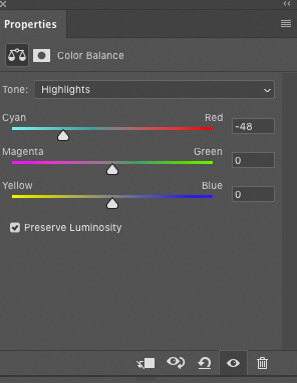
Figure 1.20 Color Balance Cyan Shift
Returning to the Background layer by clicking in the gray area to the right of the layer name, a new selection is created with the Quick Select tool of the medium gray wall behind the hotel entrance. Figure 1.22 shows the selected area.
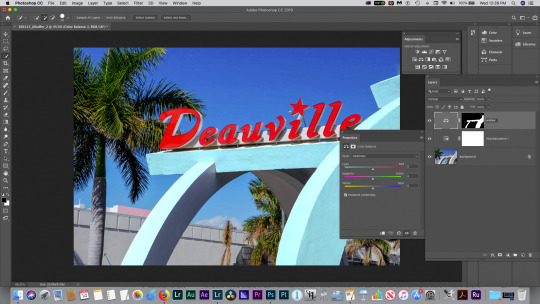
Figure 1.21 Color Balance Cyan Shift Result
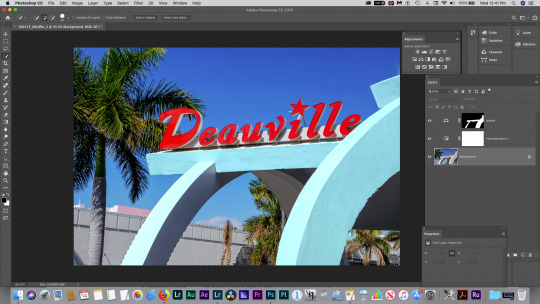
Figure 1.22 New Selection Area
By choosing another adjustment layer, Photo Filter from the Adjustment panel, as with the Hue/Saturation layer, the selection area becomes a layer mask on the Photo Filter layer. This new layer is created immediately above the Background layer you selected in the layers panel. This is always the case when you create a new layer; it is always placed directly above the currently active layer. Of course, you can move layers in the layer stack by clicking and dragging them up or down in the layer stack. A blue line appears when you have moved it far enough to drop into place. The only layer in this document that can’t currently be moved in the stack is the Background layer, which has a lock symbol at the far right. Locked layers cannot be moved, cannot contain transparent pixels, and cannot have a layer below them. Should any of those things become necessary in your file, however, you can unlock the layer simply by clicking on that lock symbol. See Figure 1.23.
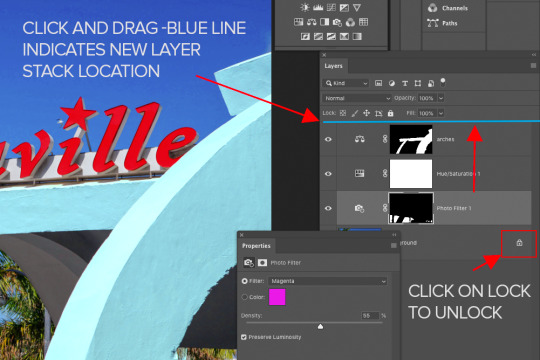
Figure 1.23 Photo Filter, Moving layers, removing lock
The Photo Filter Properties panel should be open. If you don’t see it, just choose Window>Properties from the main menu. As you can see in Figure 1.24, I have chosen a Magenta filter, with a density of 55%, which fills in the selected, masked gray area in the background.
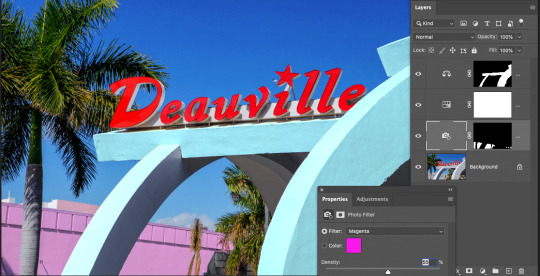
Figure 1.24, Photo Filter Applied
Next, I chose the Zoom tool, and zoomed in to about 148%, mousing down to the bottom of the image by holding down the Spacebar. Holding down the Spacebar with any active tool turns it into the Hand tool, which allows you to move around a zoomed-in image. This facilitated examining if the entire area I wanted to fill with the magenta color is indeed filled with that color. In Figure 1.25, it is not covering the area in the middle of the smaller plant. This is easily remedied however, since we have a layer mask on that layer. As mentioned previously, black areas of the mask are concealed from the effect, white areas reveal it. To correct a layer mask, you can paint on black wherever needed to conceal more, or white to reveal more. In this case, I want to reveal more, so painting in the missing areas on the layer mask with white paint is necessary. Clicking on the layer mask thumbnail in the Photo Filter layer, additional white lines form around the perimeter of the layer mask icon, which indicates that only the layer mask is currently selected. This is also indicated by the tab at the top of the document, again shown in Figure 1.25.
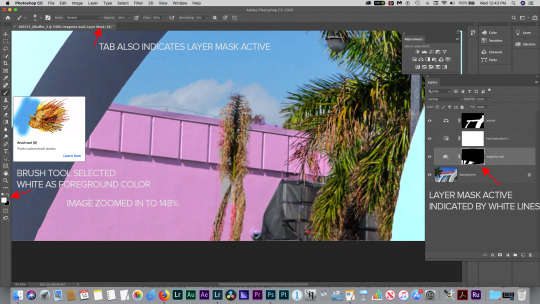
Figure 1.25 Layer Mask modification
With the brush tool selected, I mad sure white was the foreground color chosen in the color picker, by clicking on the “X” key, which is the keyboard shortcut for flipping foreground and background colors. When a layer mask is active, only black, white or gray are color options-no other colors can be chosen, or are even useful when working on a layer mask. I chose a 13 pixel soft-edged brush, and carefully painted in white up to the plant’s edges to fill it in with the Photo Filter’s magenta color. If necessary, zoom into more to see the edges of the plant and where to paint in the mask, Figure 1.26 shows how to set this up.
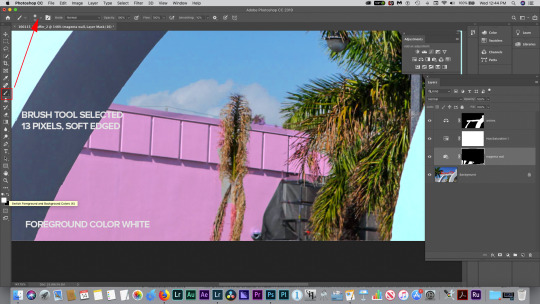
Figure 1.26 Brush tool, paint color
Figure 1.27 shows the layer mask painting completed.
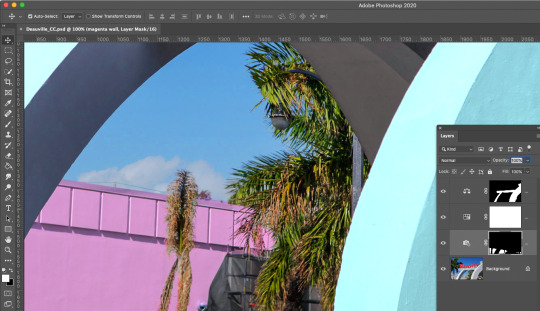
Figure 1.27 layer Mask completed
Zooming back out(keyboard shortcut ⌘-(minus sign) or Control -minus sign PC), you can see the completed image. Next it should be saved, and we have a number of options depending on the end use intended for this photo. First, we’ll check the resolution by choosing Image>Image Size from the main menu.See Figure 1.28 and 1.29.
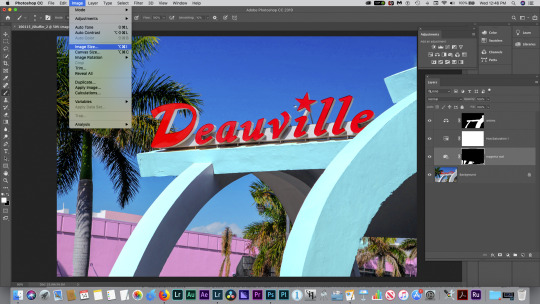
Figure 1.28 Image Size
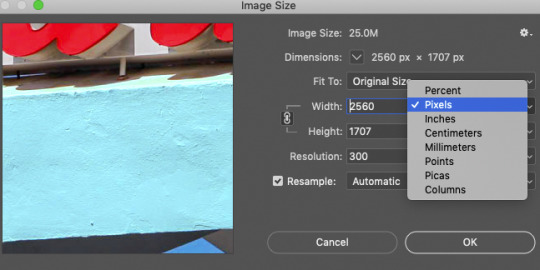
Figure 1.29 Image Size dialog
Resolution refers to the number of pixels in an image needed to resolve enough fine detail for a given output device or medium at a given viewing distance. In the case of screen-based output, such as a website or broadcast television, a general rule of thumb is that only 72 pixels per inch of resolution is required to meet the detail standard. We measure images intended for these types of output in pixel dimensions, and their size relationship to the screen dimensions in pixels. So if you have a 500 pixel wide image on a 1920x1080 pixel screen, the image would take up about one quarter the screen area. See Figure 1.30.
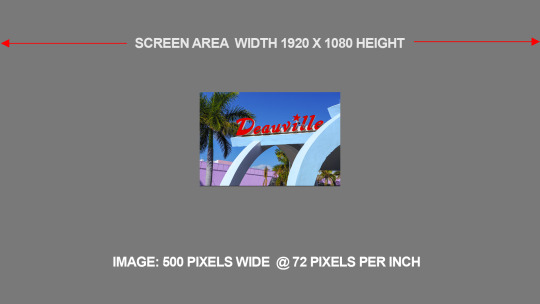
Figure 1.30 Resolution
However, if you wanted to make a print of this image in the same size, you would need approximately 240-300 pixels per inch of resolution to make a sharp print, with no obvious Pixelization. So, instead of an image 500 pixels across @72 pixels per inch, you’d need an image 2083 pixels wide @ 300 pixels per inch. Resizing the image in Image Size would result in Upsampling, which is a mathematical recalculation known as an algorithm. This re-calculation attempts to add in the missing pixels, which in Photoshop it does not generally do very well, resulting in an unsharp, often pixelated image. See Figures 1.31, 1.32 and1.33.

Figure 1.31 Image size @ 72 ppi (pixels per inch)

Figure 1.32 Image size upsampled to 300 ppi

Figure 1.33 Image soft and pixelated
As you can see from these examples, using an image that only has enough resolution for screen-based output is not recommended for print output, as the image cannot easily be scaled up without a loss of important detail. The solution to this problem is to make sure your image has enough resolution for print output to begin with, as scaling the image down (downsampling) is much less damaging to the image quality overall. Here’s the image sized to 2560 x 1707 pixels @ 300 pixels per inch(ppi)seen in Figure 1.34. In Figure 1.35, and 1.36 the image is scaled down(downsampled) to 500 pixels across @ 72 ppi. Even when viewed at 200% in Photoshop, the image quality is much better than the upsampled example in Figure 1.33. Photoshop’s algorithm is simply better at tossing away pixels than adding in missing ones, as these images prove.

Figure 1.34 Image size 2560 x1707 @ 300 ppi
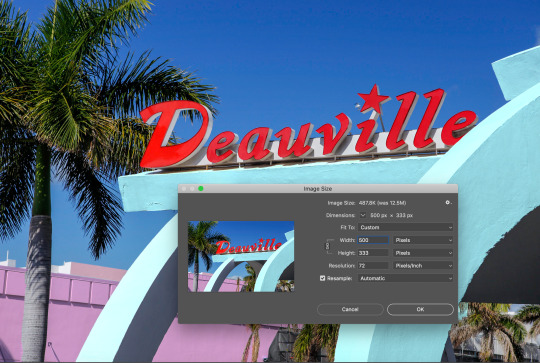
Figure 1.35 Image size downsampled to 500 pixels across @72 ppi
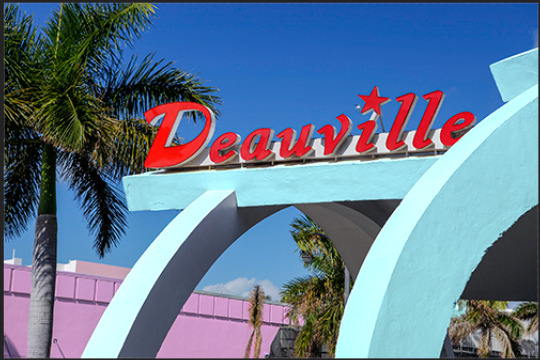
Figure 1.36 Image downsampled, viewed at 200%
Photoshop also provides a method for previewing the output using different file types, compression settings and resolution options.This can be found under the File>Save for web(Legacy). See Figure 1.37.
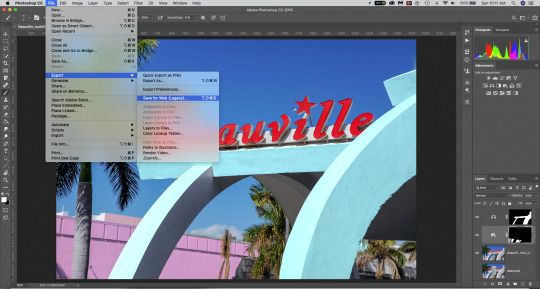
Figure 1.37 File> Export>Save for Web(Legacy)

Figure 1.38 2-up comparison
The interface can be viewed a number of different ways: Original, Optimized, 2-up and 4-up. Original simply shows the file at its current resolution and file type. Optimized will display the file compressed using the current settings in the upper right corner under Presets. 2-up and 4-up are the most useful views, however, as they allow for before-and-after visual comparisons of image quality. The 2-up view is shown in Figure 1.38, depicting the original 16.7 Megabyte file on the left, and a JPEG at 60 quality(High preset) on the right. In this case, the file would be reduced to 735.2 K(Kilobytes) with this setting, and below that is an indication of file load times with different bandwidth internet connection speeds. Here it states that the file will load in 5 seconds at 2 Mbps (2 Mega-bits, not bytes!) per second, which is a typical speed for a modern cable modem as of this writing. Of course, that would be still too slow for most viewers today, and that is because the file is still in its original pixel dimensions: 2560x1707 pixels, which would be huge on most viewers’ screens, which are often no more than 1920x1080 pixels in size. So, a reduction of image size is definitely in order if the intent is to upload this file to a web page. Otherwise, it can remain at the full dimensions if the intent is to provide a file for emailing that can even be printed out by the recipient. In general, most email servers will accept files up to 3MB. Larger files may be blocked by anti-virus software at the email server.
There are multiple ways to compress files depending on the end use. Available here are GIF, JPEG, PNG-8, PNG-24 and WBMP. This interface provides the ability to compare several of them at once.
GIF compression is used on photos only when creating animated GIFs and occasionally when transparency in the original file needs to be retained, as the JPEG format does not support transparent pixels. GIFs allow for a reduction of the number of colors in an image, using different settings, and reducing the image to as little as 2 colors. This results in a dot pattern known as dithering, which is the compression method attempting to simulate colors and tonal changes that are being removed by using a dot pattern. As you can see in Figure 1.39, it is often an undesirable artifact in continuous tone type images such as a photo. It fares much better as a compression method for solid tones and some gradients such as those found in logos and other “flat art” illustrations. The exception is the animated GIF, which if it employs 256 or sometimes, 128 colors, it can be acceptable for that kind of output. See Figure 1.40.
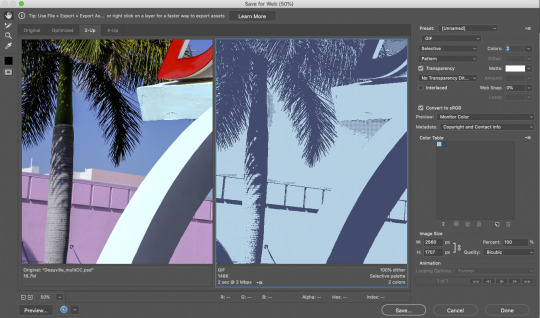
Figure 1.39 2 color GIF

Figure 1.40 256 color GIF
Further color reduction usually causes too much dithering, so it is not typically used to reduce the file size any further in the GIF format.
JPEG is the preferred compression method for photographs, as it excels at reducing file size without sacrificing the continuous tone quality of the image. There are a number of presets available in the interface, from Low (15) to Maximum(100). All will reduce the file size significantly, and Maximum is rarely needed to retain enough quality for web-based images. Anywhere from 60-80 (High-Very High) settings are generally sufficient, even for emailed images intended for printing. A 4-up comparison view can be seen in Figure 1.41. Image quality is very good in all of these settings, so it is most desirable to choose the smallest file size that retains the quality level. You’ll note that “Optimized” is checked by default at the top right. Progressive, the other option, is rarely used today as it is a relic of the days of dial-up modems and slower connection speeds. It “progressively”increases resolution as it loads, at first pixelated and then sharp.The currently selected setting is outlined in blue at bottom left, and if chosen, would be the output settings used here to create the JPEG file for export.
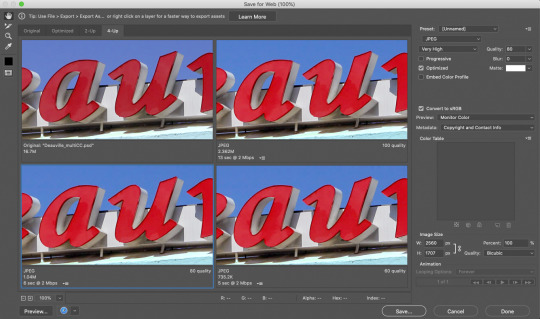
Figure 1.41 JPEG Comparison
Of course, as mentioned previously, reducing the file size is very important for an image to load quickly on a web page, so you can easily reset the pixel dimensions as shown in Figure 1.42. Select one dimension with your cursor, and as long as the chain link symbol to the right of those dimensions is indicating width and height are linked(a bracketed line next to the link is visible). The image will scale proportionally, keeping the Aspect Ratio, as the dimensional relationship is known, consistent throughout the process. Here I have changed the pixel dimensions to 500 px wide, 333 px high, or 19.53% of the original size.
You can even set up the interface to preview the compressed image in various internet browsers, such as Fiirefox, Chrome, Safari etc. Figure 1.43 shows how to set that up, and Figure 1.44 shows the Preview window in the browser(Safari shown here). Figure 1.45 shows the actual Preview in the browser, along with some html source code below.
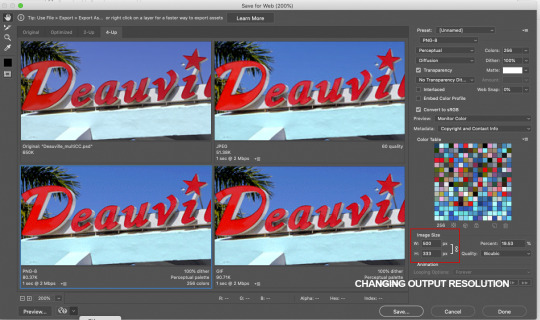
Figure 1.42 Changing Output Resolution
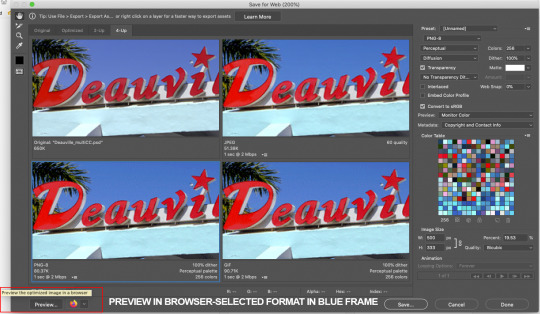
Figure 1.43 Preview in Browser
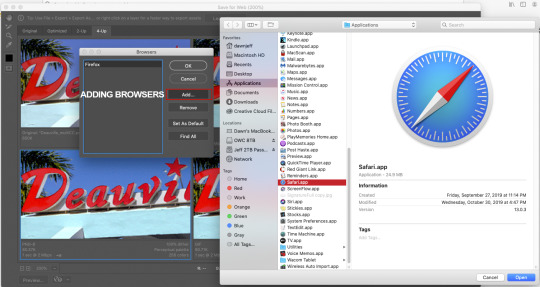
Figure 1.44 Adding a browser
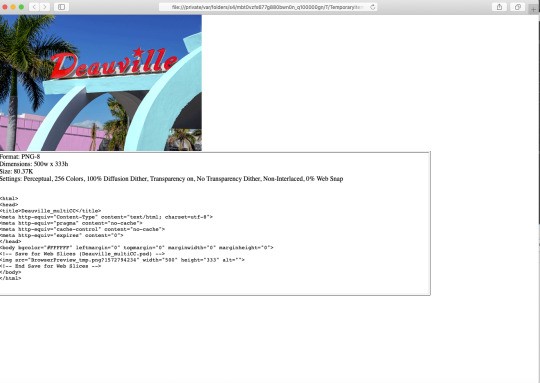
Figure 1.45 Browser preview
It is also possible to compare different compression methods and file formats in the 4-up window. In Figure 1.46, you can see the differences in quality and file size between the Original and JPEG, GIF, PNG-8, side by side.
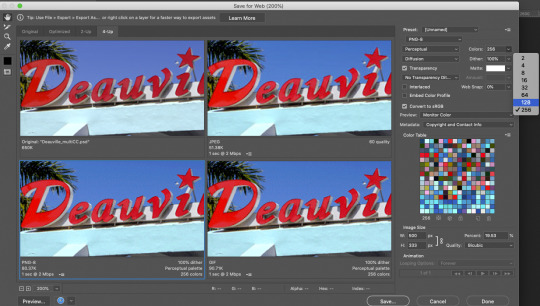
Figure 1.46 File format comparison.
PNG is an option that is often employed on websites as well. It has the added benefit of allowing transparency in a photo while retaining better continuous tone quality as compared with the GIF format. The PNG format comes in two versions-PNG-8 and PNG-24. PNG-8 can exhibit some of the dithering effect that GIF does, although the resultant file size is a little smaller than GIF at the same Color Table settings. This can also be seen in Figure 1.46. PNG-24 will be similar in quality to JPEG(smoother continuous tone) at the expense of a larger file size. It is also often used when there is a fair amount of type in the image, as it is usually sharper than a JPEG in that situation. Since the format has increased in popularity, Photoshop also provides a Quick Export to PNG option, in addition to the Save fore Web(Legacy) export.
The term Legacy here refers to the methods that have been incorporated into Photoshop from earlier versions, and is usually referenced to distinguish it from newer commands that may perform the same task. In this case, the newer version is a simplified, and much more limited interface-File>Export> Quick Export as PNG. The PNG Quick Export Preferences only provide a choice of PNG-8 or PNG-24. PNG-8 creates a smaller file with fewer colors due to lower bit depth. PNG-24 contains more bit depth, and thus will be of higher image quality at the expense of a significantly larger file size. See Figure 1.48.

Figure 1.47 Quick Export as PNG
Preferences for the PNG output can be found under the Photoshop CC menu on the Mac and under the Edit menu on PCs. Navigate to the Export Preferences as shown in figure 1.49.
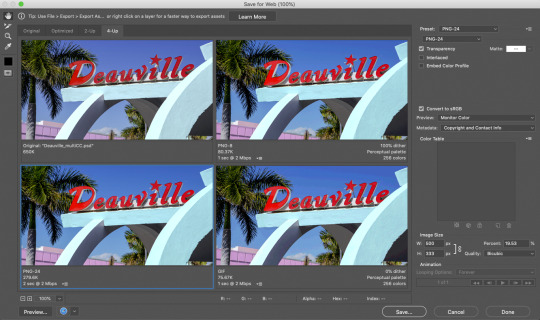
Figure 1.48 PNG Quality Comparison
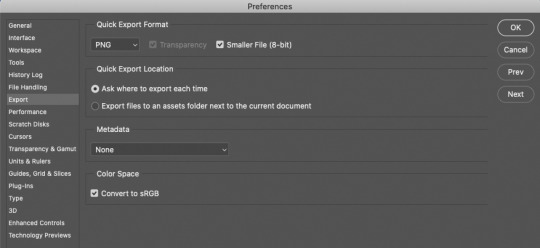
Figure 1.49 Quick Export PNG Preferences
While all these options work well for web and other screenbased
output, other formats are often used for print, such as TIFF and
PSD. TIFF can support layered files, and can be saved either as
completely un-compressed, or compressed using a “lossless” algorithm
known as LZW compression. This method preserves more image
quality than JPEG’s “lossy” compression, and thus is used when output
quality must be optimal. Large, high resolution print output, such as
trade show displays, point-of-sale displays or gallery prints are
examples that require this. PSD is the native file format of Photoshop.
While TIFF can support layers, PSD is my preferred format for saving
the master layered file. The reason is simply that I can establish that
format as a signifier that the file contains layers, without needing to
open it, as would be required with a TIFF. So, my preferred and
recommended output workflow is this:
• PSD: Master file from which all other output is generated. Contains layers.
Largest file size due to layers and high resolution.
• TIFF: “Flattened”file(all layers merged into one single layer) May also be
compressed using LZW compression to make file size small enough for
upload or email. Designated mainly for high-quality print output.
• JPEG:“Flattened” and compressed file, used for web or screen-based
output, optimized using Save For Web settings. Also used for compressed
high-resolution uploads to service bureaus and commercial printers. If the
file size can be reduced to under 3MB, most email servers will accept it as
an attachment.
• PNG: Alternate web or screen output. Used mainly when transparency or
type quality is paramount in a continuous tone(photo quality image).
PNG-8 is a smaller file size than PNG-24, but may cause dithering artifacts.
• GIF:Used on logos and vector-based illustrative artwork primarily, as the
color table can be reduced to fewer colors more successfully on that type
of image, resulting in a smaller file size for web optimization. 128 or 256
color tables can be a applied to animated GIFs created from photographs,
which is generally the only time you would use the GIF format for photos.
The dither pattern that can result with fewer colors is particularly undesirable when applied to photographs.
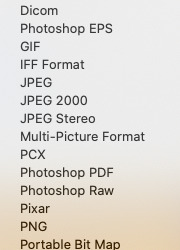
Figure 1.50 File Formats
•Photoshop PDF: For many print and web projects, PDFs are used when the
files contain large amounts of type, as it embeds the fonts used in the document.This eliminated the need to have the particular font used installed on the computer that receives the file. PDF also allows multiple files to be combined into a “slideshow” presentation, or a multi-page, printable document. Many commercial printers who print on 4-color printing presses prefer a PDF of the page layouts in their workflow, particularly because of the embedded font feature.
• Large Document Format: Used when the file size exceeds 2GB, it is not
supported in older versions of Photoshop that could not address image files
of that size. The format supports images up to 300,000 pixels in any
dimension. It also supports 32-bit HDR (high dynamic range) images, which
are merged from multiple image captures to extend the tonal range of the
image.
Most of the other file formats in the “Save” pulldown menu are used
infrequently, some even rarely, as they are very specific to one industry or are
now dormant, such as Scitex CT, Photoshop EPS,Photoshop DCS 1.0 and 2.0,
which are used by the commercial printing industry. PCX is another example-a
legacy format for Windows computers, now largely supplanted by JPEG, BMP
and GIF. Others, such as DICOM, are specific to medical imaging (x-rays, CT
scans, MRI etc.) or for outputting high resolution 3D images, such as the Pixar
format.
One other factor to consider when saving and exporting, particularly in print
output, is to maintain what is known as a “Color-Managed” workflow. This
workflow requires a calibrated monitor to maintain consistent color reproduction through the image processing and output stages.
First, a calibration device, such as the iOne from X-rite, is attached to the computer via a USB input, and then placed onto the monitor screen. Using the software that comes with the device, a series of colors and tones are
projected and read by the device, which standardizes monitor brightness and
color(white point). Once this is done, a Profile of your monitor is saved onto the computer and referenced when displaying files in Photoshop. Those files can have an input color profile of their own, such as sRGB, Adobe 1998, Generic CMYK, Pro Photo and others, known as a Color Space.
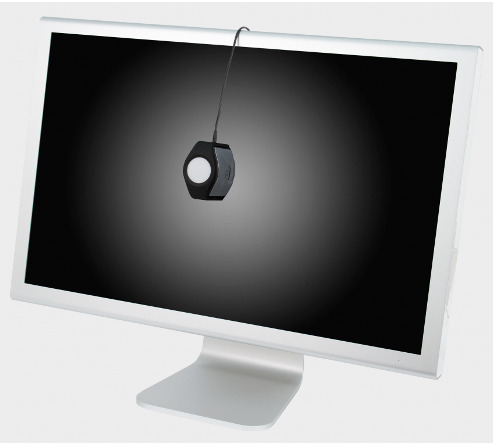
Figure 1.51 iOne Calibration
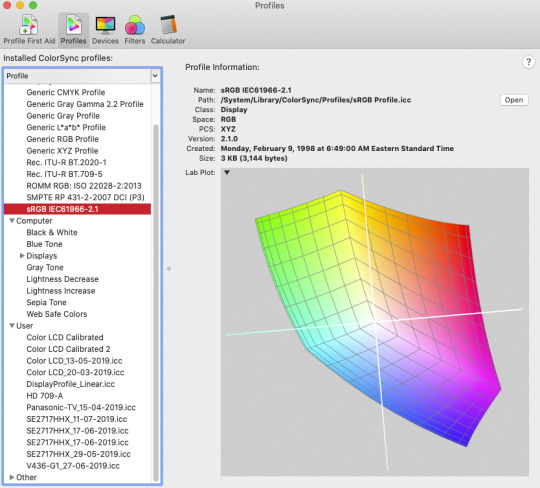
Figure 1.52 sRGB Color Space
The Color Spaces most commonly used are:
• sRGB: A target color space for screen-based images, both web and video
on the web. It is also sometimes employed by photographic printing
services as well. It is a range of color that works for both Windows and
Mac display environments and web browsers. REC 709, a broadcast video
color space, is nearly identical in range(gamut) to sRGB. See Figure 1.5.2
• Adobe 1998- A wider range of color(gamut) than sRGB, often used for
high-quality print output such as multi-ink color photographic printers. Only
a few high-end monitors can display the full range of colors possible in
Adobe 1998, and four-color printing presses fall far out of the range that
Adobe 1998 is capable of reproducing. Most photo-quality inkjet printers
have 6-12 ink colors, which extends the range of printable colors
significantly. A calibrated profile for that device and the paper brand/type it
is printing on is also required to obtain predictable and consistent results
when outputting. Many inkjet paper manufacturers provide custom ICC
Profiles of their papers. ICC(international Color Consortium) is an
international standards organization that sets those standards for color
managements systems, supporting utilities such as Apple’s Color Sync
Utility, which can graphically display the color gamut of color spaces and
output devices, as seen in Figure 1.53.
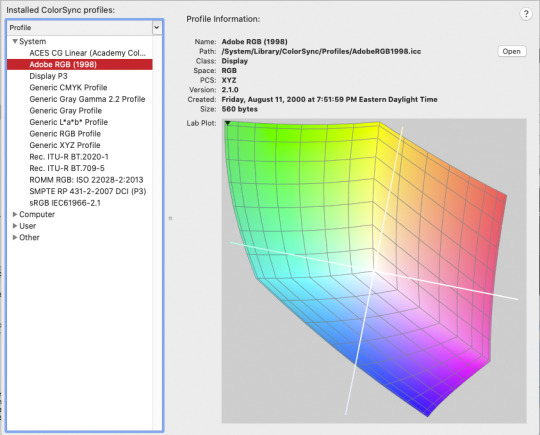
Figure 1.53 Adobe 1998 Color Space
• Pro Photo-Currently the widest gamut(range) color space. It is used
mainly for “Master Negative” RAW capture photo images, (which do not
have an embedded color profile) in 16-bit color, which can contain over
4,000 levels of tone, and millions of colors. It is particularly good at
reproducing the most saturated colors. No monitor currently exist that can
display the full range of colors possible in Pro Photo color space, and no
printer output can print all those colors as well, but it is used as the primary
color space for images like this with the consideration that, in the near
future, both monitors and printers will be able to reproduce what is there in
the original file. In addition, the greater amount of information allows for
significantly more aggressive image editing and processing while still
retaining color and tonal detail. See Figure 1.54.
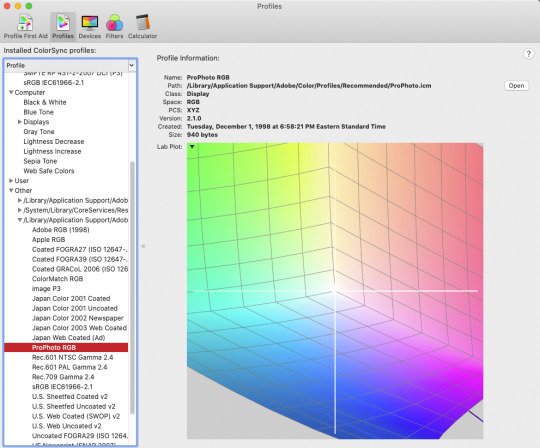
Figure 1.54 Pro Photo Color Space

Figure 1.55 CMYK Color Space
• Generic CMYK- While the other color spaces mentioned here are in RGB
color,(red, Green, Blue) which is the color range that monitors and inkjet
printers use. CMYK refers to four-color printing press ink colors-Cyan,
Magenta, yellow, and Black. The “K” refers to Black, not to be confused
with “B” for Blue as in RGB. These colors are viewed by reflected light off
the paper surface, not in transmitted light like that of a computer screen.
The CMYK color space is thus a very narrow range of less saturated
colors, and darker colors, as can be seen represented by the ColorSync
Utility in Figure 1.55.
Photoshop’s Color management features allow the user to preview or “Soft
Proof” the output on the computer monitor before sending the file to a printer
or other output device. Figure 1.55 shows the menu item to preview an image
in the default CMYK color space, which in North America is US Web Coated
SWOP v2: This refers to the type of printing press-Single Web Offset Press, or
SWOP, is a Web press. This term used in the industry refers to printing on
large, continuous rolls of paper, called a Web, as opposed to Sheetfed, which are large single sheets of paper. Coated means the paper has a coating to prevent excessive ink absorption. The SWOP Coated is the standard, since most printing press jobs are printed this way in North America. Other standards, such as those for Sheetfed presses, European and Asian standards can also be chosen as required.

Figure 1.56 Soft Proof setup CMYK
The soft-proofing feature can also display colors that are out-of-gamut, or the
range of printable colors. A default Gray overlay, known as a Gamut Warning
indicates the colors that are out-of-range for the output device, in this case, a
printing press. This can be used as a guide to modify the image so the colors fit
within the range of the device. See Figure 1.57.
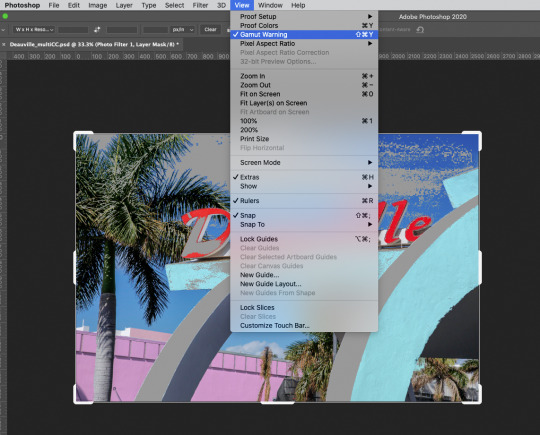
Figure 1.57 View>Gamut Warning
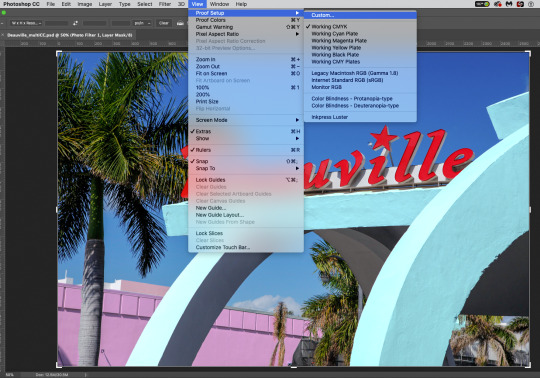
Figure 1.58 Choosing Custom Soft Proofing setup
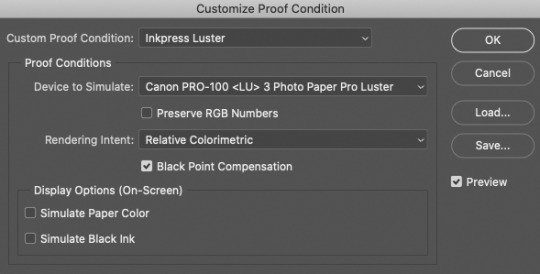
Figure 1.59 Customized Proof Condition
This feature can be used with any output device, and is commonly used when sending a file to a photo-quality inkjet printer that contains more ink colors. It utilizes a calibrated profile of the particular printer model and paper stock chosen. These profile are often easily obtained from the paper manufacturer’s website, and on the Mac are installed into a subfolder within the ColorSync folder in the System.
Once installed, they become accessible in the View>Proof Setup>Custom pulldown menu. Figures 1.58 and 1.59 show that the soft proofing is set up for a Canon Pro 100 inkjet printer output on Luster paper. Once selected, the monitor displays a preview, and Gamut Warning can be chosen to preview any out-of-range colors, just as was done with the CMYK Preview. In Figure 1.60, the Gamut Warning for the Canon Pro 100 on Luster paper is shown, indicating
some adjustment should be made to better match the printer’s range.Typically the issue is one of too much color saturation in certain hues. Photoshop has a method of selection, known as Color Range, that can select just the Out-of-Gamut colors, and use that selection area to create a Layer mask in an Adjustment layer that corresponds to and only affects those colors. In Figure 1.61, 1.62, and 1.63, you can see how those colors are selected using Color Range.
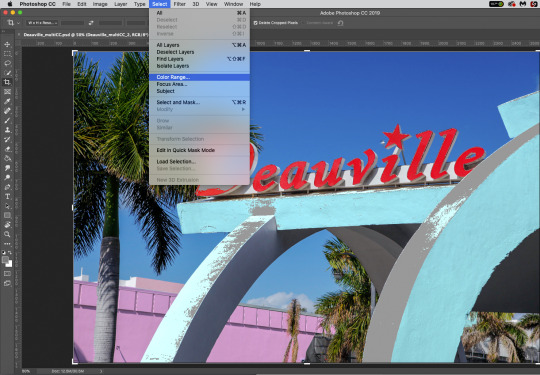
Figure 1.60 Gamut Warning Inkpress Luster paper
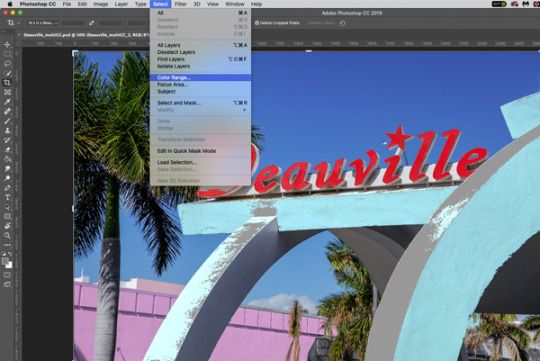
Figure 1.61Select>Color Range
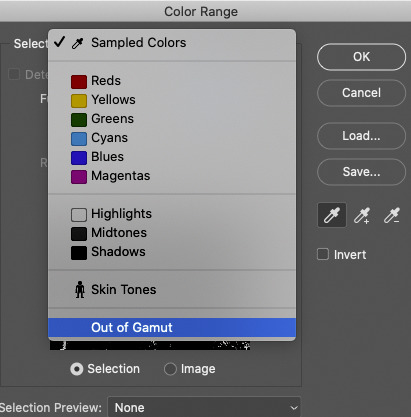
Figure 1.62 Color Range>Out of Gamut
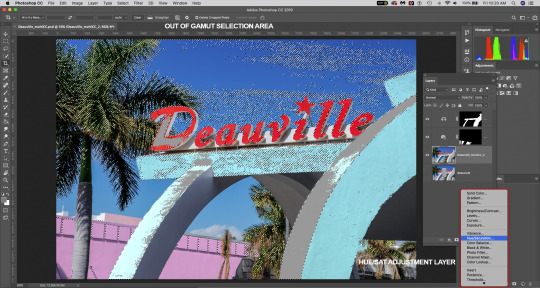
Figure 1.63 Out of Gamut Selection area, Hue/Saturation adjustment chosen
A Hue/Saturation adjustment was chosen, and a Layer mask is
automatically created revealing only the out-of gamut colors selected.
Here, an overall reduction of Saturation in the Master range(all colors),
brings the image into the printer’s output range on the Luster paper
stock. Figure 1.64 shows this clearly, as the gray overlay from the
Gamut Warning has largely disappeared.In Figure 1.65, some
Saturation is returned to the Reds by an additional adjustment to the
Hue/Saturation layer which is still within the printer’s range.
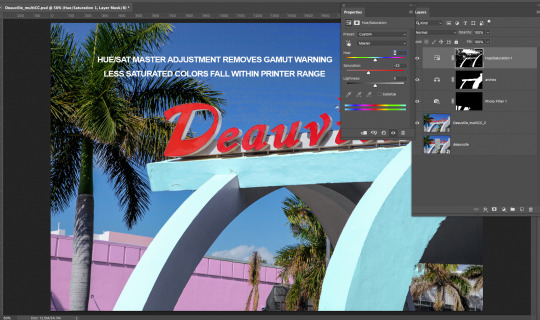
Figure 1.64 Hue Saturation adjustment applied
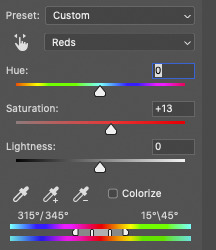
Figure 1.65 Red saturation increase
Now that we’ve determined that the colors will print very close to
the screen image by employing Soft Proofing, our next step is to set up
proper Color Management settings for printing. To do that, we’ll choose
FIle>Print.The highlighted pulldown menus of the Dialog box that pops
up from choice are shown in Figure 1.66

Figure 1.66 Photoshop Print Settings
At the top is the Printer chosen, and then the key color management settings are selected. Under Color Handling, Photoshop Manages Colors is chosen so that all our calibrated color adjustments to the image are sent directly from Photoshop to the printer. If we chose Printer Manages Colors, the Printer will alter those color numbers again, which will result in the color being incorrect. The Printer Profile determines how those colors fit into the range of the paper stock and printer, so the correct paper profile must be chosen here. The
Rendering Intent determines what method Photoshop will use to map those colors to that Printer Profile. Relative Colorimetric is generally chosen as the most accurate, although Perceptual can often work as well, particularly on very saturated color images. The preview image to the left of these pulldown menus will show the effect of choosing a different Rendering Intent. The visual difference between Perceptual and Relative Colorimetric is often small and subtle, and is a matter of personal choice and very specific to the image content. The other two options, Absolute Colorimetric and Saturation are not generally used for photo inkjet output. Saturation works best on graphics like pie or bar charts. Absolute Colorimetric is sometimes preferred by commercial
printer for their press setup. See Figure 1.67.
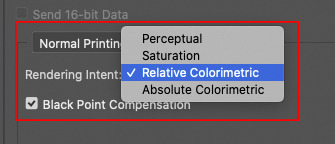
Figure 1.67 Rendering Intents
Black Point Compensation is checked by default. This generally preserves shadow detail in the image by mapping the deepest black to a black level the printer can reproduce.
Normal Printing is also selected by default, and is the correct setting for most direct printing to an inkjet or other photo quality printer.However, one can take the “Soft Proofing” on screen to another level,known as Hard Proofing. A Hard Proof is a printed output that simulates the CMYK output of a printing press on a photo quality printer. To generate this output, you should choose Hard Proof instead ofNormal Printing, as shown in Figure 1.68. Choose Working CMYK as the Proof setup, which will use the CMYK Proofing Profile selected in the Edit>Color Settings menu, seen in Figure 1.69.
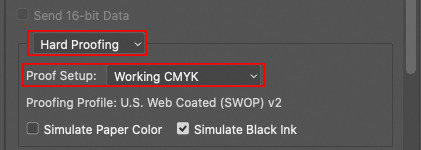
Figure 1.68 Hard Proofing
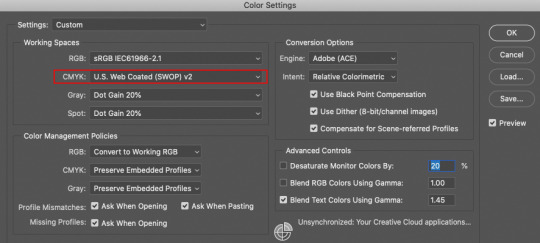
Figure 1.69 Color Settings
Scrolling down in the dialog box allows you to setup the orientation(horizontal or vertical) and scale of the image on the paper,as well as adding any printing registration marks that may be required in a “Proof” print provided to a commercial printer. See Figure 1.70.
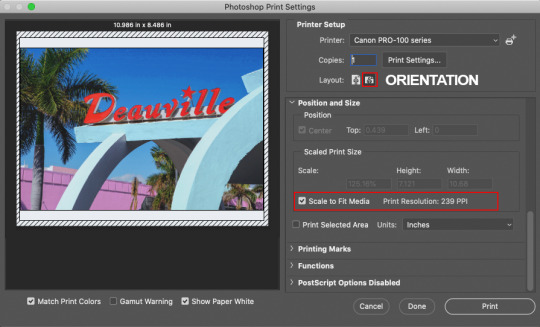
Figure 1.70 Print output Scale and Orientation
Once the color management settings, orientation and scale are all selected, the last step is to Click on Print Settings at the top under Printer Setup. The dialog box that appears will vary with the printer brand and model, and here you will see the dialog box for a Canon Pro 100 printer as an example. Several pulldown menus should be addressed here, as they will have an effect on the final output.
Figure 1.71 Shows several key options:
• Paper Size
• Media Type (Paper chosen)
• Paper Source( single sheet from tray, straight-through feed, or roll)
• Print Quality (Draft, Standard or High)

Figure 1.71 Paper size, Quality and Media, Source, and Print Quality
Figure
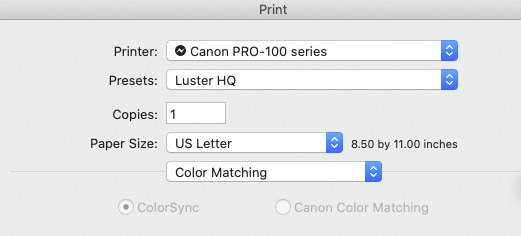
1.72 Color Matching
Figure 1.72 Shows the pulldown menu option for Color Matching, under Quality and Media. Color Matching allows you to choose whether you use the System’s Color Matching(in this case Apple’s ColorSync) or the printer’s Color Matching. This Option is grayed out here because we have chosen Photoshop Manages Color,which uses the System’s Color Management, which is the recommended workflow for accurate color reproduction. Once these settings are established, they may be saved as a Preset under the Preset pull down menu. This is highly recommended if you regularly print on the same paper stock. See Figure 1.73. Click the Save button at the lower right of the dialog box to return to the Photoshop Print Settings menu, then click Print.
Once you have all these settings in the dialog box selected as required by your particular printer, you should save them as a Preset, particularly if you use the same paper type regularly. Figure 1.73 shows the pulldown menu for Presets.
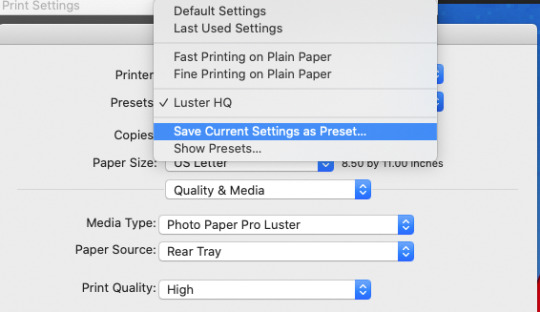
Figure 1.73 Save Current settings a Preset
Now you’ve learned a bit about Photoshop’s Interface, Workspaces, and Tools. You’ve also seen how you can make non-destructive edits using Adjustments, Selections, and Masks. Lastly you now know different ways to Save and Export your images, including Print output. I’d love to see what you can do with this knowledge-Send me a link to your images!
0 notes
Photo
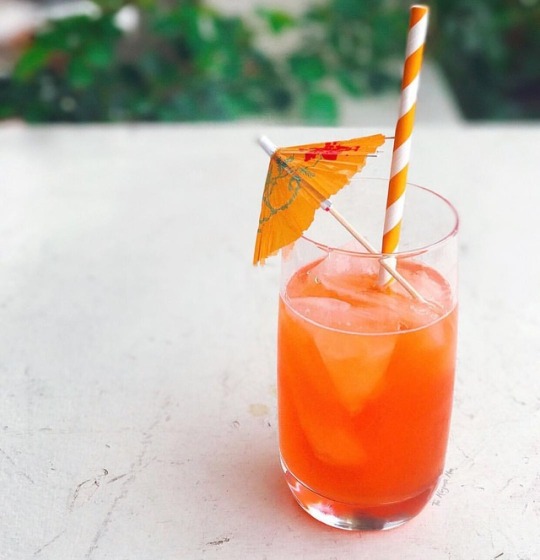
Mid-Week Motivation: Looking for a margarita treat without the guilt? Please enjoy my Blood Orange citrus Margarita with only 122 Calories. . Recipe: . 30mls @casamigos Anejo tequila 15mls @cointreau_officiel 60mls ALT Blood Orange and Citrus naturally sweetened soda (bought at @woolworths_au ) 15mls freshly squeezed lime juice . Result: A 'bloody' fabulous Citrus Taste Explosion 💥 _____________________________ Nutritional information: I am not a nutritionist or dietician- I have calculated these results based on research: . ⏺Tequila 30mls 64 calories 0 carbs. ⏺Cointreau 15mls 47 calories 3.5 grams carbs. ⏺ Blood Orange soda 7. calories 1.5 grams carbs ⏺15mls lime juice 4 calories, 1.3 grams carbs TOTAL: 122 Calories, 6.3 grams carbohydrates . . . . #margarita #margaritas #cocktail #cocktails #lowcarb #lowcalorie #bloodorange #bitters #cocktailart #orangeisthenewblack #mixology #thirsty #slurp #cocktailporn #drinkoftheday #tequila #cocktailphotography #weightloss #detox #homebar #antioxidant #craftcocktail #drinkstagram #thefeedfeed #feedfeed #f52gram #imbibe #imbibegram #craftcocktails #margs (at Bentleigh, Victoria, Australia)
#bloodorange#imbibe#margs#orangeisthenewblack#mixology#cocktail#weightloss#cocktails#craftcocktails#feedfeed#margarita#craftcocktail#slurp#thirsty#lowcarb#margaritas#antioxidant#f52gram#lowcalorie#thefeedfeed#imbibegram#cocktailphotography#bitters#detox#drinkstagram#cocktailporn#drinkoftheday#cocktailart#homebar#tequila
2 notes
·
View notes
Text
Chocolate Orange Latte (with instructions for a Hot Chocolate version)
Toasty cinnamon and clove over a base of chocolate and coffee, with a bright finish of winter orange. Can easily be made into a coffee-free version as an extra special hot chocolate.
Ingredient measurements are in most case guesses, since I don’t cook by measuring much. Try this out and adjust for your own tastes—you may want more orange, less cinnamon, or less of everything, because I like things to rely more on flavor than sweetness. On that note, this drink has no sweetener in it besides what’s in the chocolate. If you use baking chocolate, add sugar to taste.
Ingredients:
measurements for one large drink
1 cup milk
the zest of one large orange
1 cinnamon stick
~1 tsp vanilla extract
4-5 cloves
1/2 TBS cocoa powder
~1/4 cup roughly chopped chocolate
1.5 cups strong coffee
Instructions:
1. Begin by infusing the milk. Add the milk, cinnamon stick, cloves, vanilla, and orange zest to a saucepan. Heat on med-high heat until it begins to simmer—make sure it doesn’t foam and boil over. Heated milk is notorious for that and it makes a huge mess.
2. Once it’s simmering, turn off the heat and leave to infuse for 10-15 minutes.
3. In the meantime, make your coffee by whatever method you like best. It should be made a bit stronger than usual, but you don’t need to make it double strength or anything.
4. Strain the milk through a cheesecloth or a fine mesh strainer to remove all the spices and orange zest. Feel free to squeeze the orange zest (unless it’s still very hot—check first) to get all the stuff out because that’s fun to do.
5. Put milk back in saucepan, turn the heat on medium, and add your chocolate. Do NOT add the cocoa powder yet—instead, get a small bowl, take 2 TBS or so of the milk and put it in there. Add cocoa powder to that and whisk together to create a thick paste, then add that to the pan. This method ensures your cocoa powder mixes evenly with the milk and won’t end up as just in large powder-clumps floating around.
6. Whisk until all the chocolate has melted. Pour milk into a large glass (I use a measuring cup) add your coffee. Pour into a mug of your choice and top with whipped cream and cinnamon powder, if desired.
Ingredient notes:
You can make this as hot chocolate by adding more milk and chocolate and forgetting the coffee. Try 2 1/2 cups of milk (remember, the milk will cook down) and 1/3-1/2 cup of chocolate and 4 TBS cocoa powder.
You can adjust sweetness quite a lot with your chocolate & cocoa powder ratio. Cocoa powder is unsweetened and bitter, so if you want it less sweet, get your chocolate flavor from more powder, less chopped chocolate. And vice versa.
Melty chips are your best bet for chocolate in this recipe. Chocolate chips have additional ingredients that assist in them keeping their shape under high heat, and aren’t designed to be melted down. You can find melty chips in bulk sections of grocery stores. Of course, you can use baking chocolate, or a chocolate bar. Whatever you have on hand and sounds best to you is the way to go. I made mine with milk chocolate, but it would be absolutely delicious with dark as well.
A microplane is best for zesting citrus, but if you don’t have one, you can use the small side of a cheese grater, just be a bit gentle to make sure you don’t get into the pith.
A fine mesh strainer is absolutely one of my favorite kitchen tools. I use mine constantly because I’m always making ridiculous things like this, and the fine mesh will strain anything out of liquid, no matter how fine. They’re well worth the investment of a few bucks, and aren’t as troublesome as cheesecloth can be.
You can probably use alt milk, though I haven’t tried this. I see no reason why it wouldn’t work just as well as dairy milk.
0 notes
Text
New Post has been published on All about business online
New Post has been published on http://yaroreviews.info/2020/12/alden-global-seeks-to-buy-tribune-publishing
Alden Global Seeks to Buy Tribune Publishing
Tribune Publishing has a market value of roughly $470 million.
Photo: Brian Cassella/Zuma Press
By
Cara Lombardo
Close
Cara Lombardo
,
Dana Cimilluca
Close
Dana Cimilluca
and
Lukas I. Alpert
Close
Lukas I. Alpert
Updated Dec. 31, 2020 12:08 am ET
A hedge fund that owns a big stake in Tribune Publishing Co. TPCO 0.31% is seeking to buy the newspaper chain behind titles including the Chicago Tribune and New York Daily News, according to people familiar with the matter.
Alden Global Capital LLC, which is already Tribune’s largest shareholder with a 32% stake, could disclose an offer for the company as soon as Thursday, the people said. Details of the potential bid couldn’t be learned.
Tribune has a market value of roughly $470 million after a yearslong slide as the prospects for local newspapers dim. Its shares are little changed this year and closed Wednesday at $12.79.
Other News in Deals
A deal would have far-reaching implications for an industry beset by sharp declines in revenue over the past 20 years that have led to a wave of consolidation and cost cuts. Between 2008 and 2019, the industry shed 51% of its newsroom jobs, according to the Pew Research Center.
Tribune Publishing, one of the largest newspaper chains in the country by circulation, publishes nine larger-market daily papers, including the Baltimore Sun, Orlando Sentinel and Hartford Courant.
Alden controls MediaNews Group, a private company that owns some 60 daily newspapers around the country, including the Denver Post, San Jose Mercury News and Orange County Register. The hedge fund has a reputation for making deep cost cuts at titles it acquires.
Newsletter Sign-up
Deals Alert
Major news in the world of deals and deal-makers.
In July, Alden cemented a firmer position on the Tribune board, taking control of a third seat out of seven in exchange for an agreement to extend a standstill agreement that prevents the hedge fund from increasing its stake or making a hostile bid until after June 2021.
Consequently, any deal to increase the stake would likely need signoff from Tribune or a significant portion of shareholders unaffiliated with Alden. The company’s second-largest shareholder, with about 25%, is Patrick Soon-Shiong, a billionaire biotech investor who in 2018 bought the Los Angeles Times from Tribune for $500 million.
With the industry reeling from the economic impact stemming from the coronavirus pandemic, Tribune has laid off dozens of reporters and closed many of its newsrooms entirely to save on real-estate costs. Earlier in December, Tribune agreed to sell its e-commerce business, Best Reviews, to Nexstar Media Group Inc. for $160 million.
Write to Cara Lombardo at [email protected], Dana Cimilluca at [email protected] and Lukas I. Alpert at [email protected]
Copyright ©2020 Dow Jones & Company, Inc. All Rights Reserved. 87990cbe856818d5eddac44c7b1cdeb8
Appeared in the December 31, 2020, print edition as ‘Fund Seeks to Fully Buy Tribune Chain.’
0 notes
Text
Overtime - All in a Day's Work - But Whose Day?
Overtime – All in a Day’s Work – But Whose Day?
Overtime Calculation – Why the Definition of “Day” Matters
Overtime in California is day to day. Premium pay is at 1.5 times the regular hourly rate for each hour over eight, and double time for each over 12. Overtime at double rate is also due on the seventh consecutive day of work.
But who defines a “day,” or a “week?” Is it the classical calendar definition of Sunday through Saturday? Or…
View On WordPress
2 notes
·
View notes
Text
Acute Liver Failure. What Emergency Physicians Should Know.
Acute liver failure (ALF) is a rare entity. There are only about 2,000 cases per year, meaning you will probably see this less than once a year at your emergency department. Recognizing these patients and transferring them to a tertiary liver center is crucial. The liver is the new frontier. The mortality gap between management in a typical community ICU and a specialized liver center is enormous. If you are not at a liver center, and you keep the ALF patient at your hospital, the expected outcome for the patient is death. If you transfer to a liver center, the expected outcome is recovery (with or without transplantation). The contrast is that stark.
Recognizing ALF
There are 4 criteria:
The patient does not have pre-existing cirrhosis
The patient has been symptomatic for less than 26 weeks (half a year)
There is encephalopathy
INR is > 1.5
Grading encephalopathy is not an expectation of the emergency physician, but it is the GCS of hepatologists, and guides management. I recommend attempting this endeavor. My interpretation, hitting the high points for easy memory:
Grade 1: Patients are alert and oriented, but may be a little goofy. Poor concentration and reversal of sleep rhythm are the hallmarks. Obvious asterexis suggests at least grade 2.
Grade 2: Asterexis is obvious. There is some drowsiness and disorientation.
Grade 3: Somnolent, but can arouse to voice. Able to speak, but will give an incoherent history.
Grade 4: Either completely unresponsive, or only arouses to pain.
Note that the INR is the most important liver function test. You can have AST and ALT of one billion; if your INR is normal, you don’t have liver failure. Conversely, AST and ALT can be normal; if your INR is high, you may have liver failure. Always order it when liver disease is suspected.
Fulminant hepatic failure (FHF) is a subcategory of ALF. This is defined by an ALF patient who went from no previous liver disease to hepatic encephalopathy within 8 weeks.
Arrange transfer to a liver center
This is more important than trying to find out the cause. The cause should not change this decision. The vast majority of these patients are young and can live long and healthy lives if their ALF is reversed. Liver centers do more now than just transplantation. Liver failure is arguably more complicated than the failure of any other organ. Liver centers have a multidisciplinary team involving gastroenterologists, neurologists, neurosurgeons, transplant surgeons, and infectious disease. They now have artificial liver technology, liver dialysis, extracorporeal nanorobotic shit teleported from the future…
The bottom line is, if you happen to drink yourself until your eyes turn orange, you’d want to be transferred to a liver center. Do the same for your patient.
What else to do for the really sick ones?
The number one cause of mortality in ALF is cerebral edema. Any ALF patient with grade 3 or 4 encephalopathy should be treated similarly to a severe TBI. These patients should be intubated, head of the bed should be elevated to 30 degrees, and mannitol should be discussed with the accepting doctor. Lactulose should be given per NG tube. A head CT should always be ordered. Advanced cerebral edema can be detected, and ICH often complicates or mimics hepatic encephalopathy.
The number two cause of mortality is infection. If the patient is sick, just give Zosyn. If the antibiotic sleuths from upstairs talk about, “What are you treating?” Just answer, “Yo mama.” If there is significant ascites, diagnostic pericentesis should be performed. If the fluid has an absolute neutrophil count >250, spontaneous bacterial peritonitis (SBP) is diagnosed, regardless of symptoms. With ultrasound guidance, this procedure can be safely performed in 5 minutes.
The number three cause of mortality is bleeding. If there is any scary bleeding, you must correct coagulopathy:
Give PRBC in the same manner as you would in a patient without ALF.
Start with 4 units of FFP. 1 or 2 units will not be enough.
Give platelets if the platelet count is <50,000
Give cryoprecipitate if the fibrinogen is <80. Oh yeah, order a fibrinogen level.
If there is variceal bleeding, you need to stop it and stabilize the patient before transfer. You may need to involve your local GI guy and intensivist. Two special drugs: octreotide and Zosyn. The official guidelines say something like ceftriaxone, but the sepsis gestapo is out and retrospectively reviewing your chart; and these patients almost always will meet SIRS and end organ injury.
ALF patients are often hypotensive. They may have significant peripheral edema, but they are intravascularly depleted. Bolus fluids up to 30mL/kg. Also add albumin. Hepatic failure and hypotension is the only scenario I give albumin. I give 25g of 25% solution. If MAP is still less than <65, I use the lactic acid. If it is normal, I do not start vasopressors unless the accepting doctor demands it. Many liver patients are baseline hypotensive and forcing a normal blood pressure with vasopressors may be detrimental.
Keep the patient NPO and check the glucose every 1-2 hours. These patients get hypoglycemia hard. They may die from hypoglycemia. These patients will require much more glucose to reverse hypoglycemia, and they will take longer to clinically recover from hypoglycemia.
Give N-acetylcysteine (NAC) for Tylenol poisoning and Amanita mushroom poisoning. For Tylenol poisoning, Tylenol levels are useless by the time ALF develops, and are usually 0. NAC is still hepful. For amanita mushroom poisoning (which mainly occurs in California, Oregon, Washington), add IV penicillin G and PO/NGT silibinin or activated charcoal.
Do not give benzodiazepines unless behavior is completely unmanageable. Benzoes are cleared by the liver, and will make the patient’s exam unreliable for a very long time. If fact, if the patient develops seizures, phenytoin and not a benzo is the first line. If the patient is intubated, propofol is good for agitation. If a benzo must be given, I recommend small aliquots of Versed.
Take home points
Identify ALF: No known cirrhosis, symptomatic for <0.5 years, INR >1.5, hepatic encephalopathy
Aim to transfer all patients with ALF to a liver center
Always get a head CT
Sick or not sick? Give Zosyn to everyone who is sick
Severely depressed LOC? Intubate and assume elevated ICP.
Bleeding? 4 units of FFP.
Hypotensive? 25g of 25% albumin and fluid boluses up to 30mL/kg
Check the glucose often. Treat hypoglycemia aggressively.
Don’t give benzodiazepines
1 note
·
View note
Text
Performance Photos of Zara and Hana

More photos of Zara (as Howard) and Hanna (as Seymour) in action!
Credit seems to be @/shonalouiseblog, but correct me if that’s wrong
#zara macintosh#hana stewart#six musical#six the musical#six west end#six alternates#pink alt#pink alt 1.5.1#pink alt 1.0#pink alt 1.5#orange alt#orange alt 2.0#orange alt 2.3#orange alt 2.3.1#courtney bowman#anne boleyn six#boleyn 2.0
85 notes
·
View notes
Text
Week One / January 8 - January 14
Sunday 8 January 2017
4:37pm - Auckland, New Zealand
Today, I set off on my journey. Mum, Dad, Chadz, Nana, Grandad and Amanda came to see me go. We said goodbye at the airport, and I know that if I’d turned around to wave them goodbye properly, I would be crying for days. I was still crying when I sat on the plane. The lady next to me made sure I was okay, giving me hugs and sharing her own experiences of he exchange. She’d been back in New Zealand for six years and shared lots of stories about her love life and job. She’s a chef, and prior to returning to New Zealand, had been overseas for 25 years, learning how to cook. She helped a lot. Currently sitting just outside duty free in Auckland International Airport, waiting for my gate to appear on screen. Too nervous to vlog at this moment - maybe I’ll start once I get to France, on the prep course.
6:53pm - Emirates Plane AKL - BNE
Meal has just been served. For dinner, I have a mini fruit salad, dried fruit, fruit bread, water, salmon (both hot and cold), with a mini salad (lettuce, a cherry tomato, some other vegetable I think) and hot carrots, courgette and mashed potato and a little chocolate too!! I’m going to eat while watching ‘The Light Between Oceans’ - I now don’t have to pay $10-$16 for it! Going to eat, drink and then sleep - my priorities for the night!
7:04pm - Emirates Plane AKL - BNE
The other vegetable in the mini salad is cold cubed potato.
4:23pm - Emirates Plane AKL - BNE, AU Time Zone.
Cold cubed potato is not nice. Also, gluten-free bread is always dry. That’s okay! I added the dried fruit and have orange juice now too! The highest abomination is that the FRUIT SALAD HAS GRAPES WITH SEEDS IN IT!! SEEDS!!!
7:05pm - Brisbane International Airport, Gate 75
Arrived at about 6:45, took about twenty minutes to leave the plane. I went up to Gate 75 to transfer, and found it completely deserted! Needless to say, I started crying because !! I’m in a new country, there’s no passengers or staff around, and I don’t know if I’m supposed to be there or not. At this point, a wonderful young family, who were waiting for their daughter, came up and asked what was wrong. After explaining the above predicament, they assured me that everything was fine! Although, they did say then say that they were on the same flight and didn’t know where to go. At least we had each other! I entertained their two year old and chatted with the mum while the dad went to find answers.
Unknown time, somewhere over Northern Australia
I slept for three hours, had dinner (chicken breast, mini salad, bread roll, chocolate brownie) which was great! Chicken breast came with mashed potato and tomato paste, both of which I mixed together and put on the roll as gluten-free rolls are BLAND, and mint mushy peas. Chicken itself was lovely! Salad came with a slice of chicken, chopped tomatoes and cucumber and spinach - yum! But the BROWNIE was so good - so rich and chocolatey! I had two glasses of apple juice and one cup of water too. Now my eyes are straining, so I’ll head to sleep. There’s a super nice flight attendant called Charlotte who calls me Miss Maisie. She’s from England. Also, HELP! My nose is running and I only have two hours left to last 11 hours!
Monday 9 January 2017
1:55am - Emirates Flight BNE - DXB, above Colombo, Sri Lanka
According to the screen, we have 4 hours and 20 minutes left to Dubai. I’ve used all my tissues so have resorted to using the ones in the bathroom - which is both a negative and a positive as I’ve run out of tissues but at least it lowers my chances of deep vein thrombosis! I just popped up to the galley to ask for water or juice , it seems like I slept with my mouth open - it’s all dry and funny! I may go brush my teeth on my next trip for tissues. My in-flight entertainment unfortunately has not been working the entire flight - it used to only play Finding Dory for anything I selected, with no audio, and once that finished, it just went black and I can’t play other movies, tv shows, music or games! It’s alright though. Instead of looking at the flight cameras, which were also affected by the Finding Dory situation, or turning off the screen (ditto), I’ve been doing homework that’s I’ve set myself (Year 12 French textbooks), been sleeping, or been playing games on my phone. Fingers crossed that it works on the next flight! I’d like to watch the last half hour of The Light Between Oceans and then the movies below:
Imperium: Harry Potter pretends to be Muggle white supremacist (alt-right?) to get information for the police.
The man next to me was watching it and I saw a clip on Graham Norton, so I know it looks interesting!
Finding Dory: Ellen Degeneres finds herself.
Good reviews from my brother and sister. Let’s hope it doesn’t break my entertainment system again!
I JUST LOOKED UP AND THE AISLES HAVE TINY LIGHTS THAT LOOK LIKE STARS. I love space. So much. I’m sitting next to the Big Dipper! Obviously I’ve never seen it before, having lived in the Southern Hemisphere all my life, so that’s amazing! Probably not as cool as the real thing, but I’m still in awe.
I’ve also calculated on my next flight (DXB-CDG), I’m sitting really close to the front, so I can get off quicker! TV Screen up fronts announced there’s four hours now until we land. I might play some Broken Age - Mum, tell Alby that for his birthday I’ll transfer $20NZD into his account, but only if he uses it to buy an iTunes card and get the game. He loves it, after all. I forgot to mention! There’s another exchange student from the same company on this flight, she’s going to France too! Except she’s going home. I just realised my Flight Information isn’t working either. It still says 7628 miles until destination.
3:46am - Emirates Flight BNE - DXB, across from Delhi
I BROKE A NAIL! I was trying to pop my wallet back into the seat pocket and my nail caught on the tray table and snapped! Quite a shame, considering I just got them done two days ago. Anyway, I wanted to write down how many people are watching various films (that I know of and can see)
1x The Magnificent Seven
1x Florence Foster Jenkins
1x Iron Man 3
1x The Avengers
1x The Avengers: Age of Ultron
2x Now You See Me 2 (they’re sitting right next to each other)
8x Bridget Jones’ Baby (at least).
Breakfast is here soon. The lighting for morning is so much better for my eyes than the lighting for the night, but I still have a bit of a headache. Will tell you what I get for breakfast when it comes.
3:21am - Emirates Flight BNE - DXB, somewhere over India
1.5 hours left to go! Breakfast is:
Bread roll (1)
Jam and margarine (1 each)
Fruit salad (pineapple, grape, melons)
Omelette (1)
Baked Beans (1 serving, multiple beans)
Yogurt (1)
Roast vegetables (courgette, potato, pumpkin)
4:04am - Emirates Flight BNE - DXB
Coming into Dubai now. Had a splitting headache so tied scarf tightly around my head and eye. Eye socket feels swollen. Got paracetamol from flight attendant, as mine was in the overhead locker. Started crying because I know Mum always carries parasol on her, so I could’ve asked. Half an hour away from destination, says the screen. 11,791km away from Brisbane. -19 degrees outside.
Unknown Time - Emirates Flight DXB - CDG
Lunch is:
Water
Coleslaw, a slice of tomato, ham, salmon
Fruit salad ( pineapple, melons, a grape)
Gluten Free muffin
Strawberry reserves
Milk
Will be grabbing lemonade asap!
10:21pm in Paris. Emirates Flight DXB - CDG
I just put on Tarzan after the man next to me caught me watching his screen - he’s watching The Shallows. I got confused with time. The previously described lunch was actually SECOND BREAKFAST. I truly feel like a hobbit now. Actual lunch was:
Mini salad (chilli chicken, cucumber, lettuce, lemon, tomato)
Fish and quinoa, broccoli and tomato
Bread and margarine
Chocolate and a little chocolate cake, which had yummy vanilla frosting.
I just got spooked because a man sitting behind me stretched out his foot and I thought it was an animal. Anyway, we’re currently flying over Budapest! This is cool, I’m officially in (or over) a part of the world I haven’t been to yet. An hour and forty minutes left of the flight - just enough for a nap.
10:02am local time - Emirates Flight DXB - CDG
Update! Flying over Germany - caught sight of Munich on the monitor. Only one hour left!
11:37am - Emirates Flight DXB - CDG
The home stretch! I just saw on the map both Lille and Paris - so close now!!
11:41am - Emirates Flight DXB - CDG
27 minutes left!! We are coming up to flying over Ardennes. I’ve also realised my camera won’t turn on, which means iPhone vlogging but that’s okay!! It’s very foggy in Paris apparently - only 700m of vision and you can’t see the sky, but it is clearing up! At least, that’s what the pilot told us.
11:47am - Emirates Flight DXB - CDG
Passed Luxembourg and had the PA for landing.
11:51am - Emirates Flight DXB - CDG
it’s quite unfortunate that the weather is allegedly so dull in Paris, the skies above are beautiful and bright.
11:53am - Emirates Flight DXB - CDG
Passed Reims! Honestly my sense of geography is so bad, I don’t know what that really means, but we look pretty close on the map. Only 16 minutes left until arrival now! My screen says 61 miles until destination, but that means nothing. I’ll have to look at the main screen. Apparently 90km!! Not long now!!! You can tell I’m getting excited by the amount of exclamation marks I’m using!!!
11:75am - Emirates Flight DXB - CDG
9,153ft. Outside temperature is -4 degrees Celsius. I can see Dijon on the main map and am eagerly awaiting seeing buildings below us on the cameras.
12:00pm - Emirates Flight DXB - CDG
We are 61km away, and still above the clouds :(
12:04pm - Emirates Flight DXB - CDG
GOING THROUGH CLOUDS
12:07pm - Emirates Flight DXB - CDG
Still going through clouds. Watching three different screens to see different angles of plane. Looking at the screen of the main next to me, we’re getting close! On my screen, I can see dark through the clouds but nothing definitive yet. The outside temperature is 2 degrees celsius, I’m expecting it to stay around this temperature due to the winds and general winter coldness.
12:10pm - Emirates Flight DXB - CDG
The cameras were blocked by cloud for a bit and then we came through that… to see more cloud. At this point, Paris may as well just be Cloudland.
12:12pm - Emirates Flight DXB - CDG
Definitely in fog now, the tail camera is getting wet I SEE THE RUNWAY
12:13pm - Emirates Flight DXB - CDG
Landed. It is 5 degrees outside. It is surreal just being on the runway.
2:44pm - the TGV to Lille
I had to run to get the train! My representative met me after I collected my baggage. We went to Paul, a patisserie (I’m making the assumption it’s like Brumby’s, as I saw two of them in Dubai Airport as well). I got a ‘le Parisienne’ - that is, a ham sandwich. She also bought me a chocolate tart for the trip, as well as water. And now I’m zipping through the French countryside, trying to catch my bearings. I’ll be in Lille at 15h37 according to my ticket.
Tuesday 10 January 2017
17h38
So sorry for not writing! We had a bunch of activities and dinner, after which, I was too tired to write. We had tartan at L’Arriere-Pays followed by crêpes for dessert. Before that, we quite literally got lost in the streets of Lille, and had to ask for help. We stopped at the supermarket and H&M, the latter of which had Wi-Fi. We also stopped at Notting Hill Coffee for… coffee, where we people-watched. This morning, breakfast was a slice of apricot jam toast, fruit and juice. We had classes today, going over the rooms of the house, school, holidays and body parts. We also had ‘galette du rois’ for l’Epiphanie. We broke for lunch - ciabatta with ham and cheese, pain au chocolat, water - and managed to get lost again by retracing our steps from the night before. We stopped by H&M so I could grab tights, and I stopped by the supermarket again to buy two packets of lollies for Alby’s birthday, just like he asked. He also asked for a souvenir from France, so i might pick one up tomorrow when we do our day trip to Paris. Iris at this moment is getting the same, unless she messages me asking for something else. I did see a cute shop I might go to and see if there’s anything. I’m going to head off for dinner and then I think we’re doing laser tag. Talk tomorrow about Paris and laser tag!
Wednesday 11 January 2017
9h04 - the TGV from Lille to Paris
We haven’t left Lille yet, maid aujourd’hui, nous voyageons à Paris! I think that the plan is to go to Sacre Coeur, then the Louvre, the down the Champs-Elysées to l’Arc de Triomphe and then La Tour Eiffel. if we have time, we’ll go to Notre Dame. When we get back, there’s going to be a trip to the shopping mall if we’re not too tired. A man has sat next to me, and I don’t know if he knows that I speak French or not. Going to put this away and do some reading Much love, will talk on the way back. Fingers crossed that I’ll vlog from Paris!
Saturday 14 January 2017
10h15 - Perpignan
I have so much to write about!
In keywords:
Laser tag was exhausting, but tremendously fun
Paris was beautiful, I vlogged, it looked like pictures
La Piscine (the museum) was gorgeous
The train was long, I slept
Perpignan is also gorgeous. Ma famille d’accueil sont très sympas.
In detail:
Laser tag! After dinner at La Chicorée, we went to laser tag, where we had two twenty minute games and we found out just how competitive everyone is. In the second game, we played teams, and the blue team (not mine) figured out how to attack us from above.
Paris was amazing! We visited Sacre Coeur first, where I was swindled out of five euros, but then I found five euros on the side of the street so all was restored in the world. We then went to the Louvre, and ate lunch there. Unfortunately, we didn’t go inside, but the pyramid itself is gorgeous (I use that word a lot, I’ve realised in this entry.) It was just surreal. We next wandered along to Notre Dame, where all I could think of was Philippe Petit, the tightrope walker (The Walk is one of my favourite films, and Joseph Gordon-Levitt one of my favourite actors.) The inside of the building is BEAUTIFUL, After that, we went to the Eiffel tower, which was very exciting, and I bought two Eiffel tower souvenirs for Iris and Alby. After that, we went to the Arc de Triomphe. where alas, we couldn’t go up. That was because as under-18, we were free, but we also needed an adult with us. We then wandered the Champs-Elysées, where I bought a new knit jacket from Zara. On Thursday, we went to La Piscine, which is a museum in Roubaix. The story behind the name (which translates to ‘swimming pool’ in English) that the main building itself used to be a swimming pool. You have to go through an old changing cubicle (or at least, we did) to get to the museum. The main hall’s architecture is beautifully structured, with high ceilings and coloured glass in the shape of the sun. There’s many sculptures spanning the length of the old pool, and even more in other rooms. There’s even more paintings in all the rooms, and even one on the ceiling!! And yesterday, I caught the TGV from Lille Europe to Paris Nord, from Paris Gare Lyon to Perpignan - all in all, it took six hours, which was okay because I slept most of the time. I can’t say much, it was nice and warm on the train. I was picked up at the station by Marc, Rose, Marion, Myriam, and Myriam’s student, Clara. We went to school and I got my timetable and textbooks. I’m in Premiere-L, or Premiere focusing in literature (English literature or litterature anglaise is one of my subjects). I thought I was going to be in Seconde, which meant struggling through maths again! We had pizza for dinner. Today, I’ve been sitting at the dinner table while Marion does homework, I work on both the blog and the vlog, Rose makes lunch, and Maxime plays rugby. I’m about to find music for the vlog, but I think that tonight (or this afternoon), we’ll head out to get school supplies and anything else I need, like my bus card, shampoo and conditioner, etc. There may be another update tonight, otherwise I’ll chat next week.
1 note
·
View note
Last Seen Blogs
bad-k1tty-blog
Bad Kitty ;p

saint-collection
Collection

rex-n-leif
do you want another butthole?


queerbookwhore
Queer Book Whore