#r36
Text
31st Oct - 3rd Nov 23
I got to spend nearly the whole week with my darling @tranitron ! It was wonderful look at all this !!
youtube
We performed some songs together for an audience of friends and recorded it to reel to reel tape, I warmed up the crowd with a the blues I've been writing then we sang The Girl I Left Behind Me (folk song), This Year (The Mountain Goats) and Stay Forever (Ween) as well as True Trans Soul Rebel (Against Me!) as a finale.
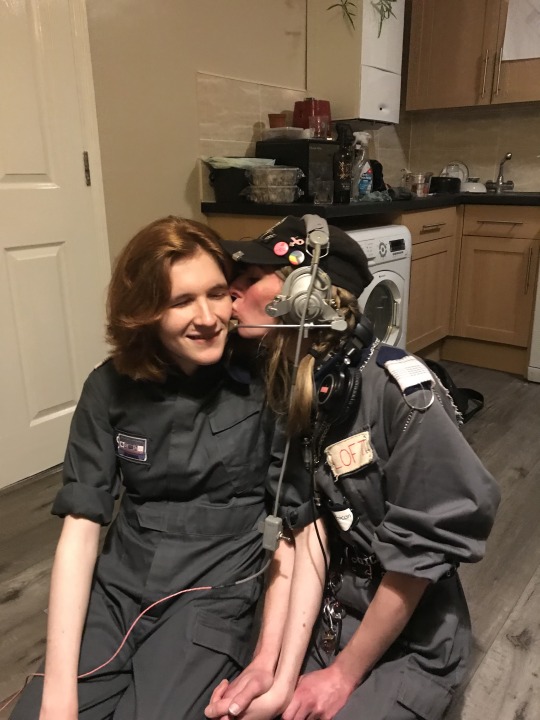
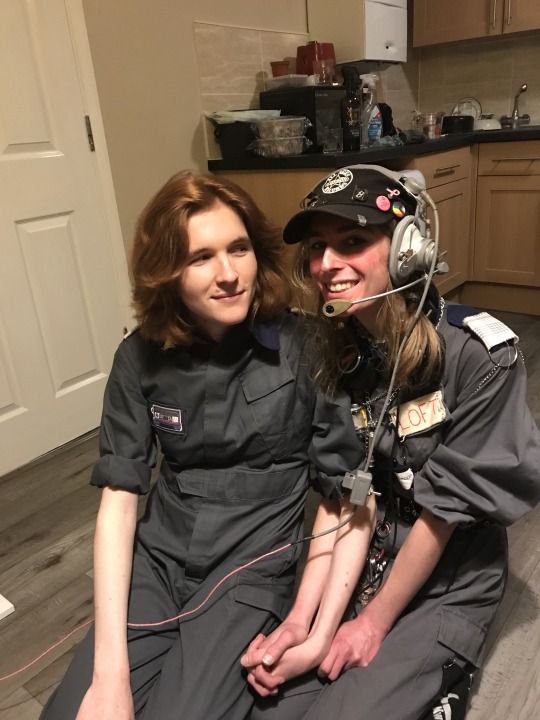
Here we are just after performing (I'm wearing her headphones). c:
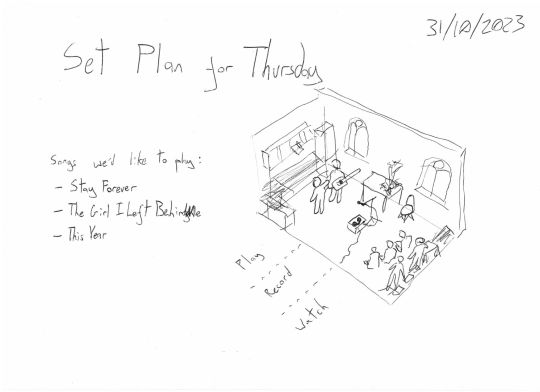
Christie even drew up a plan ! ^-^
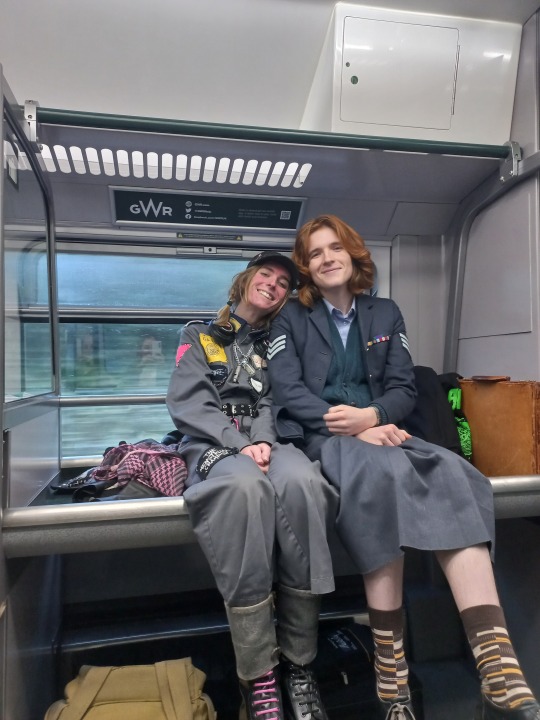
Here we are on our way into Bristol sat in a cute little luggage compartment c:
These are just some documented highlights of the most recent of all the magical adventures I get to spend with her <3 Until next time ~
10 notes
·
View notes


Video
youtube
R36 Nissan GT-R Nismo Concept Design by hycade (Part 4)
#concept cars#concept car#concept design#nissan#nissan gt-r#r36#r36 nissan gt-r#gt-r#r36 nissan gt-r concept design#hycade
2 notes
·
View notes
Text

never again is what you swore the time before
0 notes

Text


🤎 MK5 R36 🤎
#tea's car collection#Volkswagen#volkswagen golf#golf mk5#mk5 r36#german cars#european cars#cars#car photos#car photography#bagged cars#stanced cars
24 notes
·
View notes
Text
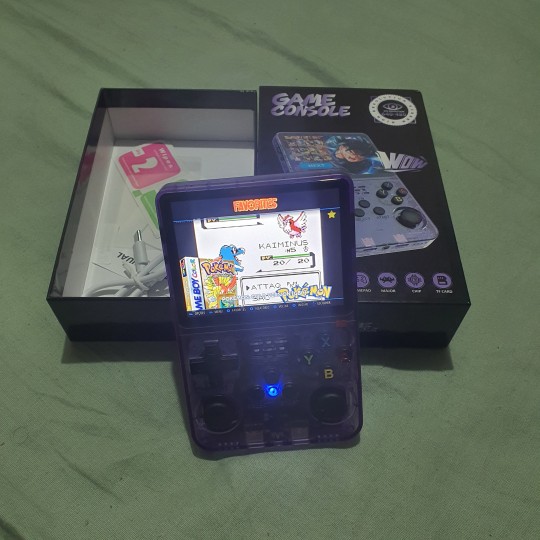
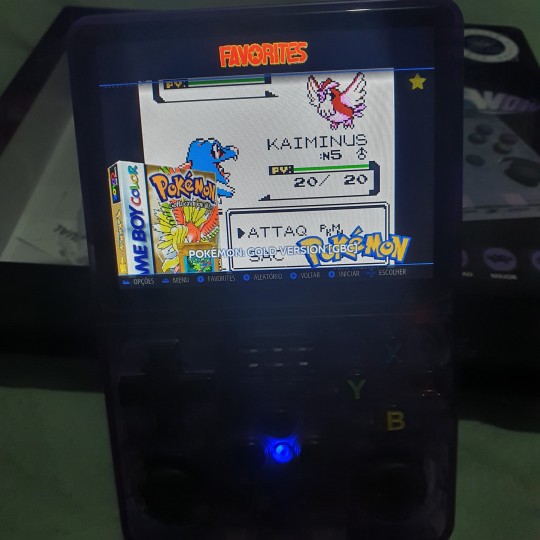
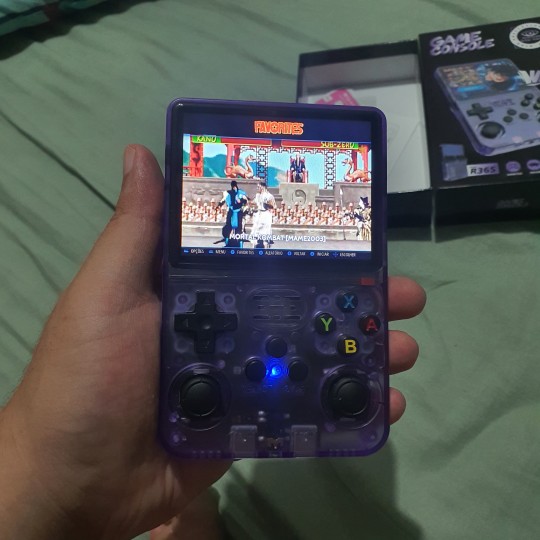
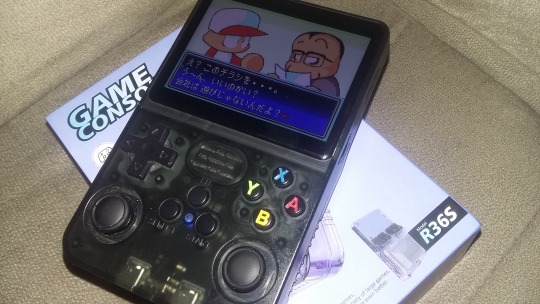
Portátil R36S: Review e guia de instalação
Portátil R36S: Review e guia de instalação
Graças ao saque-aniversário e o 13º no Novembro passado, pude me dar o luxo de comprar um portátil de emulação relativamente barato no Aliexpress visando o maior custo-benefício possível. Depois de consultar alguns videos e artigos, escolhi um R36S da Data Frog que estava por 190 pratas durante a Black Friday.
A encomenda levou quase um mês, boa parte disso presa em Curitiba e cobrando uma…
View On WordPress
1 note
·
View note
Note
hey if you write a pattern for the chilchuck amigurumi I will buy it instantly
ive gotten multiple asks about this, so ill just answer them all here in one go.
i wrote down everything while i was working on it, but i theres some stuff that i would do diffrently and i also didnt take a lot of process pics so it wont be a full proper pattern for those reasons, but ill add all that i have under the cut!
i dont want any compensation, but if you wanna do me a favor you can donate to esims for gaza, unrwa, any of these gefundme's, or another trusted charity of your choice.
now to the pattern! i would love to see the results of anyone making a squeakychuck, feel free to tag or dm me :)
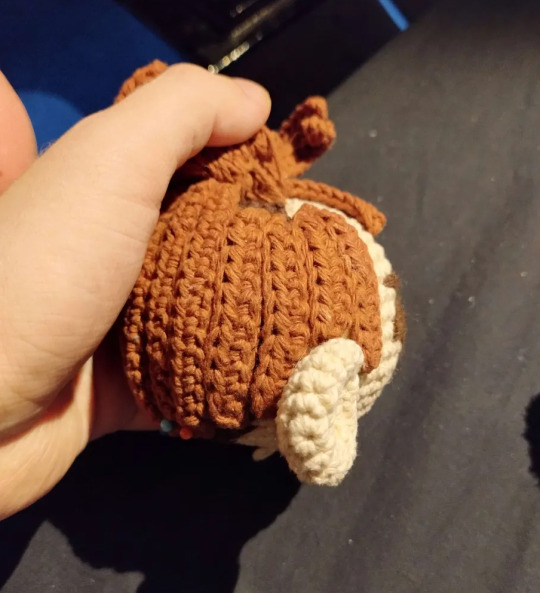
the dimensions of this depend on the size of ur squeaker and yarn, i had a 4ish cm squeaker and somewhat thick 4/8 cotton yarn (kinda 6/8ish thickness). depending on ur yarn and squeaker u might need to follow a different pattern for the body.
if youre using a different body base pattern, the tunic and blouse pattern are pretty easily adjustable. ill add some notes for that at those sections of the pattern. ill also link some videos i used at relevant sections.
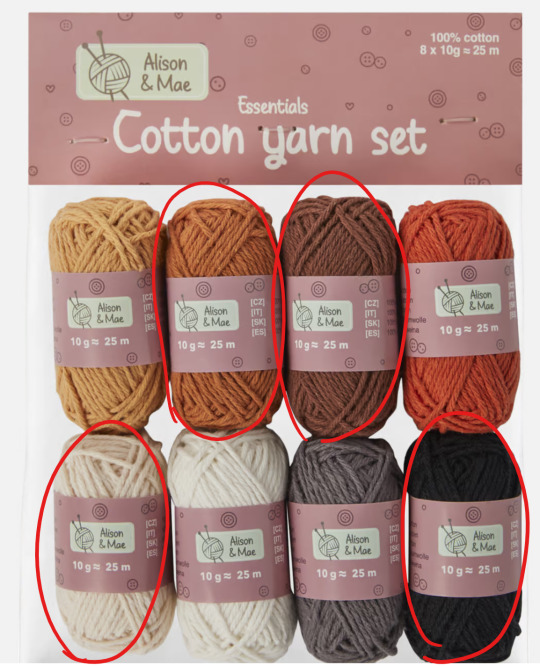
if theres an Action store near where u live, see pic below for the yarn i used for the skin, reddish brown, black and light brown. i got 3 of these but 2 packs was enough. the dark brown and creme were from my stash. i also got the squeaker from a donut dog toy from Action.
-
abreviations list (all in us terms):
mr = magic ring
sc = single crochet
hdc = half dubble crochet
slst = slipstitch
ch = chain
bobble = 5 double crochet in one stitch
4inc = 4 sc in one
4 inc = increase in the next four stitches
BLO = back loop only
FLO = front loop only
what you need:
-skin color of choice yarn
-creme/white yarn (normal for body, thin for blouse)
-greyish creme (for boot flaps)
-black yarn
-dark brown yarn
-light brown yarn
-reddish brown yarn
-green yarn
-4 tiny buttons (for arm joints)
-cardboard (for shoe sole
-3.5mm hook
-squeaker
-needlefelt needle
-stuffing
-stitchmarker (optional, i always mark the first stitch of the round)
-
once again disclaimer, this is not a propper pattern, this is just what i wrote down while i was crochetting. it may not nessecarily be the best way to do it. i wanted most clothes to be removable, but you have to partially disassemble the doll if you want to remove them. if you dont like how something looks or works ur free to do whatever you want. big fan of fucking around and finding out personally.
if you have any questions feel free to dm me, might take me a while to reply though.
-
SQUEAKY CHUCK PATTERN 3.5mm hook
head (skin)
r1: sc 6 in mr
r2: (inc) x6
r3: (sc 1, inc) x6
r4: (sc 2, inc) x6
r5: (sc3, inc) x6
r6: (sc4, inc) x6
r7: (sc 5, inc) x6
r8-15 : sc 42
r16: (sc 5, dec) x6
r17: (sc 4, dec) x6
r18: (sc3, dec) x6
r19: (sc2, dec) x6
r20: (sc 1, dec) x6
r21: sc 12
slst, fasten off
ears x2 (skin)
r1: sc6 in mc
r2: (inc) x6
r3: (sc, inc) x6
r4-6: sc 18
r7: dec 9. slst fatsen off.
Body - leg up (skin, black, thick creme)
start with skin
r1: ch 6, inc in 2nd from hook, sc 3, 4inc, sc 3, inc
r2: inc 2, sc 3, inc 4, sc 3, inc 2
r3: inc 3, sc 5, inc 6, sc 5, inc 3
r4: BLO sc in all
r5: sc 3, dec 2, sc 3, dec 2, sc 6, dec 2, sc 3, dec 2, sc 3
r6: sc 1, dec, sc 4, dec 6, sc 4, dec, sc 1.
r7: sc 6, dec 3, sc 6
stuff
-r8 dec, sc in all
change color to black [color change video]
r9-23: sc in all
1st leg: fasten off
2nd leg [joining legs video]:
r24: sc7, ch 1, sc join in 1st leg after last sc, sc13, sc1 in visible v loop of ch1, sc 7
r25: sc7, sc 1 in remaining v loop of ch1, sc21
r26-31: sc 28
r32: sc 7, change color to creme/white, slst 1, sc 20
r33-35: sc 29
r36: (sc 8, dec) x3
r37: (sc7, dec) x3
r38: (sc6, dec)x3
add squeaker
r39: sc21
r40: (sc 5, dec) x3
r41-42: sc18
r43: (sc 1, dec) x6
fasten off
Arms (skin, dark brown)
i made the arms movable with button joints, but after looking at some videos i discovered that what i did is not called a button joint and i dont have a video explaining it, so i hope this drawing helps.
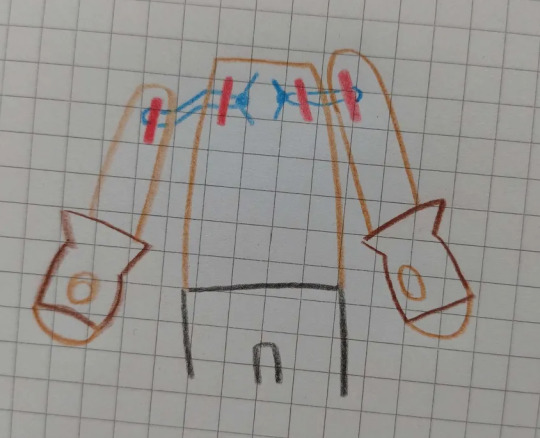
the red bits are the buttons inside of the arms and body, and the thread (blue for clarity, i matched it w the skin) should be pulled tight and finished off with a double or tripple knot inside the body.
or you could just sew on the arms that also works. but wait with doing that until youve finished the blouse as the hands dont fit through the sleeves. i have a seperate section on assembly at the end of the pattern.
start with skin
r1:sc6 in mc
r2: inc x6
r3(sc, inc)x6
r4 : sc 18
change color to brown
r5: sc 18
1st arm r6: sc 3, bobble, sc 14.
2nd arm r6.2: sc 14, boble, sc 3
[i matched the top loop to the bobble color but i think it would look better if u didnt]
r7: sc 18
r8: (sc 4, dec)x3
r9: (sc 3, dec)x3
r10 sc12
color switch to skin (you might want to do this a round earlier, i didnt initially plan on making the gloves flared, and this color change part can sometimes be seen and look kinda weird)
r11-14: sc 12
r15: (sc4, dec)x2
r16-19 : sc 10
r20: (sc3, dec)x2
r21: sc8
insert button joint
r28: (sc2, dec)x2
slst, sew shut
glove flare (dark brown)
r1: ch 15, slst join LONG TAIL
r2: (sc4, inc)x3
r3: sc4, inc, sc8, inc, sc 4
r4: sc 2, slst fasten off
sew 2 rows below thumb bobble
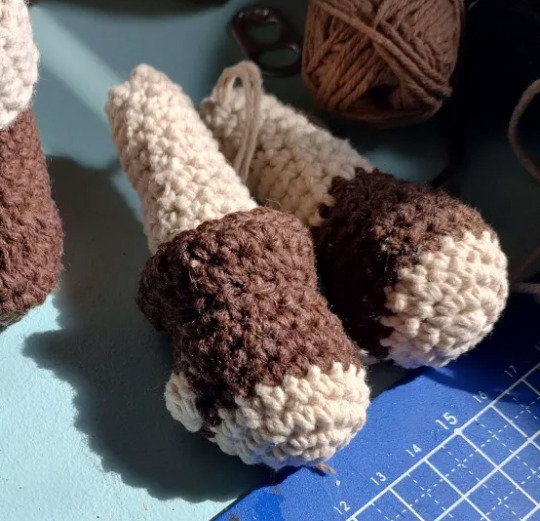
boots (light brown, dark brown, greyish creme) [video]
these are removable but they dont go on easily, so you gotta patiently massage the feet in there.
start with light brown
ch 7, start in 2nd from hook:
r1: sc 5, 3inc, sc 4, inc
r2: inc, sc 4, inc 3, sc 4, inc 2
r3: inc, sc 5, hdc inc 7, sc 5, inc 2
r4: slst fasten off. sew in holes/tails, fray ends for flat gluejob. trace onto cardboard for sole.
switch color to dark brown
r1: BLO join slst, BLO sc in all
r2-3: sc in all
glue in sole
r4: sc 8, dec 5, sc 12
r5: sc 7, dec 4, sc 10
r6: sc7, dec2, sc 10
r7-10: sc in all
switch color to greyish creme
r11-12: sc in all
r13: slst, FLO sc in all
r14-16: sc all
slst fasten off
flip the greyish creme flap over.
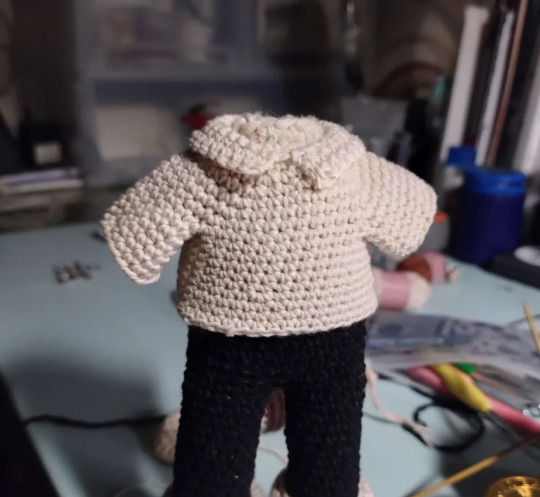
blouse (thinner creme)
this is a standard raglan pattern, if you need the whole thing bigger/smaller you need to have more/less chains at the beginning. this change also carries over to the collar. the increases are evenly spaced for me, and unless your doll has a very broad chest this shouldnt have to change.
if the arms need more space you need to either add more rows to the r3-7 part and/or add more chains in r8 (this part should fit pretty sugg around the body)
i was experimenting a bit w using BLO to minimize the gap where the sleeve and body seperate (r8). it worked p good but you can ignore it if you dont understand it and just sc in all.
(edit: if this confuses you, understandable. I answered an ask abt it here but feel free to ask if its still unclear)
r1: ch24, slst join.
r2: (sc 5, inc) x4
r3-7: inc in first of previous inc. last row should have 10 sc between increases.
r8: sc5, blo sc 1, ch 5, blo sc join in 1st of next inc, sc 11, blo sc1, ch5, blo sc join in 1st st of next inc, sc 5
r9: sc6, blo sc 1, sc 5, blo sc1, sc11, blo sc 1, sc 5, blo sc 1, sc 6
r10-13: sc in all (36)
r14: (sc8, inc)x4
r15: sc in all (40)
slst finish off
Sleeve
r1: join mid armpit, slst ,sc2, sc in the leftover bits from the BLO stitches, sc 11, sc in leftover BLO bits, sc2
r2-6: sc in all
collar
join left-middle front, sc 7, inc, sc8, inc, sc 7. turn
r2: sc7, inc, sc 10, inc, sc 7. turn
r3: sc8, inc, sc 10, inc, sc 8. turn
cuffs
r1: join mid body-facing side, FLO sc 20
r2-4: sc 20, slst fatsen off
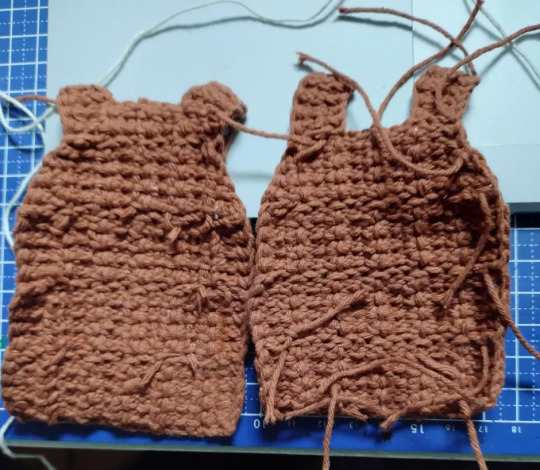
Tunic (red brown) [tunesian entrelac crochet]
if you want to make this bigger i recommend keeping the same square layout, but making the squares bigger. its a bit of measuring and math to figure it out.
the tunic is made in tunesian crochet and i dont really know what written patterns for that look like so i hope this makes sense.
for a single square:
r1: ch4, start in 2nd back bump from hook. pull up a loop from ever back bump. you should have 4 loops on your hook total. simplestitch in all
r2-4: simplestitch in all.
r5: slst in all. fasten off
for the slanted parts i did the decrease by pulling through the middle 2 loops in one go on the back pass
this is how the full thing should look, its worked from bottom left to top right.
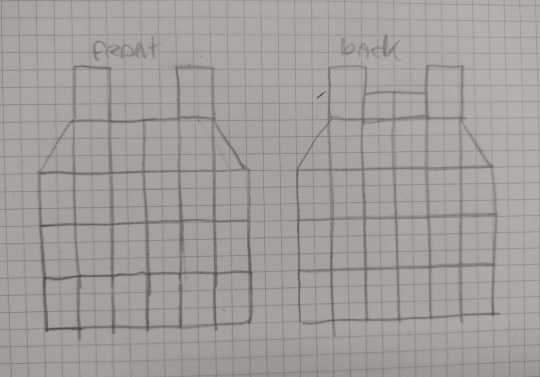
sew together the shoulders together, then sew in all of the ends
:) good luck
tunesian crochet has a tendancy to curl, so if you used cotton i def recommend blocking it
i defined the grid a little bit with a dark brown pencil.
cowl (green)
BLO sc 7, repeat till desired lenght, then BLO slst join the last row to the first.
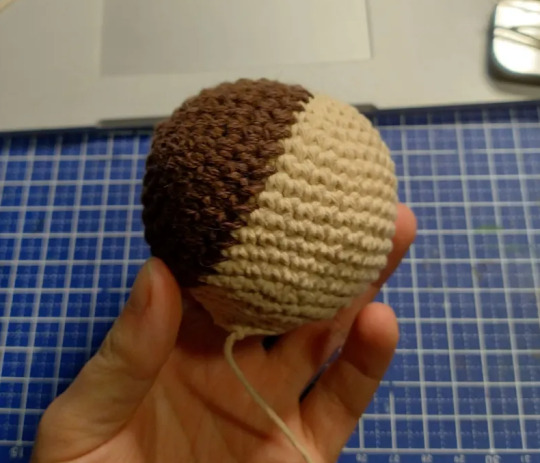
scalp undercut bit (dark brown)
r1: sc 6 in mr
r2: (inc) x6
r3: (sc 1, inc) x6
r4: (sc 2, inc) x6
r5: (sc3, inc) x6
r6: (sc 4, inc)x6
r7: sc36
sew on back of the head (recommend doing this before the ears and face, see end for more detailed assembly instructions)
hair (reddish brown) [hair video]
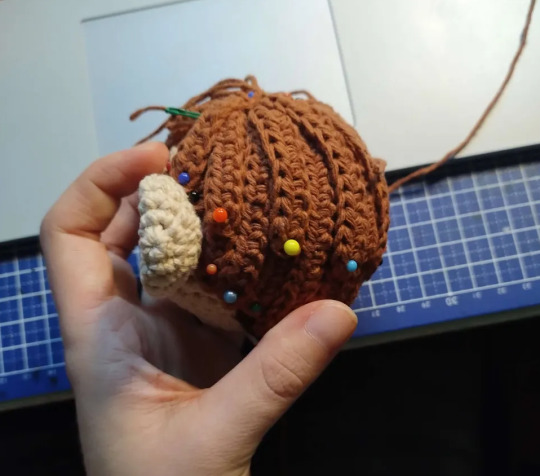
disclaimer, this is kind of a mess. the lenghts didnt line up the way i intended so i improvised by adding loose strands and spent a lot of time pinning every strand in place before glueing them down.
i used bison kit contact glue since its sturdy, transparant, flexible and waterproof. you can use hot glue as well, i just personally dont like it because its bulky.
r1: sc 21 in mc. join BLO slst
r2: ch 12, sc in 2nd from hook, gdc10, BLO slst join
r3: ch 12, sc in 2nd from hook, gdc10, BLO slst join
r4: ch13, sc in 2nd from hook, hdc 11, BLO slst join
r5: ch13, sc in 2nd from hook, hdc 11, BLO slst join
r6: ch 14, sc in 2nd from hook, hdc 12, BLO slst join
r7: ch16, sc in 2nd form hook, hdc 14, BLO slst join
r8: ch 18, sc in 2nd from hook, hdc 16, BLO slst join
r9: ch 18, sc in 2nd from hook, hdc 16, BLO slst join
r10: ch 14, sc in 2nd from hook, hdc 12, BLO slst join
r11: ch 12, sc in 2nd from hook, hdc 10, BLO slst join
r12: ch 10, sc in 2nd from hook, hdc 8, BLO slst join
from now on, join in the FLO's of previous round
r13: ch10, sc in 2nd from hook, hdc 8, FLO slst join
r14: ch10, sc in 2nd from hook, hdc 8 , FLO slst join
r15: ch12, sc in 2nd from hook, hdc 10 , FLO slst join
r16: ch12, sc in 2nd from hook, hdc 10 , FLO slst join
r17: ch14, sc in 2nd from hook, hdc 12 , FLO slst join
r18: ch16, sc in 2nd form hook, hdc 14, FLO slst join
r19: ch 18, sc in 2nd from hook, hdc 16, FLO slst join
r20: ch16, sc in 2nd form hook, hdc 14, FLO slst join
r21: ch14, sc in 2nd from hook, hdc 12 , FLO slst join
1x ch 6, sc in 2nd from hook, hdc 4
2x ch8, sc in 2nd from hook, hdc 6
2x ch 10, sc in 2nd from chain, hdc 8, slst in same, fasten off.
2x ch 12, sc in 2nd from chain, hdc 10, slst in same, fasten off.
3x ch14
pin all in place until it looks good, tie +glue loose strands first. then glue back pieces, crown, and lastly bangs/ top back layer. some of the lose strands go behind the ears, one is the left sideburn, and the rest is to cover up the crown. these pics are the best i can do as a guide, this was my first time doing this so i was struggling lol.
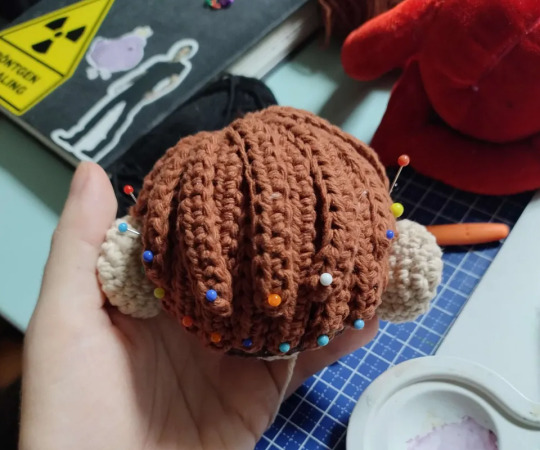
i didnt fully glue down the bangs and the top back layer bc i thought it would be fun if u could ruffle his hair, but my friend who i gave the plush to has significantly abused him (its been 2 days) and his hair is a mess so im gonna have to glue it down again lol. might as well do it all the first time if u plan on throwing him down the stairs or something.
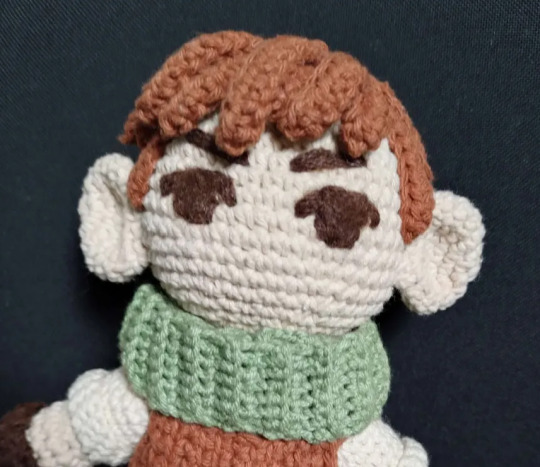
Face
for eyes + eyebrows, embroider outline with dark brown, then needle felt [video] the inner parts w unraveled dark brown fluff. the dark brown i used was probably acrylic. cotton doesnt really work well for this.
Belt and pouch (dark brown)
the belt is a 3 strand basic friendship bracelet! [video]
sew together the ends and hide it with by sewing the pouch on top.
i didnt write down the pattern for the pouch, but from the top of my head its the same start as the squares for the tunic
r1-9: simple stitch in all
r10: simple stitch 1, decrease by putting your hook through 2 vertical bars when pulling up a loop, simple stitch edge 1.
r11: slst in all, finish with a long tail
use tail to sew together the sides, and sew the pouch onto the belt. use some yellow thread to make a button.
ASSEMBLY.
put on the blouse, put the arms in their place and finish the button joints.
put on the tunic, lace the sides with dark brown yarn, finish with a knot and hide the tails underneath the chest part of the tunic.
slide on the belt and boots.
sew the scalp undercut bit to the head
sew the ears to the head
tie + glue the loose hair strands behind the ears
glue the back of the hair
glue the back of the hair
glue the middle circle part of the hair
glue the top back layer and bangs
sew the head to the body
put on the cowl
i hope this is somewhat clear, feel free to dm me is you have questions.
enjoy your squeakychuck :D
255 notes
·
View notes
Text
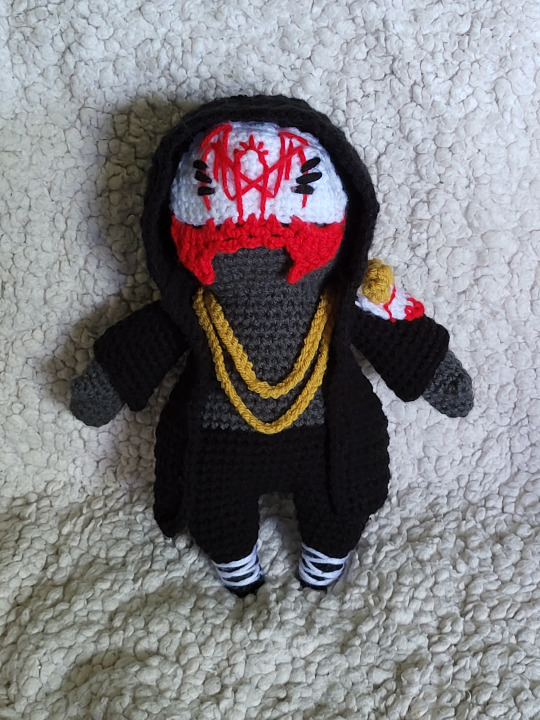

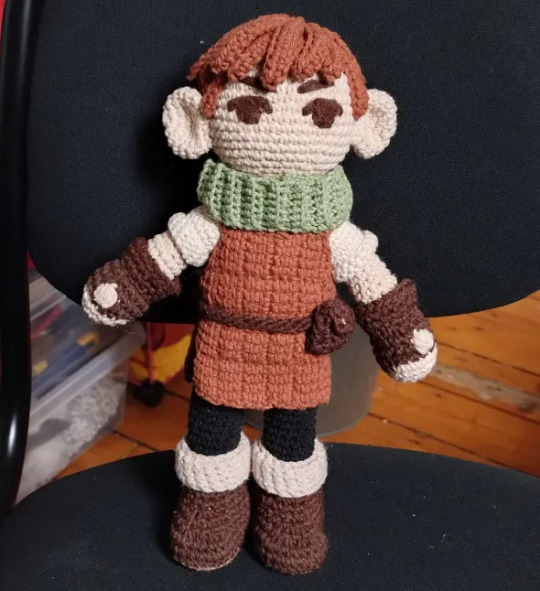
I finished my own Vessel amigurumi design! He's cute, he's huggable, he's full of the love you want (and polyfill).
I also included my notes if anyone wanted to make their own. If you do, please credit me and show me, I'd love to see! If you find errors or need help, just ask.
Worsted weight yarn (weight 4) - black, dark grey, light grey, white, red, gold
3.5mm hook
US terms
sc - single crochet
hdc - half double crochet
dc - double crochet
tr - treble crochet
dtr - double treble crochet
inc - increase
dec - decrease
ch - chain
sl - slip
sk - skip
mr - magic ring
bo - make bobble
Legs (Make 2) - black
R1. MR 6, join (6)
R2. (sc 1, inc.) repeat (9)
R3. sc around. (9)
R4. (sc 2, inc.) repeat (12)
R5-6. sc around. (12)
R7. (sc 2, inc.) repeat (16)
R8-9. sc around. (16)
R10. (sc 3, inc.) repeat (20)
Fasten off first leg.
Make second leg & continue onto body.
Body & head (stuff as you go)
R11. Ch3, 20sc in first leg, 3 sc in chain, 20sc in second leg, 3 sc in chain. (46)
R12-18. sc around. (46)
Switch to dark grey
R19. sc 11, dec, sc 21, dec, sc 10. (44)
R20. sc 10, dec, sc 20, dec, sc 10. (42)
R21. sc 11, dec, sc 19, dec, sc 8. (40)
R22. sc 10, dec, sc 18, dec, sc 8. (38)
R23. sc 11, dec, sc 17, dec, sc 6. (36)
R24. sc around. (36)
R25. sc 10, dec, sc 17, dec, sc 5. (34)
R26. sc around. (34)
R27. sc 11, dec, sc 15, dec, sc 4. (32)
R28. sc 10, dec, sc 14, dec, sc 4. (30)
R29. sc 11, dec, sc 13, dec, sc 2. (28)
R30. sc 10, dec, sc 12, dec, sc 2. (26)
R31. sc 11, dec, sc 11, dec. (24)
Body ends head begins
R32. (3 sc, inc.) Repeat. (30)
R33. 2 sc, inc. (4sc, inc.) Repeat, 2 sc. (36)
R34. (5 sc, inc) Repeat. (42)
R35. 3 sc, inc, (6 sc, inc.) Repeat, 3 sc. (48)
R36. (7 sc, inc) Repeat. (54)
R37-45. sc around. (54)
R46. (7 sc, dec) Repeat. (48)
R47. 3 sc, dec, (6 sc, dec) Repeat, 3 sc. (42)
R48. (5 dc, dec) Repeat. (36)
R49. 2 sc, dec,(4 sc, dec) Repeat, 2 sc. (30)
R50. (3 sc, dec) Repeat. (24)
R51. 1 sc, dec, (2 sc, dec) Repeat, 1 sc. (18)
R52. (sc, dec) Repeat. (12)
R53. dec. Repeat (6)
Pull through loops and fasten off.
Embroider leg wraps to legs in white.
Thumbs (Make 2) - dark grey
MR5.
Fasten off.
Arms (Make 2) - dark grey
R1. Ch 5, sc 3, inc, sc 3 in other side of chain, inc. (10)
R2. sc around. (10)
R3. inc, sc 4, inc, sc 4. (12)
R4. sc 6, sc 5 sts in thumb, sc 6. (17)
There'll be a small hole between the thumb and hand. With the way it rests it will not be noticable. I'm not sure how to fix this yet and still have the thumb sit properly.
R5. sc 4, dec, sc 5, dec, sc 4. (15)
R6. sc around. (15)
R7. sc 7, dec, sc 6. (14)
R8-9. sc around. (14)
R10. sc 7, dec, sc 5. (13)
R11. sc around. (13)
R12. sc 7, dec, sc 4. (12)
R13. sc around. (12)
R14. sc 7, dec, sc 3. (11)
R15. sc around. (11)
R16. sc 7, dec, sc 2. (10)
R17. sc around. (10)
R18. dec 5. (5)
Fasten off. Leave long tail for sewing.
Sew arms to body.
Cloak - black
R1. Ch 41, sc across, ch 1, turn. (40)
R2-11. sc across, ch 1, turn. (40)
R12. sc 5, dec, sc 26, dec, sc 5, ch 1, turn. (38)
R13. sc 6, dec, sc 22, dec, sc 6, ch 1, turn. (36)
R14. sc 5, dec, sc 22, dec, sc 5, ch 1, turn. (34)
R15. sc 6, dec, sc 18, dec, sc 6, ch 1, turn. (32)
R16-21. sc across, ch 1, turn. (32)
R22. sc 3, ch 5, sk 5, sc 15, ch 5, sk 5, sc 3, ch 1, turn. (32)
R23. sc 3, sc 5 into loops of chain, sc 15, sc 5 into loops of chain, sc 3, ch 1, turn. (32)
R24. sc across, ch 1, turn. (32)
R25. sc 5, inc, sc 5, inc, sc 8, inc, sc 5, inc, sc 5, ch 1, turn. (36)
R26. sc 10, inc, sc 14, inc, sc 10, ch 1, turn. (38)
R27. sc 5, inc, sc 26, inc, sc 5, ch 1, turn. (40)
R28. sc 10, inc, sc 18, inc, sc 10, ch 1, turn. (42)
R29. sc 5, inc, sc 30, inc, sc 5, ch 1, turn. (44)
R30-37. sc across, ch 1, turn. (44)
R38. sc 20, dec 2, sc 20, ch 1, turn. (42)
R39. sc across, ch 1, turn. (42)
R40. sc 19, dec 2, sc 19, ch 1, turn. (40)
R41. sc across, ch 1, turn. (40)
R42. sc 18, dec 2, sc 18, ch 1, turn. (38)
R43. sc across, ch 1, turn. (38)
R44. sc 17, dec 2, sc 17, ch 1, turn. (36)
R45. sc 14, dec 4, sc 14, ch 1, turn. (32)
R46. sc 10, dec 6, sc 10, ch 1, turn. (26)
R47. sc 9, dec 4, sc 9, ch 1, turn. (22)
R48. sc 7, dec 4, sc 7. (18)
Fasten off. Leave long tail and sew top of hood together.
Starting from bottom corner of cloak sc around front edge, around the hood and down the other front edge.
Sleeves (Make 2) - black
R1. sc 5 into armhole, inc into side of next stitch, sc 5, inc into side of next stitch. (14)
R2. sc around. (14)
R3. sc 2, inc, sc 6, inc, sc 4. (16)
R4. sc around. (16)
R5. sc 3, inc 2, sc 11. (18)
R6. sc around. (18)
R7. sc 4, inc 2, sc 12. (20)
R8. sc around. (20)
R9. sc 5, inc 2, sc 13. (22)
R10. sc around. (22)
Fasten off.
Mask body - white
R1-4. chain 21, sc across, turn. (20)
R5. sc 1, dec, sc 14, dec, sc 1, turn. (18)
R6-7. sc across, turn. (18)
R8. sc 1, dec, sc 12, dec, sc 1, turn. (16)
R9. sc 1, dec, sc 10, dec, sc 1, turn. (14)
R10. sl 3, dec, sc 4, dec, sl 2, turn. (11)
R11. sl 2, sc 6, sl 2. (10)
Fasten off.
Mask filigree - red
Work across the bottom of the mask body.
R1. ch 5, sk 5, sc 1, (ch 3, sk 1, sc 1) x 3, ch 5, sc 1.
R2. sc into space, hdc 1, dc 1, tr 1, dtr 1, ch 4, sk 1 in chain, sc 3 in chain, tr 1 in space, dc 1, sc 1 in next space, (ch 3, sc in next space) x 3, dc 1 in next space, tr 1, ch 4, sk 1 in chain, sc 3 in chain, dtr 1 in space, tr 1, dc 1, hdc 1, sc 1.
Fasten off.
Embroider logo to mask in red.
Embroider eye holes to mask in black.
Sew mask to head.
Fur cape - light grey
R1. ch 11, sc across, ch 1, turn. (10)
R2. sc 1, dec, sc 6, dec, sc 1, ch 1, turn. (8)
R3. sc 1, dec, sc 4, dec, sc 1, ch 1, turn. (6)
R4. sk 1, sc 4, sl 1, turn. (5)
R5. sk 1, sc 3, sl 1. (4)
Fasten off.
Cut 7 cm lengths of yarn and attach to fur cape with larkshead knots. Two strands per stitch along the long edge (this is the top). One strand per stitch for the other rows.
Brush out fur with a slicker brush.
Sew fur cape to back of cloak.
Pauldron - white
R1. ch 12, sc across, ch 1, turn. (11)
R2. sc 3, switch to gold, bo, sc 1, bo, sc 1, bo, switch to white, sc 3, ch 1, turn. (11)
R3. sc 1, dec, sc 5, dec, sc 1, ch 1, turn. (9)
R4. sc 1, dec, sc 3, dec, sc 1, ch 1, turn. (7)
R5. ch 1, sk 2, sc 1, ch 1, sk 1, sc 1, ch 1, sk 1, sc 1, switch to red, ch 1, turn.
R6. sc 1 in space, ch 2, dc in next space, ch 2, sc in next space.
Fasten off.
Backstitch line across pauldron in red.
Sew to left shoulder of cloak.
Necklace 1 - gold
ch 45
Tie ends together
Necklace 2 - gold
ch 55
Tie ends together
41 notes
·
View notes
Text
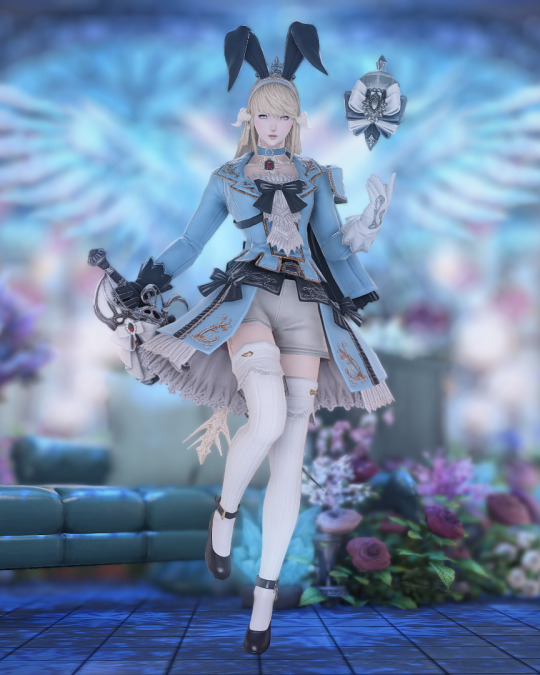
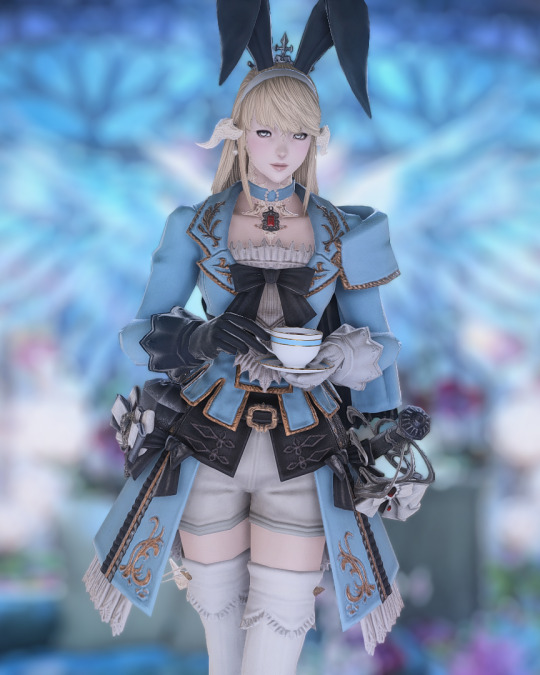
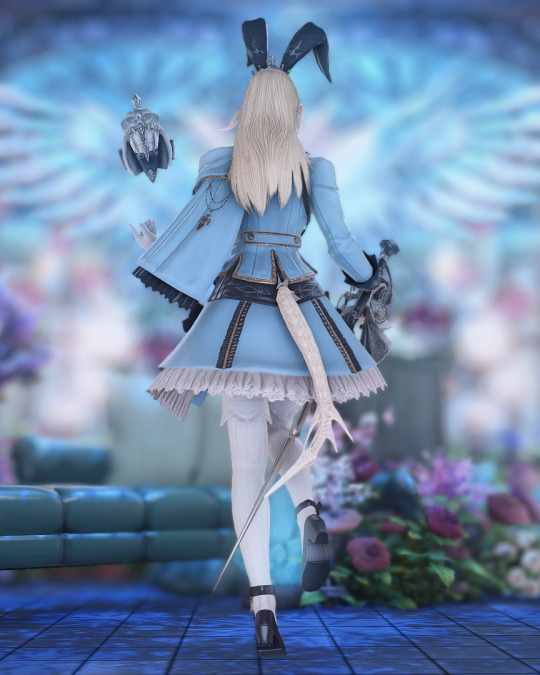

Unbirthday Alice
Alt version of Mahou Shoujo Alice.
Head: Bunny Chief Crown - soot black
Body: Idealized Estoqueur's Bliaud - sky blue
Hands: Plague Bringer's Gloves - default
Legs: Spriggan Bottoms - snow white
Feet: Loyal Housemaids Pumps - default
Alt Head: Frontier Ribbon | Far Eastern Schoolgirl's Hair Ribbon | Loyal Housemaid's Brim
Alt Legs: Idealized Estoqueur's Bottoms | Fat Cat Shorts | Edenmorn Chausses of Casting
Alt Feet: Dirndl's Pumps
Earring: Pearl Earrings
Neck: The Emperor's New Necklace
Wrists: The Emperor's New Bracelet
Right Ring: The Emperor's New Ring
Left Ring: The Emperor's New Ring
Main Hand: Tropaios Rapier - snow white
Off Hand: --
Fashion Accessory: --
Minion: --
Mount: --
Location: #studioshade - "Gilded Cage" - Aether/Adamantoise Goblet W28 P42 R36
Shader: Faeberry Bloom
#ffxiv#ffxiv glamour#ffxiv au ra#ffxiv red mage#eorzea collection#valkariel ilmarë#studioshade#au ra#raen#red mage#blues/indigos#lights/whites/pastels#darks/blacks/greys#uses mogstation items#uses seasonal items#cosplay glamour#cute glamour#fantasy glamor
30 notes
·
View notes
Video
youtube
R36 Nissan GT-R Concept Design by hycade (Part 3)
0 notes
Text
a while ago i knitted nepeta's hat from homestuck and i just remembered that there's a pattern on my deviantart but i'm never active on there so i thought i'd share it here!!

disclaimer: i am aware this is not canon-accurate. it's my own design inspired by the original
disclaimer 2: idk much about yarn weights or size charts. this is by no means a professional pattern. i'm just writing down what i did incase someone wants to do it too
pattern under keep reading!!
tools & materials:
circular knitting needles (i used 3,5mm)
a crochet hook (for the edging, mine is 4,5mm)
a sewing needle
blue, orange, red and yellow yarn (i'm unsure of how much exactly is needed, but it's less than a ball each)
8 stitch markers (it doesn't have to be anything fancy, i literally used safety pins)
abbreviations used:
r[n] - row number
k - knit
p - purl
mk1r - make one right (tutorial)
mk1l - make one left (tutorial)
k2tog - knit two stitches together (tutorial)
ssk - slip, slip, knit (tutorial)
ear flaps (make 2):
cast on 7 stitches
r1: p7
r2: p1, mk1r, k untill 2 stitches before the end of the row, mk1l, p1
r3: k1, p until 1 stitch before the end, k1
repeat rows 2 and 3 for 12 rows (you should have 21 stitches by then)
r4: k1, p until 1 stitch before the end, k1
r5: p1, k until 1 stitch before the end, p1
repeat rows 4 and 5 for 10 rows
do not cast off
hat:
(tip: when knitting on circular needles, place a stitch marker at the beggining of the row)
put the 1st ear flap on circular needles, cast on 18 stitches, put the 2nd flap on, cast on 28 stitches
knit for 35 rows
r36: *k11, place stitch marker*, repeat between ** until the end of the row
r37: *k untill 2 before stitch marker, k2tog, put stitch marker on right needle*, repeat between ** until the end of the row
r38: k whole row
repeat rows 37 and 38 for 20 rows (you should have 8 stitches left)
cast off, leave a tail and sew up the top
horns (make 4):
cast on 15 stitches with red yarn
r1-r5: k
r6: k2tog, k13, ssk
switch to orange yarn
r7-r9: k
r10: k2tog, k11, ssk
r11: k
r12: k2tog, k9, ssk
switch to yellow yarn
r13: k
r14: k2tog, k5, ssk
r15: k
r16: ktog, k3, ssk
r17: k
r18: k2tog, k1, ssk
cast off
sew together 2 horn peices and stuff them with scrap yarn/stuffing, then sew onto hat (i recommend pinning it first, so you're sure of the placement)
stars (make 4):
stars were made following this pattern, exept i purled uneven rows (1, 3, 5, ect)
sew 2 stars together, purl side out. stuff them with scrap yarn/stuffing
border:
with a crochet hook and orange yarn, crochet a border around the edges of the hat. this is opional but makes the edges not curl up. i don't know much about crochet so i can't rlly explain this part
chain about 30 stitches with a crochet hook and make a border around the stars. do this twice for both ear flaps
if y'all have any questions lmk in the comments and i'll try to answer!! :3
#knitting#knitting pattern#homestuck#nepeta leijon#homestuck nepeta#hs nepeta#hom3stuck#cat ear beanie
26 notes
·
View notes
Text
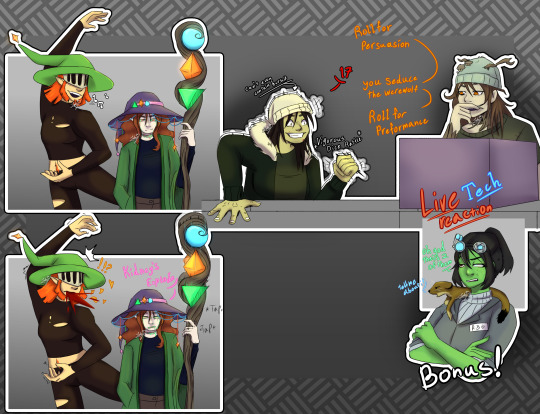
Im not even done- and thats what concerns me
I have like 1 more drawing to finish
James Cobb and Kaycee Hobbs By unsantcum
Amber, Kay, and R36 are mine
@longelk
#my artwork#digital art#artfight2023#team werewolves#not all my characters#inscryption au#inscryption#inscryption fanart#rebecha#kaycee hobbes#p03#james cobb#pike mage#amber pike
69 notes
·
View notes
Text
"Dying's not so bad. It's staying dead that sucks."
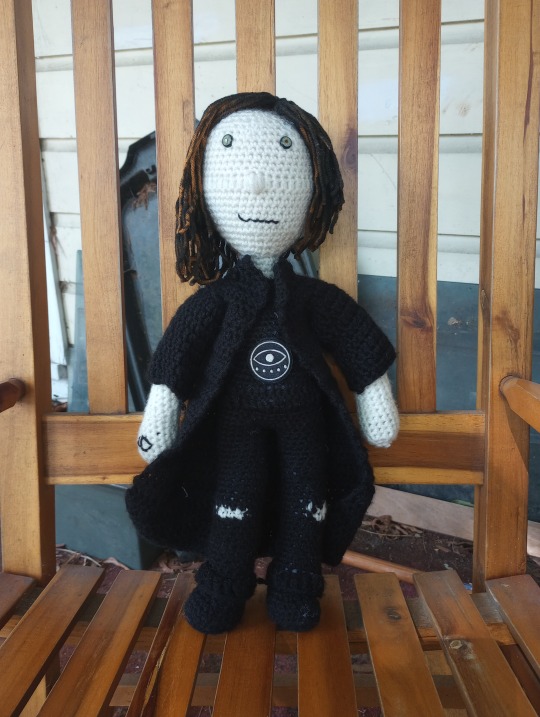
Character Name: Gerard “Gerry” Keay
Fandom: The Magnus Archives
Voiced By: Jon Gracey
Yarn Used:
Skin: CraftSmart Value - Off-White
Shirt/Trousers/Shoes: Red Heart Super Saver - Black; heidi & jo iron-on applique
Hair: CraftSmart Value - Curry; Tulip Colorshot Fabric Spray Paint - Black
Face: Park Lane 10mm plastic eyes - hazel; Red Heart Super Saver - Black
Tattoos: Red Heart Super Saver - Black
Basic pattern here.

Okay, so if I’m being honest here, this particular Gerry is 100% influenced by the version in “Awake and Unafraid” by blasphemous-lies-and-deceit, who is amazing and deserves all the love. (Not that I don’t want to hug canon!Gerry too, but holy hell.) I will also confess that I had to undo him at one point; I’d been working on him steadily for a while, and then set him aside in favor of NaNoWriMo, whereupon he promptly got swallowed up by the hellscape miasma that is my room. I finally unearthed him in a moment that can best be described as “I have discovered every single godsdamned thing I have been looking for in the last six MONTHS and also the Ark of the Covenant and Jimmy Hoffa, and yet I cannot find the one specific thing I am looking for and which I only purchased a week ago” and started working on him again. Unfortunately, I had no idea where I was in the pattern and what variants I had actually done, so I unraveled most of his torso and started over. This is why it has taken me almost a year between Hux and Gerry.
Oh, well. At least I can confidently tell you that I altered the “base” pattern as follows:
Shoes: Black combat boots, baby! Like with Mini and Hux, I kept the color the same, but otherwise the shoes are the same as before.
Trousers: I was trying to give him baggy black jeans, so I wanted them to come down over his shoes. Thus, when I got to the top of the boots, I did a round in the front loop only to give myself a little ridge, then did a round of treble crochet in the front loops of that before going back to sc for the rest of the trousers. (I think. I forgot to write this down as I was doing it and it’s been, as previously mentioned, around six months since then at time of writing.) I also wanted to give him some artistic rips in the knees, so I switched to the white I’m using for his skin and did front-loop in the black around it to give it a bit of texture and make it look like they are, in fact, torn across the knees. Deliberately or not, your call.
Shirt: I wanted Gerry to be wearing a kind of baggy, shapeless shirt, and also to be a bit taller and lankier in the torso, with a slightly longer neck. I also put him in all black because that’s how he’s always described, so I worked him the same way as Joseph (just without changing color) up until R36, and then:
R37: Ch 2, hdc in each fpdc around, sl st in first hdc (38 hdc).
R38-48: Ch 1, sc in each st around, sl st in first sc (38 sc).
R49: Ch 1, [sc in next 17 st, inv dec over next 2 st] twice, sl st in first sc (36 sc).
R50: Ch 1, sc in each st around, sl st in first sc (36 sc).
R51: Ch 1, [sc in first 2 st, inv dec] 9 times around, sl st in first sc (27 sc).
R52-53: Ch 1, sc around, sl st in first sc (27 sc).
R54: Ch 1, [sc in first st, inv dec] 9 times around, sl st in first sc (18 sc).
R55: Ch 1, sc in each st around, sl st in first sc (18 sc).
R56: Switch to skin color. Ch 1, sc in back loop of each st around, sl st in first sc (18 sc).
R58-59: Ch 1, sc in each st around, sl st in first sc (18sc).
I also added an iron-on patch to give him a design on his shirt. (Fun fact, I bought three different patches and kept losing them before I could find my iron, which I had stupidly put away where it belonged.)
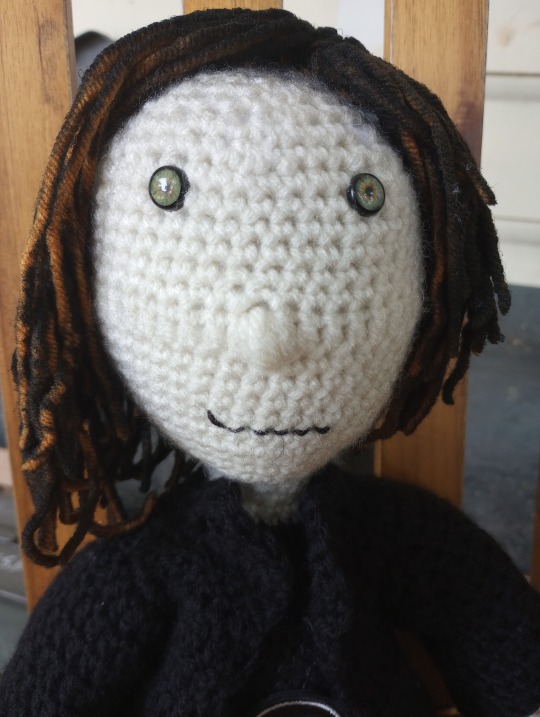
Head: I always picture Gerry as having a long, thin face and a slightly larger nose, so I followed the base pattern for his head up to what is R60 on the original pattern (but is R64 on this pattern due to previously-made changes), and then:
R65-70: Ch 1, sc in each st around, sl st in first sc (42 sc).
R71: Ch 3, dc in next 26 st, puff st in next st, dc in next 15 st, sl st in first dc (41dc, 1 puff stitch).
R72-77: Ch 1, sc in each st around, sl st in first sc (42 sc).
Continue from R72 on original pattern.
Unfortunately, I didn’t stuff him as much as I should have, so his neck is kinda floppy. I’m working on a solution to that.
I also used safety eyes for the first time here! And oh my God they saved so much time. I wasn’t sure they were going to work in the package, but once I got them in his face, I liked them a lot! I embroidered a little smirk for his mouth. Used yarn this time because I finally had a yarn needle to do it with and didn’t feel like digging for my embroidery floss by the time I got to his mouth, and I like it.

Hair: Yeah, I’m a ginger!Gerry convert, what of it. Anyway, because his hair is always described as “badly dyed”, I initially considered using a variegated yarn, but couldn’t find one that would do what I wanted it to do, I decided to badly dye it myself. I wrapped a hank of yarn around a piece of cardboard, tied it off, and cut it, then spread it out on said cardboard and sprayed it with black fabric spray paint I found in the clearance aisle at Joann Fabric. And, as if it knew why I was doing it, it just…wouldn’t…take. I must’ve sprayed, rearranged, sprayed again, let dry, untangled, discovered that I’d just done the surface, resprayed, moved, and sprayed again about twelve times before I thought I’d got it. I hadn’t. Finally, I gave up and sewed the mottled orange-and-black mess onto his head (which was a headache and a half, especially since I wanted him to have a side part), discovered that it was neither as long nor as thick as it had looked before I put it on his head, debated starting over, decided not to, took him back outside, and covered his face with a paper towel, then sprayed the hair again, this time while it was already on his head. That way a) it dyed the scalp as well, and b) I could hope it stuck. (It also occurred to me that I was doing this on the front porch, right on the EDGE of the porch, and that it was, if not raining, at least very humid, and I wondered if that was affecting it, so once I’d sprayed his head down, I brought him inside and let him cure that way.) The yarn still soaked up a lot of the dye, but at least it’s more or less evenly covered…and it does, in fact, give the effect of a bad dye job, so…success?
Arms: I did Gerry’s arms the same way I did Hux’s, except that I gave him short sleeves rather than long ones. I also made them a little bit longer than normal, partly because Gerry is a little bit taller and partly because I was an idiot and wasn’t counting properly.
Trenchcoat: I may have made this slightly more complicated than necessary, but I like how it came out, so:
Ch 48.
R1: Dc in third ch from hook, dc in each ch across, turn (46dc).
R2-5: Ch 3, dc in each st across, turn (46dc).
R6: Ch 3, dc in first 17 st, fpdc around next st, skip next st, inv dec, dc in next 4 st, inv dec. Skip next st, fpdc around next st, dc in same st, dc in next 17 st, turn (43dc, 2 fpdc).
R7: Ch 3, dc in first 18 st, bpdc around fpdc from prev row, skip next st, inv dec in back loops, dc in next 2 st, inv dec in back loops. Skip next st, bpdc around fpdc, dc in st behind, dc in next 18 st, turn (41dc, 2bpdc).
R8: Ch 3, dc in first 19 st, fpdc around bpdc from prev row, skip next st, inv dec twice. Skip next st, fpdc around fpdc from prev row, dc in same st, dc in next 19 st, turn (39dc, 2fpdc).
R9: Ch 3, dc in first 19 st, bpdc around next 2 fpdc, dc in next 19 st, turn (38dc, 2fpdc).
R10: Ch 3, dc in each st across, turn (40dc).
R11: Ch 1, sc in eacn st across, turn (40sc).
R12: Ch 1, sc in first st, ch 1, skip next st, sc in each st across, turn (39sc, 1ch).
R13: Ch 3, dc in first 38 st, dc in ch sp, dc in next st, turn (40dc).
R14: Ch 3, dc in each st across, turn (40dc).
R15: Ch 1, sc in first 38 st, ch 1, skip next st, sc in next st, turn (39sc, 1ch).
R16: Ch 3, dc in first st, dc in ch sp, dc in next 38 st, turn (40dc).
R17: Ch 3, dc in each st across, turn (40dc).
R18: Ch 1, sc in first st, ch 1, skip next st, sc in next 38 st, turn (39sc, 1ch).
R19: Ch 3, dc in first 9 st, inv dec, dc in next 18 st, inv dec, dc in next 9 st, turn (38dc).
R20: Ch 3, dc in first 9 st, inv dec, dc in next 16 st, inv dec, dc in next 9 st, turn (36dc).
R21: Ch 3, [dc in first 8 st, inv dec] three times, dc in next 3 st, turn (33dc).
R22: Ch 3, dc in first 6 st, [YO x4, insert hook into next st, pull up loop, YO and pull through 2 loops x6]*, ch 6, skip next 3 st, repeat *, dc in next 11 st, repeat *, ch 6, skip next 3 st, repeat *, dc in next 6 st, turn (23dc, 4 extended stitches, 12ch).
R23: Ch 2, hdc in first 7 st, sc in ch sp 6 times, hdc in next 13 st, sc in ch sp 6 times, hdc in next 7 st, turn (27hdc, 12sc).
R24: Ch 2, hdc in first 7 st, inv dec in back loops 3 times, hdc in next 13 st, inv dec in back loops only 3 times, hdc in next 7 st, turn (33hdc).
R25: Ch 1, sc in first st, hdc in next st, dc in next st, tc in next st, dtc in next st, [YO x4, insert hook into next st, pull up loop, YO and pull through 2 loops x6]*, ch 4, inv dec in hdc 10 times, hdc in next st, ch 4, repeat *, dtc in next st, tc in next st, dc in next st, hdc in next st, sc in next st, turn (13hdc, 2sc, 2dc, 2tc, 2dtc, 2 extended stitches).
R26: Sl st in first sc, sc in next 5 st, sc around chain and into edge of extended stitch 4 times, sc in next 11 st, sc around chain and into edge of extended stitch 4 times, sc in next five st, sl st. Fasten off.
Sleeves: Join yarn to st in armhole. For row 1, ch 1, sc in first st (mark starting st), sc in next 19 st around, join (20sc). For rows 2-10, ch 3, dc in each st around, join (20dc).
Add buttons to sc rows of front opposite ch sp if desired. (I do so desire, I just haven’t done it yet.
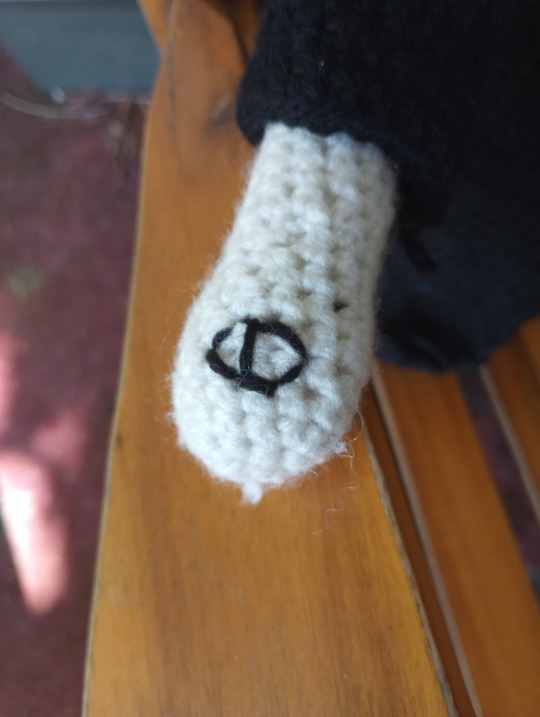
Tattoos: Gerry’s tattoos are embroidered on in backstitch. I only did three (one on each hand and one on the back of his neck), because I was doing it in yarn and it was way too thick for anything tinier, but what the hey, he doesn’t technically have “joints”. (The ones on his knees don’t show because the holes are sagging below the joints. That’s my story and I’m sticking to it!)
65 notes
·
View notes
Last Seen Blogs

eduardoastudillo-blog
EDUARDO ASTUDILLO

hidingcoyote
no idea what i'm doing

shibirekurage
shibirekurage

heroicn0nsense
Such Heroic Nonsense

thoughtkick
Deeplife Quotes