#s4 cc down
Text

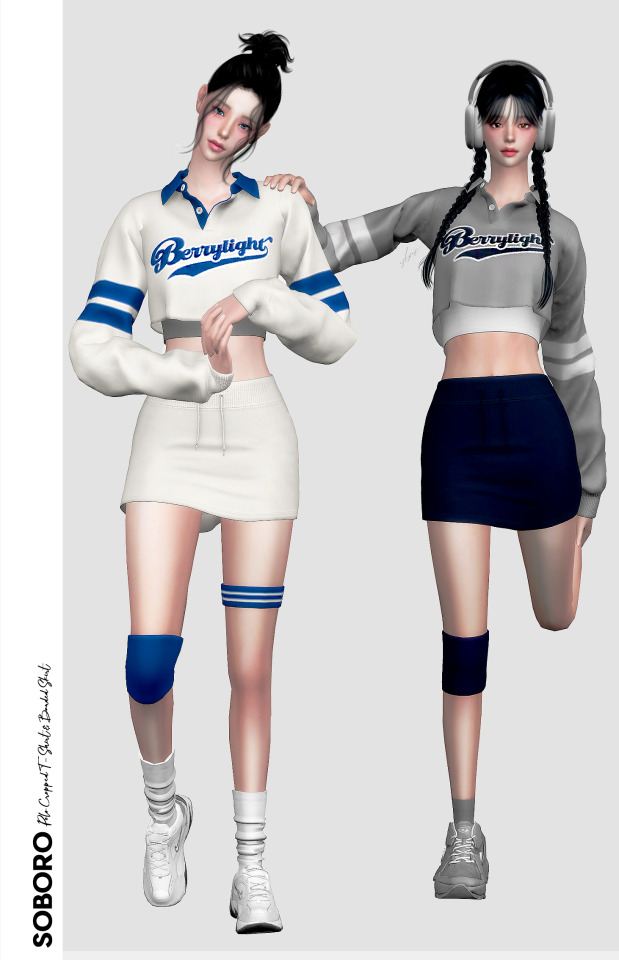

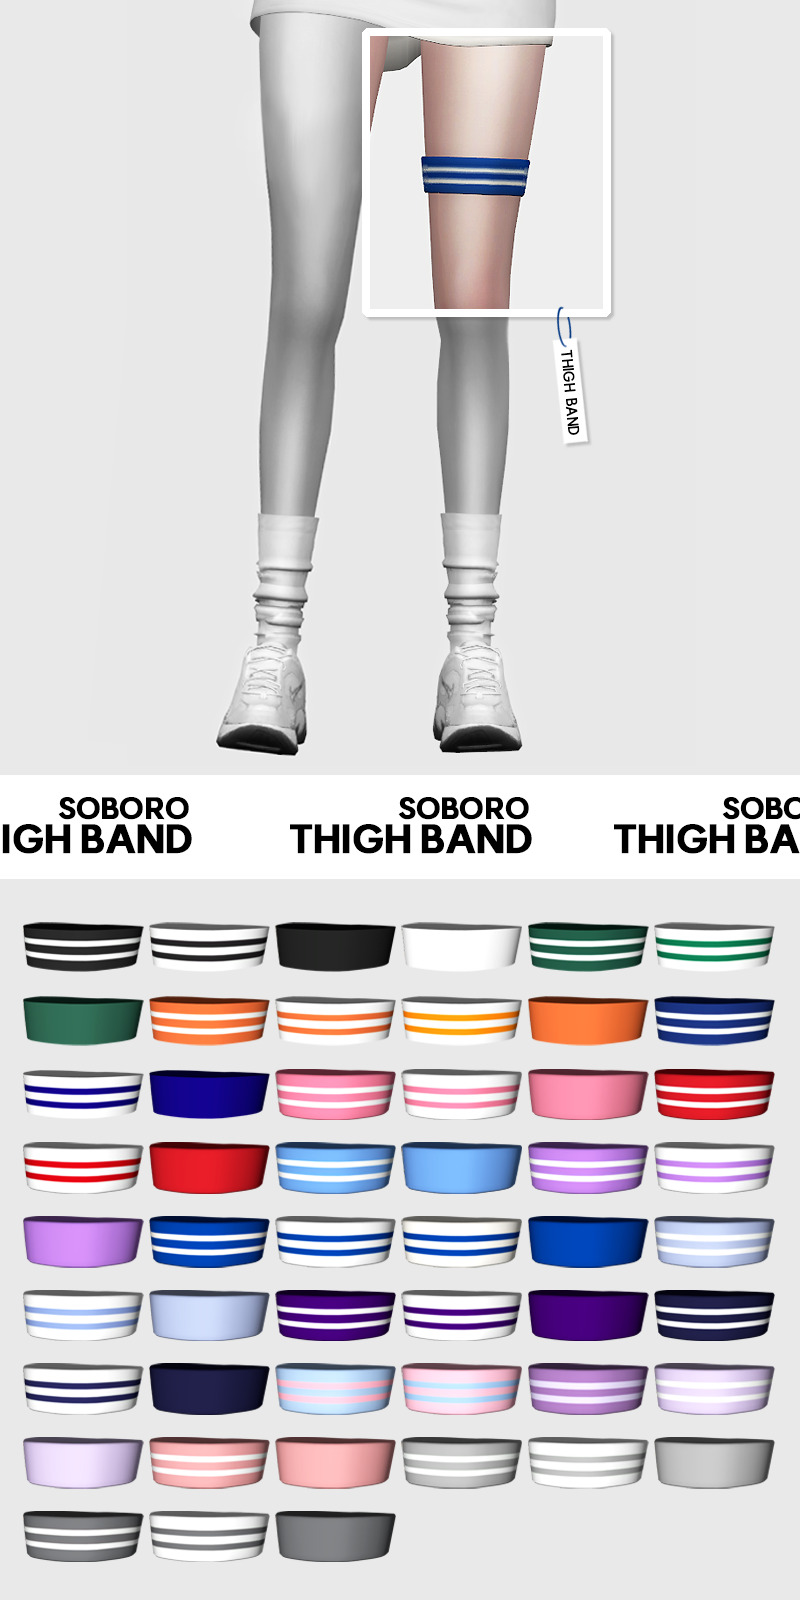
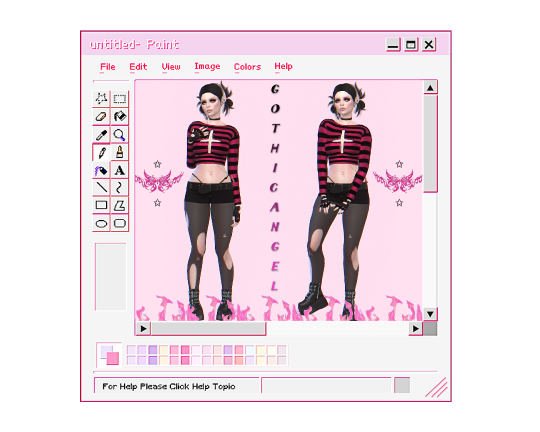
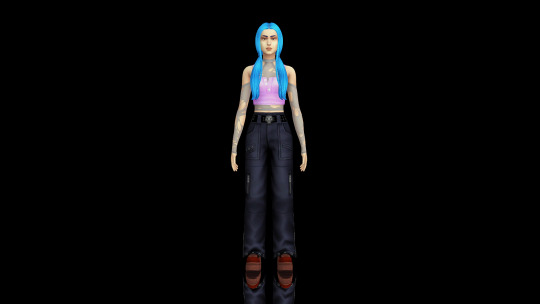
[SOBORO] Polo Cropped T-Shirt and Banded Skirt & Knee Brace & Thigh Band
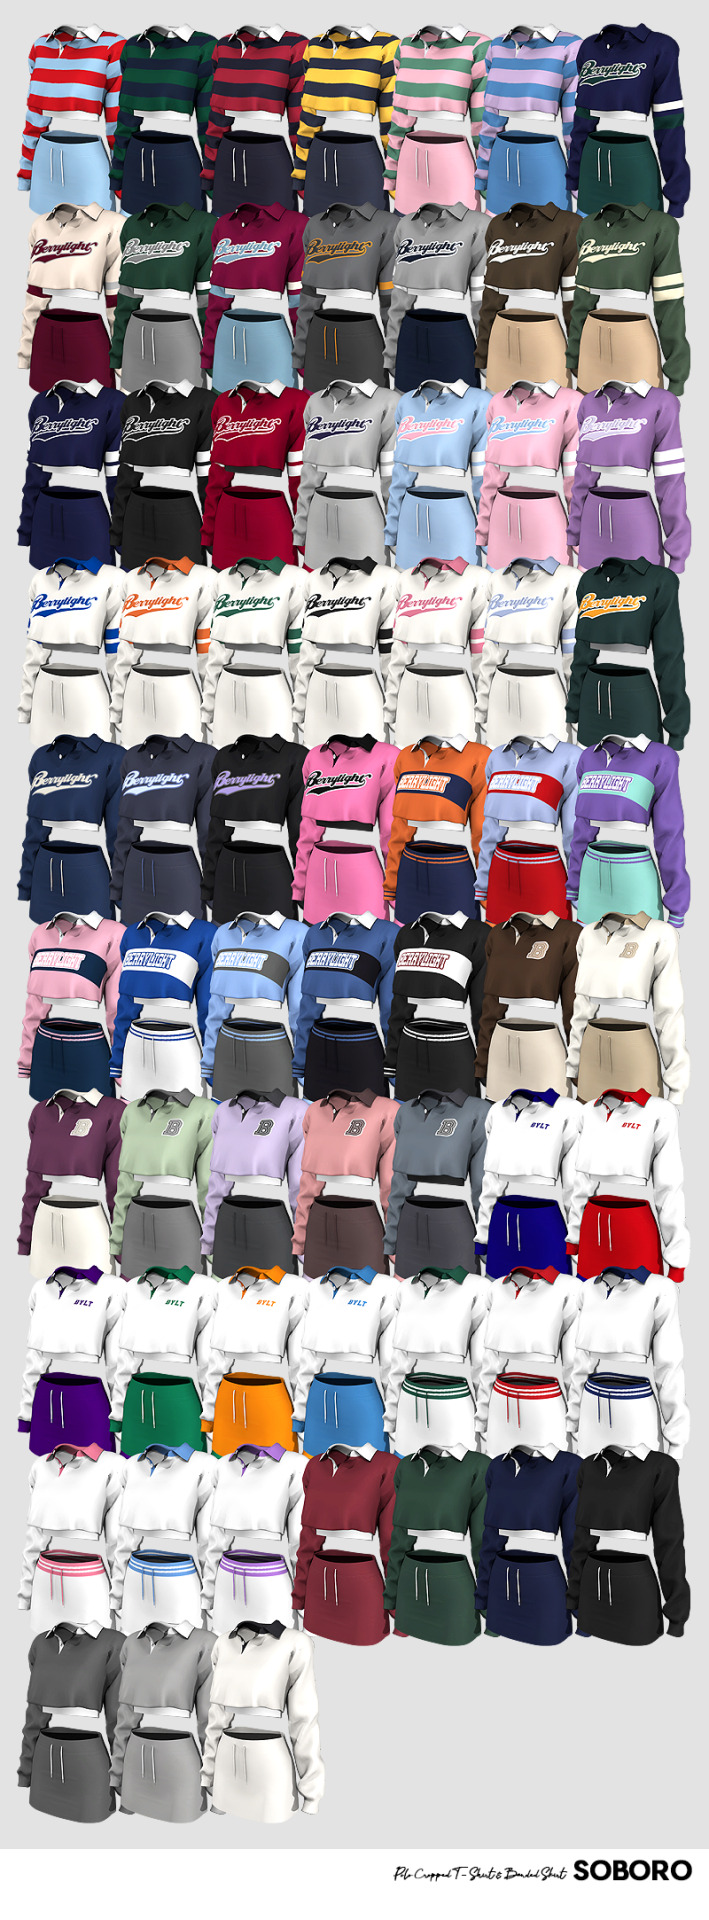
" Polo Cropped T-Shirt and Banded Skirt "
🖤 The Sims 4
🤍 New mesh
🖤 Dress 66 Swatch
🤍 HQ mod
🖤 All LODs
🤍 Clothing body
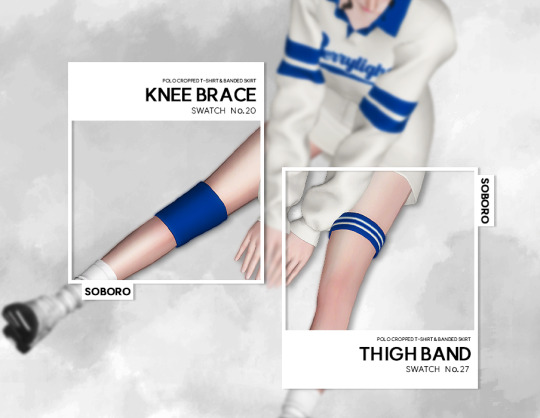
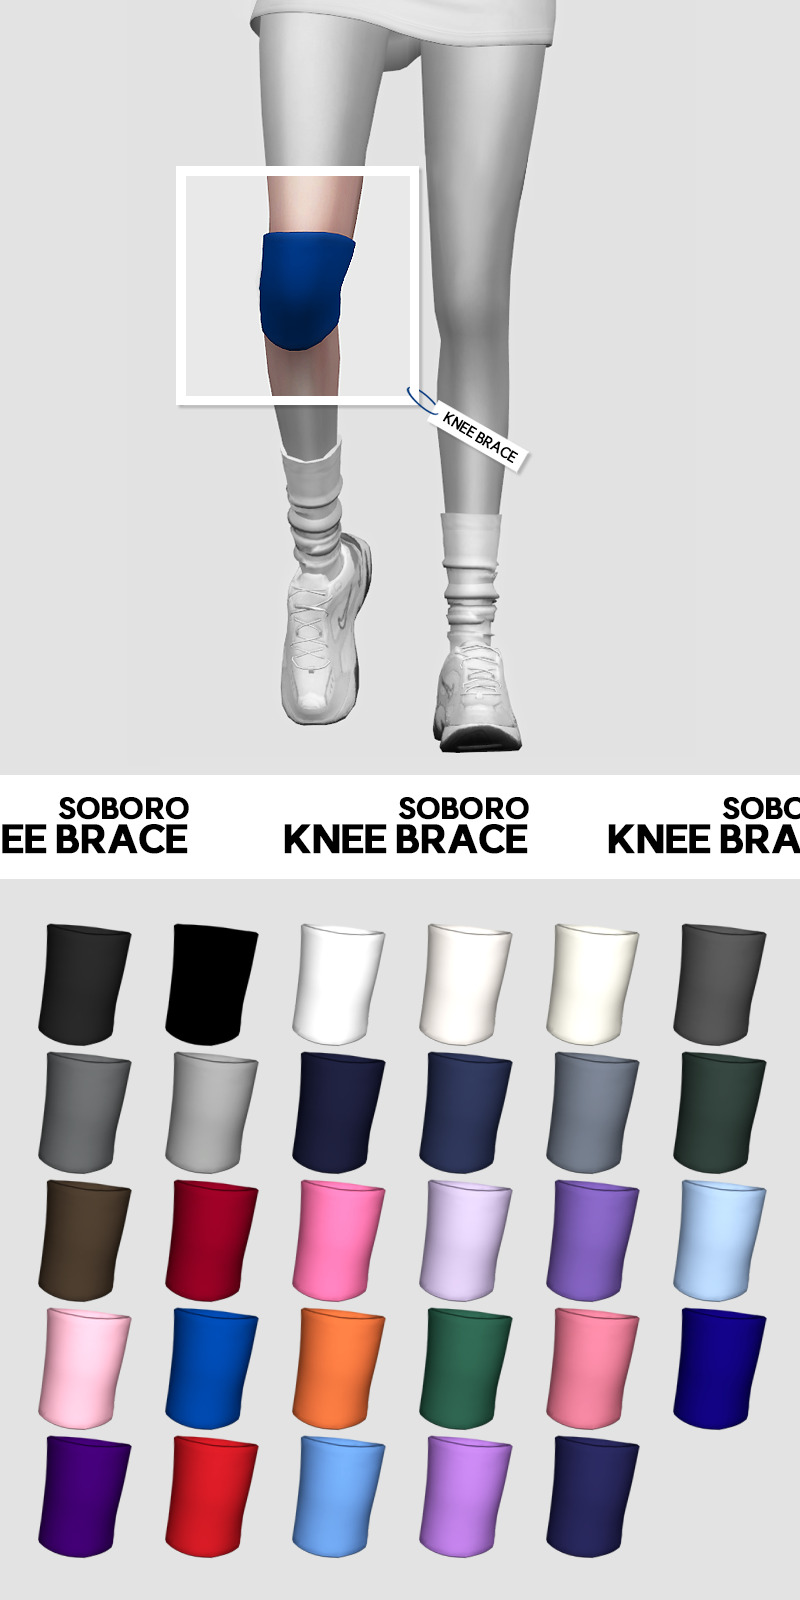
" Knee Brace & Thigh Band "
🖤 The Sims 4
🤍 New mesh
🖤 Knee Brace 29 Swatch / Thigh Band 52 Swatch
🤍 HQ mod
🖤 All LODs
🤍 Knee Brace _ Right Bracelet (Wrist Right)
Thigh Band _ Left Bracelet (Wrist Left)
[Early access Download] Patreon __ 👉 here
[T.O.U]
All content provided by "Soboro" can only be used for personal purposes and cannot be used for commercial purposes. In addition, it is strictly prohibited to unauthorizedly modify, replicate or distribute files, so please keep in mind this rule.
.
#ts4#ts4cc#sims4#s4cc#s4cc download#sims 4 download#sims4cc#sims#the sims#ts4 cc download#s4 cc#s4 cc down#s4 cc download#ts4 custom content#the sims 4 custom content#the sims 4 cc#sims4 cc#sims 4 custom content#the sims cc#ts4 dress
75 notes
·
View notes
Photo
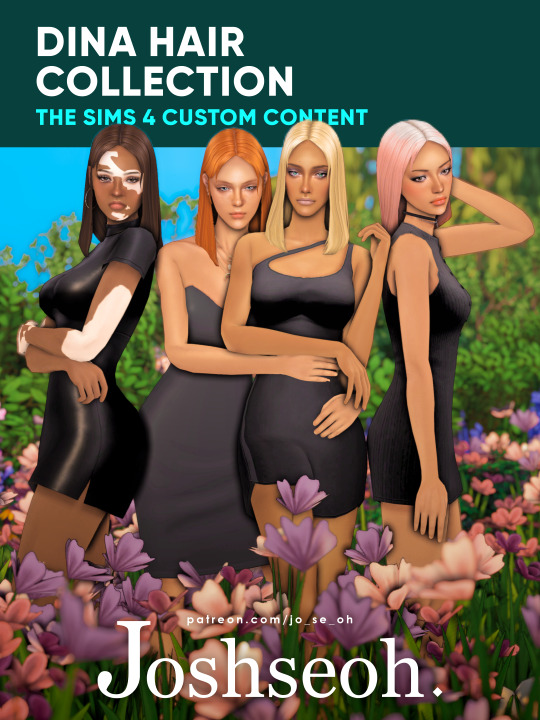
Dina Hair Collection
The maxis match version of Dina Caliente's from The Sims 2!
Public release: 09/06/23
For feminine frame
Basegame compatible
24 EA swatches + 1 blond swatch (similar to her TS2 version)
For teen to elder
Custom thumbnail
Hat compatible
Shadow map
Specular map
Normal map
Disallowed for random

Dina Hair Overlay
For feminine frame
Basegame compatible
Compatible with all Dina Hair
Found in Brow Ring (Left) category
Also available: TS2 Original Version

Read my Terms of Use before downloading!
Download here
#the sims 4#ts4#s4#ts4 cc#s4ccfinds#ts2#s2#the sims 2#simblr#sims 4 download#sims 4#simmer down#the sims 4 cc#the sims 4 custom content#sims 4 simblr#ts4 mm hair#ts4 maxis match#ts4 maxis match cc#dina#dina caliente#the sims 2 dina caliente#ts4 dina caliente#caliente#ts2 to ts4#hair remake#hair cc#s4 hair cc#ts4 hair#joshseoh#jo_se_oh
485 notes
·
View notes
Text


Sim Request By @justice-sims🍇🌿
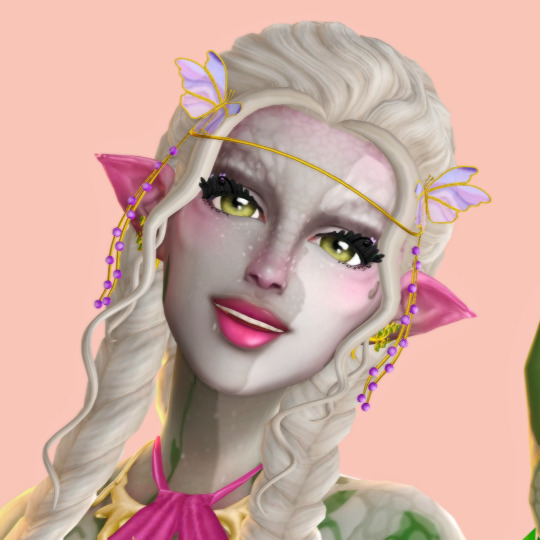
Amaltheia Nectarios. she/her, Aspiration: expert nectar maker. traits: cheerful, loves the outdoors, nosey. Occult: Nymph. Medium CC
One of the many daughters of Dionysus, Amaltheia is a nymph of the vine. Her figure mirrors the towering stone walls of ancient cities, and she frequently dresses in the hues of her cherished nectar. Her aspiration is to cultivate a vineyard worthy of the gods and to be known as the nymph who possesses the most "juiciest" gossip.
~thank you for the request! and I hope you like her! (╯▽╰)
~credit to the cc creators💚
❦download❧
#I'm not gonna lie... it took me until last night to finally realize her lol I had SOOO many ideas it hurt! I was in pain guys!#but I finally narrowed it down to something actually attainable in the sims. whimsy cc is scarce I dare say.#seyvia's sims#sim requests#ts4 simdump#simdump#ts4#sims 4#s4 lookbook#occult sim download#sim download#sim dump#the sims 4#ts4 nymph#nymph sim#vine nymph
36 notes
·
View notes
Text


🌿 Sophie [Download Available: Anna&Bibi]
🦋 Butterfly Wand [Download Available: Anna&Bibi]
👸 Tiara Crown [Download Available: Anna&Bibi]
✨ Shoes Toddler V1 [Download Available: Anna&Bibi]
#ts4 simblr#sims 4 simblr#simblr#s4 lookbook#ts4 lookbook#sims 4 lookbook#sims4#the sims 4#sims 4#the sims 4 cc#the sims cc#ts4 custom content#sims 4 cc#ts4cc#sims 4 custom content#ts4 anna&bibi#the sims custom content#ts4cc download#down#the sims4#ts4 cc#ts4 toddler#ts4 toddlers#the sims 4 toddlers
15 notes
·
View notes
Photo

lookbook !
♡ inspired by this super cute cc set ♡
★・・・・・・★・・・・・・★・・・・・・★
hair | nails | top | skirt | thong | leggings | shoes | gloves | earrings | piercings: 1 / 2 / 3 | choker | headset
★・・・・・・★・・・・・・★・・・・・・★
creators: @arethabee @asansan3 @ceeproductions @fukkiemon @helgatisha @indisim @jius-sims @magic-bot @nightcrawler-sims @pralinesims @the-crypt-o-club @theevyxen
#lookbook#ts4 lookbook#s4 lookbook#ts4cc#s4cc#cc finds#hystii#the sims 4#thanks to all cc creators <33#i figured out how to stop my picture quality from going down when i was editing#google is great#love google#this lookbook is the product of fukkiemon's new playlist set#i had to have it and use it#thank you fukkiemon :))<3333#my sims#mira
66 notes
·
View notes
Text
load, https://hasuxitef.tumblr.com/post/692087722147446784/mode-d-emploi-motorola-moto-g5-download, https://hasuxitef.tumblr.com/post/692087722147446784/mode-d-emploi-motorola-moto-g5-download, https://hasuxitef.tumblr.com/post/692087722147446784/mode-d-emploi-motorola-moto-g5-download, https://hasuxitef.tumblr.com/post/692087722147446784/mode-d-emploi-motorola-moto-g5-download.
#http://vk.cc/c7jKeU#nofollow#<p> </p><p> </p><center>BIBERON TIGEX MODE D'EMPLOI CASIO GRAPH 35+ >> <strong><u><a href= rel= ta#<br>#<br> </p><p> </p><p> </p><p> d'éco-participation Calculatrice graphique Casio Calculatrice Graph 35+E 12 € Biberon col étroit "Ai#SUR UNE SÉLECTION PAPETERIE ET MODE ** 8490 Dont 0.04 d'éco-participation Calculatrice graphique Casio Graph 35+E Niveau lycée pour toutes#Casio Graph 100+ et kit de connexion PC USB ATECA - Poubelle a pédale 35 litres Juice - Poubelle a pédale - TIGEX Chauffe biberon Express v#zone alarm francais mode d emploi fr zonealarm francais zonealarm france astrologie et ascendant heure chanson montre and casio comment des#Samsung galaxy s4 i9506 4g ltecire orthodontique gum mode d'emploi · Snapchat de telechargement. d'emploi#Peugeot 308 cc mode d'emploi casio graph 35+#Tagged: 35#Casio#d'emploi#graph#mode#Ornithine Philips slv 3100 mode d'emploi ipad Manuel porsche panamera Chauffe biberon tigex 2min30 notice#fr.shopping.rakuten.com/s/notice+entretien+renault fr.shopping.rakuten.com/s/calculatrice+casio+graph+35e+mode+examen#</p><br>https://hasuxitef.tumblr.com/post/692087722147446784/mode-d-emploi-motorola-moto-g5-down
0 notes
Text

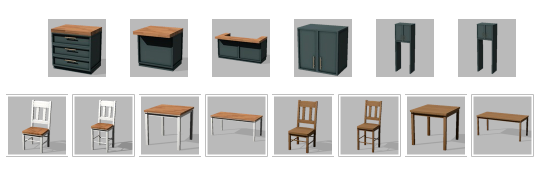

Basic Reduxe Kitchen
CC Set of 14 BGC Items
A combination of my Back to Basics and Basic Luxe kitchens, because I really liked my mesh for the Luxe ones, but I will always love butcher-block tops more than any other kitchen surface. It's a pretty standard kitchen and I think the file names are self-explanatory, so here are some bullet-points-of-interest:
Like my Basic Luxe kitchen, the counter's end pieces have been changed to an alternate full-tile model and a half-tile model for more customization.
The cabinet also contains half-tile end pieces
This color palette draws a few swatches from the Basic Luxe palette, but I changed the hardware color slightly, and grabbed a bunch of colors from sforz's various palettes
The dining set packages come in two standalone versions: one set that matches the rest of the kitchen's swatches, and another set of 18 solid wood tones (bottom two rows of palette image)
Disclaimer: I re-mapped the UVs for the island tops and some counter tops, so the dirt overlays may be funky-looking. Since you're supposed to clean them when they're dirty anyway I decided it wasn't worth the effort to figure out a seamless texture for them (if you saw the uv map you would understand)
Download link below the cut!
There isn't really much to say about this one! I thought it was going to be an easy project (when will I learn?) but I found some mistakes in the original meshes (nothing big but I'm a perfectionist) and fixed them along the way, which took extra time. And then I spent forever trying to decide on colors, and then trying to trim down the count (I cut 2 whole wood tones which helped decrease the number by about 30%).
I also decided to do custom thumbnails for these, because I liked the way they came out in my Basic Luxe set. I spent about three days manually generating, exporting, editing, and importing thumbnails (and even set up an auto-clicker program to help me!)... only to find out that S4S added a "catalogue thumbnail underlay" option in one of their updates. I'm still mentally recovering from that (read patch notes!!) 😔
Anyway, at least I got to play with ReShade a bunch! I've been mostly using it for screenshots in ESO, which is an online game that I can't pause, so being able to take my time and play with shaders and get juuuuust the right look was a real treat!
I use Peacemaker's No Occluder mod to prevent weird shadows from appliances/cabinets.
Credit: Kitchen Clutter | Solid Wood Texture by @myshunosun
Download (Patreon) Always free, no ads.
692 notes
·
View notes
Text
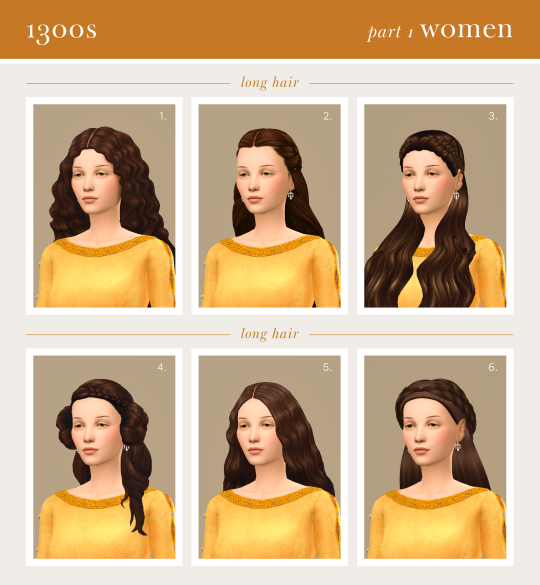


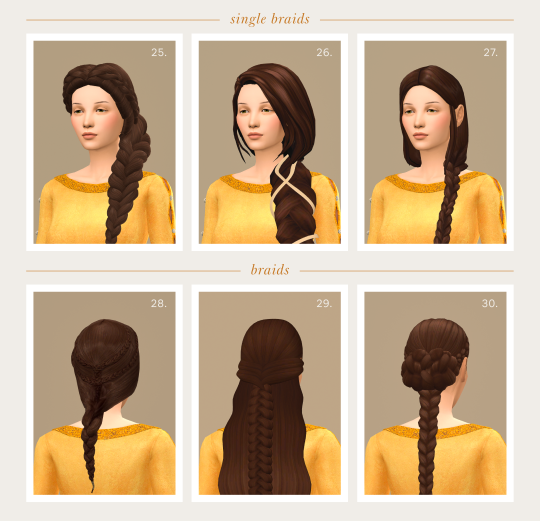
I've been really enjoying the @kosmichippie Ultimate Decades Legacy video series over on YouTube. While the traditional decades challenge begins in the 1890s, the ultimate version has you travelling all the way back to 1300 to start. This has inspired me to create a series of CC collections and lookbooks, starting with century by century, then whittling down to era/decade as fashion cycles start turning over more quickly.
First up is the 1300s. I didn't think I'd be able to find many female hairstyles for this century, but I was pleasantly proven wrong. During this period unmarried women wore their hair freely, where as wives and widows were expected to wear their hair either up or cut and covered at all times. Part two will include veils and other headwear, so enjoy these more liberated styles for now. CC links under the cut.
You can find more of my historical content here: 1300s ✺ 1400s ✺ 1500s ✺ 1600s
1 - Maria by Simstrouble
2 - Gratiana by Quirky Introvert
3 - Cotton Candy by Tekri
4 - Medieval Long Hair with Buns by Alin22
5 - Noah by Dogsil
6 - Merielle by by Sylviemy (TSR)
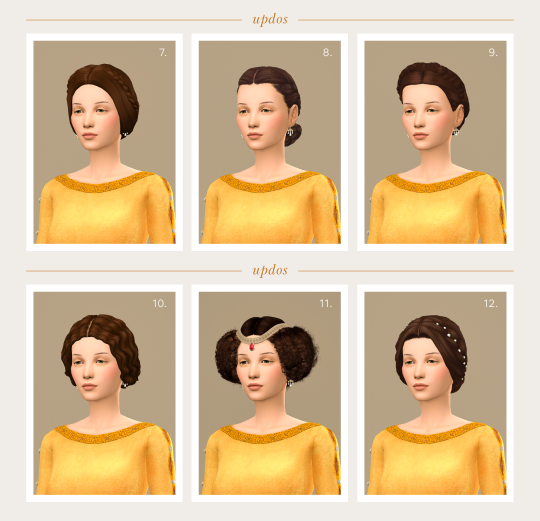
7 - 1850s Hair 3 by Buzzard's Bits and Bobs
8 - Lieke by Birksche
9 - Braided Hair Wreath by Birksches
10 - Peggy by Buzzard's Bits and Bobs
11 - Brianna by DarkNighTt (TSR)
12 - Penelope by Buzzard's Bits and Bobs
13 - Padme Picnic by Buzzard's Bits and Bobs
14 - TSM Queen's Buns by Simverses
15 - Medieval Side Buns by Alin22
16 - Marguerite by Sehabla Simlish (TSR)
17 - Antoinetta by Melancholy Maiden
18 - Victoria by Feral Poodles
19 - Matilda Braids by Sychik
20 - Agnes by Sychik
21 - Meike by Birksches
22 - Penny by Tekri
23 - Zinnia by Bed & Musae
24 - Audrey by Wasteland Whisperer
25 - Esmerelda by Wasteland Whisperer
26 - Helen by Oydis
27 - Rowen V3 by Tekri
28 - TSM Double Braid by Simverses
29 - Sail by Enrique S4
30 - Padme's Mustafa Hair by Buzzard's Bits and Bobs
With thanks to some amazing creators: @simstrouble @qicc @tekri @dogsill @buzzardly28 @simverses @feralpoodles @sychik @wastelandwhisperer @oydis
#hair collection#ts4#ts4 cc cas#the sims 4#the sims#ts4 decades challenge#sims 4 decades challenge#ts4 cc#ts4 cc hair#ts4 historical#ts4 history challenge#sims 4 history challenge#sims 4 historical#ts4 medieval#sims medieval#1300s#medieval#historical cc#ultimate decades challenge#14th century
868 notes
·
View notes
Text
Tutorial: Converting all types of CAS CC to work with color sliders (+ how to disable it)
This enables CAS CC to work with Color Sliders for Hair, Clothes, & Accessories by thepancake1 and @mizoreyukii.
Since S4 Studio only let's you batch convert hairs and update makeup for compatibility, I present to you: TS4AlphaConverter_2_2_0_0 by CmarNYC.

Keep in mind that enabling CAS CC for color sliders will increase the file sizes of your .package files!
Sliders will also always affect all the texture, i.e. you can't exclude accessories like buttons or zippers, so some textures might not work well.
Also check out this tutorial: Fixing slider compatible CAS CC with broken textures

💜 Requirements:
Color Slider mod
TS4AlphaConverter_2_2_0_0
CAS CC you want to enable
Featured CC by @trillyke @daylifesims @jius-sims @magic-bot
💜How to enable CC for color sliders
1. Download the required program, mod and CC you want.
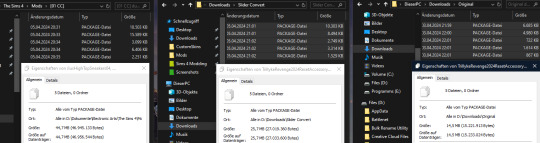
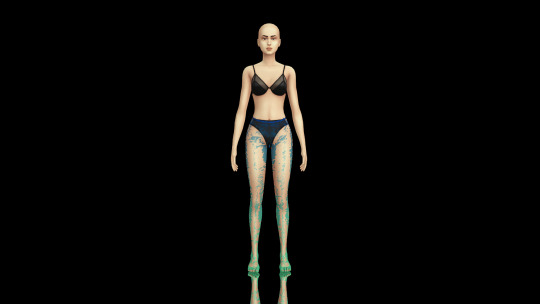
This is my outfit before sliders:

2. Open up Alpha Converter
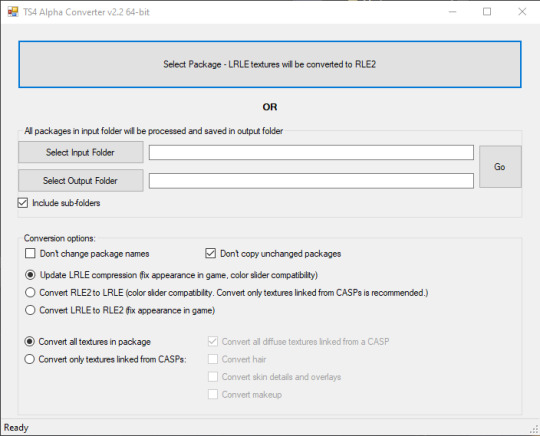
3. For enabling sliders, you can only use the folder option and not single files:
Select your input folder which contains the .packages you want to enable.
Then select your output folder where you want to save the new files.
"Include subfolders" is handy if your CC goes into more folders inside your input folder. It will reproduce the same file structure.
4. I would recommend enabling "Don't change package names" so you can just replace your input files directly, otherwise it adds "_Fixed" at the end of the filename.
I will also leave "Don't copy unchanged packages" checked.
5. Next we will select "Convert RLE2 to LRLE" to enable color sliders. I will explain the others later.
It then enables "Convert only textures linked from CASPs" which is good, e.g. it will only target actual CAS CC textures then and no Build & Buy for example.
Leave "Convert all diffuse textures linked from CASP" checked if you want to convert all types of CAS CC.
6. These are my finished settings:
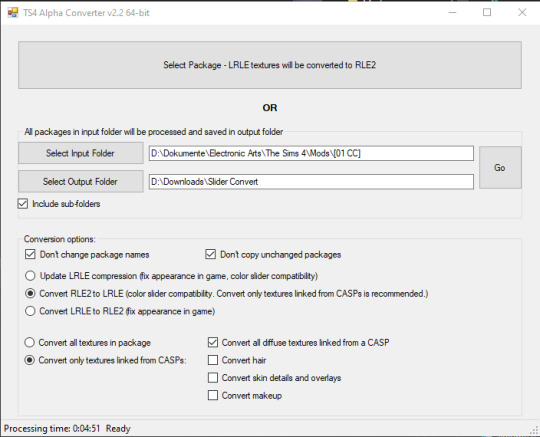
7. Press "Go". It will then take a while depending on file amount and swatches, as it will have to go through textures one by one.
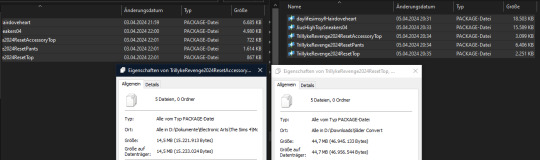
8. Check your finished files. The file size should be bigger, in this case it went up by 30 MB for only 5 files.
This is how the outfit looks after applying sliders to all pieces:
💜 How to disable CAS CC for color sliders
This time select "Convert LRLE to RLE2". You can leave "Convert only textures linked from CASPs".

2. Press "Go" and let it do it's thing.
3. As you can see, the file size went down again (middle), but it is not the same size as from the original file (right).
You will no longer be able to use sliders on the CAS CC piece, except transparency, which always works.
💜 Fixing slider compatible CAS CC with broken textures
If some of your CAS CC displays huge areas of missing, pixelated textures there is an issue with compression.
I don't know how and why this happens, but check out * this tutorial * on how to fix it.
@thefoxburyinstitute @maxismatchccworld @emilyccfinds @sssvitlanz
#yoru tutorials#ts4 tutorial#ts4 resources#tutorial#Sims 4 tutorial#s4 guide#ts4 guide#Sims 4 studio#Sims 4 cas#ts4 cas#color slider#cmarnyc#thepancake1#mizoreyukii
64 notes
·
View notes
Note
Hi! I have a question do you know if there a way to get vfx trains from San myshuno to work in any lot or world ? Not functional but showing up if you place like train tracks or rabbit hole train station sorry for the bad English
Hi! Well I think there's 2 ways to do it: one is to link an object with a VFX (i.e. a train track obj with added train vfx). I think BakieGaming did a lot of his animated ccs this way, tho I haven't checked the exact details.
Two is by extracting the mesh and make them into a buy mode item which you can place anywhere.
Both are static in place, and while there are some that're animated, they're located pretty far away from the spawn point that idk if it's usable XD you kind of need to do some make believe with the static objs, or figure out how to move the animated ones closer to the obj it's spawning from.
Regardless, here's a tutorial for the 2nd method since it's how I first interpreted the question haha
How to Extract VFX Meshes w/ VFX Tool
Will be going over how to find their mesh instance id w/ the VFX tool, find it in Sims 4 Studio, extract those meshes & textures, and have them buyable in-game.
Tools needed: Sims 4 Studio, VFX Tool by denton47, and Studio Effect Player mod by andrew (in-game)
All credit to denton47 for the info on how to find the mesh, I'm just relaying the info that I found there :D
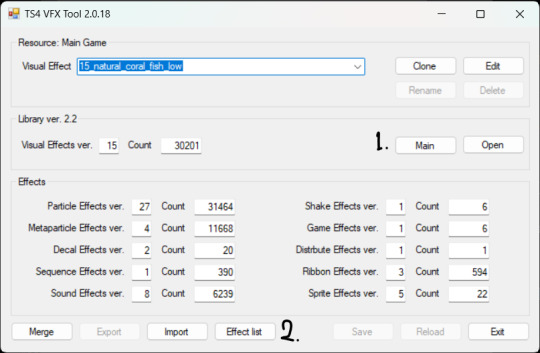
VFX Tool - find mesh's instances
Install the VFX tool. Once done, select Main (1), then select Effect List (2) to get the list of all available vfx for easy viewing. This will allow you to look through the dropdown to find the VFX you need.
Search for the VFX you want to extract the mesh from by going over the list and use the Studio Effect Player mod to try out different keywords and see what object it's associated with (Select Effect, then paste the vfx name).


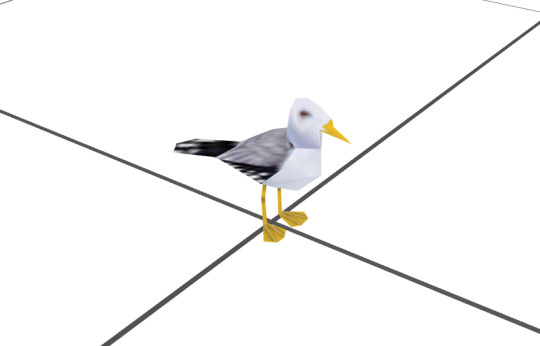
For the San Myshuno trains in particular, they are labelled as "commuter_train" and has several variations. Ones that standout/has unique variation are:
commuter_train_car : on the middle w/ a middle carriage mesh
spice_commuter_train_car : on the front, mesh is the same as above but w/ dirty texture
uptown_commuter_train_locomotive : on the back, front/back carriage
spice_commuter_train_car_locomotive : not pictured, contains 2 different meshes (front & middle/back carriage)
Once you found the VFX you need, go to Edit (1), then select Edit (2) on the first ParticleEffect. On the new window, search for the IID/instance id (3), and copy that number on notepad. Do the same for the other VFXs listed above.

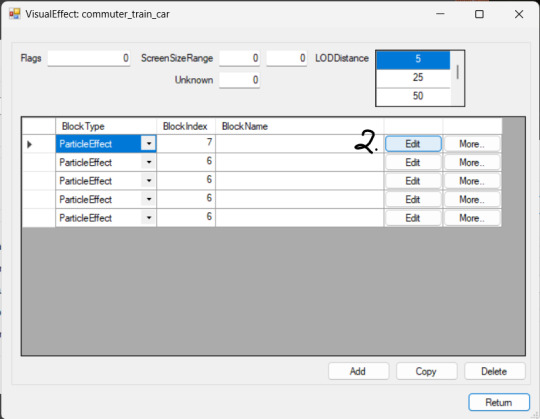
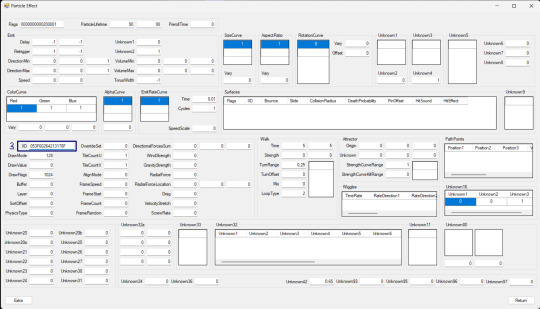
The ParticleEffect points to either a mesh or texture. The first 1 or 2 usually has the IID to the mesh while the others have IID of additional textures (e.g. headlights), which you can skip over.
Here are their IID:
commuter_train_car : 053F60264213178F
uptown_commuter_train_locomotive : 122458A81FD85174
spice_commuter_train_car : 4F02D6E9EBE47B71
spice_commuter_train_locomotive : 973B164B6BE4933A & 562FA1E2D1E29690
S4S - find models & textures with Game File Cruiser
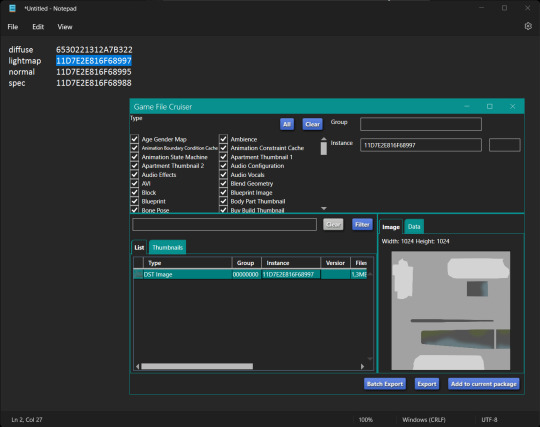
Open S4S > Game File Cruiser, and search for one of the IID above (will be using the commuter IID).
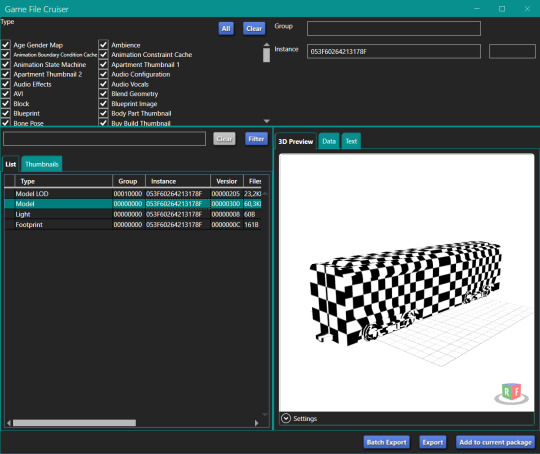
You'll notice that there's no texture. What you can do is to go to Model (1) > Edit Items on Lods (2) > Edit Items on Meshes (3) > scroll down to Edit Items on Material (4) > and select & copy the DiffuseMap IID (5), which is 6530221312A7B322.
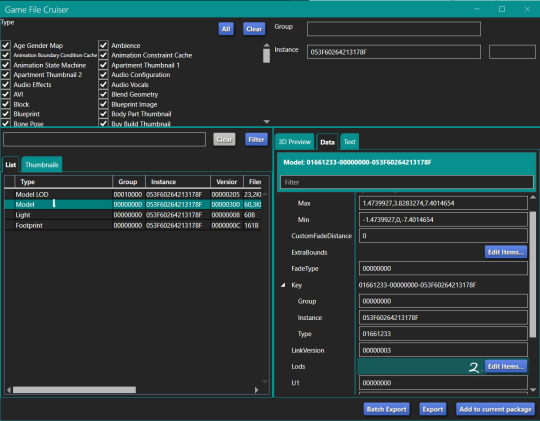

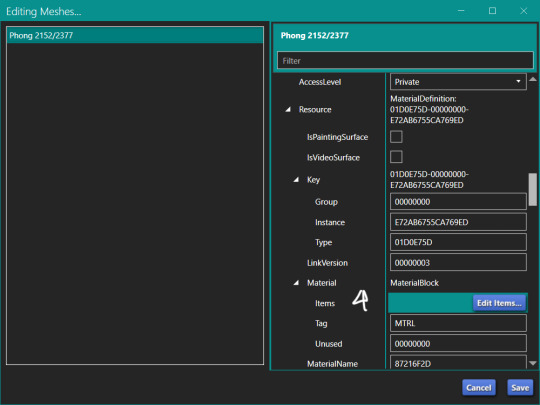

Search for the new IID in games file cruiser. This IID in particular has its own mesh and seems to have more Material information when you inspect it. So, in addition to the IIDs we found from the VFX tool, we'll also add this new mesh & resources into the package file later on.

If you plan on editing these textures, save the instance numbers of LightMapTex, NormalMap, and SpecMap onto a list, and export each of them using GFC.
Go back and keep the main GFC window open for now.

Before you continue: take note of how many Materials / mesh groups there is on the object. Since this has 1, you'll need to clone an object with 1 mesh group too.
S4S - extracting mesh & making object override
Just for info, by editing the file to make it possible to extract the mesh, you'll be making this file into a buyable object that will also override EA's meshes & textures (if you choose to replace them), though you can add custom swatches that won't affect the EA obj.
Create a 3D Mesh item. Since this object only has one mesh group, search for an object with the same amount. Back in the GFC window, select all resources and add them to the current package.

With the 6530221312A7B322 IID copied, select Object Definition > Model > paste in the instance box.
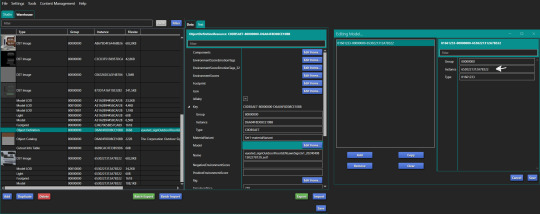
Also paste it for the Footprint resource and change the Group number to 00000000 to make sure it's linked to the right resource.

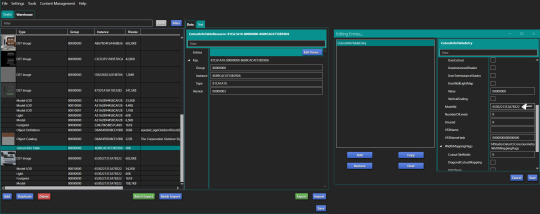
Then, select CutoutInfoTable > Entries > scroll down until you find ModelID and paste the IID you've copied.
Save, reload package file, and now you can extract the mesh and textures!

Note that if you update the mesh/texture, it will also override the VFX object that goes around in San Myshuno.
Repeat the process for the other mesh variants on new package files. If you simply want to have them be buyable, getting 2 different models is fine, but if it's a texture override, then it's worth getting all the models instead.
Last note, this train object has the LargeObject shader and that seems to prevent it from lighting up at night, so you'd want to change that to Phong instead.

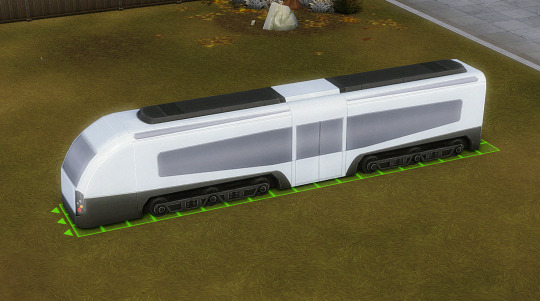
In-game preview:

If you want your object to have proper LODs, it'll probably be easier to clone a 3D mesh that already has that and import the train mesh you've just extracted into the cloned package file.
The train tracks are probably accessible if you look for debug/live edit objects in buy mode.
56 notes
·
View notes
Text
OOOOO
Hello Hi Yes
I’ve only seen this done once before but I seriously wanna put my own twist on it.
Steve, Tommy, Eddie and Billy who all get stuck in the school post s3 pre s4 after being cornered by a demogorgan and not having anywhere else to go.
But like— the twist; there’s no Billy (he’s dead, sorry) and it’s Corroded Coffin instead. Yes Tommy’s still there because I crave Stommy friendship.
So they’re all caught up at the high school after school for one thing or another, and they all end up meeting in front of the front office while trying to leave but then Tommy and Eddie get into an argument over something dumb and then a demogorgan hits and Steve’s like in charge and shit idk.
And there’s a part where Eddie’s like “THATS NOT WHAT A DEMOGORGAN IS!” and Steve is like “I DONT FUCKING CARE BCAUSE EITHER WAY ITS GONNA BITE YOUR FUCKING FAVE OFF”
And there’s another part I really wanna write where Tommy is panicking really bad to the point of a full blown panic attack and Steve is like “I’ve got this” and calms him down as easy as spelling his name.
And another part where Steve gets a really bad cut or smth on his leg and Eddie and Tommy have to physically hold his ass down to get him to cooperate.
There’s much gay tension, obviously.
And Eddie and Tommy bickering. Lots of that.
And then there’s this one part where Steve finally gets his walkie to work (cause it wasn’t before for some reason) and he calls role call and Eddie and CC are like “HENDERSON? WHEELER?? SINCLAIR???”
Idk man, I just need Stommy redemption, Eddie and Tommy bickering, and Steddie getting together under fucked up circumstances. Also CC interacting with Tommy and Steve in a positive light is such a funny thought to me idk why.
But yeah that’s it. Might write it, might not. Idk yet but it’s def out there now.
#stranger things#steve harrington#dustin henderson#mike wheeler#eddie munson#lucas sinclair#tommy hagan#corroded coffin#cc#steddie#stommy#but platonic#the upside down strikes again#tommy and steve being actual friends#cause I crave it#and i can't stop thinking about it#and I deserve nice things dammit#so does steve#so he gets a bf and new friends#my boys 🫶#my babies 🫶#gareth x will eventually 👀#maybe#still dunno how I feel abt it#robin buckley#will byers#max mayfield#el hopper#having a lot of thoughts#gay steddie thoughts
104 notes
·
View notes
Note
Hello, do you have tutorial for how you get 3D models into your game?
hi! it's easy, here's a quick tutorial:
So first off you'll need Sims 4 Studio, Blender, and a very general idea of how to use Blender to make CC
Your 3D model needs to be in a file format supported by Blender. I use 2.76 which supports what you see in the screenshot below. If the model you found isn't available in a supported format, there are converters online which can convert models to .obj (anyconv.com, etc.). Just give it a Google
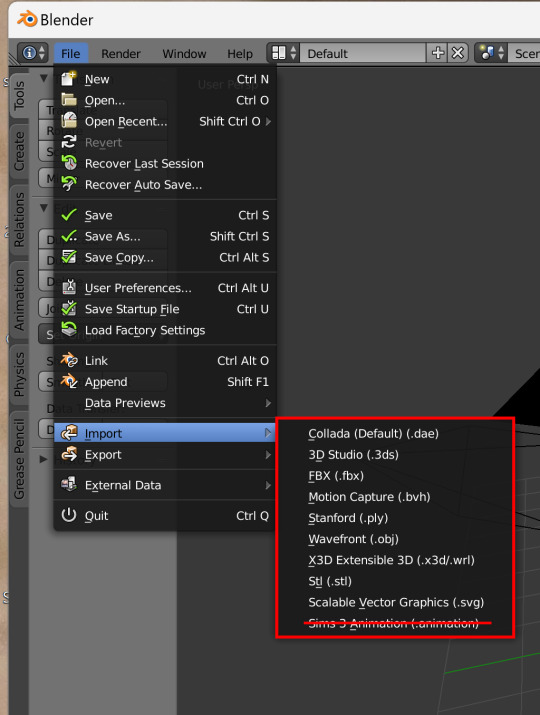
I found a .dae model of an old TV on freepoly.org to use for this tutorial (the download came with a textures folder and a model folder).
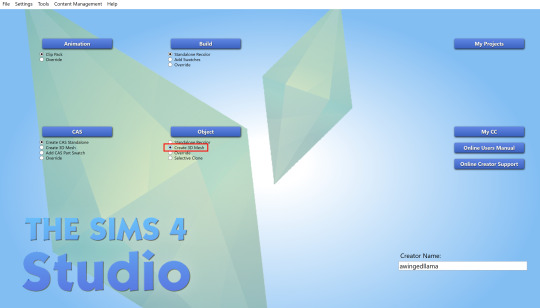
In S4S, create a 3D mesh for whatever kind of model you downloaded (or just a deco object, if you don't want it to be functional).
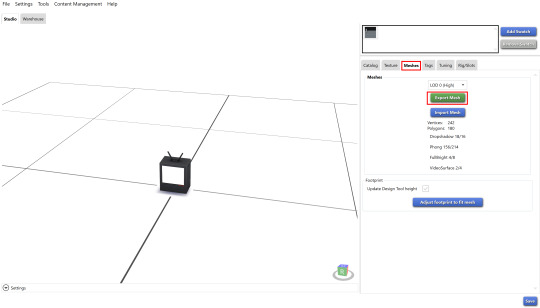
In the meshes tab, export the mesh of the EA object.
Open the blender file of the EA object, and import the 3D model into the scene. The TV model is a collada file, but you'd import whatever kind of file you downloaded.
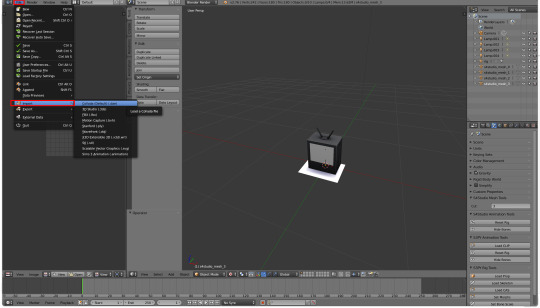
If it looks like nothing happened, don't worry! Your model is there, it's probably just to scale - which means super huge in comparison to the tiny Sims 4 object. Zoom out until you can see it, and then size it down with the 'S' key. Move it to the same place as the EA mesh
Rename UV Map to uv_0. Then, after deleting the EA mesh in edit mode, join the 3D model with the EA object. Shift-click the imported model then the EA object in the outliner, before pressing Ctrl+J (you have to be in Object mode for this to work. Use Tab key to quickly toggle between Edit and Object mode)
If you are using a deco object, you'll be replacing s4studio_mesh_1. s4studio_mesh_0 will probably be a shadow plane, which can be left alone or hidden altogether in your mesh
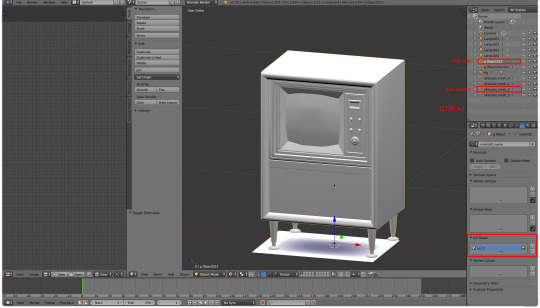
Apply a decimate modifier to the mesh if necessary (some 3D models are pretty geometry heavy – you'll probably want it under 10k polys). Since decimating is destructive, you don't want a very high poly mesh, because it won't look good after the modifier is applied. (you can retopologize the mesh but that's a whole other thing)
Import the mesh in S4S (the higher poly the mesh, the longer this takes), then import the texture that came with the model. This texture was a 4k JPEG, so it needed a bit of work (especially as TS4 doesn't support 4k textures). I sized it down to 1024x1024 and converted it to a .png.

Replace all LODs and shadow meshes. Make sure to import a blank bump and specular map, or else your object will be oddly lined and shiny
This last step is optional, but as most 3D models (that aren't game ready) are made for rendered environments, a lot of the textures don't have ambient occlusion or highlights. It makes for a bit of a plain-looking object in TS4, so I like to add these by baking the shadows in blender and painting highlights in PS. I also used the oil paint filter in Photoshop on the wood to make it more maxis-match.

If you haven't made anything for TS4 this might seem complicated, but once you get the basics it's very, very simple. Like copy-and-paste
the only other thing would be to make sure that the license for the 3D model permits personal use! (and not to paywall it obviously because beyond being crusty behaviour, that is legally perilous)
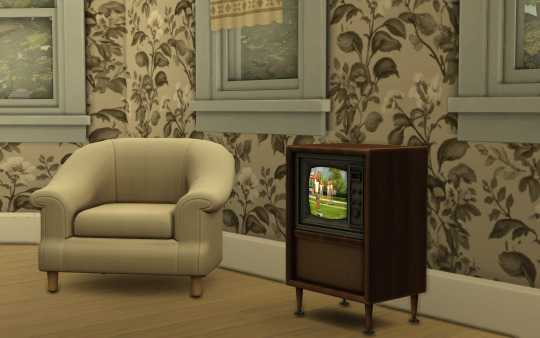
download the TV here if you like
and if you have any questions about specific steps, dm me!
358 notes
·
View notes
Text
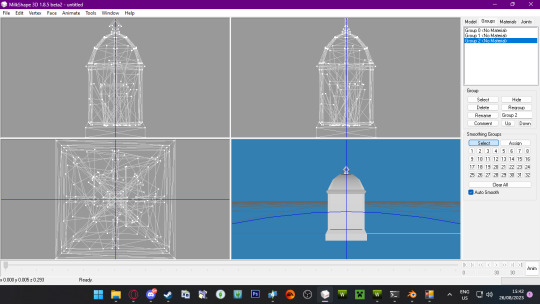
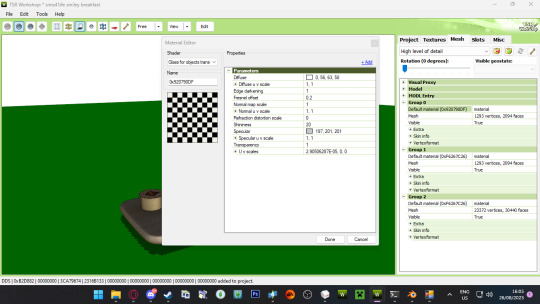
Short tutorial on how i put textures on glass TS3
So i was thinking a wile back this might help some creators/converters when it comes to glass textures
well in this tutorial im gone convert a object with a glass object and texture on it
Step 1:
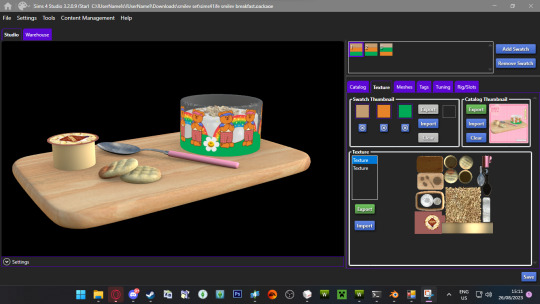
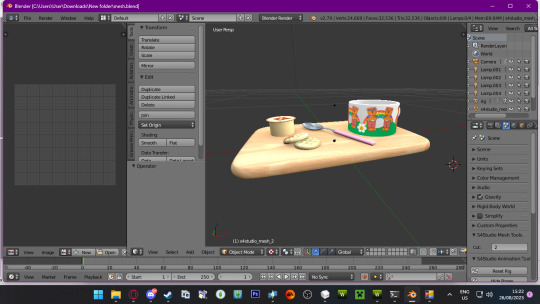
okay so this is the object i gone convert yours might be different ofc but you see the object of mine has 2 textures.
Texture one for me has the small object on the bords textures like the cookies and spoon exsport it!
and texture 2 has the glass objects texture as shown in the image bellow
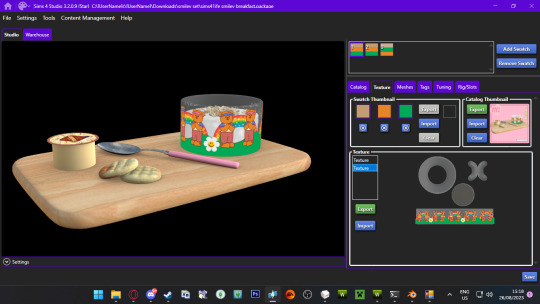
Export it aswell just as it is!
note some objects textures might be just one texture but its okay! just exsport and work with it! :)
STEP 2:
After you exsported your mesh from S4S (sims 4 studio) open it in blender
it will look like this ones it in blender now what i gone do is find the glass part of the object and duplicate it
now you can export it out of blender ;)
STEP 3:
Now open TSRW
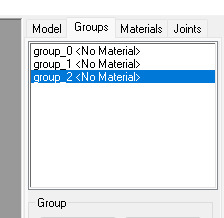
So sins this is a small decor object i gone use a plant mesh as my reference but we need a specific one so the mesh looks fine in game with its glass texture
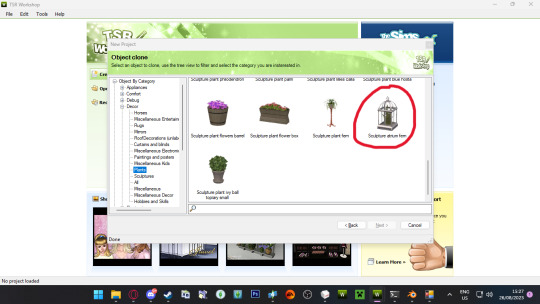
pick the refence plant called Sculpture atrium fern i recommend using this as a reference when making small decor when having a glass mesh in the object
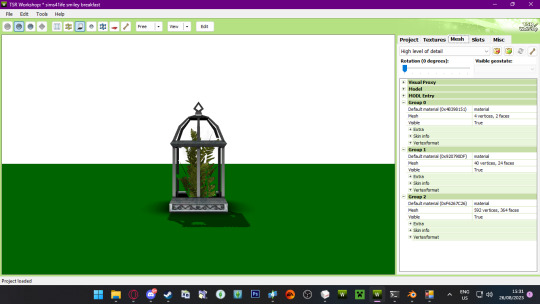
now it has 3 groups
group 0 (shaddow map)
group 1 (glass group)
group 2 ( and the other parts of the mesh thats not glass)
now i normally delete my shadow group sins i dont use it with my cc but you dont have to if you dont want to
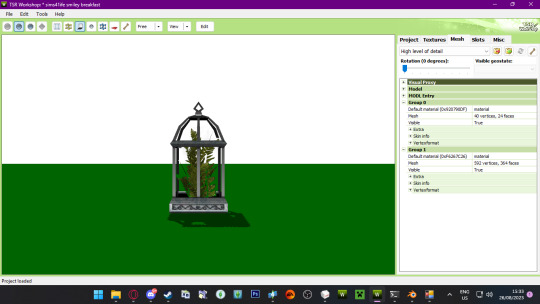
now sins i deleted my group 0 i have no shadow group and only 2 groups is left
now its
group 0 (glass group)
group 1 ( and the other parts of the mesh thats not glass)
i am gone duplicate group 1 and now i will have 3 groups and remember to rename the 3rd group as 'group 2" and as you remember you made 3 groups in blender where there was only 2 groups before sometimes there is more depends really but for me there was 2 groups of meshes now there is 3 after i duplicated the glass mesh
remember to rename the 3rd group as 'group 2"
export your mesh as a .wso object!
STEP 4:
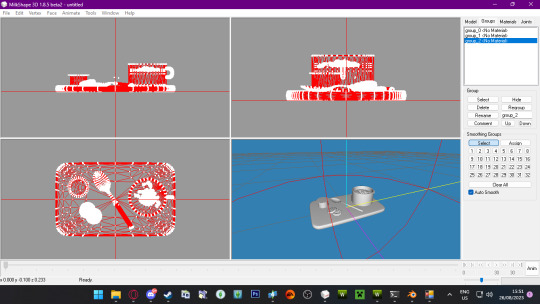
Open milkshape and import your mesh you just exported out tsrw
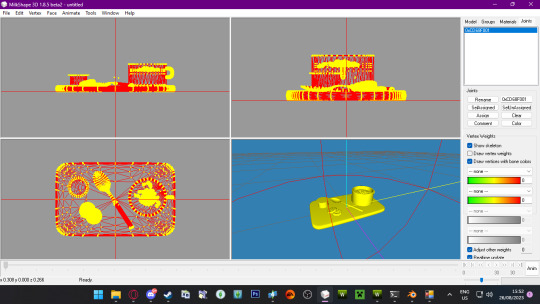
your mesh will now look like this delete all the groups and you will see the blue bubble thing well thats a bone that will not be deleted go to the joints tab and you will see this
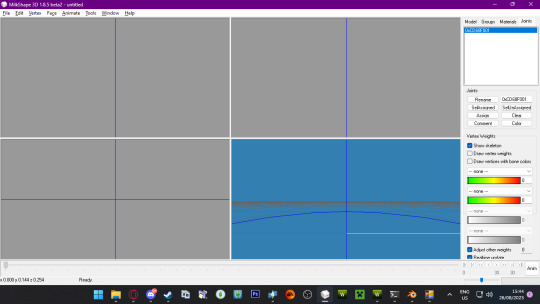
some numbers thats just the bone name if im right DONT MESS WITH IT keep it as it is just click on 'draw vertices with bone colors'
thic the box next to it and it will turn blue :)
NOW you can import you mesh you exported from blender that is a ,obj file
now you can check what mesh you are on by just pressing select on the group and it will turn red in the 3d view
like i can see im on on of the glass parts now but aside from that
now its time for renaming
simple just rename them as this :)
after that click on Edit>Select All and you will see all your meshes has turned red in the 3d windows
like this and go back to joints tab and click on assign your mesh will turn yellow now thats good! that means you have done good so far :D
and you have done it right!
now you can export your mesh out as a .wso object
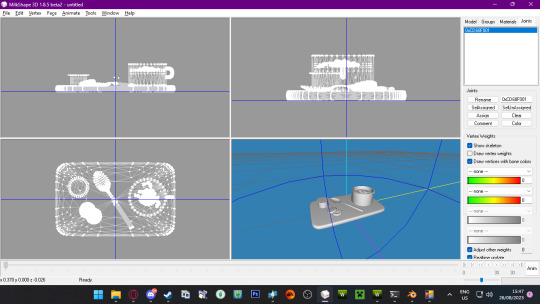
STEP 5:
Now go back to TSRW and now you almost done yay!
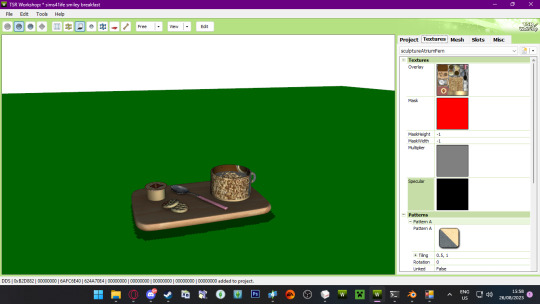
After you imported you mesh just import your textures as normal
might look weird but we gone fix that!
now go back to the mesh tab and click on group 0 and click on the 3 little dots next to materials
click on the arrow down by diffuse and change the numbers to "65,65,64,100" in the little boxes as show below

click done and if there comes a pop up just click on yes
but then you see nothing has changed dont worry its only the glass texture you fixed we gone add the texture on the glass now
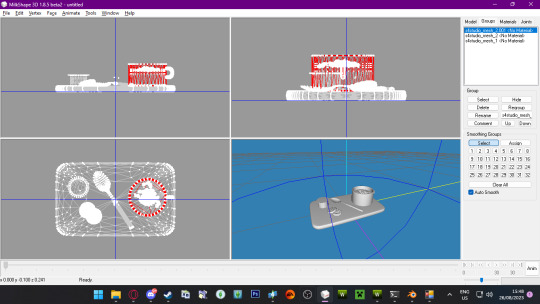
now click on group 1 and then on the 3 dots again
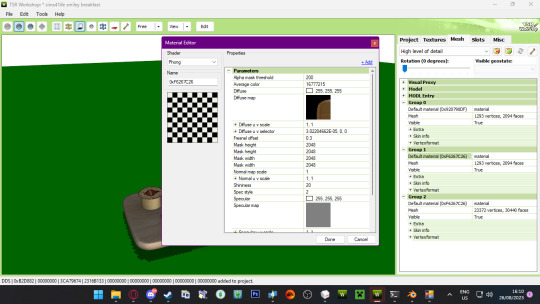
this will open click on where there stand phong and a menu will drop down here is a tutorial where i showed how to add 2 textures on a mesh but i will show you here anyway aswell
click on the drop down and click on phong alpha and a pop up will appear and click yes, click on phong alpha again and change it back to phong and click yes
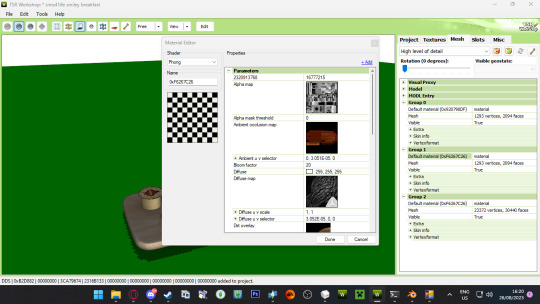
it will look like this and delete alpha map, ambient occlusion map,dirt overlay,normal map and sparkle cube
now click on diffuse map>edit and import the texture thats gone be on the glass
and when thats done click done and 2 pop ups will appear just click yes to both
and now it will look like this!

perfect!!
the same needs to be done for medium level of detail
Now test it in game to see how it looks!
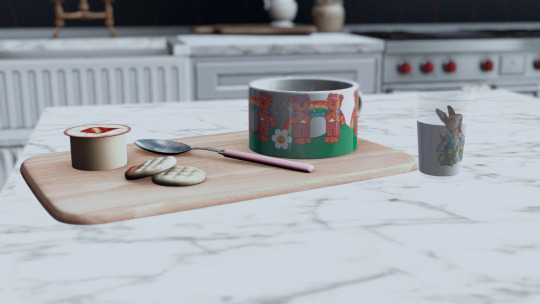
this is mine in game not gone lie its not looking perfect but i gone fix that latter but the glass next to it was also made this way and it come out perfect ;)
hope this help some people out
82 notes
·
View notes
Text
a ramble bc flame needs to chat for a min
i don't get it
i really don't
i already hate dream, but the fact that he had all these insanely fucking talented people on his smp (mind you, this shit doesn't happen often) and has a lightning-in-a-bottle story that spawned over the course of a pandemic and gained so much massive internet fame to a point where it leaked into the real world (remember Trump replying to Quackity? Lil Nas X going on the dsmp?)
and he just. blew it.
like it boggles my mind.
this is the same guy who swore up and down this year that things would be better, that communication would improve, that vol 2 would be a new era for the smp and we'd get constant lore.
vol 2 was meant to begin back in September. no wonder c!wilbur's finale was so rushed.
with all this shit coming out about the finale, it's becoming more and more clear that basically none of the cc's were really consulted about this finale and it appears to have just come up randomly and wasn't planned in advance.
even ignoring the Allegations, this is still such a shit thing to do to your fellow ccs. you would think given how popular the dsmp is and how much it supposedly matters to dream himself, he'd be busting his ass to make sure that every cc is heard, and that if he needed help he'd have a few co-managers to keep track of lore and everything.
BUT NOPE.
instead we got a rushed c!wilbur finale (that is pointless now bc vol 2 is still not out), a damage control, impulse-made c!tommy finale (that shitted on everything c!tommy's story meant) and a syndicate finale that was good, but it could've been Great if the amnesia plot wasn't chucked in.
part of me genuinely believes dsmp doesn't matter to dream outside of money anymore, bc that man hasn't interacted w the lore in good faith in well over a year by now. every time this year he logged on, it was to either do damage control lore, or to help snf piss off fans.
most of the issues trace back to him, bc it just seems Oh So Funny that his character was the central conflict to s4 (or rather, was supposed to be) and yet he fucked off for almost a year. not even c!tommy's plot with c!phil and c!sapnap happened bc they needed dream and woopdy-doo it didn't fucking happen.
and if even tommy couldn't reach dream, why the fuck would anyone else be able to?
what a fucking waste.
306 notes
·
View notes
Text
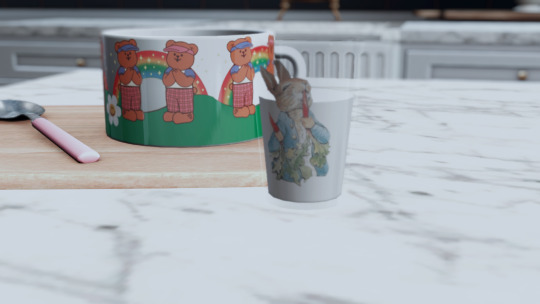
Last night I sent my teen to prom. All the teens were initially loaded onto the dance floor, so I had her join them; but they just stood there. Nobody moved as time ticked on.
I cancelled and re-did actions. I used testingcheats to reset sims. I tried everything to get them to do stuff, and was about to say "Dang, this game is so bugged, why couldn't they make this one thing work?" and chalk it up to EA being crap at their jobs—
—then I noticed that occasionally the teens would have a thought bubble above appear their head. The thought bubble was always the headshot of the same townie teen. I checked my sim's moodlets and saw the dreaded "Embarrassed"/"Cannot unsee" moodlet, indicating someone was apparently nude in the vicinity.
Finally, I realized the problem. I used Better Exceptions to learn that townie's CC apparel, and tracked it down to a pair of pants that still had the "nude" buff attached to it, causing everyone to bug out and freeze in place because they couldn't get over their embarrassed reactions. (And apparently the teen spawned with them even though they're disallowed for random, asdsfjk)
Finally I used testing cheats to "delete" the teen with the offending trousers and the teens were freed! They started dancing and talking and laughing… but then prom ended. I took too long to work it out, haha. XD
This "nude" buff thing with CC clothing happens so often, and it drives me nuts, haha! Thankfully @sims4studioofficial's recent update made it even simpler to remove the nude buff tuning, but you still have to go through every package file one by one to fix is. :\
Has anyone made some sort of tool or batch fix to mass-remove the nude buff from CC clothing? It's one of my major pet peeves but I have so much CC clothing and going through them one by one would take literal days. ;____;
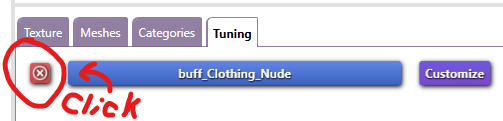
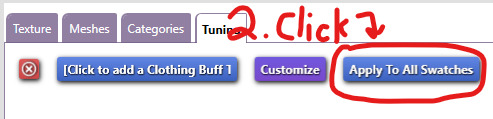
(Old tutorial on how to fix the nude buff tuning on CC clothing using Sims4Studio)
(Or with the latest S4S update, open the package file, click to the "Tuning" tab, and click the "x" next to the nude buff modifier in the list. Don't forget to click "apply to all swatches" and "save" when you're done!)

147 notes
·
View notes
Text
Simpu's Good Night Peaches and Creme Brulee skins expanded and defaulted
Hi, hi! Kind of an unexpected cc post from me, I know. But anywayyy... every now and then I like to have a semi-realistic/alpha game if I'm in the mood. And a few years ago, I stumbled across these two skins. Good Night Peaches I thought was really cute... but I really didn't like how... whitewashed the S3 was. And there were only 4 colors. Creme Brulee, I also really liked but there were only 6 recolors, and nowadays I need a wide variety of tones. The more the merrier!
So I went ahead and whipped out Photoshop, recolored them in the rest of Trapping's tones, geneticized all of them and made new defaults! If you have Simpu's original files, you can just overwrite them with mine without breaking anything, now they'll have genetic values :D
Both sets of defaults come in the same color actions:
S1 - Light Rose, S2 - Sunkissed, S3 - Olive Skin, S4 - Sunset.
No supernatural tones, sorry to say! This was my first time doing anything with skins, but I hope you like it all the same.
Here's the new defaults for Creme Brulee, as well as a quick and dirty Body Shop swatch down below, first row is the new recolors, bottom row is Simpu's original recolors.

Download: Default | Geneticized/Townified
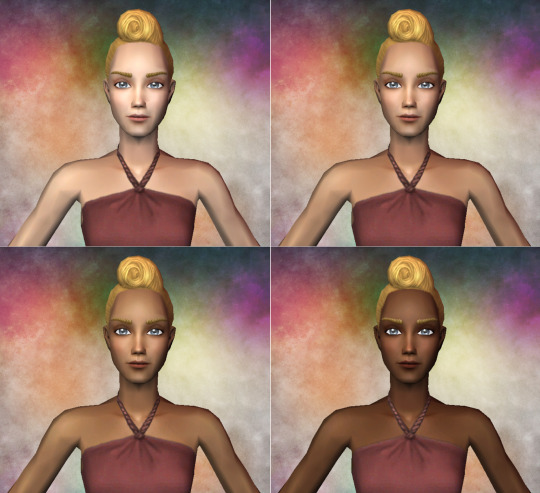
And then the Good Night Peaches defaults and quick Body Shop swatch. The last 4 in the second row are Simpu's original swatches, the rest are my recolors.

Download: Default | Geneticized/Townified
Credits: Simpu, Trapping, Lilith, Mouseyblue, Pooklet.
#ts2cc#s2cc#sims 2 download#the sims 2#dl: skintones#dl: skin#also pls ignore the maxis eyes and stuff fhidsofhs I took everything out so bs would load faster#dl: genetics
35 notes
·
View notes
Last Seen Blogs

beauxhildegard-blog
at your service

momsgirthyson
I wish
sarahmdraws
Sarah Draws

solified-chanyeol-lover
Just Say Yes

ee-estudio
ESTUDIO_ESCRITORIO