#service principal
Text
try public preview - microsoft identity Conditional access filters for apps
try public preview – microsoft identity Conditional access filters for apps
As part of Zero trust posture, protecting all apps is key. At present, policies explicitly list apps. Today Microsoft announced the public preview of filters for apps. This provides a new way to manage Conditional Access (CA) assignment for apps and workload identities at scale.
With filters for apps, admins can tag applications with custom security attributes and apply Conditional Access…
View On WordPress
#$filter#access#API#apps#Azure Active Directory#conditional access#cpolicy#developers#devices#Identity platform#Management#Microsoft Entra#MS Graph API#Policy#public preview#Secure#Security#security attributes#service principal#users#workload identities#zero trust
2 notes
·
View notes
Text
[Azure DataLake] Métodos para dar acceso
Hay muchos artículos que hablan sobre la creación de una plataforma unificada de datos, donde equipos de Analítica (bajo diferentes nombres) arman un data lake con ETLs y procesos de ingesta tomando datos de múltiples fuentes de información, almacenando y organizando datos para alimentar modelos de Business Intelligence, Data Science, Machine Learning, y otras ramas relacionadas de la analítica.
En este proceso de crecimiento, tanto en volumen como en fuentes de datos a considerar, siempre llega el momento en el que hay que compartir datos que tenemos en nuestro data lake con personas/equipos que desean usarlos y accederlos, externos al equipo que desarrollo la ingesta y transformación de datos. Este es un punto que muchos saben que eventualmente habrá que hacer, pero como no es vital al comienzo de un proyecto entonces se saltea (la conocida “deuda técnica”) y luego cuando aparece la necesidad, ¡estamos en un apuro por resolverlo! En este articulo voy a mostrar algunas de las opciones que tenemos para dar este tipo de permisos sin que esto sea un peligro para todo el trabajo que venimos realizando.
1- Azure Data Share
La primera opción que vamos a ver es Azure Data Share. Este recurso (distinto al data lake), nos va a permitir compartir snapshots de determinadas carpetas dentro de nuestro data lake. Esta opción es práctica pero tiene varias desventajas, la principal es que estamos replicando datos fuera de nuestro data lake (quien recibe el Data Share, debe mapear el snapshot a su propio data lake), esto da pie a que haya diferentes “versiones” de los datos y quien desee consultarlos no estará usando los datos actualizados, además de estar pagando por almacenamiento que no debería con otras opciones.
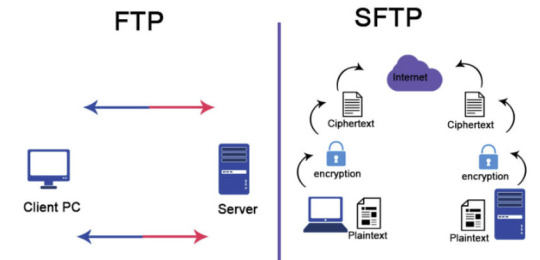
2- SFTP
¡La segunda opción que veremos es más directa que la anterior! El único requisito es que nuestro data lake debe tener activada la jerarquía de carpetas (Hierarchical Namespace en un Data lake Storage Gen2). Si tenemos eso deberíamos ver la opción en el portal para activar SFTP (preview por ahora). Esta opción nos permitirá levantar un servidor SFTP (ssh file transfer protocol) que leerá directamente desde nuestro data lake. La configuración es bastante sencilla, simplemente se crea un usuario (local al FTP, no será parte del Active Directory), se selecciona el contenedor que queremos compartir y los permisos (el mínimo sería READ y LIST). ¿Desventajas de este método? El permiso elegido en el FTP será independiente de la configuración de permisos RBAC, ABAC o ACLs que tengamos dispuesto en nuestro data lake, y los permisos rigen para todo el contenedor, no solo una carpeta. Otras desventajas son: esta opción no permite que el usuario lea directamente el data lake como otras opciones, y este servidor SFTP no es accesible por Data Factory (por ahora, ojalá cambie esto en un futuro).
Muchos clientes son capaces de conectarse a un servidor SFTP como si se tratase de una “carpeta remota” para descargar o subir archivos, de modo que es una opción practica para compartir datos con usuarios de todo tipo (negocio o técnicos). Los clientes clásicos para windows son WinSCP o FileZilla, pero ¡hay muchos más! (ni hablar para linux)
3- SAS
El tercer método que veremos para conectarnos es mediante un SAS (Shared Access Signature) y este sí que nos permitirá conectarnos y leer directamente el data lake desde cualquier software que pueda hacerlo (por ejemplo, código Python, desde Databricks, u otros servicios de Azure como Data Factory). Un SAS es básicamente una cadena de conexión, generada a partir de las Access Keys del lake, que permite que nos conectemos al data lake con determinados permisos que son elegidos al momento de crear esta SAS. Crear un SAS es muy sencillo, vamos a la opción homónima en el portal de Azure, elegimos que servicio deseamos habilitar (por lo general Blob), completamos las siguientes opciones según nuestras necesidades y finalmente damos click en Generar. La desventaja de este método es que los permisos que definamos valen para TODO el data lake, no solo para un contenedor o una carpeta, por lo que es fácil caer en dar demasiados permisos con este método. Arreglarlo es sencillo, ya que como los SAS son creados a partir de las Access Keys, renovando estas últimas todos los SAS que la utilizaron quedaran sin efecto.
Desde el explorer del lake, podemos generar SAS para una carpeta o archivo especifico, con lo que ganaremos mucho en seguridad sobre el método de creación de SAS anterior. Les dejo una imagen, no es para nada complicado, simplemente navegamos hasta la carpeta que queremos y damos click con el botón derecho:
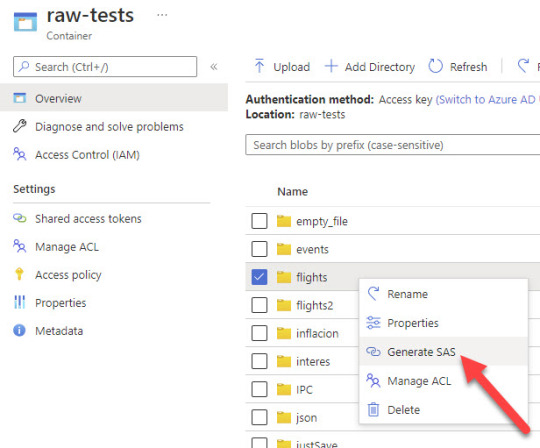
Recordemos que los permisos mínimos para poder conectarnos y ver que archivos hay dentro de la carpeta son READ (obvio) y LIST. Este último es fácil de olvidar, pero si no lo agregamos el SAS podrá leer los archivos solo si le indicamos el nombre y la ruta exactos del archivo que queremos leer.
4- Service principal
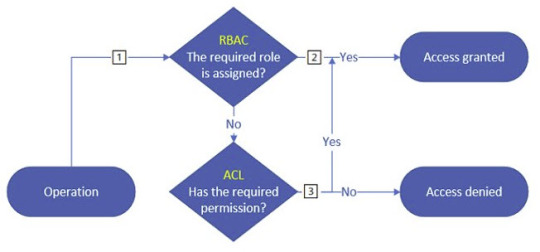
El cuarto método que veremos para conectarnos es mediante un Service Principal. Esto es crear un usuario de servicio (App Registration) y luego asignarle los permisos necesarios para conectarse y leer el data lake. Este método es el recomendado por ser el más seguro de todos, ya que podemos definir los permisos de este usuario como lo haríamos con cualquier otro, mediante RBAC, ACL o el nuevo ABAC.
SPOILER: Si no sabes que significan estas siglas, atentos porque habrá un artículo sobre esto próximamente.
Básicamente, este método es el único mediante el cual tendremos un control más granular sobre los permisos que estamos dando dentro de nuestro data lake.
5- Autorizar usuario AD - ¡NO recomendada!
Este método es prácticamente igual al anterior, solo que en lugar de autorizar un Service Principal, lo haremos con un usuario de AD. La razón por la que no es recomendado hacer esto es porque no ofrece ninguna ventaja sobre hacerlo con un Service Principal y compartir sus credenciales (secret key o certificado). Además, como regla general y buena práctica, ningún proceso automatizado debería estar autenticándose con un usuario de AD.
Con esto concluye el artículo, por supuesto que ¡estas opciones no son todas las disponibles! Siempre hay muchas formas de lograr el mismo resultado, y decidí dejar afuera los requisitos específicos de algunos recursos como Synapse por ejemplo, que requiere que asignemos permisos RBAC al MSI del workspace, pero eso puede ser tema para otro post 😊
¡Espero que les sea de ayuda! Nos vemos en la próxima.
Escrito por Martin Zurita
#datalake#azure data lake#azure storage account#Azure datalake#service principal#azure#azure cordoba#azure argentina#azure jujuy#azure data platform
0 notes
Link
Digging this doc resource from Microsoft regarding the different types of service principals:
Application - The type of service principal is the local representation, or application instance, of a global application object in a single tenant or directory. In this case, a service principal is a concrete instance created from the application object and inherits certain properties from that application object. A service principal is created in each tenant where the application is used and references the globally unique app object. The service principal object defines what the app can actually do in the specific tenant, who can access the app, and what resources the app can access.
When an application is given permission to access resources in a tenant (upon registration or consent), a service principal object is created. When you register an application using the Azure portal, a service principal is created automatically. You can also create service principal objects in a tenant using Azure PowerShell, Azure CLI, Microsoft Graph, and other tools.
Managed identity - This type of service principal is used to represent a managed identity. Managed identities eliminate the need for developers to manage credentials. Managed identities provide an identity for applications to use when connecting to resources that support Azure AD authentication. When a managed identity is enabled, a service principal representing that managed identity is created in your tenant. Service principals representing managed identities can be granted access and permissions, but can't be updated or modified directly.
Legacy - This type of service principal represents a legacy app, which is an app created before app registrations were introduced or an app created through legacy experiences. A legacy service principal can have credentials, service principal names, reply URLs, and other properties that an authorized user can edit, but doesn't have an associated app registration. The service principal can only be used in the tenant where it was created.
0 notes
Text

Give me your best arguments!
#ineffable husbands#good omens#crowley#aziraphale#top crowley#bottom aziraphale#pillow principality#anthony 'acts of service' crowley
101 notes
·
View notes
Text

dogma didn't want to do a portrait but tup and kix made him… and there's only so many flashes he can take before it looks like war.
#this took forever ... hopefully that won't be a recurring thing...#fuck#anyway. MUCH self-doubt and frustration aside.#this is from my No Order 66 AU!!#the massiff is Exo and she's here bc Dogma got reconditioned after Umbara#it didn't stick but... well. reconstructing your brain to nothing will have effects even if you DO remember who you are.#her tasks are DPT and interruption and fetching help when needed#for dissociation/meltdowns/ptsd flashbacks/etc#and also crowd control (give him space sometimes!) and finding Dogma if he wanders off while dissociated#and a few other small things that that follow the same principals#(she can do a bit of retrieval--not really her thing but she was trained a bit in it)#(Dogma keeps wanting to have someone teach her to help w/ tup's seizures but rightfully everyone tells him no.#Tup will get his own service animal if he needs one. and he denies one for now.#dude you had a chip erode part of ur brain and then had experimental surgery that fucked u up but okay. fine. have it ur way!)#anyway she has her longer spikes filed down for safety during DPT. it's completely safe--like cutting fingernails!#OKAY yeah thats it. hopefully some day i'll WRITE this au. xoxo mwuah#saleucami au#clone trooper dogma#dogma#clone trooper tup#tup#clone troopers#exo the service massiff#massiff#star wars: the clone wars#the clone wars#star wars#my art#mimse art
78 notes
·
View notes
Text


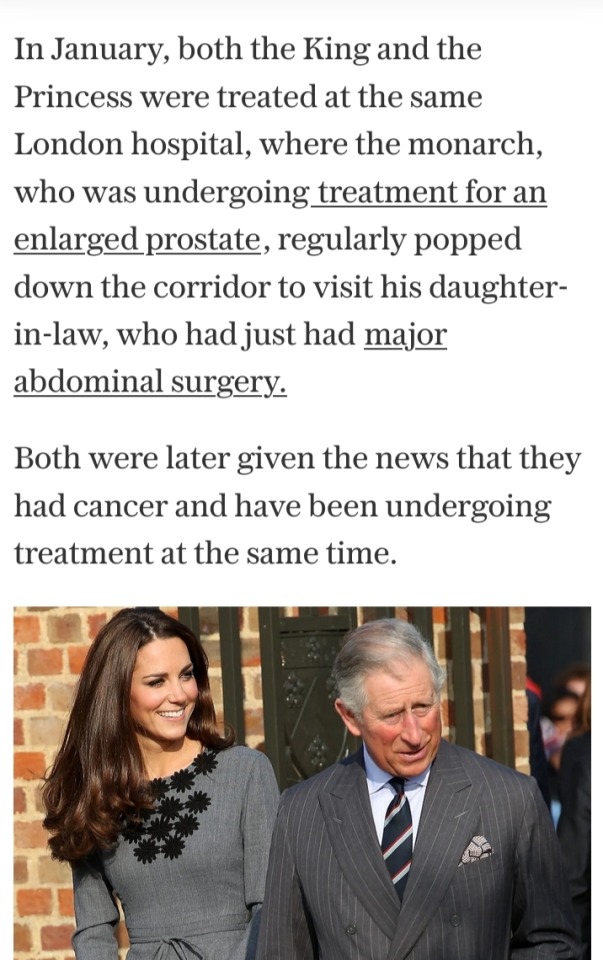
The King is said to be very fond of his daughter-in-law
Credit: Danny Martindale / WireImage


#King Charles III#His Majesty The King#Princess of Wales#Catherine Princess of Wales#Catherine Middleton#Kate Middleton#British Royal Family#Order of the Companions of Honour#Royal Companion of the Order#George V#outstanding achievements#arts#sciences#medicine#public service#Knights Companion of the Most Noble Order of the Garter#Royal Lady Companion of the Most Noble Order of the Garter#Duchess of Gloucester#Great Master of the Most Honourable Order of the Bath#George I#Prince William#Prince of Wales#Grand Master and First or Principal Dame Grand Cross of the Most Excellent Order of the British Empire#Royal Knights and Ladies of the Order of the Garter#St George's Chapel#St George’s Day#April 23
13 notes
·
View notes
Text
what did brnine do to asepsis anyways
... is what I wanted to make the post about (I'll elaborate) but I was looking through a transcript for info & this is so funny to me. Keith

I should make a compilation sometime bc last week Ali said something about integrity that reminded me of a specific lyke moment & made me laugh... I knew I wrote it down somewhere I just can't find it now.
#I do think it's different but it did not use to be. That much#palisadeposting#Oh right. What did brnine do. it was never that clear to me. Probably bc it wasn't said explicitly#They rebuilt a divine but they have got to put some checks in there or else this wouldn't work out#in pzn there was a kind of mindlessness implied but what asepsis did then vs now is just completely different#Basically I'm just thinking about to what extend the murder divines autonomy was impacted.#Won't anyone think of the murder divines right to choose.#Also re: making divines into tools#which is what it started as and... Probably isn't now? Brnine asepsis relationship is strange but it is caring. That's been shown.#Still if I was a divine I would be a lot more worried about brnine collecting those. On principle. But hey its helping the cause right#It just came to mind bc if fealty is a tm-era divine they WOULD know about the pleroma hypothesis#Which like. Actually divines in service under the principality are already tools. & they would've rebuilt it too.#palisade spoilers#This is all very halfbaked & I got sidetracked thinking about lyke.sorry#I'd usually check more transcripts bc my memory is ever spotty but that's annoying on mobile. I'll have to live w possible inconsistencies
10 notes
·
View notes
Text

"Another day, another life I may not have to sacrifice
But I'm still aiming for the sky
In this suburb to Hell I'm living to tell
'Bout how I defended my Rome
Hail the Caesar, Kingdom Come"
- Rome Is Falling, Civil War
Featuring: @techbro-arts
#Silver Wing#Techbro West#techbro-arts#Pegasus#Earth Pony#MLP#My Little Pony#Art#Random Art#Rome#Roman Empire#Legionnaire#Legion#Roman Army#Rome Is Falling - Civil War#Congratulations techbro you're in the legions now#These are Principate era legions so you're in for 25 years of military service
24 notes
·
View notes
Text
What if, whenever one of my colleagues (especially those higher up who should know better) is glaringly wrong/ableist/racist/overall bad at work and I have to correct them for legal/ethical reasons, I ask, "Was that embarrassing for you?" and stare at them until they answer.
#in which sara is a teacher#look I'd only do it to the REALLY reprehensible people#like if the racist librarian was still there i would absolutely hit her with that#principal could do with it#the people up in the district who are trying to remove services could do with it#it seems fun
6 notes
·
View notes
Text
Day Sixty-Seven
Mr. B, Mr. I, and I met with The Principal, the Director of Student Services, and both Deans during PLC time this morning to discuss the way we currently track/level Global Studies and American Studies (I told the rest of the department they could join us, or do work on their own). Mr. B observed that students who aren't college-bound are being placed in college prep courses because there's no other option, and made the case that's not the best way to serve them or their college-bound peers. So we discussed possible changes we could make in the future, and obviously, that's going to take more than this one conversation, but I think we made a good start.
I spent my prep time checking over the essay outline assignment my Global Studies students had been doing; it's set up like a standard citation practice assignment (a set of questions to research, answer, and properly cite in MLA format), but this one had three, color-coded parts. Today, when my students came to class, I had them read the instructions and two examples of the Religion/Philosophy Essay, and some saw straight away how the work they'd done was going to set them up for essay drafting. The rest figured it out as we discussed the examples, and what was included in their introductions, bodies, and conclusions; I wrote discussion notes on the board in the same colors as the color-coding on the outline, and then it became totally clear.
For a lot of my students who're daunted by essay writing, realizing they'd already done the research and had it organized was a game-changer for their confidence. So I definitely think the way I sequenced these essay prep lessons- outline assignment, then instructions and examples, rather than the other way around (in which case a lot of students would have skipped the outlining, I think)- worked as intended. Feeling good about that!
APGOV was pretty excellent, too. We got into the Civil Rights Movement today by discussing Brown v. Board and subsequent school desegregation efforts, as well as the resistance to those efforts. A lot of my students knew about Ruby Bridges and the Little Rock Nine, a few knew about James Meredith, and it was good that they could bring their background knowledge into the conversation. After that, we tackled some things they new less about: the Federal Interstate Commerce Commission rule that interstate trains and buses- and station waiting rooms- had to be desegregated, Boynton v. Virginia, and the Freedom Rides. I showed an excerpt of PBS' Freedom Riders, which students found really engaging. It led into a great discussion.
And I had nothing to do at the end of the day, so I actually got to leave on time! Woohoo!
#teaching#teachblr#teacher#edublr#education#high school#social studies#pbs#freedom riders#PLC#the principal#the director of student services#dean 1#dean 2#Mrs. T#Mr. B#Mr. I#department head#day sixty seven
2 notes
·
View notes
Text
Little reminder that you have an impact on people, perhaps to a larger degree than you thought. If you must say something, try to keep it kind
#remembered my old principal (rip <//3) calling me champ and now I'm sad again#we never talked besides that moment but his memorial service pulled tears from me that i didn't know existed
2 notes
·
View notes
Text
President, um ?
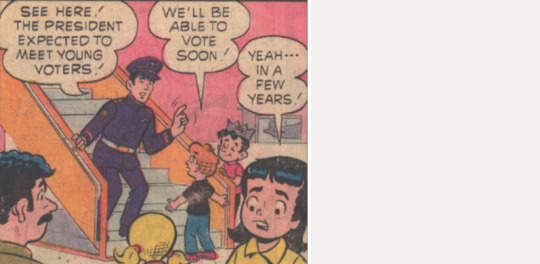
All right. It is 1975 and the President is going to walk off the tarmac of Air Force One and meet the Little Archie gang. And which president is that?
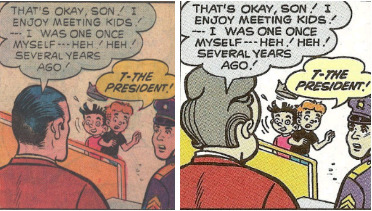
Okay. I know the 2000 reprise looks enough like Bill Clinton -- I guess? - - But what's up with this Gerald Ford? Is this off of his modelling days?
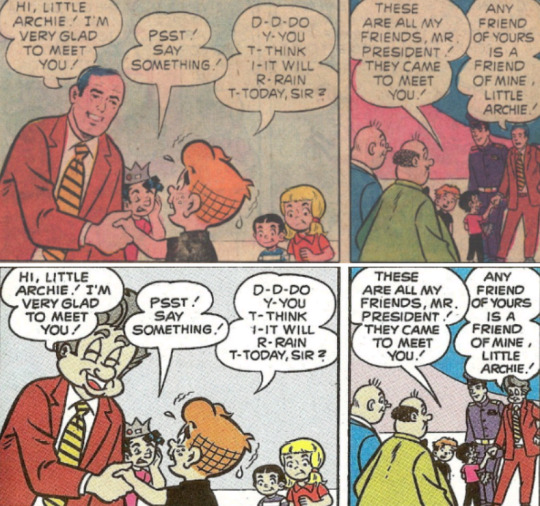
Clinton as a bobblehead. Or one of those relay mascots in baseball games.
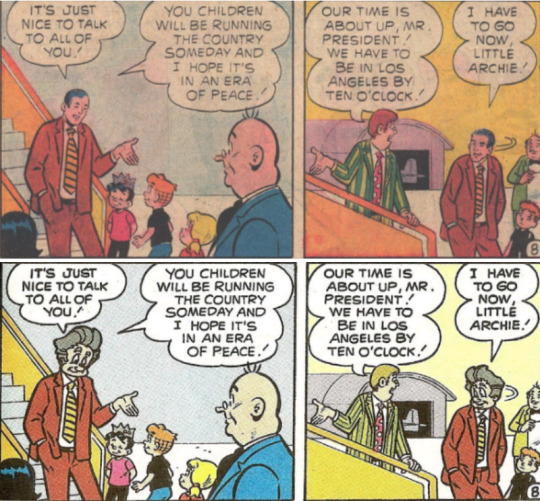
Well. We know the story can't follow with the last president.

Though, if Bill Clinton is politicking for votes to the Democratic ticket he may be barking up the wrong tree.

The story does have a reprint credit for 1982. I am guessing they stuck with the old model that looks not at all like Ford and even less like Reagan. But, Reagan did make a stopover a few years' later.
#Archie Comics#Little Archie#Archie Andrews#Jughead#Veronica Lodge#Betty Cooper#Reggie Mantle#Air Force One#Gerald Ford#Bill Clinton#Mr. Weatherbee#was an elementary school principal#Secret Service#Bob Montana#Jughead was a Naderite#Mr. Howitzer#Cheryl Blossom#Stan Goldberg#1985#Dexter Taylor#1975#Bobble heads#Ronald Reagan
8 notes
·
View notes
Text
listen i love the headcanon of hunter having a service dog but i think we are missing out on the comedic and very real potential of hunter staying in the human realm and carving his next palisman to be a wolf. boy is straight-up taking a six-foot long wild animal to school and nobody can say shit.
#well not ''wild animal'' since they're technically a magic being but also#camila @ curious kids: THIS IS A MAGIC WOLF PLEASE DO NOT APPROACH A REAL WOLF <3#combine that with luz getting an emotional support snake palisman#she gets to take it to school and the principal can't say shit!#genuinely love the idea of magic familiars acting as service animals#astra rambles
5 notes
·
View notes
Text
So is the only way to watch Interview With a Vampire by paying for AMC? Y’all I already have literally so many streaming services I realllyyy don’t wanna pay for another is there like… no other way?
#i wanna watch but I don’t wanna get ANOTHER goddamn streaming service#not even cause I can’t afford it. it’s just like. the principal of the thing
4 notes
·
View notes
Text
explodes
#❝ chattering ! ♡#ITS BEEN . . .#a day#i had NO service in the school god damn#i got a lot of compliments on my outfit tho so that was swag#also band was fun mweheheh#i ended up getting all the electives i wanted so !!! thats also#good#my sister missed her bus home tho so like that was bad#the office lady fucking threatened my mom who 1) has no drivers liscense nd 2) has no car#that she wld call social securtiy ?? when she said my dad wld take like 30 mins to get there bc he works far away ????#like i knew the middle school staff sucked but what the FUCK#my mom was crying#i have nvr wanted to fight an adult so bad like man u don't have to be so fcuking rude like#we have circumstances nd we cant work around them at the drop of a hat#like if we had a second car drivers liscense be damned my mom wld have picked up my sister so like .#man im so pissed#ALSO IT WAS THE PRINCIPAL#i fucking hate her shes so rude to EVERYONE#literally no one at the school likes her i hope she quits or smth#also apparently she got onto my sister bc when my dad nd her got back she started crying like crazy#i hate school staff :punches air:
5 notes
·
View notes
Text
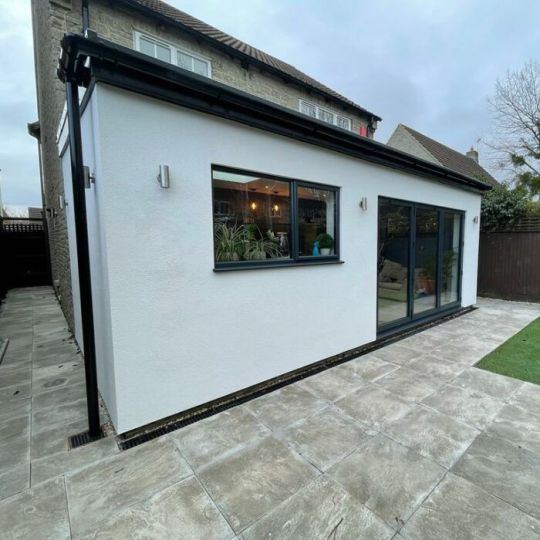

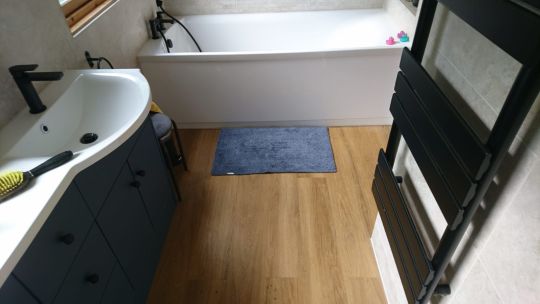

Building Works
We undertake all aspects of building works such as extensions, loft conversions, garage conversions, porches and internal structural and non structural modifications. We can liaise with planning and building control on your behalf and advise you throughout the process. All trades are in house so we can manage the project from start to finish for you
#building#buildings#construction#home improvement#home improving project#bedfordshire#bathroom remodelling#contractor#demolition#building projects#Building Works#Design And Construction#Homes Refurbishment#Hotel Interior Designers#House Design#architecture#New Building Houses#New Construction#Principal Contracting#Principle Contracting#Project Management#management#Property Services#Refurbishment Projects#roofing solutions#Site Management
1 note
·
View note
Last Seen Blogs