Last Seen Blogs

momentummemetico
Momentum Memético
dd10180
DD Stuffs
kindaghast
we do some postin

smillie-face
Smillie Face
dd10180
DD Stuffs
Text
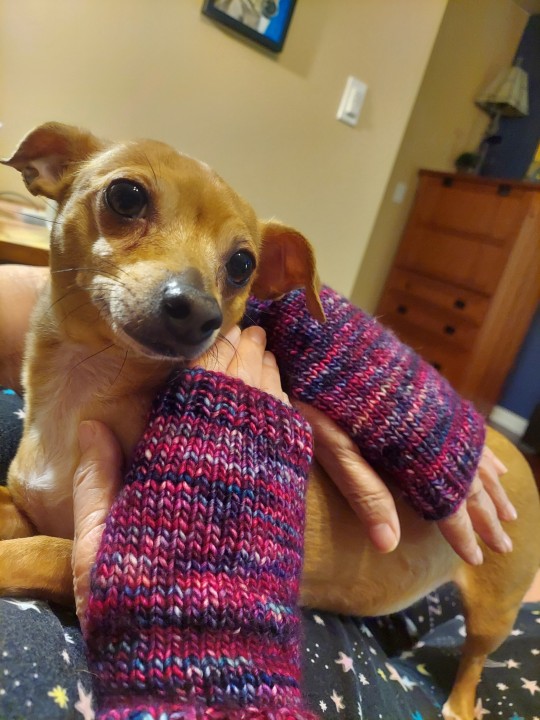
Scrap Yarn Gloves again, another Malabrigo, Mecha, color Aniversario.
These mitts make my mom so happy. Dog tax paid.
9 notes
·
View notes
Text
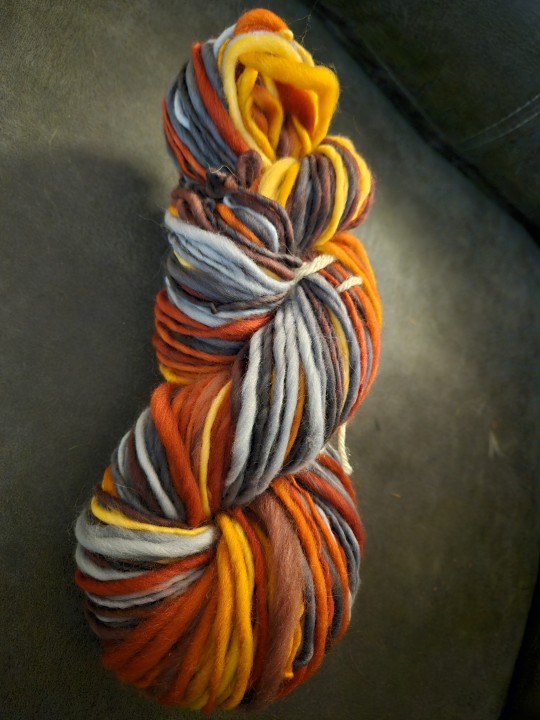
Another beautiful roving set by Upstream Alpacas, a gorgeous and super soft alpaca silk blend.
The second I clear a bobbin, I'm onto the next!
This is why I needed the chain ply practice. These colors will want to stay together.

74 notes
·
View notes
Text
Is it the prettiest? No.
Is it somewhat inconsistent? Yes.
Does it need to be washed and beaten to have a chance of being balanced? Yes.
Did I chain ply it? HELL YES.
Do I feel a bit better about using chain plying in the future on something it might matter on? Absolutely.
Will this be this year's fair entry? To be determined.
Previous post.
Alpaca Merino blend. 78yds. 4oz.


28 notes
·
View notes
Text
Soooo pretty!!


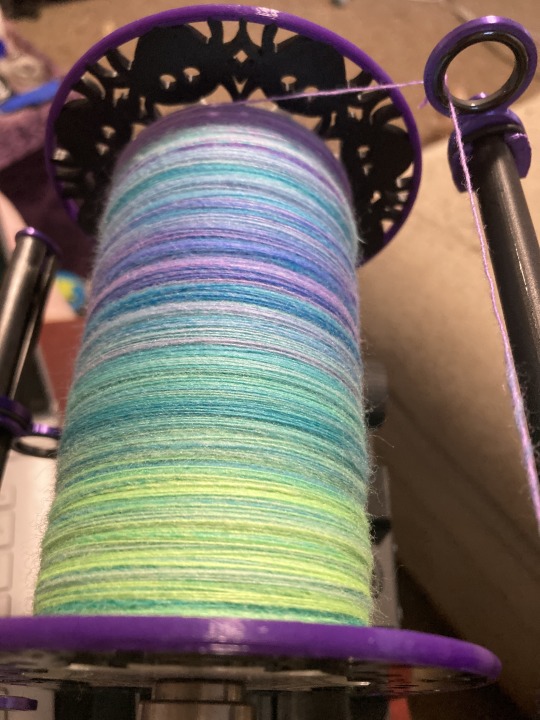

finished the electric rainbow rambouillet! it’s sooooooo pretty!! I hope plying doesn’t ruin it (planning to chain ply- I can’t imagine doing anything else.) I almost hate to take it off the bobbin since it’s so pretty from the side. But I want to keep using the spider bobbin so that won’t work 😅 I am obsessed with the gradient, seeing it fill the bobbin was super fun.
See this post here for pics of the braid, which is from SpinningSiren on Etsy (same as the bobbin!)
200 notes
·
View notes
Text
The alpaca silk firestar SECOND PLACE yarn had some more life to give.
Knitted these up over the weekend. They are a wee bit too big, so I need to make some adjustments. Or felt just a teeny bit?
Experiments await!

18 notes
·
View notes
Text
This will be super helpful!!
Interested in cool cable knitting patterns?
I've made a site where you can make your own
I learned to knit a while ago specifically to make cool braid patterns with cable knitting and I'm also a web developer
So I made this
You can make a braid and it will create a cable knitting pattern out of it
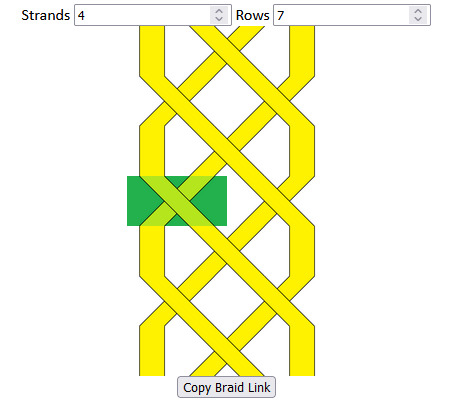
It starts with this here, you can change the size with the inputs above and when you hover over crossings you can click and it will change how it crosses (right over left, left over right, or parallel)
Every time you do it updates this pattern down here that you can follow to knit that braid
There are notes and abbreviations listed on the site for the specifics
Please tag me if you make things with this I'm so proud of it :)
1K notes
·
View notes
Text
Absolutely stunning.

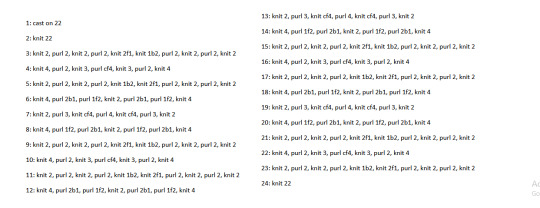
I am beyond excited about how this one turned out. I used multiple pages of Frieda quotes and literally wrote them all out on this quilt in half inch lines. The effect from a distance just looks like an allover quilting. And then you come close and can read her words. Love it so much!
Edited to add closeup pic of the quilted words
648 notes
·
View notes
Text
#notetoself
Want to learn something new in 2022??
Absolute beginner adult ballet series (fabulous beginning teacher)
40 piano lessons for beginners (some of the best explanations for piano I’ve ever seen)
Excellent basic crochet video series
Basic knitting (probably the best how to knit video out there)
Pre-Free Figure Skate Levels A-D guides and practice activities (each video builds up with exercises to the actual moves!)
How to draw character faces video (very funny, surprisingly instructive?)
Another drawing character faces video
Literally my favorite art pose hack
Tutorial of how to make a whole ass Stardew Valley esque farming game in Gamemaker Studios 2??
Introduction to flying small aircrafts
French/Dutch/Fishtail braiding
Playing the guitar for beginners (well paced and excellent instructor)
Playing the violin for beginners (really good practical tips mixed in)
Color theory in digital art (not of the children’s hospital variety)
Retake classes you hated but now there’s zero stakes:
Calculus 1 (full semester class)
Learn basic statistics (free textbook)
Introduction to college physics (free textbook)
Introduction to accounting (free textbook)
Learn a language:
Ancient Greek
Latin
Spanish
German
Japanese (grammar guide) (for dummies)
French
Russian (pretty good cyrillic guide!)
317K notes
·
View notes
Text
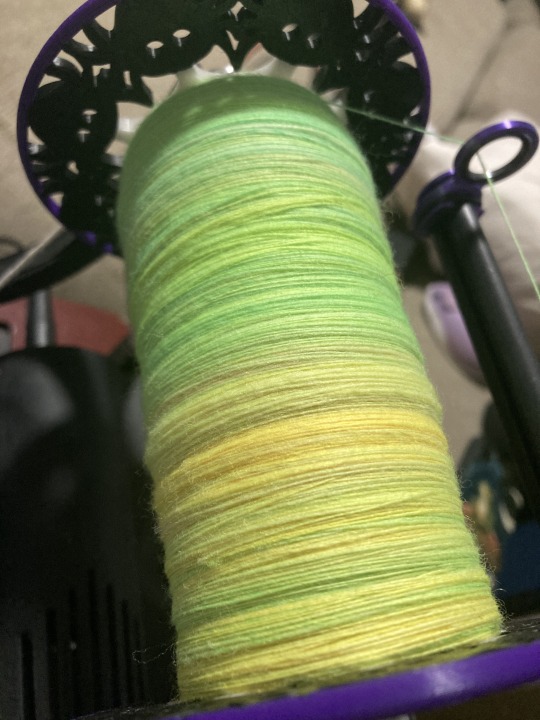
Quick add before I forget the blend...
80% alpaca, 20% Merino. 2oz from Evergreen Fleece Processing.
I have another 2oz, no idea what to do with it. Maybe chain ply practice?
The most inconsistent spin. Ugh. But the colors are nice.

3 notes
·
View notes
Text
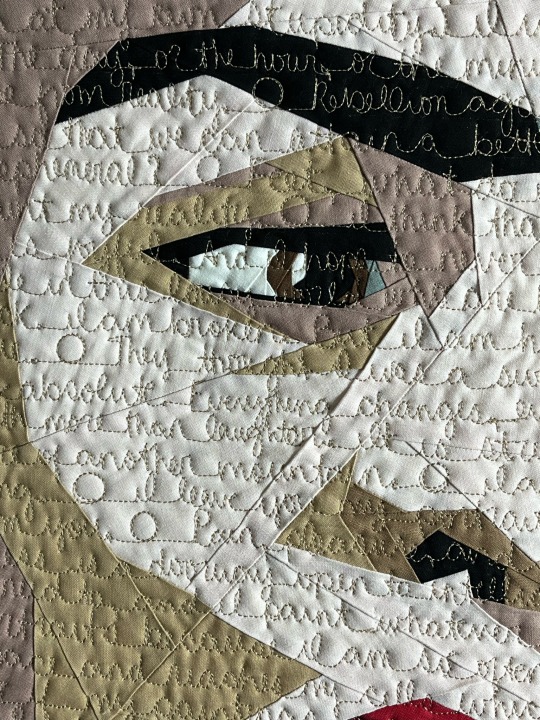
Plain weave just goes so very very fast...
Ok, so, this was explicitly a learning exercise. I wanted to reverse warp and weft to see how that affected the look of the fabric.
Picture 1 has chaos yarn as warp on the left, white yarn as warp on the right. Picture 2 was taken with the stripes to be at the same orientation so my brain could see the color difference, not just the pattern difference. (Picture 2 has white warp on the top, chaos warp at the bottom.)
So now I know! It will be a good visual for me as I look at other projects. The difference is there, although not as obvious as I would have initially thought.
I've also not known what to do with either of these pieces. This is acrylic, and the colors are not my favorite. However, the spawn suggested possible Ren Faire costume pieces. Not period correct material, but these could make their way into some sort of corset that matches some insets in a skirt or pant. Still to decide. But the colors would be fun.

17 notes
·
View notes
Text
Well the other weaving project needed a time out. I'm just not ready to dive into that piece yet. And I realized that I also have a ton to learn. In the continued spirit of stash busting, I did a warp in white with the obnoxious chaos yarn as the weave. There's a previous post where I did the chaos as the warp, white as the weave. I need to learn more about what I can do and plan for.
So, no plans for this yet. Just over here making fabric. But I'm learning stuff, and that matters a whole lot right now.

68 notes
·
View notes
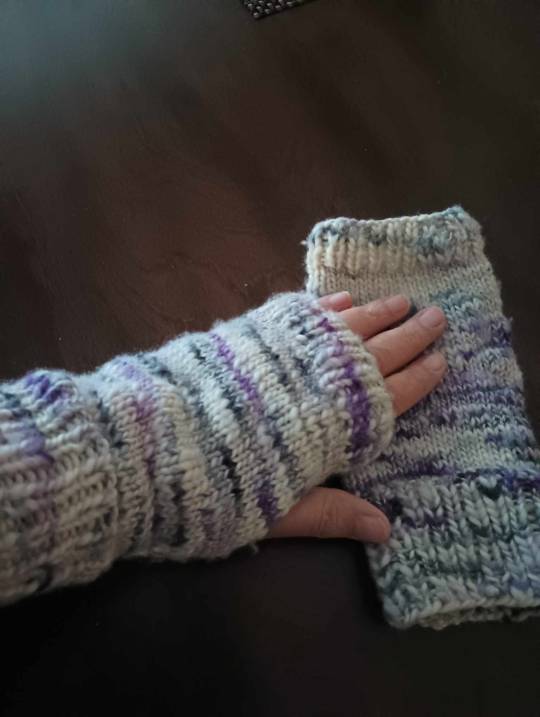
Text
Finished a stash busting project over the holidays, finally got an action shot! These are the Scrap Yarn Gloves in Malabrigo. Made these for my mom while she was here for the holidays. It started as a hat and we hated it. Ha. A little frogging and these beauties came to life. I also made a spare in case one gets damaged.
Fun little knit. And more magic loop practice! Maybe I dare myself to do something sock related this year??
44 notes
·
View notes
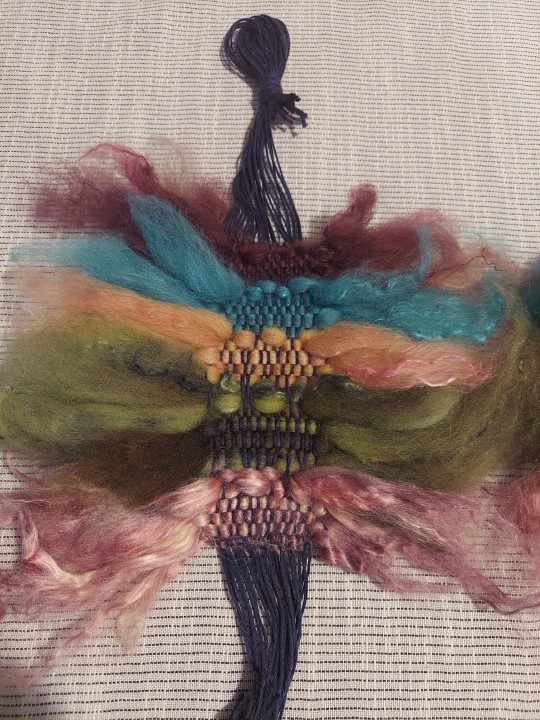
Text
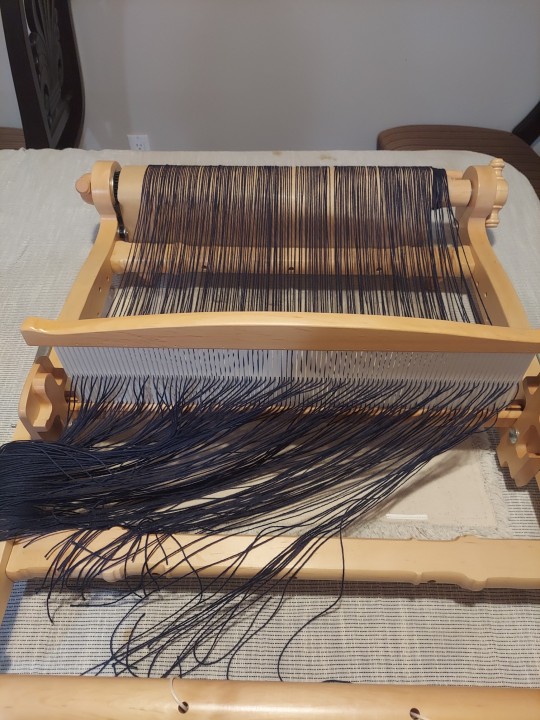
Finally got the warp mostly done for the space picture wall hanging. Did a sample of the warp in both blue and black to decide which was less demanding on the planned colors. Blue was the clear winner (I think).
Also... I'm pretty certain I warped this backwards and was just too overwhelmed with the warp to do it again. It's a minimal difference given the two heddle design. I'll make it work... and figure out a way to better remember which way to warp.
Also... what's the best way to keep your warping peg from falling over midwarp???

6 notes
·
View notes
Note
This is, absolutely, fiber art!
Upsizing clothes! There are a million upcycling tutorials for clothes that are too big, but so few on how to make too small clothes you still love bigger!
Thank you for your suggestion! We all go through weight fluctuations in life, so it stands to reason our clothes should be able to fluctuate with us.
Resizing your clothes used to be a very common practice before the advent of fast fashion. Fast fashion sizing is extremely flawed, especially when it comes to plus size fashion, and we're stuck with a lot of vanity sizing, so it's a good skill to have regardless of whether you're looking to mend something old or buy something new.
How to upsize clothes:
Introduction:
There are many different ways to make a garment larger. The following list is not exhaustive, just a few ideas to get you started.
Grading patterns:
If you're making your own clothes, it's always useful to know how to modify a sewing pattern. The easiest way to adjust a pre-existing pattern to your size is slash and spread grading. First, you need to define which spots on the pattern need extra space. You then cut your pattern in that spot, and slide the resulting pattern pieces away from each other until you've got the size you need. Use paper to fill in the gaps. To ensure the resulting pattern makes for well-fitting clothes, make a mock-up and add, move, or remove darts where necessary to adapt it to your body type.
The image below shows potential slashing lines on a set of standard pattern blocks. Each line is a spot that allows you to add extra space. To read more about this process, check out the corresponding article by Threads Magazine.
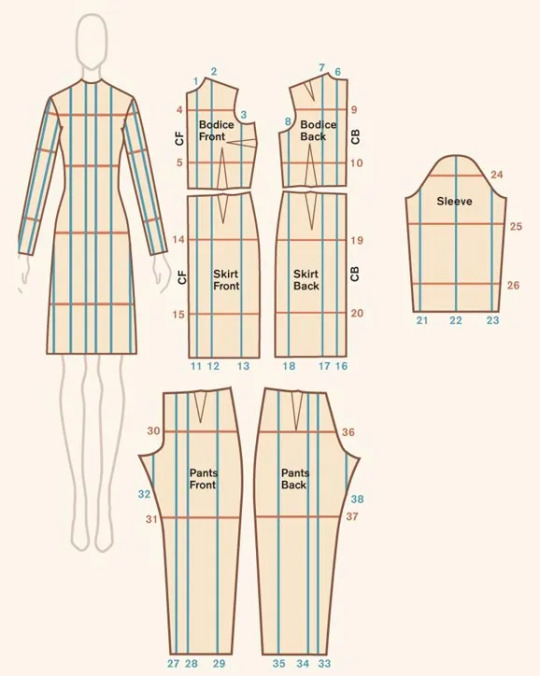
(Image source) [ID: a diagram of slashing lines on a pattern block for a dress, bodice, skirt, sleeve, and a pair of pants.]
To make your clothes easier to let out in the future, make sure to provide ample seam allowance when cutting out your pattern pieces. This surplus fabric has several different uses, including giving you some wiggle room for when you need to size up your garment.
Now, let's take a look at pre-made garments.
Lengthening clothes:
A garment that's too short on you is easy to modify. Just add more material!
If it's a skirt or a dress, add ruffles to the bottom. Ruffles are easy to make by hand or with a sewing machine. You could also add lace, or wear the item with an underskirt.
For pants, let down your hem or sew on a new cuff. If this isn't enough, maybe consider turning your trousers into capri pants or shorts.
As for shirts, sewing an extra layer to the bottom edge is the easiest way to go, too. You could even combine two shirts into one to get an extra long shirt.
Another option is to cut your item in two and insert extra fabric between your separated garment parts.
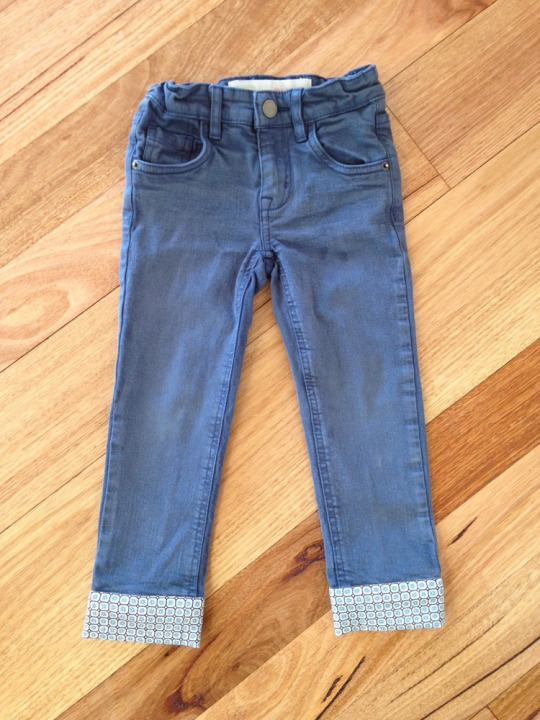
(Image source) [ID: a pair of blue pants with cuffs sewn onto the bottom of the legs to lengthen them. The cuffs are made out of a fabric with a blue and brown geometric print.]
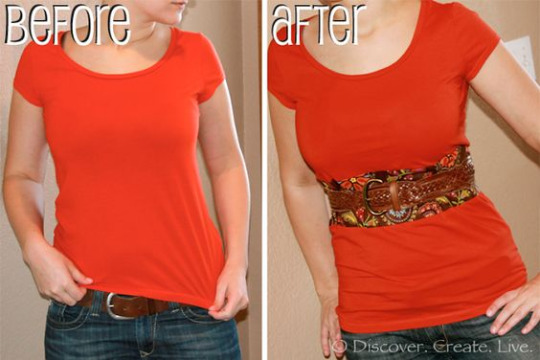
(Image source) [ID: a before and after picture of a red t-shirt that was lenghtened by adding in a patch of colourful fabric at the waist.]
Letting out seams/darts:
Remember how we made sure to have ample seam allowance earlier? When a garment has surplus fabric in the seams and you only need a little extra space, you can undo the seams of your garment and sew them back together again, this time with a smaller seam allowance than before. The Spruce Crafts has a pretty good tutorial on how to let out seams. You won't be able to make major size changes using this technique, but if you only need a few centimetres, this is a good way to go.
A lot of garments also have darts. Darts are fabric folds that are sewn down in strategic places to help the fabric follow the body's curves. If a dart doesn't fit you the way you want it to, then unpick the dart and try on the garment. Either leave the dart open, or pin the dart in place however you want it, then take off the garment again and sew the dart back together.
Be careful not to rip the fabric when using a seam ripper. Also note that removing entire darts may change the garment's fit.
You can also add custom darts to achieve a better fit, but that's a topic for another time.
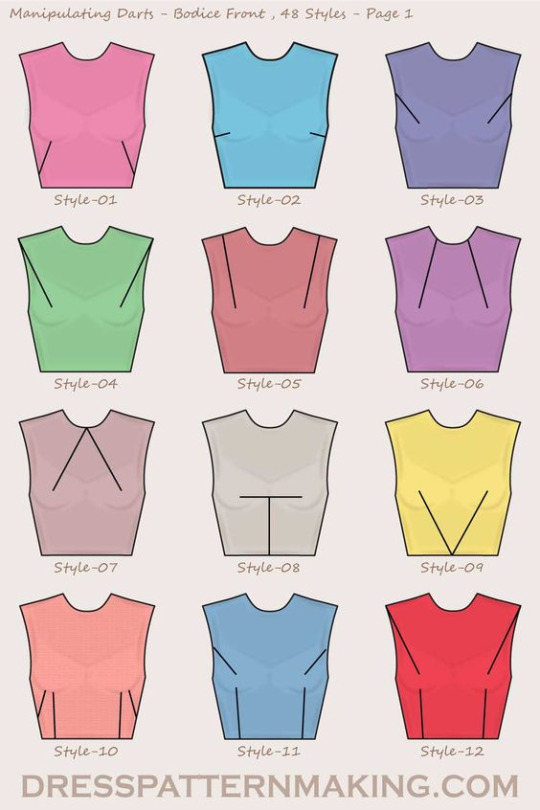
(Image source) [ID: twelve different types of darts on a feminine bodice block.]
Adding extra fabric to your garment:
If we need to add more room than seam allowance or darts can provide us with, we need to add extra material. Remember those slashing lines we looked at earlier? If you're working with a pre-existing garment rather than a pattern, those are the perfect places to chop up your clothes and add in extra fabric.
Check your sewing stash for fabric that's similar in weight and material to your original garment, or go thrift shopping for an item you could use to upsize your garment. Long skirts and maxi dresses are a great source of fabric for alterations like these!
Lace inserts are also a fun choice to add some room, and if you're working with a knit item, you could even knit or crochet your own custom insert.
Define the area where you want to add extra fabric on your item, and measure how much you need. Draw a straight line on your garment with chalk/soap. Make sure the line doesn't cross any important structural or functional parts of your garment like darts or button holes: refer to the slashing diagram we saw earlier if you're not sure what spot to pick. Cut the line open (or unpick the seam if it's situated on a seam), and add in your extra fabric. Finish off your new seams so they don't unravel later on, and you're done!
You can add straight strips of fabric for extra width or length, or you could use flared panels or even godets to make your item flair out.
Want to see this technique in action? Check out this video by Break n Remake:
youtube
Some ideas:
This Pinterest user cut a straight line down the front of a t-shirt and inserted a lace panel to add extra width in the front of the garment.
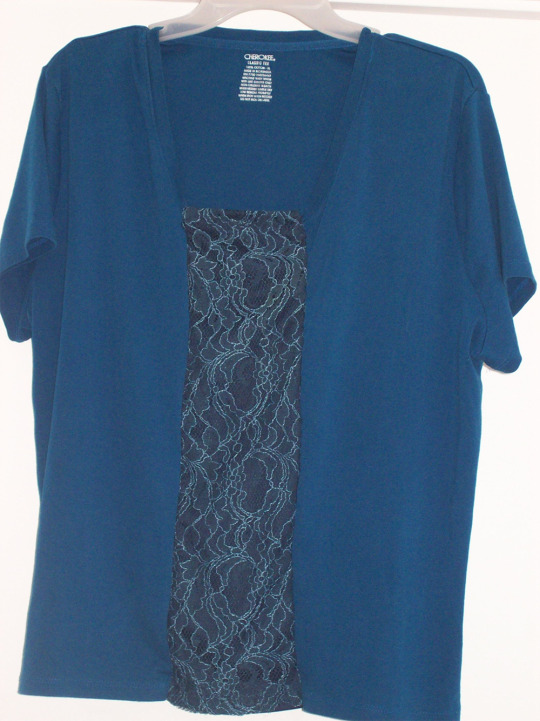
(Image source) [ID: a blue t-shirt with a panel of dark blue lace added in at the centre front.]
Busy Geemaw cut open the side seams of a shirt and used flared panels to add some extra width in the bust and hip area.
(Image source) [ID: a green and white long-sleeved shirt with a striped flared panel in matching colours inserted at the side seam.]
This person added a panel to the sides of a pair of jeans to give them more space in the hip area. You could easily use a long straight panel or a panel that flares at the bottom to resize the entire garment instead of just the hips, or use a wide piece of elastic for extra stretch.
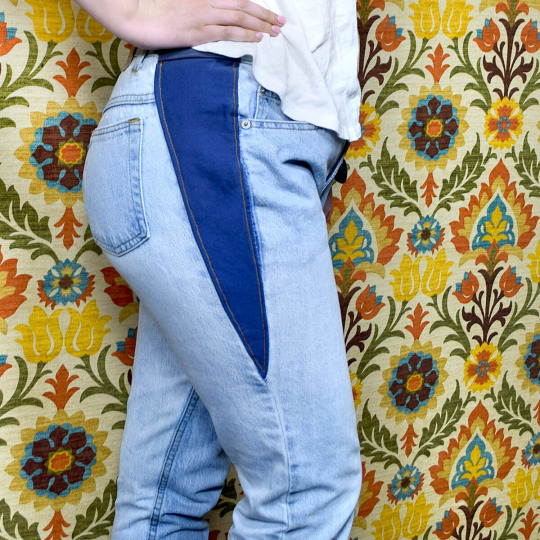
(Image source) [ID: a side view of a pair of light blue jeans with a dark blue wedge-shaped denim insert running down from the waist and ending above the knee.]
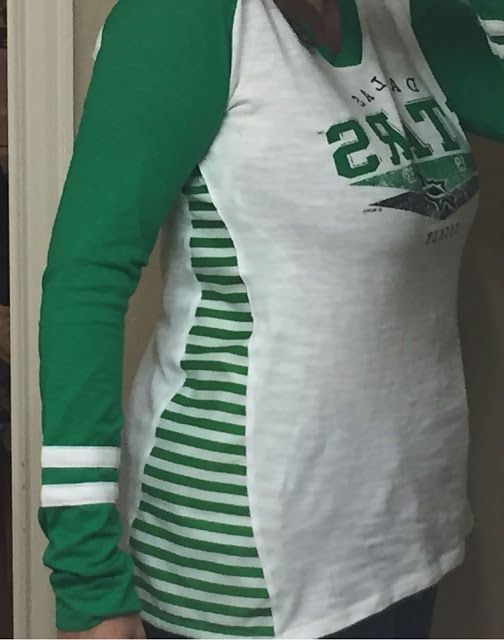
This person added a godet in the back of their shirt in order to get more space in the back.
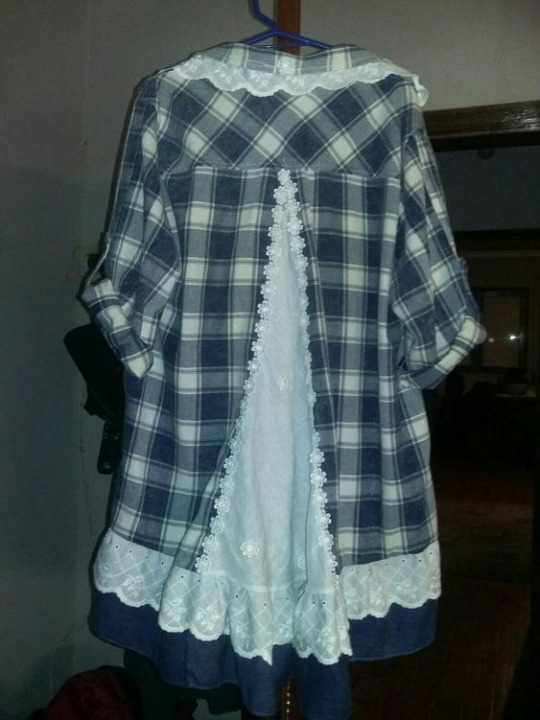
(Image source) [ID: a blue and white plaid shirt with a white lace godet inserted in the back.]
Blue Corduroy enlarged a pair of shorts by opening up the side seams and adding in strips of fabric.
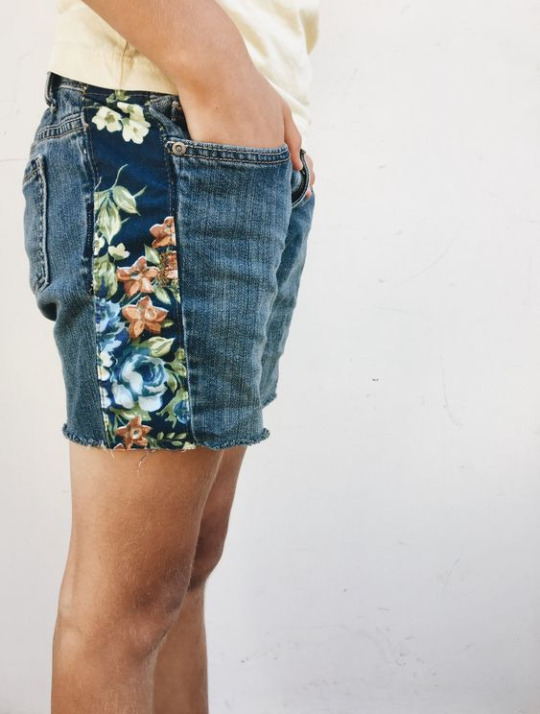
(Image source) [ID: blue denim shorts with a floral fabric insert at the side seams.]
You don't need to resize the entire garment if you don't want to. For example, One Brown Mom turned this ankle-length skirt with a too small waistband into a well-fitting knee-length skirt by taking advantage of the skirt's flared shape.
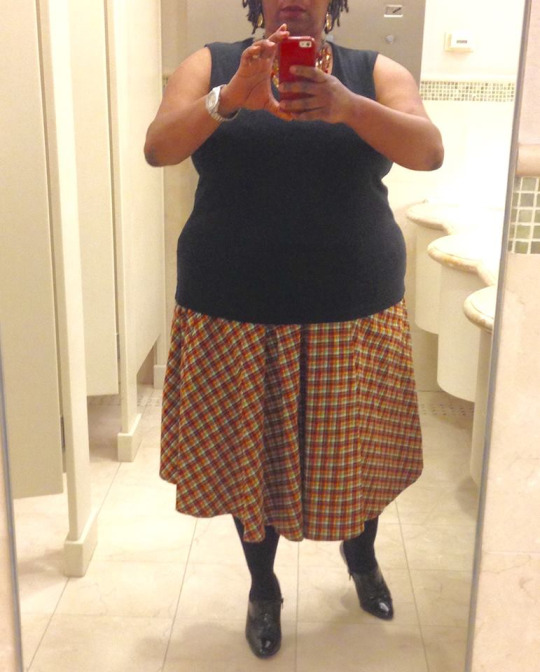
(Image source) [ID: a woman wearing a black shirt and a brown tartan knee-length skirt.]
Conclusion:
Throughout our lives, our weight will fluctuate and our bodies will change. There's no shame in this: it's just a fact of life. Therefore, knowing how to upsize an item that is too small for you is a useful skill to learn.
If you want more inspiration, check out these projects by Confessions of a Refashionista, One Brown Mom, and Thriftanista in the City.
47K notes
·
View notes
Text
Looks like all the goodness of Malabrigo. So squishy!!
God...I spun this whole 8oz in two evenings. I don't have to ply it. I might just stick with fat singles forever. It's so fluffy.
69 notes
·
View notes
Text
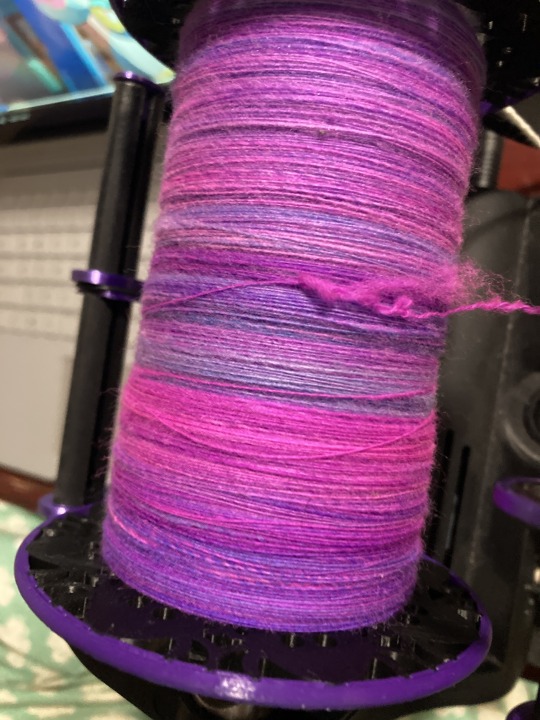
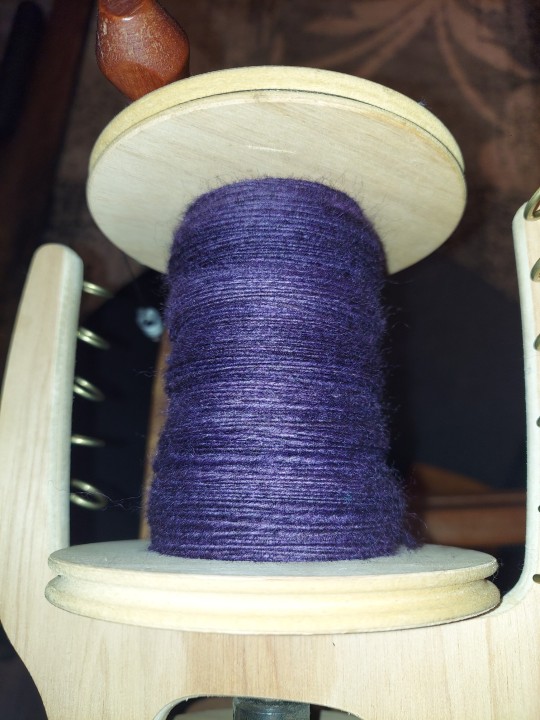
I really needed to get through this 4oz of purple, mostly because I started it during TdF and it just kept falling to the backburner.
This lovely BFL from Greenwood Fiberworks was an absolute dream to spin up. I have another 4oz, but there are other fiber things calling my name.
But I finished this bit!!
4 notes
·
View notes
Text
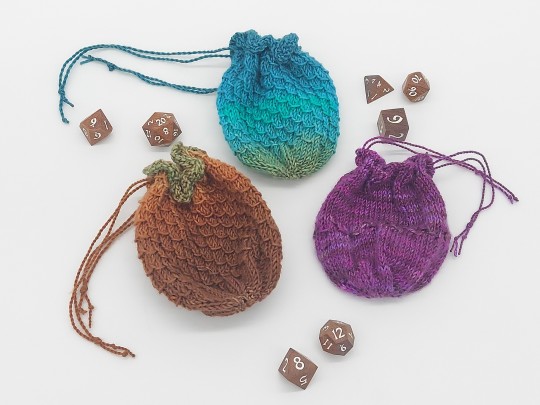
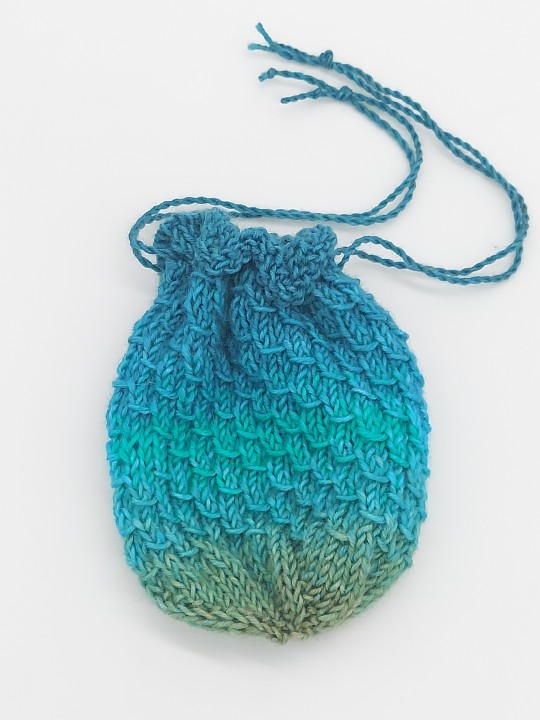
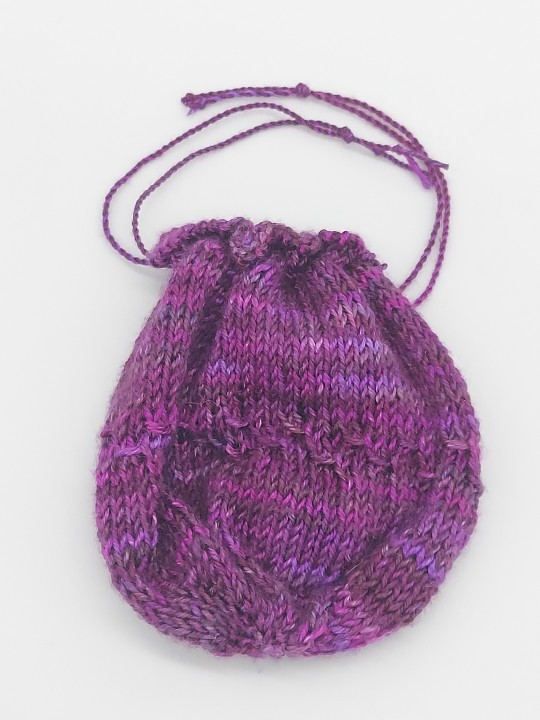
This year a long time friend invited me to their D&D group. I've been enjoying getting to know the whole group and am so grateful for this new band of friends.
In gratitude, and to do a bit of stash busting, I knit up these dice bags, using this Dragonskin Dice Bag pattern. The brown and teal are the remainder of The Blue Brick Dyeworks sock yarn from the previous slouchy beanie, and the magenta is Malabrigo Mora in Sabiduria.
I ended up not doing the dragonskin pattern on the Malabrigio. It was too slick, and the row that I did try in the dragonskin pattern really lost the color.... you know, the reason we love Malabrigio.
I'll be handing these off today, and I'm really happy with how they turned out. It was another practice on Magic Loop as well, which I can now confidently add to my bag of tricks.

7 notes
·
View notes