
giantcypress
giant Cypress
A monk asked Joshu, “What is the meaning of Bodhidharma's coming to China?”
Joshu said, “The oak tree in the garden.”A monk asked Zhaozhou, “What is the living meaning of Zen?”
Zhaozhou said, “The cypress tree in the yard.”
2120 posts
Don't wanna be here? Send us removal request.
Last Seen Blogs

silverapplestock
what is it that you truly desire..?

india0007-blog
Untitled

benhanhan
无标题

aphroditcs
bababouille;

leefpot
Leef
Text
Housekeeping
Any weirdness you've been seeing on the desktop version of Giant Cypress is me mucking around with a new theme. With the old theme, new posts have sometimes been displaying in unexpected ways, because of the new post format that Tumblr implemented. In addition, the old theme had become less well-behaved on mobile devices. So I thought it was time to redesign the blog.
The new theme has all the components that the old one did. I've carried over many of the design elements of the old theme, which I think is nice. It's more responsive, with an improved look on a wider array of different screen sizes, on mobile and desktop. I think it scans better now, as well as having a better balance between text and photos for posts. And then there were the many tiny tweaks that may or may not have been that noticeable, but were driving me nuts. That's why I spent a good 30 minutes this morning chasing down why a dot was positioning itself a hair to the right from where I was expecting it.
Anyway, I think I'm done, and I hope you like the new theme. If there's anything that seems off, please let me know.
1 note
·
View note
Text
Here's a short video of how I use the plane tapping out tool. Hopefully this will give a better sense of how hard I'm hitting the blade with the hammer part of the tool. This corresponds to about how hard I hit the blade with a hammer if I'm tapping out that way.
if it looks like the tapping out tool is placed at an awkward angle, it is. This was so I could get a good camera angle. Normally it would be sitting directly in front of me on the bench.
At 27 seconds long, this video is worth 810,000 words.
16 notes
·
View notes
Text
Japanese plane setup (Wilbur’s version) - III: Tapping out
[Note: this step should not be needed with a new Japanese plane, but you never know. And It is an important part of sharpening and maintenance as you use your plane.]

Now that the plane blade is in better shape, we can turn to sharpening. The first thing to check with sharpening a Japanese plane blade is the hollow on the back. The back of the blade is where the hard steel layer is. When sharpening, if we were to work the entire back, that would be a real chore because of the hardness of the steel. The hollow is there to make this much easier, as only the flat part behind the cutting edge needs to be dealt with.
As the blade gets sharpened, however, eventually the flat area gets narrower, until it goes away, as on this plane blade. This isn't as much of an issue with a chisel, because of the difference in how the hollows are constructed between plane blades and chisels. To fix this, we can tap out the blade.
Tapping out causes much angst among woodworkers looking to use Japanese planes. I think that’s partially because that the traditional method of tapping out using a hammer and an anvil or some other supporting surface has the chance of disaster if the hammer blow hits too close to the edge. In my experience, that’s a bit overblown. If you have the hand-eye coordination to do woodworking, you’ll be able to do this task.
The other issue is that the physical act of tapping out is hard to convey in words, especially regarding how hard to tap the blade with the hammer. I’ll do my best.
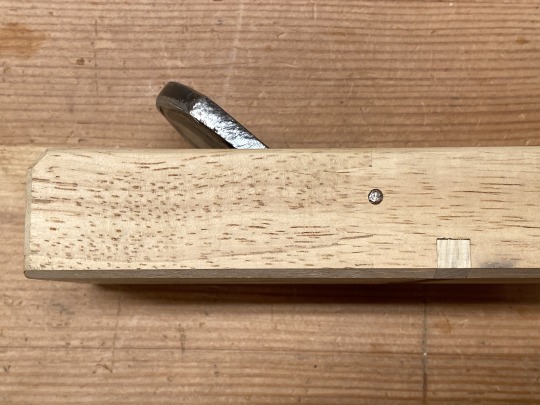
I’ve written elsewhere about using a hammer and an auto body float as an anvil for tapping out, and that system still works well. Since then, I found a device that makes tapping out a bit easier for people who don’t do it all the time. And to be honest, it's easier for me, too. Here it is.

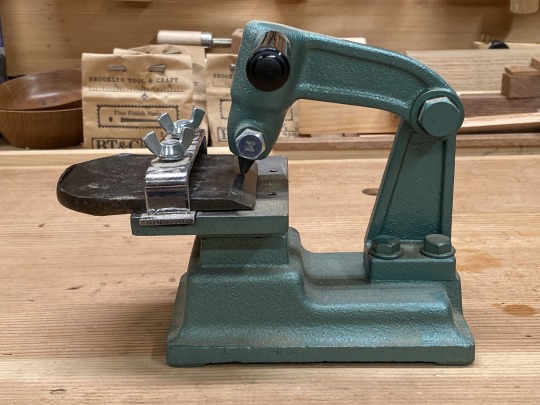
This device has a hammer head that comes to a point, mounted on a hinge. The blade is held in a carrier by two bolts.
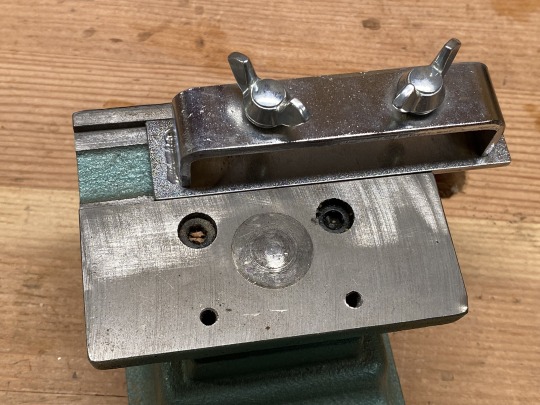
The blade is positioned over a small rounded surface that serves as the anvil. This is located under where the point of the hammer will come down. The carrier slides in a track that allows you to move the blade back and forth.
By fixing the blade in the carrier, it can be positioned so that the hammer comes down in exactly the spot you want it to of the tapping out process. To get started, I put some pencil lines on the bevel side that corresponds to the flat area on the back that needs to be reestablished.

Then I can use the device to start tapping. The point of the hammer is positioned about 2/3 to 3/4 of the way up from the edge. I’ll start tapping with the hammer while sliding the plane blade back and forth, concentrating on the area that I marked with the pencil lines.
It’s hard to quantify how hard I’m hitting the blade with the hammer, but it’s probably in the ballpark of how I would be hammering a finish nail into a piece of pine. You will leave little dents in the soft layer of steel.
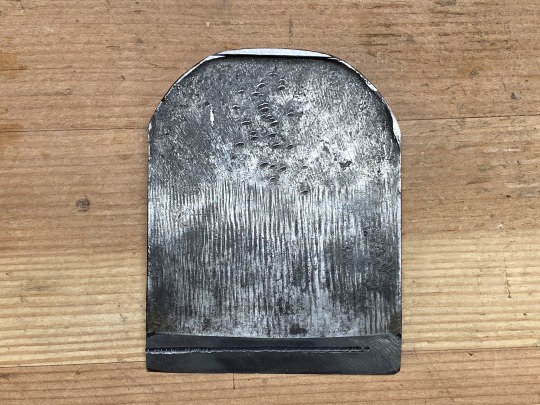
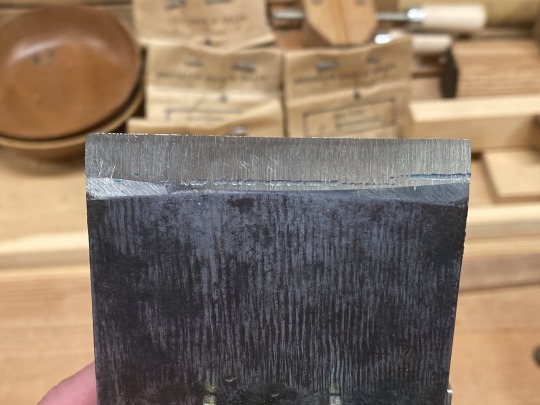
After some tapping, the bottom hard steel layer will be pushed down. You can see this by working the back of the blade after tapping. The flat area behind the cutting edge gets reestablished pretty quickly.


More interestingly, you can see the deformation of the blade from tapping out by working the bevel side of the blade with a coarse stone. The shallow hollow in the middle was created by the tapping out process.
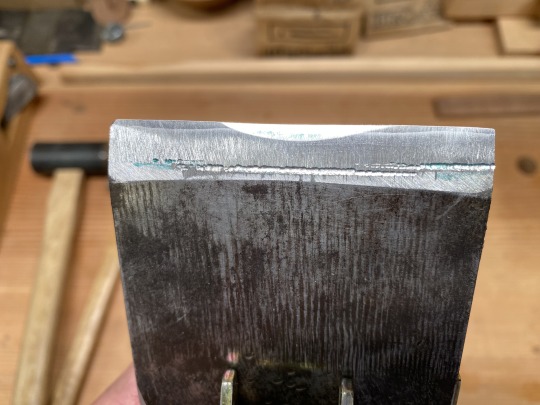
And after more sharpening, that hollow goes away.
Is this device necessary for tapping out? No, but it sure makes it a lot easier. And given how simple the device is, it might not be too hard to rig up something like this on your own.
4 notes
·
View notes
Text
Japanese plane setup (Wilbur's version) - II: plane blade rehab

[Note: this step should not be needed with a new Japanese plane.]
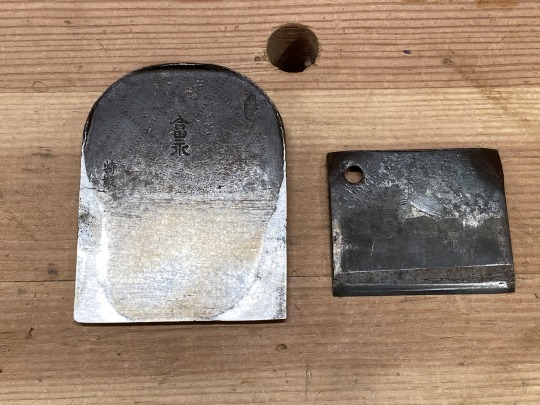
This being a used Japanese plane, the blade isn't perfect. It's got a fair amount of mushrooming around the top of the plane blade.
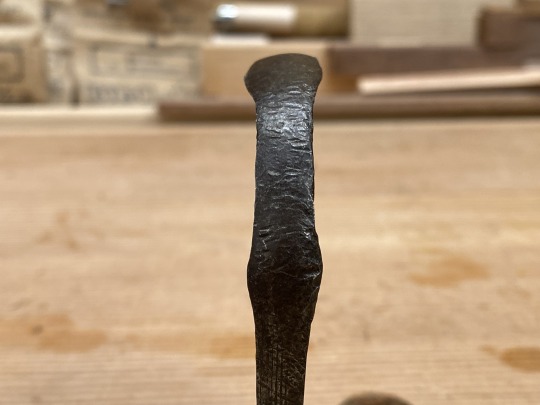
The mushrooming is in three spots — at the top, and on the sides. This speaks to how consistent the previous owner of the plane must have been when tapping the blade to adjust its position. It also makes me think that the previous owner might have used a 1500g hammer for the adjusting.
I could just leave the mushrooming alone, but to my eyes, it doesn't look great. From a more practical standpoint, I want to adjust the bevel angle when sharpening, which means that I'll want to use my Grintec sharpening jig, and the mushrooming prevents the blade from fitting into the jig.
The approach to fixing the mushrooming wasn't too sophisticated. I used a combination of hammering the mushroomed areas on a small anvil, grinding down the mushrooming, and a file. Here's the end result.


It's not perfect, but it's better than it was before. More importantly, the blade will now fit into my Grintec sharpening jig.
On to sharpening.
7 notes
·
View notes

Text
Upcoming talk at the Maine Japanese Woodworking Festival

Although I've alluded to this before, I realized today that I never explicitly mentioned this here. My bad.
The good folks at the Maine Japanese Woodworking Festival were kind enough to ask yours truly to teach and give a talk this year. The festival runs from July 26 - 28, 2024 in Mercer, Maine. The title of my talk is "The Japanese Tool Tradition: It’s Not What You Think It Is". I figured it's a good title — vague enough that I can keep tweaking the talk and still be in scope, and with just the right amount of clickbaitiness.
I know I'll be covering the things that make Japanese tools so awesome — Japanese tool steel, blacksmithing, and tool making techniques and construction, and so on. I'm also putting together thoughts about where Japanese woodworking sits in the wider woodworking world, some of which were informed by my trip to Japan last year.
Here's the link to register. Hope to see you there.
1 note
·
View note
Text
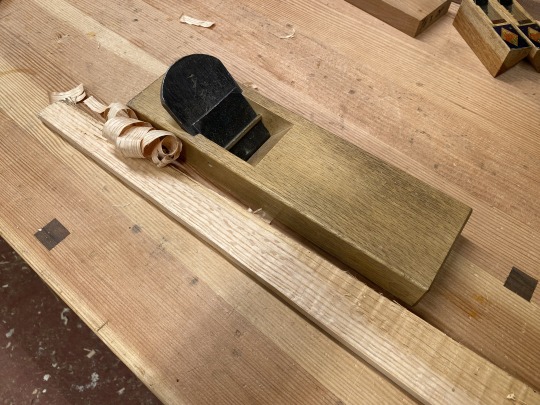
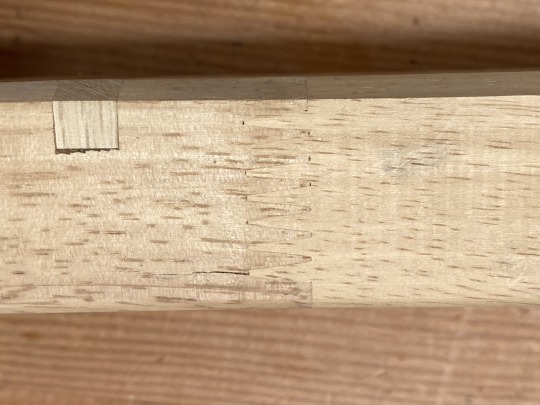
Japanese plane setup (Wilbur's version) - I: where to start
Back in 2010 I put together a series of posts on how to set up a Japanese plane. I've been told that these posts were good, but there are aspects of Japanese plane set up that I didn't cover back then, and other aspects that have changed a bit over time. I figured if Taylor Swift can rerecord her catalog, I could revisit Japanese plane set up.
This time, I'm starting with a used plane instead of a new one. The set up process will be the same with the exception of one step that may or may not be needed for a used plane. I'll be sure to point that out when we get there.
Here's our plane. I found it on eBay. It has a standard 70mm blade, and is in decent, but not great shape.
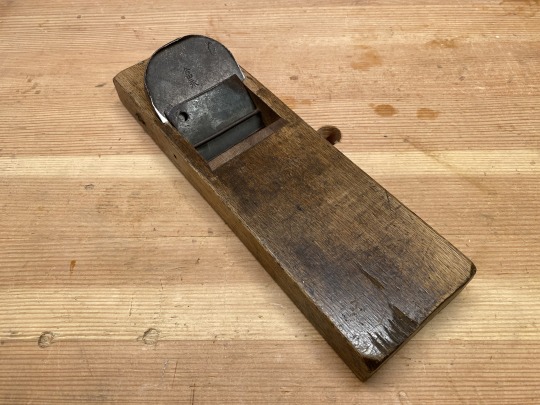

To my eye, the blade looks decent. The flat area between the hollow and the cutting edge is too narrow, but that can be fixed with sharpening. From what I can see on the bevel, the lamination looks even, and the hard steel layer is nice and thin. It's hard for this to show in a photo, as the bevel is a little rough, which hides the lamination a bit. We'll see how it looks once I sharpen it.
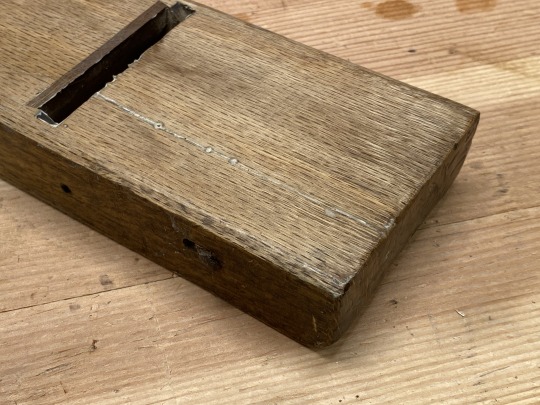
The body is in okay shape.


There's some waxy stuff on the bed of the plane. My guess is that the blade was projecting too far forward, and this stuff was applied to build the bed up to fix that. I will be getting rid of this at some point, and using what I think is a better way to fix this.

There's also an insert that was put in to tighten up the mouth. In the picture above, you can see three nails holding this in place. Here's the view from the bottom.
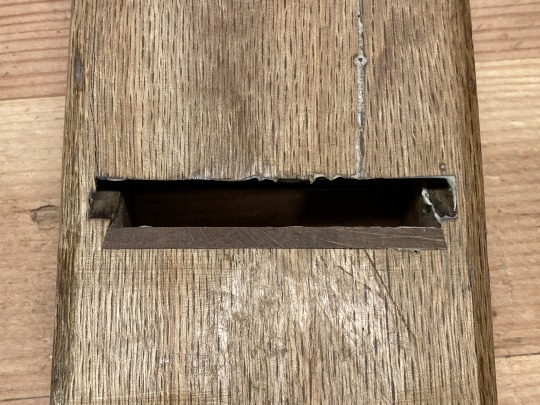
There's also a crack in the back part of the body. There's some stuff in the crack, and a nail that was driven through the body of the plane, which was clenched to hold this together.

So this is where we're starting. The first thing to do is to sharpen the blade.
Why sharpen the blade? It's not because Japanese tool fans are obsessed with sharpening. There's a practical reason for doing this. The blade of a Japanese plane is not perfectly even. There's a slight wedge shape to the blade which can be seen from the side.

The wedge shape matches the wedge-shaped side grooves in the throat of the plane, and this is what keeps the plane blade in place when you use a hammer to adjust it. If I worked on the plane bed to fit it to the blade without sharpening it, and then sharpened the blade, which shortens the plane blade, the fit would not be optimal after the sharpening.
So sharpening first it is.
6 notes
·
View notes
Text
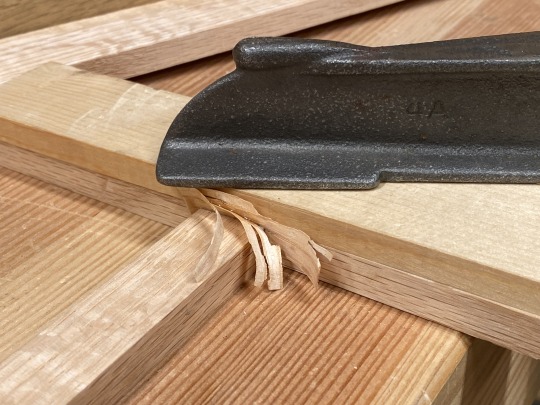
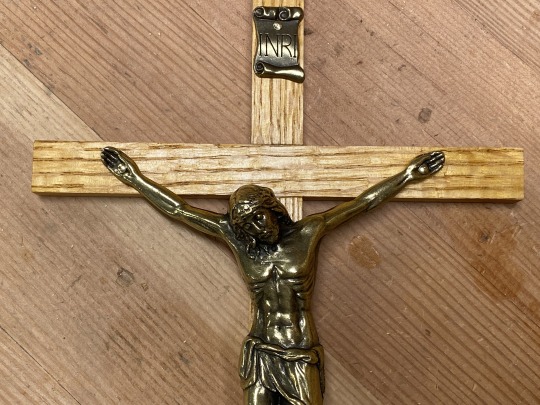
Into the gap
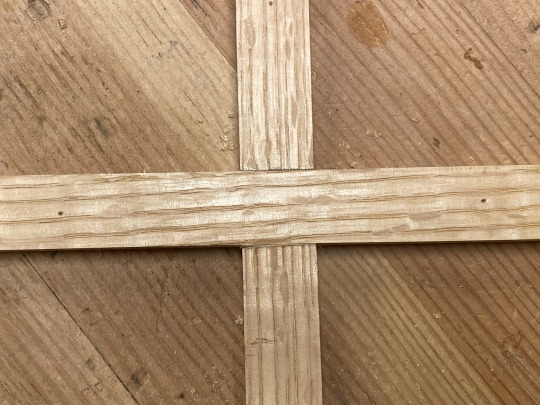
One of the things that resulted from the COVID pandemic was that I wound up teaching the OCIA course for our church (long story). The students got their sacraments at the Easter Vigil Mass, and I decided to make crucifixes for them as a gift. This should be a pretty straightforward project — mill out pieces of wood for the upright and crosspiece portions of the cross, cut a lap joint, glue, finish, and attach the corpus and INRI plaque.
But it is a truism in woodworking that the smaller projects are the hardest to do, because you see every detail. And for this crucifix, there was a detail that bugged me.
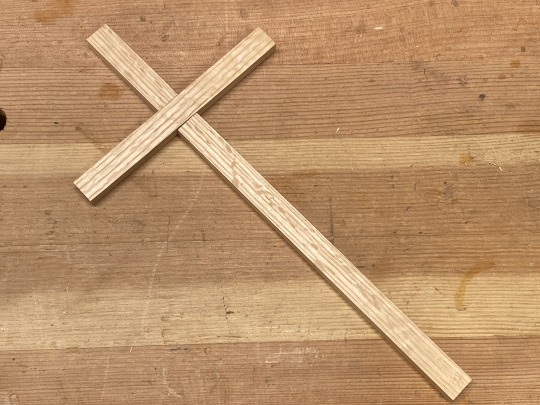
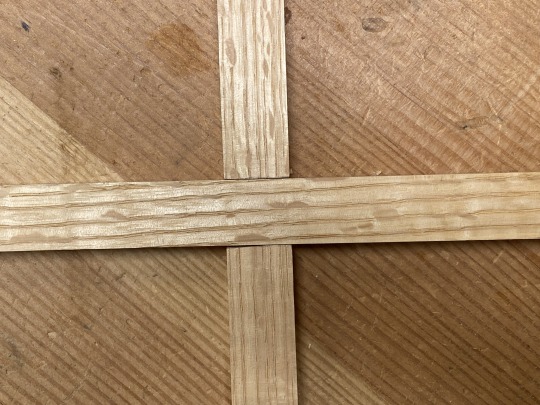
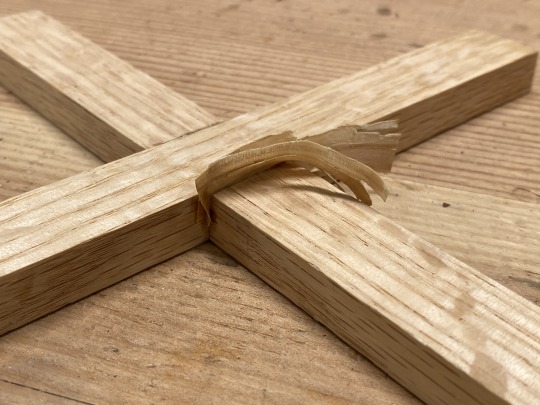
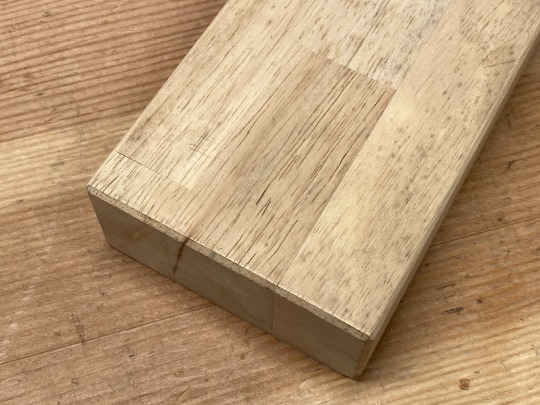
On the lower part of the bridle joint to the left, there's a bit of a gap. That's where I went a little off my line. It happens. Structurally, this joint would be fine, but visually this stuck out to me like a sore thumb. The good thing is that this is pretty easy to mitigate.
The way I fix small gaps in joinery like this is to use plane shavings to fill in the void. The first thing is to figure out the best orientation for that shaving. You want the shaving to go with the grain of one of the two parts of the joint. In this case, it would be along the grain of the crosspiece.
Then make some shavings from another piece of wood that's the same species as the piece. (It does occur to me that if you use a contrasting piece of wood for this, you've moved from fixing a gap in a joint to making inlay.)
Japanese planes are well known for their ability to make gossamer-thin shavings less than 0.001" thick. That's not what we want here.
I test fit the shaving until I find the section that fits well, and then trim down the shaving with a pair of scissors.

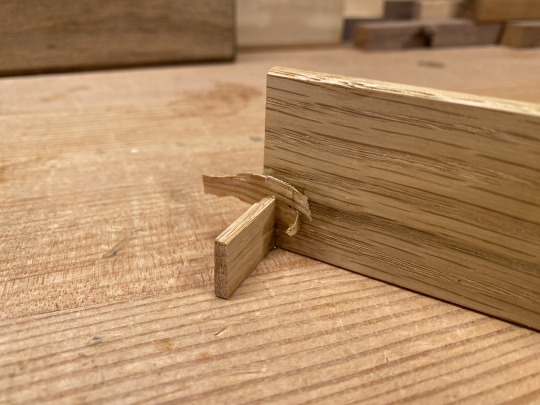
Then glue up and clamp the joint. I'm a big fan of liquid hide glue overall, but it's especially good in this situation because it makes the shavings slippery enough so that everything fits together. Don't worry that the joint will look like one of Phyllis Diller's outfits. We'll fix that later.
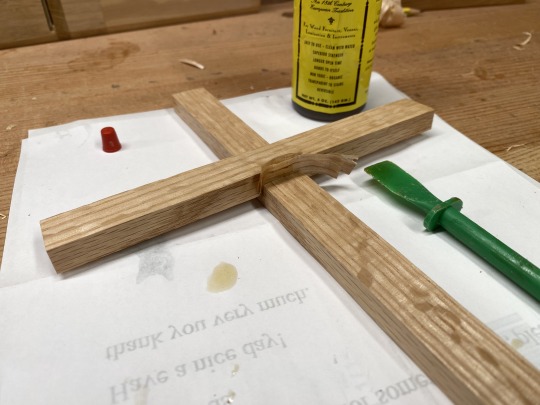
After the glue dries, the joint will look like a mess. Again, don't worry.
Now I use a chisel to get rid of most of the shavings hanging off the joint as well as the dried glue squeeze out, and a plane to bring everything flush. The joint looks much better now.
As it turned out, I was also making a small divider for a container that sits in one of our kitchen drawers, and left a little gap in that joint as well. I used the same technique to fix that, even though it will sit in a drawer, and will never see the light of day, because that's what woodworking has done to me.

For the crucifix, I used shellac and wax for the finish, and attached the corpus and INRI plaque. It turned out pretty nice.
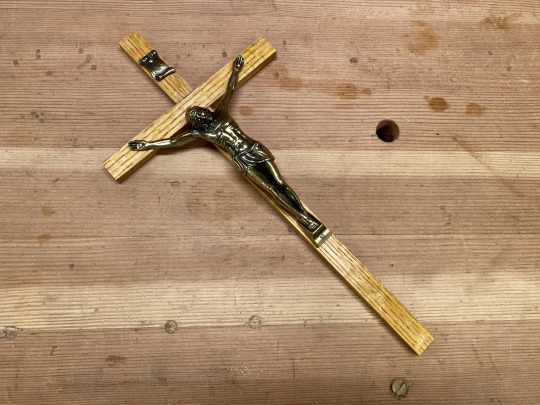
And that's when I noticed that Jesus's head would have covered up that gap anyway. I guess Jesus really does save.
10 notes
·
View notes
Text
It Was 25 Years Ago Today! →
Joel Moskowitz celebrates the 25th anniversary of Tools For Working Wood.
Congratulations! Joel's one of the good guys.
0 notes
Text

Happy Easter from the King of the Monsters and Giant Cypress!
7 notes
·
View notes
Text
I Go To Pieces

I picked up this Japanese plane from eBay for a completely different reason than what I’m highlighting in this post. When it arrived, I was a bit surprised by the body of the plane, as it was made in a way that I had heard about, but never had seen in person. I didn't anticipate this, because of low-res pictures on the eBay listing.
The body of this plane was not a single piece of wood, as usual. Instead, it was laminated together from multiple pieces of wood. Here's a closeup of the top.
Here's the bottom of the plane.

And a view from the end of the plane.
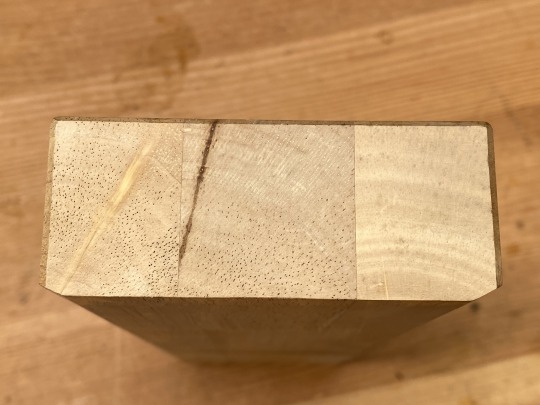
Taking a close look at the side, there's evidence of machine-made finger joints for the end-to-end connections between the pieces.

Without any other information, my guess is that this plane body was made from a piece of butcher block countertop, or something like that. I don't think this is a usual method of making planes, as I've not run across this in over a dozen years looking at used plane auctions. And no Japanese tool seller that I know of offers plane bodies made like this.
The plane works pretty well, though. I gave it a try on a scrap piece of walnut without conditioning the sole or any of the usual Japanese plane set up procedures, because I was impatient. It still pulled nice shavings and left a nice surface on the walnut.

It will be interesting to see how this plane works once I actually set it up.
7 notes
·
View notes
Text
@julietwiskey1 — this a running joke I haven't done in a while. When I first started woodworking, Japanese tools had a reputation in the US/European hobbyist woodworking world for only being suitable for use in softwoods, and therefore not suitable for "real" woodworking. I knew that wasn't the case, as evidenced by the fact that Japanese woodworking can and does use hardwood species, including those from Southeast Asia, like various rosewoods.
Besides covering this topic in my talks and articles on Japanese tools, I have a running joke here on Giant Cypress where I would post work that I or (usually) other people have done with Japanese tools and hardwood species, and comment that "so-and-so doesn't know that you can't use Japanese tools on hardwoods."
In the time I've been writing about Japanese tools, I like to think that I was able to help put that myth to rest, and it does seem to me that this sort of chatter has died down somewhat over the years. As a result, I haven't done this gag in a while. Recently, however, the "Japanese tools can't be used on hardwoods" trope has popped up on my radar. Maybe it's time to break out the running joke again.
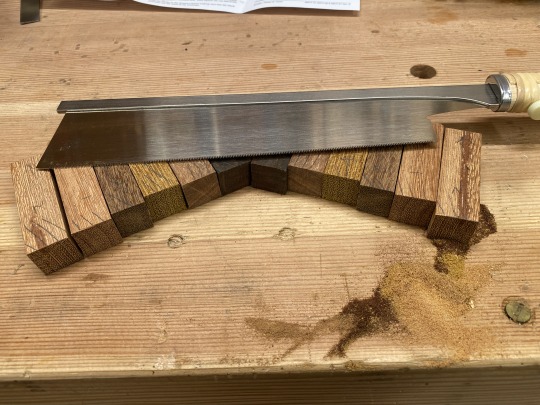


I teach the OCIA class at St. Bartholomew, our church. For this year's group, I made some pens as gifts. The pen blanks are all some sort of unidentified Brazilian hardwood.
The first step in making these pens is to cut the pen blanks into two pieces, and I used my dozuki for that. I forgot that you can't use Japanese saws on hardwoods, much less tropical species.
16 notes
·
View notes
Text
Three of Thirty Six Views of Mount Fuji →
On the occasion of a complete set of Katsushika Hokusai's "Thirty-six Views of Mount Fuji" being offered for auction by Christie's, Joel Moskowitz offers some great information and insights on them, including this tidbit:
The complete set actually consists of 46 prints because Hokusai added 10 prints to the series. If you're thinking of adding the series to your own walls, bear in mind that Christie's has set the estimate between 5 to 7 million dollars.
So if I win the lottery, I know what I'll be shopping for.
0 notes
Text

Here's an Asian who rocks. And maybe moonwalks, too.
Happy Friday!
1 note
·
View note

Text
Maine Japanese Woodworking Festival 2024 →
if you're thinking about going to this, there's an early bird discount that ends tomorrow.
Also, Yann Giguère and Jason Fox was kind enough to ask yours truly to give a talk at this event this year. Despite the fact that I'll be yammering on for an hour, it should be a great time anyway.
2 notes
·
View notes