#Also first time coloring in CMYK (i thought I might want to print it) and man it is a headache.
Text

You turn on the light.
#the owl house#toh#toh promo#watching and dreaming#luz noceda#amity blight#lumity#the collector#EIGHT HOURS. A SOLID THREE SPENT SOLELY ON TWEAKING COMPOSITION AND COLOR BALANCE UGH.#I really wanted a Catholic stained glass window vibe for this one#but I didn't like the look of black outlines on everything for a real stained glass aesthetic.#Also first time coloring in CMYK (i thought I might want to print it) and man it is a headache.#Before I'd just color in RGB and go fuck it whatever happens happens but it's time to grow up... it's time to learn how to do it right#so yeah my signature colors aren't there! because cmyk is the devil! but it looks nice anyway I think.#So excited to see how this all ends I want weirdos to stick together soso bad
7K notes
·
View notes
Text
Finding Perfect Dress Shirt For Shorter Men
Half tones and PMS colors: It can be very costly to use high resolution pictures and full tone colors. Budget constraints, often call for the use of halftones. In order to achieve this, the color scale must be toned down to the PMS color percentage.
Next consider if there is any writing on the shirt. People seem to have differing opinions regarding writing on T-shirts, but one thing we have noticed is that profanity is not so in fashion this year as it has been and it can offend a number of different people. Make sure that you are comfortable with people of all ages reading the shirt that you are looking at and that you would be sure not to offend them in any way. This will keep you from being in any kind of situation that might be awkward.
Share the Message: The unique design of your shirt, shoes or cap will spark a comment or compliment. This is your opportunity to start the conversation about Jesus and His message of love, hope and salvation. A t-shirt and five minutes could be all it takes to change a life!
Now I would like to mention that in this article I have frequently compared T-Shirt transfer printing to screen printing. Screen printing has two distinct benefits. You are able to use white ink and the ink for screen printing is designed specifically for fabric.
https://teezland.com/t-shirts/gamer/ are a better choice: It is quite common for designers to use an RGB or CMYK scheme. But if you want a better finish and smooth color separations, using PMS colors is your best bet. Sometimes, the printer may give pieces of fabrics and sample prints so that they can match the colors and texture as per their needs.
If the company's focus is on kids, then for your prints, you might decide on pastel or bright colored shirts. Kids happen to love bright colored apparel and will be more likely to favor it over blander colors, which will help keep your company in the foremost thoughts of their parents. If you are geared to an adult clientele, as I mentioned earlier, black is always a great choice for custom T shirt printing, followed by grey, white and blue. Think of your audience and the focus of your company or organization.
These more advanced t-shirt printing processes now make use of, what else, a computer! If you want to start a custom tee business, knowledge in basic computer operation is a must. What you need to do is print the customer's desired design in a special type of paper with an inkjet or laser printer and using waterproof ink. Then the image is transferred to the shirt. The images are then dried and ironed so they won't come off no matter how many times you use and wash the t-shirt. The quality of the t-shirt itself is also important.
Who's gonna wear it?: The first step to creating a T shirt design is to consider your target audience. Specifications such as height, width and gender should be captured.
1 note
·
View note
Text
Vograce stickers review
I don’t usually make reviews here but I felt it would be opportune since there isn’t any out there and if you are looking for options and you can’t find any soul talking about it, then you would rather avoid that option, right?
When it comes to stickers, I always print them locally. It’s pretty much a hit and miss here, the people who print here are very casual and take little care of their machines. One day the prints can be nice and the other a total mess. Since the designs I was doing required kiss cutting(So you can peel off the sticker out of the sheet) and I don’t have a plotter like a machine like a silhouette or a cricut I decided I wanted this time my stickers to be made by a company.
First I contacted a company in the US which I heard good things about(Mind you, I’m from Peru) But they were taking a while to reply. I don’t want to comment on them much since I never fully tried their service. The thing was, time passed by and the stickers were on a void of no progress.
I recalled then Vograce(Which is a known company based in China for making acrylic charms)was making stickers and sticker sheets(Vinyl/PVC and washi like paper) They replied very fast which make me feel things would be done on time. Here I’m posting my experience with making stickers(I had done charms with them before)
Communication:
Speed: Fast! Yet pay in mind because of timezones the exchange could be delayed.
Language barrier: This must be the massive Vograce downside of them all. As someone who speaks English as a second language, I have a hard time to make myself understandable. Vograce reps are pretty much the same. I think it’s best to keep messages short and simple if you can. If you need things to be fixed, then try to illustrate them so they can understand it better.
Fixing stuff: Another Vograce downside and for a moment I felt like I was talking with two different people. The first two days of exchanges went smoothly and the rep which was attending me was very nice. I sent my files via Google Drive and there were no issues at all. Yet the third day where there was another thing to fix, the rep(Which was supposed to be the same person) approached me in a rather rude manner or at least that was the impression I had. Also, they refused to check my files via Google Drive when the previous days they had any issue? This plus the fact of the timezones, the exchange was becoming really slow and tedious.
Sticker formatting:
There is no way to know how exactly they need their stickers to be formatted unless you ask them, and they are a little vague about it. I’m going to give a bit of advice here:
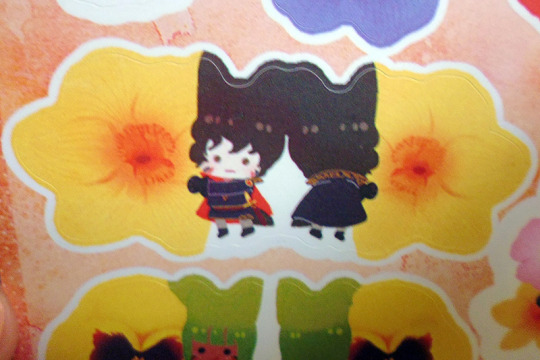
The way you need to format your sticker sheet is similar to how Zap Creatives request it as far as I know. You have a PSD file with a layer called “background” where the non-cut art goes. and a layer called “art” where your sticker pieces go. I had a big issue here because of the following sticker sheet:
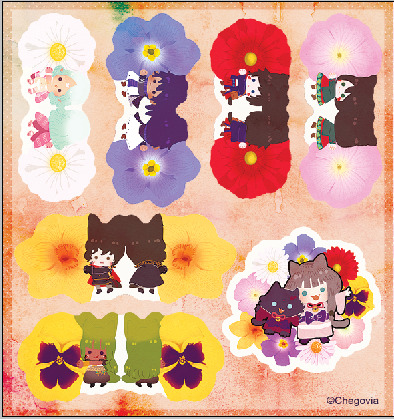
As you can see, the borders are different colored, not just one color.
Vograce then replied to me with a preview of all the sticker sheets that looked like this. The pink line is the cut line:
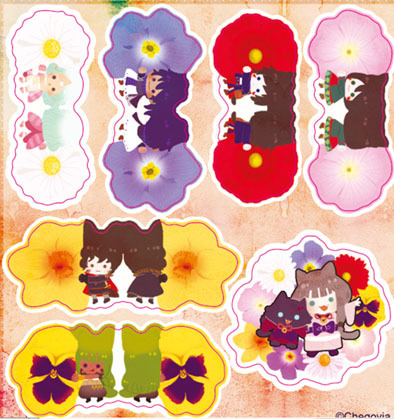
So I thought “Welp, I fucked it up, it looks like they need a bigger bleed border just in case the cut line moves a little” I requested if it was possible to change the artwork to this one I did according to the thick white bleeding they added:
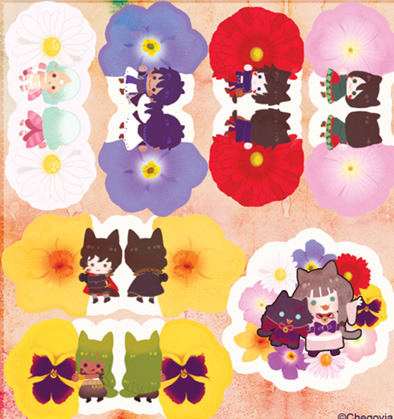
This is when things got difficult and it’s the change they were refusing to do. They told me because the stickers were very close to each other, they needed that white border. But my issue wasn’t the border but the color of it so I was clueless on why they were so against on changing it? Perhaps I’m ignoring the fact that their plotter program is different from Photoshop when it comes to replacing the artwork, but after a very very tedious exchange, the artwork remained as the preview they sent at first. So pay in mind there is a big big chance your artwork gets a white border instead of the color you requested. If anything, when printing with Vograce, avoid the nuisance and make your borders white. This may save you some headaches when sending and fixing your files.
Price:
Vograce by no means is the cheaper option if you consider shipping. The US sticker company I approached before was 20 cents less for one A6 sheet and had a flat rate of $20 of shipping for a certain amount of stickers. Vograce only ships via express(EMS) or private couriers so the shipping could be as much as the item itself depending on where you live.
Shipping:
Again, since you are paying for express shipping, things are meant to arrive quickly to your place. I knew they had a holiday so I requested if it was possible to ship it before it. Their rep promised they would, and so they did. After the previous headaches, I was relieved they kept their promise and did the effort to have them on time considering how hectic things can be before holidays.
Sticker quality:
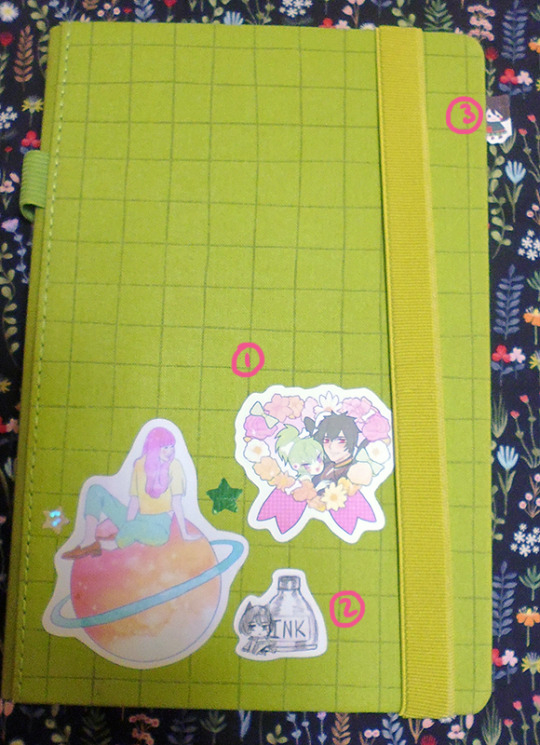
After all the struggle I on the process the stickers finally got here. I don’t have a wide reference on how other companies make their stickers, but to me, these are very nice:
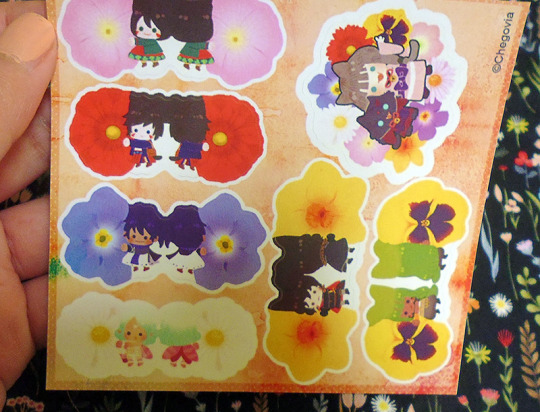
I was afraid that white border would show up but it wasn’t the case:
It’s a very precise cut.
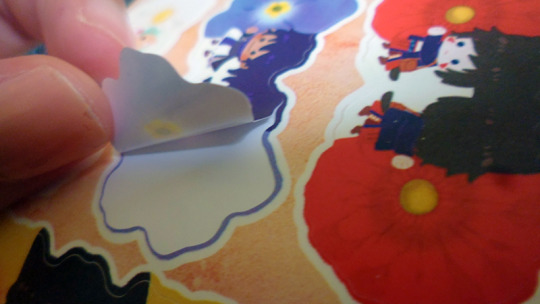
The stickers are very thin tho! Yet they are very sticky.
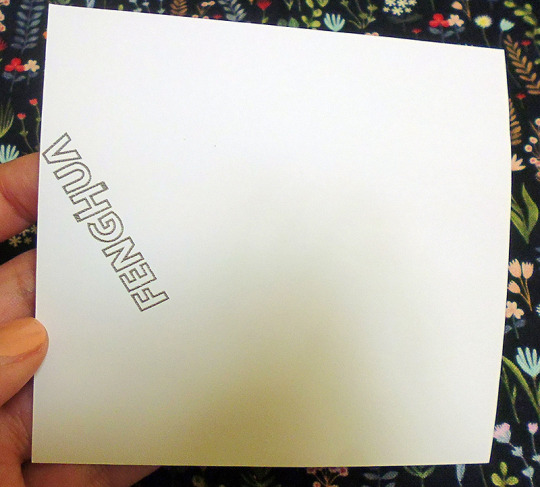
The back of the sticker paper looks like this, which might be a turn off to some people but since I’ve been printing locally, the stickers here look kinda similar with the manufacturer name so I don’t really mind.
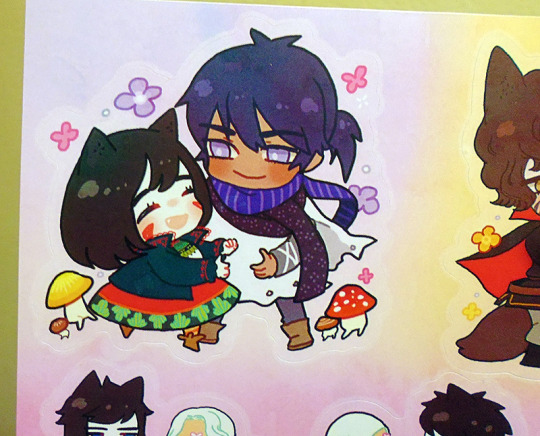
The colors are accurate on what I sent them. Maybe they lean a liitle bit to the yellow side but that’s me being super picky because they are very close to what it looked in the screen(In CMYK) You can choose between glossy or matte finish. I knew that glossy makes your colors pop even more but I felt it could be a little jarring to have a sticker that reflective if you pasted it in your laptop or such. I’m glad the matte finish didn't dull the colors up.
How they will stand:
I have no idea yet lol. I stuck some in my most used journal and see how it will go. So far they have stuck to it well considering it’s a fabric cover.
Final thoughts:
While the end result was pleasant, I think I will try and search for another sticker company next time. Perhaps go for Vograce if you are already making a big order of something else with them. I felt the issues with communication and fixing were a turn off to me. Maybe if they had their formatting info in a PSD or in a video they would avoid so many problems with people like me who are clueless which honestly it’s a massive waste of time from both sides.
30 notes
·
View notes
Text
Book Printing: What Do You Do in an Emergency?
What do you do when a job goes south? It can happen in any number of ways. I have a client who regularly prints a color-chip book for fashion. I’ve written about her work a number of times in this blog. Her product is akin to a PMS swatch book for make-up and clothing based on one’s complexion. It is small (3.54” x 1.42”); 118 pages in 4-color process, produced digitally on an HP Indigo; and then drilled and assembled on a metal screw and post assembly. Depending on the particular press run, my client might print anywhere from 3 to 30 copies of each of her 22 master copies (each master copy addresses people with particular hair and facial complexion). Because of the ultra-short press run for each master copy, my client’s job needs to be produced digitally.
The Backstory
About two months ago my client put in an order for copies of her color swatch book. It was the first time the current commercial printing shop had done the job. To be safe, we had asked the printer to produce a complete, untrimmed set of all colors used in the 22 master print books as a test. Each swatch had the CMYK percentages noted below the solid color as well as my client’s proprietary name for the hue.
To determine if there would be a perceptible color shift once the sheets had been laminated in the final press run, we had the custom printing vendor produce one set of laminated, untrimmed swatches (as many as would fit on an approximately 12” x 18” press sheet) and one set of unlaminated swatch pages. I had seen in prior iterations of this job produced by another printer that some of the colors in the blue range had shifted slightly. I wanted to make sure that if there were color problems, they could be definitively attributed to either the custom printing or the lamination.
So we thought we were ready to go, once my client and her business partners had approved the test sheets. We also thought this would be a good way to ensure consistent color if we should ever need to change commercial printing vendors. After all, the prior printer had gone out of business just after one of my client’s reprints: hence the need to move the job.
My Oops
What we hadn’t foreseen was a simple error in the specification sheet: The covers had to be laminated, but somewhere in the process this notation had been removed from the specification for the text pages. Due to the heavy ink (actually liquid toner) coverage, without lamination the heavy solid colors on the swatches could easily be scratched. I actually tested this on a sample, and I found the problem to be marginal on light colors and more pronounced on darker colors. (This was due not to the toner coverage but to the eye’s tolerance for flaws in yellows, for instance, but not in dark purples.)
So the job came back with laminated covers and without laminated text. The printer’s customer service representative had caught the error (the inconsistency between the initial laminated but uncut proofs and the unlaminated text sheets in the actual press run), but he had assumed—without asking–that it was intentional. He had deferred to the specification sheet.
It was not the printer’s fault. It was mine, as the commercial printing broker. So I cut a check to my client to cover the printing. Fortunately I had not needed to do this up until this point in my history as a printing broker. It was unpleasant, but it kept my client happy.
The Next Steps
At that point, my client had a full run of unlaminated color swatch books. The colors were superb, but the pages were fragile since they were unlaminated.
Since my client had effectively paid nothing for these (since I had reimbursed her), she then paid the printer for a reprint—which turned out to be a much longer run. This one would be laminated.
Fortunately, my client still had 96 salable books (albeit salable for less than the usual price, since they were not laminated). I encouraged her to use these to keep her clients (she has a 4,000-name client list) happy while waiting for the new, laminated print books. I explained that she had an equity base. The books were usable. This would be a good, temporary, public-relations fix.
The Reprint Process
The reprint process didn’t go as well as planned. It was supposed to be a three-week turn-around. I understood that the lamination film had to be hand loaded, a sheet at a time, by the printer. There was going to be a lot of hand-work, but the good news was that all steps in the process, including the drilling, round cornering—everything—would be done in house.
The problem was that this printer is a small shop. In terms of service, that’s a good thing. I have been working with the printer for more than a decade, and I have always received a premium print job for a lower-than-usual price. In fact, I just sent this commercial printing vendor my sales commission invoice for the hundredth project we have done together.
But being a small shop, the printer had been hit hard recently when a number of key employees had to be out for health reasons, deaths in the family, and any number of other crises.
You may say that I’m naive. I believed the printer because of our ten-year-plus history. What I did do, however, was work out a plan with my client for daily (or every two days) status updates from the printer.
Initially, the job just seemed to sit there. But after a few days, things were back on track, and the job actually shipped today. I just looked at the calendar. The entire process had taken four weeks instead of three.
What We Can Learn from This Case Study
Sometimes things that look really bad can be salvaged. I salvaged the relationship with my client by paying for my mistake (and fortunately it was not a huge job). And what looked like an endless wait for the reprint turned out to be only a one-week delay.
I firmly believe it was because of a few important things:
I had had a long, mutually beneficial, business relationship with the printer. This was not the first job. I made it clear that continuing the relationship was a priority. I also noted that other printers had not done as good a job with the color fidelity (which was clearly of utmost importance to my client for her color swatch book).
Based on the length and quality of the business relationship, I was kind. I didn’t blame the printer. My goal was to complete the job to my client’s satisfaction, not to lay blame. Therefore, coming up with a way to leverage the initial printing to make my client’s clients happy while they awaited the new print books helped resolve the situation, as did requesting email updates from the printer (the written word seemed to make the process more formal and quantifiable).
I focused on solutions. (Another job had gone south one other time in my 30-year history of buying custom printing. The printer went out of business during a textbook printing job. He had no credit and could not buy paper. So I urged the company I worked for at the time to purchase the paper for the print books at its own expense and then deduct this amount from the final payment to the printer. In this case, the printer was able to finish the books in satisfactory condition before closing his doors.)
I did ask this printer to notify me in the future if anything seemed the least bit inconsistent in a job, between the specification sheet and any other verbal or email instructions.
In your own print buying work, think about the approach I have described. Just because you can blame the printer, pull the job, and send it somewhere else doesn’t mean you should. After all, a trusted vendor can often step up and work wonders, even in the midst of a crisis.
Oh, and one other thing. Read and reread your specification sheet—again and again. Even if you do this, once in a great while you will miss something, and you may have to pay for a reprint. Ouch. After all, the specification sheet is your contract with the printer. But the more often you check and recheck it, the less likely you will be to let a costly error slip by.
The post Book Printing: What Do You Do in an Emergency? appeared first on Printing Industry Blog.
Book Printing: What Do You Do in an Emergency? published first on https://getyourprintingcompanies.tumblr.com/
0 notes
Text
A Tale of Two Vector File Formats
A Tale of Two Vector File Formats
Since version 7.5, the DecoNetwork Designer has performed all of its rendering client-side to greatly improve the user experience. To help achieve this, we use SVG as our primary display format. SVG enjoys wide compatibility across browsers and most user manipulations that our designer requires can be done in real-time. If we ever run into problems, the human-readability of the format improves debugging.
However SVG is no panacea in the world of printing. This is where PDF is often preferable as a preflight format. SVG and PDF are, at their core, very different formats that have a very different target use. Here we discuss the challenges that DecoNetwork has had to overcome to reliably offer PDF as a production file format for printing, whilst using SVG for front-end display.
Color Space
One of the main limitations with SVG is its exclusive use of the sRGB color space. While it is true that SVG1.1 does actually support embedded ICC color profiles, and SVG2 supports an even wider range of managed and unmanaged colors, these features generally have no browser support. In practice, we are dealing with an unmanaged, RGB-only format. However PDFs often contain colors defined in non-RGB color spaces (for example, PANTONE spot colors, or CMYK) and we should strive to preserve this information in the upload-designer-production workflow.
With this in mind we can summarize the following objectives when dealing with PDF files:
We must support PDF as an input file format (eg, designer uploads, stock library images and so on)
Allow manipulation of imported PDF objects in the designer in real-time, using an SVG representation of those objects.
Preserve colors – including non-RGB colors – that were in the original PDF, unless they are user-modified or palette-matched in the designer.
Support PDF as an output production file format, rendering colors true to the original document or those picked/matched in the designer.
When a vector file (eg PDF) is uploaded into a deconetwork library or the front-end designer, it needs to be converted to SVG for our designer to be able to manipulate it. At a glance, it would be tempting to simply convert it with one of the many tools available, and manipulate only the resulting SVG from that point forward. Later when generating production files, we can just convert our SVG back to PDF with the same tool. This would be a relatively simple route, and a little experimentation leads us to believe that this is what some of our competitors are doing.
But alas, as mentioned earlier, when the uploaded PDF contains, for example, PANTONE® or CMYK-spot colors, the convert-and-forget approach would lose this important information and we’d be left with an RGB-only document even when we later convert back to PDF for production files. In practice, this may lead to an outcome whereby a fulfilment center prints a design on a garment where the colors look “off” compared to the file that was originally uploaded by the customer.
With this in mind, imagine we have a PDF file with the following structure:
As we can see it uses two CMYK colors and a color from an imaginary palette of spot colors. After a rudimentary conversion to SVG, we might end up with the following:
If we were to load this SVG into the designer and only consider the information it contained, we’d lose the original colors that the artist had intended to use.
Our solution to this lossy process implements a hybrid approach. Any uploaded vector is converted to an intermediate file format (DNT – DecoNetwork Template) whose objects are easily converted to SVG for display purposes but also stores the “real” color of those objects alongside the RGB representation that gets used in the SVG. This way we can build a “mapping” that we can refer to if we convert back to PDF at a later stage.
Since we didn’t want to write an entire PDF converter/parser from scratch, we build the DNT in two passes. First, we still convert the PDF to SVG using one of a handful of existing solutions. We then interrogate the PDF object structure for used colors to create the mapping which might look something like this:
Finally, we have an SVG-to-DNT converter that takes both the SVG and the above mapping to create the complete object. The DNT is converted to SVG in the designer, and any manipulations made by the user will modify both the SVG on screen and the underlying DNT.
After an product is decorated in the desinger and an order is created, we enter the production phase. If the production file format is PDF, the steps are effectively the reverse of the above process. Armed with the DNT generated from the designer, we convert it to an SVG and use off-the-shelf tools to convert the SVG to PDF. But now this PDF has only RGB colors. We have written another tool that takes the RGB mappings from the DNT and substitutes these colors directly in the PDF.
“That seems too complicated.” I hear you say. “You can just convert RGB back to CMYK with a simple formula, here’s a one I found with some googling…” Unfortunately it is not so simple. Whilst various formulae exist for remedial RGB->CMYK conversions, they are approximations at best, since RGB->CMYK is essentially a subjective conversion. CMYK and RGB colorspaces have a different gamut, so given only an RGB result, we can’t know for sure the original CMYK color from which it was generated (ie, the gamut mapping is missing). Not to mention simple formula-conversion doesn’t solve the case for spot colors. We need to, and can, do better than this.
We can visualize the PDF life-cycle as follows:
When PDFs behave badly
Occasionally we see issues with PDFs that leave us scratching our heads. In the production phase, DecoNetwork automatically captures “fatal” errors (those where a production file fails to be produced). These errors are sent immediately to our team of engineers to investigate and resolve, meaning that often problems are seamlessly rectified before the user even knew anything went wrong.
Other times, files are produced that just don’t work right. Recently a DecoNetwork client had reported that a production PDF was causing Adobe Illustrator to crash when opening. Leaving aside the general recommendation not to use AI for PDFs, sometimes you’ve got to work with the tools you have. Unfortunately AI didn’t leave any traces in its logs as to what might have gone wrong.
At first glance, there appeared to be nothing wrong with the PDF. Certainly not visually, and its internal structure appeared okay according to the various tools we had at our disposal. It would open fine in Adobe Reader, Acrobat Pro and various other open-source readers.
We were left with simply trying to track down what traits were unique to the failing PDF that didn’t exist in PDFs that worked fine. Upon inspecting the PDF in a text editor (the internal structure of a PDF is quasi-human readable), one object of interest was noted:
... 6 0 obj << /Length 568 /Filter /FlateDecode /Type /XObject /Subtype /Image /Width 1800 /Height 2000 /ColorSpace /DeviceGray /Interpolate false /BitsPerComponent 1 /SMask 7 0 R >> stream ....
Describing what each of these tags does is beyond the scope of this article, but in short: This defines a grayscale raster image blob, using 1-bit of data per component. Since grayscale has only one component, our blob is effectively a 1-bit-per-pixel image, ie, black and white. These 1-bit rasters repeatedly showed up in the AI-crashing PDFs and were consistently absent from the PDFs that opened O.K. I suspected we had our culprit.
It is worth noting that this is a perfectly valid PDF object. However, given the size of the PDF specification, it comes as no real surprise to us that not every combination of PDF features are supported in every PDF tool (though not supporting 1 bit images – the absolute simplest type of raster, is a tad disappointing). Nonetheless the goal here is to ensure that for maximum compatibility we do not produce PDFs that contain these 1-bit objects. We instead substitute them for RGB objects (that happen to contain only values [0,0,0] and [255,255,255]). Theoretically one could “tap into” the PDF pipeline (mentioned in the previous section) at any point to substitute this object for a 24-bit RGB object.
Digging deeper, we find that the Cairo graphics library, upon which our SVG->PDF conversion partly depends, is “smart” enough to only write out a monochrome stream even if it is given an RGB stream as an input, provided those inputs contain only black and white pixels. Presumably this is to keep the file as small as possible (the above black-and-white stream uncompressed is ~9KB, the same content encoded in an RGB stream would be around 216KB). What this does mean though is our stream substitution can only be performed at the very last step, before the final production PDF is saved.
We could, alternatively, inject a single colored pixel into the otherwise grayscale stream to guarantee the stream remains RGB all the way through. This is simple and tempting, however, given the use case, we can’t help but feel introducing a new color, even if visually miniscule, could potentially spoil a production workflow.
Final thoughts
Hopefully by now you have more insight into, and have gained further appreciation of, the background processes that happen in DecoNetwork’s production file processing pipeline. At DecoNetwork we’re always adding features, and make those that are particularly experimental available to our beta testers. We encourage you to push our system to its limits and let us know the results.
from DecoNetwork Blog https://www.deconetwork.com/blog/a-tale-of-two-vector-file-formats/
Hover your mouse to Deconetwork.com
from Blogger http://lamurdis.blogspot.com/2017/08/a-tale-of-two-vector-file-formats.html
0 notes
Text
Commercial Printing: Ricoh’s Advances in Inkjet Printing
I received a press release from a colleague and friend this week about new developments at Ricoh in production-level digital inkjet printing. I found this intriguing. It doesn’t feel like it was that long ago that an inkjet printer sat on my desk and printed somewhat muddy colors on uncoated laser paper. The product was good enough for a color mock up. It would help me visualize the final printed results of a job if I used a little imagination. I didn’t need, or expect, much more.
Now the press release from Ricoh, “Ricoh Changes the Inkjet Game, Introducing Additional Inks and the New RICOH Pro VC70000,” (Ricoh USA, Inc., 6/25/18) addresses some of the issues in the new and expanding realm of production inkjet.
As I understand the term, “production inkjet” refers to the evolution of inkjet commercial printing from my initial memories noted above to a technology that is seeking to rival the speed (efficiency) and quality (resolution and color gamut) of offset printing on the huge offset lithographic presses that run 24/7.
Implications of Ricoh’s Advances
Volume and Speed
Ricoh’s press release notes that the CV70000 was built to “accelerate the transfer of offset print volumes to digital.” (“Ricoh Changes the Inkjet Game, Introducing Additional Inks and the New RICOH Pro VC70000,” Ricoh USA, Inc., 6/25/18).
So a lot of what’s happening is a dramatic growth of inkjet press efficiency.
Not that long ago, you would choose an inkjet printer or digital color laser printer if you wanted to produce 500 brochures (or another, low press run), because all of the make-ready (preparation work) to get an offset lithographic press up to speed would put the initial entry point (cost) of the short job at the same level as the cost of a much longer offset run. Another way to say this is that you would pay a bit less for 500 digital copies than for 1,000 offset copies, but the unit cost would be higher. Plus, you could personalize them.
Now, the efficiencies of production inkjet allow for much longer runs on a digital platform. For instance, the press release notes that the RICOH Pro VC70000 can produce “nearly 130,000 A4/letter impressions an hour” (492 feet-per-minute).
(Keep in mind that if you want 1,000 copies of a 500-page book, that job involves custom printing 500,000 book pages. Of course, this number rises exponentially if you’re producing 100,000 print books.)
This takes time on any press. To put this in perspective, an offset lithographic web press might run at 3,000 or more feet per minute, which is much faster than a sheetfed offset lithographic press, which might run at 12,000 sheets per hour. So, while production inkjet is still slower than offset commercial printing, the increased efficiency still makes it a game changer. (And the speed will continue to improve as the technology matures.)
Quality of the Printed Product
As I noted at the beginning of the blog posting, inkjet custom printing used to provide marginal color fidelity and detail. (In fact, back in the day, I used an inkjet printer only to visualize color placement. For everything else I used a laser printer.)
Now, according to Ricoh’s press release, the RICOH Pro VC70000 provides “1200 x 1200 dpi resolution on uncoated, offset-coated, inkjet treated or inkjet-coated papers” (“Ricoh Changes the Inkjet Game, Introducing Additional Inks and the New RICOH Pro VC70000,” Ricoh USA, Inc., 6/25/18).
This tells me a number of things. First of all, the resolution and therefore the detail in the images printed on a Ricoh press are startlingly crisp.
Furthermore, the ability to print on so many different paper stocks means commercial printing vendors will have flexibility (and therefore more control over price) in choosing custom printing papers to stock.
In addition, since acceptable substrates include coated papers, Ricoh’s press release also implies that printers can now digitally produce crisp graphics in color on superior paper that will reflect the kind of detail and color vibrancy that didn’t exist a short while ago. And this is at production-level speeds.
More specifically, this implies that Ricoh has addressed issues of ink drying speed in its new press. (This is because the new production level inkjet presses need to be able to dry ink immediately on a coated press sheet, and since the ink needs to sit up on the coated surface of the sheet.)
This quick ink-drying ability will avoid the wet, rippling paper I used to experience on inkjet printers, while accommodating coated press sheets comparable to those used on an offset lithographic press. (Another way to say this is that you can now print high-end catalogs and magazines on an inkjet press.)
Color Gamut
Color gamut is also a function of quality, but I’d like to address this separately. As I’ve noted before, having access to more ink colors makes an incredible difference in the color range and color fidelity of a printed piece. And inkjet presses, in my experience, usually have the capability of expanding the color ink set by multiple hues.
This is not alien to offset lithography. Back in the 1990s I worked with a commercial printing vendor who offered High-Fidelity Color (which he also referred to as Hexachrome). These were probably proprietary names, as well, but the gist of the technology is that instead of separating images and text into the four process colors, this printer separated them into six: cyan, magenta, yellow, black, green, and orange—or occasionally purple, as I recall. By adding extra inks, he could match more PMS colors, and he could achieve more vibrancy in the images because the color gamut was larger.
Other commercial printing suppliers were doing similar things by adding touch plates, or kiss plates, that “bumped up” overall color in the offset lithographic CMYK spectrum by accenting specific areas of photo imagery with the ink on the touch plates.
Being able to do this on an inkjet press means that you can achieve the expanded color gamut without all the extra ink units, plates, wash-ups, blankets, and other expensive make-ready supplies and labor.
So the color quality enhancements within the production inkjet presses also make me optimistic.
Operating Cost
Having access to multiple paper stocks makes a huge difference. Inkjet papers used to need pre-treatment. Therefore, there were fewer of them a commercial printing vendor could purchase. This tied his hands in two ways. First, paper vendors could charge more for these specialty papers, and, second, clients had fewer options for custom printing substrates. They couldn’t page through practically any paper swatch book, choose what they liked, and ask the printer to purchase and print on it. Ricoh’s approach means printers will pay less and their clients will have more options.
What This Means to You
Here are two thoughts:
If you’re designing for print, keep it up. Companies like Ricoh would not be pouring money into the development of presses that produce high-end catalogs and magazines if they thought print books and periodicals will cease to exist.
Observe and study the technology as it develops, but go beyond the promotional literature and request printed samples. Then compare the crispness of the text and imagery (resolution) and the color accuracy and vibrancy (color gamut) to that of offset printed products you admire. Compare printed output on both coated and uncoated press sheets. And check the detail in the highlights and shadows of the photos. Then, going forward, watch the technological developments across multiple digital platforms from multiple press manufacturers.
This is a most exciting time.
Commercial Printing: Ricoh’s Advances in Inkjet Printing published first on https://getyourprintingcompanies.tumblr.com/
0 notes
Last Seen Blogs

khdependent
Salem

newbsombrero
Lost Butch

keerusswhore
aly


suspectsmysterymansionhackcheat
Suspects Mystery Mansion Hack – Suspects Mystery Mansion Cheat