#Needle Felting How Much Wool Do You Need As A Beginner
Video
youtube
Needle Felting How Much Wool Do You Need As A Beginner
#youtube#Needle Felting How Much Wool Do You Need As A Beginner#Needle Felting#SnowflakeForest#Wool#Needle Felting Wool#Wool Needle Felting#Felting Wool#Wool Felting#Needle Felting Wool Beginner#Beginner Needle Felting Wool#Fiber Artist#Wool Art#How To Needle Felt#How Much Wool For Needle Felting#Needle Felting Wool How For A Beginner
0 notes
Text

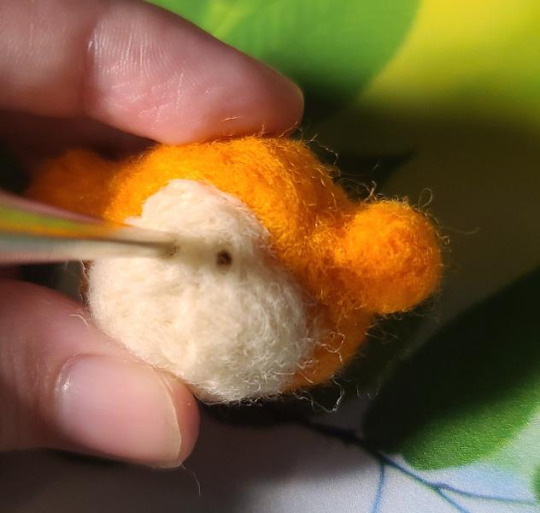
Hello and happy Waddle Wednesday!! I've had some people ask about making the needle felted Waddle Dees, so I decided to make a post outlining the process. This is how I make the tiny Waddle Dees and some brief alternatives if you wish for a slightly different look.
These little ones are pretty beginner friendly and take about 30min to 1 hour to make, dependent mostly on size, experience and how firm the end result is.
I will be going over how to make these two cuties:

And if you have any questions I will be happy to try and elaborate :)
0. Prep
Quick essential items list:
Wool for body and arms (average Waddle Dee is redish orange/orange)
Wool for face (Off-white/very light tan)
Wool for feet (Yellow/Yellowish)
Wool for eyes(Black/Dark Brown) OR plastic safety eyes (Black/Brown)*
Wool for blush (Pink or Red)
Any thing for accessories (such as a small hat)
Needle felting needles*
Anything else needed for your needle felting experience*

*Safety eyes are also called doll eyes. I will be talking about the ones shown in the picture. They are black half spheres with a pole.

*For those who have not needle felted before, needle felting needles are DIFFERENT than sewing needles. A sewing needle is made to puncture and pull a thread through fabric. A needle felting needle is made to tangle up wool and force it to take a shape. You can NOT use a regular sewing needle for needle felting. For the rest of these steps, I will be calling the needle felting needle just a needle.
*There are some things that some people use that I do not and will not be using. This includes finger covers and foam blocks. I have tried using these and do not like them, however they may be beneficial to you.
Needle felting involves lots of stabbing the needle into wool. Therefore I will say lots of stuff about stabbing with needles. Some images may also trigger trypophobia and there are pics of my hand. Please be warned.
1. Planning
First, think of what pose you want your Waddle Dee to be in. Sketch it out. It doesn't have to look good, it just has to be clear to you what you want. No, this step isn't necessary. This step is mostly to keep the pose in mind when forming the body and to judge proportions.
I typically only draw a simple pose to remind myself how I want the Waddle Dee to look, however if drawing the pose from multiple different sides helps you, go for it.

Whatever plans you have for the Waddle Dee should also be incorporated. If you plan on gluing a magnet to your Waddle Dee and sticking it on to the fridge, the pose should have a side where it is possible to glue a magnet on.
Small details should be avoided if you are a beginner. It is very hard to accurately get the wool in the right spot and stay. Even small, white dots in the eyes might be too much detail.
Keep in mind what order your will need to take the steps in. For instance, some poses will put the legs on top of the face, therefore the face will need to be completed before the legs.
Not everything has to be made of wool. If you are comfortable with it, you are able to glue stuff on to needle felted creations. If you want accessories, like a Bandana, this is something to consider.
2. The Body
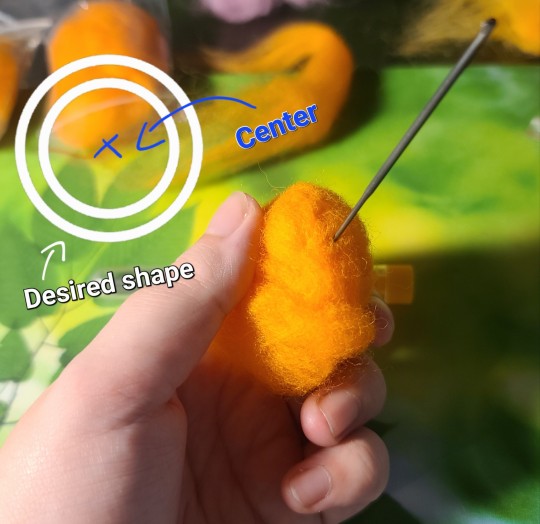
I hope you like spherical objects, as Waddle Dees are very round and require making many round shapes.
Step 1, roll wool into ball. To roll, put in palm of hand or on a flat surface. With other hand, make circles. Just like making a ball out of clay.
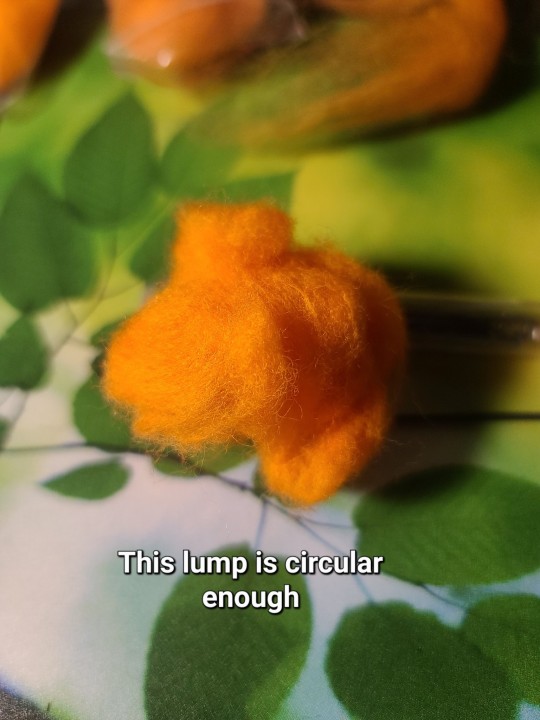
Step 2, stabby stabby.
Try to stab towards the center. The more stabs, the firmer the creation will be. Try to stab all sides as equally as possible. The stabs can range from shallow to deep depending on what you think would be best in this situation.
Step 3, forming.
As seen in the picture, the wool is starting to form, however it is not yet firm. Press one side into a flat surface. Begin to stab in a circle along the bottom, flat against the surface. Take care not to put too much pressure on the needle, as it can break. After a few circles of stabbing, the creation can be taken off of the flat surface again. This flat side will now be referred to as "the flat part". It is the side of the Waddle Dee that will be touching the floor (or, if standing, the side where the feet will be).

Keep stabbing the rounded parts towards the center. Stab the flat part perpendicularly (if we we to consider the flat part ground, then stab "upwards" rather than the center). The sides around the flat part should be rounded if possible, by stabbing the rounded parts towards the center.
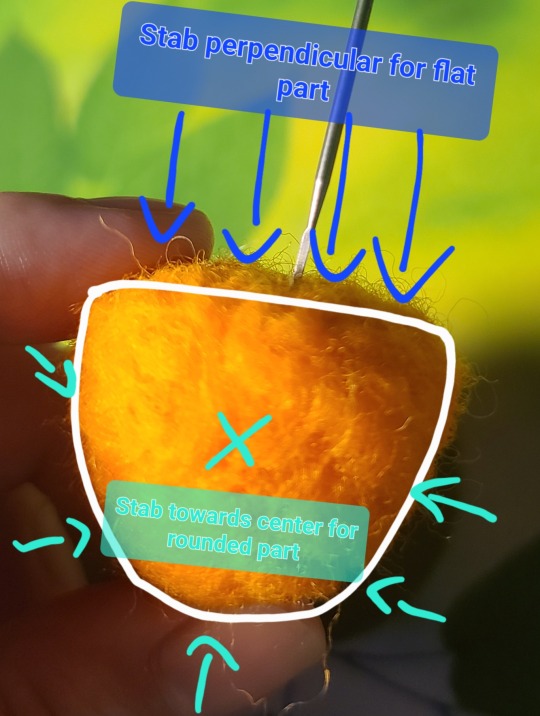
The body does not need to be completely firm to move on to the next step. If it is still squishy, that's fine. If it's asymmetrical it's fine. If it's not a perfect gumdrop shape, that's fine.
3. Arms/Hands
The arms for the Waddle Dee are easy compared to the body. I will be demonstrating two different methods.
Method 1. Rub the wool into a ball. Start stabbing the wool to make two spheres/spheroids of roughly equal size, but leave one side loose/unstabbed.

Attach the arms by stabbing the unstabbed wool onto the body. Remember what pose you want your Waddle Dee in.

Method 2. Rub the wool into a ball. Start stabbing the wool to make two spheres/spheroids of roughly equal size.

Attach the arms by stabbing them onto the body. The arms might need to be held in place while this happens with either your own hand or a sewing pin. The face for this Waddle Dee has been completed in step 5.

4. Legs/Feet
The legs are similair to the arms. The difference is they will be made slightly larger, more oval shaped and be generally a little more flat. I made the feet large for both of these Waddle Dees, however it is perfectly fine to have smaller feet, just use less wool.
Rub wool into an oval shape. Think of the center as a straight line instead of a point and begin stabbing into the center.
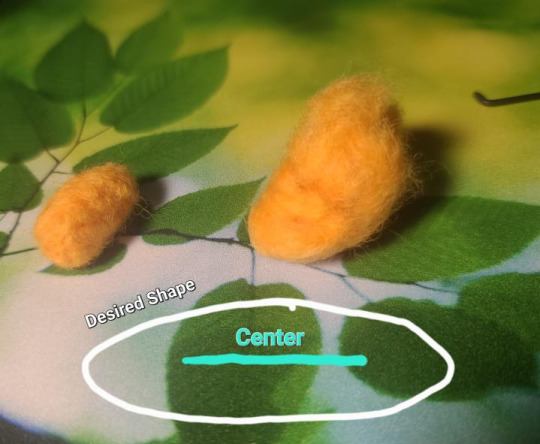
The feet can just be round, however, if the Waddle Dee is standing, I like to make the soles of the feet flat. The method is the same as making the flat side on the body. The flat side will face away from the body and will be on the long side of the foot.

The wool needs to be less loose than the arms as it is not the same color as the body. I recommend method 2 of attaching the arms for attaching the legs. Keep in mind when attaching the legs that the legs need to keep form enough to not lose shape when attached to the body. If using Method 1, the feet will look like the following:

5. Face/Cheeks
Keep in mind when making the face that, in some poses, it should be done before attaching the limbs. The area of the body where the face will be attactched needs to be firm enough to not lose form. There are two ways to make the face and I will briefly touch up on the difference.
Method 1. Take the wool for the face and put it over where the face will be. Stab the outline for the face shape. Stab the inside for the face shape. Take off the extra wool (cut it or pull it).

Keep layering and stabbing more wool on the face until the layer is thick enough in your opinion.

Method 2. Take wool for the middle of the face and stab it's outline and inside. Layer this like method 1 until satisfied.

Next make an oval for the cheeks and attach. Keep stabbing until firm. Layer until satisfied.

Method 1 provides a more controlled face shape, whereas method 2 provides more shape. Method 2 is also better for a Waddle Dee that is laying down. If laying down, Method 2 may also need a flat side.
6. Eyes/Blush
To make blush, form two, identical, tiny ovals and needle felt them flat on to the face. I recommend attaching the eyes first so they can be placed accordingly.
There are two methods for the eyes.
Method 1. Use wool. If the eyes are open, make two, identical, tiny ovals and needle felt them flat into place.

To make whites in the eyes. make tiny white circles and felt them flat into place on top of the the black ovals.

If the eyes are closed, make the oval more tube/string shaped. Don't make it too thin, or it might disappear when attaching.
Method 2. Create two indents where the eyes should be. The first indent can be made with a needle, such as a safety pin, however can be made larger with a pencil or chopstick. Make the indent as large and as deep as the stick part of the eye.
Apply glue to the stick end. You can just stick it in the nozzle of the glue. Please use craft glue/glue made for fabrics. Put eye in hole. Let glue dry.

Method 1 allows for more control over the facial expression, including open and shut eyes, angry eyes, sad eyes etc. It is also the faster method, as it does not require waiting for the glue to dry. Method 2 makes the eyes look neater and more "professional". This is also great if you want to have detailed eyes, as you can paint the safety eye.
Method 3, which I will not be covering, is gluing whatever you want to be the eyes for the eyes. This includes buttons, sequins, resin eyes and whatever. Go wild.
7. Good to go
Just add accessories if desired and your Waddle Dees are good to go! These two are fine as is at the moment, though I am thinking about attaching magnets to the beady eyed one in the future so they can help me with my sewing.


Remember, these Dees are very tiny, so be sure not to lose them!


There is no strict rules with making the Waddle Dees. Do the steps in whatever order you feel most comfortable with, use whatever materials you wish, use whatever colors and designs as you wish etc. I hope both you and your Waddle Dees are loved.
#kirby#kirby series#long post#waddle dee#waddle wednesday#needle felting#craft needles tw#how to#needle felting how to#wool felting#wool#As an aside did you know that you can put 30 pics in a post now#everyone in my family said my Waddle Dees looked edible rip
37 notes
·
View notes
Text
8 Arts & Crafts That Are Perfect for Camping - Panergy

1. ROCK PAINTING
All you need are rocks, paintbrushes and washable, water-based paints for this easy kid-friendly project. “Some of the stones we end up bringing home, but most of the time we leave them alongside the lake for others to enjoy later,” says Dan Morris, a chainsaw enthusiast who camps in New Zealand. His family does their rock painting by their favorite lake for swimming as it’s an easy way to clean up any mess.
2. STICK LOOMS
Stick looms are another great craft that utilizes natural materials (although you should first make sure you’re in a place where it’s OK to take them). Craftiments has a great guide that details how to make your own. In addition to the twigs, leaves, bark and flowers you collect, you’ll need yarn to hold it all together.
3. NEEDLE FELTING
Tracey Beni is a long-time crafter and camper. One of her favorite projects to complete while camping is needle felting. “It’s small enough I can have everything I need with me and I can complete an entire project while on the road, in the passenger’s seat,” says the founder of Baker Street Living. Her biggest tip for beginners is to start with a ready-to-make kit that comes with all of the tools and wool you’ll need.
4. KNITTING
“If I’m sitting, I’m knitting,” says Krista, a full-time RVing nomad and the founder of ExploreWithKnitsy.com. She does it on travel days as well as when she’s sitting around the campfire. That said, she’s so good at it now she can easily knit while walking, too. “I even do it at the zoo and museums!” Her tip for beginners is to seek out the nearest yarn shop. “They’re everywhere and most yarn shops love new knitters so it’s easy to schedule a lesson or pop in to ask a question.”
5. CROCHETING
Krista is also a big fan of crocheting. “I always have at least 2-3 projects with me – and yarn stashed away for many more!” Crocheting is a bit easier to learn than knitting since it uses simpler techniques and tools. Even kids can pick it up if they have the patience. Just make sure they start with thicker yarn and bigger hooks which aren’t as hard to use. Fun fact: crochet even has a “camping stitch.”
6. SONGWRITING
After getting settled at his campsite, Mark Joy starts songwriting. “I find I’m inspired and calmed by being away from the normal daily grind,” says the musician and founder of Mark Joy Blogs. “I can get in the zone and quickly come up with chords, melodies, and lyrics that I’m happy with. I will then take them home to record a full production in my studio.” When he’s short on space, he brings his travel guitar which is much smaller. For beginners, he recommends bringing a guitar and books on songwriting and music theory. “This is a great time to learn while you don’t have distractions like school, work or nagging chores.”
7. WATERCOLOR PAINTING
Before she was a working artist and settled with a studio, Barb Toland was living full-time in a motorhome. She traveled the country for seven years. “During this time I taught myself how to paint using watercolors,” says Toland who had no clue she’d just stumbled upon her future career. She painted from her camp chair while sitting outside, from the dinette in her RV and she even packed her paints in her backpack for hikes. “I painted the beautiful images and landscapes that surrounded us and used them to record beautiful memories of our time on the road,” says Toland.
8. CALLIGRAPHY
Britannica defines calligraphy as “the art of beautiful handwriting.” It’s been practiced by different cultures around the world for thousands of years. These days, it’s what Candice Criscione – who has traveled the world working as a hiking and cycling guide for Backroads – does when she’s on the road. “It’s the perfect hobby for traveling because I just need a pen and paper,” says the founder of MominItaly.com. Her tip for beginners is to get a flexible book light that you can attach to your notebook so you can work in low light conditions. “Also, make your calligraphy about your trip. Label pages and attach photos, ticket stubs, etc.”
0 notes
Text
What Is Embroidery And What Are The Main Types Of Embroidery?
If we want to define it in the simplest way, we can say that embroidery is the artisan technique by which textile pieces are decorated with the help of a needle and using a thread. However, there is much more to say about the importance of this technique. What was traditionally dismissed as a minor creative activity is now recognized as an artistic expression. Learn more about this exciting activity, which you can start practicing right now.
What are the main types of embroidery?
Embroidery has a long history and it is amazing to discover that it has been present in practically every culture in the world for centuries. Although the techniques may vary, some stitches are almost universal and the principle of needle use is almost always the same. Embroidery almost certainly derived from sewing. Before the industrialization of textiles, people made their garments by hand, with the help of needle and thread. At some point, the interest arose to decorate the garments, to denote certain social aspects or to reflect the personality as a means of expression.
The arrival of industrialization and the looms
The arrival of industrialization affected the world of embroidery. The Jacquard loom (a power loom invented by Joseph Marie Jacquard in 1801) wove complex brocade and damask patterns with a punched card system, precursors to the first data systems used from telegraphs to the first computers. This machine revolutionized the industry and accelerated the production of embroidery which, until then, was painstaking and very laborious work.
Later, the Schiffli embroidery machine would complete the automation process, until the hands were no longer necessary for embroidery. Twinkle Industries is the pioneer in producing high-quality Schiffli embroidery fabric at affordable prices and according to your custom demand. From nylon laces to embroidery laces, you can purchase genuine fabric online at Twinkle Industries.
Most popular embroidery types
In general, you can start embroidering right away with a free technique if you know the most basic stitches. If you want to follow some of the more elaborate techniques, in this article we compile some of them. Some of the most popular techniques are –
Cross-stitch: Typically on an Aida fabric, cross-shaped stitches are created that form the design. Contemporary examples recreate pixel art by the square finish of each stitch.
Embroidered relief: With slightly more complex decorative stitches, you can add volume to your embroidery.
Needle Painting: It is a technique with which great realism is achieved. Imagine that your needle is a brush and the thread is paint, you will use painting and drawing techniques to compose images.
Painting and embroidery: You can mix textile paint, with materials such as watercolor or acrylic, to create spectacular pieces on fabric that you paint by hand.
Miniature embroidery: It is a trend in which pieces of even millimeters are created.
What materials do I need to start embroidering?
Needle
The most essential material is the needle. You can find needles in many sizes and types, but it's a good idea to start with special embroidery needles, known simply as embroidery needles. There are specific needles for different embroidery techniques –
· Crewel embroidery needle: It is a type of embroidery with wool.
· Punch needle or magic needle: It embroiders quickly creating rich textures.
· Kantian needle: A special needle for this technique that creates textures.
· French embroidery: It is used to add beads or rhinestones, very typical of haute couture dresses. Beads can also be added without using this needle.
Depending on the material you use, you will want to experiment with needles of different sizes.
Thread
There are specially made threads for embroidery. The best known is the cotton embroidery thread, which comes in six strands. You can separate the strands depending on the finish you want to achieve. Cotton pearl thread is also widely used in embroidery, and is characterized by its shiny, polished finish. It is manufactured in different thicknesses. You can also embroider with wool, rayon, silk, metallic finish threads. In any embroidery supply store you will see the wide variety of materials and colors.
Frame
A great idea, especially if you are a beginner, is to use a hoop. It allows you to create tension in the fabric, so that your stitches are secured in it. An advantage of the hoop is that you can use it directly to decorate your walls with your embroidered pieces.
Cloth
The best things to start with are cotton fabrics and other natural fibers. You don't want to start one with a weave that is too tight or too loose. A popular fabric is the Aida, typical of cross-stitch embroidery. Also many people choose fabrics made of silk, felt, canvas, linen and wool. You can embroider on practically any type of fabric.
Embroidery and its uses in garments and decoration
By pure thread and stitch, embroidery is added to all kinds of garments. Just as Crochet Laces were the rage at one time, today embroidered fabrics are stomping on stained glass, especially on shirts and dresses. They have become a distinctive detail. The arrival of spring and the heat only means one thing: buying a mini dress with embroidery is a good investment for those moments when you need to shine and be the most chic of a party, cocktail or meeting at work. Also the pants will add embroidery to your designs. They will be seen a lot in jeans and also in other genres.
If you dare to embroider it yourself, remember to buy threads that do not fade, so that the garment is not ruined. The hand-embroidered shirts will be the star of this season. They will be seen a lot on different types of fabric in white and light blue, and also in super intense tones. If we are a little afraid of embroidery on clothes or do not know how to combine it with our style, a good option is to resort to purses, bags, wallets or other accessories with some embroidery. Embroidery is also going strong in decoration. The revaluation of craftsmanship makes more and more people want to put their stamp on different objects, such as pillows, squares, towels, curtains, tablecloths and placemats, etc.
Like Embroidery fabric, modern garments industries also fond to Lycra Fabrics.Buy genuine quality fabrics from Twinkle Industries.
#GPO Fabrics#Nylon Laces#buy crochet laces online#GPO Lace#Buy Embroidery Fabrics#buy cotton laces online
2 notes
·
View notes
Text
I’ve been following the needle felting tag for a while (I know don’t make fun of me) and while im absolutely not any kind of expert I’d like to give a few tips for beginners!
Firstly, felt longer than you think you need to. A lot of the beginner stuff I see tends to be felted quite loosely, you can tell because the fibers are sticking out and you can see the individual bunches of felt in the project. This just means you haven’t felted it long enough, the fibers should be densely woven and the item should be firm by the time it’s done or it will likely fall apart or just not retain the shape you want.
When just starting out you won’t have much of a feel for how dense your pieces should be and when they’re ready, a couple of indicators are 1. It takes a lot of effort getting the needle in, and 2. You can’t squish the piece. If you squeeze it, is shouldn’t really change shape.
Similarly, if youve felted it very densely but there are still hairs sticking out everywhere it’s totally fine to take a pair of scissors and just trim them off! Especially with cheaper wool, you can’t always felt all the little fibers in so they stop sticking out, trimming them will make the finished project look much neater and resemble the shape you’re looking for. I do this with all my stuff and it makes a world of difference. (However this should be done at the very end, if the piece isn’t felted densely enough yet and you trim the fibers and THEN try to continue felting them it becomes more difficult for the fibers to weave together as they are now shorter/more even.)
Don’t forget to tear the wool into smaller pieces before you start! Especially wool with nice long and fine fibers. Like I mentioned in the first tip a lot of beginners projects have the bunches of fibers retaining the same shape they had in the bag they came from, and it makes the final piece more lumpy.
Ok the last one is purely my own expirience but a good rule to keep in mind to avoid stabbing your fingers while working is that you should always be able to see the fingers you’re holding the wool with
You almost definetly will stab yourself at some point, it’s easier to do when you’re starting out and haven’t developed that muscle memory yet. If you’re worried about hurting yourself you can wear a leather glove on the hand you’re holding the wool with!
Feel free to add your own tips if you have any! This is just common stuff I notice
#long post#these are about felting only with wool btw#i often felt with yarn and much of this doesnt apply to that#but most people start out felting only with wool so im focousing on that#needle felting#i thought about including example pics througout the post but i didnt want to make the original artists feel like im shaming them#or that their work is bad#none of this makes your work bad#the biggest problem these mistakes will give you honestly are that your peice wont hold its shape/last very long#at some point i want to make a post showing my step by step felting process w pictures#its a fun hobby I think more people should try! you really don't need any previous artistic skill to do it either
110 notes
·
View notes
Text
Diary of a Junebug
Trying out some art kits!
Chocolate seashells
I’ve heard of these before but never really got the opportunity to try them out until Rosie brought them to the camp. Since it’s a bit of an advanced craft with all the chocolate and pots and pans required, we bought another kit in case the first attempt failed.
First attempt wasn’t exactly a fail, which is a good thing. But we knew that it could’ve turned out better so we tried again after watching several videos on this kit. And it did turn out better! We can never have too many chocolates so that was also another bonus!
I felt that the seashell molds could’ve been more interesting instead of the generic shapes but that’s just my personal opinion. I wasn’t expecting much from the chocolate so I was pleasantly surprised at how easily it melted and how it tasted. It’s milk chocolate with a hint of dark, making it not too sugary sweet, which is how I like it. From experience the chocolate in these kinds of kits are a bit too sweet for me. One of the issues we had the first time was getting the consistency right so batch one came out a bit lumpy and full of air bubbles in the mold. Batch two succeeded in getting that shiny chocolate appearance on the outside. Overall it was fun and I can’t say no to sweet treats!
Rating: 7/10
Mini bookbinding kit
I’m a big fan of bookbinding ever since discovering it a few years ago through a channel called Nathalia’s Bookshelf. Bookbinding takes some practice to get it right and once I finally got the hang of it, I couldn’t stop! I love making all kinds of cool covers, which are made with scrapbook paper, recycled cardboard from boxes, and cool images I found online or made myself. The most relaxing part for me is making the stitches - there’s just something so satisfying about stitching pages together.
I just love bookbinding and anything to do with books in general!
So a while ago I found this mini bookbinding kit from Craftycrafty, which was my childhood. They sell the best art kits that are great for beginners. I’ve never seen the bookbinding one so I’m guessing it’s fairly new. The kit has everything you need to make a small coptic stitch book and it looks easy enough! Coptic stitch is my favorite bookbinding method and I haven’t been disappointed by Craftycrafty yet. So I bought a bunch to save for arts and crafts day!
And this is my honest opinion but I’m really happy with the art kit! It’s clearly for beginners so don’t expect a professionally made book on your first try. The kit has everything from paper to an awl to a bone folder to chipboard. Only minor things like the plain cover designs and the paper in general a bit thin and flimsy for my liking. But other than that, it was pretty good and everyone had fun doing it!
Rating: 8/10
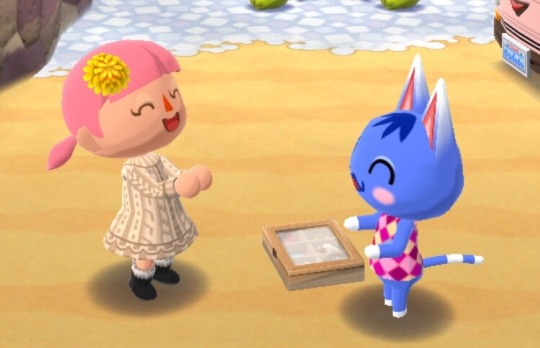
Kawaii needle felt kits
I always wanted to try needle felting so I was excited to find this big kit! There’s twenty four kits in there, two of each design. There’s kittens, puppies, macaron bears, kawaii stars, birds, foxes, cupcakes, emojis, coffee cups, flowers, blowfish, and ladybugs. All the kits come with everything like melamine foam, wool, gloves, accessories, and needles. I decided to start simple with the kitten kit because the shapes were simple.
I have to say I had a lot of fun making these cute kitties. Took a while to get the round shape right and my first two came out lopsided while third time was the charm. The kit had enough for three kitty heads, which was more than enough. I was afraid that I was going to get impatient but I didn’t - instead I found it to be relaxing and fun!
We have a bunch of kits left over so we’re saving those for a needlefelt themed arts and crafts day since we all enjoyed it so much! Can’t wait to try more needlefelt crafts!
Rating: 10/10
Polymer clay charms
Polymer clay charms have become my latest obsession and I’ve been really getting into making charm bracelets. I found this cute kit a while back and wanted to try it for a while. There were some mixed reviews about it as some loved it and others saying that it wasn’t good. So I decided to see for myself how well this kit holds up.
I’ll be honest, as soon as I opened the kit, I had low expectations. The colors of the clay looked dull and when I started working with it, I wasn’t a fan of the texture. I’m not sure if I got a bad batch but some parts of the clay felt dry and crumbly. The package design isn’t the best so I’m guessing that’s why the clay dried out. It also came with dotting tools, which I found a bit flimsy and bulky, so I used my own tools. But even the best tools can’t really do much for crumbly clay.
Overall, it wasn’t too bad. Not something I’d buy again but it’s okay for beginners.
Rating: 5/10
Teddy bears
A plushie kit! I haven’t done one in years! Stitches has a bunch of kits left over from the giant teddy bear thing a while ago so we decided to put them to good use! There was a mix of regular teddy bears and patchwork teddy bears. Since it’s been a long time since I’ve made plushies, I chose the plain bear.
It wasn’t anything too special, just like any other plushie kit, but I enjoyed it a lot! Making the teddy bear reminded me how much I love stuffed animals and now i want to make more! I also sewed a little heart pillow with some leftover fabric in my sewing scraps box to add a nice touch. The bear’s name is Honeybee because the color of the fabric reminds me of honey.
Rating: 8/10
#animal crossing#animal crossing pocket camp#acpc#Diary of a Junebug#headcanon ramble#Daphne Primrose
4 notes
·
View notes
Photo

A staple in my reference books.
I had purchased this book years ago and my Granddaughter stole it from me so I had to replace it. This book will sit on the shelf for a long time, but there will always come a time when I need to reference it again and I'm real glad I have it when I need it. Lots of great information in here for all kinds of needle work including knitting, crocheting, macrame, crosss stitch and needlepoint, embroidery, tatting, finger lace, and a whole lot more. I particularly like the sections on the various stitches for both knitting and crocheting. It tells you what the pattern is so you can design your own afghans, sweaters, etc. Very informative book. Probably why it's been around for so long.
Go to Amazon
An oldie, but goodie!
I checked this book out at the local library originally and fell in love so much that I came here to purchase it. It's an old book, but it's so comprehensive and helpful that you really don't need anything else. It covers virtually all types of needlework in an easy to understand way for beginners. I actually taught myself to crochet using this book. It gives you step by step instructions with quality pictures. I've used this more than any other crafting book or magazine I've ever gotten. You won't be disappointed with it - guaranteed!
Go to Amazon
Fiber Artist Must Have
This is the bible of fiber crafts. I borrowed a copy from a friend and found all the information I needed and then some in it. I had been doing research on new stitches and how to do different things via google and youtube and this book helped me understand things let unclear by those sources. If you do fiber arts or you know someone who does fiber arts I highly recommend this book. I bought a copy for myself and another as a gift for a family member. Amazing book and well worth the price. Would and have recommended this book to a friend.
Go to Amazon
Illustrations are great
I looked at many different books on needlework and this was the best one I could find. The illustrations are great and easy to follow. The directions are clear and also easy to follow. I have found others that are similar but the directions are not as clear and there were no pictures. If you are looking for something that could be used as an introduction to needlework, this would be it.
Go to Amazon
This is a good reference book to have.
Although, it is somewhat dated, It has a lot of good information. It is one of the best reference books and should be reprinted with an update. It covers nearly every kind of needlework, except punch needle and needle felting with wool.
Go to Amazon
Most Complete Guide Ever!!!
I had a copy of the Complete Guide to Needlework in the 1980's (as soon as it came out) and used it faithfully for years. In the early 2000's I lent it to a teenage friend of mine who enjoyed it so much she kept it.
Go to Amazon
Complete is the clue
Wanted this Guide for my granddaughter, as she is interested in learning needle crafts. It has almost anything you want to know about so many crafts with detailed instructions. I think everyone should have this book if they are just learning or need to brush up on a craft you forgot you like. Can hardly wait to see her first trials. She wanted me to teach her how to crochet, I am right handed and she is left handed. The instructions give details for either. It is the best guide I have ever used. I know that it will assist her more than I ever could.
Go to Amazon
This is a most excellent and complete guide to needlework
This is a most excellent and complete guide to needlework. Although it's an older publication that may miss the most recent needlework fads, it has everything up to the publication date, in excellent detail. Very good guide for those who have forgotten a method or who want to learn new ones.
Go to Amazon
Five Stars
Superb needlework book!
Good book...just what I needed!
Five Stars
Five Stars
Five Stars
I love this book
Five Stars
Five Stars
Five Stars
0 notes
Text
Needle Felting Projects for Beginners
Having got the idea of how to do needle felting, it's time to make a start on some easy, straightforward projects. Actually get to grips with the craft and make your first felted item. Once you've started producing your own items, you'll soon get inspired to make your own designs but meanwhile to help you gain confidence and experience, we've put together some easy projects to help get you going.
Here's a short tutorial showing you how to make a needle felted mushroom. It guides you through every step, demonstrating how to work the wool. As the tutorial is in video format, you can easily press the "pause" button if you want to work your own mushroom at the same time and not get left behind. I can just picture a group of these little fellas mixed into a bowl of decorative dried seed heads for an attractive autumn feel.
youtube
Needle Felting Kits
One really easy way to get started on a project is to buy a needle felting kit. This not only gives you everything you need to complete the task: the wool, felting needle, felting mat, embroidery needle and thread but easy to follow, step by step instructions.
We've spotted a needle felting kit for making this rather cute hedgehog and think this would be a great way to get going with your new craft. If you are interested in having a go at this yourself, you can buy the kit here.
The completed hedgehog measures 6.5 x 6.5 cms and will take around 4 hours to make.
This next video shows you how to make some really pretty little needle felted flowers. It's just under 7 minutes' long so doesn't take up too much time to watch. The trick here is to use mini cookie cutters to create the basic flower shape. If you don't already have any suitable cutters in your baking drawer, then try these star shaped cutters from Amazon which should do the trick nicely.
youtube
Once you've got the basics of felting these mini flowers, I'm sure you can find a myriad of uses for them! They would make a really great addition to a beautifully wrapped gift - I can just see them as embellishments, perhaps in bright spring colours, for an Easter gift, for example. Or how about using them on your homemade birthday cards? A glass bowl filled with these flowers in a mixture of shapes would really liven up a coffee table or sideboard. If you have a go at making these little flowers, do get in touch and share your photos of how you've used them in your finished projects.
Reprinted from Needle Felting Projects for Beginners. See more at http://woolcraft.craftybug.co.uk
0 notes
Photo

4.0 out of 5 stars
Cute book and fairly easy to start felting...
4.0 out of 5 stars
Not in love with the steps given
Well... I clearly am not a natural at this but after four tries, I can't seem to get anything to look even close. Not in love with the steps given, need something more for derps like me I guess. Go to Amazon
5.0 out of 5 stars
Wonderful book!
I love little felted monsters and this book has an excellent array of ideas for creating them, as well as some very cute non-monsters. I think the frog is particularly appealing. Worth the money, if you are a current or wanna-be felter. Go to Amazon
4.0 out of 5 stars
As a true beginner felter, my 15 year old daughter made the wolf just like the picture
She loves this book and loves the characters. It could have a little more info on how to do some things, needles, etc. But it has gotten her into felting like you wouldn't believe. Go to Amazon
4.0 out of 5 stars
Great for the photos but step by step instructions leave a bit to the imagination.
Got this as a gift. The buddies are MUCH larger than you would make with a kit, but obviously you can scale them down. I don't believe you could really get the sizes he suggests out of the wool amount he suggests but if you're getting this book you can probably adjust to whatever size you want. If you do want to make these full size, I'd suggest getting some stuffing to cut down on wool. Stuffing is much cheaper.Also, I don't agree with the strategy of grabbing 1 oz of wool into a ball and just start stabbing. You'll never get the inner part firm that way. I like to start with a smaller amount of wool, felt it, then add more to build up slowly. But hey, that's just me.If you're a true beginner, I'd suggest a few Dimensions kits first.I've made 3 buddies so far. They've taken about 3 - 4 hours each. See pic. Go to Amazon
5.0 out of 5 stars
A terrific craft book with great results
This book was the best gift that I gave this Christmas. My daughter immediately started creating, following easy step by step directions. In a week's time, she had several little woolbuddies of her own. So cute and a terrific investment. Hats off to Jackie Huang. Go to Amazon
5.0 out of 5 stars
Wonderful step by step photos!
I adore this book! As a beginning needle-felter, I find the projects inspiring and the instructions clear and easy to follow. The projects advance in difficulty (introducing new techniques), so there's something for everyone!oh, and did I mention they're all ridiculously cute? :) Go to Amazon
2.0 out of 5 stars
Vague
The directions in this book could not be more general. There are no specifics on how to make these figures. If you have no experience, don't bother. You'll need to know how to make certain shapes, how to attach sections, and how to needle felt in general. There are photos of "steps", but they don't show you or instruct you on how to do anything. Go to Amazon
0 notes
Photo
3.0 out of 5 stars
Packed full of good information, the format drives me crazy
3.0 out of 5 stars
Too basic for me
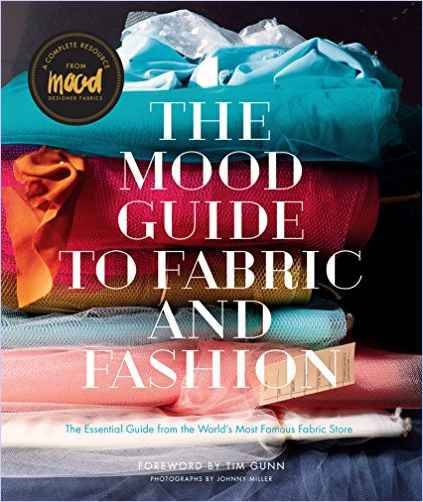
It was very interesting to read about the origin of the famous Mood Fabrics and also about many of the long time employees there. However, if you're looking for a comprehensive book on fabrics you might want to look somewhere else. Much of the information was verrrry basic and if you are an intermediate to advanced sewist, you already know everything the book has to say. The book itself is well printed and contains many quality color photos. I read the book through entirely in two days and will be donating it to my local Textile Center Garage sale. Go to Amazon
3.0 out of 5 stars
Is it worth is? (Sewing Edition)
I think a beginner or someone who does not work with a variety of fabrics will get the most from this book.Forward: DecentIntroduction:DecentThe fabric of our lives history of mood:Social fabric-textiles yesterday,today and tomorrow:I did like the information given on sustainable fabrics.I also appreciated the map of fabric-producing countries and what fabrics they are known for.The fabric timeline given was just okay.Fabric 101: This section goes over topics I think are discussed in most sewing books. Fiber,yarn,woven fabric, knit fabric,blends,grainlines,stretch fabrics,yardage requirements,shrinkage and care,one way fabrics interfacings, interlining,underlinings etc, trims,weights of fabrics, how to check for quality fabric. There was not much new in this section that I have not encountered in several sewing books as stated above.Fabric and Design: Function and fabric-choosing the right material for your pattern. (weight,drape,body,budget,skill level,color,combining textiles-Each section is about 2 paragraphs long.I did enjoy the shopping checklist :)Cotton, linen and Hemp: Wools: Knits,Silks and Other Fabrics:: I felt like these section were okay but something was missing-for instance in fabric savvy needle sizes were given for every fabric listed,which I though would also be done in this book as well. The book gives you the details of the fabric but I don't think you would come away any wiser with how to utilize the fabric from this book.I liked the section on denim in the book and wish more of the fabrics had been presented in a likewise manner.Granted the book is authored by the store Mood, I still did not think so much information about the store would have been dispersed throughout.Read more › Go to Amazon
5.0 out of 5 stars
good Mood
Finally a comprehensive if not exhaustive survey of apparel fabrics suitable for amateurs and pros alike. Packaged to sell to fans of the Runway reality show, it is quite informative and delightful just to read like a regular narrative. Very nice photos and background facts make this a good reference for students, designers, and those interested in basic information about textiles. Go to Amazon
5.0 out of 5 stars
This is a wonderful book. It contains a lot of information
This is a wonderful book. It contains a lot of information, and is extremely well-written. It's destined to become a leading textbook for fabric/design classes. Mostly, though, it's just a great read for anyone who loves fabric. Go to Amazon
5.0 out of 5 stars
Terrific reference.
Received this book a few days ago for my birthday. It is an excellent guides to all sorts of fabric. Most of the fabric that I am familiar with is quilting cotton and poly/cotton blends so I'm happy to have a book that tells what a fabric is, has clear pictures that you can almost touch for the textures as well as hints to sewing some of these great fabrics. I also appreciate the honesty in the book. So many sewing related books try to be cheerleaders and tell the reader that anyone can do this. In the Mood Guide on some of the 'fussier' expensive fabric, they flat out tell you that if you don't have experience with the fabric, get a professional to sew it up for you. Granted anyone should have the ability to try to sew anything they want to, but why take the risk of spoiling a perfectly wonderful and expensive wool fabric because you have never even sewn on cheap wool before?This book will certainly have a home on my sewing reference shelves. The only way it could be better is if they had a book of actual swatches of the fabrics to coordinate with the photos in the books. This book gives me all the info I need to make informed fabric choices. If you have a dedicated sewer and Scrabble player, they even mention a fabric that starts with the letter Q that doesn't need a U following the Q! Go to Amazon
5.0 out of 5 stars
Great resource!
I stumbled onto this book and haven't been able to put it down! Loaded with info and pictures and anticdotes. Great resource and inspiration. Go to Amazon
5.0 out of 5 stars
Great story and also reference book
This book tells the interesting story of Mood, I enjoyed reading it. I use it as a reference, so I can get an idea about fabric types for dressmaking and buying online. Go to Amazon
0 notes
Last Seen Blogs

mermaidsbare
MERMAIDsBARE
rachaellynn70
Untitled

supercase
Supercase
ratgraphic
RatGraphic? I hardly know Graphic

chocpehpunithe
Untitled