#also I got some cheap peel off nail polish and some other cute stuff at the mall today
Text

#kirby#daily kirby#my art#digital#hal laboratory#nintendo#jk I'm gonna sleep right now and no one can stop me#not even me#also I got some cheap peel off nail polish and some other cute stuff at the mall today#which is why I can't stop me from sleeping lol#favorites
228 notes
·
View notes
Photo
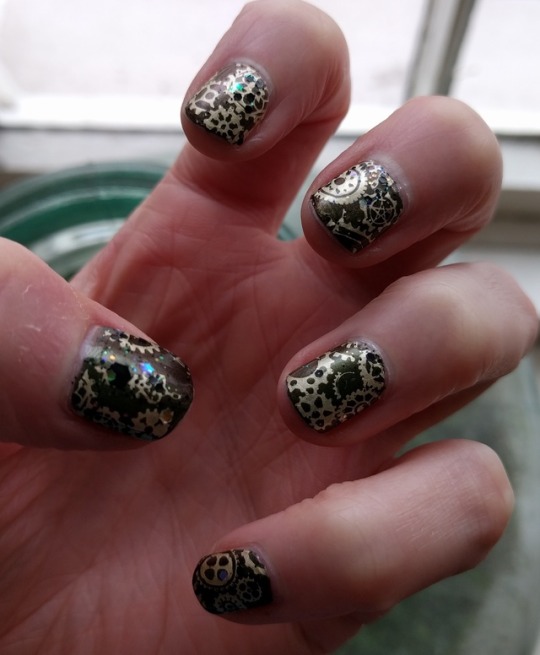

This evening I had a really fun adventure of nail art and trusting my followers on Twitter. 😋 Here is the epic thread!
Basically, for each stage of my nail session I made my followers vote for what I should do next. While I applied the base coat folks voted on which should be the base colour. While I applied the base colour people voted on what the stamped design should be. While I applied the second layer of the base colour people voted on what the stamped design’s colour should be. And while I stamped the designs, people voted on what the top coat should be.
I had to post a lot of photos and wait for polls to end, but that’s okay because it gave each layer time to dry properly - I am usually very impatient.
We ended up with:
Base coat: OPI Glitter Off (it’s literally just PVA glue in a nail varnish bottle with a HUGE mark-up, do not waste your money, just use PVA glue)
Base colour: OPI’s Green on the Runway (dark green/bronze)
Stamp design: MoYou London’s plate #1 from the Steampunk Collection (£5.99)
Stamp colour: MoYou London’s Liquid Gold
Top coat 1: Seche Vite (see notes below)
Top coat 2, left hand: OPI’s Comet in the Sky
Top coat 2, right hand: OPI’s Matte Top Coat
~
THE TUTORIAL
I highly recommend nail stamping as a fun and relatively easy way to get very fancy nails. The plates are cheap for something you can use over and over again with lots of different colour combinations, and once you’ve got the knack you can very cheaply have quite detailed and awesome-looking designs on your nails.
So here’s how to get your nails to look fancy, because someone on Mastodon asked for a tutorial.
This tutorial minimises use of nail varnish remover, because I hate it. You’ll only have to use it to clean your stamping plate between nails.
You will need:
PVA glue and brush
Nail varnish for the base colour
Nail varnish for the stamping colour - something thick and gloopy and colour-rich
Stamping plate - well-known brands are Konad and MoYou London, and you can find lots on eBay for cheaps too.
Stamper - I use one from Konad.
Old unwanted credit card for scraping
Acetone-based polish remover
Cotton pads
Sellotape/parcel tape
Something to put under your stamping plate, eg: kitchen roll
Some notes on the above
A stamping plate is just a metal plate engraved with cool designs. The nail varnish goes into the grooves, you scrape off the excess, and then pick up the nail varnish from the grooves onto a stamper. Then you stamp them onto your nail. It sounds more complicated than it is! If you are struggling to visualise it, look up nail stamping on YouTube - there’s a couple of good links to specific videos at the end of this post.
The polish remover and cotton pads are for cleaning your stamping plate. You won’t have to use these on your hands or nails. You will need to use an acetone-based polish remover that’s not got any fancy ingredients in it, because extra oils and whatnot leave streaks on your stamping plate, and removers without acetone don’t clean the plate fully.
Do not use the Konad scraper that comes with the Konad stamp. It will scratch your plate. Use an old credit card instead! MoYou London sell tiny credit cards for scraping, which are very cute but not really worth the money on their own.
The stamper I use is by Konad, but some brands sell clear stampers. They are really good in theory because you can see where you’re stamping on your nail. I’ve not found a clear one that I get on with yet but they look pretty great! If you use a clear stamper, DO NOT clean it with nail varnish remover, or it will get cloudy. Clear stampers should be cleaned with tape, eg: sellotape.
Tips
Make sure your nails are clean. Oils stop the base coat from sticking to your nails.
Use a base coat. If you don’t your nails will go all yellowy. If you use PVA glue as directed here you can peel off your nail varnish without having to use nail varnish remover, which is GREAT.
Open a window. The smells are strong!
HOW TO!
Stick some tape to your worktop in such a way that the sticky side is facing upwards. You’ve got to do this before you do anything else because tape will wreck your nails. You’ll be using this to clean your stamper between nails.
Paint your nails with the PVA glue. At this stage it’s important to stay in the lines! If it’s a choice between covering less nail or going outside the lines, cover less nail. You only need a very thin layer, or it will take forever to dry. (Remember that PVA can’t be removed with acetone! So like, don’t make any mistakes. I’ll give you tips for avoiding mistakes in this tutorial.)
When the PVA has completely changed from white to clear, paint your base colour on top. Unless you’re sure you don’t need to, do two coats. It will look better, I promise.
Wait for it to dry COMPLETELY or you will regret it; you’re going to be applying pressure with a firm nail stamper, and if you do it too soon you will squoosh it and be sad.
Put on some top coat. I know, we’re not done, but if you make any stamping mistakes you can remove the stamp-mistake without bothering the base colour if there is a layer of top coat in the way.
Paint around your nails with the PVA glue. It will make post-stamping clean-up much easier. That’s either side of the nail, around the cuticle, and around the fingertip. Make sure there is a gap between the PVA and the nail.
For this stage you’ll need to work fast or your design will transfer incompletely. Put your stamping plate on your kitchen roll. Get your gloopy stamping polish and blob it onto the stamping plate, on the stamp design you want on your nail. Scrape off the excess with your credit card. Pick up the design with the stamper, and then stamp it onto your nail. See how the design kind of splats all over your finger? That’s why we put PVA around your fingernail. You can just peel off the messy PVA bits later.
If you go wrong, use some nail varnish on a cotton bud to remove the mistake-stamp, wait a while, and then re-stamp. The top coat you applied in stage 5 will protect your base colour for one or two mistake removals.
After each stamp or two, clean the plate with the acetone and cotton pads. Clean your stamper by stamping it onto the sticky side of that tape that you stuck to your work surface in step 1.
Again, wait for it to dry COMPLETELY or it will streak when you put the top coat on, Seche Vite or not.
Stamp some more, if you want to?
Apply Seche Vite top coat. It’s the only top coat I’ve found that doesn’t streak the stamped designs. It goes on thick. Don’t try to put it on in thinner layers! Also, don’t take your time. It dries fast, hence the name. If you go too slow you’ll end up making it lumpy. If you need to, wait until it’s dry and then apply more.
When the Seche Vite layer is completely dry you can add other top coats like matte or sparkly stuff, if you want to. But Seche Vite is so shiny and good that you might not care~
Remove the PVA from around your nail, and when you’re completely sure that the top coat is completely dry, wash and dry your hands. It’ll help clean things up a bit.
And there you go. :) The PVA glue means that you don’t need to use nail varnish remover to clean up your fingers or even to remove the nail varnish when you’re bored of it; it just peels off.
If you’re a video kind of person, here is a good video tutorial with FAQs at the end and here is a video of common mistakes.
6 notes
·
View notes
Photo
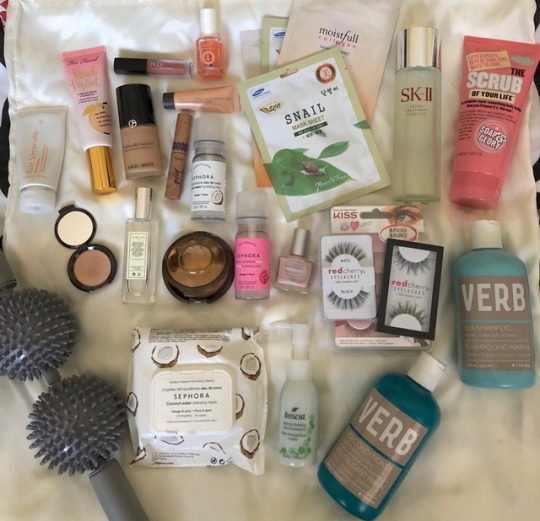
CURRENT FAVOURITES
Hey! So following up on some current favourites from the last one, almost five months later ♥
** SKIN CARE FAVES **
Kate Sommerville ExfoliKate Intense Exfoliator ~ this is in my FabFitFun Fall 2017 box that I was a bit hesitant to try on at first just because of my new found love in my Sephora charcoal exfoliator. ExfoliKate works better and not just because it’s on the pricier side- but because it really does work for my new acne’s. I use this every three days as a part of my night-time routine and I find that my skin soaks up my skincare products better right after.
Korean Face Masks ~ my brother’s girlfriend picked up some Korean face masks for me when she was in South Korea and we all know that the Koreans have a A+ rep with skincare products. I’ve retired peel-off masks just because it just never worked for me and I didn’t find it was worth the time. These face masks are so soothing and relaxing!
SK II Essence ~ my current skincare regimen breaks the bank but it’s the only one that works! I have finally taken the plunge and splurged on SK II essence and it’s the best decision I’ve had in a while. I know this essence is very pricey but because I only require four drops, twice a day, I know that the 160 ml bottle will tide over until the next Sephora VIB sale in November.
Essie Cuticle Oil ~ leaves my cuticles soft and easier to push back, and makes my manicure look better and healthier.
Dermelect Ridge Filler ~ another FabFitFun score. I love wearing this as is for about a couple days, and on the third day, I’ll usually apply my nail polish. It makes my nails look stronger. And did I say it looked just as pretty as is !
Verb Sea Shampoo and Conditioner ~ I recently decided to move on from drugstore hair products (i.e., whatever’s marked down at the grocery store) and use a higher-end line. Verb was actually not my first choice to try out, but my #1 is a bit on the pricier side so I decided to try something reasonable for now. The Verb Sea shampoo and conditioner together cost $32, which I can live with. The reviews were promising, so I decided to just buy it without sampling. I love the subtle smell, and the way it feels after blow-drying in the morning. I wash my hair at night and my scalp used to get extremely oily the next day with drugstore hair cares, and I never have that problem with these products. I also noticed the fallouts to be lesser and lesser. Loving my bouncy hair especially this summer season.
Fresh Sugar Lip Polish ~ I’ve had this product for God-knows-how-long, and for all I know, this stuff’s already expired... but it still works! I wish I can use this everyday, but I know I shan’t so I won’t. lol I use it during my makeup days and it improves my matte lipstick application.
Sephora Face Wipes ~ this is one of the items that I picked up on a whim while at a Sephora ~travel items~ counter, and I’m glad I did. I swear by my Garnier makeup remover but those don’t have that closure thingamajig so my last one just dried up when I forgot to close it properly. I tried the Sephora Coconut makeup remover wipes first, and I already ordered another one online of a different type.
Sephora Face Mists ~ do you ever just pick up something from Sephora when ordering online just so you qualify for a free deluxe sample? Just me? Anyway, this face mist was only bought for the deluxe sample reason and I was going through a phase of face-mist-craze so I figured why not? I got the coconut one first, and I fell in love with it- I liked the atomizer a lot, I liked the price point, and I like the soothing effects so I decided to purchase the other type. This is my go-to during no-makeup days (which is, every day) plus a spot-concealer. Can’t go wrong! I wish they make other kind in the future.
Boscia Makeup Remover Cleanser ~ I remember the days when I attempted to use a makeup cleansing oil and it did not quite workout well for me, but I realised it’s because I wasn’t using a makeup wipe BEFORE using the cleansing oil. I also noticed that using a makeup removing wipe didn’t cut it at times, so I decided to use a cleanser once again. I love the cooling effect right after removing a full day’s worth of makeup, and I can tell it’s really unclogging them pores. I still use my regular face cleanser afterwards, and I’m ready to zZz.
Jo Malone Mimosa and Cardamom Perfume ~ price-wise, this is luxury. I was looking for a new perfume for the winter and took the Sephora Fragrance IQ and this is one of the results. I’ve been relying a lot on the Fragrance IQ to decide my next scent, and so far, it hasn’t steered me wrong. I am obsessed with the subtlety of this scent- so feminine, so floral. I want to add “it’s so me...” but it’s really not. Haha...
Soap and Glory Body Scrub ~ I’ve been obsessed with body scrubs and I like to treat myself with a polish/scrub especially after a greasy workout. I wish I can use these scrubs everyday- but that’s detrimental to the skin of course! This is my current scrub, and I’ve used a few from Soap and Glory before. This has a nicer scent that lingers on my body throughout the night and I can still smell it the next day after tossing and turning and literally rubbing my body in my sheets. Again, I’ll use this everyday if I could!
** MAKEUP FAVES **
Too Faced Peach Perfect Foundation ~ I saw this as one of the top-rated foundations in Sephora so when I went in for my complimentary makeover, I requested to have this used on me. I like the consistency and how it has that blurring effect on my face, but at the same time, not being too cakey.
Giorgio Armani Luminous Silk Foundation ~ I’ve always wanted to try this foundation but because I need to be color-matched before buying, I’ve put off for a couple of years. I also requested for this foundation to be used on me during a Sephora makeover and at the time, I didn’t like how it felt on my face. I used the sample I requested after the makeover and I liked it the second time around, and the coverage is surely buildable. I like how it looks on my face after a long day of makeup- and definitely long lasting.
Tarte Amazonian Clay Mascara ~ I stopped buying full-size mascaras and just heavily relied on the deluxe samples I get from shopping online at Sephora since there is ALWAYS a sample available for the taking. I’m buying a full-size of this one, though, because of the clump-free application and its amazing wand. You can literally apply multiple coats without that spider-webb-y look.
False Lashes ~ I know I’ve been too late in on the false lashes wagon, but I just recently started obsessing over them . I know I still need PLENTY of practice but when makeup gurus say that falsies put the whole makeup look together, they are not lying! I have short, pathetic Asian lashes and adding falsies make a ton of difference. I mostly apply lashes on bare eyes (i.e, no shadows) and I love the natural look it gives. For now I’m just practicing on cheap, Walmart lashes such as Ardell, Kiss, and a few things from nailpolishcanada, and I’m hoping to master the ~art~ of applying with a full-on eye makeup look.
Huda Beauty Matte Lipstick in Venus ~ I purchased this as a Lip Contour set and it came with a lip pencil and another liquid lipstick, but I enjoy this lipstick on its own as I’d say this is the closest shade of my lips. It’s long-lasting and doesn’t feel tacky- almost as if you don’t have any lipstick on. And I also like that it’s good even without a lip liner.
Becca Luminous Liquid Highlighter in Opal ~ my new holy grail! Crazy to think that this was purchased as a deluxe sample and I ended up LOVING the heck out this. The first time I used it, I was amazed by the glow it created even underneath a setting powder. I can almost use it on its own, but it just makes topping it with a powder highlight more longer-lasting and popping.
Becca Luminous Highlighter in Opal ~ I tried the cult favourite Champagne Pop before as my first Becca highlighter and for me, it didn’t live up to the hype that much. I wish I tried the Opal highlighter first; this, paired with its liquid constituent- girl your highlight can and WILL be seen from space.
Becca Sunlit Bronzer ~ I feel like I’m always on a hunt for a good bronzer, especially it’s almost summer time and sometimes I just go for the bronzy, warm look. I like how this fits the bill- not too light compared to the Too Faced Chocolate bronzer- and not to dark like the Nars Casino bronzer.
** MISC **
Muscle Roller ~ this was in my FabFitFun Winter 2018 box and boy oh boy, this is my new bestie. It does work wonders especially on intense leg days (it can be leg WEEKS at my gym sometimes) and works best especially for those who are so bad at skipping foam rolling at the gym (you know who you are!)
Analogue album by Odie ~ it was an album J shared to me- he wasn’t even all hyped up, just pointing out how this kid sounds like Kid Cudi- but one day I just let the whole album play and I was blown away. Perfect chill tunes. And it helped that Odie’s reppin Toronto!
CupShe Bikini ~ I’ve been seeing CupShe on my Facebook feed but I never actually bought anything from them until I saw this cute bikini set that made me say “I oughtta have those!”. I figured it would be my first ever CupShe purchase, and with the $2 shipping to Canada, it sure won’t be the last. Another plus? There weren’t any duties/taxes fee when they arrived. How awesome!
Yoga Jeans ~ I can’t buy jeans online just because it’s never true to size for me. We have a local boutique in town and I’ve had my eyes on this brand for the longest time and one day I was just walking past the store and saw that they have a 25% off store-wide event and I thought it was a perfect time to get my hands on these. They fit like a dream, they have the length that looks good on my 5′4 figure, and the material is stretchable. I would definitely buy these even in full price! So worth it.
#skin care#hair care#makeup#beautfy#skii#korean face mask#sephora#haul#becca#soap and glory#verb#boscia#false eyelashes#huda beauty#too faced#bronzer#jo malone#muscle roller#sierradorotheia#current fave#current favourites
0 notes
Last Seen Blogs

whyareyousooffended5
Why Are You So Offended ?

mrmordensheadonapike
Mutants With Swords IN SPACE!

sy-fri
Sy-fri

lurallyn
Stars and Signs

ekspulso
wendigo