#chefilona
Text
CHEF ILONA: PANETTONE BREAKFAST BAKE

"Christmas morning should be a low effort meal-time; it’s the perfect day to savour a hot drink and the twinkling lights on the tree."
Several years ago, I was visiting the homestead for the holidays which meant I got to enjoy watching my mom putter around the kitchen cooking up all of our most favourite foods.
My dad has a penchant for the Italian Christmas bread, Panettone, and there is almost always one on the counter for the entire month of December.
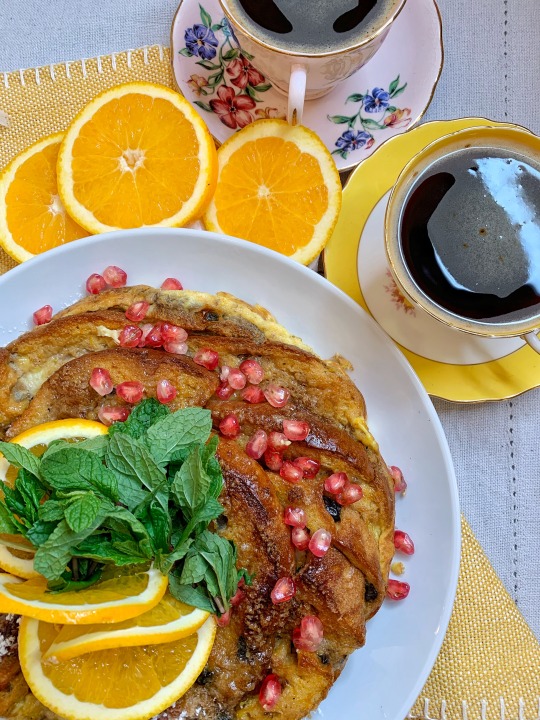
Panettone is a sweet Christmas bread which has its origins in Milan. This rich dough is studded with citron, raisins, and other candied fruits. It is baked in a cylindrical shape and has a domed top. In some
ways I can see a bit of a flavour profile similarity with Easter’s hot cross buns, but Panettone is much
fluffier.
Now from time to time, the Panettone gets a little stale or dries out a bit, and this particular year I was there for such a situation. My mom decided to use the bread for French toast. It tasted amazing, but I was still thinking there had to be an even easier way to make this French Toast, so mom didn’t have to stay at the stove. We decided to make a bake out of it, and it worked like a charm.
It is the kind of dish that is a hybrid of bread pudding and French toast. I started adding in eggnog in the last couple of years
and it is even more festive. If you are so inclined, I recommend a jigger of rum mixed in with the eggnog base; it is so at home in this mélange.
This can be made and ahead the night before, or when you are ready to eat it.
Eggnog and Panettone French Toast Bake
Created by Chef Ilona Daniel
1 loaf all-butter panettone bread
7 large eggs
1 1/4 cups eggnog
1 Tbsp vanilla extract
Zest of 1 orange
2 tsp cinnamon
½ tsp nutmeg
¼ cup brown sugar
Icing sugar and Syrup for serving if desired.
Slice the panettone into slices that would fit into your toaster and tile them into a buttered casserole dish.
Gently whisk the remaining ingredients together and pour over the bread.
Cover and place in the fridge overnight so it will ready for baking in the morning or place into a pre-heated 375f oven.
Bake for 30 minutes and serve with syrup and powdered sugar if desired.
#pei#chefilona#canadianchef#eastcoast#cbcpei#eater#chefsofinstagram#yum#explorecanada#foodwriter#panettone#holiday breakfast#xmasbreakfast#breakfast#lazybreakfast#easyrecipes#easy breakfast#eggnog#french toast#prince edward island
2 notes
·
View notes
Text
CHEF ILONA: The secrets to the best chocolate chip cookies ever!

Chocolate is a versatile ingredient that can be used in a wide range of dishes, both sweet and savoury.
"Our love for chocolate varies from person to person, and is a cherished indulgence because of its taste, texture, cultural significance, and personal associations."

From childhood to adulthood, we always find a way to come back to the classic comfort that chocolate inherently is.
Secrets to softer cookies
One of the keys to a tender chocolate chip cookie is our choice in sugars. Sugar is hydroscopic. In simple terms this means that sugar has a property of attracting and absorbing moisture from the surrounding environment. I have used a combination of both white and brown sugar. Brown sugar is more hygroscopic than white sugar primarily due to its higher molasses content, making it an essential component of the best chocolate chip cookie.

Cocoa Butter Percentages
Cocoa butter percentages in chocolate indicate the proportion of cocoa butter in the overall composition of the chocolate. Higher percentages generally correspond to higher-quality chocolate with richer flavors and smoother textures. For example, a chocolate bar labeled as "70% cocoa" means that 70% of the chocolate bar's weight is derived from cocoa products, including both cocoa butter and cocoa solids. The remaining 30% may include sugar, milk solids (if it's milk chocolate), and other ingredients.
White Chocolate
White chocolate is made primarily from cocoa butter, sugar, and milk solids. Unlike dark or milk chocolate, white chocolate does not contain cocoa solids, which are responsible for the brown color and characteristic flavor of chocolate.
The cocoa butter provides the creamy and smooth texture of white chocolate. Sugar is added to sweeten the chocolate, giving it a pleasant taste.

Best Ever Chocolate Chip Cookies
Makes 1 dozen cookies
½ cup butter, melted
½ cup white sugar
¼ cup packed light brown sugar
1 Tablespoon vanilla
1 egg
1 ½ cups all-purpose flour
½ teaspoon baking soda
¼ teaspoon salt
½ cup semi-sweet chocolate chips
½ cup 75% dark chocolate chunks (I just smash up a chocolate bar)
Preheat the oven to 350 degrees.
Microwave the butter for about 30-40 seconds to just barely melt it. (It shouldn’t be hot)
Using a stand mixer or electric beaters, beat the butter with the sugars until creamy.
Add the vanilla and the egg; beat on low speed until just incorporated; about 10 seconds. (Extended beating of the egg will make the cookies tough)
Add the flour, baking soda, and salt. Mix until crumbles form. Add the chocolate chips and incorporate either with your paddle whisk if using stand mixer or use your hands if using electric beaters.
Scoop the dough into 12 large balls and place on a parchment-lined cookie sheet. Refrigerate the cookies for 1-2 hours.
Bake for 10-12 minutes until the cookies look puffy and dry and just barely golden. DO NOT OVERBAKE. You will know the cookies are done when the bottom of the cookies are just becoming golden across the entire surface, and the top is gently puffed and pale.
It is a must to cool the cookies on the tray for 30 minutes. These should stay soft for many days if kept in an airtight container. I also like to freeze them.
#pei#chefilona#canadianchef#eastcoast#eater#cbcpei#chefsofinstagram#yum#explorecanada#foodwriter#chocolate#chocolatechipcookies#canadianfoodwriter
2 notes
·
View notes
Text
CHEF ILONA: BLUEBERRY CLAFOUTIS

Instead of the usual French Toast or pancake, try something different while classic for brunch or breakfast; clafoutis. This French dish might sound unreachably fancy, but a clafoutis doesn't require any special ingredients—you probably have all of them in your kitchen.
Clafoutis (pronounced klah-foo-tee) is a classic French dessert that originates from the Limousin region of France and dates back many centuries.
Its name comes from the Occitan dialect word "claufoti," which means "to fill." The dish was originally created as a simple, rustic, and frugal dessert. Its simplicity makes it perfect for a hurried brunch by baking fresh fruit, typically cherries, in it’s iconic sweet, pancake-like batter. The result is a custardy, flan-like texture with a slight crispy edge.

From a technical and culinary perspective, there are several important aspects to consider when making a clafoutis:
Fruit Selection: Choose fresh, ripe fruit for your clafoutis. Traditionally, cherries are used, but you can opt for other fruits like cherries, mango, roasted apples or pears, or even peaches.
Batter Consistency: The batter should be smooth and slightly thick but still pourable. Whisking the wet ingredients into the dry ingredients gradually helps to achieve this. The right batter consistency is crucial for the custardy texture of the clafoutis.
Baking Dish: Use a buttered baking dish or tart pan to prevent sticking and for easy removal of the clafoutis.
A blueberry clafoutis is a delightful variation of the classic French dessert and makes use of berries natural to the Maritime area.
The blueberries will release their juices as they bake, creating a delicious contrast between the sweet and slightly tart berries and the custardy clafoutis. Blueberry clafoutis is a perfect dessert for showcasing the vibrant flavor of fresh blueberries.
Julia Child, who famously brought French Cuisine into the homes of North America was deeply fond of clafouti. To elevate the clafouti experience with your guests, you would be remiss if you didn’t share her famous quote related to the dish: "A party without cake is just a meeting. A meeting without clafoutis is just a meeting."

Blueberry Clafouti
Chef Ilona Daniel
Serves 4
2 cups fresh blueberries (or fruit of your preference)
½ cup all-purpose flour
½ cup sugar
¼ tsp salt
1 cup whipping cream
3 large eggs
2 Tbsp butter, melted, plus more for greasing dish
1 Tbsp vanilla extract
Pinch of nutmeg
1 Tbsp icing sugar
Preheat oven to 375°F. Butter a 9-inch square baking dish or cast-iron skillet (which is my preference). Sprinkle blueberries evenly over bottom.
Whisk together flour, nutmeg, sugar, and salt in a bowl. Whisk in cream, eggs, melted butter, and vanilla until completely smooth; for best results, use a stick/immersion blender. Let batter stand 5 minutes. Slowly pour batter evenly over blueberries.
Bake in preheated oven until clafoutis is golden brown and set in center, 25 to 30 minutes. Let stand 10 minutes. Sprinkle with icing sugar just before serving.
#pei#chefilona#canadianchef#eater#eastcoast#cbcpei#chefsofinstagram#yum#explorecanada#foodwriter#CLAFOUTIS#julia child#frenchfood
3 notes
·
View notes
Text
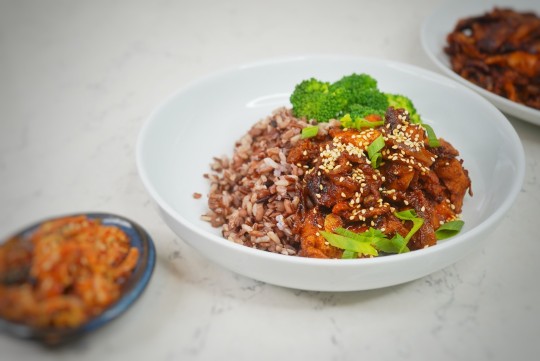
CHEF ILONA: JEYUK BOKKEUM

Stir frying the Bokkeum way
Exploring the cooking techniques found in Korean cuisine
What is bokkeum? It is the Korean method to cook food or food ingredients with little or a small amount of liquid by stir-frying over heat.
Origins
The origins of jeyuk (jeyuk is the Korean word for pork) bokkeum can be traced back to the Joseon Dynasty in Korea, which lasted from the late 14th century to the late 19th century. During this time, meat dishes were relatively rare in Korea due to Confucian dietary restrictions that encouraged vegetarianism. However, pork was more commonly consumed in Korea than other meats because pigs were easy to raise and provided a reliable source of protein.
The modern version of jeyuk bokkeum, as we know it today, likely began to take shape during the 20th century. With the introduction of chili peppers and other new ingredients, Korean cuisine started to evolve, incorporating spicier and more flavorful elements into traditional dishes.
All about that spice
Jeyuk bokkeum is usually made with a combination of gochujang and gochugaru.
Gochugaru is a coarsely ground Korean chili powder similar to crushed red pepper flakes in texture, traditionally made from sun-dried peppers without the seeds.
Gochujang or red chili paste is a savory, sweet, and spicy fermented condiment popular in Korean cooking. It’s primary constituents are gochugaru, glutinous rice, and salt. The sweetness comes from the starch of cooked glutinous rice, cultured with saccharifying enzymes during the fermentation process.
Though the application of chilies in this dish comes two-fold, yet the dish isn’t nearly as spicy as you might think. And of course, you can always adjust the heat level to your taste. You can omit gochugaru if you like it less spicy or add more to make it spicier.
Why marinating matters
The technique of marinating meat in Korean cuisine, known as "bulgogi," dates back centuries. The term "bulgogi" means "fire meat," and it originally referred to beef dishes. Over time, this marinating and grilling technique was adapted for various meats, including pork, leading to the creation of “jeyuk bokkeum."
Jeyuk bokkeum gained popularity in South Korea as a delicious and affordable street food option. It's known for its spicy and savory flavors, making it a favorite among many Koreans. It can be found in restaurants and homes throughout South Korea
This dish can be served in ssam, lettuce wraps alongside other dishes, or it can be enjoyed with rice and some additional vegetables. If you happen to have some kimchi, this would be a great accoutrement to enjoy with the pork.
The dish's history reflects the adaptability and creativity of Korean cuisine, where traditional ingredients and techniques are combined with new flavors and ingredients to create delicious and distinctive dishes like jeyuk bokkeum.
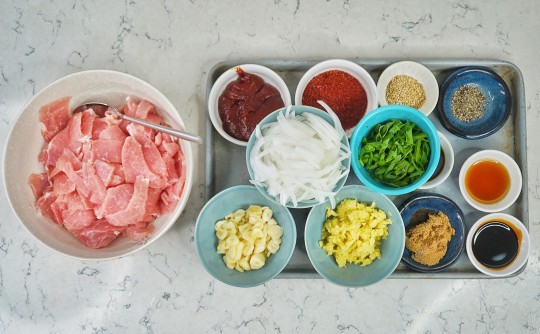
Jeyuk Bokkeum
Adapted
Serves 6
1 ½ pound pork loin (pork belly is traditional- if you use belly increase cooking time to 12-15 minutes) cut into bite size pieces (1/8 inch thick)
¼ cup gochujang
2 tablespoon soy sauce
1 tablespoon dark soy sauce
2 tablespoons brown sugar
2 tablespoons gochugaru
½ teaspoon ground black pepper
1 tablespoon toasted sesame oil
5 garlic cloves, minced
1 tablespoon ginger, minced
1 medium size onion, sliced
4 green onions, sliced
1 teaspoon toasted sesame seeds
Add all the marinade ingredients into a bowl with the pork along with the onions and green onions.
Mix everything together until fully combined.
Marinate the pork in the fridge for at least 30 minutes, but overnight is best.
To cook, heat a heavy bottomed pan, or preferable in a large cast-iron skillet, cook the marinated pork (in 2 batches if you have a small pan).
Fight the temptation to start moving the meat around in the pan the moment is touches it. It is important to allow the pork to sear and become caramelized. Leave it for 30 seconds and stir. Repeat the process until the pork is cooked.
#pei#chefilona#eastcoast#canadianchef#eater#cbcpei#chefsofinstagram#yum#explorecanada#foodwriter#koreanfood#jeyukbokkeum#gochugaru#gochujang
2 notes
·
View notes
Text
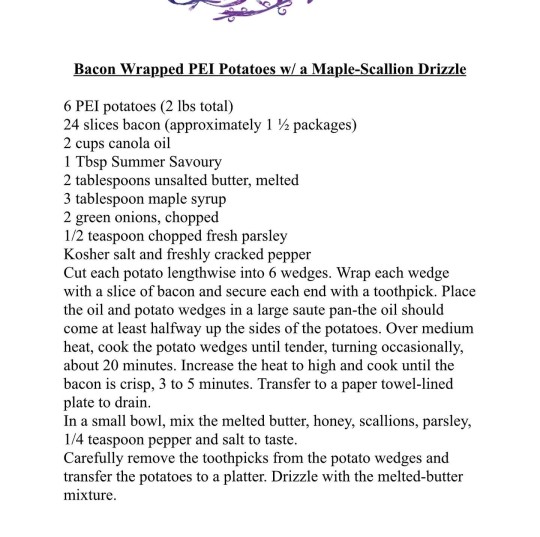
CHEF ILONA: BACON WRAPPED PEI POTATOES W/ MAPLE-SCALLION DRIZZLE & BEER-CHEDDAR DIP

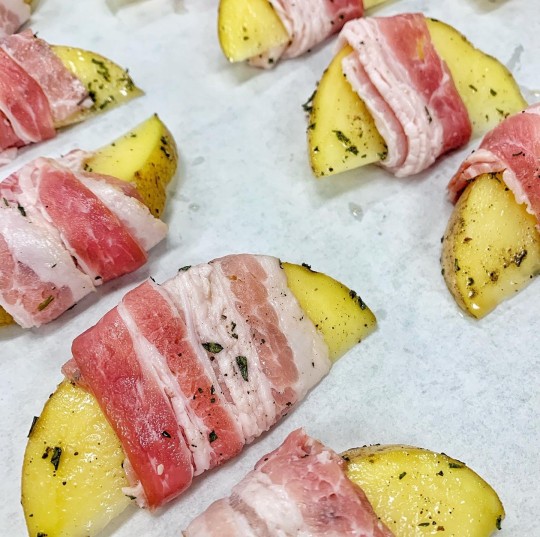


#pei#chefilona#canadianchef#eastcoast#cbcpei#eater#chefsofinstagram#yum#explorecanada#foodwriter#PEIPOTATOES#bacon#beer#cheese#cheesedip
2 notes
·
View notes
Text
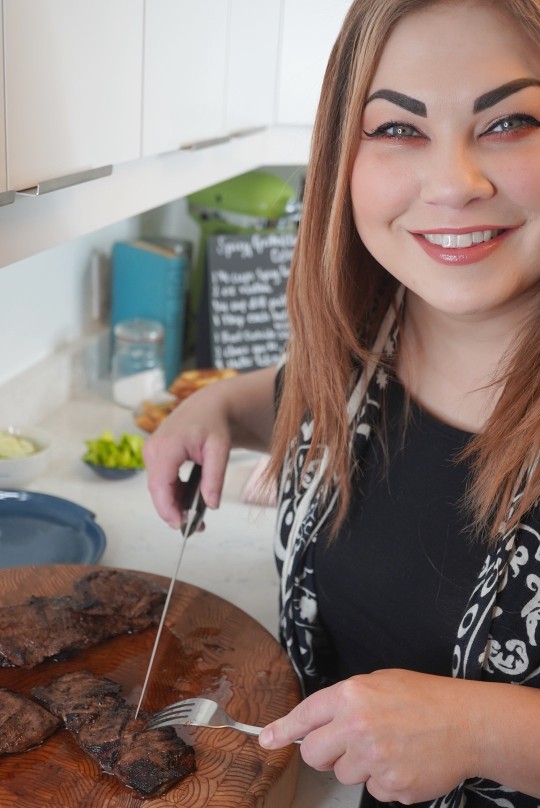
CHEF ILONA: Spicy Grilled Caesar Steak with Celery Salad

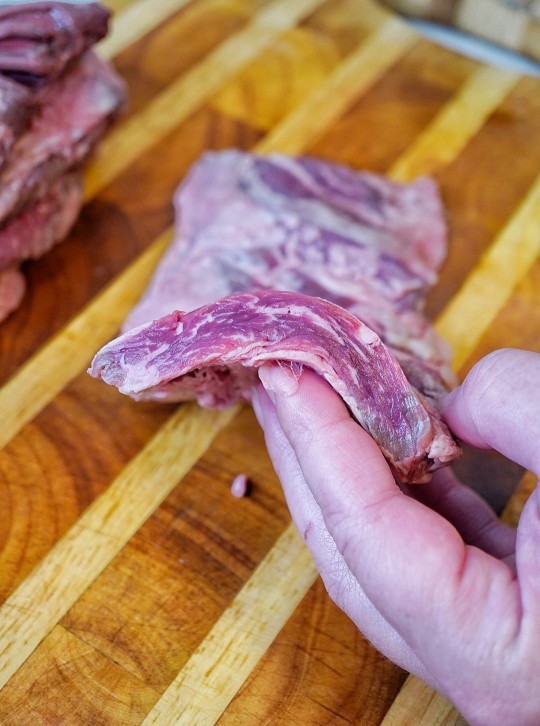
Outside Skirt Steak: Shaped like a sash, Skirt Steak is long, thin and flat, with strong graining and bold beef flavour, similar to Flank Steak.
Pierce steak all over with fork. Place in sealable freezer bag with 1 cup (250 mL) marinade; refrigerate for 8 to 12 hours.
Discard marinade. Pat meat dry. Grill, pan-fry or broil using medium-high heat, turning at least twice with tongs. Cook to medium-rare at least, 145°F (63°C) or to medium at most 160°F (71°C).
Let rest 5 minutes before serving or slicing.

Spicy Grilled Caesar Steak with Celery Salad
Serves 4
1¼ cups (300 mL) extra-spicy tomato clam cocktail
2 oz (60 mL) vodka (optional)
¼ cup (60 mL) dill pickle juice
1 tbsp (15 mL) EACH hot pepper sauce, prepared horseradish and Worcestershire sauce
1 Beef Outside Skirt Marinating Steak (about 1½ lb/750 g)
2 cloves garlic, smashed
4 stalks celery, thinly sliced on a bias, leaves reserved
1 large dill pickle, finely chopped

Method
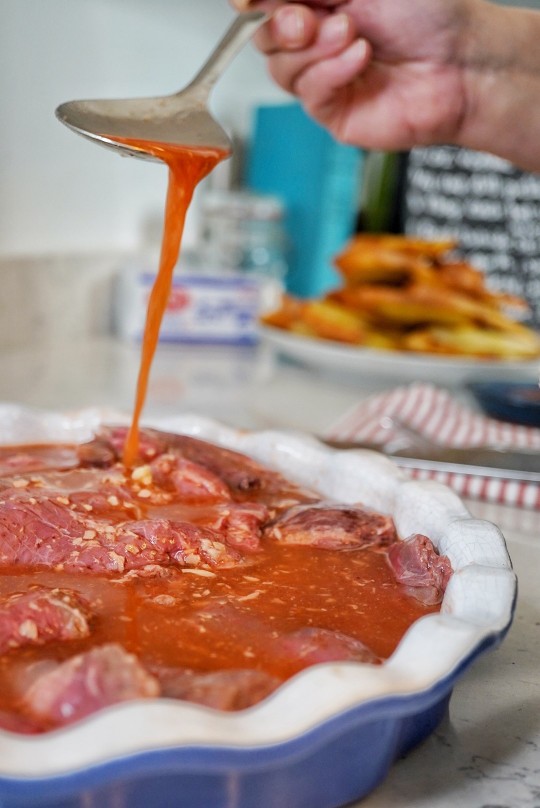
1. Combine tomato clam cocktail, vodka (if using), pickle juice, hot sauce, prepared horseradish and Worcestershire sauce in a bowl. Measure out ⅓ cup (75 mL) for salad and set aside in a medium bowl. Pour remaining marinade into a large sealable freezer bag. Pierce steak all over with fork. Add to marinade in bag with garlic, massaging to coat. Seal and refrigerate for 8 to 12 hours.
2. Meanwhile, add celery and pickle to reserved marinade and toss to coat. Tightly cover and refrigerate until serving, for up to 8 hours.
3. Remove meat from marinade; discard marinade. Pat steak dry with paper towel. Season all over with 1 tsp (5 mL) celery salt.
4. Grill steak in a closed preheated barbecue over medium-high heat (400°F/200°C) for 6 to 8 minutes for ¾ inch (2 cm) thick steak, turning twice or more, or until a digital instant-read thermometer inserted sideways into centre of steak reads 145°F (63°C) for medium-rare at the least. Transfer to a cutting board and let rest for 5 minutes.
5. Slice steak thinly across the grain and serve warm with celery salad. Sprinkle with remaining celery salt and reserved celery leaves.
Tip
Indoor method: Heat 1 tbsp (15 mL) vegetable oil in a cast-iron or heavy-bottom skillet set over medium-high heat. Cook steak, turning at least twice, for 6 to 8 minutes or until a digital instant-read thermometer reads 145°F (63°C) for medium-rare when inserted sideways into steak.
#steak#skirtsteak#beef#bbqrecipes#grilling#grillingrecipes#summer recipes#chefilona#canadianchef#pei#princeedwardisland#explorecanada#canadasfoodisland#discovercharlottetown#caesarcocktail#feedfeed#cbcpei#cbc#foodphotography#canadianfoodwriter#foodstylist
2 notes
·
View notes
Text
CHEF ILONA: MEXICAN STREET CORN PASTA SALAD

Pastas are an easy way to feed a crowd. Serve it up simply on a platter in family-style fashion, or plated for a lingering estival repast. One of the precious parts of summer dining in Canada is that we can enjoy our meals either indoors or al fresco. Dining al fresco can be as elaborate or as simple as you like, and is about the experience of unwinding.
Mexican street corn, or “elote” is a staple of the street food scene in Mexico City. The word elote comes from the Nahuatl word for corn, and this dish is thought to have originated with the Aztecs. Elote is grilled corn on the cob covered in melted butter, mayo, chili powder, cotija cheese, and lime.
This recipe is a great place to use the glut of herbs in your summer garden. I think it’s almost impossible to have too many fresh soft herbs. If you have chives or edible flowers in your garden, add in to the mix with reckless abandon.
*********** Noodle size is important to consider for each pasta dish you make. It is often better to have a noodle that is of a similar size the rest of the ingredients in the dish, so you can enjoy a bit of everything in one bite.

Mexican Street Corn Pasta Salad
Chef Ilona Daniel
Serves 6
1 lb short pasta noodles (such as ditali, rotini, fiorelli, fusilli, or other as preferred), cooked according to package directions
1 cucumber, sliced in half-way lengthwise, seeded and sliced into half-moons)
½ cup cilantro, roughly chopped
½ - 1 cup mild pickled jalapenos, chopped
½ cup red onion, small dice
1 cup cotija (or feta cheese), crumbled
3 cobs of corn
6 radishes, sliced thinly
3 green onions, sliced thinly on a bias for garnish
Dressing:
1 ½ cups sour cream
½ cup mayonnaise
½ cup lime juice, freshly squeezed
1-2 Tablespoons Hot Sauce (I prefer a Mexican hot sauce here)
1 teaspoon chili powder
1 teaspoon garlic powder
1 teaspoon onion powder
2 teaspoon ground cumin
2 Tablespoons cilantro, chopped
To prepare the dressing, combine all ingredients in a bowl, and stir to combine.
When tossing the noodles and other ingredients with the dressing, reserve ¼ cup to drizzle over the top of the salad as part of the garnish.
For the salad:
To enhance the visual appeal of the dish, reserve a little of all the vegetables to arrange over the top of the dressed pasta salad.
In a large frying pan over medium heat, add 1 tablespoon of vegetable oil.
Add corn to the pan and cook until the corn is slightly browned.
–OR--
Brush corn with oil and season with salt to taste. Grill over medium-high heat for 5-10 minutes, turning throughout, until kernels begin to char. Allow to cool slightly before using a sharp knife to cut kernels from the cobs.
In a large bowl, toss all the ingredients (except for the vegetables and cheese you’re saving for garnish) with all but ¼ cup of the dressing. Place pasta salad onto a plate and arrange with remaining vegetables and cheese. Drizzle remaining dressing over the top, and if desired, feel free to sprinkle a small amount of chili powder over the surface of the salad for added depth.
#pei#chefilona#cbcpei#elote#streetcorn#peifoodstory#mypei#discovercanada#explorecanada#princeedwardisland#eastcoast#atlanticcanada#canadianfoodwriter#tourismcanada#summerrecipe#grilledcorn
2 notes
·
View notes
Text
CHEF ILONA: Rice Paper & Sweet Potato Noodle Dumplings!

Let’s play with some new ingredients for our pantry!
Cooking at home can become monotonous from time to time. We get stuck in a routine that starts to feel like a rut. In my experience, just like travel, experiencing new ingredients can help bring feelings of renewal to our everyday existence.
The recipe I am sharing with you today is for rice paper dumplings. It is a very approachable place to start learning how to make dumplings. There are no complicated folds or dough to work with. A robust, plant-based filling is wrapped in rice paper bundles and then pan fried.
Rice paper
Rice paper is made often from a combination of rice flour and tapioca starch. It is formed into circles or squares just slightly thicker than a sheet of paper. To use rice paper, simply slide the sheet into a large bowl of cold water until it just becomes pliable. It can be used to make fresh rolls without any other additional cooking required, or it can be pan-fried as I am doing with the dumpling recipe today.
Sweet potato noodles
When we think of sweet potato, most often we think of holiday meals and the colour orange, but sweet potato noodles could not have less association to either concept. Korean sweet potato noodles, or Korean glass noodles are made from sweet potato starch and water and are gluten free. The noodles are sold dried in bundles and once they are cooked, they have a wonderfully chewy and light texture. To cook sweet potato noodles, bring a large pot of water to a boil for about four to five minutes. Drain the noodles well and rinse the cooked noodles under cold water immediately. Once the noodles are cooled, toss the noodles with some sesame oil or vegetable oil so that they don’t stick together.
Toasted sesame seeds
This sounds almost too simple but buying the sesame seeds already toasted makes such a handy addition to many applications. Typically, toasted sesame seeds are a Korean or Japanese product that can be found in grocery stores in larger city centres or readily at any Asian grocer. Toasted sesame seeds lend a greater flavour than its untoasted counterpart. I like to add it to soups, noodle salads, and when the seeds are mixed with honey and Dijon mustard makes a perfect glaze for fish, chicken, or pork.

Rice paper dumplings
Created by Chef Ilona Daniel
Makes 12 dumplings
24-26 rice paper sheets
1 package firm tofu, crumbled by hand and squeeze out any excess water
1 package (227 g) cremini mushrooms, very finely diced (brunoise)
½ cup grated carrots
1 cup finely grated coleslaw mix or grated green cabbage
2 spring onions, finely sliced
4 garlic cloves, minced
2 Tbsp grated or minced ginger
1 cup sweet potato noodles, cooked and cut into 2 cm pieces
2 tbsp soy sauce
1 Tbsp toasted sesame seeds
4 Tbsp cilantro, chopped
2 Tbsp vegetarian hoisin sauce
1 tsp sesame oil
Pinch of white pepper
Oil for frying
Directions: In a large pan, sauté mushrooms for a few minutes in oil. Once browned, add all the vegetables (except cilantro and green onion) and tofu. Add in the sweet potato noodles, soy sauce, hoisin sauce, sesame seeds and a pinch of white pepper along with a dash of sesame oil, stir through and take off the heat. Stir in chopped green onion and cilantro.
While the filling cools in the fridge, prepare a dumpling building station. You will need: a bowl of water and a dampened cutting board.
To assemble: Slide a rice paper sheet in water for a few seconds and place on the damp surface. Add a spoon of the filling mixture in the centre of the sheet in a rectangle shape
Starting at the bottom, fold over the rice paper sheet to cover the filling. Then fold the top of the sheet over the filling, then the same with the sides so you will be left with a square/rectangle shape pocket. Repeat this process so the dumpling is double wrapped. Continue to repeat this process until all 12 of the dumplings have been assembled. Pan fry the dumplings in vegetable oil for a few minutes on each side over medium heat until lightly golden.
Serve with your favourite dipping sauce. I really like sweet chilli sauce with these dumplings.

#dumplings#dumpling#rice#ricepaper#plantbased#vegan#easyrecipe#cbc#cbcpei#cbcmainstreet#canadianchef#peichef#chefilona#radiopresenter#hoisin#sweetpotatonoodles#noodle#silken tofu#realfood#goodeats#chefsofinstagram
13 notes
·
View notes
Text
CHEF ILONA: Panettone & Egg Nog Baked French Toast
Christmas morning should be a low effort mealtime; it’s the perfect day to savour a hot drink and the twinkling lights on the tree.Several years ago, I was visiting the homestead for the holidays, which meant I got to enjoy watching my mom putter around the kitchen cooking up all of our favourite foods. My dad has a penchant for the Italian Christmas bread, panettone, and there is almost always one on the counter for the entire month of December.
Panettone is a sweet Christmas bread originating in Milan. This rich dough is studded with citron, raisins, and other candied fruits. It is baked in a cylindrical shape and has a domed top. In some ways, I can see a bit of a flavour profile similarity to Easter’s hot cross buns, but panettone is much fluffier.

Now from time to time, the panettone gets a little stale or dries out a bit, as it did this particular year. My mom decided to use the bread for French toast. It tasted amazing, but I was still thinking there had to be an even easier way to make this French toast so Mom didn’t have to stay at the stove.
We decided to make a bake out of it, and it worked like a charm.It is the kind of dish that is a hybrid of bread pudding and French toast. I started adding in egg-nog in the last couple of years and it is even more festive. If you are so inclined, I recommend a jigger of rum mixed in with the egg-nog base; it is so at home in this mélange.
This can be made and ahead the night before, or when you are ready to eat it.
Egg-nog and panettone French toast bake
Created by Chef Ilona Daniel
1 loaf all-butter panettone bread
7 large eggs
1 1/4 cups egg-nog
1 Tbsp vanilla extract
Zest of 1 orange
2 tsp cinnamon
1/2 tsp nutmeg
¼ cup brown sugar
Icing sugar and syrup for serving, if desired.
Slice the panettone into slices that would fit into your toaster and tile them into a buttered casserole dish. Gently whisk the remaining ingredients together and pour over the bread. Cover and place in the fridge overnight so it will ready for baking in the morning or place directly into a pre-heated 375F oven. Bake for 30 minutes and serve with syrup and powdered sugar if desired.
#cbc#cbcpei#canada#explorecanada#discovercanada#discovercharlottetown#explorepei#discoveratlantic#chefilona#chefsofinstagram#canadianfoodwriter#media personality#tourismpei#canadianfoodstylist#foodstylist#foodphotographer#eggnog#holidayrecipe#eastcoast#panettone#christmasrecipes#prince edward island#pei#meetinpei#welcomepei#lovelocalpei
3 notes
·
View notes
Text
Chef ILona: Sesame Soba Noodle Salad

What are Soba Noodles?
Soba noodles are thin noodles made with buckwheat flour; sometimes with the addition of wheat flour. Their characteristic nutty flavour is enhanced with their dense and chewy texture.
This noodle salad is a salad that will hold up and not become mushy. The salad can stand alone or be served as a side along with a piece of grilled salmon or chicken.

We are adding the plant powerhouse, edamame to this buckwheat noodle salad base to create a nutritionally dense meal replete with a bounty of vegetables as well.
Edamame is a word used to describe immature green soybeans. Edamame has a nutty, earthy flavor to it.
Edamame is a great source of plant-based protein. It’s also an excellent source of Vitamin C, Calcium, Iron, and Folates.
You can also use edamame:
Stirred into pasta
Eaten alone with salt and pepper
Tossed in a salad
Mixed in a stir fry
Pureed into a dip
Sesame Soba Noodle Salad
Serves 4-6
1/3 cup unseasoned rice vinegar
1/3 cup vegetable oil
2 tablespoon Sriracha (hot chili sauce)
1 tablespoon toasted sesame oil
8 cups matchstick-size pieces mixed vegetables (such as carrots, radishes, beans, cucumbers, and bell peppers; about 1 1/4 pounds)
Kosher salt, freshly ground pepper
1 cup frozen edamame beans, shelled and thawed
8 ounces buckwheat soba (Japanese-style noodles) or vermicelli noodles, cooked according to package directions
1 cup (loosely packed) cilantro leaves including the tender stems
3 scallions, thinly sliced
1 tablespoon black or white sesame seeds
Whisk first four ingredients in a large bowl. Add vegetables to the dressing; toss to coat. Season with salt and pepper.
Top the vegetables with 1 cup of thawed edamame beans.
Cook noodles in a large pot of boiling salted water, stirring occasionally, until al dente; drain. Run noodles under cold water to cool them; drain well and add to bowl with vegetables and edamame.
Add cilantro and scallions; season to taste with salt and pepper.
Sprinkle sesame seeds over and serve.
#pei#chefilona#canadianchef#eastcoast#eater#cbcpei#chefsofinstagram#yum#explorecanada#foodwriter#media personality#presenter
0 notes
Text
CHEF ILONA: WHIPPED COTTAGE CHEESE W/ ASPARAGUS PESTO & ALEPPO PEPPER

"Leap into Spring with Whipped Cottage Cheese and Asparagus Pesto" ~Chef Ilona
While many Canadians reach for yogurt over cottage cheese when in the dairy case, but when it comes
to nutritional value, cottage cheese may just be the superior cultured dairy product. According to Health
Canada, roughly one half-cup serving of 2% cottage cheese contains 90 calories, 12 grams of protein, 5
grams of carbohydrates, and 2.5 grams of fat. Additionally, cottage cheese is an excellent source of
calcium, which plays an important role in maintaining bone health.
If the nutritional statistics on cottage cheese isn’t enough of a motivator to include more cottage cheese
into your diet, I find its inherent versatility highly engaging. Cottage cheese is suitable for both sweet
and savoury preparations.

As of late, I have become a fanatic of whipping the cottage cheese for about 45 seconds using an
immersion/stick blender. I use the whipped cottage cheese as the base for various toppings and for
spring, charred asparagus pesto is going to be my go-to.
The traditional version of pesto is made with a glut of fresh basil, pine nuts, parmesan cheese and olive
oil. In my iteration of the herbaceous, verdant sauce, I use roasted asparagus, a splash of lemon juice,
pistachios, parsley, tarragon, parmesan cheese and olive oil. The resulting flavour is very fresh while still
have enough depth of flavour to carry throughout the cottage cheese base.

I live to garnish my springtime platter with some of the reserved tips of roasted asparagus, Aleppo chili
flakes, additional Parmesan, olive oil, and parsley, but feel free to use your own creative license to
garnish or not garnish at your own discretion. I live to serve assorted vegetables including the first of the
radishes of the season, cucumbers, and crostini.
Whipped Cottage Cheese and Asparagus Pesto
Chef Ilona Daniel
Serves 4-6
For the whipped cottage cheese:
2 cups cottage cheese
2 Tbsp olive oil
Using an immersion blender or a food processor, whip ingredients together until smooth, about 1
minute. Taste and season with salt as desired.
For the asparagus pesto:
2 bunches asparagus, trimmed
3 Tbsp olive oil
2 garlic cloves, crushed
¼ cup pistachios
½ cup parsley
2-3 sprigs tarragon, de-stemmed
½ cup parmesan, grated
1 tbsp fresh lemon juice
½ cup olive oil
Set oven to high broil.
Toss asparagus with olive oil and sprinkle with a bit of salt and pepper to taste. Place asparagus on a cookie sheet and broil until the asparagus is lightly charred. Allow to cool before moving the next step.
Place the asparagus, garlic, pistachio, parsley, tarragon, parmesan, and lemon juice in a food processor.
Process until finely chopped. With the motor running, gradually pour in the olive oil and process until
the mixture is combined. Season well with salt and pepper to your preference.
Spread the cottage cheese over a serving platter, and dollop with pesto. Sprinkle with additional herbs,
chili flakes, parmesan or lemon zest according to your own whim. Drizzle with olive oil. Serve with
crackers or crostini, and assorted veggies for dipping.
#pei#chefilona#canadianchef#eastcoast#eater#cbcpei#chefsofinstagram#yum#explorecanada#foodwriter#tumblr#foodphotographer#foodstylist
0 notes
Text
CHEF ILONA: Field Berry Pavlova Roll

So what exactly is pavlova anyways? Traditionally speaking it is a spherical meringue based dessert originating in either New Zealand or Australia (depends on who you ask). The dessert is named after Russian ballet dancer, Anna Pavlova.
The baked meringue is typically filled with chantilly cream and passionfruit- Passionfruit is as common as an apple or a strawberry is for us here in Canada.
My adaptation for this pavlova is to turn it into a roll and use field berries instead of the standard passionfruit. I think this makes for a perfectly light, and well-suited dessert for Easter or any springtime-early summer meal.

Pro-tip: Let your egg whites come to room temperature. Room temperature egg whites captures the most air for the loftiest meringue on the go!
So what exactly is pavlova anyways? Traditionally speaking it is a spherical merigue based dessert originating in either New Zealand or Australia (depends on who you ask). The dessert is named after Russian ballet dancer, Anna Pavlova.
The baked meringue is typically filled with chantilly cream and passionfruit- Passionfruit is as common as an apple or a strawberry is for us here in Canada.
My adaptation for this pavlova is to turn it into a roll and use field berries instead of the standard passionfruit. I think this makes for a perfectly light, and well-suited dessert for Easter or any springtime-early summer meal.
Pro-tip: Let your egg whites come to room temperature. Room temperature egg whites captures the most air for the loftiest meringue on the go!
Summer Berry Pavlova Roll
Serves 4-6
Created by Chef Ilona Daniel
Meringue Roll:
• 2 tsp corn starch
• 2 tsp vanilla extract
• 2 tsp white wine vinegar
• 6 large egg whites
• 1 cup sugar
Filling:
• 1 cup whipping cream
• 2 packages whipping cream stabilizer (optional)
• ¼ cup sugar
• ½ cup fresh raspberries or your favourite berry in season
• ½ cup chopped dried strawberries
• Icing sugar for dusting
Line an 11″x16″ jelly roll tray (Swiss roll tin) with the baking paper. Preheat the oven to 325F/160C.
Mix the cornstarch, vanilla and vinegar together in a small bowl, until smooth; set aside.
Whisk the egg whites in a clean, dry bowl until stiff, and then whisk in a little sugar, and a little of the cornstarch paste, and continue adding until they are completely incorporated.
Spoon the egg white mixture into the prepared tray and smooth out using an offset spatula. Bake for 25 minutes or until it is lightly golden.
Place a towel on the counter, topped with a sheet of baking paper, sprinkled with confectioner’s sugar and turn out the meringue onto the paper.
Next, peel away the lining paper and place a new piece of baking paper on top, then roll the meringue, starting from the short side, using the towel as an aide; cool.
Whip the cream until stiff peaks form.
When the meringue is cool, unroll it, and remove the top paper; spread the whipped cream over the entire layer. Top with dried strawberries and re-roll the dessert, placing the seam side down.
Dust generously with confectioner’s sugar.
Move to a serving platter and use a serrated knife to cut into slices. Top with additional whipping cream and slice berries.

#pei#chefilona#canadianchef#eastcoast#eater#cbcpei#chefsofinstagram#yum#explorecanada#foodwriter#harrowsmith#canadianfoodwriter#canadianfoodstylist#food photographer
0 notes
Text
CHEF ILONA: Iberian Mussels with Chorizo and White Wine
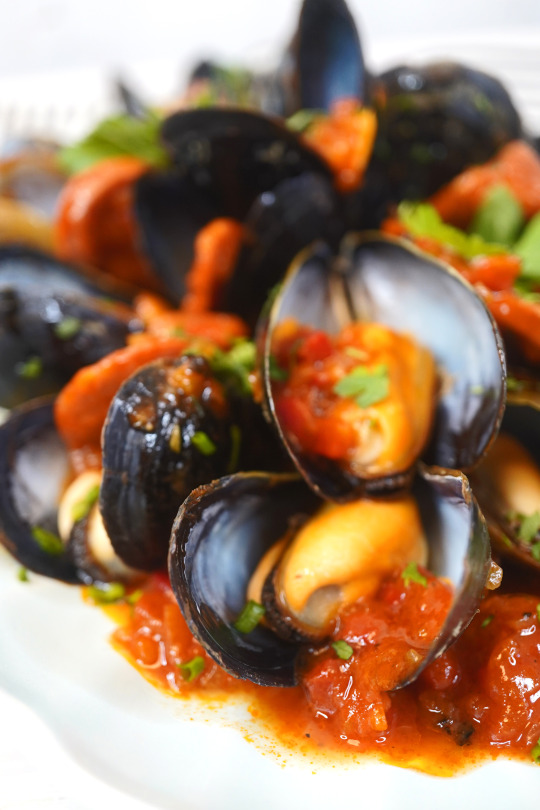
The Iberian Peninsula is a mountainous region that's most associated with the countries of Spain and Portugal.
When we talk about the flavours of the Iberian peninsula, what are we talking about? The most basic ingredients include eggs, beans, rice, cheese, pork, beef, seafood and a wide range of vegetables.
Chorizo (Spanish) or chouriço (Portuguese) is a pork sausage flavored with paprika that is smoked, often over hickory. The sausage is a flavorful ingredient in egg or bean dishes, soups, casseroles and sandwiches.
Because of the thousands of miles of coastlines in the peninsula, fish and seafood are a very important part of the local cuisines.
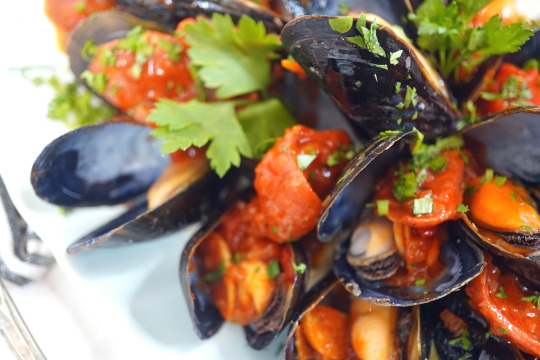
Iberian Mussels with Chorizo and White Wine
Chef ILona Daniel
Serves 4
5 lbs mussels
3 tbsp olive oil
1 large onion, finely chopped
4 cloves garlic, chopped
200g chorizo, skin removed and sliced
1 Tbsp paprika
3 Tbsp tomato paste
½ cup roasted red pepper, chopped
2 cups dry white wine
3 tbsp chopped fresh flatleaf parsley, plus extra sprigs, to garnish
Clean the mussels well, scrubbing the shells and removing the beards. Throw away any which are broken or don’t close when tapped on the side of the sink.
Heat the olive oil in a large pan, add the chopped onion and sauté for 2-3 minutes, until slightly softened. Add the chorizo and cook for a further 2 minutes. Add the garlic and chorizo and cook for another 3 minutes. Stir in tomato paste and paprika and continue to cook for two minutes. Add in the mussels and the wine and season with a pich of salt and black pepper. With a simmering sauce, cover the pan and allow the mussels to cook for 8 minutes or until the mussels completely open.
Throw away any mussels that haven’t opened. Garnish the mussels with chopped parsley and serve immediately.

#pei#chefilona#canadianchef#eastcoast#eater#cbcpei#chefsofinstagram#yum#explorecanada#foodwriter#peimussels#canadasfoodisland#prince edward island#harrowsmith#harrowsmithmagazine
1 note
·
View note
Text
CHEF ILONA: REVITALIZING GINGER CHICKEN NOODLE BOWL!

Ingredients that instantly remind me of sunshine and brightness are ones I often reach for in the darkest and shortest of days. Ginger and turmeric are at the top of my pure sunshine ingredients. The dazzling, indelible colour of turmeric conjures up memories of canola fields and a warm breeze blowing through my hair. Ginger brings vitality and vibrance to the tastebuds in such a singularly special way. Ginger is versatile, sliding easily into the role of sweet or savoury applications.

Ginger is a rhizome which means its root system grows and spreads across rather than vertically. These rhizomes of ginger are known as hands which is why you might sometimes hear the quantity of ginger needed for a recipe as “thumb-sized”.
Gingerol, the essential oil which gives ginger its unique aroma and flavour also has powerful anti-inflammatory and antioxidant effects which can help reduce nausea symptoms.

Additionally, ginger can soothe an upset stomach and can aid in more rapid digestion. Sometimes, if I’ve had a rich meal, I will slice a few thin slices of ginger, pop them into a mug, pour boiling water over them and sip like tea; it works like a charm.
Ginger was one of the first spices to have been exported from Asia. It made its way to Europe along with the rise of the spice trade and was used intensively by ancient Greeks and Romans as both medicine and flavouring.
The soup recipe I am sharing with you today is very approachable for a weekday meal. If you buy grocery store roasted chicken, the leftovers work well in this soup. If you want to make this soup plant-based, swap the chicken for some tofu sheets called yuba and some enoki mushrooms.

The pancit canton noodles are also a brilliant yellow which really sends that sunshine impact into overdrive. It is not entirely necessary to use the pancit canton noodles, you can use whatever you have on hand. I just adore the bright yellow noodles in the creamy golden broth. The fresh squeeze of lime and fresh cilantro are a must in my books. This soup is not suitable for freezing.
Revitalizing Ginger-Chicken Soup
Created by Chef Ilona Daniel
Serves 4
2 garlic cloves thinly sliced
2 Tbsp grated fresh ginger (fresh ginger is so important in this recipe)
1/4 teaspoon turmeric
4 Tbsp vegetable oil
4 cups Chicken Stock
1 can coconut milk
1 cup shredded cooked chicken
1 cup creamed corn (I use one of the smaller cans of creamed corn)
2 Tbsp Sriracha sauce for serving if desired.
Chopped fresh cilantro, thinly sliced green onion, and lemon wedges for serving
1 package (227g) Canton (Pancit Canton) noodles, cooked according to package instructions
In a stock pot, heat the oil to medium-high heat; quickly sauté the ginger, turmeric and garlic for about 20 seconds. Immediately pour in stock, coconut milk, and creamed corn. Simmer the soup for 15 minutes. Stir in noodles, shredded chicken, and heat through.
Serve with green onion, cilantro and lime.
#pei#chefilona#canadianchef#eastcoast#eater#cbcpei#chefsofinstagram#yum#explorecanada#foodwriter#FOODGASM#tastemaker#soupoftheday#noodlebowl
1 note
·
View note
Text
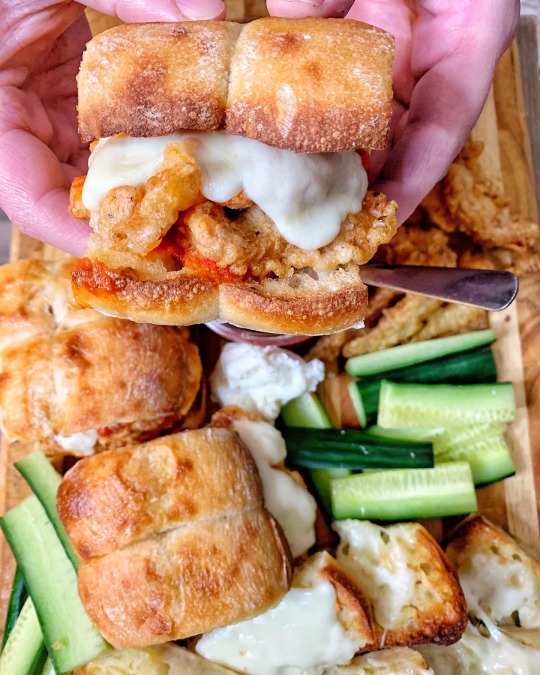
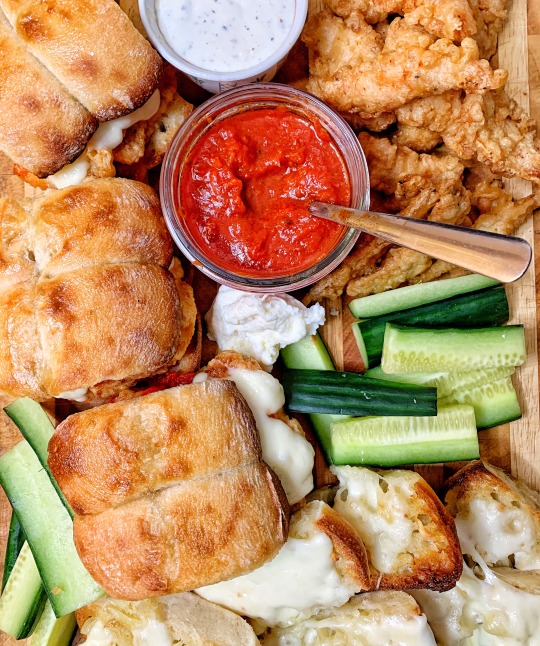
CHEF ILONA: TEMPURA CHICKEN PARMESAN SLIDERS
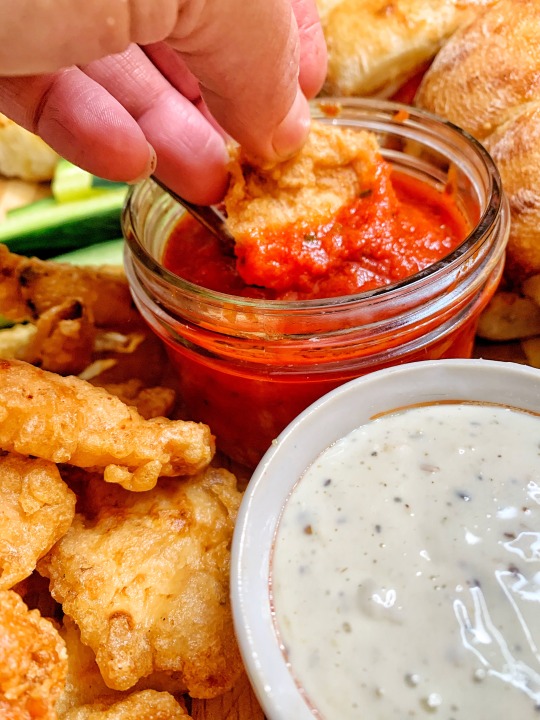
Chicken tempura is a Japanese dish that involves coating chicken pieces in a light, crispy batter and then deep-frying them until they are golden brown and cooked through. Tempura batter typically consists of flour, water, and sometimes eggs or other seasonings. The batter is mixed to a thin consistency and the chicken pieces are dipped in it before being fried in hot oil. The result is chicken with a crunchy exterior and tender interior.
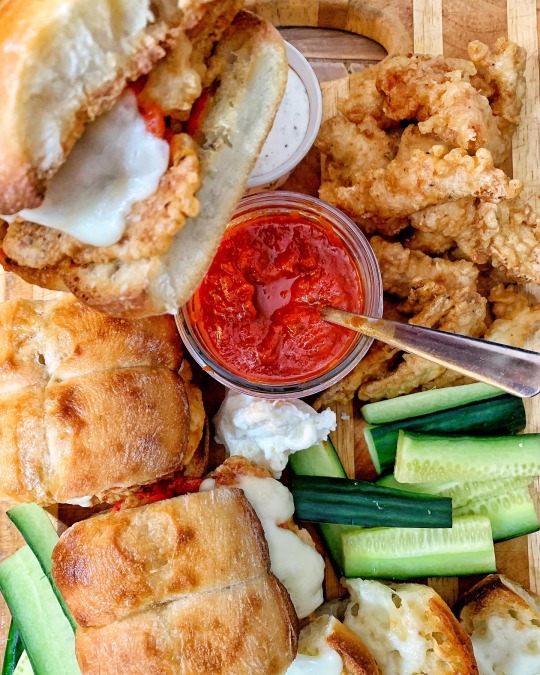
Chicken tempura is often served with dipping sauces such as soy sauce or tempura dipping sauce, but today, my plan is to bring together the superior Japanese batter, with Italian flavours for a laid back romantic meal- Tempura Chicken Parmesan Sliders.
TEMPURA CHICKEN PARMESAN
CHEF ILONA DANIEL
SERVES 2-4
1 lb chicken breast, sliced into thin strips seasoned with salt and pepper
Batter:
3/4 cup all purpose flour
1/4 cup cornstarch
1/4 teaspoon baking soda
1 large egg, whisked
1 cup soda water
In a bowl, mix together the dry ingredients. Make a well in the center and stir in egg and soda water.
Heat oil in small to medium pot to 340-350F
Keep the batter sitting in a bowl resting in a bowl filled with ice.
Dip the strips of chicken in to the batter and allow excess batter to drip off.
Fry the chicken in batches fro 3-5 minutes or until golden brown and chicken is cooked through.
I like to arrange the chicken on a board with garlic butter toasted slider buns, fresh mozzerella, a batch of Marcella Hazan's tomato sauce, and crunchy vegetables as a BYO chicken parm slider situation.
#pei#chefilona#canadianchef#eastcoast#cbcpei#eater#chefsofinstagram#yum#explorecanada#foodwriter#recipeoftheday#chickenparmesan#chicken parmesan#marcella hazan
0 notes
Text
CHEF ILONA: INSTANT POT FUDGY BROWNIES
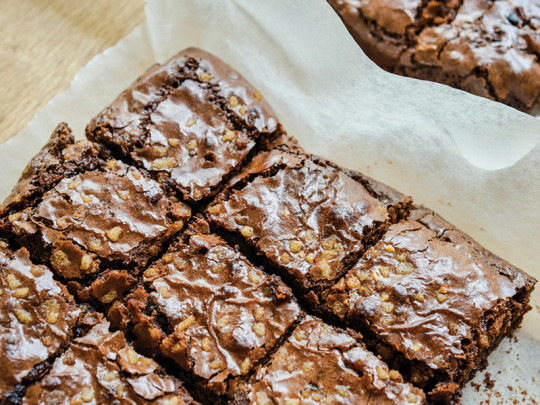
Instant Pot brownies are incredibly easy to make, and yields a blissful balance between the texture of cake and fudge. They're everything you want a brownie to be!
Baking in an Instant Pot is a great trick to keep in mind when it's mid-summer and the last thing you want to do is heat up the kitchen. It's also foolproof because of the consistent temperature during baking and inherent humidity within the chamber protects the texture.
Instant Pot Fudgy Brownies
Ingredients:
2 large eggs
1 cup (250 ml) granulated white sugar 1⁄2 cup (125 ml) canola or vegetable oil 2/3 cup (157 ml) cocoa powder
1 Tbsp (15 ml) vanilla extract
1⁄4 tsp (1 ml) salt
1⁄2 cup (125 ml) all-purpose flour
1⁄2 cup (125 ml) chopped nuts (optional) Cooking spray
Directions:
1. Place Instant Pot rack in bottom of inner liner and add 2 cups water.
2. Line a 7-inch (18-cm) round cake pan with parchment paper and spray with cooking spray.
3. Add eggs and sugar to medium-sized bowl. Beat until smooth (about 3 minutes).
4. Add oil, cocoa powder, vanilla, and salt to egg mixture. Beat on low until well combined (about 1 minute).
5. Add flour to mixing bowl about 1/8 cup at a time, mixing in between, until well combined. 6. Add nuts and fold into batter with a spatula.
7. Pour brownie batter into to the prepared baking dish.
8. Lower baking dish into Instant Pot using a foil sling. Secure lid and set valve to sealing.
9. Cook on high pressure for 24 minutes. Use the quick-release pressure method. Once the pressure is fully released, carefully remove lid.
10. Using foil sling, lift the baking dish out of the Instant Pot. Set pan aside and allow brownies to cool for 10 minutes.
11. Cut brownies into wedges and serve.
#pei#chefilona#canadianchef#eastcoast#eater#cbcpei#chefsofinstagram#yum#explorecanada#foodwriter#canadianfoodwriter#instantpot#instantpotbrownies
0 notes
Last Seen Blogs

yavuzbey42
İsimsiz

gimeru
🌱💚

wolfpai999
Welcome To The Circus

silvermoonartworks
Call Me Hifumi

notalexisnicole
Dear Diary,