#fun fact i used the golden ratio in the composition
Text

Happy Holidays @kaleenjoyer !!
It's your @fmasecretsanta bringing you a mixed bag of your requests because I couldn't just choose one :D sooooo here's a wholesome parental royai moment with the Elrics!
I got inspired by this painting by Geoffroy Henri Jules Jean.
Hope you had a great Christmas/Holidays and wishing you all the best!
#fma#fullmetal alchemist#royai#elric brothers#edward elric#alphonse elric#roy mustang#riza hawkeye#fmab#fanart#fma fanart#artists on tumblr#fun fact i used the golden ratio in the composition#and i wanted to experiment more but i forgot#i almost never do backgrounds tho so this was a nice exercise#but also no idea what i am doing#kezokinos#wanted to draw hair braiding for so long!!
348 notes
·
View notes
Text
Ex. D: Understanding Visual Composition
I visited IKEA @ Alexandra with my friend during the weekend, and we took the opportunity to take some pictures to apply the shot sizes and camera angles to understand visual composition. Even though I understood the lecture, application was slightly challenging taking multiple shots of the same subject.
Since, more people nowadays would prefer to shop online, this series of picture would show her fun adventure while shopping at IKEA at their physical store.
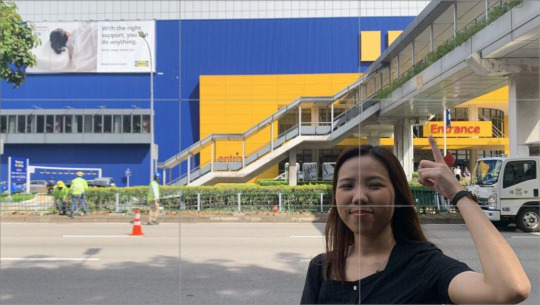
Firstly, this is a photo of my friend outside the IKEA Building, I used the Rule Of Thirds to make the building in the background stand out. This to offer a pleasing and balanced arrangement of her at IKEA the IKEA Building. I also choose this picture to start off the blog post to show the audience that my friend is at IKEA.

Secondly, I took a picture of her using the iPhone to take a selfie at one of their showroom that showed a nice balcony interior design. I applied the Golden Ratio on the phone to emphasise to the audience that if they were to have their rooms designed like IKEA’s showrooms, they can easily take an Instagramable selfie at the comfort of their own homes.
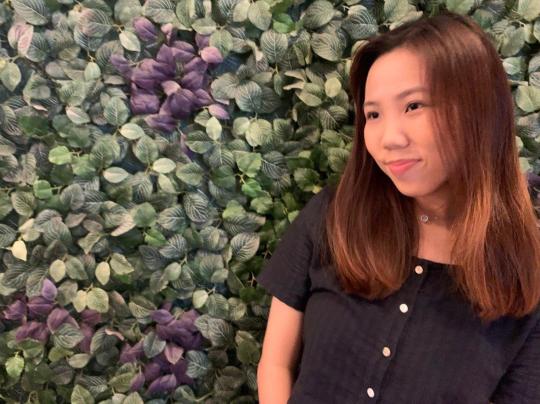
Thirdly, the subject is placed on the right, at the eye-level to show a fairly neutral and familiar shot. This camera angle is to make my friend look friendly and approachable amidst the series of shots showing that she is at IKEA. In fact, this background is the fake leaves backdrop that is in their interior too, letting the audience know that they can purchase natural looking backdrop for their walls at home too.

Next, this is a mid shot showing my friend browsing through the details of the products at the store by reading the description/price tag. This lets the audience know that they can easily find more detailed information of the interior and its products while shopping at the physical outlet too.
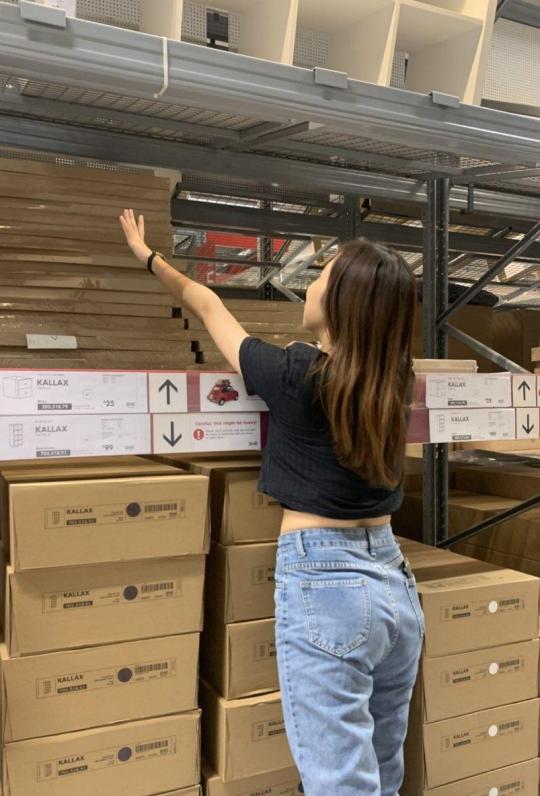
Next off, this is a mid-shot taken to show the action of her collecting her furniture at the self-serve furniture area.

To end off the series of photos, this is a medium close-up shot of my friend looking very happy after a successful trip to IKEA.
0 notes
Text

This final A1 piece in acrylics came about following an exploration of ways in which the sea is represented in art. I ran a search via Google images and then scrolled through the results, settling on only the images that caught my eye. I wanted images that were visually impactful and as my knowledge of art and artists is still very limited, it seemed to me that this might introduce me to and pique my interest in work I wouldn’t otherwise have noticed.
In the end, the pieces that drew my eye were largely by artists I knew of but only really from a distance. This time I had been drawn in by their work and not their name or reputation. They also, very conveniently, came from different time periods and different artistic traditions. I printed out copies of each and then made drawings from them in different media, which inevitably meant interpretation as this, and my own developing style, impacted on the copies.
First was The Great Wave (1829-1833) by Katsushika Hokusai, a Japanese artist working largely in wood block and print. The result is a very formal and stylised image. I copied this using soft pastels, changing the background to black and omitting the boats drawn up into the wave so as to focus as much as possible on the construction of the wave itself. Hokusai makes tendrils of the foam and fixes the water in position so that, in effect, it’s no less solid than Mount Fuji in the distance. I liked the drama of that and the sense of power it evokes, despite its being static.

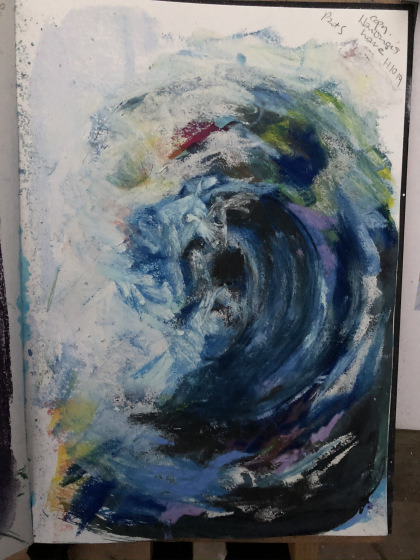
Next I looked at what I then discovered was Turner’s Fishermen on a Lee-shore, (1802), an acknowledged masterpiece of grandeur and drama. This was a daunting piece to copy and it felt presumptuous to attempt it. Again, this is soft pastels in an A5 sketchbook and I felt pleased by the way my rendering of some of the elements turned out. I like the motion and the effect of blending and how, without realising how I did it, the marks that form the tumbling foam in the foreground seem to work.

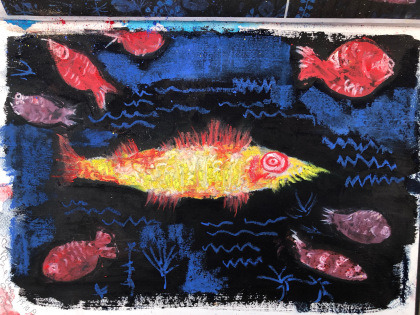
The third piece was Paul Klee’s Golden Fish (1925). The colours deceived me into thinking this was by Kandinsky so I was surprised to find it wasn’t. Klee’s image is almost naive and childlike, a semi-stylised piece that verges on abstract in that realism is barely described. I used soft pastels again for this copy and made the image on black gesso. I like the colourful representations of the fish and the merest suggestion of the surrounding element – water. It was fun to do.
Finally, I took on one of Maggi Hambling’s series of hugely energetic gestural pieces (circa 2012) describing waves, most of which are in portrait orientation and towering so that the impact of power comes across without any further context. Hambling makes broad marks in an expressive style that speaks of the essence of a wave rather than its objective anatomy. I like the way she incorporates unexpected colours into the water, maybe reflecting the way droplets act as prisms to fracture white light; but maybe not. My copy is in soft pastels which are also quite large – especially on A5 paper – and tries to home in on that expression.
My first intention was to make larger versions of these and to weave into them text relevant to the period in which they were made. I had seen typographic art in galleries in Brighton earlier and liked the idea. Later though, I was drawn back to a poem by Marianne Moore called The Steeplejack (c 1930s) which I’d drawn before starting the course and thought to return to that.
After completing the A1 piece, I did return to it and made a series of images owing something to each of the artists, with accompanying text from a particular stanza speculating on how Durer would have liked to ‘live in a town like this, with eight stranded whales to look at’. This is on A3 hot pressed watercolour support; each image is drawn directly onto it and the surrounding colour is black gesso with outlines of white conte.
The ‘D’ of Durer is made by a great wave after Hambling; and the stranded whales wearing lettering spelling that out, is black ink on white gesso with deliberate spaces left between them to emphasise their edges as a Hokusai woodblock might. Beneath is blended soft pastel representing the ‘sweet air’ (after Turner), and last is Klee’s golden fish accompanied by text that describes the water as being ‘etched with waves as formal as the scales on a fish’. Ideally, I would have used letraset for the text but had to resort to handwritten and typed text which I don’t consider ideal. As I have no capacity for calligraphy or even well-controlled handwriting, this remains an exercise until a better way of handling the imagery occurs to me. Also, I’m still quite fond of my pre-course drawing based on this poem and that is interfering with progressing the new way of looking at it.

In the meantime I made a series of drawings and paintings based not on the original art works I’d chosen but on similar real-world photographs which seemed to lend themselves to my chosen styles.
The whales. This is from a photograph attributed to ***
The great wave: this one from a representative photograph attributed to *** – as no one was there for the actual incident – of the largest wave ever recorded in the north Atlantic (2012).
I began to put these into a composition, first as separate images in a sequence reflecting the stylised through to the expressive, and then as part of one whole piece with quite explicit reference to Hokusai’s and Hambling’s waves, Turner’s blending around the whales, and a couple of red fish nodding towards Klee. The bottom image shows in more detail both the formalised structure of the Hokusai wave and also begins to reference a more modern notion of structure drawn from 3D computer modelling when I discovered that one of my reference whales was in fact an animated construct. The red lines represent the wire frame stage of the animation process. Also in this image is my Fibonacci layout, something that had come up while observing NASA engineers in the Mars rover live lab as they inadvertently one day fell into exactly a classical golden ratio tableau. I drew this out in orange conte to find where the focus should be and it was clearly not there.
This led to a further composition which moved the whales closer to the wave and eventually dispensed with both the stylised wave and the additional whale although I retained the red lines for a while and used dots of orange to hint at Klee’s fish.
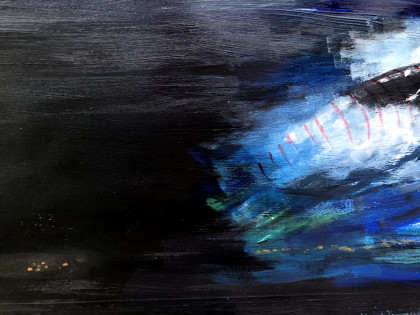
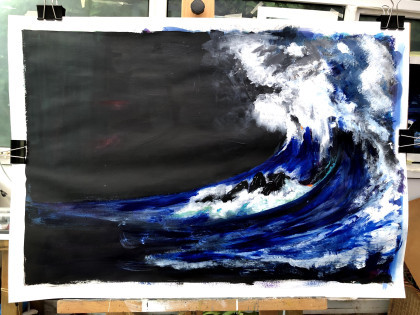
I tried also using portrait orientation as had Hambling because at one point it seems that the expanse of dark sea and sky to the left was draining the energy from the elements on the right. This is made in inks, oil pastels, and coloured conte on a black gesso ground and while I like the effect of rubbing and scraping at the surfaces to reveal the colours in the layers beneath, I’m not wild about the composition or the rather insubstantial feel of the media I’ve used so I returned to acrylics.

This required yet another iteration of the basic composition and, after checking again both onscreen and on the easel from a distance where the focus needed to be, I printed and cut out multiples of the feeding whales to position under the wave and determine how many and where they should go. This led to the final composition as shown beneath.
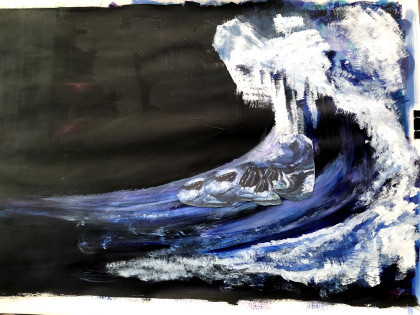
Unfortunately, I could find no way of eliminating reflection of light on the black gesso and moving the camera closer led to the black being rendered as grey by the digital algorithm. The better shot is at the top of this post but from a distance. It can be zoomed for detail. Here, I want to describe something of what remains of the artists whose work brought me to this point. For me, Hambling’s expressiveness dominates the wave structure and contains small patches of colour which reflect her style and also a little of Klee’s golden fish. Some parts of the foam are more stylised than others where I manipulated a stylus in the wet acrylic to make curls in the edges, then further down is a very clear-cut edge to a rising component of the wave, marking with a thin line of turquoise the foreground water from the central melee of the whales. This is the Hokusai influence. I have used blending – by finger – on the foam in the large wave and also in the turbulence around the whales where the behaviour of the water reminded me of the waves in Turner’s piece.
As additional notes, there are two small patches of dark red wash in the black area to the left which I’ve intended as both an indication that this is a ‘live’ area (sky) and not simply one that hasn’t been addressed. The colour reflects those in Klee’s painting. Then finally I’ve placed a dot of orange in the sweep of the wave just between its base and the whales to both reflect again Klee’s fish and also to pinpoint what, to my eye, is the centre point of the Fibonacci spiral.
I have learned a great deal in the making of this piece. First that copying great works needn’t be intimidating and doing so delivers ideas and motor skills subliminally. Second, that repetition (up to a point – I do become very tired of seeing some things after a while!) improves those motor skills as these are refined from many stiff movements to one or two large swift ones. And thirdly, that innovation is born of practice and looking, listening and feeling. I’ve used music quite often throughout this work, in particular the score for the ballet Woolf Works by Max Richter (2017) which describes the tormented life and tragic demise of Virginia Woolf. The final scene is danced before an enormous monochrome sea moving in the slowest of slow motions. I’ve also made audio and video clips of the waves crashing onto the beach at Lancing and used these too to keep the sense of power and fluidity in mind. Most of all though, I’ve had at the front of my thinking the terrible losses we’ll experience if we fail to protect our oceans, our wildlife, and our planet. This is not a political message piece, but for me the subtext certainly is.
Woolf Works, Ballet performed by the Royal Ballet, score by Max Richter. 2017.
Paul Klee, The Golden (or Gold) Fish. (1925).
J.M.W. Turner, Fishermen on a Lee Shore in Squally Weather (1802).
Maggi Hambling, Bold Breaking Waves. (c 2012).
Katsushika Hokusai, The Great Wave off Kanagawa. (1829-1833).
All sites last accessed 18/01/2020.
NB I may edit this post prior to submission, but will not do so subsequently.
Part 5 – personal project submission This final A1 piece in acrylics came about following an exploration of ways in which the sea is represented in art.
0 notes
Text
How Have World AeroPress Champion Recipes Changed Over The Years?
It’s been ten glorious years since the first World AeroPress Championship: ten years of experimental, creative, boundary-pushing – and, above all, fun – performances.
When it first took place, in a small room in Oslo with just three competitors, few could have imagined the mammoth that it would grow into. Today, there are 58 national competitions around the world in the months leading up to the World Championship, while its sponsors include some of the industry’s biggest names. Over 3,000 people compete every year.
So, what does it take to walk away with the iconic golden AeroPress trophy? And as the championship has evolved, how have the recipes changed? I reached out to several Champions to find out.
Learn more! Read 5 AeroPress Lessons I Learned From 4 Champions (& Their Recipes)
Gold, silver, and bronze: the trophies for the World AeroPress Championship, provided by AeroPress, Inc. Credit: World AeroPress Championship
The Early Days
The coffee industry has come a long way over the last decade, something that’s reflected in the competition’s constantly evolving recipes. In the early years, the presentations were high on passion. However, by today’s standards, the coffee wasn’t what you might expect of a Championship-worthy AeroPress brew.
Paulina Miczka, 2017 World AeroPress Champion and Head Barista at Kaffeine, London, tells me that “over the years, tastes have changed. Some time ago, people loved dark roasted coffee.” Lightly roasted single-estate coffees? No, thanks – think a toasty, chocolaty blend instead.
But it’s not just the coffees that have changed: the recipes have, too. Lukasz Jura, 2009 AeroPress Champion and Owner of Coffee Proficiency, Poland, tells me that, today, “we are much more aware of the extraction process.”
If he were competing in 2018?
“I think that I’d have to do everything different,” he confesses. “Today, I’d start testing coffee with my regular recipe… Then, I’d make adjustments depending on the coffee I have. I’d definitely goal into something I can easily repeat in the coffee shop, so I can share the experience with my customers.”
But a lack of coffee science and darker roasts don’t indicate a lack of passion, talent, or inclination to push the coffee industry forwards. Far from it: these early pioneers drove experimentation and helped put the AeroPress, one of coffee’s most beloved brewing devices, on the global coffee map.
Paulina Miczka, 2017 World Aeropress Champion, 2015 and 2017 UK Aeropress Champion. Credit: Paulina Miczka
A Playground for Coffee Experimentation
Jeff Verellen, 2011 and 2013 World AeroPress Champion, tells me that “most of the competition was purely for fun. A lot of competitors did something very kooky: Gwilym Davies was standing next to me freestyling completely, having no recipe in mind. In 2011, James Hoffman was testing new prototypes of an ultra-advanced Japanese synthetic filter in the championship. Stephen Leighton of Has Bean was making two AeroPresses very differently and mixing them.”
When I ask Stephen Leighton about his goal, he confesses, “I can’t remember what I was thinking at the time. I tend to have a lot of crazy ideas.”
As for James Hoffman, he says, “Hario was experimenting with a synthetic filter for the V60 that was easier to clean and maintain than cloth. It didn’t filter quite as well as cloth, I think, so when I used it, I made a double layer of it, cut to fit an AeroPress…
“I just thought it was fun. This is why I used it, more than following any particular trends at the time. Back then, the AeroPress Championship was much less serious than it is now.”
In the earlier years, the championship wasn’t about brewing the best possible coffee. It was about experimenting. You followed those “what-if”s and “I-wonder”s to do something new – and sometimes, that something new was also incredibly delicious.
Many would say that the event still has this playful, open-minded attitude. But some things have changed: today, experimentation is guided by greater coffee knowledge, data, and often technical tools and equipment.
You might also like AeroPress Coffee Guide: How to Brew for Different Flavor Profiles
Using a scale to carefully control brew ratio. Credit: Dedy B. Rivai
3 Things That Have Dramatically Changed
Jeff says, “It all depends on the panel of judges but, in general, the evolution is to more cleanness, less body, more juicy (but not sour) coffees.” He adds, “These recipes are for competition. Not a lot of people brew them at home; some of them are a bit too elaborate, some of them require a lot of coffee.”
But what has led this evolution?
“Nowadays, we understand much more about coffee then we did 15 years ago,” Paulina says. “We have better tools and grinders than we had before… the understanding of water is also much better. There are many books those days which help us learn more.”
And Martin Karabinos of Leroy Bar & Café, Slovakia (who represented his country on the world stage in 2014, 2016, and 2017) says that changing recipes reflects not only competition standards but the fact that more and more coffee consumers are turning to an AeroPress. “The fact that consumers are asking for AeroPress was not as usual as it is now,” he says.
So, let’s take a look at some of the big changes:
Water Temperature & Quality
During the initial years, Jeff says that “the more serious competitors were trying conventional techniques using 1:16 brew ratio, 90°C (194°F) water temperature, two minute plus steep time, and pressing all the way through. This made an ‘okay’ cup, yet was a bit dry and bitter. I noticed that, at lower temperatures, this bitterness fell away. In 2010, I came third with 86°C (187°F); Marie Hagemeister took the title with 80°C (176°F).”
And today, it’s not unusual to see competitors using water between 75°C and 79°C (167°F–174°F). (Interestingly, when Martin placed second in the World AeroPress Championship in 2014, he used 80 g of water at 35°C/95°F and 135 g at 92°C/198°F.)
What’s more, Martin tells me that “certainly today, the filtration of water is discussed more. In Rimini, I used the basic water from organizers of World AeroPress Championship. Nowadays, the filtration of water is at a completely different level. Baristas can influence the composition of water, which is great.”
The AeroPress: the inverted method. Credit: Leto Coffee Brew Bar
Extraction Levels
Paulina used a refractometer, a tool to measure extraction levels, in her routine. But what is extraction? And how does it affect the taste of our coffee?
Extraction is the process by which flavor and aroma compounds in the coffee grounds enter the brewed coffee. But not all compounds extract at the same time or rate. First, you get the fruity acids, then sweetness and balance, then bitterness and finally astringency. This means that, by controlling the rate of extraction, you can control the flavor of your coffee.
Discover more! Check out What Are The 3 Phases of Drip Coffee Brewing?
Paulina says, “My recipe couldn’t be that special without the refractometer I used. Many years ago, when people started working on AeroPress recipes, they couldn’t come up with one like that because there simply weren’t all those tools and knowledge available.”
Using it, she tells me, allowed her to achieve the best possible balance of acidity, sweetness, and body in her final brew.
The AeroPress, ready to use. Credit: The Coffee Tamper
Bypassing
Bypassing: it’s the act of adding water to already brewed coffee.
Many AeroPressers will add all of their water to the AeroPress channel. But it’s also possible to use less water during brewing for a more intense flavor. Water can then be added later to keep that strong cup profile while reducing the heavy mouthfeel. It can also limit variables during brewing, increasing consistency.
Doing this is, in fact, closer to the original recipe recommended by AeroPress creator Alan Adler, who set out to create an espresso-on-the-go.
Read all about how Alan Adler created the AeroPress here!
And it’s a fashion that has come back in style. Lukasz tells me, “There’s a tendency of bypassing AeroPress brews these days, at least in competitions.”
Jeff agrees, saying, “The first time I saw an inverted bypass recipe was the winner of one of the regionals in the US in 2012–2013, I think… He used a bypass recipe involving 37 g of coffee and quite a big dilution, making essentially three coffees…
“I remember Tetsu Kasuya, the 2016 World Brewers Cup Champion and 2015 Japanese AeroPress Champion, being inspired by this, too. There were many bypass techniques being used in the 2016 Polish national championships. Filip Kucharczyk mastered it and took the title in a field of 108 competitors.”
Starting the plunge. Credit Bastiaan Roozendaal
Some Things Never Change
But despite these changes, many things have remained constant. Lukasz tells me, “The AeroPress seems to be still an innovative brewing method. For many years, competitors were presenting very different styles of brewing and many of them are surprisingly good.”
And Jeff emphasizes that “the AeroPress is more of a device to brew at home. The World AeroPress Championship is a reflection of a gigantic hobby culture.”
There are many wonderful things about hobby cultures. They are filled with passionate, open-minded individuals. They lead to experimentation, diversity, and ultimately evolution. And even as the AeroPress becomes a more common fixture in coffee shops, this attitude continues.
As Paulina says, “There is still so much to learn.”
Enjoyed this? Check out 5 AeroPress Lessons I Learned From 4 Champions (& Their Recipes)
Written by Julio Guevara.
Please note: This article has been sponsored by AeroPress, Inc.
Want to read more articles like this? Sign up for our newsletter!
The post How Have World AeroPress Champion Recipes Changed Over The Years? appeared first on Perfect Daily Grind.
from Perfect Daily Grind https://ift.tt/2zTs8zY
0 notes
Text
MMS 173 Blog 1: First Impressions and Progress
I was surprised to find out that aspiring photographers tend to study what was in Unit I of this course the least. To me, composition, design elements, principles, color, cropping, and frames are the most essential factors to produce a good photo. Of course, technical knowledge will also help a tremendous amount, but what separates a casual photo from a great photo is the visual qualities that catch your eye immediately and makes an impression.
If you take a perfectly technically adjusted photo but the subject, composition, and other elements are mediocre, it kind of defeats the purpose. That’s not saying that those who don’t spend much time studying the theory and design aren't good, but I feel like being extra aware of these details can make a picture. Take myself for example, I’ve always thought that I was subconsciously using said design elements and theory, but now that I’m extra aware and more knowledgeable of what they actually are, I can see what exactly I can improve on with my photos and which ones I thought were so good but were actually a mess when it comes to composition, cropping, elements, principles, etc.
Here are some photos I took after starting the class:
iPhone 8 - Lightroom CC
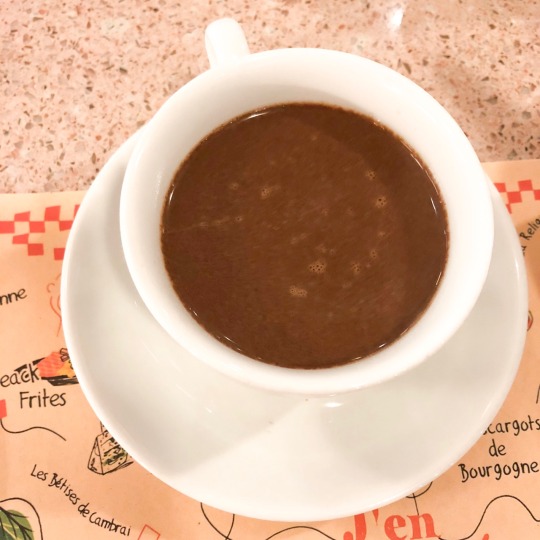
A cup of hot chocolate. Rule of thirds, emphasis, and color editing.
iPhone 8 - Lightroom CC

A gorgeous sunset from an office window. Golden ratio, color, a bit of saturation and contrast.
iPhone 8 - Lightroom CC - Tripod - Bluetooth remote

Self-portrait. Rule of thirds, color, saturation.
When I started this class, I kind of already predicted where I would be in terms of skill or talent and I was mostly right. I have a spot in my heart for photography but haven’t really developed the skill as much as I could, while some of my classmates are on par with professional photographers. I’d love to meet some of them and exchange thoughts and maybe even get some advice.
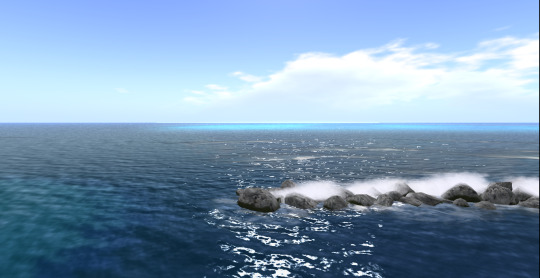
I started trying to take pictures in a virtual setting using Sir Al’s suggested software “Second Life”. I’ve got to admit that it really is ideal for going on virtual photowalks because of the controls for the camera and the setting of the game. Taking a few steps will get you to picturesque setting after another. Unfortunately, it’s pretty tedious when your internet is as bad as mine. I was basically playing a stop motion animation and all the details take ages and ages to render.
Here are a few photos I managed to take:


I would love to take a real photowalk with my classmates maybe even just around the UP Diliman area. Last term, I managed to find myself in a group full of MMS 173 students going on a cultural mapping exercise around UP Diliman and La Mesa Eco Park. Even though we weren’t there for MMS 173 (in fact, it was for HUM 2), we managed to bond over photography and videography. We basically went on a photowalk for our cultural mapping exercise. That was the first time that I ever really bonded that much with my fellow classmates. We now have a group chat where we just goof around, talk about our school woes, and even arrange more photowalks and shoots.
Here are some photos we took on the walk:

Credit: Igie Lalo

Credit: Ice Mercader

Credit: mine
This picture I’m really pleased by. I think the colors are great, a little faded and dreamy, the composition I also like, but I hate the fact that there are garbage cans and people that didn’t fit the aesthetic. There were also pieces of trash scattered around. I think maybe I could’ve changed the angle or waited a bit for people to dissapate or just tried harder to get a better shot.

Credit: Igie Lalo

Credit: mine
Hopefully, we will get to experience something like that this term for MMS 173. I would love for there to be a few face to face sessions maybe with sir Al, as well, for us to get some field action and learn from him and from each other as we walk around taking photos. It’s also really handy, I’ve found, from experience with MMS 172. There was a face to face session where we were showed the works in WildSound Studios and taught different techniques as we worked on different audio projects. I think that it’d be amazing if we did something like that for MMS 173. A live demonstration, critique, and instructions could be really helpful in applying the different techniques to our photography.
Next up for us in this course is Unit II: Technique. I think I’ve gotten the gist of the design elements, although, I will continue to master it as we go on. I don’t think that I will ever be as passive about it as others, because it’s something that I have a lot of fun learning about and really makes a massive difference in your photos how everything goes together. I’m going to be excited to start learning more about the technical aspects of photography, though. I plan on getting a professional camera soon, so it will be useful to actually know what functions there are and how to use them accordingly.
0 notes
Text
Koh-I-Noor Extra Soft Pastels
Koh-I-Noor Extra Soft Pastels
When I first became involved and started watching colored pencil artists on YouTube; marvelling at the amazing art they were creating, I knew it was something I wanted to aspire to achieve. As I became more and more confident with colored pencils, I started looking at other similar mediums such as pastel pencils and pastes in general. Again, the art I was watching pastel artists create was mind blowing and so I just knew I wanted to try my hand at them as I was developing so many ideas for paintings with them.
At the beginning of the this year ( 2018 ) Koh-I-Noor sent me out quite a range of supplies for me to review which I am eternally thankful for and humbled that a company such as Koh-I-Noor are happy enough with my reviews that they trust their products with me to deliver an honest review.
So far I have had the privilege of testing and reviewing the Koh-I-Noor Polycolor, Mondeluz and Woodless pencils, all three outstanding products and at incredibly affordable prices. Knowing Koh-I-Noor as I do, in all honesty, when I received these Extra Soft Pastels to review, I obviously knew I was in for a treat, however, there is more to reviews than just having fun and that is what I intend showing you guys in this review.
(adsbygoogle = window.adsbygoogle || []).push({});
Koh-I-Noor Extra Soft Pastels Available Sets
The only criticism I have with the Koh-I-Noor Extra Soft Pastels is that there is not more of them. The largest set in this range is 48, with smaller sets ranging from 12, 24 and 36. The really good thing however is that the pastels are sold in open stock form, so if you use a particular color much more than others, you can replace it as a when needed.
Although I have mentioned that I would like to see larger sets than 48 because I love them so much, it is also worth mentioning that the Extra Soft Pastels are not the only Pastel Koh-I-Noor produce, they also have pastel pencils which I will also be reviewing for you very soon, they also do dry pastels in round and rectangle studs as well as oil pastels.
Koh-I-Noor Extra Soft Pastel Characteristic
The Koh-I-Noor Extra Soft Pastel are cylinders of buttery gems, when you remove the sleeve from the box and remove the box lid, you are greeted with a spectrum of brilliant color gently nestled in between black foam slots to protect their delicate composition.
Each cylinder is wrapped in a protective clear plastic coat, which obviously serves the purpose of protecting the actual pastel and displaying the relevant information about the individual pastel.
Printed on the plastic is the Koh-I-Noor Logo, at the side of which in large print is "Extra Soft Pastel" which is the particular brand. Just above this is printed "Toison D'or" which I think is French and means "Golden Fleece" according to Google Translate.
Further on round the plastic sleeve is printed the pigment name of the Pastel, followed with a numerical code which relates to the individual pastel should you need to replace a particular pastel. Next to the code and perhaps most important of all the information is the lightfast rating. Of all 48 Extra Soft Pastels, the lightfast ratings are really good, 5 star being the most lightfast and 1 star being the least lightfast, of the 48 Extra Soft Pastels 39 are 5 star, 5 are 4 star, 2 are 3 star and 2 are 2 star with no 1 star. So as you can see the vast majority of the pastels are 5 star rating and in fact only 4 of the pastels may not be used if you are completing a commission for someone, which on a ratio bases is absolutely excellent.
Koh-I-Noor Extra Soft Pastels Performance
When I very first got started in pastels, because I wasn't sure as to whether or not I was going to like them, I purchased cheap pastel paper, which I soon discovered was a bad idea. I always tell people that the surface you are creating your art on is just as important as the art mediums you are using, that cheap pastel paper I used was perhaps the biggest reason I disliked pastels at that stage. It wasn't until I done a bit more research and discovered good quality pastel paper, that I discovered just how amazing pastels are to work with.
(adsbygoogle = window.adsbygoogle || []).push({});
One of the excellent points about them is that you can come back in with lights over your darks, something that simply cannot be achieved with colored pencils. With the Koh-I-Noor Extra soft Pastels, laying them down on the pastelmate, which was my first surface of testing, the pigment to the pastelmat was almost magnetic. The lightest touch transferred ample pigment, when gliding along the paper, it was clear to feel and see just how creamy and buttery the pastels are. Koh-I-Noor are not messing about when they claim them to be extra soft.
The nest surface I tried the pastels on was UART sanded paper, for this test I chose a middle of the line paper in terms of sanded grade, with 800 being the smoothest paper and 200 the roughest, I used the 320 grade. Again, because of the sand paper nature of the surface, the very lightest touch between pastel and surface claimed the pigment, delivering bright and vibrant layer.
I was able to create a simple piece of art and speed painting using the Koh-I-Noor Extra Soft Pastels, hoping to help demonstrate to you just how wonderful they are, their vibrancy and easy layering ability. In the art work I also used the Koh-I-Noor Pastel Pencils which I will be reviewing for you very soon as well.
Koh-I-Noor Extra Soft Pastel Pricing
To purchase any of the Koh-I-Noor Extra Soft Pastel sets here in the UK, you can expect to pay for the smallest set of 12 £8, the 24 set £11, the 36 set £24 and the largest set of 48 will cost you £31. As you can see, for £31 you can purchase for yourself 48 excellent quality Koh-I-Noor extra soft pastels, but more importantly, all but 4 of them are excellent lightfast rating, you can do as many commissions as you like and know with confidence your art is protected against the light.
In America to purchase the same excellent quality pastels will cost you $18 for a set of 12, for the 24 set $27, for the 36 set $39, and for the largest 48 set it will cost you $41.
For those of you in Europe you can expect to pay €12 for the smallest 12 set, for the 24 set €17, for the 36 set €23 and for the largest 48 set you will pay €27.
(adsbygoogle = window.adsbygoogle || []).push({});
Koh-I-Noor Extra Soft Pastel Conclusion
When you take into consideration the incredibly low price tag for the Koh-I-Noor pastels and the amazing lightfast rating throughout all 48 pastels, I really don't think you can go wrong with these wonderful pastels.
Even if you take all these amazing qualities about the pastels away, their beautiful soft smooth consistency and easy ability to lay down pigment and blend, any artist regardless of experience is going to have a lot of fun with them.
I personally loved using them, making my only criticism of the Koh-I-Noor Extra Soft Pastels all the more pertinent and that is that there is no enough of them. I know, with the other pastel sets combined, Koh-I-Noor have a total of 120 tones across those ranges. With the Extra soft pastels I would love to see a 72 set or if I was really allowed to push things 120 and I say this only because I love them so much.
#Koh-I-Noor#Koh-I-Noor Extra Soft Pastels#Koh-I-Noor Pastels#Koh-I-Noor Pastel Review#Koh-I-Noor Pastel Pencils#Review of Koh-I-Noor Extra Soft Pastels
0 notes
Last Seen Blogs