#i got so excited about the composition and the moon I forgot It was supposed to be a recognizable oc LOL
Photo
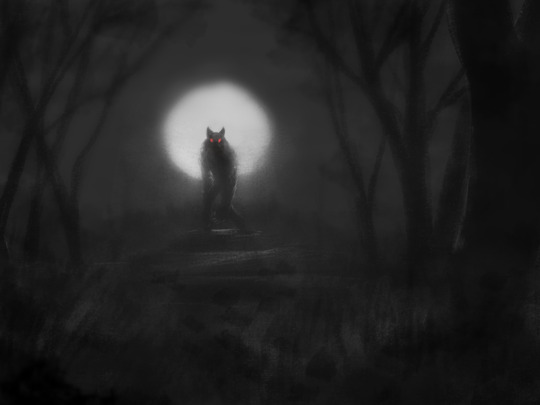
Day 20 - Werewolf
#It's just a werewolf today#i got so excited about the composition and the moon I forgot It was supposed to be a recognizable oc LOL#reimagineOCtober#art challenge#halloween#werewolf#illustration#digital art#30 minutes#photoshop#tw scopophobia
34 notes
·
View notes
Text
Roald Dahl Project: Animation
17.12.18
Now moving onto the animation part of this project. I, of course, did this all in After Effects, and I was excited to get started on bringing movement to my creations.
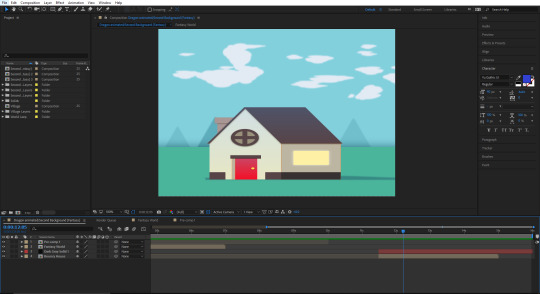
To start with, I opened up the first scene and arranged the layers accordingly, all two of them. Those were the clouds and the background layer. The clouds were very easy to animate, though I did find out that unfortunately, everything that is off the composition is cut off, so I was forced into moving the clouds further off the screen, so that there’d still be some movement without them just abruptly cutting off when they reached a certain point. I set a position key frame, and moved the clouds about four steps to the right using the shift key. That was it for the first scene. I had no text to add, and no girl to animate yet. I suppose, in retrospect, I could’ve made the shadow a separate layer, so that it would move with the girl, but then again, I didn’t plan on having the girl move up and down initially.

Next was where it got a little more advanced—the fantasy world scene. I started with the clouds, since I knew they’d be the easiest. I did the same as what I did with the first scene’s clouds, except in reverse. With the foreground clouds, I moved them in the direction of the first scene’s clouds. This was to give the effect of the clouds circling the Earth, which I think I pulled off well.
The next part of this scene was to animate the castle. To do this, I just set around 6 position keyframes throughout the scene’s duration (on the castle) and moved the castle up and down, which looks quite subtle, but that was my intention, so I pulled it off well in my opinion. Looking back, I should’ve put the waterfall on a separate layer, so that I could animate it, somehow.
Lastly, for this scene, I had to animate the dragon in the background. This was full of experimentation and trial and error, and even in the end, I’m not completely happy with the result, but I think that it was the best I could muster. I firstly had the dragon move from off the screen to the right of the castle. This was easy enough, and I also made him rotate slightly as he moved upwards. I brought him to a stop here, and then had him move behind the castle to above the Earth (not actually, but from this angle, it looked like that). After that, I had him move upwards to the left of the moon, and then move down at a steady pace off screen. The part where he moved from above the Earth to the moon was very tedious after I just couldn’t get it right. I tried to get it to move as fluidly as I possibly could, and of course, I used easy-ease, and this helped a lot, but I still couldn’t capture the movement properly. After a while of almost frustrating attempts, I did manage to get a whole sequence that looked fairly fluid, though it does look like he is slowing down at some points.

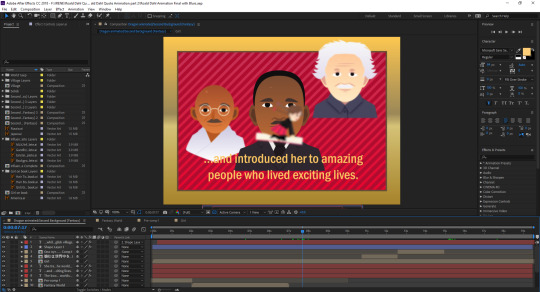
Now for the next part of the animation, the influential people. I already had some ideas in the back of my head of how I could make them move. One of these was to have them roll onto the screen like how it would look if you won a jackpot at a casino. I tried to animate this but I couldn’t really portray it how I wanted to. I tried duplicating the characters and have them all above the screen and then when one would go off screen at the bottom, the next one would roll across. I just thought that this was not worth doing, since it took a while, and even with my experimentation, I couldn’t get it right. I just implied that I have them all on separate layers, which I did once I realised they were all on the same layer, when I was organising them.
My other idea, and the one I would be sticking with, was to have each character sort of bounce onto the screen. I would be putting the squash and stretch principle to use. This was quite trial and error-y, and took me a while to produce a result that I was happy with. I made MLK appear first, and then Gandhi, and then Einstein (in no particular order of favouritism, I just decided I wanted it to go like that). So I added scale keyframes this time around, and each time MLK went down the lowest that he could, he would move slightly down, which was how I incorporated the slow in and slow out principle. Then when he went back up from his bounce, he would do the same thing, until there was no movement left, and it looked like jelly (you’ll get what I mean if you look at this scene in the final animation). I did the same thing for the other two, but with slightly different sequences—I think Gandhi had a smaller amount of bounces, and Einstein had a little more movement than MLK did. I actually tried animating the head so that it would move when they were bouncing too, which involved me making it on a separate layer, but it just looked strange so I dropped it (not literally).
Another thing I did was when I finally got around to animating the girl—I needed to make the characters blur out in the background so that the girl would be clear in the foreground (again, you can see what I mean if you watch this scene). To do this, I simply added a gaussian blur to the characters, and made the girl also have one, because she too would appear blurry when I wanted to put focus on the background. I made the keyframes align across the different layers, and just altered them accordingly to give the effect of a camera focus shift. This was something that I wanted to do in an animation that I did about seven months ago at the time of writing, but couldn’t get right. I’m pleased with how much progress I’ve made in such little time. Here’s a link to the animation that I made with the timestamp at the part that I’m referring to: https://youtu.be/XHsnJvmbg5w?t=2.
It was now the time to animate the final scene in the animation—the “English village” which again, is less a village and more a singular house. For this, I already had an idea in mind, and that was to have the house bounce up and down much like the influential people scene. This was because the girl would be sort of landing in the house at the end. I wanted to portray that kind of effect in games, where a character would go over to an item, and it would just pull towards them like a magnet, I did this type of thing but with the house. To do this, I just did pretty much exactly what I did with the people, added a keyframe that made them move slightly down or up when the bounce reached its height or lowest point. This was on a bigger scale, so I needed more bounces this time around, and so it really looks like it just comes to a stop after bouncing so many times. Of course, this was definitely making use of the exaggeration animation principle, since this would never happen in real life, unless you’re on a bouncy castle—which now that I think about it, it looks exactly like one...
For this final scene, I also had the idea to have the screen fade out to black, to give the effect that it was the end of the story. This was actually the first time I looked up a tutorial online for this, and it was fairly simple actually, I probably could’ve figured it out had I gone at it enough times. But it was helpful, so I am appreciative of it. Here’s a link to the tutorial: https://www.youtube.com/watch?v=c5cLptQ6EDw. Essentially, all I had to do was make a black solid shape and put it over the scene, and then I would add some opacity frames on it, and have one set at 100%, and one set at 0%, at the end where the black would fade in. Here’s what I’m talking about: https://youtu.be/WmPHWqFPyOE?t=17. That was it for this final scene.
Now I will be going over how I animated the girl as well as the text in my animation. Okay, so first of all, the girl, because that is what I did first. I started by placing her in the center of the screen, and then I made her stretch across the entirety of the animation (until I got to the end part where I would be having her disappear into the house). I also made sure her anchor point was centered on her, since I thought that would be the optimal position, and luckily, my judgement was correct. So, before I get into how I animated her, I needed to also make sure that her pigtails were connected to her hair, but not part of one layer—to do this, I had to parent both layers to the layer that the rest of her was on, which I did by dragging the swirly icon on the layer panel on the bottom left to the middle layer, that she was on.
Okay, so ignoring the pigtails for now, I needed to animate her so that it would look like she was moving forward, and to be honest, ultimately, you may mistake it for her simply floating, but I couldn’t really think of another way of portraying forward movement. I essentially made it so that she just bobbed up and down a bit, like what I did with the castle in the sky, but a lot less linear, and more random. I just added keyframes to the points which I wanted her to reach, and added easy-ease to make it look fluid. I kind of forgot to mention them, but I’ve been adding easy-ease to all of the things I’ve been animating, including the influential people, the house, and even the gaussian blur that I added to the influential people scene.

Another thing I did was to have her rotate a little, since it was shaky, and there was probably wind or something, so I just rotated her a bit using rotation keyframes, and added easy-ease to them. It was smooth sailing until I reached the Japanese flag, because I needed to have her move to the very top of the screen in time for her house to show up, so I had to start early. I had to get a sequence right where she aligned with the bottom of the scene during the Japanese flag, and she would then use the time during the Russian flag to move to the top. This sounded easy enough, but the movement just didn’t want to work with me, as soon as I made her go from the bottom all the way upwards, the movement just kind of jumped, and it looked really out of place and awkward. For the life of me, I just couldn’t fix it, even the graph editor didn’t help in this situation. Eventually, I did fix it, but I had to compromise some of the bobbing up and down before she got to the Japanese flag, so it would allow for more time for her to move up, which still doesn’t look perfect or how I wanted, but it will have to do. Here’s a link to that: https://youtu.be/WmPHWqFPyOE?t=10.
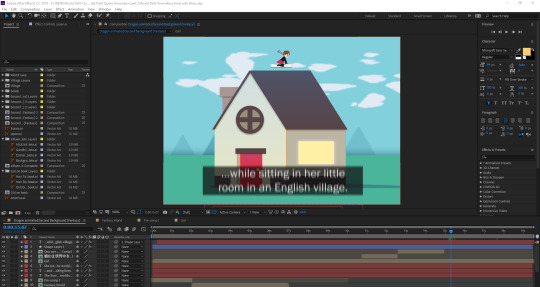
When she did get to the house scene, she was at the top and ready to be absorbed by the house. I made her slightly shrink while she was moving upwards, which I did using the scale tool, and then when she was moving into the house, I made her scale all the way to zero the moment she reached the point where the house bounces. I think I kind of portrayed the effect I was going for, but it also does look a little off still. Finally, the pigtails, which were pretty fun to animate, because I kind of had free reign over how I wanted them to move. I also made sure that the anchor point was right where they started, on the back of her head, so that when I wanted to rotate them, they would move exactly how I wanted them to. I essentially made them move upwards when she moved upwards, and then down etc. etc. This looked pretty solid in my opinion, and kind of like how it would work in real life.
So finally, I had to animate the text, which was fairly easy, but there were still some complications. To start with, I had the first line of the quote; “the books transported her to different worlds” simply move onto the screen using position keyframes and easy-ease. Nothing extravagant or special, just basic movement (mainly because I couldn’t really come up with something good to do with it). The next part to animate was; “and introduced her to amazing people who lived exciting lives.” Again, all I did was have the text come from the bottom as soon as the text from the last scene went off screen. Simple but effective, I thought. I made the text yellow, because really, no other colour worked, literally. White blended with Gandhi’s robe, black, with MLK’s suit, that and it just looked bad, and every other colour because it didn’t fit with the theme. Yellow was perfect, since you could see it over everything, and it also corresponded to the golden border on the scene.

Now, as soon as that text disappeared, I made the next text come into play. “she travelled all over the world”. I had it start by moving up into the screen much like its predecessors, and coloured the text according to the flag that was above it, red, white, and blue. I wanted to transition the text into the next text in a different way, so what I did was have it scale down immediately by 90% and then immediately again to 0%, this was making use of the slow in and slow out principle again. I did the same thing with the next text, which happened to be all Japanese, which I thought was a good idea. It says roughly the exact same thing as the quote did, but in the language of the flag above it. I hope that the ellipsis at the ends of the text indicate that the viewer isn’t missing anything by it being in another language. I followed the exact same formula for the the Russian text, in movement and in language. The transitions all looked super smooth in my opinion, and I’m very pleased with how they turned out. See the screen shot below. I gave the text for these segments a force motion blur, by the way, which is why the screenshot looks blurred.


Finally, the text for the English village scene. For this, I had the Russian text scale down to 0%, like I mentioned, and then had the text for this scene appear almost immediately, on a black, transparent block. This was because, this time, no colour really worked well. I made the box using the solid shape tool, and resized it to fit the part of the quote; “while sitting in her little room in an English village”. I lowered the opacity of the shape, and parented the text to that layer, so I could move them both at the same time. What’s interesting is that I made them look like subtitles, with the black square around the text.
Well, that is the end of my animation and assets creation process. I really didn’t intend to write this much, so I’m sorry for that. But, the more the merrier, right? Very fitting for this time of the year, I’d say.
0 notes
Last Seen Blogs

rose-apposee
Alxce
isrra-el
Mujeres amputadas
the-friendly-entity
The Shy Entity


exmovibes
Ex-mormon