#i'm not used to photoshop running so quickly lmao
Photo


#mine#doctor who#dwedit#david tennant#catherine tate#GUESS WHO'S BACK IN ACTION#hello friends!!!!!! i haven't made gifs in so long#i was away for most of july#and before that if you remember my laptop's usb ports died on me#so today i got myself a new laptop!!!!!#it's so shiny and new and fast compared to my poor 8 year old laptop#i'm not used to photoshop running so quickly lmao#also now that i don't have my old gifs on this laptop#you're probably gonna keep seeing me say that 'idk when's the last time i giffed this'#just warning you l o l#ok i think that's enough tags#good night friends!!! :D
1K notes
·
View notes
Text
someone sent in this ask and I spent literal hours putting together this tutorial but then it wouldn't let me post it and when I went back into my inbox the ask was gone?? good thing I copy and pasted it, so here it is in its own post
I'm not sure if this will work with programs other than photoshop, but this is how I do it. I know @shinobi-bacon has a tutorial here on how they do it which is pretty different from the way I do it, so if my tutorial is confusing maybe theirs will click with you better lmao. I stole the greenscreen idea from them anyway
SO FIRST, you want your villager on a green screen background. to do this, go to harv's island and use a custom pattern to make the walls and floors bright green. If the villager you're using has green in their design, you'll have to pick a different colour that isn't in their design, but for most villagers green is fine.
if your villager has every colour on them like pietro or stiches then rip you're gonna have to do some manual editing frame by frame. try to choose a colour that doesn't touch the edges of their silhouette too much in that case because it'll make life easier for you
so once you have them in green purgatory, record them doing their emote or whatever. I just use the built-in screen record function that the switch has. press and hold this button to record the last 30 seconds that your switch displayed:

next send that video to your computer and trim off the start of the video so it starts right before a recognizable part of the animation. for this emote I cut it off right before the blink. if you have a slow computer, you'll probably want to trim the end off too so the video is only a little bit longer than one full animation loop
(you can use the video editing software of your preference, I just use quick time player Edit -> Trim)
okay time for photoshop. go File -> Import -> Video Frames to Layers
for "range to import" select "from beginning to end" (or you could skip the last step about trimming the video and select a range here, but I find it kind of finicky), and make sure "make frame animation" is checked
once imported, if it doesn't pop up on it's own, go Window -> Timeline to get your animation at the bottom

click through those frames at the bottom until you find an easily recognizable frame (I chose the first frame where her eyes are closed) and delete all the frames before it. in the layers panel, the layer from the frame you've selected should be the only one turned on. delete all the layers below it
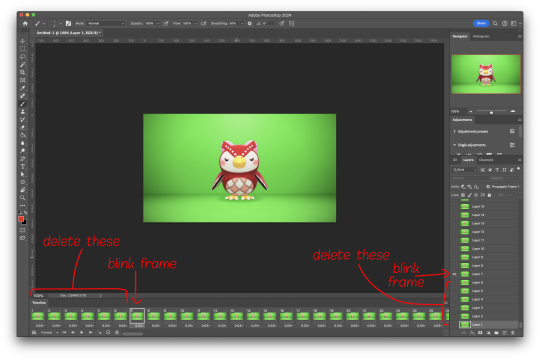
now go through the frames to find the next identical frame. this is where the animation loops. delete that frame and all the frames after it, as well as all of their corresponding layers (note in the picture, frame 121 is selected, and it's exactly the same as the frame from the start of the animation)

hit the play button on the bottom left to double check that it loops properly
next, make sure both THE FIRST FRAME AND BOTTOM LAYER are selected, and crop and reduce the image to your desired size. you can do this step later if you want, it's just that doing it now will reduce the load on your computer and make it run a bit faster. just as long as the first frame and bottom layer are selected, you can do this at any time
SAVE HERE because if you mess up this next part it's a pain to fix, but it's easy to quit and start over if need be
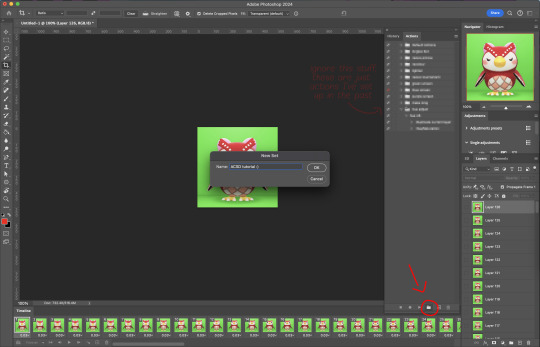
now it's time for my best friend the actions panel !! say hi actions panel !! (Window -> Actions). what the actions panel does is record your steps so you can quickly automate repetitive tasks.
in the actions panel, click the folder and name it whatever you want
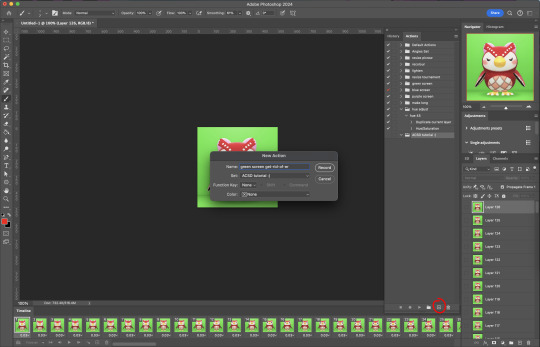
then click the little plus and name that whatever you want and hit record. You'll see the dot turn red to indicate that your actions are now being recorded
now with the BOTTOM LAYER AND FIRST FRAME selected (ignore that I have the wrong layer selected in the pictures, I fixed it after), go to Select -> Colour Range

click on a part of the canvas that would be green

shift+click on the rest of the green background and adjust the fuzziness until just the character's silhouette remains
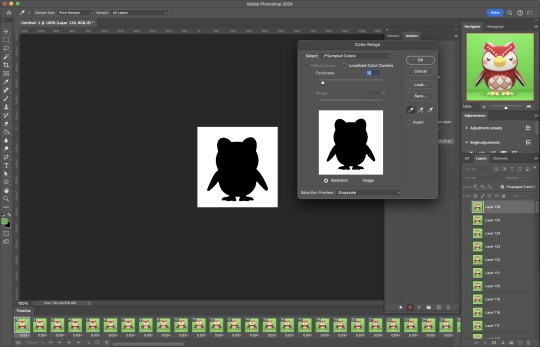
hit OK, now the background should be selected. go Select -> Inverse so that the character is selected, and click on layer mask.
click the next frame button (you MUST click the button, not the actual frame. you need the recording to recognize "go to next frame" and not "select frame 2"),
then keyboard shortcut option + ] to select the next layer up (again, you MUST use the shortcut so it knows to move up one layer and not just "select layer 2"),
and then stop recording.
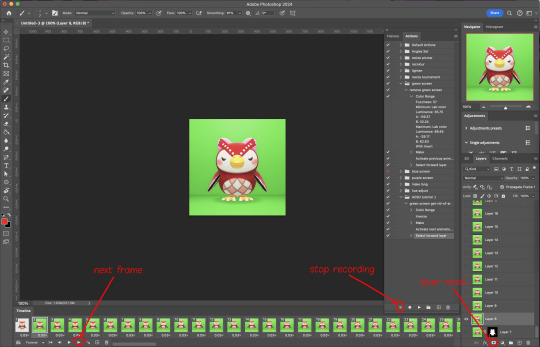
now just repeatedly click the play button and it will do all those steps we just did for each frame :)

this part is usually where it gets messed up for me. if it did something weird like duplicate the same frame or layer your animation over a static frame, just quit and reopen that save I told you to make earlier. the action recording you just made will still be there when you reopen photoshop, so just select the first frame and bottom layer and repeatedly hit play again. if it STILL doesn't work, you probably did something wrong
the recording is now saved in photoshop forever until you delete it, so you can reuse the recording for other gifs! but if they use a different colour background, you'll need to make a new recording (you can see I have separate ones for blue and purple screens). also if you were working with one of those colourful villagers and parts got masked out that shouldn't have been, you'll have to go frame by frame and manually fix them. that's why we masked out the background instead of deleting it.
now it's time to make it into a gif! go File -> Export -> Save for Web. make sure Matte is set to "none" so you don't get those weird white flecks. colours and dither you want as high as they can go, but you can lower them if you need to make the file smaller (though I'd recommend resizing the image smaller first). the bottom left shows your file size. currently as of January 2024, tumblr allows gifs of up to 10MB
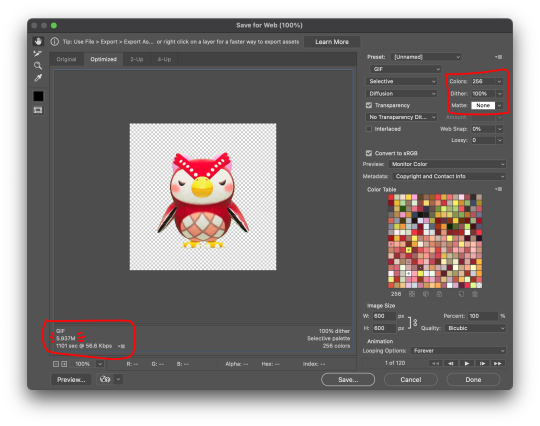
and there ya go! gif! :)
61 notes
·
View notes
Text
got my income for the month the other day and after 6+ months of not being able to make digital art the way i'm used to with my specific accessibility needs because of physical health symptoms with my hands, i was finally able to buy myself a new Paint Tool Sai license today, since a little while back i successfully installed an optional Windows 10 operating system on my Macbook (Sai doesn't run on Mac, at least not Version 1 which is what i need and have been using for over a decade) that i can switch back and forth between whenever and i am so so so so happy and relieved about it and so fucking excited to get to draw digital lines the way im used to drawing them after trying so many other similar programs and failing to find anything that worked exactly the same as Sai's basic built-in pen stabilizer 😭😭😭😭😭😭
i was able to quickly test out my (also ancient lol) art tablet with it and make sure everything works and it doesnt lag or anything like that and its perfect its exactly like i've always used it, i remembered which pen stabilization number setting i've been using for years and like.
dude. i know i sound dramatic right now LMAO but i CANNOT sketch or draw properly on traditional paper or sketchpads anywhere near what i can do in Sai because of all my tremors and shakiness and sudden muscle movements that make accidental lines and all that. and when i drew just one regular brush stroke in Sai and felt it move like im used to and got that super smooth sensation of 'pretty much just drawing like im holding a pencil/pen but with the shakiness of my lines improved'....almost cried a lil not gonna lie fjsgdgsgdhsgshf its been so many months and i've put so much mental energy into researching how to do that whole windows installation on my 2012 era macbook and somehow did that without completely messing it up and then having to wait until a month where i have enough extra money to buy the official version (Sai is so important 2 me and the most accessible digital art program i've ever used for my specific hand problems and i've used it for so long that i am only comfortable using the officially licensed version of it, yknow?) and also theres just something so nice about finally being able to use it again a few days before my birthday even though that timing wasn't on purpose...
AHHHHH im just so relieved. i feel like im free to just be able to make sketch pages and draw stuff whenever i have free time to and i have an idea in my head again and i havent felt that in so long and it was making my depression so much worse....and also because i've been doing my best to adapt to the similar but different settings in Clip Studio Paint, i have 2 really nice digital art programs with a lot of cool and useful features between the both of them now that i can use to like, mix and match with my art!! which is awesome!! i think Clip will mostly be used by me now for more graphic design type projects since Sai's always been my core art program, but i'd love to experiment with drawing/sketching/painting pieces in Sai and then plopping them into Clip and adding some extra fun effects or background elements or even just easier to repeat patterns with its' huge free-to-use resource library for like stamps and texture effects and more photoshop-y things like that.
ANYWAYS!! im just rambling to myself because im so happy and relieved to have My Art Program back so i thought i would share since its rare for me to feel as happy and excited and get some sense of normalcy back in any capacity these days, being immunocompromised and stuck in my house as long as i have been the past 3 years and counting. it has been a good amount of time since i've felt like i have A Victory To Celebrate and i hope that feeling lingers as long as it can 🥹✌️
2 notes
·
View notes
Last Seen Blogs

thegot7network
THE GOT7 NETWORK

candiderz
Untitled
improvnonsense
Improv Nonsense
malefeetislife
MALE FEET IZ LIFE
daimonclub
Daimon Club Organization