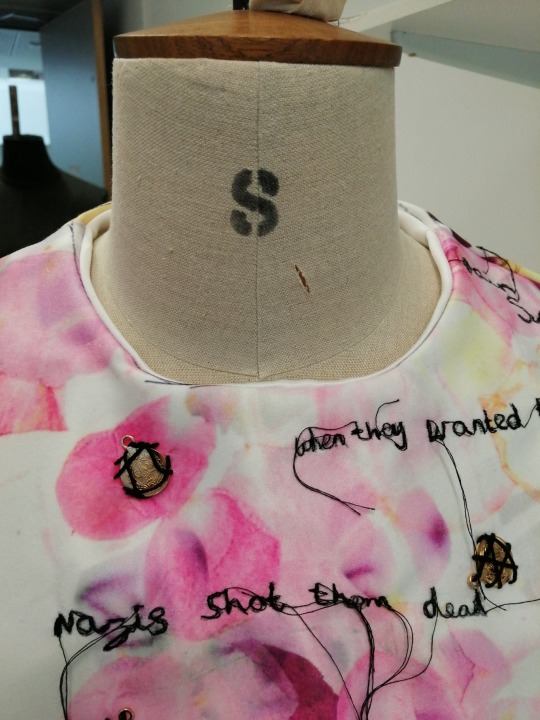
#originally I was going to just embroider the neckline but I decided to include all of the reasons he was a walking red flag bc why not
Text

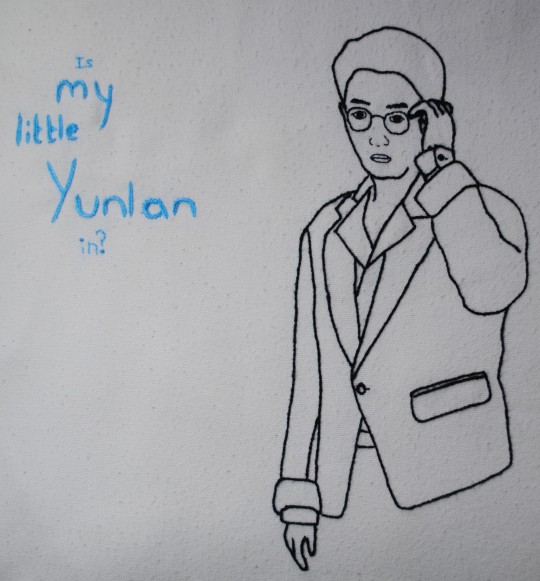

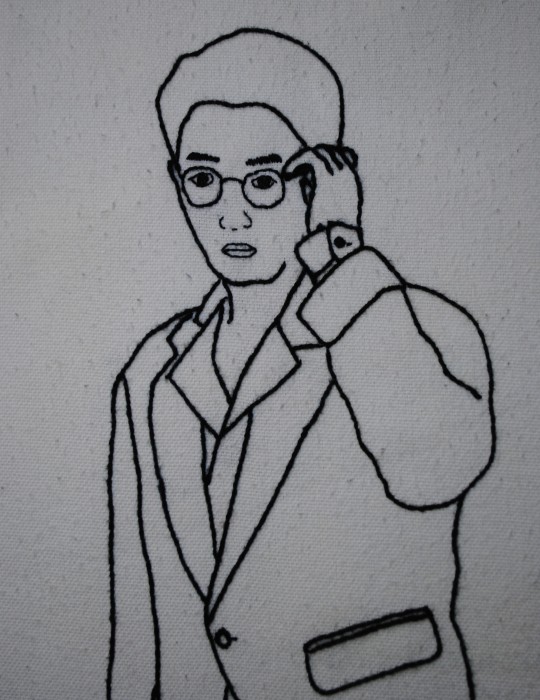
The October bonus prompt is Costume/Disguise so how could I not immortalise the world's worst Shen Wei cosplayer through embroidery?
#guardianbingofest#ye zun#embroidery#zhenhun#guardian#twabbbiih made a thing#guardian cdrama#he literally has the same face as Shen Wei and yet he retains the title because wow does he not know his brother#we're all going to ignore his right hand okay? the screenshot cut off there so I had to improvise#let us count the ways he failed terribly 1. that neckline 2. that way of adjusting his glasses 3. my little Yunlan#'Ye Zun failing to fool us into thinking he was Shen Wei bc his collar was too slutty' - mid-n0vember once again coming through with inspo#smarmy and a little bit slutty is such a wonderful description of him#originally I was going to just embroider the neckline but I decided to include all of the reasons he was a walking red flag bc why not#the way he thought Shen Wei had a thick enough face to call ZYL 'my little Yunlan' to his COLLEAGUES. wild.
28 notes
·
View notes
Text
Final and additional experiments
Hand embroidery (early sample)
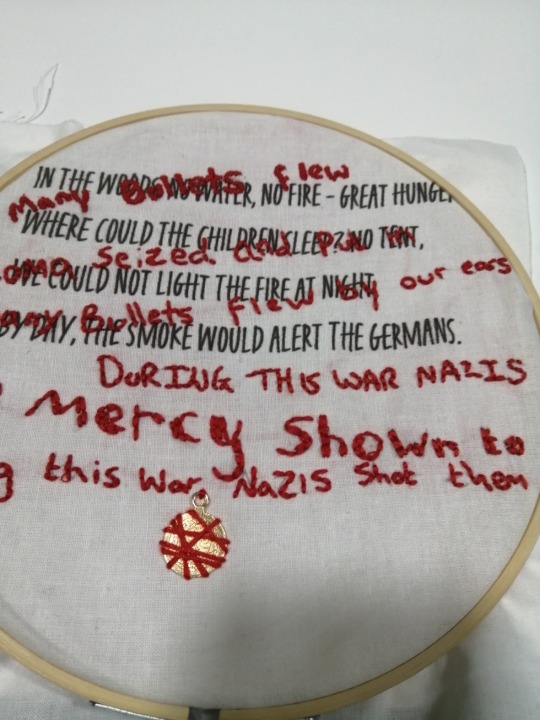
This sample took a long time to do, perhaps 5 hours causally on and off which is already far too long to be worth doing for a final piece. For this experiment I wanted to layer the printed text with some embroidery to make the piece crowded and uncomfortable which I believe it successfully did do. Aart from time being an issue moving forward another issue is it is a bit too neat, while I wanted to hand sew so that It would be personal I and to be a bit freer with the text, when I hand sew it feels like it had to be perfect when I would want my text to be rougher to show a quickly written note, not a neat perfect note. Because of this I will try to use machine embroidery, I will have a lot less control of the machine which should help me create a rougher piece. On this sample I also tried out embellishing a gold coin onto the fabric, this worked but I will push it further in a future sample and experiment more with how much of it is covered and showing.
Advanced embellishments
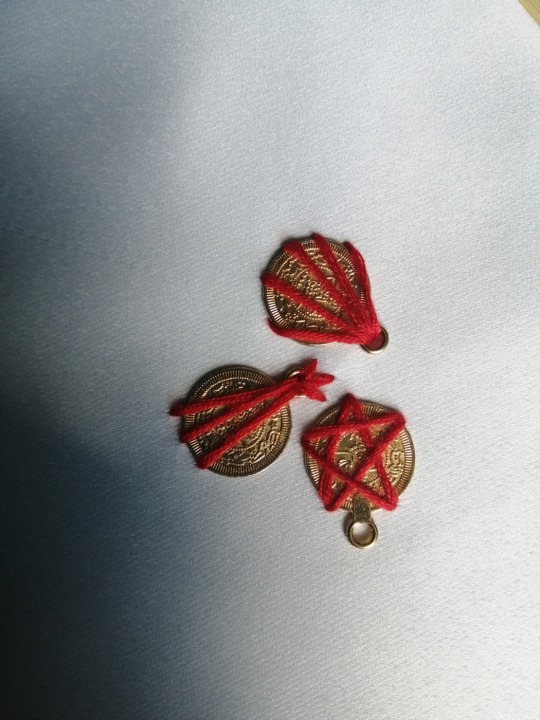
Here I pushed what I did in my last sample further, I tried a few methods of getting the coins stuck onto the fabric, one of them is too neat and uniform I want them to be freer and much more random, they must be secure so that the coins don’t fall out but also have enough of the gold showing to make it obvious what it is which this sample shows well.
Machine embroidery
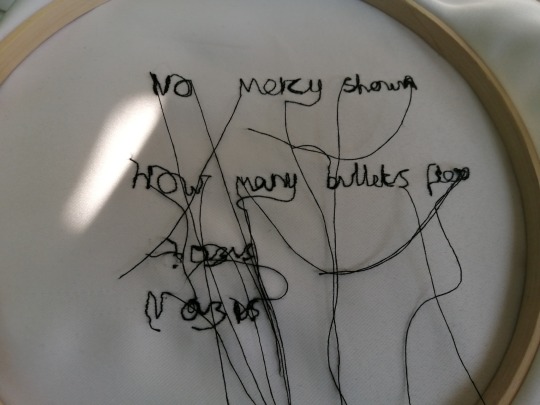
I wanted to basically recreate what I did by hand on the machine, this was a lot freer and rougher like I predicted but it was also a lot faster which will be a huge benefit going into my final making weeks. I will maybe write a bit smaller on my final as the text seems a bit large and maybe too legible right now, however this is easily fixable In my final.
Overlaying fabric choices and experiments.
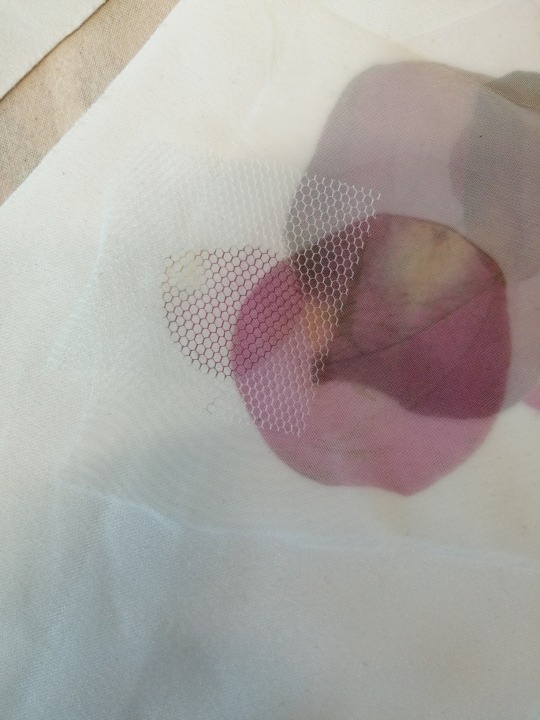
I have 3 main options for an overlay fabric, netting which is white and has small but obvious holes in it. Tulle which would be either off white or white which is see through all over, soft and delicate or organza which is finer than tulle but less soft while keeping the delicate nature. I want to try the hand applique and sublimation printing on each fabric to test the use of these fabrics and weather they are useful for my final garment. The fabric has to show layers well as that is the intention for the final and it needs to take well to being hand embroidered on to be useful on my final.

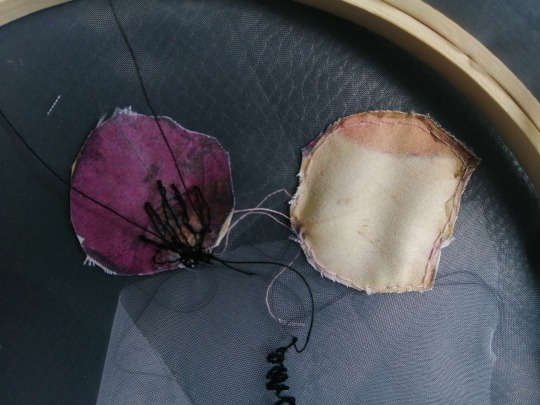
The netting and organza took well to he hand embellishing, the method for hand embellishment which would be most delicate is when I sew only a small amount of the petal instead of going all around the petal with stitching, this still holds the petal without being bulky and ruining the look. This will also leave the petals hanging a bit which goes with the petals falling idea for my final. The tulle did not take well to the embellishment so it is knocked out of the running. Next I printed onto the 2 remaining fabrics, an idea which only occurred in the print room, both are synthetic which is good as technically the dye should stick but I was concerned that like with the big green nets that I put through the press a few weeks ago I was concerned that the fabrics would shrink or melt. However both of them did well when I put them in initially just to flatten them out, next I printed petal emblems on them. The netting had an interesting effect as there are considerably big gaps between strands it created and interesting negative space appearance which was not what I was looking for. The organza however did very well, it was delicate but oddly bold, you can layer more than one on top each other and it creates an effect with a lot of depth.


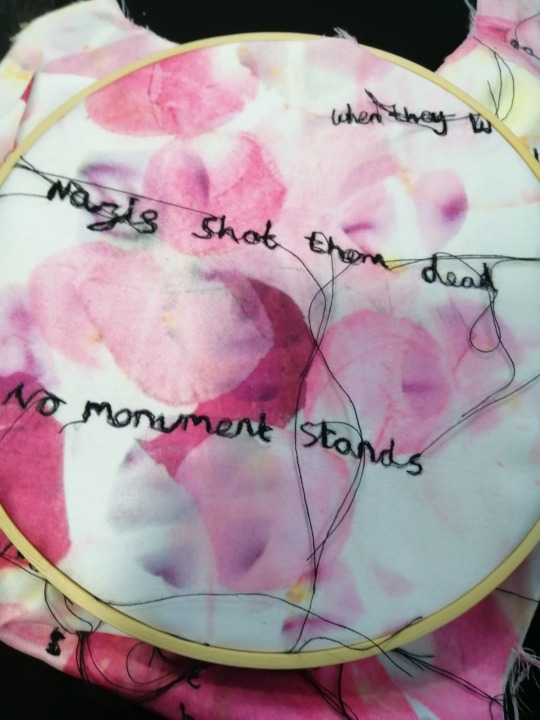
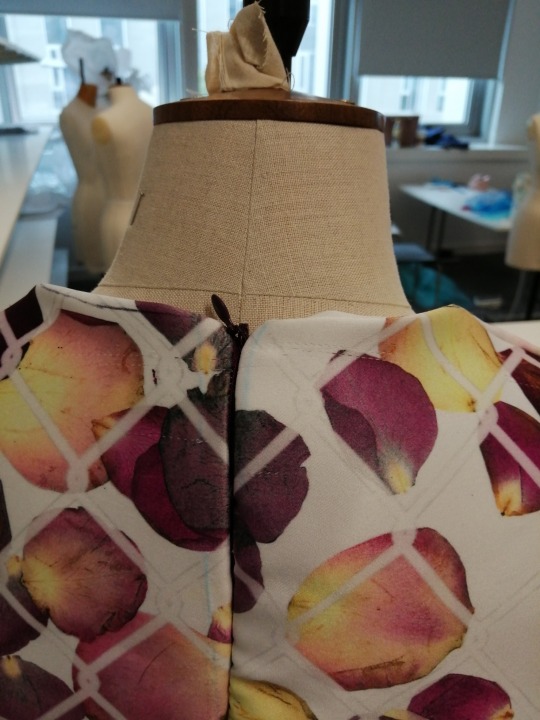
Final piece.
Making
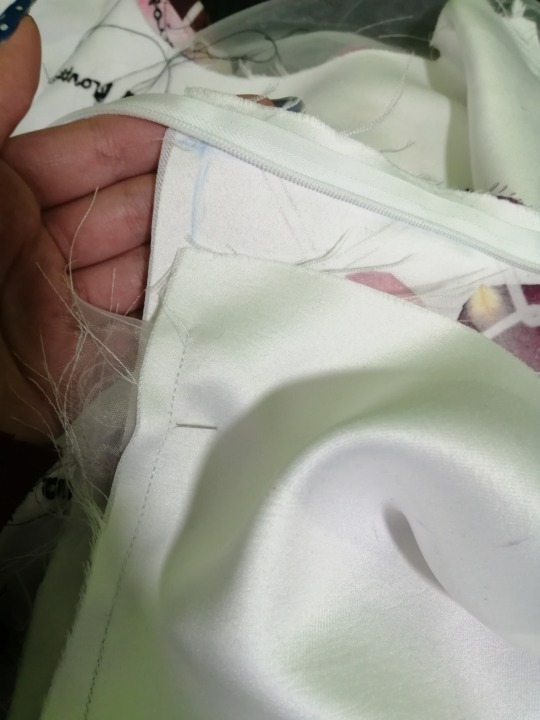
What I thought would be a small task ended up taking 4 times as long as I thought it would. In practice I didn’t come across any major issues but when it came to the final everything went wrong.
The bobbin kept catching on itself which lead to a build up of thread on the inside of the garment, while this isn’t an aesthetic issue it did create some technical issues as the needle struggled not to get caught on it, this made the lettering a bit rougher than intended but as the idea of the text was a bit rough looking it isn’t too noticeable. To cover the roughed up fabric from the unpicking I add words over it so that is isn’t obvious that there is faulty fabric underneath.
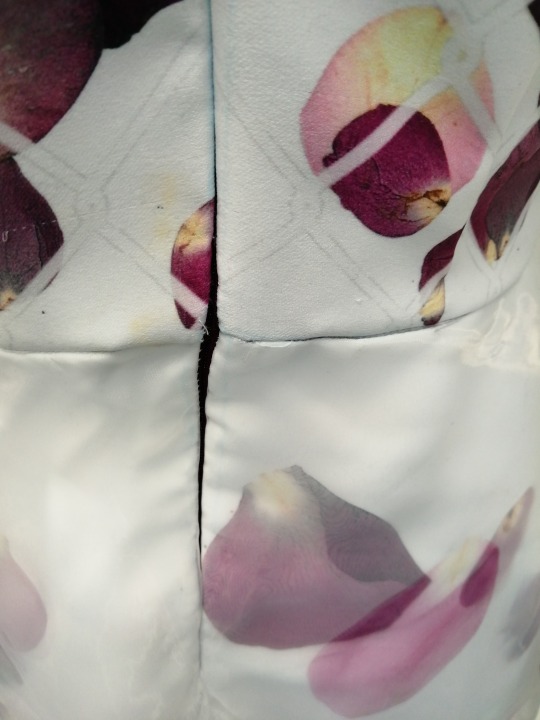
A mistake I made In the final which didn’t happen in my samples was a oversight on my behalf, I sewed the top right of the bodice to the middle thought the embroidered lettering, this ruined the fabric when I unpicked it, the unpicking took about 2 hours as it was detailed and layered stitching which is not easy to undo especially when working with the fabric I was using. This set me back a day so I took 2 days of work (on and off) to finish the bodice machine embroidery. After that getting the machine embroidery done it is time to add the embellishment by hand, I add several gold coins wrapping in dark thread spread as randomly (and strategically) as possible to make it look natural and not have one side too gold heavy.


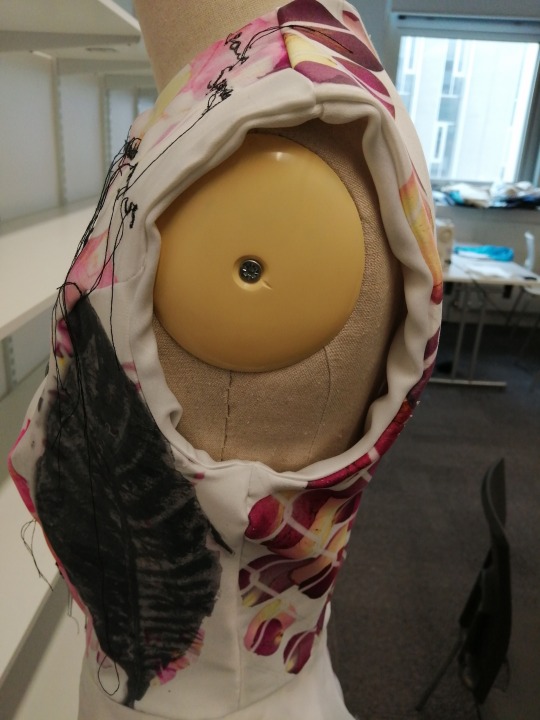
With the front panel of the bodice done I added the invisible zip into the back 2 panels before sewing the bodice all together (I will find out this is a mistake in the future) with half the zip in I then sew the darts for the back pieces and sew the bodice panels together, once this is done I do the same with the skirt panels. After the skirt panels are done I add the overskirts to the base skirt at the waist. Once that is done I am ready to attach the skirt to the bodice.
I notice that there is spare fabric in the bodice and it wont fit into the skirt, I thought I would overcome this by making sure I used my full seam allowance for the bodice however this didn’t solve this issue so I made the darts in the back panel bigger to use the extra fabric. Once I added the waist seam I then tried to add the bottom of the zip to the skirt which should have worked in theory however it was time consuming to make it match up and fit, it didn’t help that I was using a straight foot to sew the zip in instead of the zipper foot, the zip broke and I had to take it out which took a long time and messed up the fabric (as previously mentioned the fabric doesn’t take well to being unpicked) I decide to wait to see my tutor before putting another zip in and move on to the hem of the skirt, sleeves and neckline. While it pins flat, when I sew it all the hems pucker a bit (quite majorly on the neck) and I decide to hold off calling the garment finished until I can confer with my tutor.
Friday 14th May 2021.
14th of May
Friday schedule.
10-12 industrial machine induction.
12-1 overlock seems and organza.
2-3 add zip
3-4 facing for neck and sleeves.
4-5 sketchbook printing
5.30-7.30 blog write ups, plan sketchbook pages and scan in finished sketchbook pages ready for final submission.
Of this list I achieved everything before 3pm, I also had help from the pattern cutting tutor to make a facing for Tuesday, I will cut the fabric over the weekend and I will bring it in on Tuesday so that I can be taught how to add a facing. I didn’t get any sketchbook work done but I will prepare images to print on Tuesday. I have also managed to scan the first few finished pages in ready to be put on the pdf.
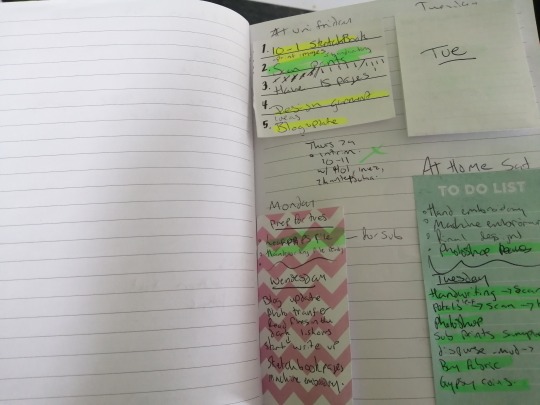
Additional planning
To insure l stay on top of everting l make sure to makes small manageable lists to help motivate me and keep track of what needs doing and when

Finishing’s.
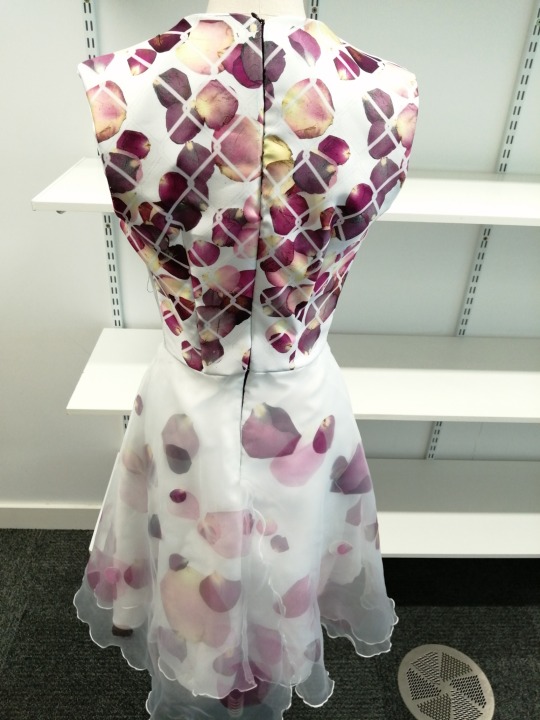
As the edges were rather rough after a talk with the tutors we decided to overlock all the edges which meant undoing the original hem and we also added another invisible zip where the first one broke. After this was all done the piece looked a lot cleaner. In future I would overlock all edges on the inside of my seems and hem edges, this stops fraying and gives a clearer finish.
As my organza layers frayed a lot too I had those overlocked, the effect is prominent but it adds to the design. The effect of the overlocking is that the edges of the organza looks like a flower petal which matches the rest of my floral themed garment, the overlocking didn’t make the piece look too bulky as it was done on the mini overlocker which sews smaller. The stiches didn’t add too much weight to the hem either meaning the layers still float and are not held down by the hem which was another worry.
Last 2 weeks detailed schedule.
Friday 14th – After university – plan the next few weeks. Add to final evaluation.
Weekend – mostly blog and maybe look for photoshoot locations.
Saturday 15th – Blog day. 4 hours at least of intense blogging. Upload sketchbook pages to tumblr. Cut out facing.
Sunday 16th - 2 hours of blog making changes as discussed with tutors and 2 pages of sketchbook plus plan a few sketchbook pages.
Monday 17th – Official photoshoot plan with write up to back up decision. Prep images for printing for sketchbook.
Tuesday 18th – Get Paula’s help with sewing the facing in. Photograph final garment on mannequin and maybe shoot in front of university if there is a suitable location. Print images for sketchbook and scan in more pages for pdf.
Wednesday 19th – Food shopping so not much university work.
Thursday 20th – Photoshoot if not done. Finalise evaluation. Finish sketchbook.
Friday 21st – Edit final photos. Hand in all physical work if done. Work on blog.
Saturday 22nd – blog
Sunday 23rd – blog
Monday 24th - hand in digital.
Making continued
Tuesday 18th

I sewed the facing in, had the hem finished, had the last of the seams overlocked. This was a fairly quick process. Now it is done i can begin to properly prepare for my photoshoot.

Most of my blog was finished yesterday at home so today i printed images for my sketchbook and i will hopefully get around 5 or so pages done by 10pm tonight including pages with fashion roughs.
As for the rest of the week l will take a break on the Wednesday part from doing the photoshoot. Thursday l will make progress on m sketchbook and prepare printing for my sketchbook to do on Friday. On Friday l will hand in my final garment and final sketchbook after scanning it in ready for my digital submission which l will have ready for Monday.
0 notes
Text
Ahoy there and welcome aboard the ship!
The blog is a lot of fun these days and I am always excited to put up new content. Today is a movie review day and what better movie could be here than the record-breaking wedding flick, The Wedding Party!

Name: The Wedding Party
Year of Release: 2016
Studio: EbonyLife
Cast: Adesuwa Etomi, Bankole Wellington, Sola Sobowale, Ireti Doyle, Richard Mofe Damijo, Alibaba Akpobome, Somkele Iyamah, Eyinna Nwigwe, Daniella Down, Ikechukwu Onunaka, Beverly Naya
Director: Kemi Adetiba
Synopsis: As their big day arrives, a couple’s lavish wedding plans turn into a nightmare that includes exes, fighting parents and uninvited guests.
[insert spoilers ahead logo]
If you don’t know The Wedding Party, I suggest that you open your Netflix account and watch it ASAP. This is one movie that actually shows how a typical Nigerian wedding runs and I for one, was amazed at how much I could relate to some of the events which unfolded over the course of nearly two hours.
A BIT OF CONTEXT:
In Nigeria, weddings are huge, all-inclusive family affairs. No matter your social standing, when you’re getting hitched, expect to be throwing a carnival-like bash for your family, friends, church members, long lost relatives and the assorted ‘mogbomoyas’ (gate crashers). Weddings here are typically lavish and everyone is expected to pitch in any way to support the couple. Regular weddings are like one-day festivals but upper-class weddings can span days and involve several parties happening simultaneously. Everyone is expected to be uniform in the native ‘Aso-ebi’ (family cloth) and appear as a strong unit. Both families usually choose two different and sometimes complementary colors to mark the occasion. As Nigerians incorporate ethnic customs in their weddings, different aso-ebis are often allotted for different parts of the wedding ceremonies. We like to dance and sing and make merry a lot and our weddings always reflect that.
Now, back to the review…
The Wedding Party is a Nigerian designer’s couture dream and I’m not surprised about that as a top designer was hooked for the characters’ costumes. Mai Atafo, a celebrated bridal designer, was behind the amazing looks of the entire wedding party and to be honest, it was something. Bride Dunni’s wedding outfit was a work of art and so were those of the bridesmaids. Maid of Honor Yemisi was stunning in her fuchsia pink gown.
The Wedding Party is not just a story about a couple making it official- it’s a larger conversation about what occurs when two people from different ethnic groups in Nigeria decide to get married. It explores what happens when two different cultures attempt to merge and the friction resulting from the collision. The ethnic groups represented, The Yoruba and the Igbo, are two of the largest ethnic groups within Nigeria’s borders and historically, have not been the best of neighbors. But the film had a larger message, one which resonated with people within inter-ethnic unions- it was possible to achieve synergy. Inasmuch as the bride and groom, Dunni and Dozie were the focus of the movie, it was through their mothers, Lady Onwuka and Mrs. Coker that the story of inter-tribal differences was told. It’s a pretty story with real world consequences written into it.
Story aside, let’s look at the costumes!
Igbo
Yoruba
The first thing to note is the difference between what the families of the bride and groom wear. The bride’s family is Yoruba and the groom’s Igbo (in real life, the actress who plays the bride is Edo and the actor who plays the groom is Yoruba. Also, they are an actual married couple. So you see, life does imitate art sometimes!). This had to be accurately represented in what they wore. Socially, the Yoruba are known as a merry and flamboyant group and though their iros (wrappers), bubas (blouses), geles (head ties) and agbadas (large embroidered overshirts) were not as bright as what I usually see every weekend, the designer still tried to convey the family’s wealth as well as their culture clearly and it was very well done. For the Onwukas, the same appearance of wealth had to still be relayed to the audience. Being an Igbo family, thick embroidered wrappers and heavy beaded blouses as well as statement jewelry had to be the go-to for the mother of the groom and her friends. Although equally as merry and flamboyant as their Yorubas counterparts, the Onwuka family received the toning down treatment as Lady Onwuka’s character showed a clear distaste for extravagant shows of wealth as opposed to proclaiming her family’s riches through snide remarks. Nevertheless, both families were beautifully attired for the movie.
Now, for the bridal party, I’m going to split this up into three groups: the bride and her bridesmaids, the groom and groomsmen, and the exes.
For the bride, Mai Atafo had the wedding gown come as a detachable set consisting of an off the shoulder cape with a cathedral length train and a sleeveless column gown with a bejeweled belt and 3-D appliqué. It was a most daring style, leading the way in changing the way Nigerian brides approached bridal styling. Light, easy and sort of breezy, the gown accentuated its wearer’s slim build, bringing out her form and enhancing it as she moved down the aisle. It was a work of art, the same way the Maid of Honor’s dress was. That fuchsia gown is the ultimate dinner party inspiration, what with its cascading off the shoulder lapel and white diamond-like appliqué. The rest of the bridesmaids had dresses just as good, in fuchsia of course and appliquéd with tiny multicolored flowers.

For the grooms, Mai Atafo did not disappoint. Originally a menswear designer, he put his signature touch in the suits worn by the groom’s side of the bridal party. Unlike in a lot of wedding pictures I’ve seen, the groom and his boys had clear distinctions- black for Dozie and blue for Sola and the rest of the gang. The suits were wonderfully made, adding to the air of refinement these upper-class men already possessed (except Sola. He was a basket case).
Now for the exes. In this area, we need to split it into two parts: Rosie (Dozie’s ex-girlfriend) and Small Chops (Chief Onwuka’s mistress). Both of them gatecrashed the wedding and they made sure they were dressed to send clear messages to the people they came for. Rosie’s reception outfit was a lesson in Modern Bride 101. Daring back cut, layered flounces and an off the shoulder neckline (Mai Atafo must really like off the shoulder wedding gear, phew!) were given to a character who came to upstage the bride on her wedding day. The message of ‘Dozie, you don’t know what you are missing’ was clear and having the dress in white gave it the extra slap it needed when Dunni and Rosie eventually clashed. In that scene, the differences between both women was clear just from looking at how they were dressed: Dunni- sweet, girlish and innocent and Rosie- daring, provocative and evil. That was a fantastic visual contrast and one of the best I’ve ever seen in white. Small Chops on the other hand, came with the intention of disrupting Chief and Lady Onwuka’s peace of mind and she dressed the part.
Small Chops (real name unknown as Chief Onwuka had the original idea of disguising her as finger food) arrived in a goddess-like style. Haltered cowl, empire waistline and a back whose movements would make a wedding veil jealous, Small Chops did what she came to do in style. Unfortunately, her triumph was short-lived and she was pushed out of the gathering before any more punches were pulled. So long, Small Chops- we may not have known your name, but your dress was a front to back hit all the way. Shout out to your fascinator too.
And there we have it, folks- my review of the wedding party and its style moments. In general, much of the story was playing a fast and loose game but it made for an easy, enjoyable and relatable viewing. This is just one Nigerian’s point of view anyway so go watch and tell me what you think about it.
Until next time,
Ciao!

Movie Review: The Wedding Party Ahoy there and welcome aboard the ship! The blog is a lot of fun these days and I am always excited to put up new content.
1 note
·
View note
Text
Have you ever experienced textile love at first sight? I have, and the object of my desire subsequently led me on an embroidery pilgrimage through Guatemala.
It was 2018: our first ever tour of Mexico had just finished. As part of the tour, we had obviously seen a lot of textiles and specifically, Mexican huipils. I thought I had seen all the huipil designs one could ever imagine. But then I wandered into one shop and saw something completely new to me. A purple and lilac striped huipil with incredibly intricate hand-embroidered birds perched around the neckline. At that moment, I was both lovestruck, and lovesick, to know of its origins as the colour combination was beautiful, the attention to detail spectacular and the craftsmanship so skilful. I asked the store owner where it was from and why was it so different from all the other huipils on sale in the shop and in Oaxaca in general. She told me why: this huipil was from Guatemala.
I bought the huipil in an instant and upon my return to the hotel, I immediately started researching #guatemalantextiles on Instagram and googling Guatemala huipil bird designs. The searches led me to a selection of photos of women wearing very similar woven huipils with stripes and bird embroidery to the one I had just bought. My near-obsessive research took me to the website of Cojolya Association, where I discovered that most of the women in their community of artisans were wearing the huipils I admired so much! I know from experience that ethnic communities around the world can be identified by the style of clothes they wear and the textiles they make after all this is one of the reasons I started my textile tour company in the first place. I reached out to Cojolya and asked them if it was possible to visit their project.
CLICK HERE TO VIEW OUR ANNUAL GUATEMALA: WEAVING, EMBROIDERY & COMMUNITY TOUR
On sale, new and second-hand huipils in the typical style worn by the women of Santiago Atitlan, all abundantly decorated with different species of birds in different sizes amongst local flora.
The base fabric of the huipil is always stripped.
The sizes and details of the birds varies from artisan to artisan
I am the first to admit that I have carved out a dream life for myself. Having the means and ability to follow my textile inspirations around the world to meet and learn from the artisans who make a particular garment is one of the best and greatest privileges of my life. And that is exactly what I did. In August 2019 I left Mexico and travelled to Panajachel on Lake Atitlan in Guatemala, exactly one year after I laid eyes on and bought my bird embroidered huipil.
I took a very rickety boat trip in the rain across the lake and after I got off at the pier, (feeling seasick as a dog, I might add) I walked uphill on the main thoroughfare through the charming town. There were textile shops everywhere and many, many different interpretations of the bird embroidery on striped woven fabric. I was obviously in the right place! This was indeed, a dream come true!
At the top of the hill, I reached the offices of Cojolya Association HQ. Along with many other activities and services they actually specialise in teaching backstrap weaving to local artisans in order to preserve the ancient technique.
The super supportive and helpful team at Cojolya informed me that although the bird embroidery is still practised by most women in the community, it is not particularly commercially viable for them to earn a living from due to the length of time that takes and the high price associated with the craftsmanship. This was to be the first embroidery workshop anyone from the association had organised.
The central thoroughfare of the town is lined with market stalls selling fresh produce and embroidery threads.
Second-hand huipils are on sale to both locals and foreigners
A local lady shows us one of her hand-made bird embroidered huipils for sale
After stopping in a local shop to choose colours for the embroidery (I picked pink, purple, green and yellow) I was taken to the family home of Andrea, who was to be my teacher for the day. We shared coffee with her other sisters and brother and then went out to work on their balcony.
She spoke a little English, I spoke a little Spanish and we made up for the rest with Google translate. I told her the story of the huipil I found in Oaxaca and how it had led me on an embroidery expedition to Guatemala, to Lake Atitlan and now to her very own front porch. It was a very beautiful and profound moment for me, reflecting on the journey and sharing the story with Andrea, one of the actual artisans who specialise in creating this deeply feminine cultural artefact which I had fallen in love with.
Andrea also told me the history of the bird embroidery motif, in particular, it is said to date back to when the houses of the town had thatched roofs. Women would embroider the beautiful, colourful birds who nested in the thatched beams of their homes. As a trade to the village increase, women were able to obtain books with illustrations of different birds from all over the world and thus their embroidered aviaries began to expand to incorporate the new species they learned about.
Andrea uses my huipil as inspiration for the bird we will embroider during our workshop.
Andrea uses her book of illustrated birds to use a reference for her embroidered designs
The internet also comes in handy for seeing different species worldwide.
Andrea showed me a selection of her collection of handmade huipils, as well as a bird encyclopedia she frequently used, so we could choose the best bird design to work with. We decided on a Tangara species and Andrea drew the design directly onto the garment with a biro pen.
The artisans from this town have been drawing birds their whole lives and understand the proportions of the delicate birds features so well that they can reproduce their dimensions quickly and accurately.
The technique is certainly not easy, but not impossible. If you take your time, watch and listen carefully, you can get into the flow of the embroidery after a few hours. The style is highly detailed and because the artisans are proud and precise they want you to produce the best embroidery possible. We used long and short embroidery stitches to effectively colour in the drawing. At the time I remember feeling that during the first few hours my bird looked as sophisticated as a child’s pencil colouring, but as I built up layers, and my confidence, the bird began to become more 3D and lifelike. We used a mix of blanket stitches around the edges and added fly stitched to create the texture of the feathers on the wings.
The process is as hard as it is deeply rewarding. After five hours, I was very pleased with the final outcome. There was such a sense of achievement and also even more respect for the craftsmanship and culture that goes into every one of these embroidered huipils.
Andrea in action, threading up the needle ready to add important details
The embroidery technique uses a combination of long and short stitch embroidery to fill the central areas
On my first visit to Andrea, I didn’t have an embroidery hoop and the local women don’t use them which made the process more difficult for me at times.
My teacher Andrea has been embroidering her own huipils with birds since she was around 10 years old. The huipil I am wearing in the photo was the one I bought in Mexico which inspired me to travel to Guatemala and find the community of artisans that made it.
Birds, butterflies, flowers and leafs have long been used as inspiration for decoration on the women’s huipils and the men’s pants in Santiago Atitlan.
French knots, blanket stitches and long and short stitches are used to build the texture of the bird’s feathers.
I returned to Andrea’s house a week later to work on a second bird – this time a green and yellow parrot – which was bigger and therefore included greater detail. I felt more confident but still needed a lot of help from Andrea and together we created a beautiful bird. It was very special to be able to return to work with Andrea and to continue to learn from her: we will reconnect again when I visit her every year before the start of our annual Guatemala: Weaving, Embroidery & Community textile tour.
Falling in love with that huipil in Oaxaca, Mexico, is absolutely what led me to discover Guatemala and the wealth of textile mastery that is still so integral to the culture. The experience was one of the most profound moments I’ve had since starting Haute Culture Textile Tours. It was a wonderful reality check to be able to appreciate how far the company has come. I feel so lucky and privileged to be able to fall in love with textile and then follow the story of its production right back to its roots. To be able to learn the technique myself directly from the community of artisans who make it part of their visual identity, and then share the experience with other textile enthusiasts, is why I’m doing what I’m doing.
Andrea and I with the finish bird design after 5 hours.
This bird embroidery with Cojolya Association is one of the many highlights on our
Guatemala: Weaving, Embroidery and Community Tour.
The best way to fly to Guatemala
Are you looking for the best flights to Guatemala? We recommend searching with Skyscanner.
Click here find the best flight prices to Guatemala
Don’t forget your travel insurance
I recommend World Nomads insurance for their global, reliable and flexible cover. With 24/7 emergency assistance and 140+ activities covered, you’re in safe hands.
Check out the latest travel insurance prices and detail
Suggested further reading for Guatemala
MAKING MEMENTOS WITH PINE NEEDLES IN LAKE ATITLAN, GUATEMALA & BACKSTRAP WEAVING WORKSHOP IN GUATEMALA
Are you going to Lake Atitlan or Guatemala? Why not pin this post and save it for later?
My mission to make the beautiful bird embroidery of Guatemala with Cojolya Association Have you ever experienced textile love at first sight? I have, and the object of my desire subsequently led me on an embroidery pilgrimage through Guatemala.
0 notes
Text
Why A Sweatshirt Is Your Wardrobe’s Secret Weapon
http://fashion-trendin.com/why-a-sweatshirt-is-your-wardrobes-secret-weapon/
Why A Sweatshirt Is Your Wardrobe’s Secret Weapon
Anything Paul Newman wore for six decades straight gets automatic entry to the Menswear Hall of Fame. You don’t need to see its papers, just wave it through. Newman loved a sweatshirt. He wore one as a preppy, blue-eyed heartthrob in the 50s and 60s and never took it off, showing up to red-carpet events in his 80s still wearing the ageless style.
Newman understood that in a sweatshirt, he could look casual but considered, chic but athletic. All at the same time, all with a simple pullover. It’s seasonless, flattering to every body shape and easy to layer: one of the few genuine everyman items in men’s fashion.
Its appeal is down to comfort and versatility, says Pelle Lundquist, founder and creative director of Swedish brand A Day’s March. “It’s hard to find a more comfy garment that also goes well with what most people like to wear. A sweatshirt is easy to use both for a street or a smart-casual look.”
It’s also a trailblazer. The sweatshirt blurred the lines between sportswear and fashion half a century before a marketing executive coined the word “athleisure”. And it was the first item of clothing to be emblazoned with logos, turning us all into walking advertisements for the brands we wear.
Before that, it was a technical garment. First made for American football players in the 1920s, its lightweight cotton construction wicked away sweat (hence the name) and felt more comfortable to exercise in than the heavy wool jerseys worn at the time.
Ivy League students made it part of the preppy look in the 1950s, wearing sweatshirts on campus, proudly displaying the name of their school or team across their chest (giving birth to logomania in the process). Icons like Newman and Steve McQueen adopted it. Then the style went urban in the 1980s when hip-hop made sportswear its own. Now, it’s at home in practically every menswear alma mater you can think of: there are styles for streetwear kids, surfers and skateboarders, Scandi minimalists and men of athleisure.
Whatever your look, you need one. “Sweatshirts have never gone out of style,” says Mr Porter style director Olie Arnold. “They hold a place within all categories of menswear, including the luxury and designer worlds.”
What To Look For
Choosing a sweatshirt is like choosing a T-shirt: your options are almost limitless. But the essential blueprint is a athletic top, usually long-sleeved, with a ribbed hem and cuffs. Before deciding on a particular style (see below) look for design touches that have been there from the start.
“The original design was rendered in classic grey featuring long sleeves, a rounded neck and a triangle of elasticised material stitched onto the top front,” says Claude Troisfontaine, CEO of Russell Athletic, the brand whose founder invented the sweatshirt back in 1925. “This subtle yet distinctive detail was introduced to collect sweat around the neckline as well as provide stretch and reinforcement when pulling the garment on and off.”
Raglan sleeves are another throwback touch, first designed to give more freedom of movement during exercise. “If you want a classic look, go for a raglan style in a 100% cotton loopback fabric, somewhere around 330-380 grams,” says Lundquist. “If you want a clean contemporary look I would go for a fleece-back cotton-polyester mix. That makes the sweatshirt a bit more sturdy, gives the colours a bit more pop and it’s also a bit more soft and warm.”
Jersey is another comfortable, sturdy option that leans more sportswear. Or if you just want to loaf in luxury, there are cashmere versions that feel incredible on everything but your wallet.
How To Wear A Sweatshirt
Dress it up
Like white sneakers, a clean-cut sweatshirt (probably in neutral colours, definitely without logos) is a piece of sportswear that plays nice with smart-casual looks. “[It’s] best executed in that Ivy collegiate look, preppy and layered in a considered way,” says Arnold. Wear a slim-fitting grey style with chinos or selvedge denim and either smart sneakers or casual shoes like a Derby or loafer.
You can also layer it under a jacket or coat. Sweatshirts work with the most casual of suits but match better with bomber jackets, leather jackets and varsity jackets – or a formal overcoat. “When wearing a sweatshirt or hoodie under an overcoat, I would opt for a more traditional print such as a houndstooth check.”
Dress it down
Jersey sweatshirts work well as loungewear, comfortable, oversized and neutral, but it’s also a way to be more daring with sportswear. “Most recently, streetwear and logomania have dominated much of the catwalk collections, with logos being sprawled across everything from hoodies to slides, and a sweatshirt is an easy way to jump on board with this trend,” says Arnold.
Try block colours and big logos, styled with jeans or joggers. “I would advise wearing a branded sweatshirt over a classic white tee with denim jeans and sneakers,” says Arnold. For those brave enough, a full branded tracksuit is a strong look and to own it you just need a great pair of sliders and bags of confidence.”
7 Sweatshirt Trends To Wear Today
Classic Grey Marl
The most commonly made, frequently bought and easily worn style of sweatshirt, this is one of the evergreen basics of a man’s wardrobe, like selvedge denim and white sneakers. In fact, pair one with exactly those items for what is perhaps the single easiest way to look like you’ve made an effort. Not bad for a piece that moonlights as lazy loungewear.
Big Logos
The sweatshirt gained mass appeal when university sports teams began using it as a way for people to wear their allegiance proudly on their chest. Today, designers are doing the same thing. Pick a side: you can either go for a loud streetwear look and plaster your labels all over Instagram, or use your branded sweat as the single loudmouth in an otherwise quiet outfit.
Short Sleeve Sweatshirts
Short-sleeved sweatshirts fall into one of two camps. They’re either sporty in an 80s kind of way or a little oversized, with wide, Kimono-style sleeves for those who like the Japanese street style look. Aside from baring your forearms, they’re the same as the other styles on this list, most often made in a cotton-jersey fabric. Yeezy had it right styling these in neutral, tonal looks.
Colour Pop
Health warning: if all you typically wear is navy, grey and black introducing a flash of colour to your wardrobe can lead to involuntary shortness of breath. The sweatshirt is your sartorial brown paper bag. As an easy mid-layer that you can half-hide under a jacket, it’s an easy way to experiment with trending pastels or primary colours. And if loud tones don’t make you nervous in the first place, just lose the jacket and brighten up every room you walk into.
Preppy
The sweatshirt went from sportswear to casual dress on the campuses of Ivy League universities around the middle of the 20th century. Every loud and proud logo in fashion can be traced back to this period, when designers realised that a sweatshirt could turn its wearer into a walking advertisement. Enrol in the style with contemporary preppy brands like Ralph Lauren and Abercrombie & Fitch.
Motif & Embroidery
Like big logos and and college affiliations, printed or embroidered motifs are a head-turning embellishment that turns a sweatshirt from a background player to your outfit’s main attraction. Playful or provocative, you can match the design to your personality or quietly reveal your brand affiliations (Kenzo’s tiger or Coach’s cartoon T-Rex). A deliberately big look, these play nicest with neutrals.
Throwback Sportswear
Only a particular kind of masochist would wear one for the average burpee workout these days, but the sweatshirt is still closely associated with fitness. Like retro sneakers, these styles acknowledge the bona fide fashion heritage to be found in sportswear: Russell Athletic and Champion have the longest history, but you can also nod to 80s or 90s trends with styles that respin designs from those decades.
0 notes
Last Seen Blogs

besipipahargabatu
Besi Pipa Harga Batu TERBUKTI, WA 0851-7236-1020

jinkalewajinkalak
Untitled


johan44
Pastures

notausurper
http://www.dugisultimatewowguide.info/