#so this bulk looks a lot more flat than the body sketch i had underneath woops
Text

Oops- somehow I’ve made a Bulkhead humanformers design before even making a Breakdown humanformers lmao, the power of @nukeli‘s she/her Bulkhead just gave me such brainrot so... Butch Lesbian Bulkhead everyone!
this also solves my dilemma on how to design fitting bot-to-outfit clothing choices for grounders and well- just put em in military armour lmao
#bulkhead#tfp bulkhead#transformers#tfp#humanformers#maccadam#fanart#i was gonna cheapen out on colouring by slapping on a camo design and calling it a day but it really looked horrible#and not even in my purposefully 'i have fun with this' shits and giggles sketch purposefully not great (affectionate)#but like utter shit so much so that i couldn't just use the same tinted green it went from true green to yellow green#if i were to slap dash together my humanformers designs together into my own personal human au would this be considered canonical? yeah#i put a lot of thought into bulkhead and breakdown's backstory at least in human context that i think it wouldn't work without butch bulk#i was gonna use this as a practice to draw fat and yeah i kinda did but it doesn't show because i forget how 3d works on armour#so this bulk looks a lot more flat than the body sketch i had underneath woops#will this help inspire me to make a breakdown design (i have been suffering for years so probably not)
73 notes
·
View notes
Text
Building a Stop Motion Puppet
In this post, I’m reflecting on the puppet building process - creating a stop motion puppet ready for filming.
I’ve already began some stop motion experiments with a walk, and the process poses some challenges that I don’t really face in any other medium of animation, mostly arising from the physicality of the technique.
I identified that animating the armature was interesting, but I need to give it an actual character, by sculpting a head and neck piece, bulking the armature up and finding some clothes.
Step 1: Foam
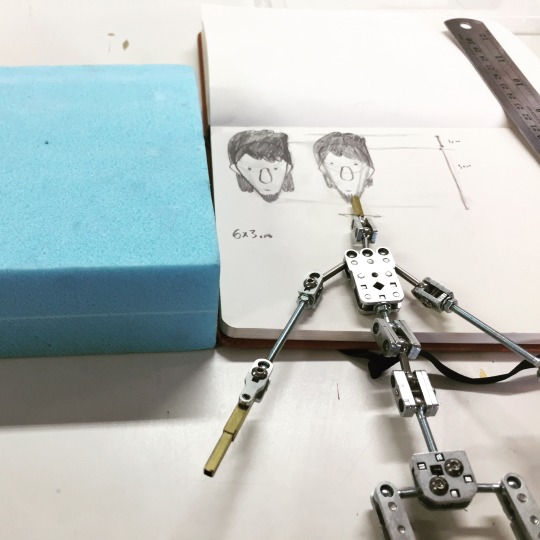
The first move was building the head, which started with a square piece of foam. I created a few quick sketches for sizing reference, and then cut a 7x4 block out of the foam using the band saw.
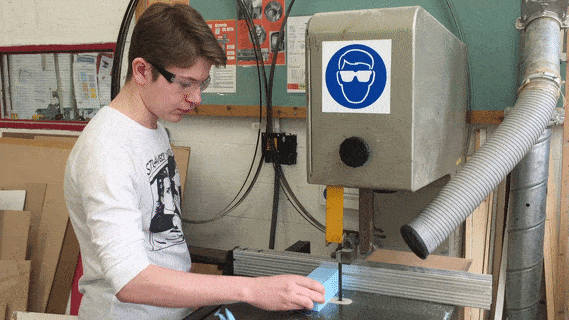
From these pieces, using a Sharpie I added my character’s face to the blocks and using these lines as reference, but the foam block into a rough head shape. I repeated this for three model heads, and then began working into each one with a dremmel tool.
Using the dremmel, my job was to carve into the head and ‘skull’ it out, adding indents and smoothing each foam piece. This was probably the most difficult part of the process, it was a new tool and kept shorting out when I attempted to carve into the head. However, after keeping with the process for a while, and with the help of the sanding machine and some very fine sand paper, I was able to create some foam heads that followed the shape of my sketches.
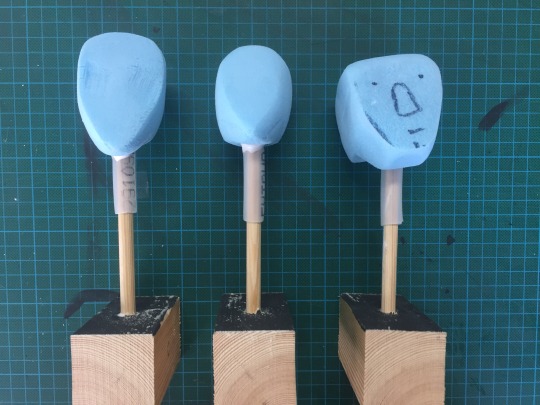
I kept the third piece to show the process, to demonstrate how I got to the other two heads. In terms of just a basic headship, I was quite happy with how these turned out - I’d be sculpting over them anyway with clay, but I was able to create an accurate foam representation of my drawings.

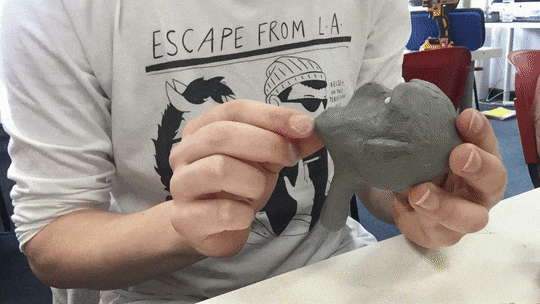
Step 2: Sculpt
For the sculpting process, I was working with two processes - one using poxy resin to add features and the other, using modelling clay to skin the foam head. As it had to dry, this process was split over a couple days.
The actual process for using the epoxy putty meant we had to work quickly, as once the two have bonded the adhesive quality begins to wear off and hardens, usually after fifteen minutes. After having been shown the process by our tutor, I set to work on creating the basic facial features, and giving my character a more defined chin, as per my sketches.

After cutting a small piece from both sticks, I needed to mix the two up which creates a soft, adhesive putty ready for modelling. This was actually rather an intuitive process, something I found relatively easy to follow. The main challenge was the sculpting process, an area in Graphic Art that I’m not particulary comfortable with or successful with. However, where I would normally jump to using an assortment of tools - our tutor explained that the most effective tool when sculpting with epoxy putty (and clay) is our own hands. With this knowledge, I would primarily use my finger to do most of the sculpting work, and simple sculpting tools to bridge each facial feature to the foam head. Dipping the tools in water granted me a few extra minutes of sculpting time.

To complete the sculpting process using the putty, I added some ear pieces and finally ‘skinned’ the model using an artex ceiling mix. It’s the mix that builders use to achieve a textured finish to ceilings, but is also a great way to ‘skin’ my character. From here, I would then paint the model and place it onto the armature.

However, during this process I was working on my clay head which turned out to be much more successful and appealing. Sculpting the clay head turned out to be more intensive, but resulted in a much better piece, I think. As the clay doesn’t need to set like the putty, I was free to just continue working on the piece throughout the two days.
The process was rather different, too. Instead of using the foam head as a face and adding features using the putty, I was skinning the head from clay, using the foam piece as a skull to cover. After adding the eyes as reference using two white pins, I could begin work on sculpting facial features on the clay model including mouth and nose.

I revised the nose piece, however, as through this process I realised just how flat my drawings are. My designs of the character show Michael with a big nose, but a flat one too - like a melon. When I was trying to adapt this to the physical realm, the result is a weirdly flat sculpture. After discussing this with my tutor, I realised that when I’m working in 3D, I need to think in 3D too. Up until now, I’d been purely working off my flat sketches, and so got to work sculpting an actual nose piece, working off a more realistic approach. Instead of trying to sculpt it as one piece as I had previously, I built the nose from two balls of clay for the nostrils and a larger piece that allowed the nose to stick out in profile, as my sketches show.
It was this realisation that allowed me to properly sculpt the features in a way that I was actually happy with, to build pieces instead of just sculpt them straight away. The final step was to sculpt a neck piece, and following this it was just a matter of smoothing the head down.
To do this, I just smoothed out any cracks or marks in the clay using my hands - a process I actually found rather addicting towards the end. As a way to further smooth the piece, I used a cup of white spirit and brush to lightly brush any marks or dirt off the clay surface, as the spirit cuts into the piece. It was important to keep this a light brushing, but unfortunately I didn’t quite keep to this as the spirit cut into the clay and revealed the blue foam underneath around the cheek bone. This was a relatively easy fix, however, just added more clay and smoothed it down using my fingers.

As a comparative review of the two processes, I can definitely see the potential in the putty head, painting over the artex skin would allow me to further customise the design. However, I found sculpting using modelling clay to be more engaging and most importantly, successful. The timed nature of the poxy putty means I’m somewhat rushing with the other piece, whereas with the clay head I’m able to take my time and really work into the surface to create a smooth face with plenty of character and personality.
I think this was the most successful element about the head sculpt - the amount of personality and character I was able to inject into just the facial expressions. My initial idea was to keep him rather neutral, but when sculpting I decided to go in a more melancholic tone, producing a character that looks deeply saddened by his own existence.
Having sculpted the head, my next move was to bulk the body up, using foam. My sketches, however, described the character as being rather lanky and slim - so I wanted to keep that stature here.
Using small pieces of foam, I would bulk up parts the body and wrap them to the armature using wire. There was a fair bit of sculpting in this process too, using the wire and then scissors to cut the foam into the desired shape and size. Like the putty, this was a rather straightforward process - but not without challenges. The main one arises from the sharp nature of the wire, which unknowingly tore into my fingertips whilst sculpting. As an improvement upon this process, I’d want to use gloves or explore a different way of wrapping the foam to the armature. Despite this, I was able to wrap up the entire armature, keeping with my character’s tall and slim build whilst giving the entire figure a much needed weight.
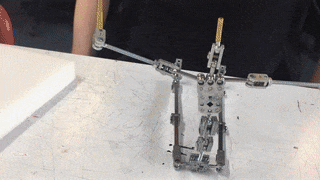
Just using wire, I was able to make some hands - but I decided to leave that part due to the time constrictions and the fact that the audience won’t really be able to tell after I play around with colour correction and chroma keying in post production. In terms of foam sculpting, I was happy with the exaggerated and cartoon-like proportions of the character, which featured a rather skinny torso with baggier legs, ready for clothing.
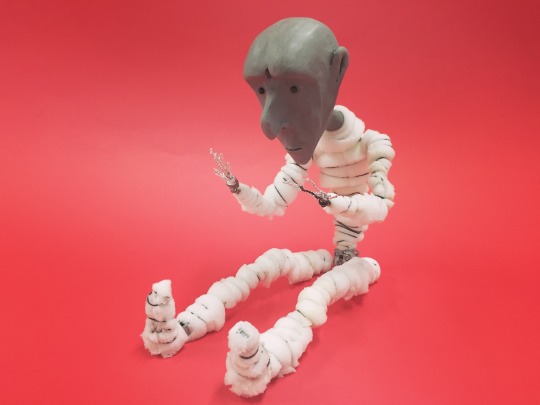
Step 3: Dress
The final step in the production of my stop motion model was finding some clothes. Whilst I could have attempted to make them myself, I’m not a skilled dressmaker and wanted the model to have a professional and industry standard look - so went to a carboot sale on the hunt for some action men figures.
My puppet uses the 12″ scale, which is the same scale as most dolls and most importantly, action men figures. I purposely chose this scale as a way to ensure fitting clothing at a decent quality. This way, I didn’t need to make my own and could have a range of options.
Going to the car boot sale allowed me to find a handful of acton men figures with a range of clothing, from baggy trousers to a brown leather jacket - clearly inspired by Indiana Jones himself. Whilst I wasn’t to replicate my initial sketches exactly, the character has baggy trousers and black boots but instead of a long-sleeved hoodie sports a black polo and jacket - which received a lot of praise from other students in the class! I’m happy with the clothes I was able to find, and the final piece represents my growth as an artist in sculpting and 3D as a medium.
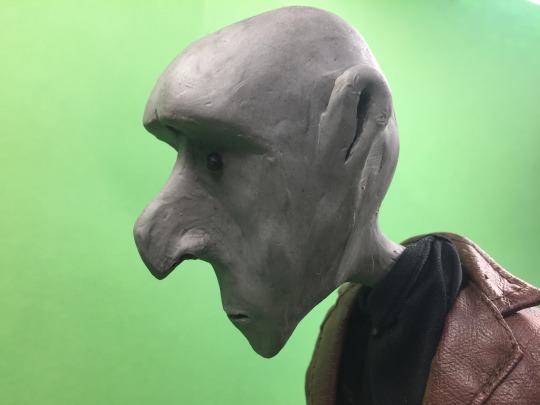
Something worth mentioning, I think, is just how appealing the stop motion model turned out to be. When I brought it into class, almost everyone commented on him, meaning I’ve done something right, atleast. Just with my own class, I’ve noticed a big difference in audience reaction: my armature didn’t really get that many comments, but when I actually add a character to the walk - it becomes something so much more than a metal skeleton. We’re able to empathise with this obviously human character, and the minutaure clothes only adds to this engaging effect. The accurate facial features (particularly the nose) drew the most praise from everyone, as did the clothes and minature boots. There’s something inherently fun and appealing about a stop motion model, an idea that studios like Aardman and Laika have been capitalising off for years now.


It was Aardman’s puppets that I was primarily responding to over these sessions, from their brilliant series of animated shorts Animated Conversations. It was animator Nick Park’s use of actual fabric clothing that I wanted to emulate with my puppet, as opposed to the claymation style of something like Wallace and Gromit. I think both approaches work, of course, but there’s a life behind the character when we use actual clothing - its more like real people, I think. We’re able to move the clothing in ways that real clothing would move, as this example, Sales Pitch, demonstrates.

When smoothing the face down, I was reminded by my tutor to look at the first Wallace and Gromit claymation cartoon. Looking back at it now, there’s quite a lot of imperfections and fingerprints in the clay that I hadn’t realised watching it as a kid. There’s an appealing, imperfect and hand-made charm to these early claymation works that I think results from these marks, however. If we compare it to something like Kubo and the Two Strings, a more recent stop motion feature, the characters are polished and clean up to the point of looking like a digital model. There’s a low-tech appeal to claymation, and it’s something that can still be seen in their most recent outputs, like Early Man. Clay is such a mouldable medium that it lends itself to being sculpted around, and as an audience, we know that. It was after realising this hand-crafted appeal that I stopped smoothing the character down and embrace the material a bit more - as these claymations did.
In this post, I’ve discussed the process of building my stop motion puppet, and the various challenges I’ve had to overcome along the way. It wasn’t easy, but I honestly enjoyed it. The brief, Under the Influence, asks us to make practical work and research that we are inspired by - whilst also challenging ourselves as artists. For me, that’s not just stop motion animation, but animation in general. Sculpting the head and the building process proved a challenge, but one that I was able to overcome through persistence and problem solving . It’s not something that I’d liked before this, but I think as I’m starting to get better at it - I’m liking the process more.
I’ve mentioned this before, but working with 3D processes is something that always intimidated me. Something like this requires a craftsmanship and level of control that I didn’t think I could pull off. I’ve discussed how a successful final major project should challenge us to grow as artists, and for me, this was one way of doing just that. Through this process, I’ve been able to really get stuck into the building a stop motion puppet and sculpting - to challenge my 2D, flat disposition and create a character with depth and form. This was my first attempt at creating an actual stop motion puppet, and although the model is a departure form my initial sketches, I think I was able to create a successful character in his own right. No longer the IT guy, Mick remembers the good old days. From the character I’ve created, it seems to echo more of an older vibe than I was initially going for, but this allows me to to explore a slower walk and a wider variety of character types.
Having built and prepped my stop motion model, the next step is to begin some stop motion walk cycles! I want to be exploring different approaches to a walk, and I’ll be attaching the rig at the torso as suggested by an animator’s comment on my work.
Actions
Create some stop motion animations using my puppet, exploring walk cycles and character acting
References
Wallace and Gromit: A Grand Day Out. (1990). Nick Park.
Kubo and the Two Strings. (2016). Travis Knight.
Sales Pitch. (1983). Aardman Studios.
0 notes
Last Seen Blogs