#stupid tumblr and its stupid 10mb limit
Text


[Source] 1987
#danny elfman#oingo boingo#made some gifs#stupid tumblr and its stupid 10mb limit#these could be so much better#anyway here ya go#my gifs#80s danny#*melts into a puddle*#87 in person
315 notes
·
View notes
Text
Oh hi. I heard it's gifs tips'n'tricks time.
View this as a little addition to this post I made a while back.
This time I thought I'd take you through my gif making process. It'll be very specific to Photoshop CS6 but maybe some of you will find parts of it helpful regardless.
And since our biggest nemesis appears to be ~The Tumblr 10MB File Size Limit~ I decided to go for the absolute worst premise for a gif: Lots of stupid wobbly particles and gw2 bloom and transparency effects. Because huge gifs love these.
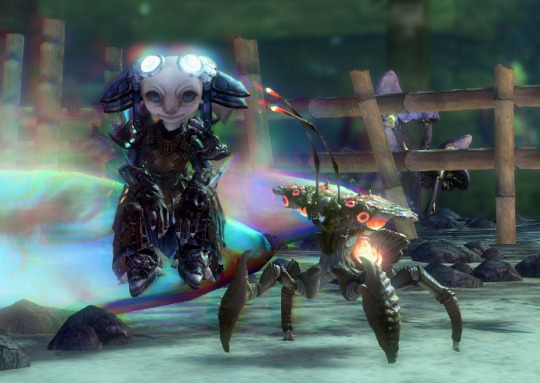
Aah, a horrifying amount of those in this single scene. Perfect!
Let's start with a little timelapse video, and I'll get into the details with screenshots below then.
So this actually went smoother than expected? Not super much fiddling needed in the end, but here's how it went in detail:
Load the raw footage into photoshop.
You can do this in two different ways: What I do is simply drag & drop the video file into the program and it'll open with a video timeline and some rudimentary video editing options.
What you can also do is File -> Import -> Videoframes to Layers and select your source video, which will give you a timeline of separate still image frames instead.
It comes down to preference, I used both methods in the past but nowadays I find the video timeline more intuitive.
Cut the footage to roughly the right length.

From experience I know that most of my gifs are around 3-4 seconds long. This can of course vary depending on different factors. Don't get too attached to the exact seconds you selected, you might have to shave off a bit depending on how evil the file size decides to act.
Optional: Change footage speed

Depending on the gif and its purpose, I slow the footage down. I usually do this for the visual effect (especially nice for showing off animation details) but it also has the practical side effect that it can help with file size. Say you want a gif that loops after 4 seconds. At 100% speed your gif will move at your original framerate (in my case 60 fps); if you slow it down but keep the same length in seconds it'll logically use less frames. That's less data to blow up the size! Yey.
Crop the image.
Now this is probably one of the most crucial parts when it comes to your final file size, and your gif looking nice on tumblr. Since the tumblr dashboard displays images at a width of 540px, you want this to be your absolute minimum image width to ensure a crisp image. If I can, I'll make the gifs larger (I like starting at a minimum of 600px and then reduce the image dimensions if needed).
With that in mind.... choose your image crop wisely.
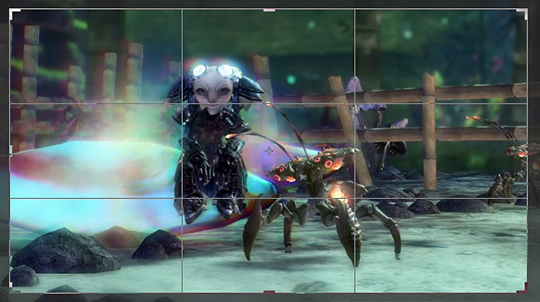
A "widescreen" image like this will be the most merciful in terms of file size, but might not always be what you want in terms of composition.

Given tumblr's very vertical nature, this kind of approach will look great in posts (if it fits your image composition of course), but at 540px minimum width tends to be a file size monster.
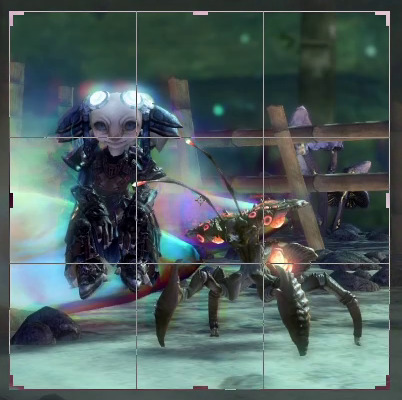
For the gif I'm attempting to make here I opted for a more square approach. The subjects of the scene fill out the image's space nicely, and it's still a nice size for tumblr posts overall. Let's see what the file size will say about this.
Replay your footage after cropping to make sure you didn't accidentally cut off any motion you didn't mean to cut.
Next up: optional colour corrections
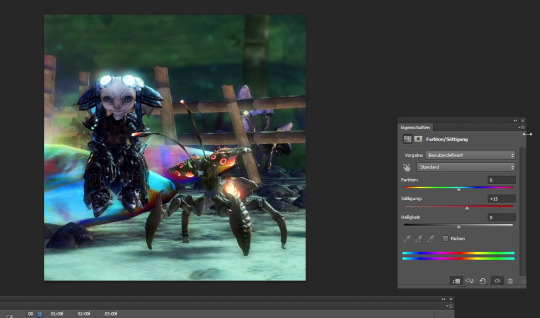
I tend to crank up the saturation for gifs way, way more than I ever would for regular screenshots since I find that often the limited web palette can make them look fairly dull. But like everything else so far, this greatly varies depending on the scene you're showing.
Note that colour correction can increase or decrease file size depending on what exactly you're doing. The more different colours you have, the larger your file size will be.
Reduce image dimensions

Since my original video footage was fairly zoomed out, the cropped area only left me 575px of width to begin with. In an earlier attempt (that I absolutely did not fail to capture and therefore had to record the whole thing a second time) I tried to leave it at these dimensions, but the 10MB size limit did not like that so now I knew better and immediately reduced the width to 560px.
Note: After you've changed the video's dimensions it won't let you edit the speed anymore (for some reason), so make sure you've got that settled.
After all the adjustments are done it's time for the moment of truth...
File > Save for Web...
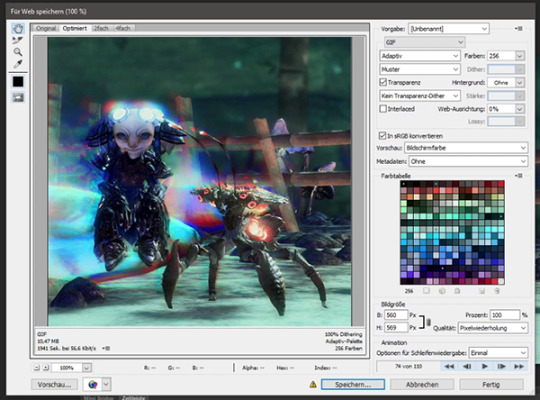
This beautiful window will open and...

Aww almost.
But honestly? That's not bad at all. I've had completely different disasters to deal with in the past (starting somewhere in the mid 20MB, good luck trying to make use of every size-reducing trick you've got up your sleeve).
Before I do any adjustments to shave off the last few KB though, I preview the gif to make sure it loops correctly. I want the Chak to sway seemlessly. Turns out it didn't, so I back out of the window to remove a few frames from the footage. And when I open the "Save for Web" window again....

Well that's anticlimatic. Apparently those few frames were enough to get the file size where I need it. (Note: Sometimes Tumblr likes to be a little b* and pretends your file is too big when you're this close to the 10MB limit. It be like that.)
While my gif journey theoretically ends here, I want to at least show you a few more things that could have helped if I had needed to get the file even smaller.
So this dithering thing I keep making a big deal of...
It can make or break a gif. In my experience this is so, so crucial to the final file size and quality of the gif.
In my own very amateurish words, dithering is a way to emulate colours that aren't actually part of the images colour palette. This is especially needed for in-game transparency effects like fog, glowy stuff, or smooth gradients. And that is part of why I chose this hell scene of all the ley line glow and the typical gw2 bloom that's particularly bad in this area.
PS CS6 offers you three different kinds of dithering techniques: Diffusion, pattern and noise.
My go-to is diffusion dithering, which has adjustable quality levels.


In my opinion it's generally the type of dithering that's often the least noticeable and creates the smoothest looking images. Unfortunately, it's also the one that creates by far the largest file sizes. Another downside is that it doesn't work super well with heavy DoF/fog etc. effects and is prone to really ugly banding, especially visible the more you decrease the quality. It looks awful for this particular scene. (Look at the glow around my asura's headpiece if you don't know what I'm talking about. Or... just the entire background.)
Both noise and pattern dithering will get you smaller file sizes, luckily.
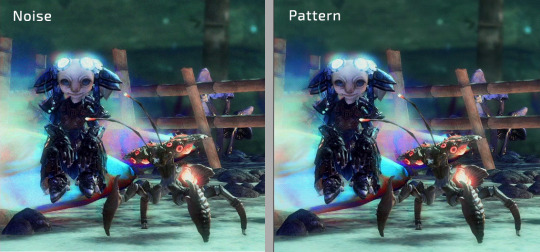
I've never used noise so far (it tends to look messy in my opinion), but pattern gets the job done! Especially for gradient heavy gifs it's a lifesaver. It's definitely more noticeable than the diffusion dithering on static parts of the gif, but it absolutely makes up for it by not having any ugly banding effects. This is also what gave me the neat little 9.99MB file size in comparison to the diffusion dithering's 15.31MB.
Last but not least, if fiddling with the dithering or image dimensions doesn't help you get below that magic 10MB mark...
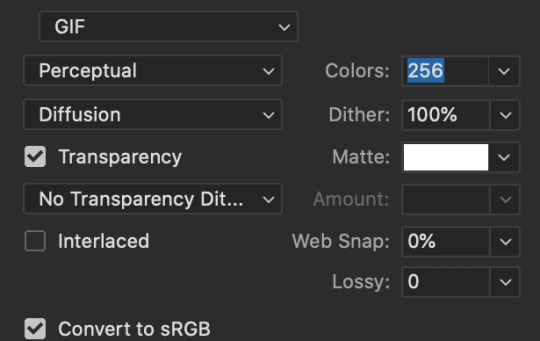
Limit the colour palette
You can either manually colour edit your image to use less colours for a more artistic approach, or you can let Photoshop limit the palette to its best abilities.
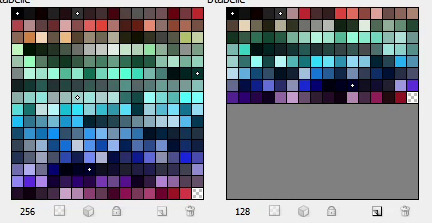
Additionally you can double click each individual colour to replace it how you see fit. (I've done that in the past when Petthri's yellow eye colour got erased and I had to bring it back manually.)
In this gif's example, reducing the palette from 256 to 128 colours has brought the file size down from 9.9 MB to about 8 MB. It can have a big effect, but doesn't always in my experience.
SHOW US THE GODDAMN GIF ALREADY!!!
Not the best quality gif we've ever seen on tumblr, but given the extremely unfavourable source material I think it turned out alright. I have to admit I'm actually surprised it worked at all.
Oh well! This got long (once again). I hope this was at least a little bit helpful to someone out there. Happy gif making!
72 notes
·
View notes
Note
Question is the legacy editor any good? I've never used it because I'm paranoid about it messing my posts up lmao but I'm curious
The short answer is yes. Legacy editor, the older way tumblr did posting, is in my opinion, the superior editor. I love the legacy editor. A lot. It is definitely superior and I'm sad staff has decided to slowly get rid of it.
However! With that said I've been pretty much exclusively using the beta post editor for the last like year when staff announced that they'd be eliminating the legacy editor eventually so I thought it'd be a good idea to get used to the beta editor. Which I suppose I did. I've gotten used to it and don't use legacy much at all anymore. I also wanted to use it because I got really tired of not being able to edit in mobile the posts I made on web using the legacy editor. With the beta editor you can edit across platforms which is soooo nice. (although it appears that in one of the apps many updates I can now edit a gifset I made today via legacy editor but not the posts I've made in the past using the legacy editor so who knows what's going with that).
But there's a lot of annoying things about the new beta editor that make it inferior to the legacy editor and I'm praying that staff will improve it. For starters, and probably my biggest complaint, is how awful it is to upload and rearrange images. It's so much easier in legacy editor to move images around. In beta the page moves when you start to move the image and it drives me CRAZY!!! I always end up putting the image in the wrong place because the page won't stop moving! Legacy is wonderful to arrange images. I do think the upload is slightly better in beta purely because it uploads multiple images in the order I select them where the legacy just puts them in whatever order it wants to and I have to remember what order I wanted my gifs in.
Legacy is also better because it actually differentiates between an image post and a text post. With the beta editor everything is technically a test post. So my gifsets are not considered an "image post". Some people have noted that the beta, since it's not an image post, it resizes the images a little and sometimes decreases the quality of the gif by doing that. I haven't really noticed that myself with my own gifs but doesn't mean it isnt happening.
The legacy editor also allows me to upload my gifs without stupid errors for no reason. Lately any time I upload more than 6 gifs at once I get an error message and have to upload them one by one. Its not because of size because they're always under 7mbs so I don't know why I can't upload them all at once. I hate it actually. And sometimes my gif will be under 10mbs (like 9.7mbs) and it'll tell me that the gif is too big. Excuse me tumblr but 9.7 is smaller than 10! I never had this problem in legacy.
The legacy editor is also better when it comes to using html, inserting links as text and not the stupid thing beta does where you paste the link and it becomes that stupid post preview thing that I hate, and oh my god is it awful for text blocks! When it first came out you couldnt select multiple texts blocks at all. You can now but it isn't the easiest. And it like expands when you do and makes it weird. Idk it's hard to describe. In legacy you can just...select all the text with no problems. Text blocks are treated like individual sections in the beta and make editing a major pain in the ass.
I also don't like thst apparently new xkit won't work in beta and you have to use xkit rewritten because fuck I don't want to learn how to use that one when I've been using new xkit for years but I guess I'm gonna have to now. I haven't been having any problems with xkit yet but who knows....
So yeah I think overall legacy is better. Beta Post Editor has some good things (I like the increased image upload limit, the editing tags is good) about it but there's so many problems. Unfortunately we're stuck with it so I've been sticking to using it exclusively to make the transition easier on myself. I do suggest becoming used to how it works and to just continue to provide feedback to staff about features we dislike or bugs we come across. Hopefully they'll listen and improve it.
#this got long#i'm so sorry#apparently i have thoughts about this whole legacy vs beta post editor thing going on right now#I've got to do a feedback write up to sent to tumblr#hopefully they can continue to edit and improve the beta post editor to make it more like the legacy editor#especially for us making gifsets#mod post#mod replies#ask#anon
6 notes
·
View notes
Text

For this gif tutorial I’m going to try to keep it as basic as possible, I may add a few tips for coloring at the end, but for the most part this is going to be how I make my basic gif. Also I’m not going to use my vapoursynth to process the video beforehand, just because I know not everyone uses it and it’s harder to learn. This is going to be just a downloaded mp4 video through the gif process. Don’t let the idea that this is a BASIC TUTORIAL fool you, I’m going to try to teach you a lot of things. It’s gonna get wordy, but i will try my hardest to keep the process easy. I’m just going to explain what things do instead of having you just copy + paste my method and not know what it means. okay? okay.
Before we start though, if you plan of giffing live stages you either need to accept the they will not be super crisp and clear OR learn how to use avisynth/vapoursynth to resize the videos without quality loss.
If you just want to gif music videos or variety shows then this should still give you HQ gifs.
Other notes:
try to ONLY use 1080p and up video if possible, maybe 720p if you’re really desperate, but anything under that... it’s not going to look good at all, so try to avoid using them.
The Photoshop I am using is PS 2020, so all my screenshots will be from that version and with my weird set up. But I’ve been using pretty much the same method since cc 2015 so other than the fact that some placements and names are tweaked, it’s the same. (If you can’t find something on your version shoot me an ask and I’ll try to help! And asks I get on this tutorial I’ll link HERE for future reference)
CUTTING VIDEO
To cut videos I’ll just use my quicktime player.
I use edit > trim to select the portion of the video I plan to gif and save that as it’s own new mov file.
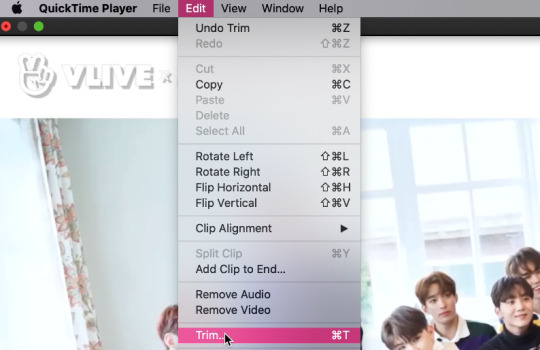
which pops up this tab

that you just slide until the part you want to gif is selected

then just save it as a new video and your done with part 1
ENTER PHOTOSHOP
Now what we’ll do is open our photoshop and import that clip into layers
FILE > IMPORT > VIDEO FRAMES TO LAYERS and select your video.
A small pop up will appear to show the clip you’re opening, you can trim it further here or just keep going by clicking okay
my setup is weird for drawing BUT you should have it looking remotely like this:

The things you will DEFINITELY need to see are TIMELINE, LAYERS, ADJUSTMENTS. If you don’t have these sections you can add them to your screen by clicking on the WINDOW tab at the very top menu bar and clicking on them

LAYERS - this is pretty self explanatory but each row is a layer in the gif. the more layers the bigger the gif will end up, the longer it plays. So bigger clips will have more layers and end up as larger gifs in the end.

TIMELINE - This is where you can edit the gifs timing (make it faster or slower)
We’ll be doing a bit of work with it so it’s important to know it well
ADJUSTMENTS - Best friend and worst nightmare. this is where ALL the tedious recoloring is done. VERY rarely would you not use these. 99.9% of kpop things are filmed through a green or blue lense so you’ll want to fix that to not have ghost idols
So, Let’s make a gif
Step 1 - In the top right corner of your timeline is a set of lines, click there and then click SELECT ALL FRAMES

under each frame is a time stamp (this video’s is 0.04) this decides how fast each clip goes by, or how quickly the gif moves. Personally I prefer slower gifs, but I say anywhere between 0.04-0.06 is a decent speed.
Step 2 - with all the frames selected, click on the small down arrow next to any of the frames and change the speed to your liking. (I’m going to use .06)
Step 3 - in that same tab of lines we’ll now click CONVERT TO VIDEO TIMELINE, which will change our Timeline to look like this:

Step 4 - Back in our very TOP menu we’ll click SELECT > ALL LAYERS, then on the TOP menu click FILTER > CONVERT FOR SMART FILTERS (this might take your computer a minute since our File is still pretty large.) Now our Time line will look like this:

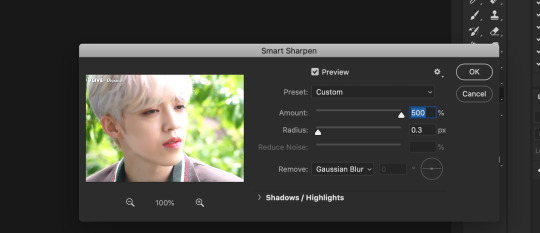
Step 5 - Sharpening
This one is VERY MUCH something you’re going to have to play with to get your settings to be how you like them. It’s also where I’d use topaz adjustments, BUT since I said we’re doing basic PS gif we’re just going to be using smart sharpening. SO:
in the TOP munu again, click FILTER > SHARPEN > SMART SHARPEN
A pop up window will appear and you can edit the settings to your liking. Mine:
Step 6 - Resize your gif or crop it to tumblrs standards: big singal gifs have a 540px width || Two gifs use 268px || and three gifs use 177/178px
To do this we’ll use the crop tool and type in our dimensions in the menu bar:

and then crop to your liking. (this doesnt resize the gif it just crops to the correct ratio so we still have to shrink the gif)
Next, we’ll resize the gif to that size in the TOP menu click IMAGE > IMAGE SIZE a pop up menu will appear and you’ll type in your resize ratio and click enter.
Now technically thats a gif. it’s TECHNICALLY done. but mine is white washed and there are words on it that I dont want so onto the coloring and blurring.
First I’m going to show you how I blur text on gifs. because text is EVERYWHERE in kpop content and it’s hideous and I hate it. so lets kill it.
BLURRING LETTERING
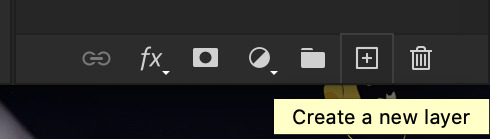
First we’re going to add a new blank layer to our LAYER TAB by clicking the little box with the + inside at the bottom
Sometimes doing this can mess up the timeline’s selection but its SUPER easy to fix so lets do that.
So in our timeline we have these two bars on each side that select what part of the gif will play. this is also where you can readjust your gif if it has extra frames at the end, or it ends up being too large and you have to make the gif smaller to save it. Just click and drag the bars back to where our gif actually ends, and all is fixed!

Now on our new layer we’re gonna take a paint brush (one of the ones with a lot of fade NOT the solid circle ) and paint over where the words are like so:

MAKE SURE ITS ON OUR BLANK LAYER AND NOT THE GIF LAYER!!
I know it looks stupid but trust me okay.
Now in your LAYER tab we’re going to duplicate our gif layer by right clicking on it and selecting duplicate.
Then we’re going to drag the new gif layer so that it’s above the paint layer in our LAYER tab :
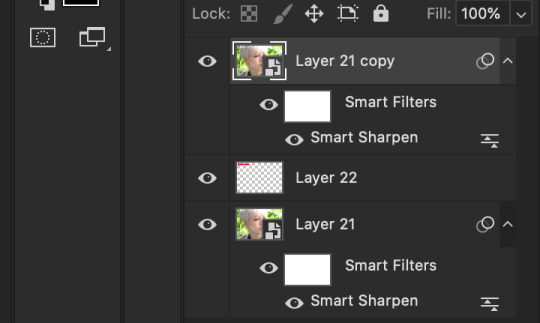
Now, right click on the top gif layer and select CREATE CLIPPING MASK. it should put a little down arrow to the left of the picture, toward the paint layer. This means the gif is ONLY visible where that paint is now.
So we’re going to click on FILTER in the TOP menu again (while we still have that top gif selected!) and Go to BLUR > GAUSSIAN BLUR. a pop up menu will appear and you can just drag the radius until the text is as blurry as you want it to be. (also IF you missed part of the text, you can just go add more paint to your paint layer and it will blur wherever you paint!)
so now my gif is like so:
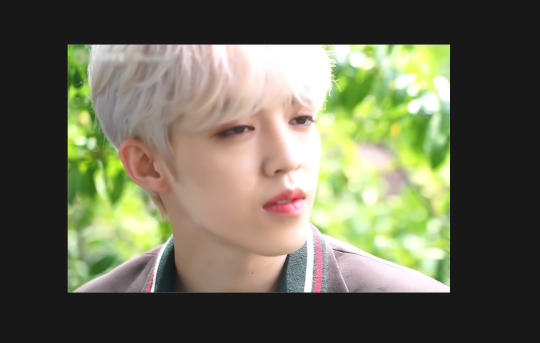
So now we’ll color him, because he’s pretty washed out.
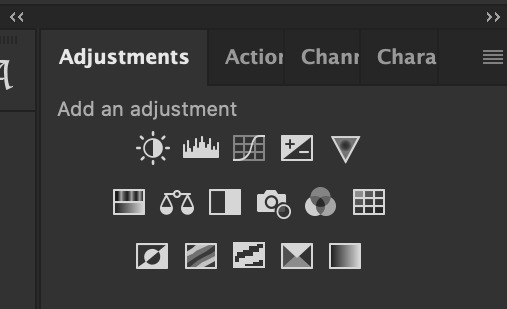
ADJUSTMENTS
This is where I’m going to be the least specific about what I do and more about what tools do, so that you can learn how to color things the way you like them!
The Adjustment tab on Photoshop has 16 options but I’m really only going to talk about 6 of them. We’ll do it in order though. All the actual adjustment tools will open in the PROPERTIES tab
Brightness / Contrast - Pretty self explanatory, but definitely should be toward the end of your coloring, as if can effect the quality a lot. Small adjustments do A LOT so don’t go crazy,
Levels - Levels is all about the balance of how dar or light your gifs will be if you adjust in the RGB layer it will adjust for the entire image, but if you change the selection to RED/GREEN/BLUE it will adjust just those colors hues. Also there are three small droppers to the left of the graph. using those you can select which part of the gif you want the image to recognize as the lightest/darkest part of the gif, and the tool will adjust the gifs coloring to that point. ( play with those droppers! magic happens i swear!)
Curves - Kind of like levels but instead of how light or dark the entire image is it works more on contrast. REALLY play with the curves options, i’m sure most things you can do with other tools can also just be done in curves if you’re patient enough to learn
Vibrance / Saturation - Vibrance will make duller parts of an image higher contract and brighter and saturation will make everything a more neon shade. or in reverse lowering vibrance will dull out the things that were already neutral and saturation will dull out the more vibrant parts of the image (usually reds)
Color Balance - Good for fixing tones. so if a live stage is SUPER BLUE!!!!! you can readjust and calm down the blues to dull them out or get rid of them completely. Again play with this its insane what it can do
Selective Color - adjusts the different colors in your image without touching the other colors. if you wanna touch the reds, make them pinker but not change the blues and greens, you do it here
If you want MORE drawn out explanations of what each of the 16 adjustment layers do here and here are actual articles you can look at. But it’s all about practice. playing with all the adjustments alone and together. Finding out what you like to do!
Now when you gif is ALLLLL colored and you’re ready to save it we do FILE > EXPORT > SAVE FOR THE WEB and a whole new window of options pops up. I’ll give you two examples of how to play with those options and then we’re done!

keep in MIND tumblr’s gif limit is 10MB which is pretty huge now, but still watch your gif size!!!!
AND SAVE your done!

I hope this was helpful! Let me know if you have any questions,again I’ll have an ask tag for it and it’ll get linked HERE if people end up needing help!
Happy giffing!!!
#drm.pst#drm.txt#Gif tutorial#this is LONG okay please be aware of that before you open it#als i did NOT reread it because it took me 3 hours to type out so it's probably a grammatic nightmare#BUT i'm JUST under a new milestone so i'm gifting this early because i had the patience to do it today lmao
97 notes
·
View notes
Last Seen Blogs

bruciebat
whoops wrong old man

thedemonh0use
Welcome to The Demon House

eddadubel
EddaDubel

maxcomputer1
Max Computer
wadaikodrumgaryu
wadaikodrumgaryu