#all-in-one macbook desktops
Text
All-In-One Desktops: The Ultimate Solution for Small Businesses
In the fast-paced world of small businesses, efficiency and versatility are key. When it comes to selecting the right technology for your office, all-in-one desktops emerge as the ultimate solution. Combining power, space-saving design, and functionality, these compact workstations offer a myriad of benefits for small business owners.
Streamlined Design: Say goodbye to cluttered workspaces. All-in-one desktops integrate the computer's components into the monitor, eliminating the need for separate towers and reducing cable clutter. This sleek design not only saves valuable desk space but also creates a more organized and professional environment.
Powerful Performance: Despite their compact size, all-in-one desktops pack a punch in terms of performance. Equipped with powerful processors, ample RAM, and high-speed storage options, these machines are more than capable of handling demanding business applications, multitasking, and multimedia tasks without compromising on speed or efficiency.
Easy Setup and Maintenance: Simplify your IT infrastructure with all-in-one desktops. Setting up these machines is a breeze, requiring minimal assembly and cable management. Moreover, maintenance becomes hassle-free, with fewer components to manage and replace compared to traditional desktop setups. This translates to reduced downtime and lower IT support costs for your small business.
Versatile Connectivity: All-in-one desktops offer a range of connectivity options to suit the needs of modern small businesses. From USB ports and HDMI outputs to built-in Wi-Fi and Bluetooth capabilities, these machines ensure seamless integration with peripherals, networking devices, and other technology essentials.
Enhanced Collaboration: Facilitate collaboration among your team members with all-in-one desktops. Many models come equipped with integrated webcams, speakers, and microphones, making them ideal for video conferencing, virtual meetings, and presentations. With crystal-clear audio and high-definition video capabilities, you can communicate effectively with clients, partners, and remote employees.
Space-Saving Solutions: In small office environments where space is at a premium, every square inch counts. All-in-one desktops offer a compact footprint, making them perfect for crowded desks or limited work areas. Whether you're setting up a home office or outfitting a small storefront, these space-saving solutions provide the computing power you need without sacrificing valuable real estate.
Stylish Aesthetics: Beyond their practical benefits, all-in-one desktops add a touch of sophistication to any workspace. With sleek, modern designs and slim profiles, these machines exude professionalism and elegance. Elevate the look of your office while enjoying the functionality and performance of a premium computing device.
In conclusion, all-in-one desktops represent the ultimate solution for small businesses seeking efficiency, performance, and versatility in their computing technology. With their streamlined design, powerful performance, and array of features, these compact workstations empower you to work smarter, collaborate seamlessly, and grow your business with confidence. Upgrade your office setup today and experience the difference firsthand.
more..
#all in one#i9#what is an all-in-one desktop#what is all in one desktop pc#desktop all-in-one computers#is all in one desktop better#all in one computers vs desktop#all in one desktops uk#all in one desktop under 30000#all in one desktop under 50000#all in one desktop under 25000#top all in one desktops#top 10 all-in-one desktops#refurbished all in one desktops#all in one desktops reddit#which is better all in one or desktop#what is an all-in-one desktop computer#all in one desktops on sale#new desktops all in one#newest all in one computer#all-in-one macbook desktops#lenovo all in one desktops#all in one desktop brands#all one pc#all-in-one pc egypt#all-in-one desktop#all in one desktop core i7#why are all in one desktops increasing in popularity#inspiron desktop all-in-one 7720 (intel®)#inspiron desktops all-in-one 7720
0 notes
Text
So, I bought a brand new MacBook Pro for myself after getting this new, high paying job and guess what they just sent me in the mail before I start on Monday?
A new MacBook Pro + accessories. I have like $7000 worth of tech sitting in my living room rn and it feels weiiiird.
#it's not all bad because this computer for work I can't use for anything else#it has configurations to their system and they will be tracking me (as expected)#so I'm glad I bought the new computer but still!! this is so weird#my old one is still going but it's on its' last legs#so the new one is definitely needed#I just.. I went from having 1 old laptop and a 2008 desktop computer#to 2 brand new MacBook Pros in a week#what even is life
9 notes
·
View notes
Note
Hey! I appreciate your perspective on computer-based things. I think I need to get a laptop and would love your opinion on decent brands. If you don't have an opinion or want to answer please disregard the q.
Context: I'm often on the move and really want something small, light, and that will last a long time. I'm bad about buying new things or taking things to be fixed so ideally it's not something that dies quickly or needs frequent repairs. For a while I used an iPad for this but I need more of a keyboard than tablets have and the shelf life of an iPad is shorter than it should be for the cost. Mine is 7 years old and only works while plugged in... I liked my Macbook Pro I got for college but it's almost 15 years old and given I haven't needed a new one since I don't think spending all that on a Mac makes sense either. I use a gaming PC mostly but I'm going to need to travel a lot more in the upcoming year. I'm ok to spend up a bit since I want it to last.
I think you're going to have to adjust your expectations about the average functional lifespan of electronics. Seven years is a lot to get out of any tablet and fifteen years is way way way above average for a computer.
At work we estimate that the functional lifespan of a laptop will be around five years and the functional life of a desktop will be around seven years; we include upgrades in that lifespan, like adding RAM and storage.
It is not *unusual* to get more than five years out of a laptop or seven years out of a desktop, but if you are a heavy user of anything other than a browser and a word processor, that's about the time when you'll find that the computer feels slow enough to be frustrating. This isn't a hard limit, and it's not something that everyone experiences because people use computers differently, but if you're an artist and you use a drawing program that program will start to feel slow after a while because as updates and patches and drivers have been tweaked for newer devices they've slowly left your device in the dust.
This isn't planned obsolescence, by the way. Computer manufacturers try to "future proof" their devices to a certain extent, but you just can't anticipate certain kinds of changes. Maybe your laptop was manufactured before there were consumer SSDs available so its operating system doesn't take the advantages and limitations of SSDs into account. Maybe your desktop was built for DDR3 RAM and we're now on DDR5 and people aren't writing programs to the standard of the old technology, they're taking advantage of the standards of the new technology.
Since you were able to use your devices comfortably for such a long time, it sounds like you're not a very heavy user and don't need to worry too much about beefing up your specs. However it does sound like you want to keep your computer and use it as long as possible while paying a reasonable price for it (which is good! I think we should all try to extend the lives of our electronic devices as much as possible!).
I actually think you sound like a good match for a Framework laptop.
Framework is a company that makes laptops that are a lot more modular than what's on the market these days. They're mean to be easy to open up for upgrades and sturdy for heavy use. Most of the parts of the laptop are easily replaceable - including the screen - so you can use them for a long time and easily make upgrades that will help the computer feel fresher.
They're a bit more expensive than comparable PCs but much easier to repair if you aren't comfortable opening up your own computer (framework is intentionally built to be easy for people who are non-technical to work on their computers), and they are a LOT less expensive than comparable macs.
I still think you're probably looking at around 7 years of regular use out of a Framework and it won't *break* at that point, it will just. Probably be a bit slow and frustrating. You might not be able to get parts for it after a certain point. You eventually won't be able to upgrade the OS. But that's true of all computers.
I've still got my 2005 macbook. It still turns on, I can still use garage band on it. But it doesn't connect to the internet and uses such an old USB standard that it is extremely slow to transfer data on or off of and it cries and freezes if i try to use photoshop. It's not broken, it's just no longer useful as a daily computer.
What I'm defining as functional here is "Is able to run multiple programs (including at least one browser with 50+ tabs open and two office suites) at the same time for 8-10 hours a day without crashing, freezing, or losing data and restarting is not a major inconvenience."
In those terms, it does sound like you're probably in need of an upgrade (I can't imagine that your current machine is particularly quick) and I think that a framework laptop would suit your needs well.
If you're looking for something somewhat less expensive, you can generally find a decent thinkbook with a 12th or 13th gen i5 processor, 16GB RAM, and a 500GB SSD for around $700-ish, which is the low end of what I think you're going to pay for a decent laptop. I'm reccing lenovo here because I personally like them and have found them to be very easy to crack open for repairs and upgrades. Stick to the thinkbook over the thinkpad because that's the business line and is a bit sturdier and they are designed to be easier to upgrade over time.
Actually, here's a thinkbook with a 12th gen i5, 40GB RAM, and a 1tb SSD for under $700. That's a shockingly good price for that laptop; the reseller OEMGenuine is one I've purchased from many times before for work and I've found them to be reliable, though the reason those specs are so good is because they've added aftermarket parts, so your RAM and SSD won't be under warranty from Lenovo.
For Framework you're looking at at least $1000, but it's easy to plug and play with upgrades so you can start out with lower specs (except processor, don't cheap out on the processor) and upgrade later. The framework is a bit smaller and easier to travel with, but I have a laptop quite similar to the lenovo and it's not a huge pain to move around - it's very light but the 15" screen might be bigger than you're looking for.
If you're willing to spend a little bit more and you're very uninterested in doing your own upgrades and would prefer the most computer you can get for your money right out of the gate, this is a 12th gen i7 thinkpad with 40GB RAM and a 2TB SSD for $1150. (I've not ordered from this reseller before, so maybe check over their terms if you're considering purchasing from them.)
140 notes
·
View notes
Text

some quick info:
↳ this is specifically for the screencapping method. i use mplayer osx extended to get my caps, but there are a few other programs you can use as well. i’ll specifically be going over mplayer here.
↳ i’m using ps 24.4.1 on a 2020 m1 macbook air
[tysm to @kyubinz for looking this over and adding some things ily]
☆ feel free to send me an ask/message with any questions you have! ☆
「 setup 」
1. finding videos
one big thing to remember is that the overall file size of your video will impact the quality of your gif. the larger, the better. i almost never use anything below 1080p, and try to use 2160p whenever i can. 4k video downloader is the program i use for downloading videos from youtube, it’s free to install and works great! because of how large some files can be, i always store any media on my hard drive. i highly recommend using one if you plan to keep lots of files on hand.
.mkv files are best, but .mp4 works fine as well (.mkv files are usually bigger aka better quality).
2. getting your screencaps
after downloading mplayer, go to the top bar and click file > open. open the video you’ll be screencapping.
you can either drag the little time indicator or using the arrow keys on your keyboard to move to the spot you want to capture. the > key can also be used to move forward frame by frame. to start capping, pause the video and press shift + cmnd (ctrl if you’re on windows) + s to take a screencap. i usually just hold it down until i’ve gotten all the screencaps i need.
by default, screencaps go right to desktop. you can set up a folder for them to go to automatically by going to settings > general and then selecting a spot in the menu under “interface”, but i just let them go to desktop and then sort them into individual folders so they’re easier for me to find while i’m giffing. in general, i try to stay under 80 frames so my gifs fit into tumblr’s 10mb image size limit.
3. importing screencaps into photoshop
to import your caps into ps, go to file > scripts > load files into stack. this window should open:

click browse, and navigate to the folder with your caps in it. select all of the caps you want to import, and then click open.
click ok to create a file with your caps, and then wait until it’s finished loading your caps into the layers tab. once they’re loaded in, this is what your screen should look like:

(if you aren’t seeing the timeline at the bottom of your screen, go up to the top bar and go to window > timeline)
click create frame animation, then go to the hamburger menu at the top right of the timeline and select make frames from layers. once your frames have loaded in, select the same menu again and click reverse frames. play through your gif to make sure everything looks good.
if you were to save your gif at the speed it’s set at now, it would be way too fast. to fix this, you have to set the frame delay. do this by selecting all your frames in the timeline using shift click, and then clicking (on any frame) where it says “0 sec”. select other from the menu that comes up, and you should get this popup:
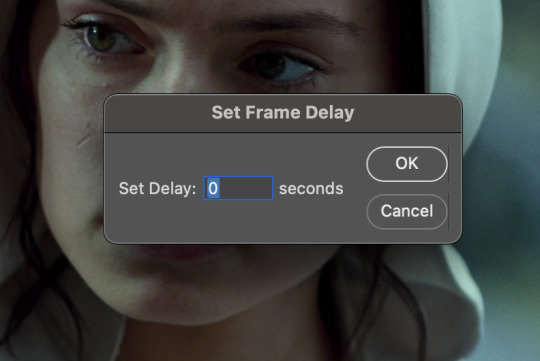
the general rule of thumb for gif frame delay is 0.05 seconds. there are some cases — certain animated movies or video games, for example — where other delays are best, but for the most part, 0.05 is what you want to use (0.05 can slightly slow gifs, and sometimes using 0.04 better matches the clip's original timing. this is really a "train your eyes" thing, and picking the best delay gets easier as you gif for longer). you can set this by typing the number into the text box and then hitting the ok button or enter on your keyboard.
at this point, i’d go ahead and save your file. you can go to file > save in the top bar, or just hit cmd/ctrl + s on your keyboard.
「 making your gif 」
1. sizing
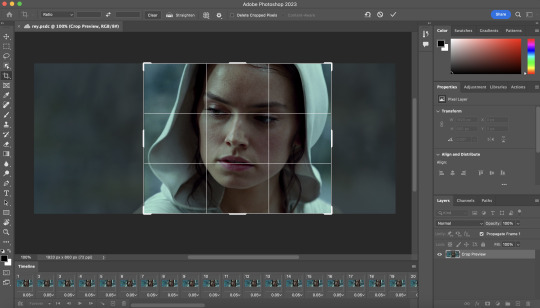
after your frames are ready, the next thing is to size your gif. to crop your gif, press c on your keyboard to open the cropping tool. white borders will show up around your gif.
before doing anything, i would suggest making sure “delete cropped pixels” is unchecked. this will allow you to drag your gif around later if you want to reposition. you can find this option at the top of your screen. drag the borders on either side until you have the area you want selected. mine looks like this:
once you’re happy with your selection, hit enter on your keyboard to finalize it.
the tumblr image guidelines require gifs to be 540px across (here’s a post detailing this). to change your gif’s image size, go to image > image size in the top bar. you’ll get this popup:

instead of setting the width right to 540, i’ll be setting it to 544, and then trimming down the edges using canvas size. this makes the quality just a little better, and also prevents any weird borders being made around your gif on the off chance photoshop decides to add them. this isn’t necessary at all, you can absolutely size right to 540, but i just like doing this. if you choose to do this, open canvas size right after you set image size (image > canvas size in the top bar), and trim your width down to 540 and your height down a few pixels as well.
2. sharpening & other filters
sharpening is essential for good-quality gifs. the first step to this is converting our timeline from frame animation to a video timeline. select this little icon in the bottom left of your screen:
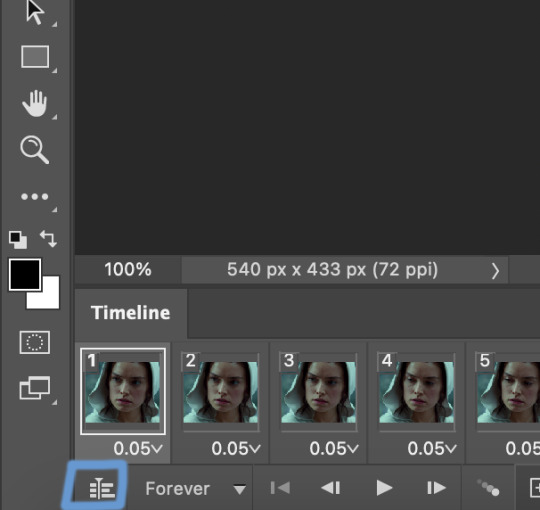
this is what your timeline will look like now:

you can use the little slider with mountains on either side to change the width of your frames in the timeline for easier access when editing. now that we’ve got all this set up, we can sharpen! i use this action pack to sharpen my gifs in addition to a few of my own settings (here is a video on how to install actions into photoshop). go to window > action in the top bar if you aren’t seeing the action tab.
i’ll be using the sharper action from the pack. to use an action, select it from the list and press the little play button at the bottom of the panel to apply it.
in addition to this, i usually also add unsharp mask at 50% amount with a 0.5px radius:


there are a few other filters than can be helpful when giffing:
a. add/reduce noise
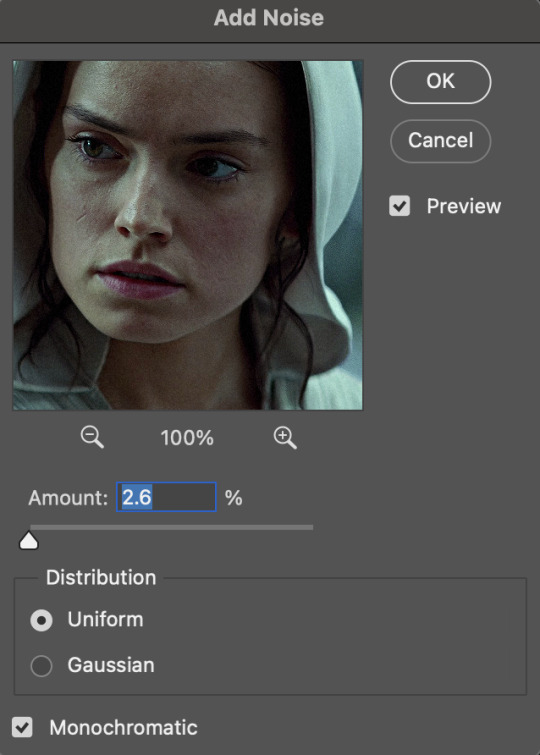
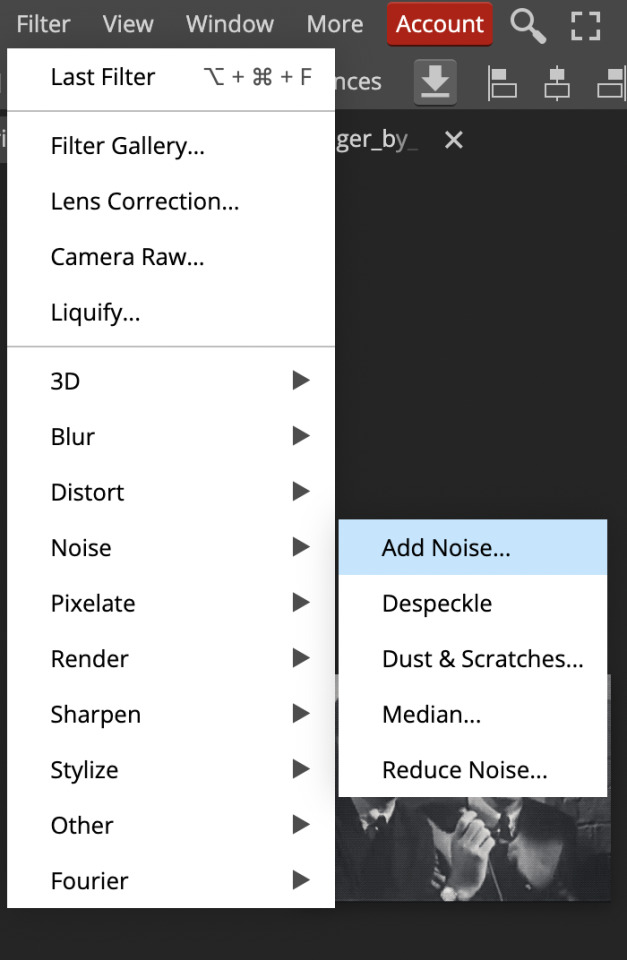
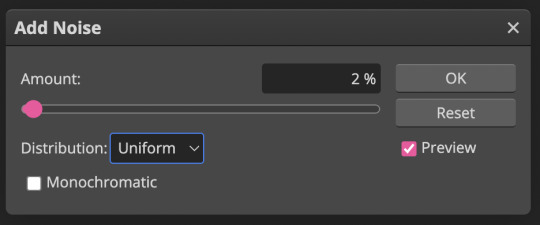
noise (aka grain) can be added with “add noise”. go to filter > noise > add noise.
these are the settings i usually use, but the amount depends on the gif (i don't ever go over 3.5 for the most part):
(if you want a grain effect but moving noise doesn't work for the gif, you can also add a grain overlay and then mess with blending mode and layer opacity until it looks how you want)
reduce noise can be used to remove some of the pre-existing grain on a clip. go to filter > noise > reduce noise. here are my settings:

leaving reduce noise on its own at 100% is a bit too much, so double click this icon and change the opacity (i usually do around 45):

b. gaussian blur
if your clip is a bit pixelated, gaussian blur can help with smoothing it out a bit. go to filter > blur > gaussian blur. my settings are 1 pixel radius w ~20% opacity (this changes based on the gif).
3. coloring
time to color! i want you to keep in mind during this section that everyone likes different colorings, and this is just my process! please don’t feel pressured to follow exactly what i’m doing, the best way to find what you like is to just mess around and experiment!
i like to start off with lighting adjustments: brightness/contrast, levels, exposure, and curves.
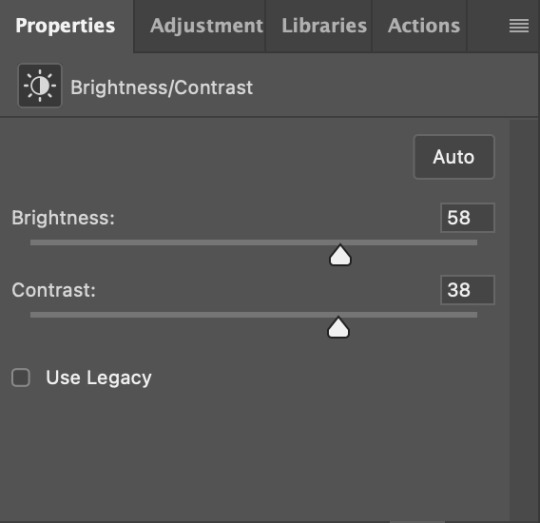
a. brightness/contrast
i usually start out with this first, just because brightening the gif right away helps me start thinking about how i want to color! here are my settings:
b. levels/curves
levels and curves can either be used interchangeably or together. i usually use levels to adjust lighting and curves to adjust color values, but i’ll go over using both for lighting as well as using curves for adjusting color values.
for both of these adjustments, i use the eyedropper tools to pick out white and black points. for levels, the top eyedropper tool to the left of the graph is used to pick out a black point. i do this first. use the tool to pick a spot on your gif that you want to be the base for black values. for me, that’s the shadow inside rey’s hood. the bottom eyedropper tool picks white point. use the tool to pick a spot on your gif that you want to be the base for white values. i chose the outside of rey’s hood. make sure you’re doing this on a new levels adjustment layer.
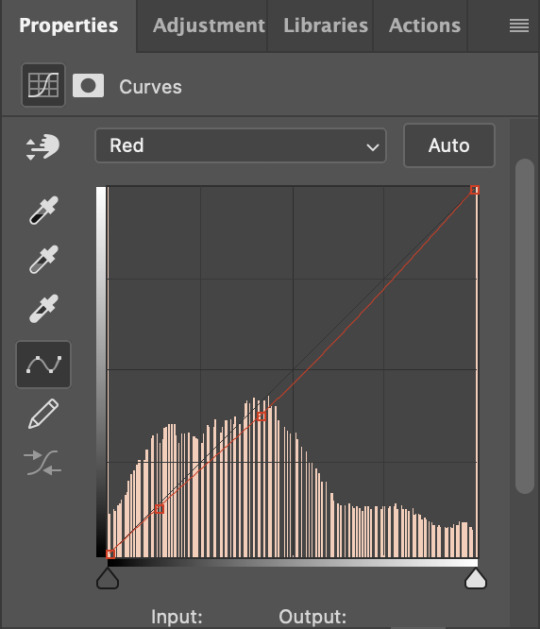
now, on to curves. you can either use the same eyedropper method or manipulate the graph directly. using the eyedropper is the same as levels, so i’ll just go over graph manipulation.
shade lightens as you move to the right along the x-axis of the graph — black is the far left, white is the far right, middle is the midtones. generally, i don’t work with midtones.
i’m going to use levels for this gif’s lighting, and curves to adjust color values. here’s how to do that:
curves can be used to adjust the amount of a certain color in different lighting areas of a gif. for example, i can specifically decrease the amount of green in the gif’s whites. to edit these values, select the rgb drop-down menu and adjust them one at a time. here are my final graphs:


c. exposure
this one’s pretty straightforward. the exposure slider adjust general exposure. the offset slider adjusts how dark your dark points are, and gamma correction can be used to lighten/darken scenes as a whole. here’s my settings:

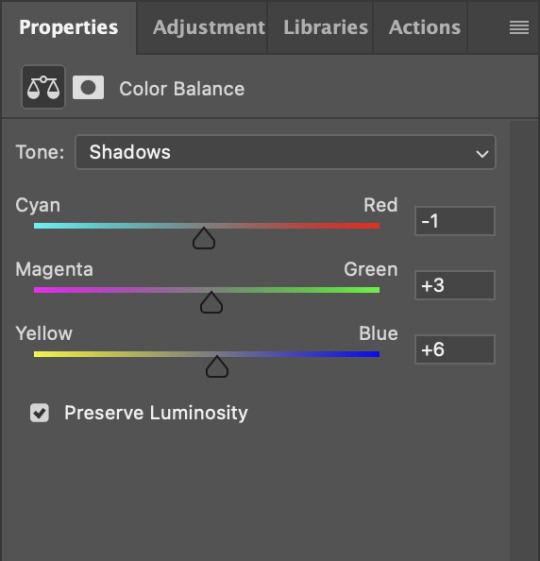
d. color balance
color balance is used to adjust overall tint of a clip. this is in general pretty simple, but i do want to point out that using the shadow and highlights tabs in addition to just the midtones can really help. here’s my settings:

e. channel mixer
channel mixer is one of my favorite tools in ps, especially for coloring scenes that are a pain in the ass without it. to avoid taking up too much space, here’s a great tutorial covering channel mixer. here’s my settings:


[at this point, i’m noticing my gif is still a bit darker than i’d like it, so i’m adding just a bit of brightness/contrast to fix it. there’s also a patch of blue over one of rey’s eyes, so i’ve used a hue/saturation layer to get rid of that bit and masked it to her eye. i’m not going to go over masking here, but there are lots of great tutorials out there!]
f. selective color
selective color can be used to adjust the amount of specific colors within a color. for example, if i were to go into the red tab and take out cyans, the reds would become more red. if i were to add yellows, the reds would become more orange, etc etc. this can be especially good for color manipulation. for this gif, i’d like to make the background more blue, so i’m going to use selective color to do this. here’s my settings:

g. color lookup
color lookup uses 3dlut files to remap gif colors (it’s a preset — think instagram filter or something similar). i don’t always use these, but when i do, i almost never leave them at 100% opacity. color lookup is great for giving gifs a film-type look if you want to do that, it’s got loads of different options. here’s my settings (adjustment layer is set to 20% opacity):

atp i’m pretty much done with coloring! i usually end up doing a few extra little lighting adjustments at the end. for this gif, i added some brightness/contrast at +8. i’ve also noticed that my gif’s looking a bit grainy, so i’ve added some noise to lean into it. this is usually the way i fix it, but you can definitely do reduce noise/gaussian blur as well if you don’t want a grainy look.
here’s my fully colored gif + a process gif (fast images warning):


「 saving gifs 」
1. frame rate
one thing you may have noticed is that my gif is looking a bit choppy. photoshop has a tendency to mess with frame delay after gifs are converted to video timeline. here’s how to fix that.
select all of your layers and convert them to a smart object (right click > convert to smart object). next, click on the hamburger menu in the top right of the timeline and go to convert frames > flatten frames into clips. now we need to change the timeline from video timeline to frame animation. click the little 3 boxes symbol in the bottom left corner of the timeline:

go to the hamburger menu again and select make frames (this is the same one you used earlier), then go through your frames and delete any duplicates. the first frame usually needs to be deleted specifically. once you’ve done that, set the frame delay back to 0.05 the way you did earlier.
2. exporting
once you’re happy with how your gif looks, go to file > export > save for web (legacy).
these are my export settings, but feel free to experiment with the menus where i have selective and diffusion selected, different settings work best for each gif. in general, most gifmakers only use selective/adaptive and diffusion/pattern because they generally work the best for tumblr. before saving, make sure your looping option is set to forever:

gif size for tumblr has a 10mb limit. my gif is under this, so i don’t need to make any changes, but if yours is over, you can either delete some frames from the beginning/end of your gif and/or adjust the height of the gif (width needs to stay 540px so your gif doesn’t get stretched/compressed on tumblr, but height is fair game).
here's my final gif!

happy giffing, and please don’t hesitate to send me any questions you have! ♡
#*mine#gif tutorial#tutorials#allresources#usertheos#userzesty#userzaynab#usershreyu#rogerhealey#userabs#userhekaates#usermaria#userraffa#usermorgan#uservivaldi#tuserheidi
280 notes
·
View notes
Text
I said I would be posting more now that I have a laptop upstairs, and I will. I haven't posted much yet because I was still getting used to the keyboard and trying to get to a more comfortable typing speed that didn't frustrate me.
I actually bought a MacBook Air. I borrowed some money from my dad that I will be paying back over time. It's my first Apple product if you don't count the iPhone I got for my parents. It's a wonderful computer. The M1 chip is super zippy. Battery life is amazing. My former 12 year old laptop lasted about 2 hours per charge. This thing lasts me basically all day. The construction is very impressive. The aluminum body feels very sturdy. The screen is beautiful and gets way brighter than I need. And while they don't have any bass, I can't believe how good these tiny laptop speakers sound. My old laptop sounded like a super quiet AM radio. This thing hasn't gotten even mildly warm yet (though I am not rendering video or anything). It is very light. I feel comfortable taking it with me around the house if I need to. The old laptop was about 12 pounds and I think this is 2.75 or so.
Apple just makes good laptops. They always have, though they weren't always a great value. But I think the M1/M2 models are actually competitively priced as long as you don't get too many upgrades. The upgrade prices are still bonkers.
The OS has taken some getting used to. But for basic functions it's fine. I haven't had any trouble navigating. And the search function is much better than Windows. As is the aesthetics.
I don't really get into those technology pissing contests. I considered a Windows laptop, but there were just so many PC laptop choices and I was overwhelmed with the research required to find a good one. Not only can quality vary from manufacturer to manufacturer, but it can also vary from model to model. There are shitty Dells and fantastic Dells. I just didn't have the energy to figure out which was which. But I knew the new M1 Macs were all well reviewed and would serve my needs. So, that's what I got.
One bonus is that all of my friends are on iPhones and so now I can use iMessage and not turn into a dreaded green bubble. I still think Apple should make texting with android not crappy, but I'm happy to have a less frustrating way to communicate with my friends until that happens. If it ever does. (C'mon Europe, force Apple to fix that!)
Choosing tech these days is just about your needs and preferences. Brand loyalty is bullshit. All of the companies basically suck as far as business practices. Google might even be eviler these days. Microsoft has always been shit. And Dell has some of the worst customer service around. In this particular instance, Apple was the least evil choice for my needs and preferences. And anytime I need to do something only a PC can handle, I can just pop downstairs and use my desktop machine.
My only complaint so far is that I don't like how the scroll wheel functions with my bluetooth mouse. I like to scroll 3 lines at a time and Apple has this weird scroll acceleration feature that scrolls really slow at first and then crazy fast the more you scroll. I think there is a workaround but I haven't had the time to figure it out yet.
I'm excited to test out Photoshop, as I've heard the M1 version is about 50% faster. I just haven't had the energy to edit any photos recently.
So, that's my Apple experience so far. It's a good computer that I hope will last for many years. I also like that they maintain decent resale value if I need something different down the line.
100 notes
·
View notes
Text
how to make gifs for free*
*okay, for $5. which is far less than what you would pay for photoshop!
this is my tutorial for people who want to make gifs but do not want to pay the steep monthly fee for photoshop. i feel especially qualified to make this tutorial because i did pay for the monthly photoshop fee a few months ago and honestly, i hated the process of making gifs on photoshop. it was extremely onerous and also cost a lot of money? no thanks! now, are gifs made on photoshop typically better quality than gifs made through free services? yes, but only marginally. and, to me, the slightly-higher quality gifs do not make up for: (a) the cost of photoshop, and (b) the ease of the free-gif making process. it will seem like there are a lot of steps below, but i promise it will all become like second nature soon enough.
BEFORE WE PROCEED: this tutorial is tailored towards the apple ecosystem. however, i’m sure most of the steps in here also apply to windows computers; i’m just not totally sure since i don’t have one.
without further ado, click below to follow the tutorial!
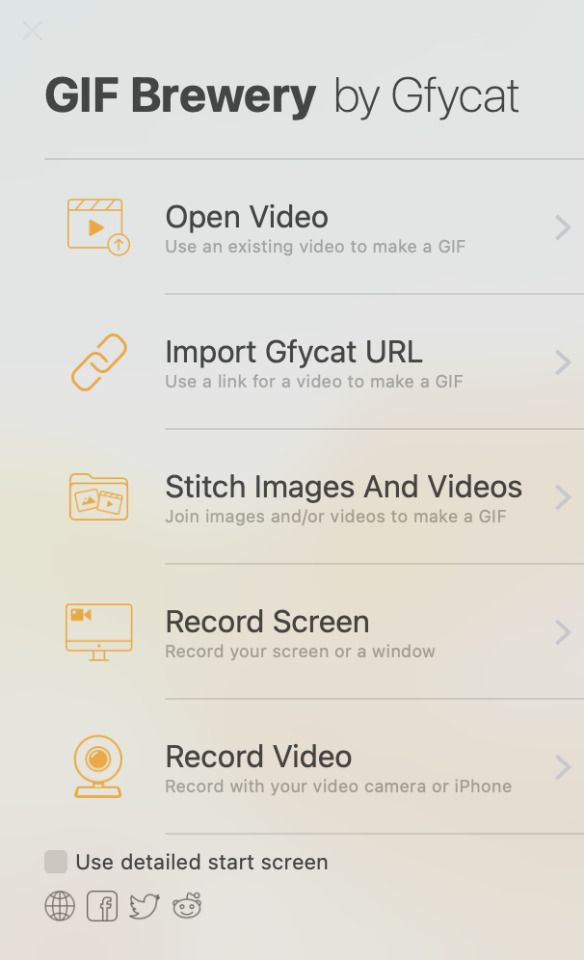
STEP 1: purchase gif brewery 3
this is the only stage where you will need to spend money - this app is integral to the process of creating gifs for free. i have tried out many different giffing apps, and this one is by far the best. it’s called “gif brewery 3 by gyfcat” and you can get it on the app store:

STEP 2: download or screen record your video
now that you’ve got your giffing software downloaded, you’re going to download your video in an .mp4 format.
downloading: i typically download from youtube or vimeo. for youtube downloads, you simply copy the link and paste it into a “youtube to mp4″ converter, which you can find through a simple google search of “youtube to mp4″ (a lot of these sites often get taken down and new ones pop up, so don’t get attached to a specific site because it’ll probably be gone like, 4 days later lmfao). for vimeo, i typically google “vimeo video downloader” and a few websites will pop up.
screen recording: there are a few different screen recording extensions you can add to google chrome, and i’ve tinkered with those in the past. however, recently i’ve been using the built-in macbook screen record function, which can be brought up by pressing command + shift + 5. once that’s brought up, you can change the size of your recording area, click record, and then save the video to your desktop. note that there IS a screen record option built into gif brewery, but i have never used it so i can’t speak to its functionality.
STEP 3: add your video to gif brewery
now that you’ve either: (a) downloaded your video from youtube/vimeo or (b) screen recorded your video and saved it on your computer; you’re now going to add the video to gif brewery and get giffing! this is where the fun part starts.
1. open up gif brewery and select “open video”
2. head into your computer and find the video you have downloaded/recorded, and select “open”
3. drag the green and red bars to the areas of your video where you want your gif to start and end. i’m using a video i giffed last week as an example:

4. click on “settings” in the top righthand corner to bring up this panel:
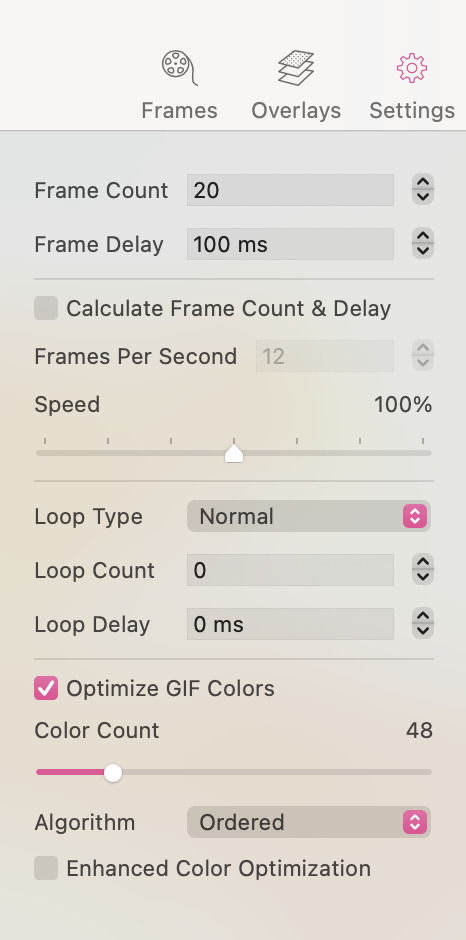
5. this is a VERY important step to ensure that your gifs turn out all right. you’ll want to change the settings in the above panel to something like this:

as you can see, i typically use 25 fps as this helps the gifs flow and not look choppy. some videos, though, work better with 20 fps (this is something you’ll get a sense for when you make a lot of gifs). i typically bring the speed down to between 70-90%, as 100% speed always feels too fast to me. and then i ALWAYS optimize the gif colours to 256. yes, even for black and white gifs.
an interlude about gif sizes: you’ll note that in the above picture, the frame count says “79″. if your gif is larger than say, 600px wide, 79 fps will probably have you producing a decently large gif. keep in mind that tumblr does not allow gifs to be over 10mb, so you’ll need to adjust accordingly. you can apply these settings and then go back and re-adjust those green and red lines from before to shorten your gif to ensure that it adheres to the size requirements of tumblr. also keep in mind that the editing process will add (sometimes significantly) to the size of your gif. so you want to aim for your gif to be well under 10mb at this stage. for small gifs, i don’t limit my fps too much, but for bigger gifs (i.e. ones that are over 600px wide), i will try to limit my fps to under 50. just keep that in mind as a barometer.
6. once you’re happy with your settings, click “create”

7. clicking “create” will bring up a window which will showcase your gif, as well as your gif size (see red circle):

at this stage, i’ll often click the “cancel” button in the lower lefthand corner and fiddle with the gif, as my gif sizes at this stage are typically enormous. this is actually a rare example where the gif is well under 10mb. however, for this gif i would crop the black edges out and probably re-size it down a bit to have it further below 5 mb (this video is far too low quality to produce a gif that’s as high as 5mb. this will vary, though, depending on the quality/size of the video).
8. so, clicking “cancel” above, i am going to crop and resize the gif:
- when you click on “crop”, this window will come up where you can adjust the size of your crop:

when you crop it to where you’re happy with it (if you need to crop your gif, that is), you’ll likely want to resize your gif:
when you click the “resize” button, the dimensions of your gif will pop up:
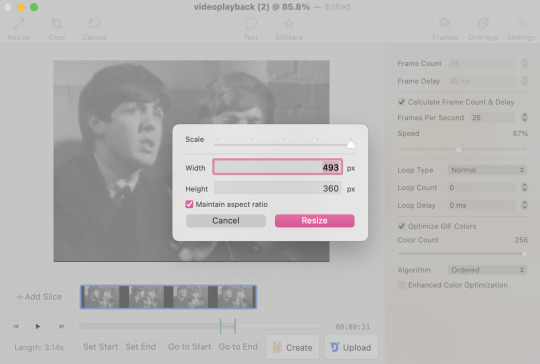
a second interlude about gif sizes: okay. here’s the thing about using a software that isn’t photoshop to make gifs. the quality of your gifs will likely suffer, compared to gifs processed through photoshop. through trial and error, i have learned that i have to make my gifs slightly bigger than the standard tumblr sizes in order for their quality to hold up. it has something to do with pixel compression, which i don’t need to go into right now. i have also learned that low resolution videos (like the one i’m using in this example, which frankly looks like it was filmed using a toaster) should almost never be used for full-sized gifs. instead, the quality of these gifs from a low-resolution video will look much better as half-sized, side-by-side gifs in a two, four, six, or eight-gif pattern (god, does that make sense? message me if it doesn’t). standard tumblr sizes are, i think, 540px wide for a full-sized gif, and 270px wide for a half-sized gif. AS SUCH, i typically make my full-sized gifs around 700px wide, to enhance the quality of them once they’re put into tumblr. yes, this means your gifs will have a higher MB output, which means your gifs will need to be shorter than those that could be made through photoshop. these are the struggles we face as Free Gif Makers, however it is worth it to me.
alright, as you can see above, after i’ve cropped the black edges out, this gif is 493x360px. so, it’s under the 540px requirement for a tumblr full-sized gif. the GOLDEN rule of gif-making is to NEVER use a gif that is under 540px wide as a full-sized gif. the gif will be stretched and will lose a lot of quality in the process. however, 493px wide is still well-above the 270px wide standard size for a side-by-side gif. i am going to size this down slightly to 350px wide (remember, we want to be well above the 270px wide standard size, as described above) so my total MBs will be smaller.
9. now that i’ve cropped and resized, my gif is now only 2.7mb:

i like this a lot better than the 5mb before, as it gives me more wiggle room in the editing process. i’m happy with it now, so i will click “save...” and save it to my desktop for editing now.
STEP 4: repeat step 3 for all the gifs you want to make for that specific gifset
i am going to make two gifs to demonstrate to you the side-by-side gif thing i was talking about above. these are the gifs at this stage, pre-editing:


STEP 5: add your gifs to photopea to begin the editing process
once you’ve created all your gifs in gif brewery 3, you can close the app. for editing the gifs, i use photopea desktop. photopea is basically a walmart photoshop, and i think it works really well considering it’s free.
1. click file > open
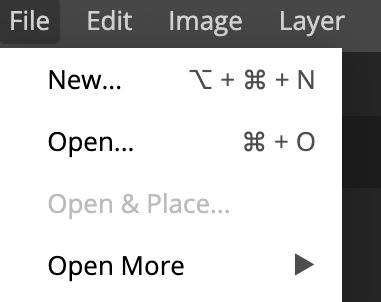
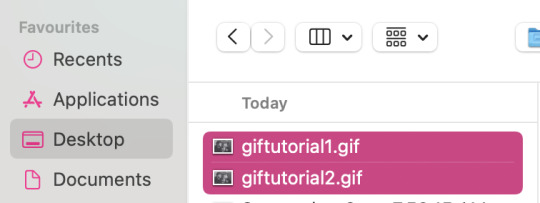
2. locate your gifs that you save from gif brewery
3. now is the actually fun part. this is where you can fiddle with the brightness, exposure, temperature, etc., and/or you can add a psd or two to your gif. i almost exclusively use PSDs and then will fiddle with the brightness/contrast/levels/curves/temperature/sharpening/grain on my own after i’ve applied the PSD. i’ve found all the PSDs i use here. that blog should also have tutorials on how to download a PSD. a PSD is basically a file folder with elements in it which will enhance the colouring/lighting of your gif. PSDs are EXTREMELY trial and error when it comes to working with a certain gif or not, so be patient as you try out PSDs on your gifs. when you download a PSD, you will add the file to photopea (file > open > find the PSD and add it), and then drag it on top of all the layers of your gif, like so:

a note on manually adding brightness/contrast/temperature/sharpening/grain, etc.: you must select all the layers in your gif for these edits to apply these changes, so they all must be highlighted like the below:

a note on sharpening/grain: adding sharpening/grain to a gif without being careful will HUGELY add to the size of the gif, and will often push it well over tumblr’s 10mb size limit. sharpening can also make your gifs look very bad if you go overboard. i often either don’t sharpen my gifs at all, or am very careful when i do. i always choose smart sharpen (as opposed to “sharpen”, which just adds a shitload of sharpening without you being able to adjust the amount), as i can adjust the sharpening elements with smart sharpen. to find the sharpen tool, go to filter > sharpen > smart sharpen:

these are the properties i sometimes choose for sharpening. however remember that most of the time i don’t even sharpen my gifs, OR i will do 50% instead of 100%. but i am going to use these properties for the gifs i’m making for this tutorial. you can typically be a bit more liberal with sharpening when you’re making smaller side-by-side gifs, as there is more room for the extra MBs added from sharpening:
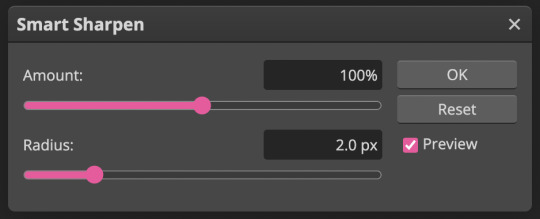
the properties you choose for sharpening will ultimately totally depend on the gifs you’re making, so don’t be afraid to fiddle around with them! i wouldn’t recommend going over 150%, though.
now, grain is something i hardly use in my gifs, as grain adds even MORE to the file size of a gif than sharpening does. however, sometimes it’s cool to have a bit of grain in your gif, so this is what i would do.
locate grain, which is found in filer > noise > add noise:
use this percentage:
unless your gif is super tiny, anything above 2-3% grain will make your file size extremely massive. use grain with caution!
STEP 5.1: adding text to your gifs
if you want to add text to your gifs, read this step. if you don’t, skip to step 6.
the most common font used with gifs on tumblr is calibri bold italic. photopea does not have calibri built in, so you will need to download it from an external source like here and then add the font into photopea. you will likely have to add it in every single time you make a gif, which is mildly annoying, but yet another tribulation of making Gifs For Free:
1. select the “T” icon on the left sidebar:

2.select the font bar which will appear up top, and then click “load font”
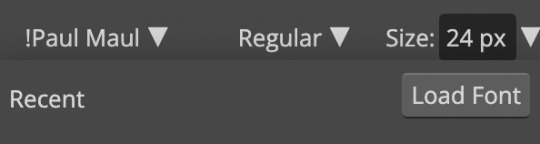
3. locate the calibri font file that you’ve downloaded in your computer and add it in. i suggest adding it in via zip file, because the zip file will include all of the different versions of calibri (i.e. bold/italic/bold italic, etc.). once you’ve loaded it in, search for it in the photopea font list and select it:

4. select bold italic

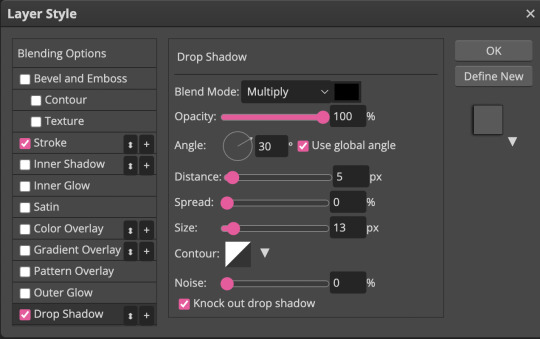
5. use these properties for the stroke (the outline of the font) and drop shadow (these are the only two elements i add to my fonts):

this is what your text should look like (sorry, it’s all pixelated because i had to zoom in):

you can adjust the size of the font as necessary and drag the text around to make sure it aligns with the centre of your gif (i’m not actually going to be using text for these gifs, but i wanted to show you because it does add a handful of extra steps)
STEP 6: save your gifs
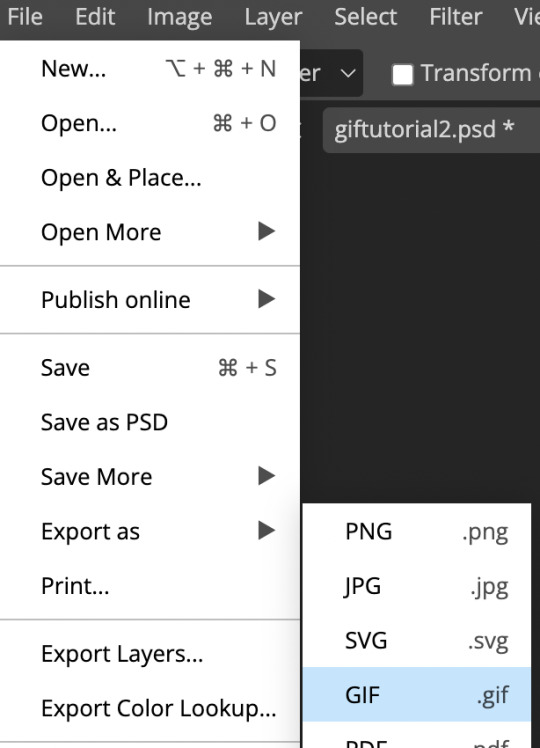
once you’re done adding your PSDs/manually editing your gifs, you’re going to save them by going file > export as > gif:
here, you will see a preview of your gif, as well as the MB total in the bottom right hand corner:
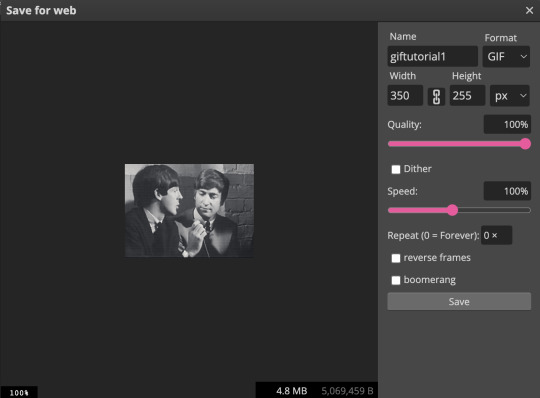
note how our gif went up to 4.8mb from 2.7mb after we originally saved it from gif brewery? that is almost entirely from the sharpening we added to the gif, and that is actually a pretty small increase; typically file size increases are much greater than that if you’ve sharpened your gif, especially with coloured gifs (black and white gifs inherently have smaller file sizes due to the lack of colour).
also note the “speed” bar - sometimes if i feel like my gif is still too fast, i’ll reduce that 100% to 80-90%.
if your file size limit is under 10mb and you’re pleased with your gif, click “save”
STEP 7: upload to tumblr
click photo > upload photos > and add your gifs. now, this is what i meant by the “half-size, side-by-side” gifs:

now, to add a caption with smaller font and smaller spaces between lines, you need to go into the HTML of your caption, which can be done by clicking the gear icon in the top right corner of your gifset and selecting HTML:

this is a sample HTML caption code. you can learn the principles of HTML by googling it, or just deducing it from the below:

and this is what that code looks like:

you can also add colour to your captions by adding a code into your HTML from this website
STEP 8: click post!
congrats! if you’ve made it to the end of this tutorial, you’ve successfully created a gif for *almost* free. i really do promise that this all becomes really fast and like second nature once you get the hang of it!
please feel free to shoot me a message if you have any questions at all! 🤍
- xoxo, caro, aka pennie
#holy mother this was a lot more work than anticipated#but it was fun!#please message me if you have any questions#i mean it!#i feel like this got very convoluted at times - especially discussing gif sizes - so plz message me if you need anything cleared up#gif tutorial#mine#giffing#gifs#tutorial
130 notes
·
View notes
Note
oh my god the US tour really was something else!! I had completely forgotten the whole roommate drama thing 😳 and the fact that Olli and Allu were the last ones awake drinking mountain dew and talking about technology!! 🥺 I bet they shared secret kisses and maybe sometimes even fell asleep cuddling on the sofa?? 🥺
maybe some night Aleksi falls asleep before Olli and Olli barely awake confesses his love to sleeping Aleksi but in reality Aleksi just pretended to be asleep because he didn’t want to go to his own bunk to sleep alone??
i have very fond memories of the US tour because (for once) everything happened around my timezone! 🥳i am not from the US but it was exciting to get some content while i was awake 👉👈
and yes yes yes! we all know olli is a big sleepyhead and a cuddly boy so they definitely cuddled to sleep in the sofa sometimes (and yes, maybe they shared some kisses, yknow you gotta kiss your homies goodnight.......)
i love the idea of a late night love confession so much because omg it makes perfect sense!!! olli is too shy to confess his feelings, so he waits until late and spills everything out when he thinks aleksi is asleep, but now aleksi has to decide what to do with that information because maybe olli didn't mean it? or it was just a joke? 🥺💗💕💖💘
fun fact that does not leave my head: their US tour bus was smaller than their EU one and it didn't have a separate "lounge room" (sadly I only remember that the one from the electric callboy tour did, don't know about the one from their headline tour) so I am 99.9% sure that they did spent many many nights awake until late, having discussions about technology like the big nerds they are....... quite close to the bunk beds, actually
so picture this stupid scenario with me under the read more because i don't wanna be annoying with an extra long post 😊
olli and aleksi, alone and awake at 2 AM discussing tech stuff like whether or not a custom built desktop pc is better than a macbook, their bandmates and/or tour managers sleeping trying to sleep less than 2 meters away from them and wondering:
what the actual fuck are they talking about
why the fuck are they awake so late? (options: they are still high on adrenaline from the shows, aleksi is a night owl, oli spent the e n t i r e day napping in the couch, all of the above, none of the above)
will setting them up with each other make them finally shut the fuck up?
is the tech discussion some sort of courtship ritual that everyone else is not nerdy enough to understand, and will it stop once they are together?
so niko and joonas try adding a bit of jealousy and drama to make them finally ✨realize their feelings✨, but it kinda doesn't work because both aleksi and olli are way too deep in denial ("we're just friends", "we have mutual interests", "we stay up late just talking and working on songs and merch stuff", "our relationship is purely professional")
well, it works a little, because "what if he likes me too?" is now a recurrent though in those empty head of theirs, and the nights have been way more quiet since then. The weird silence that settles when they run out of things to talk about (because they are too busy overthinking about their interactions with each other and if what they said or did could be interpreted as someting else) is way worse than the tech talk, though
maybe the whole thing gets solved during that tour, they confess their feelings and spend the rest of the nights kissing and cuddling and whispering sweet nothings to each other (which on some nights makes the rest of the band want so desperately to get the tech talk back, but they are really happy for them); and when they both get sick it doesn't matter as long as they can take care of each other 💖
or maybe it doesn't get solved and they pine after each other for the rest of eternity, but somehow they still get sick at the same time and blame it on the mountain dew because of course it has to be that, what else could it be? (no one believes them)
the partial solution from mr CEO for their next tour? upgrade to a bus with a separate lounge room, but they better not start fucking in there or else he will straight up ban the room from being used (he just wants the quiet space for himself)
#asks#sparfloxacin#thank you so much for the ask because i love talking about these idiots and about the twins a lot 🥺💗💕💘💖💕💕💗#i should probably use my sideblog for this but it's weird because it's still empty because i haven't decided on the layout shdfjsdhf#and this reply is really long because my thoughts come with additional thoughts that maybe do not make sense at all but well 🤭#thoughts have been had now it's time to rest (while letting the thoughts multiply on their own)#i hope the read more works....... fucking hellsite do not fail me or else.......#babies of the band 💖
23 notes
·
View notes
Text
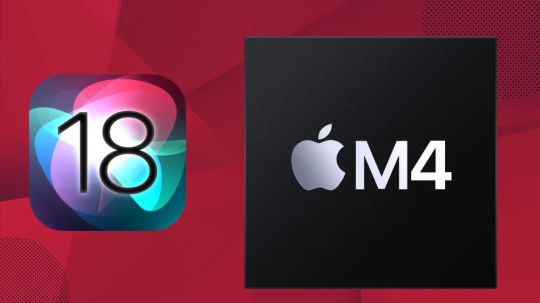
Apple M4 Chip and iOS 18: A Look at Next-Level Performance
Apple M4 Chip Rumors
Apple M4 Chip Features
Bloomberg’s Mark Gurman says Apple will add M4 Chips to its Macs in late 2024. Artificial intelligence performance will be improved by the Apple M4 Chip. Apple intends to launch its first Macs equipped with the Apple M4 Chip family of CPUs in that time frame.
M4 Chip Release date
Since Apple unveiled the M3, M3 Pro, and M3 Max CPUs all at once in October of last year, it’s probable the Apple M4 Chip range may be shown around the same time. Gurman said the M4 will be arriving in late 2024 and early 2025 for all Macs.
The first to get Apple M4 Chips are the iMac, low-level 14-inch MacBook Pro, elite 14-inch MacBook Pro, 16-inch MacBook Pro, and Mac mini. The 13-inch and 15-inch MacBook Air models will get them in springtime 2025, the Mac Studio’s in mid-2025, and the Mac Pro later in.
Apple is approaching manufacture of the Apple M4 Chip, which will come in at least three flavours. Donan, Brava, and Hidra are the codenames for the entry-level, mid-range, and top-tier chips, respectively. The low-end Mac mini, MacBook Air, and entry-level MacBook Pro will all utilise the Donan chip, while the higher-end MacBook Pro and MacBook mini will use the Brava chip.
Since the Hidra chip is made for the Mac Pro, it is likely a “Ultra” or “Extreme” category processor. With regard to the Mac Studio, Apple is testing variants that include an M4 Brava CPU variant that is likely of a better calibre than the M4 Pro and M4 Max “Brava” chips, as well as an unpublished M3-era chip.
The maximum amount of Unified Memory that M4 models of Mac desktop computers might handle is 512GB, a significant increase above the present cap of 192GB.
Although TSMC, an Apple supplier, is expected to use an enhanced version of the 3nm process for increased performance and power efficiency, the M4 chips will be constructed using the same 3-nanometer technology as the M3 processors. Apple also intends to include a much enhanced Neural Engine with more cores for AI applications.
This week brought news of Apple’s hardware roadmap. They plan to release a complete portfolio of M4-based Macs later this year, along with various iPad models, and should solidify plans for the introduction of newer iPad Pro and iPad Air models next month.
As they examined how things are going with the iPhone 15 Pro now that it is halfway through its flagship lifetime, they also heard some new rumours regarding iOS 18, which is scheduled to be introduced at WWDC in a few months. Continue reading below for all the information on these tales and more!
As to the source, the M4 series of CPUs will be rolled out later this year to the MacBook Pro and iMac lines, and during 2025, additional models like as the MacBook Air, Mac mini, Mac Studio, and Mac Pro are anticipated to get updates as well.
According to a recent report by Mark Gurman of Bloomberg, other models with M4 series CPUs would be introduced in the next year, after the initial release of the first ones later this year. Gurman provided a more detailed plan for these Macs in his Power On email today.
Gurman reaffirmed that the Mac Studio and Mac Pro would be compatible with Apple’s internally tested M3 Ultra processor, but he added that it is “all but assured that at least some of Apple’s high-end desktops” would forego the M3 chip series.
Gurman said that Apple would highlight the M4 processor series’ artificial intelligence capabilities.
iOS 18
iOS 18 Features
According to reports, Cloud Servers Won’t Be Used for Apple’s First AI Features in iOS 18
According to Bloomberg’s Mark Gurman, Apple’s initial round of new AI capabilities for iOS 18 won’t depend on cloud servers at all.
In the Q&A part of his Power On email today, Gurman said, “It appears that that the first set of features will work entirely on device as the world watches Apple’s big AI unveiling on June 10.” “That indicates that there is not a cloud computing element to the organization’s large language model, the application that enables the new capabilities.”
iOS 18 update
Gurman predicts that Apple will likely continue to provide certain cloud-based AI capabilities powered by Gemini from Google or another supplier. Regarding possible collaborations in generative AI, Apple is said to have spoken with businesses including China’s Baidu, OpenAI, and Google. Although it is uncertain whether Gemini or another chatbot will be directly incorporated into iOS 18, it is not anticipated that Apple’s ChatGPT like chatbot would be included in iOS 18.
Given that Apple supply chain experts, like Ming-Chi Kuo and Jeff Pu, have said that the business is aggressively buying AI servers, it is plausible that Apple may eventually provide some of its own cloud-based generative AI capabilities.
New generative AI capabilities for the iPhone’s Spotlight search function, the Siri, Safari, Shortcuts, Apple Music, Messages, Health, Numbers, Pages, Keynote, and other apps are reportedly coming with iOS 18. Previously, Gurman stated that generative AI would let Siri answer more difficult inquiries and auto-complete phrases in Messages.
iOS 18 release date
At WWDC, which runs from June 10 to 14, Apple is likely to reveal iOS 18 and other software improvements.
Read more on Govindhtech.com
#apple#ios18#applem4chip#cpu#ai#applemusic#chatgpt#openai#gemini#siri#macmini#macbookpro#macbookair#m3chip#technology#technews#govindhtech
4 notes
·
View notes
Note
Hello I have a question.
An update fucked up my laptop and everything on there that I had saved, organized, for the last 3 years just disappeared. I assumed my things were saved on iCloud but I didn’t have enough storage. (I also stupidly didn’t have anything saved on a physical drive). It’s been a few months, and very hard to move on, but i decided I’m going to become a very organized and overprepared person. Do you have any tips or advice on how to be organized and prepared to the point where you’re never or rarely caught off guard when something happens ? I’ve been doing some research but I want to know if there’s insider advice I’m missing. Before this incident tbh I was a very go with the flow, we’ll deal with it when it happens/it probably won’t happen person. I don’t want to be that person anymore.
I don’t know much about planning ahead, and organizing, I have bought planners before but rarely use them. Thank you.
Always hope for the best, but prepare for the worst.
In this instance you could’ve been a bit more prepared. Personally, I like to research all my options before I start investing my money into them (software, hardware, cloud storage, etc). In my current set up, I have a hard drive that my MacBook gets backed up to regularly using the app Time Machine. Instead of iCloud, I decided to go with Google Drive and I’m able to manage my files from the desktop app easily. So technically, not much is really stored in my actual laptop. If I had not looked up different methods of having everything backed up I think I would’ve only been using Google Drive this entire time(so I went with physical storage backups + cloud storage backups). So my advice is when it comes to making a plan to have backups for anything, think of what could be the worst possible scenario that you could find yourself in and use that to choose the best options that will avoid it from happening. There’s so many resources online that take the guessing work out of a lot of things so use it to your advantage. YouTube is a big one for me, there’s always up to date content that just hands over all the answers to you.
2 notes
·
View notes
Note
Hi, I love your profile and sims! I’m ‘kind of’ new to the sims world! I’ve been playing since 2018, but not religiously. I just wanted to ask about your mods folder (sorry if it states somewhere on your profile these kind of questions aren’t allowed, i’m new to tumblr too and still understanding how it works). Feel free to ignore this question if it’s not allowed. I understand that by having lots of folders within the mods folder it can make the game lag. I just wanted to ask how your mods folder looks? As I want to keep mine tidy and be able to find certain cc easily. I’m also in the process of buying a pc as I am currently using a macbook and have so much cc it’s starting to not work… If you have any tips or suggestions with having a pc (if you have one yourself) and how your set up looks, I would really appreciate it. Thank you!! 🤍
hii, firstly welcome to simblr/tumblr! 🫶
I’m an on/off player too, and completely get wanted to get things organised and tidy. It’s interesting to see how other people organise there mods for sure and it definitely helps if you find yourself running into buggy or broken pieces of cc for sure.
You’re right in saying having a lot of mods can contribute to game lag, but I would also say it depends on your system and how powerful it is. Right now I’m pretty sure my mods folder is around 40gb and needs a desperate clean up, but tbh it’s running okay! I wasn't in a position to own a desktop pc anymore so I got a laptop (asus ROG Strix gaming laptop) and I absolutely LOVE it. If I had the space for a desktop I would probably advise that over a laptop, but it really depends on personal preference and tbh I'm enjoying gaming from the sofa. My set up is literally on the sofa with my laptop on a lap tray and that's it!
my mods folder. It's an absolute mess and I am ashamed of it lol - in my packages I have some core folders of how I tried to organise things like Packages, Overhauls (textures and lighting mods etc) Gameplay Mods, and then any other mod that just needs to be placed into the mods folder upon installation like MCCC, Tmex TOOL, etc. In 'packages' I have things categorised into all sorts; CAS items, Clothes, Hair, Build/Buy - they also have folders within those that are more specific e.g skins, makeup, female hair, male clothes etc.
I hope this helped somewhat, my dm's are always open so feel free to message me there if you want! 🩵🩵
2 notes
·
View notes
Text
in other news my husband bought me a new laptop!!!!!!! :)))))) since my macbook is 10 years old and for the last few years has been almost completely unusable(so much of its software and hardware is fucked up and nothing ive tried has fixed its issues, it cant get its iOS updated anymore, it always has to be plugged in to work, and its so slow it cant run more than one program at a time), it is essentially a paperweight. this new laptop is specifically for gaming and he got it for half off (like its normally about $1k but for some reason electronic stores did black friday deals super early) and its brand new, not refurbished, and not an apple (aka shitty) product. he picked it up for me today while i was sleeping so it was just here when i woke up like it was christmas day
ive been customizing stuff on it and playing around with it to get a feel for it. i havent tried to run any games yet but i downloaded witcher 3 (since its a pretty taxing game i think itll be a good performance test), and it installed in like 10 minutes. if that game runs without issue then i bet if i got an extra stick of 8gb ram i could run freaking anything, even games like metro exodus and cyberpunk. altho my desktop PC is an absolute beast and can run any game--my husband built it for me in 2016 for my birthday and even tho it could run cyberpunk surprisingly well with those specs, he recently replaced the graphics card, mother board, and doubled the ram so it's basically a tank of a gaming PC now--i cant take that thing on trips obviously. which i have to do more often than i would like. i really needed a functioning laptop, so im super excited!!!!
in my opinion i dont deserve such a nice thing at all, or even the PC i have, especially because i havent had an income since 2019. but my husband disagrees lol he fuckin rules, i love him. aside from how much he takes care of my chronically ill ass and puts up with my shit, financially supports me, does countless things for me out of pure selflessness, always wants to make me feel good, im always amazed by the thoughtful way he gives me gifts without needing to ( its never my bday or a holiday ykwim). theyre either total surprises to me that blow me away bc the level of attention and care that went into it, or its practical things that hes like "im getting this thing for you bc you need it and you deserve nice tools instead of settling for crap, idc what you think!!!!!!"
he even bought me a brand new iphone too since my iphone is 7yrs old, cant get updated past iOS 12 meaning i cant use or download a ton of apps i rly need and its constantly running out of space and starting to have battery issues. ive been avoiding getting a new one for a long time cuz ive been clinging to having an audio jack but the phone has become so obsolete software-wise that it is more problem than its worth just to have an audio jack. although the new phone has yet to arrive which is frustrating cuz he ordered it 3 weeks ago and it still says its in the order stage, not even shipped.
regardless i feel so sugared rn lmao. im gonna play witcher 3 on this laptop and see how it runs :3
#so many nice things i dont deserve but he gets for me bc he loves me..... and its not like hes made of money. we were homeless a year ago#he lives on veteran pension and govt grants and scholarships#so these gifts r not insignificant like it would be for a rich person#he just wants the best for me bc he loves me uwu#isnt that what love is tho--wanting the world for ur partner#no matter the cost#when hes done w school and gets a job hes like extremely insistent on buying me a new car n buying us a house#since my dad has my car and hes not taking care of it at all i had to beg him to get the oil changed last time i visited him:(#and i rly love my car so it hurts seeing it get neglected and fall into disrepair....#dear god im writing an essay in these tags
24 notes
·
View notes
Text

Pabitra Banerjee is a Full-Stack AI Engineer with some knowledge of Blockchain Technology and a tech enthusiast. He is the Founder & CEO of MB WEBBER'S, a Software Development company based on Manbazar, Purulia, West Bengal. He is the Founder & CEO of some more companies based on Manbazar, like - Code Explorer, Dev Line Community, etc. He is working actively to spread Science & Technology to the common people. He is very fond of Astrophysics & Mathematics. He writes actively about Astrophysics and latest space missions by all of the space agencies on Universal Space Missions.
Biography
Pabitra Banerjee, born on January 22, 2004, is an individual with a notable presence in the technology sector. Hailing from Manbazar, West Bengal, he has demonstrated a keen interest and enthusiasm for various domains within the field. With a focus on spreading awareness and understanding of science and technology among the general public, Pabitra is involved in initiatives that aim to bridge the gap between technology and everyday life. His passion for astrophysics and mathematics is evident in his active engagement with topics related to space missions and scientific advancements. Pabitra Banerjee's endeavors reflect a commitment to the exploration and application of technology for the betterment of society.
Education
Pabitra Banerjee pursued his primary education at Manbazar Board Primary School and later continued his secondary education at Manbazar Radha Madhab Institution, both situated in his hometown. After completing his 10th standard under the West Bengal Board Of Secondary Education(W.B.B.S.E.) in 2019 and his Higher-Secondary Examination under the West Bengal Council Of Higher Secondary Education(W.B.C.H.S.E.) in 2021, he embarked on a journey in higher education. Initially enrolling in a B.Sc. Mathematics program at Bikramjeet Goswami Memorial College, under Sidho Kanho Birsha University, Purulia, he later transitioned to pursue B.Sc. Computer Science at Manbhum Mahavidyalaya under the same university in 2023. This academic path reflects Pabitra's interest in both mathematical and computer science domains.
Parents
Pabitra Banerjee is the only son of his parents.
Father : (1975 - present) Mr. Pulak Banerjee.
Mother : (1983 - present) Mrs. Babita Banerjee.
Development Projects
Pabitra has shared a lots of development projects done by him on his GitHub Account. From there we can know that he has knowledge about Full-Stack Web Development, Android App Development, Game Development, AI and Machine Learning, Blockchain Technology, DSA and many more domains of Computer Science. Here are some of his development projects -
Dev-Portfolio : This is one of his best portfolio website. The website has been built using HTML, CSS, SAAS and JavaScript. The website has a very clean UI and the design and responsiveness shows his ability to develop top class Front-End. Take a look at Dev-Portfolio.
Mac-Terminal-Portfolio : Pabitra has created a terminal interface of MacBook using HTML, CSS & JavaScript. There he has created a simple portfolio website. Take a look at Mac-Terminal-Portfolio.
Book-Finder App : A simple website to find your next book to read and book recommendations. An internship project of iNeuron. This website is developed using the React library of JavaScript. Try Book-Finder App.
Clash-Of-Space : Clash of Space is a cloned version game of the original Radius Raid of js13kGames (A JavaScript coding competition for HTML5 Game Developers) which is a popular game for kids. A space craft shooting game built with HTML5, CSS, JavaScript. It's a desktop version game, so can be played only in desktop/laptop. Play Clash-Of-Space.
MB Health Bot : MB Health Bot is a conversational agent designed to mimic a psychotherapist in order to provide emotional support to people with anxiety & depression. At its core, MB Health Bot is a chatbot trained on a text dataset using Deep Learning and Natural Language Processing techniques. MB Health Bot can provide general advice regarding anxiety and depression, answer questions related to mental health and make daily conversations. Try MB Health Bot.
If you want to explore some more projects done by Pabitra, please go to his GitHub Project Website and Pabitra Banerjee.
Core Programming Projects
Pabitra is a Full-Stack Web Developer, but he has the ability to contribute on Core Programming. He has developed a lots of JavaScript & Python Libraries to help developers to save their time and enhance efficiency. Some of his libraries are -
JS-DSA : JS-DSA is a comprehensive collection of data structures and algorithms implemented in JavaScript. This project is designed to be a helpful resource for developers, students, and anyone interested in learning about data structures and algorithms through practical JavaScript examples. Install JS-DSA.
Google-Image-Fetcher : Pabitra has developed three different libraries for three different programming languages - Python, C++ and JavaScript to download required images directly from your terminal.
Advanced Math : Advanced Math (adv-math) is a comprehensive JavaScript library that simplifies advanced mathematical calculations, covering a wide range of mathematical topics such as basic arithmetic, complex numbers, linear algebra, statistics, geometry, trigonometry, calculus, financial calculations, units and conversions, equation solvers, and math expression parsing. This library is designed to provide developers with powerful mathematical tools for various applications. Install Advanced Math (adv-math).
Please go to Pabitra's NPM Profile and PyPi Profile to find more libraries.
Visual Studio Marketplace
Pabitra has developed a lots of VS Code extensions, which are currently available on Visual Studio Marketplace.
IDX-Dark-Theme : IDX Dark Theme is a stunning dark theme for Visual Studio Code that brings the elegance of Google's IDX design to your coding environment. With its vibrant colors and thoughtful design, coding becomes a delightful experience. Take a look at IDX-Dark-Theme.
To explore more go to Pabitra Banerjee Publisher Account on Visual Studio Marketplace.
PyConda Programming Language
Pabitra is working actively working on PyConda Programming Language. PyConda is a simple, Python-based programming language designed for ease of use and extensibility. With PyConda, you can write and execute code in a straightforward and intuitive manner. He has already released the 1.0.0 version of PyConda and want to publish version 1.0.1 at January, 2024. Explore PyConda.
Published Books
Pabitra is a writer who loves to write Bengali stories, poem, song and etc. But now he has started to write in English Language and published his 1st eBook.
Beyond Bits and Bytes: A History of Technological Marvels :: Embark on a captivating journey through the evolution of technology, from the dawn of primitive tools to the dazzling horizons of quantum computing and nanotechnology. In this thought-provoking eBook, Pabitra Banerjee, a Full Stack AI Engineer and Blockchain Developer, explores the remarkable history of innovation, invention, and progress that has shaped our world. Discover the visionary pioneers who blazed trails in computing, the birth of the internet that connected continents, and the transformative impact of artificial intelligence. This compelling narrative not only delves into the past but also contemplates the ethical and societal considerations that accompany the technological marvels of today and tomorrow. Join us in this exploration of the past, present, and future of technology, and be inspired by the relentless human spirit of innovation. View this book on Amazon.
From Novice To Ninja: Mastering DSA in C++ :: Embark on a transformative journey through the realm of Data Structures and Algorithms with "From Novice to Mastering DSA in C++," authored by Pabitra Banerjee, a seasoned full-stack AI engineer and CEO at MB WEBBER'S, a prominent software development company in Manbazar, West Bengal.
Recognition
Pabitra has already been recognized by Google, thus he has a Knowledge Panel He is also an open source contributor. GitHub spotlighted him for his outstanding contribution in the last HackToBerfest.
2 notes
·
View notes
Note
I hope you know you've earned the title Linux pro my friend. Installing linux on apple hardware is a challenge, installing a linux OS without support for the architecture/arm on apple hardware is truly triumph. Even if you don't believe it i bestow upon you an honorary title of Linux pro. Be well, and be free friend!
Well, to be fair, I didn't install Zorin OS onto an M1 Mac. It's running under a UTM (QEmu) Virtual Machine. I am, however, surprised that I got Zorin OS Core running on an ARM Machine, at all. I'm even more surprised that I've done it before anyone has documented it online. There are plenty of questions about an ARM version and M1 Virtualization on Zorin's official forum, but they usually go unanswered. From the initial forum posts I used to get my leverage, most people seemed to conclude that Zorin OS Lite would work just fine, but attempting to install Zorin OS Core over top of Ubuntu Server ARM resulted in dependency issues. I got this issues at first too, but after trying and trying again, I realize that Ubuntu Server 20.04's own repositories didn't contain the app versions that Zorin OS was looking for when attempting to install. I realized that Zorin's devs probably had to implement these in repositories of their own, and I was right. I found the list of official Zorin OS repos and "sudo add-apt-repository"ed about 3-4 of them into Ubuntu Server. After that, "sudo aptitude install zorin-os-desktop" ran without errors, and one reboot later, I was running Zorin OS 16.3 Core on an ARM Virtual Machine.
It's still not perfect. Strange oddities, glitches, and freezes occur here and there. For example, this is the second version of this post I'm writing. During the first draft, the VM froze, and I had to restart it. It just does that randomly, for seemingly no reason. I've added an app to the macOS host to see if it's the external SSD sleeping that's causing this issue, but I don't know, as of right now.
The Software Store (aka package manager) also doesn't seem to work properly. Nothing installs, and I always have to use "sudo aptitude install" to get stuff. I'm assuming, despite being the ARM64 version of Gnome Software, something under the hood is still attempting to install the AMD64 version of apps, causing the weird failures and indefinite stalls.
The main LibreOffice app, for some reason, also didn't appear in the Zorin Menu, and had to be added manually.
Only one of UTM's sound card drivers allowed the audio settings to appear as normal. Everything else eliminated a bunch of sliders in the "Sound" settings and muted the VM on startup. That was pretty annoying because I wanted to hear the Zorin OS login chime. Luckily, the one sound card option fixed all this, but for some reason, the VM occasionally starts up with zero audio. It always does this when I restart, so I always have to shut down and then turn back on to fix it.
I'm sure there's plenty more, but so far that's all I've found. I'm sure a more power user would find other stuff, but I'm really only looked to use Zorin OS as a productivity OS, so I'm not likely to run into much more.
To be fair, though, even with all the weird stuff, it still runs smoother than the native install on my 2011 MacBook Pro, so I'm not complaining. In fact, I'm just happy to be using Zorin OS on my desktop, at all.
#Netscape Results#rambles#linux#linux arm#arm linux#apple silicon#virtual machine#virtualization#m1#m1 mac#mac#imac#m1 imac#zorin#zorin os#zorin os core#arm#arm64
2 notes
·
View notes
Note
12 - do you ever have trouble focusing on writing? how do you get around that?
I need tips! xD
YES i have severe adhd it's been real fun trying to function in a society
what i do (some tips are replicable maybe some r not lol):
write when i Want to.... ofc this urge doesnt always strike, sometimes u do have to go force urself through a block, but i will listen to a fic playlist or daydream about the fic and it will make me Want to write down what im thinking about. having that actual desire helps lol. bc then, even if my brain is having trouble focusing My Heart/Dick still want to write so im more likely to keep pushing instead of give up
borderline sensory deprivation honestly, i can't listen to music or watch tv or anything when i write or read or think, so i blast white noise in my headphones and get completely sucked into the doc lol
i make a separate desktop on macbook that is just two windows, the fic outline on the left and the doc or writing program on the right. that way if i go to open a tab to google something for the fic i dont see other windows/tabs of Fun Stuff i was doing before that might distract me lol
i use the Forest extension with all social media blacklisted so that when my attention wanders and i open a tab to go to twitter or whatever by muscle memory, the extension puts me back in my place with the big "Ur gonna kill ur tree if u proceed" screen and im like "UUUGGHHHH thats right im supposed to be writing FIINEEE ill go back"
know when and how to give up..... sometimes writing rly isnt working but it's still good to try, if the words arent coming out right i try to settle for like. ok well i'll open the outline and i'll read over that, or reread earlier part of fic, to see if it reinspires me. if its really not working (if ur too tired/frustrated that will show in the writing style ukno) ill at least add bullet points of what the next parts of the scene should be. maybe i dont feel like writing fancy pretty sentences right now, but i can come back tomorrow and see the quick idea i jotted down on what i was thinking of doing next and that gives me a good jumping-off point
it helps to have external accountability!!!! write with a friend holding each other to a certain time period of Working on it, or just open a sprint site that has a global sprint bc then u can see other ppl working and it feels like ur racing them. body doubling with adhd helps with this too, if u go to a cafe/library and see others working it keeps u focused (like im not gonna open youtube and start watching some stupid shit with others able to see over my shoulder, im gonna Open My Doc)
this last point is only applicable if u have a stimulants prescription for adhd (or buy it somewhere i guess lol) but i definitely am 20-1000x more productive when i take my meds. the hyperfocus is way easier to kick into. sometimes when i pop my silly lil pill i can write like 4-7k average in a 3 hour sitting
Best of luck... Never give up........ also helps i think to pay attention to what conditions work for u and replicate them, like where u write best!! last summer i got one of them fancy clicky raised key keyboards + a riser for my laptop and that made typing fun, ill probably return to it eventually i just have it packed away atm
4 notes
·
View notes
Text
In high school I thrifted a windows 98 tower and one of those big boy white monitors. It was some family’s computer that they hadn’t even wiped, and I paid $6. I don’t know why really but it was far more common about 10 years ago to find obscure 2000’s windows software discs at thrift stores, funny games and art programs and the like, so I would buy whatever cool ones I saw to install on my tower, as well as upgrading some of the components and eventually moving to windows XP (backed up all of that family’s kid’s artworks and photos because I had grown to cherish them) and it got to the point where my brother, my one friend and I genuinely enjoyed using this desktop just to goof off. Unfortunately I didn’t end up getting to pick it up during my mom and stepdad’s divorce in 2020 and it is no longer with us, along with my PC junior, my commodore VIC20s (I had 2 of them) and all the other old computers and components I’d collected over time. I did end up getting my outdated box of fucked up laptops and the iMac G4…

And I’m so grateful this big guy^ is still in my basement with a few garageband files still on it.. but unfortunately, I never seem to encounter 2000’s apple software at any thrift stores, so there isn’t much to do besides fuck around on the same version of garageband I grew up with. Still, I am grateful. I still need to order on ebay the same generation macbook that I have in the basement, so I can switch the hard drive from the broken one to a functioning one, to gain access to all of my photo booth photos from 2015 and before
5 notes
·
View notes
Text
What’s better, a desktop or laptop for programming? Why? 🖥️💻⬇️⬇️
Both are better and both are worse.
instagram
I own both a desktop and I have a laptop. My desktop is connected to a 32″ monitor, gaming keyboard and a mouse. To say that it is awesome is an understatement. My laptop is a 15″ Macbook pro (2014), i5 with 16GB memory and 512GB disk. My desktop has 32 GB memory, much faster i5, and has as many disks and disk space as I want to put into it.
👩🏻💻But back to programming, coding and hacking. Which is better ? 🤔
💻I would say, the laptop, but that is cheating, because over 90% of the time I use it, I have it connected to a 27″ display, Mx Keys keyboard and Mx Master 3s. So it is pretty much a smaller version of my desktop computer pretty much. 😍
😱If I needed to get rid of one of them, it would be the desktop one. I can take my laptop and have it on my lap in front of the TV, in my bed, on a plane, in different countries and so forth, if I needed to. I have taken it to hold lectures, tutorials, code reviews and many other things, which frankly, I would not even try to do on my desktop. 😌
🫣Before you ask, why do I have both ? I am hard pressed at answering it differently than, because I can :) I play games on my desktop one, editing movies, keep my photo library and many other things. 📽️👾
💯In a perfect world, I would have my desktop on and a smaller laptop.
🛻So, space and transportation. If you need to take it out of the house once in a while, then it is the laptop. If you ever want to meet at someones house and do a quick hackathon, then the laptop. 🤩
😇Laptops are seriously fast, with an ssd disk, you never have to wait for anything, even laptops you might consider being slow, like i3 and i5 laptops. With enough ram and fast disk, you never have to wait for anything. If you are doing web programming, then you can even get a cheaper one. All computers are very fast, the fastest ones are just crazy fast. 🏎️
❗A quick pros and cons (not a complete list, but gets the job done) :
📍Laptop pros
🔖portability
📍Laptop cons
🔖disk space
🔖memory
🔖not being able to tinker and update (most of them, many do allow for it)
🔖not ideal for storing a lot of photos
🔖expensive
📍desktop pros
🔖expandability
🔖put in as much disks as you want
🔖usually can do 32GB memory or even more
🔖Can have the latest and greatest graphic cards
🔖Does not get warm in your lap
🔖Allows for much better keyboards, mice and trackpads
🔖cheaper
🔖assemble one yourself, and no part will break that costs a lot to replace
📍cons
🔖no cons really, except for portability perhaps
I like my machines, but my laptop much more.
2 notes
·
View notes
Last Seen Blogs

freshnewmeat4u2
Untitled

harmonisphere
HARMONISPHERE

gaymirajane
my brain is rotting

luvba3
the love you give

collegegradcowboy00
Gay Cowboy