#dress pattern free
Photo
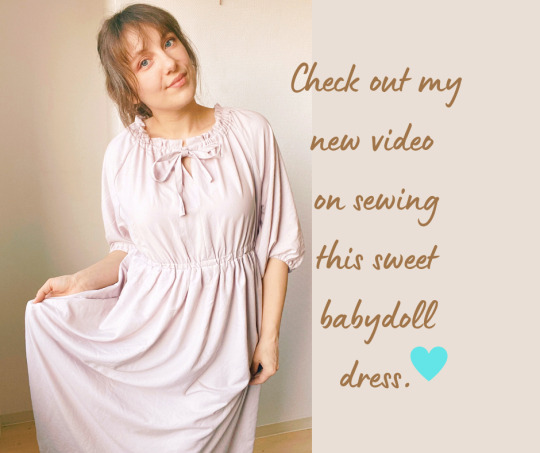
youtube
#sew#sewing#modern patterns#modern sewing#modern dresses#babydoll#babydoll dress#maternity#maternity dress#sewing patterns#simple dress pattern#dress for a girl#dress pattern free#modern fashion#pattern making#diy fashion
3 notes
·
View notes
Text


More sprites from the iam8bit Undertale vinyl.
#no real pattern just ones I felt inclined to do#all free to use without credit obv since they're not actually my sprites#although I guess link back to this post if it's convenient?#undertale#wd gaster#undyne#everyman#froggit#ice wolf#burgerpants#grillby#dress lion#mettaton ex#undertale redacted
446 notes
·
View notes
Text
I saw people talking about how Ted would own so many patterned button ups and had the AWFUL realisation me and this man would share a closet.
(Also long haired Ted propaganda be upon ye)
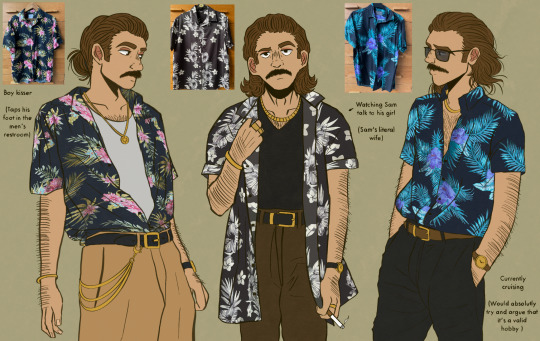

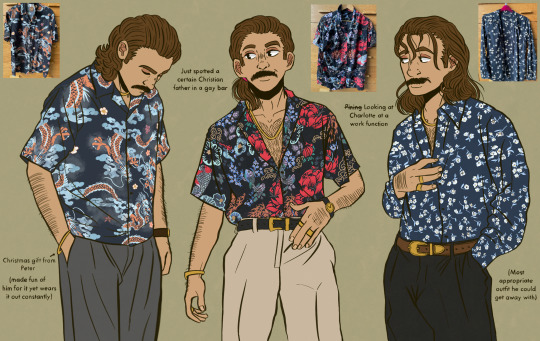

#please acknowledge the fact that I hand drew all of the patterns because it took SO LONG-#I would like to 100% blame @cowardlykrow for acting as the devil on my shoulder and convincing me to draw this#I also have 8 more button up shirts- 3 are plain and the other 5 are so out there that only a dyke could pull them off 😭#he’s my autistic hyperfixation and I get to dress him up as a personal picrew however I like!!!#I was trying to be cute and draw him with different hairstyles for one and JOEY CUT HIS HAR WHILE I WAS DRAWING HIM WITH A PONYTAIL-#dw this is just a minor setback I will continue to be a long haired goat bros truther#I’m afraid the ‘he’s just like me fr fr’ jokes got a little too out of hand on this one chief#to be cringe is to be free ig#ted spankoffski#theodore spankoffski#starkid#starkid productions#team starkid#fanart starkid#starkid fanart#tgwdlm#tgwdlm starkid#tgwdlm fanart#the guy who didnt like musicals#the guy who didn’t like musicals fanart#time bastard nightmare time#starkid time bastard#time bastard#nightmare time#hatchetfield#hatchetverse#hatchetfield universe#nmt#fanart#my art
250 notes
·
View notes
Text
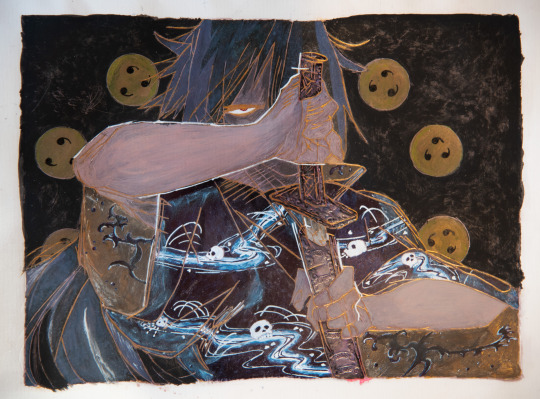
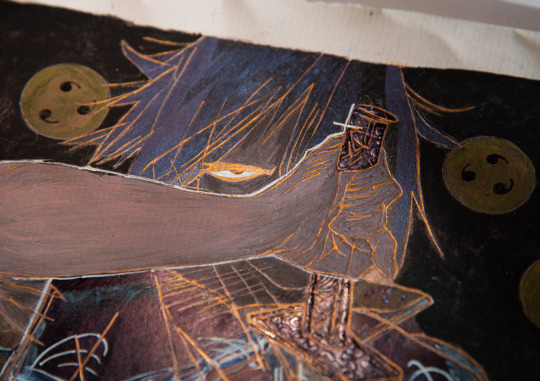
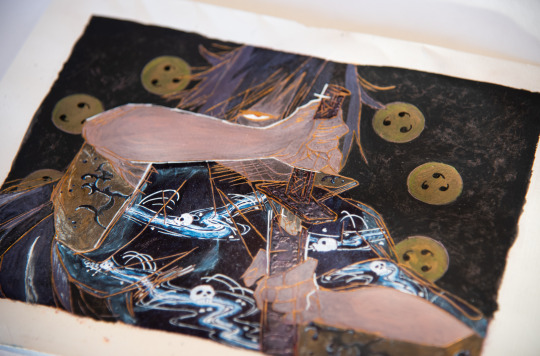
Another year, another outfit to die in! Happy birthday again Izuna!!!!!!
Like last year, I played with someone else's lines for these charming patterns, thank you so much Lena @elhnrt ! I had a ton of fun :D
Check the readmore for pattern references and explanations, there are some easter eggs in there :)
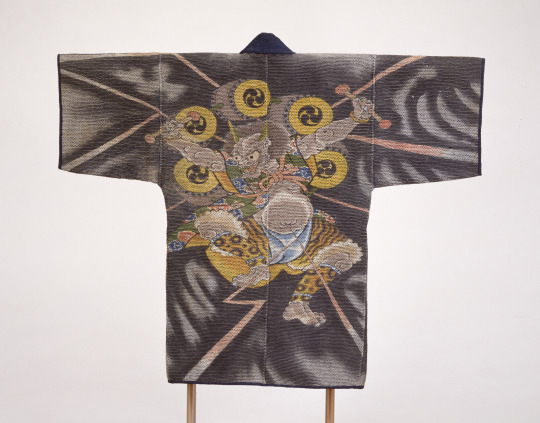
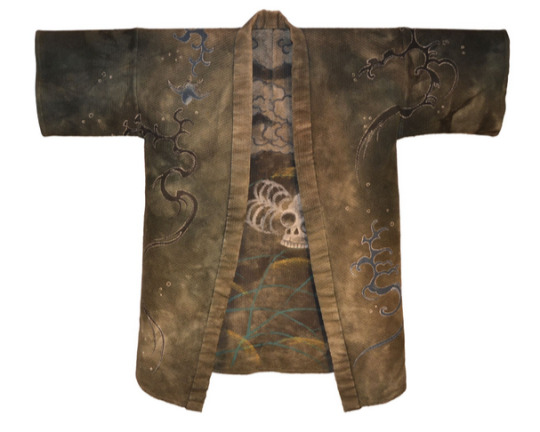
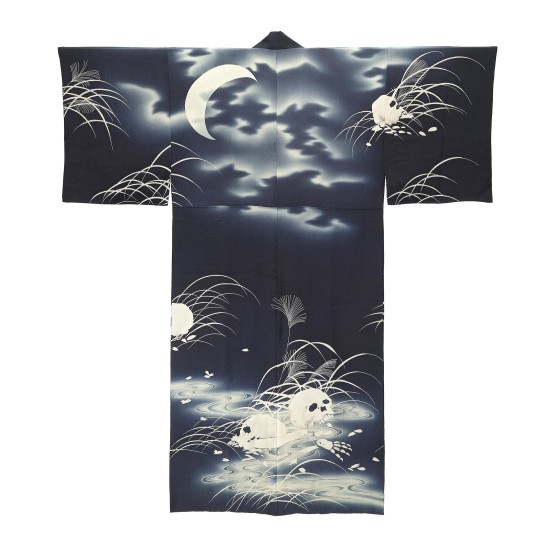
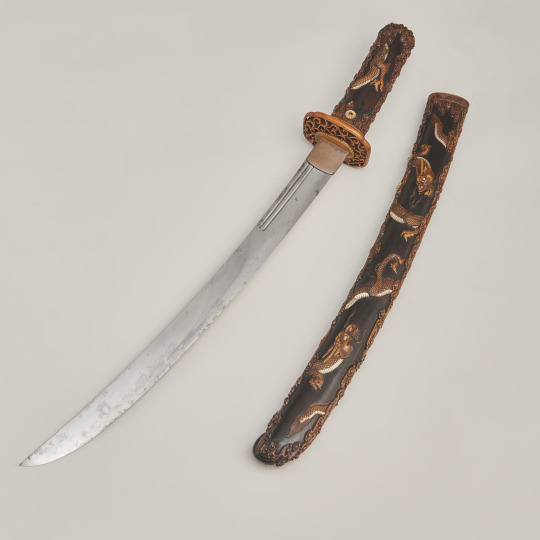
(x,x,x,x)
My goal for this piece, in addition to playing with patterns and textures and adding some Naruto references, was to add as many death flags as possible.
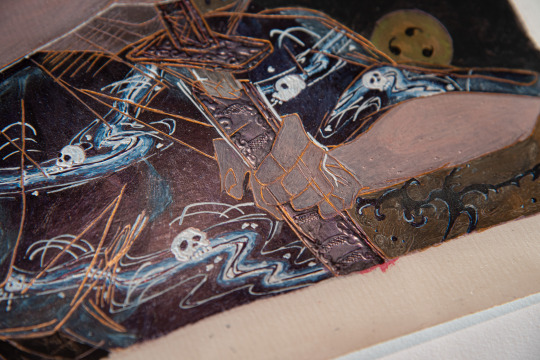
The idea of having Izuna in a fireman's coat is obviously not from me. I've always like the idea of Uchihas in fire resistant clothes, and the opportunity for a thick texture alongside a reversible double pattern is very appealing. I used the image of the second reference as a base, with skulls on one side and stylized lightning patterns on the other (visible inside the sleeves and collar). Both were common immagery of firemen coats.
The actual skull pattern is taken from the third reference. I'd seen this one before and before even learning anything abt it it was too beautiful to pass up. Those white and navy gradients are absolutely delightful and I enjoyed using my gel pens for them very much.... This particular type of imagery with skulls and bones in a field is called Nozarashi, inspired by Buddhist representation of death and transience.
The lightning pattern itself is a reference to water and lightning dragons :) Like Tobirama's iconic jutsu, it's one of the hints of what's abt to happen to our little guy. The scabbard is also decorated with dragon motifs for the same reason.
The background pattern is taken from the first reference, another fireman's coat with an illustration of Raijin, the thunder god. He is often representated with drums decorated with tomoes. It works nicely as a standard looking sharingan illustration, with a reference to Tobirama's hiraishingiris with the thunder imagery, like the thunder patterns inside the coat.
If you're interested in this I recommend the book linked in the second reference! It is entirely about skeleton motifs in japanese clothing of the early 20th century.
#mine#mixed#wip#naruto#uchiha izuna#been looking at some many fun patters I really went all in for this one#I love borrowing people's lines bc I do not care much abt anatomy or even drawing clothes tbh but patterns and textures....#it's like I'm dressing up a little doll :)#you can tell I was feeling myself seriousposting bc I capizalized the names...#anyway this was a lot of fun and of course actually quite unserious#for exemple you'll notice all these are either from late 19th/early20th c. despite the warring states era being obviously sengoku coded#later designs were easier for me to find references from and information on since I do not know much abt the subject#I allowed myself these liberties bc the timeline (wether aesthetic or narrative) in naruto is hardly strict#also it's usually the senjus who are associated with Buddhism and the uchiha are more shinto leaning but well.#you can tell yourself this is a sign of early konoha corruption on our guy Izuna#if you have any more questions abt this feel free to ask! this was a surprise again so i haven't posted any wips#but i do have some pictures of the process and I always love to chat
178 notes
·
View notes
Text
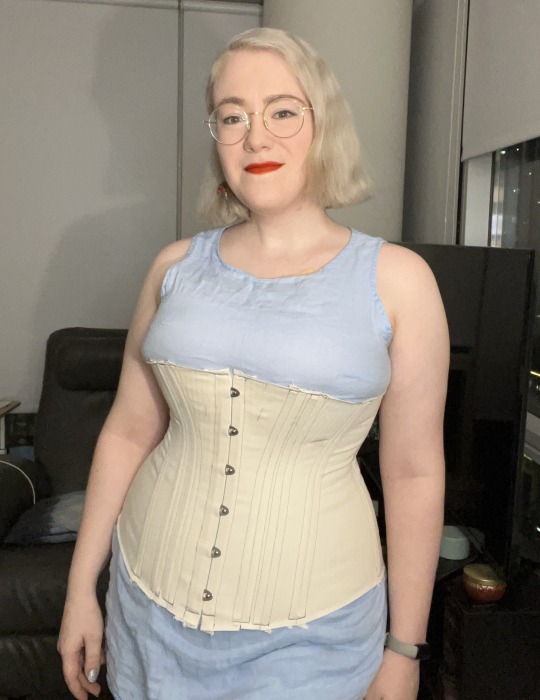


Free pattern announcement!!
I’ve been working together with clockwork_faerie to bring you a pattern from an extant 1890s corset in my collection. (Waist 33”, bust 40.5”, hips 44”). It’s available for download on my blog here 🧁
The original has loads of cording and very few bones; for ease of mocking up I just made this with bones in the seams. Since it’s paneled and not gusseted, it was a super fast make - this whole thing took three hours. I made no alterations to the pattern for this mock-up. FYI, it is too small for my bust as is, and most people like to have an even 2-4" gap at the back.
This would probably best fit measurements between 38-46” bust, 33-38” waist, and 44-48” hips, but it’s also easy to modify since it’s paneled.
I wanted to make this available for free to promote access, but if you have the money and want to support more projects like this, there is a donation button on the blog (or you can use ko-fi here).
The full size range is now up on Michelle‘s Etsy – link HERE! Go buy <3 <3
Definitely tag us if you make it, I’d love to see!
329 notes
·
View notes
Text
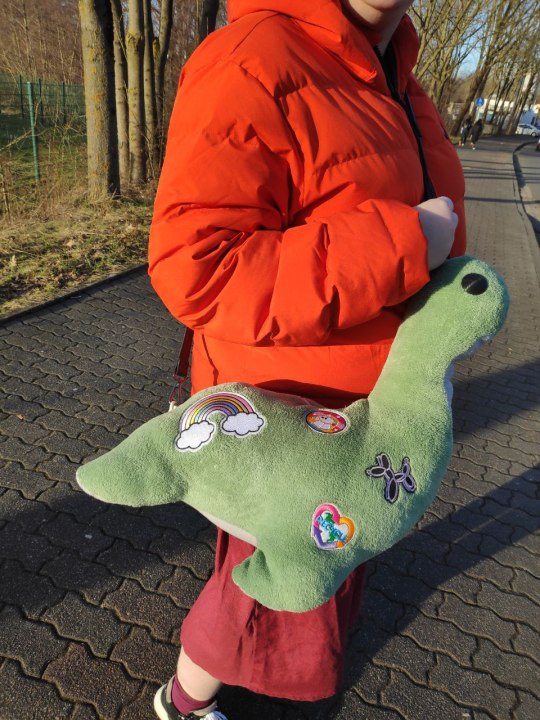
10 days ago, I decided I would get started on that linen summer dress with the swooshy skirt I've had all the materials for since last summer. So, naturally, 9 days ago, I did unspeakable things in a text editor software to reformat this free Apex Legends Nessie pattern by Jackalodreams on Deviantadt so most pieces fit on less pages. Then I printed it at 200%, taped the pieces together and... Things got a bit out of hand.
Long story short, I've got a new purse, and it made at least three separate adults who saw it smile squeal in public.
Construction notes after the break!


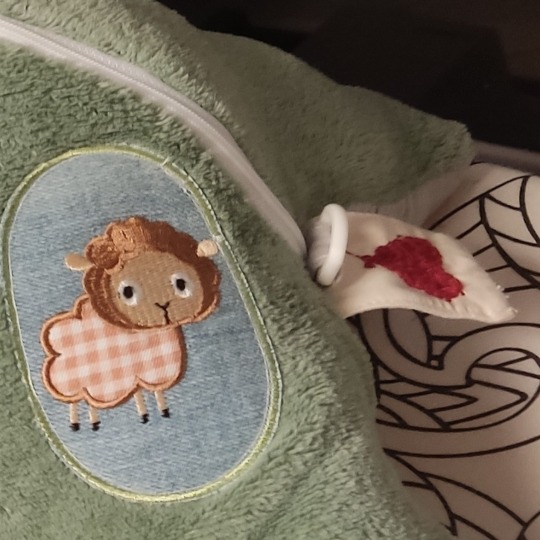
I think it only took me an evening or two to make, the main thing was getting all the materials. Zipper is from a duvet, all other hardware, eyes included, are 3D printed with PLA. (Pro tip: don't size up safety eye STL files unless you have a way to size up your fabric thickness accordingly.) Patches are mostly from stash, as is the lining (just some random jersey) and belly fabric (basic double gauze). Body is a fuzzy blanket I found on clearance. Tag is a piece of cotton calico with some quick and dirty hand embroidery on it.
Getting the tag, zipper and D-ring caught in the butt seam made me fear for my little Brother sewing machine, so maybe don't do what I did there. I didn't have the patience to figure out something else, and I didn't not want to put in a tag. Still, all the fabric edges are finished, every seam is locked, the patches are sewn on instead of ironed on, so this thing, when empty, should be machine washable at 30°C.
This deceptive little beastie took an entire 400g bag of polyfill to get structurally sound, even with the pouch pre-filled with way more things than I expected would fit. It's a pretty practical size inside for everyday errands. It came out extremely squishy, to the point that I could probably use it as a pillow on a long drive or train ride. The different textures of eyes, patches, tag, body and belly go together nicely.
The shoulder strap was borrowed for about an hour from my wife's purse (thank you, sweetie!) when Hermes smiled down upon us and had us catch one market stall selling fashion straps that was several hours late in packing up and closing. (Lesson learned: drinking a can of Monster before running small errands is a good thing.) Don't have pictures of the new one yet.
It's the size of a medium-large plush, so not ideal for tiny stores while wearing a thick winter coat, but otherwise it did quite well on its first outing.
Just gotta attach the zipper pull with a jump ring, as the sewed on McGyvering I've got right now isn't the most practical.
#nessie#sewing#plushie#handbag#bag#free pattern#working from stash#mostly from stash anyway#learning new things#3D printing#apex legends#patches#it's not dumb if it brightens someone's day#it's SO SQUISHY#no I have not started that dress yet
82 notes
·
View notes
Photo
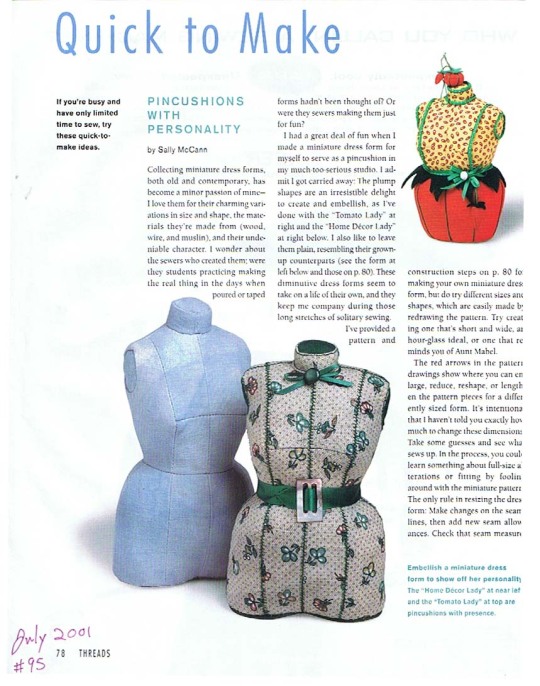
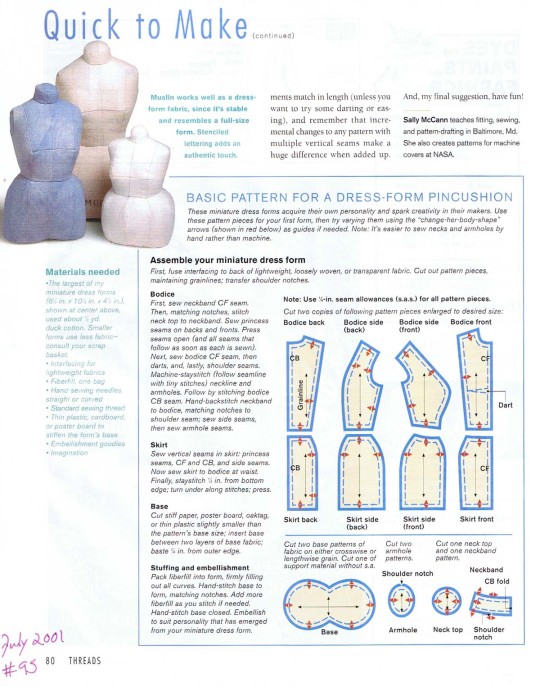
Threads Magazine - July 2001 - pin cushion mannequin
Saved from an old copy of Threads Magazine.
Might be useful for making mannequin props or as a cute pin cushion. Tag me if you make one!
#doll nerd#sewing patterns#free pattern#mannequin#dress form#miniatures#threads magazine#sally mccann#flickr purge#clearing drafts#queued post is queued
960 notes
·
View notes
Text
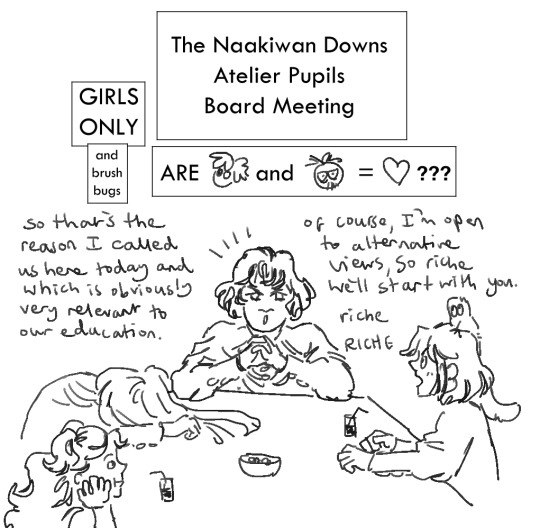
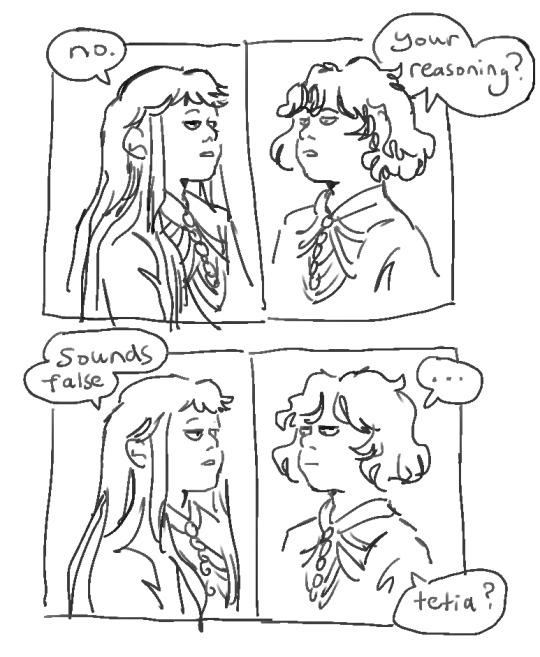


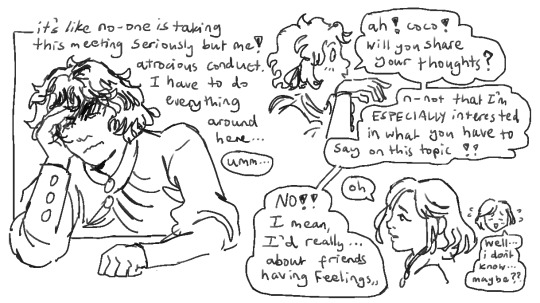


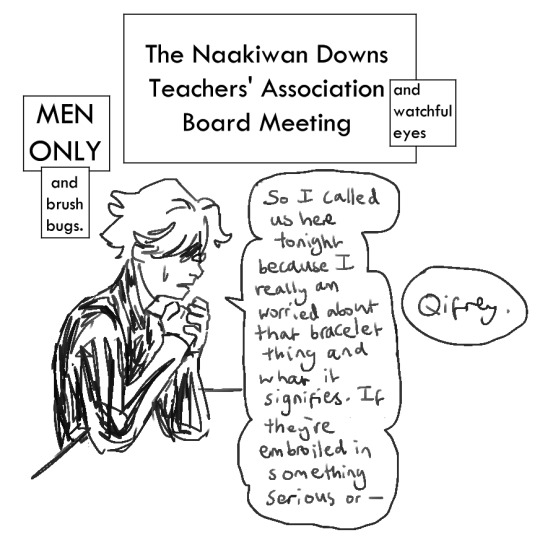
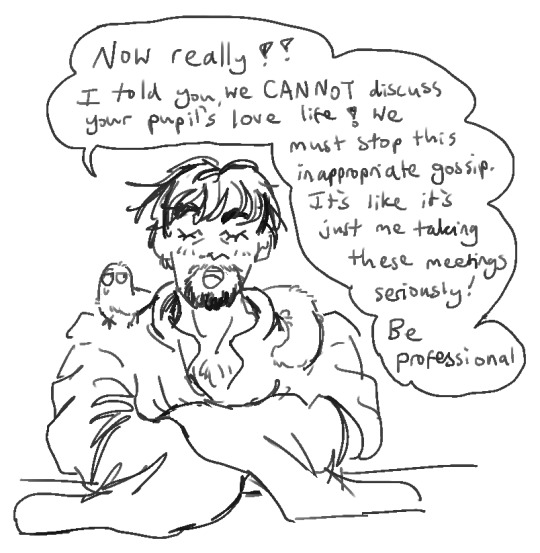
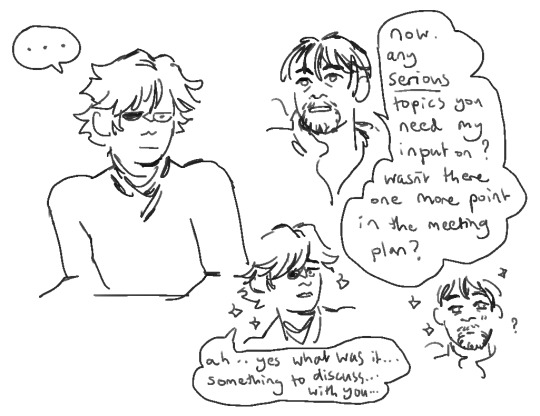

Very important conferences.
#witch hat tag#orufrey#some real serious discussions goin on in this atelier today. dont u doubt it.#agott is the only one who has ever thought about this because she is a 12 year old lesbian and UMM..FRIEND? LIKE FRIEND? IS THAT..LEGAL???#this is all i drew today because silly things like this take hours lol. at least it's practice for poses -_-#i got the pattern of the girls' dresses wrong but i couldn't be bothered to change halfway through.#don't worry if you're like what is the naakiwan downs. is that name even mentioned in the main manga#ANYWAY i KEEP thinking about what if it's actually banned for professors and watchful eyes to date like that would make a lot of sense.#like maybe it should be banned. SO??? are they just low-key Aware of what the deal is and they're just Putting their feelings aside#until graduation??? take my tassel as an unspoken reminder of how i feel?? living together trial period?? this feels like it's truly it#When we're free to be together........ Sensei loves homophobia parallels without there actually being homophobia#Let's invent reasons why men cant be together. Ummm well whatever. i'm screaming in my head but it's fine.#this will probably form the theme of my orufrey for a while. i've thought of this before but for some reason today it's big for me.#i guess the tassels might not specifically be a part of that since they exchanged them before tower of books#and qifrey made his mysterious decision to be a teacher after that and..well whatever. I need more of backstory and just..everything?#But i also don't mind when vinanna interrupts my wishes with just a chapter of just being really dreamy? I love witch hat?
82 notes
·
View notes
Text
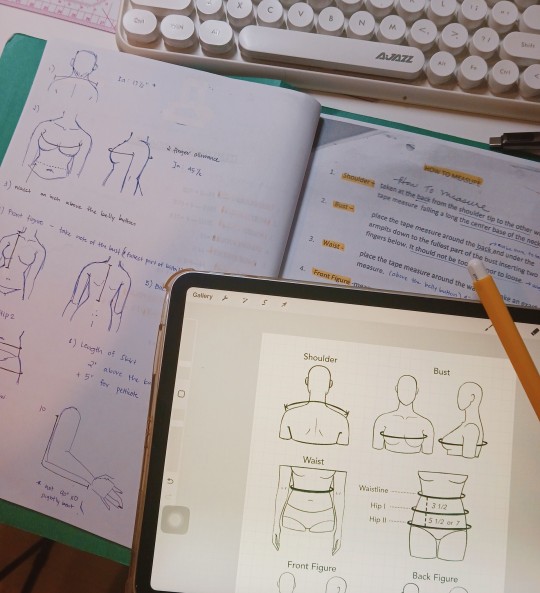
Missed out on doing art studies last Sunday. So making up for it by making measurement diagrams for the class module. 😂
#can i still put this under#study#study sunday?🤔🤔#can you tell just how excited i am for tomorrow 😂😂🙄#we're gonna start pattern making tomorrow#the gorls i doodled on my module has more sass than my generic mannequin#but what can you do she needs to be symetrical and mannequin like lmao#im giving a copy of the diagram to my teacher tomorrow#just wanna give back to her because the dressmaking classes are free (govt sponsored)#gunning for that certification kasiiii~✨✨✨#this is my Tailor's Era™️#lowkey feeling like i've come ful circle with my dress up brainrot to being able to actually constructclothes
26 notes
·
View notes
Text
I have decided that my new side quest is to unite tech/tinkering youtube and crafting/sewing youtube cause I stg it’s the same people just under different gender roles
#sewing#tech#youtube#and I am tired of the lack of sewing skill and knowledge in the tech community and the lack of tech and coding knowledge in the sewing one#I want self-sewn camera bags I want wren corridor digital to know what lycra is#I want pattern making programs that are free and useable and not gendered#like a proper sewing blender plug in#I want homemade adjustable dress forms#I want crazy wearable tech#I want the chaos energies of sewing-weird-shit and building-weird-machines youtube to combine into one beautiful abomination
77 notes
·
View notes
Text
#mycrochetpattern#crochetpattern#freepattern#crocheted#crochet pattern#free crochet pattern#crochet dress#dress crochet#freecrochetpattern
16 notes
·
View notes
Text
ok i don't do normal new year's resolutions so my resolution for 2024 is to crochet myself a dress
#been browsing some patterns#it's so hard to find free vintage patterns for dresses ugh#etsy sellers i'm taking the ergonomic handles off your hooks
9 notes
·
View notes
Text

Athy is best girl <3
#fanart#wmmap#who made me a princess#suddenly became a princess one day#athanasia de alger obelia#athy#wmmap athanasia#wmmap athy#digital art#my art#colouring her was Pain#but worth it#gaze upon her adorable cuteness!!#I wanna squish her cheeks lmao#originally the colour scheme and ribbons were gonna be cream and pink#but then I thought a muted orange might look nice#also manhwa dresses are so difficult and this didn't even have many details TvT#I need to find me some good (free) flower patterns and the like for floral clothes designs and bgs
73 notes
·
View notes
Text
Crochet Shell Stitch Dress Part 2
This is a two-part tutorial series in which you can learn to make this crochet bralette and continue to convert it into a crochet shell stitch dress. Below you will see the free crochet pattern and tutorial to make the skirt part of this dress in this post.
You can find the Part 1 pattern and tutorial here, where we will be making the bralette top. Also, I wanted to mention that the free pattern…
View On WordPress
31 notes
·
View notes
Text
Hi everyone
I’m new to this community and was wondering if
There are any good free patterns
And if anyone has free/ good instructions on making goth clothes
And website and such to avoid
Many thank you
#sewing#free sewing pattern#sewblr#new to sewing#any ideas#help#knowledge#patterns#dress#clothes#goth#making at home#website#anyone know
4 notes
·
View notes
Text
Happy 12 November! I'm happy to report that, four hours ago, I got over the mental block that was keeping me from moving on from step one in a relatively quick project that I started in early July, and now only have half an hour of work left on before it's done!
It's a flowy, above the knee dress with short sleeves, an open back and a statement neckline, done in an aggressively colorful, summer print, cotton jersey for my post-op trip to the Eifel Valley last August.
#sewing#mental block#WHY IS IT LIKE THIS#it's the free version of the portia party dress#it's promising to be so comfy#maybe I can wear it over some leggings?#dresses#with pockets#even if the pattern thinks there's no pockets#only four other projects waiting to be finished after this#not counting the mending pile
3 notes
·
View notes
Last Seen Blogs