#folder1
Text
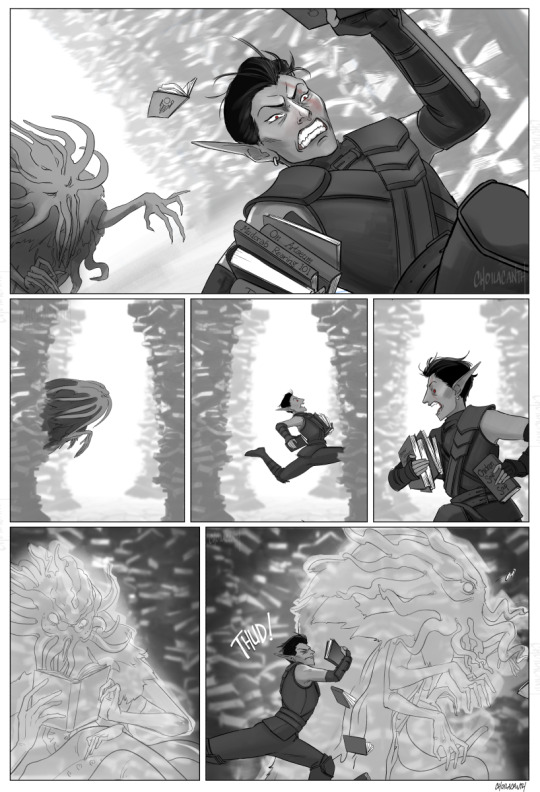

TES Summer Fest: profane
UHHHHHHH I'll show myself out hahahaha (click to zoom in)
Visible book titles: “On Artaeum”, “Mudcrab Rearing 101”, “Chicken Soul for the Soup”
All credits go to my partner for the idea. :]
@tes-summer-fest
#suggestive#seeker#skyrim#apocrypha#darra salvi#comics#choi comics#dunmer#tes art#elder scrolls#the elder scrolls#drawing#so many hands... so many books...so many tentacles...#the result of the MARTHAAA WHERE'S MY PROPANOLOL wip#tesfest23#For the record they’re not kinkshaming the one dude it’s about screwing around on company time#folder1#gallery
894 notes
·
View notes
Text
Details for Content Sizes when Importing and Exporting Content Online (Codes) (Tutorials)
Tutorial by @warrenwoodhouse
Importing and Exporting Details for different types of content that you can import and export to social media websites, apps and services.
Google YouTube
Add
Google YouTube Shorts
Aspect Ratio: 1080 x 1920
Video Length: 1 second (minimum); 60 seconds (maximum)
Video recording device: any suitable video recording device
Resolution: 8K maximum permitted (lowest resolution: 420p)
Encoding: HEIC H.264
Exporting: Adobe Premiere Pro, Adobe Premiere Express, YouTube Shorts (via YouTube app, iPhone and Android), HandBrake (encoding software), VideoLAN VLC Media Player (encoding software)
Google Blogger
Add
TikTok
Add
Snapchat
Add
Meta Facebook
Add
Meta Facebook Watch
Add
Meta Instagram
Add
Meta Instagram Boomerang
Add
Meta GIPHY GIF
Add
Meta GIPHY CAM GIF
Add
X Twitter
Add
X Twitter Vine
Add
X Twitter Periscope
Add
SONY PlayStation SHAREfactory
Details for when you’re importing and exporting content from the PlayStation 4.
Add
SONY PlayStation Share Factory Studio
Details for when you’re importing and exporting content from the PlayStation 5.
Videos - SONY PlayStation Share Factory Studio
File Formats: .mp4, .m4v, .mov, .webm
Resolutions: 64x64 to 1920x1080 mp4, m4v, mov; 3840x2160 webm
Encoding: H.264, VP9
Bit Rate: H.264 in 62.5 mbps
Scan: Progressive Scan only
Duration: 1 second to 60 minutes
Colour Space - H.264: BT.709
Colour Space - VP9: BT.709, BT.2020 (referred to as HDR)
Pixel Format: YUV4:2:0 (H.264, VP9)
Aspect Ratio: 1:1
Import From: USB:\\SHAREFACTORY\VIDEOS\
Optional 1: USB:\\SHAREFACTORY\VIDEOS\folder1\video1.mp4
Optional 2: USB:\\SHAREFACTORY\VIDEOS\folder2\video2.mp4
Music - SONY PlayStation Share Factory Studio
File Formats: .mp3, .mp4, .m4a, .aac, .ogg, .amr, .3gp, .3gp2
Bit Rate: 64 to 320 kbps with consistent bit rate
Import From: USB:\\SHAREFACTORY\MUSIC\
Optional 1: USB:\\SHAREFACTORY\MUSIC\folder1\music1.mp3
Optional 2: USB:\\SHAREFACTORY\MUSIC\folder2\music2.mp3
Images - SONY PlayStation Share Factory Studio
File Formats: .jpg, .png
Resolutions: 64x64 to 3840x2160
PNGs support transparency
Bit Colour: 8 to 32
Import From: USB:\\SHAREFACTORY\IMAGES\
Optional 1: USB:\\SHAREFACTORY\IMAGES\folder1\image1.jpg
Optional 2: USB:\\SHAREFACTORY\IMAGES\folder2\image2.jpg
Sound Effects - SONY PlayStation Share Factory Studio
File Formats: .wav
Duration: 0.5 seconds to 15 seconds
Import From: USB:\\SHAREFACTORY\SOUNDS\
Optional 1: USB:\\SHAREFACTORY\SOUNDS\folder1\soundeffect1.wav
Optional 2: USB:\\SHAREFACTORY\SOUNDS\folder2\soundeffect2.wav
Changelog
2nd April 2024 at 7:20 am: Added the sections titled “SONY PlayStation SHAREfactory”, “SONY PlayStation Share Factory Studio”, “Videos - SONY PlayStation Share Factory Studio”, “Music - SONY PlayStation Share Factory Studio”, “Images - SONY PlayStation Share Factory Studio” and “Sound Effects - SONY PlayStation Share Factory Studio”
28th February 2024 at 9:13 am: Created post
0 notes
Text
In this walkthrough, we’ll look at how to use user permissions with Amazon S3. We will create a bucket and AWS Identity and Access Management user on our AWS account with specific permissions. My use case for this was having IAM user that can upload files to AWS S3 buckets only, without the permission to delete objects.
Create a Test bucket:
Use aws command with s3 option to create a bucket:
$ aws s3 mb s3://backupsonly
make_bucket: backupsonly
Create an IAM user
The following create-user command creates an IAM user named uploadonly in the current account:
$ aws iam create-user --user-name uploadonly
Output:
"User":
"Path": "/",
"UserName": "uploadonly",
"UserId": "AIDAJII2GMOH3OAFWCIGK",
"Arn": "arn:aws:iam::104530196855:user/uploadonly",
"CreateDate": "2018-08-07T08:51:23.600Z"
Create AWS User and Policy
Next, we need to create a policy that will be associated with the created AWS user account.
This is the json file that we’ll use for the policy:
$ cat aws-s3-policy.json
"Version": "2012-10-17",
"Statement": [
"Effect": "Allow",
"Action": [
"s3:Get*",
"s3:List*",
"s3:Put*"
],
"Resource": "*"
]
We specified the actions for:
List all bucket contents
Get a list of all buckets on S3
Upload files to S3 buckets
The following command creates a user managed policy named upload-only-policy:
$ aws iam create-policy --policy-name upload-only-policy \
--policy-document file://aws-s3-policy.json
You should get output like below:
"Policy":
"PolicyName": "upload-only-policy",
"PolicyId": "ANPAZYBH8BTU6NFCTTR46",
"Arn": "arn:aws:iam::104530196855:policy/upload-only-policy",
"Path": "/",
"DefaultVersionId": "v1",
"AttachmentCount": 0,
"IsAttachable": true,
"CreateDate": "2018-08-07T09:02:13.013Z",
"UpdateDate": "2018-08-07T09:02:13.013Z"
The policy used is a JSON document in the current folder that grants read/write access to all Amazon S3 buckets.
You can also limit this to a specific bucket by changing resource section. Example:
"Resource": [
"arn:aws:s3:::bucket-name/*"
]
Or to a specific folder inside a bucket:
"Resource": [
"arn:aws:s3:::bucket-name/folder1/*"
]
You can also do the same from AWS IAM web interface:
Assign AWS Policy to IAM User
The following attach-user-policy command attaches the AWS managed policy named upload-only-policy to the IAM user named uploadonly:
$ aws iam attach-user-policy --policy-arn \
arn:aws:iam::104530196855:policy/upload-only-policy --user-name uploadonly
There is no output for this command
You can now create an access key for an IAM user to test:
$ aws iam create-access-key --user-name uploadonly
Store the secret access key in a secure location. If it is lost, it cannot be recovered, and you must create a new access key.
From UI go to IAM > Users > Add Permissions > Attach existing policies directly
Configure your AWS CLI and test:
$ sudo pip install awscli
$ aws configure
Provide:
AWS Access Key ID
AWS Secret Access Key
Test file upload:
$ aws s3 cp test-demo.yml s3://backupsonly/
upload: ./test-demo.yml to s3://backupsonly/test-demo.yml
Try delete:
$ aws s3 rm s3://backupsonly/test-demo.yml
You should get an error message:
delete failed: s3://backupsonly/test-demo.yml
An error occurred (AccessDenied) when calling the DeleteObject operation: Access Denied
Let me know through comments section if you encounter an error message.
0 notes
Note
folder titled "Why you should think critically about every piece of media you consume - An essay" (j) -KPA
YEAHREAL
even then its hidden under MORE folders to avoid persistent snoopers
turns out he just named it folder1
1 note
·
View note
Text
Gli URL semplici trasmettono informazioni sui contenuti
Gli URL semplici trasmettono informazioni sui contenuti
Creare categorie e nomi file descrittivi per i documenti sul tuo sito web non solo aiuta a mantenere il sito più organizzato, ma consente anche di creare URL più semplici e comprensibili per coloro che vogliono fare riferimento ai tuoi contenuti. I visitatori potrebbero infatti rimanere intimiditi da URL troppo lunghi e criptici che contengono poche parole riconoscibili.
Gli URL come quello che segue possono risultare poco comprensibili e creare confusione: https://www.brandonsbaseballcards.com/folder1/22447478/x2/14032015.html
Se il tuo URL è significativo, può essere più utile e comprensibile in contesti diversi: https://www.brandonsbaseballcards.com/article/ten-rarest-baseball-cards.html
Gli URL vengono mostrati nei risultati di ricerca
Infine, ricorda che l'URL a un documento viene di solito mostrato in una qualche forma in un risultato di ricerca di Google accanto al titolo del documento.
Google riesce a eseguire la scansione di tutti i tipi di strutture di URL, anche quelle più complesse, ma è sempre buona norma dedicare tempo a rendere gli URL il più semplici possibile.
Utilizzare parole negli URL
Gli URL con parole pertinenti ai contenuti e alla struttura del sito risultano più comprensibili per i visitatori.
Pratiche non consigliate:
* Utilizzare URL lunghi con parametri e ID di sessione non necessari.
* Scegliere nomi generici per le pagine quali page1.html.
* Utilizzare un numero eccessivo di parole chiave come baseball-cards-baseball-cards-baseballcards.html.
Creare una struttura di directory semplice
Utilizza una struttura di directory che organizzi bene i contenuti e ne semplifichi l'individuazione sul sito da parte dei visitatori. Prova a utilizzare la struttura di directory per indicare il tipo di contenuti presenti in tale URL.
Pratiche non consigliate:
* Nidificare troppo le sottodirectory, ad esempio .../dir1/dir2/dir3/dir4/dir5/dir6/page.html.
* Utilizzare nomi di directory non correlati ai contenuti al loro interno.
Fornire una sola versione dell'URL per raggiungere un documento
Per evitare che gli utenti si colleghino a versioni diverse dello stesso URL (diluendo così la reputazione dei contenuti in questione tra i vari URL), utilizza e fai riferimento a un solo URL nella struttura e nei link interni delle pagine. Se ti rendi conto che gli utenti accedono agli stessi contenuti tramite più URL, una buona soluzione consiste nell'impostare un reindirizzamento 301 dagli URL non preferiti all'URL dominante. Se non puoi eseguire il reindirizzamento, puoi anche utilizzare l'elemento link rel="canonical".
Pratiche non consigliate:
* Avere pagine di sottodomini e della directory principale che accedono agli stessi contenuti, ad esempio domain.com/page.html e sub.domain.com/page.html. http://dlvr.it/SXVzDl
0 notes
Text
Flask: render_template with path
I have several different templates that I'm trying to use for my flask app.
I have tried the following but it seems to only look directly inside /templates and not /templates/folder1, templates/folder2 etc.
return render_template('index.html', template_folder='folder1') return render_template('folder1/index.html')
both do not work as expected, how can I specify the sub folder of different templates.
https://codehunter.cc/a/flask/flask-render-template-with-path
0 notes
Text
Wip ask game
Rules: Post the names of all the files in your WIP folder, regardless of how non-descriptive or ridiculous. Send me an ask with the title that most intrigues you and I’ll post a little snippet of it or tell you something about it. And then tag as many people as you have WIPs.
Thanks for the tag @lilyoffandoms ❤
I swear I thought I haven’t added any new wips since the last time I was tagged to share the content of my wip folder, but I was so wrong lol
Choices Folder
Blades of Light and Shadow
Soft Side | Nia x Mal
Bloodbound: Wanted
Chapter 14 | Adrian x Scarlett (F!OC), Samantha [n*fw]
Desire & Decorum (modern day AU):
1. Meant To Be
Chapter 26: When The Bubble Bursts | Hamid x Daphne (MC) [n*fw]
Chapter 27: Reconnect (working title) | Hamid x Daphne (MC), Sinclaire, Alisha (F!OC)
Chapter 28: Things They Can’t Control (working title) | Hamid x Daphne (MC), Annabelle x Veronica (F!OC), Bartholomew x Yusuf, Luke x Cordelia
Chapter 29: If It Was You | Hamid x Daphne (MC), Annabelle x Veronica (F!OC), Bartholomew x Yusuf
Chapter 30: Answers (working title) | Hamid x Daphne (MC), Annabelle x Veronica (F!OC), Bartholomew x Yusuf
1.2. MTB universe One shots
Practice (working title) | Sinclaire x Alisha (F!OC)
Refined Taste (working title) | Hamid x Daphne (MC)
Bad Parenting (working title) | Hamid x Daphne (MC), Veronica (F!OC), Talia (F!OC)
OTP Asks | Hamid x Daphne (MC)
Sick/period prompts: Hamid x Daphne (MC), Annabelle x Veronica (F!OC)
2. A Promise mini series:
Part 4 | Hamid x Daphne (MC), Hamid x Sibel (F!OC)
Part 5: Last Chance | Hamid x Daphne (MC)
3. Unfortunate Circumstances:
Part 3 | Hamid x Daphne (MC)
Part 4 | Hamid x Daphne (MC)
4. Pillow Talk series (multiple choices books): Soft Touch | Hamid x Daphne (MC) [n*fw]
The Royal Romance:
1. For The World To Know
Chapter 13: Consequences | Liam x Jade (MC) [adult content]
Chapter 14: No Matter What | Hana, Jade (MC)
2. A College Romance - Part 2 | Liam x Jade (MC)
Love Island The Game folder
1. Unforgettable Summer:
Chapter 3: Crossroads | Levi x Jen, Levi x Jane
Chapter 4: Too Good To Be True | Levi x Jane [n*fw]
2. (One shot LITG 2) Like A Fool | Lucas x Rosalie (MC)
The Wayhaven Chronicles folder
Breakfast | Nate x Stella (F!Detective) [n*fw-ish]
Art In Motion (figure skating fic) | Nate x Stella (F!Detective)
Blood Ties (working title) | Rebecca, Nate x Stella (F!Detective) [adult content]
OTP Asks
Smutty folder multifandom (old kinktober prompts) [n*fw]
breast worship | rough sex: LITG Levi x Jane (MC)
What Happens At Night fingering: Simon x Daphne B.
dirty talk | stockings: Ryan x Sarah (F!MC)
mirrors | leather: Rafael x Evelyn (F!MC)
anal play | teasing: Brody x Delilah
begging | scratching (? 🤔): Annabelle x Veronica (F!OC)
costumes | pet play | envy kink: Logan x Carla (MC)
multiple orgasms | joi: Banner x Kate
feet | anal sex: Liam x Jade
play party | lap dance | silk/lace: Jax x Samantha
sleepy sex, morning sex, silk/lace, sensory play: Hamid x Daphne (MC)
Speechless breasts worship | Annabelle x Veronica (F!OC)
tagging: @missameliep @princess-geek @storyofmychoices and anyone else who feels like sharing their wips
17 notes
·
View notes
Note
Hi, I was wondering if you would be able to help me: so, I recently reinstalled sims 2 on my laptop after years of stopping because with the new windows and all, we all had to do the 4gb patch and using no cd cracks, etc, but after doing allll that, my sims still takes about 5+ for it to go past the loading screen. So I was wondering if you could possibly dm me(you don’t have to!) and help me figuring it out? I would appreciate it greatly ! 💜✨
I’m not the right person to help with Windows 10 problems (at least I suppose with new Windows you mean 10), I literally downgraded my computer to Windows 8.1 after getting sick of constantly having to fight with Windows 10 and that solved most of the problems I had with the game and this computer. That’s obviously awful idea since it’s only going to be few more years before Microsoft will drop the support for Windows 8 too so they can push Windows 10 on everyone. :/
Here’s some generally helpful Sims 2 tutorials though, maybe one will help you?
Sims 2 Pink Flash & Crash FIX - by Marasims
Tweaks to Graphic Rules file that helped me with The Sims 2 crashing and flashing (Win7 + Nvidia card) - by Episims
How to use hardware rendered smooth edges for TS2 (to make the game run smoother!) - by TwoFingersWhiskey
The graphics related FAQ topics at Leefish (can’t link just one, but for example make sure your graphics card is being recognized by the game)
Crashing - How to Stop Sims 2 Crashing (Memory Allocation Fix and 4GB Patch Repair) - by TheJessaChannel (I use the standby memory fix from this tutorial (The Windows 10 Update Bug and Fix) since my computer also keeps on adding and adding to the standby memory never releasing it, definitely try that one out if you haven’t already :) ) They also tell you how to test if the 4gb patch is really working there, mine wasn’t and I had no idea D: It’s unnecessary to swap them between folders but disable the compatibility mode since that seems to undo the patch)
LAG Issues - Possible Solutions - by celebkiriedhel (test the setting CPU Count to 1 or 2)
If anybody else has other useful tutorials / tips to add feel free to reblog / comment.
But for what it’s worth: my loading times are closer to 10 minutes long, they’ve always been and I’ve just considered it pretty normal, it’s an old game and really not optimized to work on newer Windows versions. Amount of custom content etc of course adds to the loading times, as well as amount of folders in your Downloads folder and how deeply they’re foldered. So ten folders directly in the Downloads folder is better than having folder1> inside it folder2 > inside it folder3 and so on.
I hope you don’t mind me replying to this publicly, I figured that this way somebody more knowledgeable might see this post and chime in. :)
30 notes
·
View notes
Text
When Pinterest let’s me put sections inside of sections you guys are screwed.
I am that hoe that has their Google Drive like:
Drive> Folder1-(3-5)> Fandom> Fic> Pieces
Okay, I’m not saying I’m organized but I like folders!
When I could put sections in Pinterest I spent DAYS organizing my boards.
So when I can put sections inside of sections it’s game over for you.
1 note
·
View note
Note
hey i'm sorry if you've answered this before! but i wanted to know if the game still loads cc if its more than 1 folder deep as in mods>folder1>folder2. and i mean cc like clothing hair etc., not script mods.

Hi there! As far as I know that didn’t change. 😊
4 notes
·
View notes
Photo

She went back in to look for Poison Song vol. 4. Probably dropped it in the sludge while being chased by seekers the other day.
i’ll fix this up someday (trying to be comfortable with sharing things in a loose and unfinished state but also trying not to be sloppy about it OTL)
#darra salvi#teldryn sero#skyrim#apocrypha#tes#tes art#wip#sketch#i too need to get to sleep#physics still eating me alive#drawing#folder1#gallery
738 notes
·
View notes
Photo
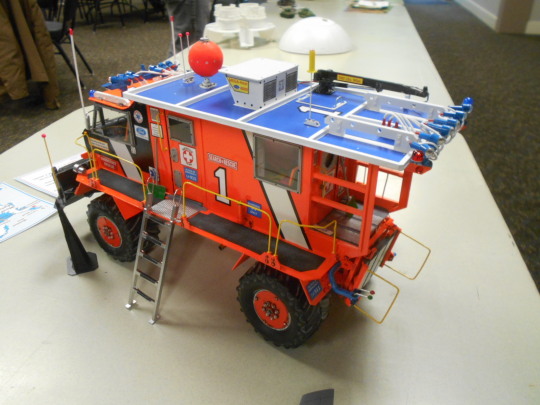

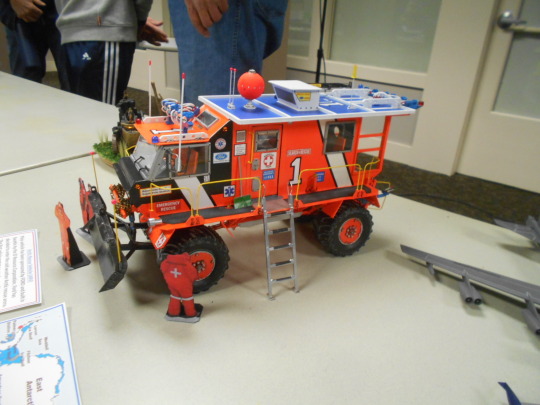


https://www.ipms-seattle.org/gallery/meetings/2022/04/folder1/index.php
The Scratch build ‘’ARTIC RESCUE TRUCK’’ in 1st 4 Pictures was built by John De Rosia from Everett Seattle.
John has built hundreds of these models so far.
https://www.youtube.com/channel/UCNz0S4TQPSXaUXaxEUrBV-Q
0 notes
Text
Where Is The Library Directory On Mac
Your Photos library holds all your photos, albums, slideshows, and print projects. If your library is large, and you want to free up storage space on your Mac, turn on iCloud Photo Library and use Optimize Mac Storage, or move your library to an external drive.
Where Is The Library Directory On Mac Pc
Mac Where Is Library Folder
Where Is The Library Directory On Mac Computer
Dec 27, 2019 You can hide the library folder again just as easily. Visit the User profile folder, and disable the ‘Show Library Folder’ option. This is a per-user setting which means if you share a Mac with other users, the Library folder will only be unhidden for your user, and not for others. The option doesn’t require admin rights to be applied. Inside your home folder is a Library folder —commonly written in Unix syntax as /Library, which means “a folder named Library at the root level of your home folder.” This folder is accessible only to you, and it’s used to store your personal settings, application-support files,.
Before you start, be sure to back up your library.
Prepare your drive
You can store your library on an external storage device, such as a USB or Thunderbolt drive formatted as APFS or Mac OS Extended (Journaled).1 Find out how to check the format of your external storage device.
To prevent data loss, Apple doesn't recommend storing photo libraries on external storage devices like SD cards and USB flash drives, or drives that are shared on a network.
Move your Photos library to an external storage device
Quit Photos.
In the Finder, go to the external drive where you want to store your library.
In another Finder window, find your library. The default location is Users > (username) > Pictures, and it's named Photos Library.
Drag your library to its new location on the external drive. If you see an error, select your external drive's icon in the Finder, then choose File > Get Info. If the information under Sharing & Permissions isn't visible, click , then make sure the 'Ignore ownership on this volume' checkbox is selected. If it's not selected, click to unlock it, enter an administrator name and password, then select the checkbox.2
After the move is finished, double-click Photos Library in its new location to open it.
If you use iCloud Photo Library, designate this library as the System Photo Library.
Delete original library to save space
After you open your library from its new location and make sure that it works as expected, you can delete the library from its original location.
In a Finder window, go back to your Pictures folder (or whichever folder you copied your library from) and move Photos Library to the trash. Then choose Finder > Empty Trash to delete the library and reclaim disk space.
Where Is The Library Directory On Mac Pc
Open another Photos library
If you have multiple libraries, here's how to open a different one:
Quit Photos.
Press and hold the Option key while you open Photos.
Select the library that you want to open, then click Choose Library.
Photos uses this library until you open a different one.
Learn more
If you have a permissions issue with your library, you might be able to resolve the issue by using the Photos library repair tool.
Mac Where Is Library Folder
1. You can't move your library to a disk that's used for Time Machine backups.
Where Is The Library Directory On Mac Computer
2. If the volume isn't formatted APFS or Mac OS Extended (Journaled), or has been used for Time Machine backups but hasn't been erased, this checkbox will either not be present, or won't be selectable after unlocking. Erase and reformat the drive for this option to be available.
0 notes
Text
Here’s How You Can Create Multiple Folders at Once in Windows 10
Windows 10 operating system makes it easier for every user to accomplish any computing task. Any Windows 10 user can easily customize the settings on their computer system as per their preferences. And usually, everyone knows how to create a folder on a Windows computer. It only takes two clicks to create a single folder on your Windows 10 computer, and then you have to rename the created folder. Well, it’s quite an easier task for anyone. But what if you have to create multiple folders at the same time? Do you know how you can do so? Creating individual folders one by one will consume a lot of your time. So is there any way through which you can create multiple folders at once? Fortunately, Windows 10 provides you with several ways through which you can create multiple folders at the same time.

Do you want to know how to do so? Want to see the techniques that you can use to create multiple folders at the same time? There can be many Windows 10 users who might not know how to do so. And if you are also one of those users, then you have come to the right page now. Here, we are going to provide you with multiple techniques that you can follow to create multiple folders at the same time on your Windows 10 computer. So, go on and read this entire post to get to the method.
Techniques to Create Multiple Folders at the Same Time on Windows 10
Creating multiple folders at once can be really useful for anyone. It can save a lot of your time and energy. And as mentioned earlier, there are multiple ways to do so. You can use a keyboard shortcut “Ctrl + Shift + N” for creating a set of folders. Well, this is what most users do. Here, the disadvantage of using this method is that you have to name each folder one by one. So, this method will not save your time and effort. Windows 10 comes with various useful tools that you can use to automate tasks. For instance, you can use the Command Prompt or PowerShell tool to create a set of folders on your Windows 10 computer. Here, we have mentioned two different techniques, and each one includes some simple steps that you will have to follow. So, without any further delay, let’s get to the methods now.
Method 1: Creating Multiple Folders at Once Using Command Prompt
Here is the first technique that any Windows 10 user can use to create a set of folders on their computer system. Here’s how this method works:
To start with this technique, first of all, you will have to click on the Windows Start button that you can see on the taskbar. After clicking the Start button, type “cmd” in the search bar and then press the enter key. From the search results that appear on your screen, click on the option of “Command Prompt” to launch the program.
Now, you will need to navigate to the folder where you want to create your multiple folders. For this, you will have to use the “cd” command and then hit the enter key.
And next, type “MKDIR folder1 folder2 folder3 folder4” in the Command Prompt window and then press the enter key to create all four folders in one shot.
And if you wish to create a nested folder, you can do so using the following command: “mkdir -p folder1/folder2/folder3.” And that’s it. That’s how you can create multiple folders at once using the Command prompt on your Windows 10 computer.
Method 2: Creating Multiple Folders at the Same Time Using PowerShell
If you don’t want to use the above-mentioned method, you can go with this technique as well. Here’s how you can create multiple folders at once using the PowerShell on your Windows 10 computer:
To follow this technique, firstly, go to the Windows Start button and click on it. And when a search bar opens up on the screen, type “PowerShell” and then press the enter key to launch the PowerShell window.
Right-click on the appropriate search result and then click on the option of “Run as Administrator.”
And when the PowerShell window opens up on your screen, you will need to enter a command to create folders. For instance, to create new folders in the documents directory, you will use the following command: “cd Documents”
If you want to create folders in bulk, you will have to gather the file names first and then run a specific command. For instance, you can create folders for each day in a week by running this command: “sunday”, “monday”, “tuesday”, “wednesday”, “thursday”, “friday”, “saturday” | %{New-Item -Name “$_” -ItemType “Directory”}. After running the command close the PowerShell window and go to the Windows Explorer to locate the folders that you have created. And that’s it.
So, these were the techniques for creating multiple folders at the same time on a Windows 10 computer. Try any of the mentioned ways now and if you face any issues, please do let us know. And keep visiting our website to read more articles like this.
Source: Here’s How You Can Create Multiple Folders at Once in Windows 10
0 notes
Text
Use powershell to print directories and files
Print a tree of all folders in the current dirctory:
Tree>dir.txt
Print a tree of all files and folders recursively in a specific directory:
tree “c:\users\me\documents” /F >files_folders.txt
Create a transcript file (.txt) in a certain location and append a report of multiple power shell outputs to that document:
Start-transcript -path c:structure.txt -append (enter)
Tree c:\folder1 /F
Tree c:\folder2 /F
Tree c:\folder3 /F
Stop-transcript
Pipe |
Write to >
Append to >>
Type the content of a file on screen:
Type search-names.txt
Start-transcript “z:\docket_log.txt”
Get-childitem -path “z:\casename\docket\” -file -Name | sort-object -property Name
Stop-transcript
Start-transcript "C:\Users\user\Dropbox\Open Matters\open_matters_log.txt" -append
tree "C:\Users\user\Dropbox\Open Matters\" /F
Stop-Transcript
0 notes
Photo

Каталог актуальных коттеджей для празднования Нового года 2020 http://rielt55.ru/notice/folder1/331272 📞 8 904 821 6535 Вацап 📞 8 960 980 4626 #арендакоттеджа #коттеджнасутки #омск #омскаяобласть #новыйгодОмск #ГдеВстретитьНовыйГод #домнаНовыйГод #нг2020 (at Omck) https://www.instagram.com/p/B4nC6mQB74x/?igshid=kb01j1ojf07g
#арендакоттеджа#коттеджнасутки#омск#омскаяобласть#новыйгодомск#гдевстретитьновыйгод#домнановыйгод#нг2020
0 notes
Last Seen Blogs

yellowstoneaussies
www.YellowstoneAussies.de

reeckityree
guha.

thezielocave-blog
Welcome to your demise.

harpsandthistles-blog
Untitled

huntingtonbeachcacalifornia-blog
Huntingtonbeachcaclifornia.com