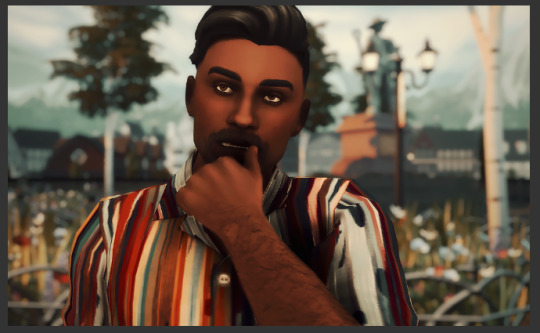
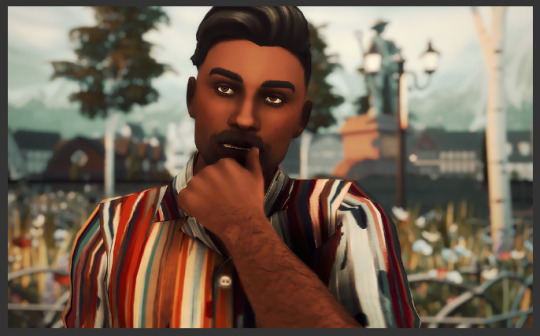
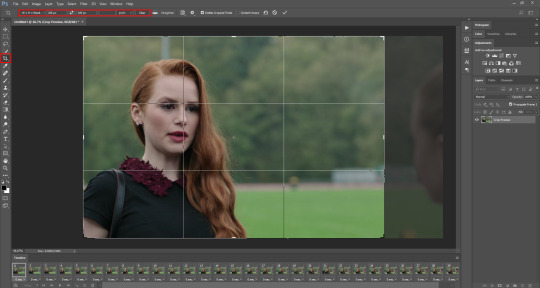
#just trying a sharpen action i downloaded :o
Text


CHANGBIN ♡ FNF MV
#skz#stray kids#seo changbin#bystay#staysource#createskz#userbeepls#usersa#melontrack#staytay#dreamytag#usertsu#usersemily#cheekyuser#bitsforkitts#bobausertag#*mine#just trying a sharpen action i downloaded :o#these only have 3 layers dfjdfj the action worked mostly on his skin tone really good so i just upped the bg colors
355 notes
·
View notes
Text
Basic Giffing Tutorial
How I make gifs for a simple scene + coloring + captions under the cut:

I’ll show you how to make this ^^^ gif (including the sharpening, coloring and captioning process).
Okay let’s start with what you need to do this: A version of photoshop with timeline (I use photoshop 2020 but probably any version will work, the program layout might just look a bit different), HD videos to gif from (preferably 1080p, especially for making big gifs, but 720p is also okay if you can’t get anything better, I just recommend making smaller gifs with it), some kind of video player that lets you trim clips in it (I use Quicktime Player because it’s the default for Macs)
1. Start with a video clip of the scene you want to gif. I usually download full episodes and clip scenes from the episode. My computer is a MacBook Pro and the default video player is Quicktime so I just trim my clips directly in that. In Quicktime you can just press CMD+T and it’ll give you trimming options. Most people use the screencapping method to make gifs, but it requires extra software and that’s not how I learned, so I’m going to tell you how to gif straight from video clips. I have no idea if there’s a difference in quality or ease between the two methods, but if you find that my way is too difficult then there are plenty of tutorials on how to do it via screencapping too like this one.
2. Open the clip in Photoshop. Just hit CMD+O and then select the video you want to gif from (or go to File > Open). Then, in the Timeline window at the bottom, scrub through the video and trim it (with the little scissor icon to the left) at the first frame of the scene/shot you want to gif and the last frame. Delete the excess clips. Before the next part, I usually crop off the black borders that some videos have if their original aspect ratio isn’t 16:9 (which most aren’t). For TV shows from Netflix, for example, the aspect ratio is usually 2:1 (or 540:270) so if you set the crop ratio to this you can get rid of exactly the black, no more and no less. I have several preset crop ratios (540:270 for TV shows, 540:225 for most movies, etc.). You can do further cropping after you have made and colored the gif, but getting rid of borders before converting the video to frames makes this easier. If your video does not have these black borders to begin with, ignore this part.
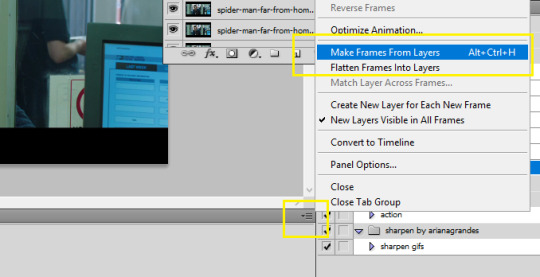
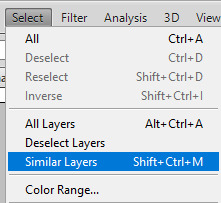
3. Convert video to frames. In the upper right hand corner of the Timeline window there is an icon that is four small lines stacked on each other (time line menu). When you click on it, a drop down menu will appear. In this menu select “Convert Frames > Flatten Frames into Clips.” Then click the button in the lower left hand corner (three small rectangles next to each other; frame animation button) that says “Convert to frame animation” when you hover over it.

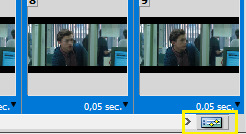
After, it should look like either of these. Sometimes, if you crop the video before you start the process, it gives you two frames like in the image on the right above. If this happens, delete the frame with the shorter time stamp on it (as indicated by the number at the bottom). Next, click the dropdown menu in the timeline window again and select “Make Frames From Layers.” It will then turn into multiple frames, as shown below:

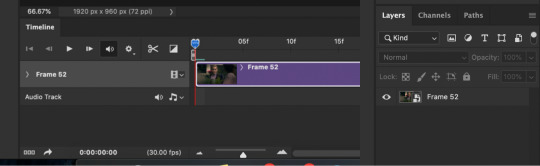
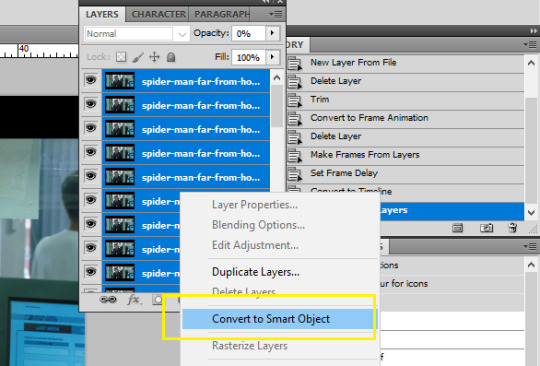
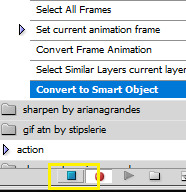
Delete the first frame (it will have a number under it, while the rest of the frames say “0 sec”), then use “select all frames” from the dropdown menu so that they are all highlighted and click “0 sec > other” and set the frame delay to “.06 seconds.” Scroll down to the bottom of the layers channel window and click and delete “Video Group 1″ then scroll back to the to top of the window and select all the layers by holding Shift and clicking on the top layer. Click the icon in the lower left hand corner that says “Convert to Video Timeline (video timeline button) and the frames should convert to long purple bars stacked vertically on top of each other. Then, under the “Filters” drop down menu at the top of the screen, select “Convert for Smart Filters.” This converts the layers to a smart object, turning the stack of bars a single purple bar and a single layer in the layers channel. When you press play in the timeline window, the image should move and play through like a video. If it doesn’t, you missed a step. It should now look like this (the left is the timeline window; the right is the layers window):
This seems like a lengthy process, but I have compiled most of these steps into a few Actions. With the actions (starting at step 3 of this tutorial) you use “Part1″, delete the frame with the shorter time stamp on it (if needed), “make frames from layers,” delete the first frame and Video Group 1, select all frames in Timeline and change frame delay to .06 seconds, select all layers in the Layers window, then use "Part2″. I assign my actions to function keys so all I have to do is use a few keyboard shortcuts ( i.e. Part1 is F1, Part2 is F2, etc.). This makes the whole process much quicker. Here is a link to download the actions I created for this process. Once you get the hang of using the actions, it all goes pretty fast. Also, when using the actions you might get messages like this:
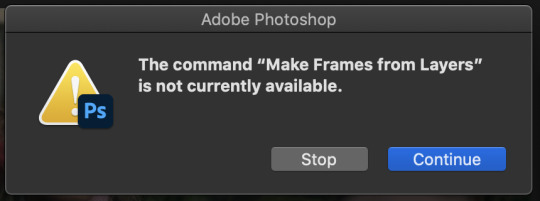
Just click stop and keep going with the instructions.
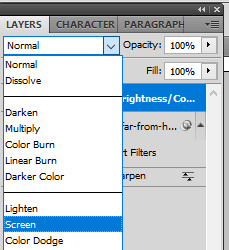
4. Duplicate the frame in the layers window and set the top layer to screen using the drop down menu in the window (it’s the second from the top and should say “Normal” to begin with. That changes the scene from this:

to this:

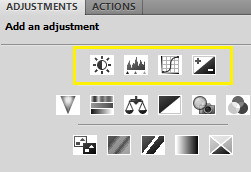
5. Make coloring adjustments. Everyone colors gifs in their own ways, so you absolutely don’t have to follow what I do. This is just the basics of how I color:
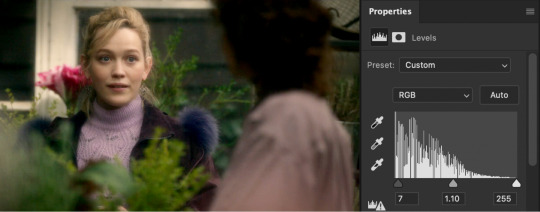
I always start with Levels (some people use curves, some people use both, I never learned how to use curves though). Under the levels adjustment menu, I start by using the black point dropper and select the darkest part of the image. Sometimes it takes a bit of clicking around with the dropper to find what works. Depending on the scene (colors, lighting, etc.) I also move the sliders if needed. There’s no real formula to it, I just do everything by sight, changing things until it looks good to me. For this gif, I selected a dark part of Jamie’s hair with the black point dropper. Then I did some minor adjustments with the sliders on the graph. If you’re coloring a darker scene, the sliders are very useful for brightening the scene, but this is a fairly well lit scene so not much is needed. This is the scene with Levels added:
Next, I usually use color balance to fix the color changes that Levels made. This looks too yellow to me now, so I use the yellow-blue slider to add in blue. You’ll have to play around with what looks best for whatever scene you’re giffing, but I’ve found that most scenes I add blue and sometime add red or cyan, but rarely use the magenta-green slider. With color balance added:

Next I use a series of selective color layer. Make a new layer for every different color adjustment you make, it makes it easier to edit if you make a mistake or want to make changes later. I always start with Black, usually just adding a little to Cyan, Magenta, and Yellow so that it increases the contrast of the whole scene.

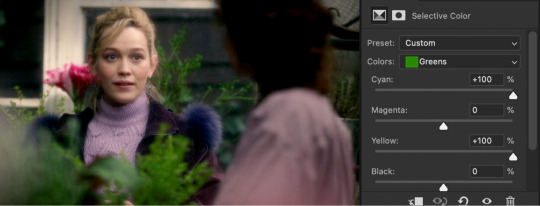
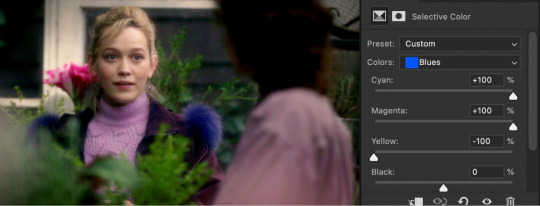
From there, you have to pick out what colors you want to accent or correct. You get better at this the more you do it. In this scene, I want to accent the green of the plants and the purple of their clothes. Normally I would do Red next to adjust skin tone, but because I want to increase the green in the picture, I’m going to start with Yellow. This will make skin tones look too yellow-green, but you can correct this with a Red Selective Color layer. The Yellow layer made the plants greener, but the Red returned the proper color to Dani’s skin.


I keep adding more selective color layers to bring out more color in the scene.

To make it even more vibrant, I use several Hue/Saturation layers to increase the saturation of certain colors.


Sometimes I also add a Vibrance layer, but for this scene it wasn’t needed. Lastly, I usually add a Brightness/Contrast layer. I prefer to get contrast out of deepening the blacks in the scene rather than use the contrast setting in this adjustment layer, but sometimes I do use it. Most of the time I just increase the brightness a little, depending on the lighting in the scene.

Really, coloring is all about just messing with different settings until things look right to you. I’m still learning new things every time I make a new gif. There are tons of other adjustments available that I haven’t even tried out, so feel free to mess around with them. Note: The more adjustment layers you add, the more the quality might decrease. I do try to do minimal adjustments normally, but I wanted to make this coloring fairly vibrant so it has a lot more layers.
If you are making multiple gifs from the same scene, repeat the process of Steps 1-4 and then copy the adjustment layers from the first gif to each subsequent gif. I normally group all the adjustment layers together (select the layers and press CMD+G) which makes it easier to copy the layers to another PSD.
6. Crop and resize the gif. You can crop your gifs any way you want. I’m in the habit of making rather large gifs (which is thankfully now possible due to the 10mb size limit) and most of my gifs are cropped at ratios of 3:2, 4:3, or 1:1. For longer scenes I usually use 16:9. Crop your gif at whatever ratio you want and then resize it. For Tumblr, there are specific dimensions that gifs have to be for them to format properly in posts. For “large” gifs (one per row), they must be 540px wide. Height does not matter. For smaller gifs they have to be either 268px (two per row) or 177px (three per row). Resize the gif by either using CMD+OPTION+I or going to the “Image” dropdown menu at the top of the screen and clicking on “Image Size” If you already cropped at your desired ratio, just change the width to 540, 268, or 177, according to the size gifs you want.
7. Sharpen the gif. After you have cropped and resized the gif as desired, you need to sharpen it. Because of the method I used in the beginning (duplicating the layers and setting the top to screen), you will have to add a Sharpening filter and a Gaussian Blur filter. Select the top layer of the gif (not the top coloring layer) and click on the “Filter” dropdown menu at the top then select “Sharpen > Smart Sharpen” These are my sharpening settings (if you’ve ever giffed before, or looked at other tutorials, you’ll notice this is sharper than most people would use. That’s because you also have to slightly blur the layer below it, which dilutes it to a proper sharpness):
Next, select the lower layer of the gif and go back the the “Filter” menu and select “Blur > Gaussian Blur” and set the radius to “1.0 pixels.”
These sharpening and blur settings are also actions I’ve created. If you download the action I listed before, assign them to function keys and you will just have to select the appropriate layer and use the function key to do the work. Additionally, learning the keyboard shortcuts speeds along the process.
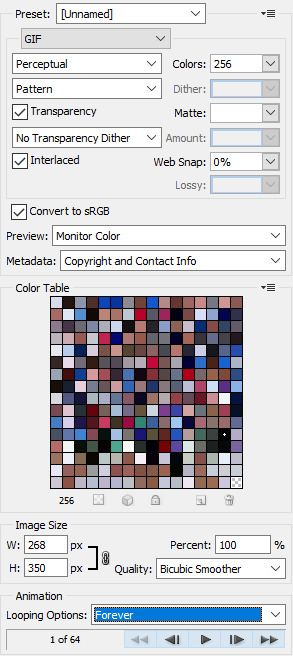
8. Export/save the gif. Go to “File > Export > Save for Web (Legacy)” or CMD+OPTION+SHIFT+S. These are my save settings (I actually have no idea what any of these things mean... I’ve never changed any of them).
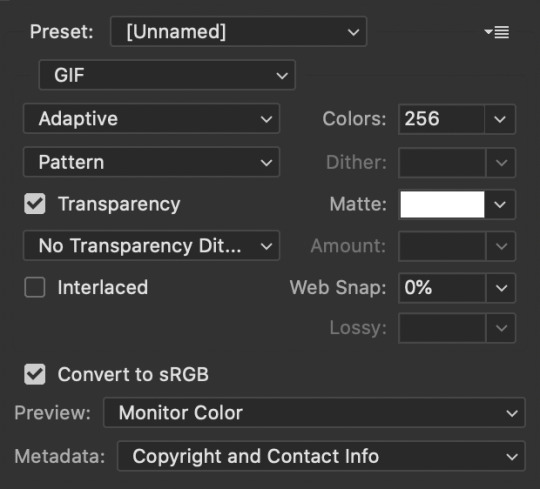
The important thing really is that you make sure that under looping options near the bottom (not shown in this screenshot) it says “Forever,” not “Once.” And also check how big the file is in the bottom left corner:
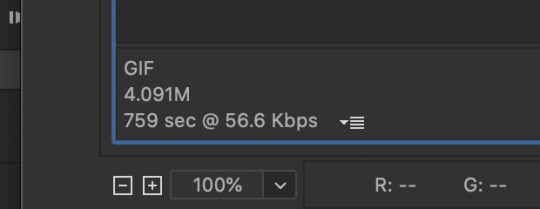
As long as the number under GIF is less than 10M, you’re good to go. Then save the file and name it.
9. Caption the gif (if needed). You can either do this in the PSD you already had open to create the gif or you can open the gif you just saved and caption it there. I find it easier to add captions directly in the current PSD. When it comes to captions, it’s really based on your own preferences. I’ve seen people use all different fonts, sizes, colors, and placements for captions. Some fonts I can recommend are: Myriad Pro, Calibri, Arial Rounded MT Bold, and Keep Calm.

There are plenty of others too. The main thing is that they normally look best when they are bolded and italicized. I have been using Keep Calm for my captions lately. I also add Stroke and Drop Shadow to the text (my text settings are also included in my Actions):

Just make sure the text is centered and has a good margin from the bottom.

This is what it looks like with those effects ( font: Keep Calm; size: 13; tracking: -25).
Anyway, that’s my basic process for gifmaking and coloring. I hope this gives you some kind of foundation to work off of. Just keep experimenting with different techniques and you’ll keep getting better. Read other people’s tutorials and tips and try them out to see what you like and works for you.
#if you're seeing this now i dont make gifs like this anymore#if you ask i'll make an updated tutorial#riah.txt
223 notes
·
View notes
Note
I've been wanting to this but I've been too shy for too long hahahaha
I've been making verivery content for a while but I really want to improve my gif sets, and your gifs are mighty beautiful TT_TT may I ask for advice? Like do you use your laptop or your phone? Do you use photoshop??
oh feel free to ask me anything ! :D and yes of course ! gifmaking is actually fairly complex on tumblr ;-; so i'll try my best to include the basics and all the important stuff !
for gifmaking i use photoshop 2018 and so i use a laptop >.< i’ve seen a lot of asks where people ask about what apps gifmakers use... and to put it nicely ... there is no easy way to get nice gifs T-T the reason gifmakers on tumblr have such nice gifs, is bc there’s a lot of patience, learning, and practice involved in creating gifs for this platform... you can’t just plug in a video clip to a gif converter and expect it to spit out an hd gif for you ... unfortunately ...
before beginning i’ll recommend this tutorial ! it’s the tutorial i used when i was first learning... and my best advice is to have lots of patience ;;;; tumblr is a hard platform to make gifs for and learning how to make nice gifs will not happen overnight
Photoshop and other resources
i personally downloaded ps 2018 and that works fine for me but i’ve noticed that ps cs5 or earlier tends to have a broken ‘import frames to layers’ action so i’d suggest newer versions for gifmaking ! to download i basically looked up youtube videos and checked comments to make sure the tutorials actually worked,,, but if you want you can try these posts ! (1, 2) i’m not sure if they work but usually there’s a lot of posts made on tumblr + other sites for downloading it for free !
About video processing programs
i also use avisynth to process my frames... this might be a really complex bit to learn and it’s not 100% necessary so i’d say you can skip over it when you’re first learning photoshop and everything but if you are interested ! basically programs like avisynth and vapoursynth reduce the video file size down to tumblr’s preferred image size without reducing the quality as much as resizing in photoshop does :o ! additionally it helps process torrents (these are the ts and tp files for live performance stages that are super hd !) but again it’s somewhat complicated i’d recommend this tutorial for download and use if you ever want to ! (vapoursynth additionally has sharpening and denoising options, but since i’ve never used vs it’d be easier to look up a vs tutorial than to ask me >.<)
Where to get videos
this part is CRITICAL !! for gifmaking,,, you could be the best gifmaker on this whole site but if you have a video with poor quality... no matter what,,, your gifs will not come out nicely T-T so when downloading any vlives or youtube videos, they should be at least 1080p in quality ! or as high quality as possible ! this is bc you need to reduce the file size down by a lot for tumblr’s dimensions and this means you need the best quality :o ! i typically just screenrecord videos these days bc downloading whole hour long vlives / long youtube videos is a strain on my laptop hhh ;;; for live perfo stages you should always download torrents to use but this means you need video processing programs like i said above >.< there’s a resource here to help find them !
these are the basic tools you’ll need hhhh there’s a lot more including sizing, sharpening, coloring, frame rate delay, exporting, saving, etc... and i don’t want to make this too long but !
essentially tumblr has size dimension restrictions for image files, a pixel too big or too small will cause tumblr to stretch or compress your gifs making them blurry... the dimensions are optimally:
a.) 540pixels (width) for one gif in a row
b.) 268pixels (width) for two gifs in a row
c.) 177pixels / 178pixels / 177pixels for three gifs in a row
for sharpening many people use topaz etc. and i’ll point you to other tutorials if you want to use it but tbh ! i use photoshop’s smart sharpen options and those work just fine for me... (plus topaz takes forever to render and i h8 its guts so)
coloring - okay so this is probably THE MOST time consuming part for gifs for me.... idk if you’ve noticed but lots of times, gifmakers’ gifs have pretty colors and nice lighting when you compare to the original video ! that’s bc we add layer adjustments in photoshop to make them look nice ! these include brightness, saturation, exposure, vibrancy, etc. but knowing how to use adjustments is a whole post on its own >.< there’s lots of coloring tutorials out there as well if you want me to direct you to them !
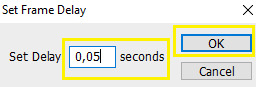
for frame rate delay, i use 0.05 seconds for 30fps (so your normal videos) and 0.03 for 60fps (if none of that made sense that’s okie ! it’s just basically how fast you set frames to play in your gif !)
when exporting - tumblr has a 10mb gif limit but honestly anything above 8mb starts making me anxious or takes too long to load .... so most my gifs are like ... 3-7mb only
but yea these are just some basic tips and stuff ?? i’m sorry it took me so long to respond and it wasn’t as nicely organized as it could be... there are a lot of really good gif tutorials out there ! you just have to look a little ! if you have any additional questions tho feel free to let me know ! i just didn’t have the heart to type out the literal process i have to go through everyday when making just one gif :p i’m sure a lot of gifmakers can relate haha,,,, happy gifmaking !~
#one day when i'm about to d*e i will release a comprehensive gif tutorial#but for now .... even i am astounded still on how much work making content is sigh#me and my cc moots should be getting paid .... ngl T_T#bonknanab#asks#🌱.text#resources#the way this doesn't even go over sharpening all that well sigh ....#there's just so much#and sorry if this sounds?? like salty in any way LMAO#idk how many times i've seen asks where people are like ??? what app do you use on your phone#and bro .... there is no app it is all my blood sweat tears and avisynth#like the frustration i feel#when people repost and are like ? what's up it's just a video anyone could make gifs#and i'm like ??? then make your own and stop reposting mine ???#sigh#anyway i hope this was helpful ;;;;#i've been gifmaking for a while and even now i'm like ... but do my gifs actually look ok#or am i making it up in my head and they're ugly ;((#fjhdgkfjghdkf#do people even want to hear gif things from me LOL
18 notes
·
View notes
Note
i'd looooove to get to know further u process of making gifs!! and possibly a psd too *eyes emoji*
Hiii 👋👋
Allrightyyy let's see 👀 I really don't use psds since i like to do the coloring for each set individually but the layers i like to use and the way i use them are in this tutorial. I think that post probs tells you more about my coloring than simply a psd would 🤔
As for the actual making the gif process it goes like this:
1. I download the video (for youtube i use 4k videodownloader, for instagram and twitter you can find sites just by googling "download tw/ig video", for screenrecording i use screencast-o-matic)
2. If the video is longer than ~5mins, i open it on VLC and cut it to shorter parts (here is a tutorial)
3. I open photoshop and go file -> import -> video to frame layers and drag the pointers to include the part i wanna gif. It's easier to get the right moment without too many unnecessary frames when the clip is short. That's why i use VLC to shorten most videos. I don't limit the frames to 2 or anything, having every frame makes the gif smoother
4. Then i delete the frames from the start or end that i don't want/need and try to make the loop smooth (i.e. i try to choose a clear frame to start and end the gif, so i don't want it to start/end with blurry frames)
5. I set the frame delay to 0.07 (but i might change it later to smth else)
6. I select all the frames and all the layers and then go to filter -> convert to smart object
7. At this point i add smart sharpening
8. Next is cropping, so i choose the crop tool, right click on the gif and usually choose the 1024x768 crop. I use the move tool or ctrl+T to move the gif around if needed
9. I resize the gif (width 540px for wide gifs, 268px for two column sets, 177px for three column sets)
After i've used image size to resize the gif to the width i want, i use canvas size to change the height to what i feel like fits the set best
(I've made an action for this so pushing a key it resizes the gif and cuts the canvas size automatically, i also have an action for sharpening. They reduce the clicking around and make the process faster and are a livesaver tbh)
10. I save the gif with file -> export -> save for web. (My settings are in the coloring tutorial i linked at the beginning of this)
11. I open the gif that i just saved. Why this way? Because on my computer saving for web works way faster when i'm working with frames rather than a video timeline. So when i open the gif after it's been saved, it opens as frames (not timeline) and this way i can delete frames if the gif size is too big, i can change the frame delay to smth else than 0.07 if it needs to be slower or quicker and the saving goes faster. Also if PS would crash at this point at least i have the gif saved 🙏
12. Then coloring!! I do this as a very last thing after the gif has already been saved. I tend to keep both the gif without coloring and the gif with coloring on my folder. (This is when upgrading from a laptop with 128gb of memory to 512gb comes handy hshdjdjdj). (But honestly giffing/using PS does go so much more smoother when you have a computer with enough power and as much memory and ram as you can afford)
--
Soo yeah that's the way my process goes and the order i've found works the best for me. I’ve said it before but i think it’s important to keep in mind that there’s no right or wrong way, just preferences. Find the steps that work for you and run with them 😌
#it's pretty funny how when i started i had an actual paper where i had written all the steps#coz it was annoying to watch the same youtube tutorial over and over again but i couldn't rmbr what i had to do next#so i typed it all out so i could quickly check from the paper what was next#and here i wrote this all from memory#i only had to check how couple words were in english since my ps is in finnish#but yeah apparently folks are onto smth with the wisdom of 'you learn by doing' whomst would've thought#anon i'm not sure exactly what you wanted to know but i hope u got it 👀#just come back if there was smth unclear 🙈#answered#mp
3 notes
·
View notes
Photo

ASKS 18
Andromeda’s a big wide open galaxy; okay anyways here are some asks about Dead by Daylight, ayoshi collab, sims 5, my old recolors, and just some sweet people who sent me some nice messages <3

Anonymous said: In your collab with Ayoshi, the outfit that shows off the Ciara Top and Jess shorts, where can I find the garter belt accessory used with the shorts?
Those stockings get asked about SO much lmao. They are BY Ayoshi like.. idk why people ask about them. I desperately want him to remake them with new textures. Maybe one day lmao. All of his CC is in this post including the stocking (Miso Tights).

Anonymous said: Omg whos your dead by daylight main
Kate and Yui <3 I have been using Jane recently too. I play as Spirit for killer but I only do killer for the challenges LMAO

Anonymous said: I am very new to The Sims world, ts4 is my first time playing, and finding out I can have mods on my game change my world, and you are one of my favorite creators! So I just came to say you are really amazing. I think I have all of your hairs, and most of you others cc, it is because of you my townies look so cute nowadays!! Remember your effort is really valued and you are loved!!!
thank you so so so much ;n; I would really advise against having all of my hairs lmao there are like 150+ and a lot of the older ones have issues i want to fix... just need to find the time
Anonymous said: what do u use to get the little sparkles in your edits :o is it a brush?
I honestly don’t remember. Every since the first one I just use the same lookbook PSD that has the sparkle on it. These look similar though so try them.
Anonymous said: wcif the first two chokers used in your pic for your hairs you just put up on your patreon?
All of my patreon cc posts are public the day they go up. the download is for patrons only but the CC posts are public. Those always have the CC i use linked at the bottom. Always. They have since June of last year. Just go to my Patreon and scroll down to the hairs, and you will see them linked. No pledging or following required.
Anonymous said: Do you have a Ko-Fi? I’m wary about trying to send a one-off via Patreon incase I forget to cancel the next month.
I have a paypal.me link > here < but please don’t feel inclined to donate. Also if you do a one-off with Patreon you can cancel it right after you pledge and you’ll still have access to the Patreon content til the end of the month.
Anonymous said: not to rush you or anything but bella is one of the prettiest sims you've ever created and i can't wait for you to release her omg
Bella queen wbk (thank you)
Anonymous said: your models are so pretty! would you consider release the tray files of them?
that is the plan, not sure when though. I am building them a house rn which i’ve been having fun doing. They all lived in a basement before
Anonymous said: hi :) just out of curiosity, what is the EA policy u always mention concerning the third hairs in ur posts? thanks!
CC put on Patreon is supposed to be post within 21 days of going on Patreon. One of the community managers said it a while ago. I have the details on my Patreon about me page if you want to read and get links. <3
@ariapixie said: Happy New Years!!🎆🎉🎉🎆🎇🎆
thank you!!! i hope youve been having an amazing year so far <3
Anonymous said: Heey love :) I am obssessed with your hairstyles *_* you're the reason I switched from alpha to MM :) just wanted to ask you how come you no longer include recolors for your latest hairstyles? :)
well there were a few reasons:
1). I never used the recolors myself. I like the colors I just never used them
2). I got comments about the colors looking too metalic
3). I had started Patreon around that time and doing recolors for 3 (and sometimes more) hairs every month would have been a lot. Especially bc my DDS was broken so I had to do them a bit more complicated than just saving as DDS.
I know that some people really liked my recolors, and I am sorry if me stopping caused any issues. There are actions for the hair colors and recoloring hair is really easy to learn and do.
@sadnessimmer said: 💌This is the Amazing Person Award! Once you are given this award you are supposed to paste it in the ask of eight different people, who, in your opinion, deserve it. If you break the chain nothing will happen, but it is sweet to know someone thinks you’re amazing inside and out! 💌
Anonymous said: how is your content so amazing ily so much 🥺💕
Anonymous said: Thank you so much for all that you do! Your hairs and collabs are amazing
thank you so much!
Anonymous said: Could you ever see yourself creating hairs (or custom content in general) for the Sims 5 once it comes out?
If the style is something I enjoy and the creation method is similar yes
@ariapixie said: Hi I think tumblr ate my ask so I’m sorry if you’ve already gotten this. I really love your editing it’s so beautiful and I was wondering if you would ever consider doing a tutorial on how you do it
honestly most of the time i do stuff differently. I run the same topaz/sharpening actions every time and then add some shadows and play with curves. Nothing that is super intensive tbh. I wouldn’t even know how to go about doing a tutorial tbh
Anonymous said: What's your name on the gallery? I can't ever seem to find anything from you, or do you not have one?
aharris00britney; make sure you have CC enabled
@wcifblog said: Hi, I am in love with your CC. I'm a simmer for a long time but just lately I've been trying to learn how to make my own CC. I've seen some of your speed meshing videos and I was wondering if you'd ever consider making a tutorial for beginners on how to create a new mesh from scratch. (I'm trying to create a curly hair on blender but I'm stupid I guess). Thank you so much for all your work, love, Kel.
hey! thank you so much <3 I actually don’t mesh stuff from scratch though. So I’m afraid I am not able to help in that department :( I’m sorry
@tarrinix said: would it be possible for you to upload a mass file for download that has all of your hairs? (I'm asking for only the ones created by you so others don't miss out of credit links and things like that.)
I really wanted to get all my 2019 CC updated before the end of the year and have it up in a .zip. But I never got around do updating stuff from the start of the year. I need to get back into updating stuff I just am so.. unmotivated recently? Idk hopefully I can get all my stuff updated in the next few months and have some mass downloads for 2017, 2018, and 2019 stuff.
@xayami said: any thoughts on 365? 😳
well.... im excited for B#RN. that is what matters, right? LMAO I’m going through a Weyes Blood/FKA Twigs phase rn so I haven’t been listening to much kpop. Especially at the time that 365 released.
Anonymous said: the sim modeling your piper hair can murder me and i will thank her over and over how make good sim
Anonymous said: it's not even just her it's every GODDANG MODEL!!!
LMAO Ivy is my 2nd blond model. She is a queen isn’t she? She is actually the sim from this lookbook and I just randomly added her to my models household and she stayed.
#asks#if anyone knows some albums that are like titanic rising pls recommend#i listened to front way seat to earth already#and loved that too#love Magdalene too#i just want some new music zzz#ive been building an actual house for my model sims the past few days#bc they lived in a basement before#and it is so bad edfgsefdc i like NEVER build anything#then my mouse broke and i struggle using the trackpad#so im on break from it
52 notes
·
View notes
Photo
9k FOLLOWERS CELEBRATION: GIF TUTORIAL by winston-wilson
In this tutorial, I’ll try to show you the basics of making a gif. Of course, there are many ways for this joyful and absolutely not stressful part-time hobby slash addiction, but this is how I’ve been doing it for a couple of months now, and it’s worked out pretty well so far. I’ve learned a couple of tricks, created my own shortcuts, and at this point it’s just something that comes naturally.
I use Photoshop CS5 Portable (you can get it here)
for taking caps, I’m using KMPLayer (get the 4.2.2.22 verison, the .23 one is screwed up - you can get it here)
please, like / reblog if you find this useful
feel free to hit me up with any questions.

1. Don’t beat your laptop with a baseball bat. Yet. Use your chair.
1.1. Videos/clips/movies.
I explained that part in this tutorial. What I want to add is that if you want the highest quality of a trailer, get QuickTime, wait a day or two after it comes out, and get the trailer here.
Find a trailer you’re interested in, play it, choose the highest quality option, press ctrl+shift+i, and you’ll get this:
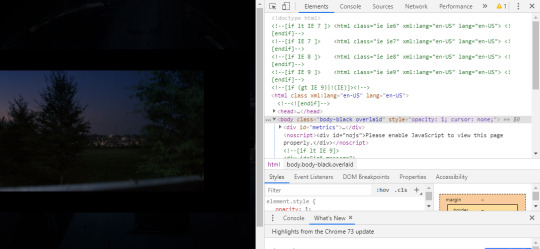
Click anywhere on that html codes and press ctrl+f. This will show up:
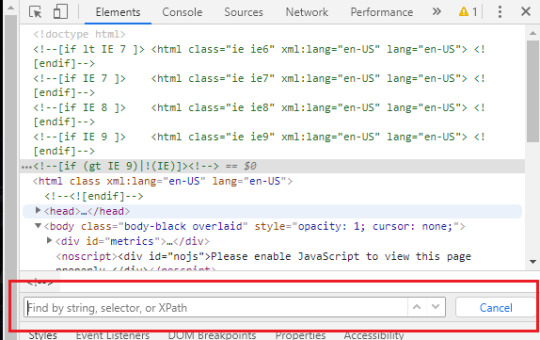
Put that brandy away. Search for ‘source’, find this:
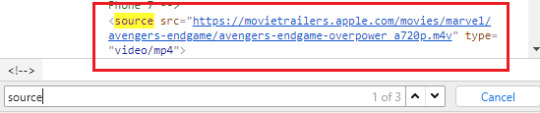
Clink on the blue link using the right-click of your mouse, choose open in new tab, and a download window should show up.
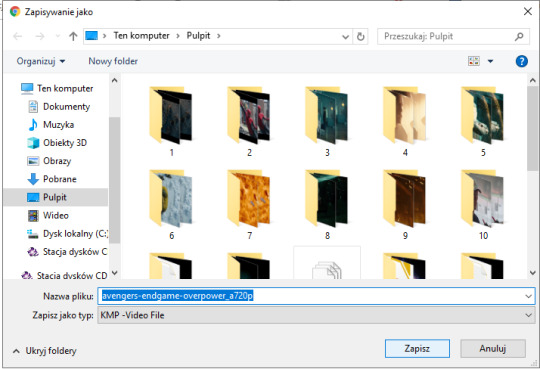
Save the video where you want to.
You can use videos from YT or movies you have on your computer or get those movies. Those movies also should be in the best quality possible. I suggest the ones with quality of 1080p and bit rate at least 6 Mb/s for best gifs.
In this tutorial I’ll be using the trailer of Spider-Man: Far From Home. Because all my movies are on another disk and I, uh...
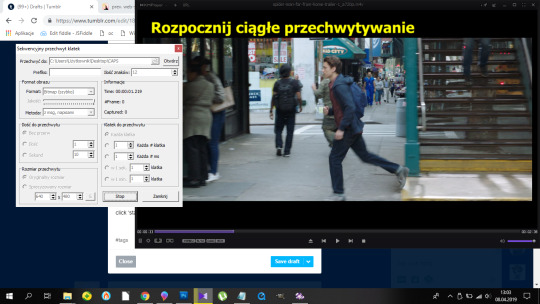
2. KMPlayer + taking caps.
Before you open a video and take caps, I suggest you create a folder that’s easy to find and use on your desktop. I have one called ‘CAPS’.
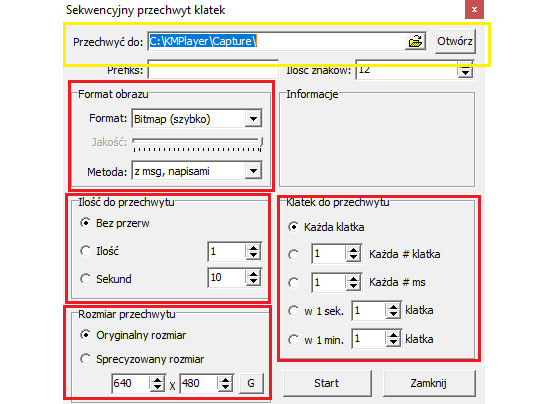
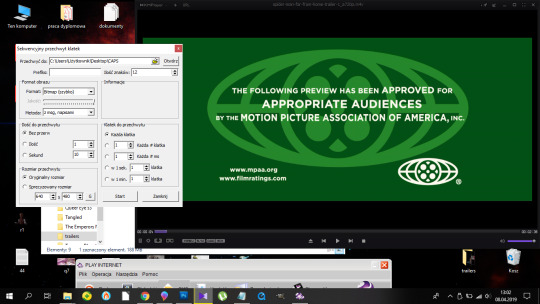
- Open your video in KMPlayer. Pause it because this version of KMPlayer stinks and you have to pause the clip in order to start taking caps. So pause it and press ctrl+g. When the caps window shows up, set it to those (red) options and choose your folder (yellow) where your caps will be stored. You have to choose that one thing every time you open that window. [Sorry for the language, but it doesn’t matter. Just choose them settings.)
- Play the video & make sure your caps window is somewhere on the side like this:
Find the part that you want to gif. You can pause before it, press start on the caps window and then play the video or just start taking caps while the video is playing. I’ll do it using the first way.
pause:
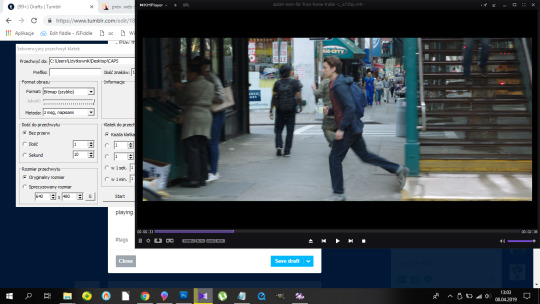
click ‘start’ on the caps:
and then play the video until I get the caps I want and click stop on the caps window first, the video second.
Close that thing if you have what you want.
- Open your CAPS folder.
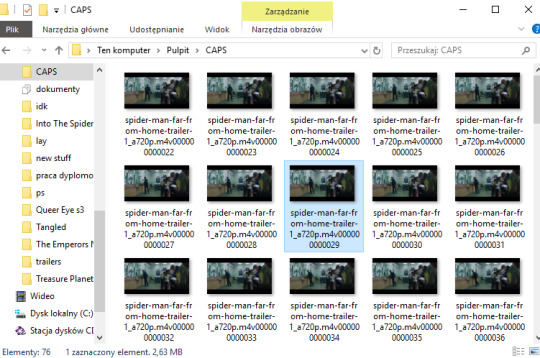
Get rid off the caps you don’t need. They’re trash and should be treated as such.
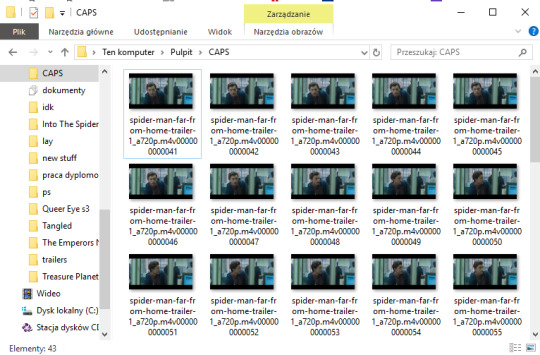
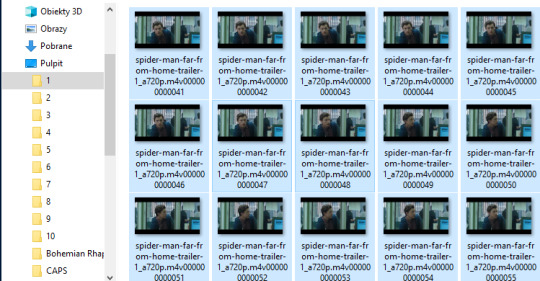
If you’re giffing more than one scene, you can sort them caps to folders. I have 10 folders named from 1 to 10 where I sort mine. And because for now I’m making just one, I’ll move those caps to folder ‘1′ on my desktop.
Time to make a gif. You good out there? If the answer is no, take Vicodin. No worries, when you’re done learning the basics, you’ll make gifs with Britney Spears playing in the background. Now shhh, focus.
3. Photoshop, aka that scary part.
- When you install it, you’ll get a folder, and in that folder there’s the app.
- Open that thing (and maybe copy on your desktop).
What you need is the layers window, the actions window, the adjustments window, the characters window, the animation window, the paragraph window, the history window... It... It sounds horrifying, I know, but cool your pits. It’s just this:
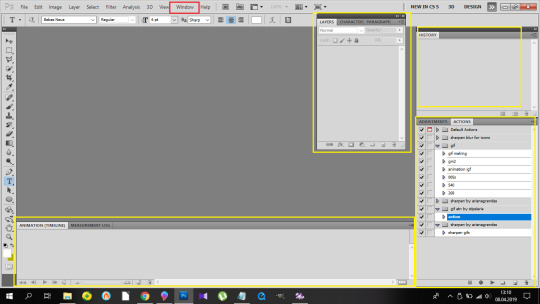
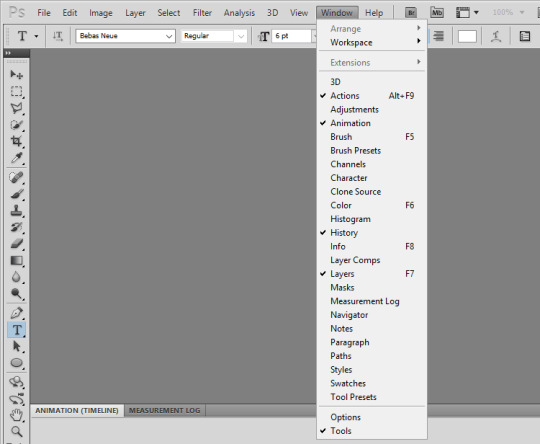
If you’re not laughing, take another Vicodin. Use this if those windows aren’t on display automatically:
And sort them. Now, I use my own keyboard shortcut for gifs. I suggest you do the same. Trust me, you don’t want to do this:
every time you make a gif. As you can see, I use alt+ctrl+p. You can set your shortcuts using the ‘Edit’ window at the bottom of which you’ll find the ‘Keyboard Shortcuts’ thingy. Then it’s a bit of digging but it all makes sense, ok? Ok. Yeah, no, it’s a lot of digging but I believe in you.
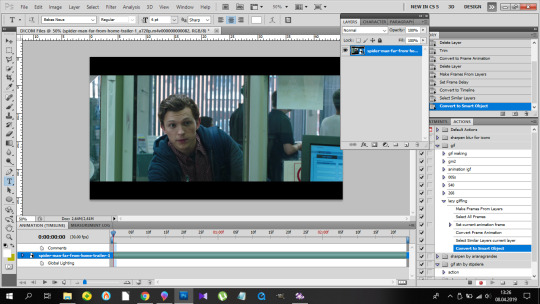
So you load them files, and this shows up:
so choose your folder where your caps are, and click OK. Ta-dah:

- This is the ‘make gif’ part. Click this:
so you can get this

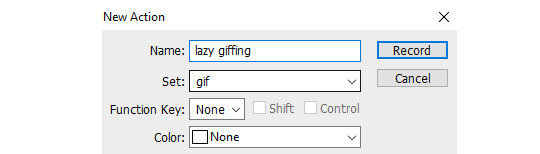
at the bottom. I have this whole process made into an action, and if you want it in an action too, at this point you should click this:
and choose ‘New Action’. Name it. Click record.
and now 1)
2) take Tylenol
2.1.)
3)

4)
5)
(you should be here now:)

6)
7) (right-click mouse)
8) stop the action recording here:
And this is how you should be looking right now:
Oops, not this. This:
Fine? Fine. Go smoke a cigarette.
You back? K.
- Dimensions. Very important. Like, 10/10 important. Don’t cross the 3Mb size.
Fitting into the tungler dimensions means your gifs will be posted in the highest quality. This is a visual of those dimensions (depending on how many gifs per row):
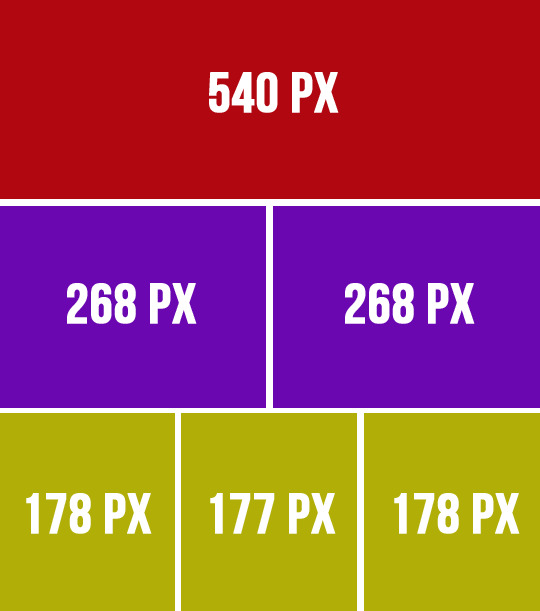
If you don’t do that, your gifs will look like blurred filmography of Zack Snyder’s.
I’m gonna make a 253px gif so it won’t stretch in that post. Gifs over I think 268px stretch on normal posts as in posts and look ugly.
So that brings us to the next steps.
- Cutting, resizing. Easy. Don’t panic.
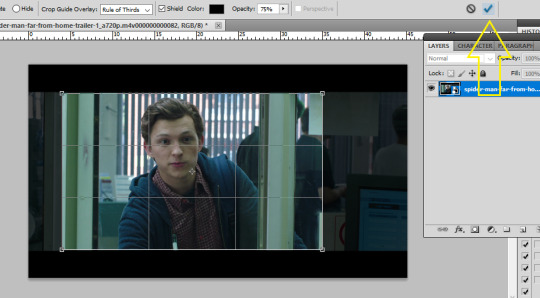
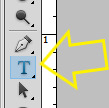
choose that tool:
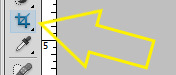
set your... this:
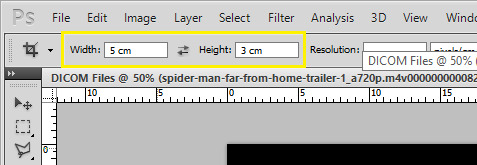
(make sure it’s ‘cm’, otherwise you’re screwed) and crop, baby, crop. I suggest the biggest area you can, of course without the black parts.
Also, depending on gifs, the dimensions can be different. For my 540px gifs I use 5x2 or 2x1 or 16x9. For my 268px gifs I use 11x7, 11x8, 5x3, 1x1. For the 177/8/7px ones, I usually use 3x5 or something. Just make it look nice. Not too thin, not too high.
Ok, so I’m cropping.
And now resizing. Crtl+alt+i.
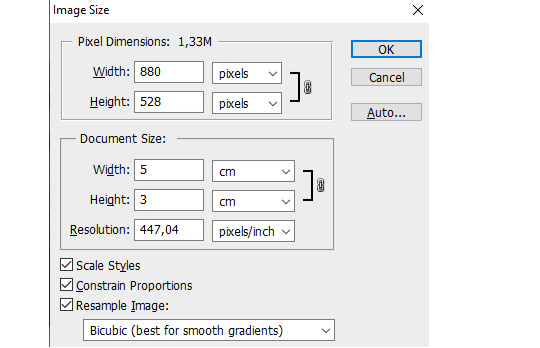
Make sure this thingy looks like that:

My width will be 253px, you make it 268, alright? Or something. Just don’t cross 540px. And put that beer away.
So I have this now:

Doesn’t look appealing, huh? Yeah.
Also click ctrl+’-’/’+’ to zoom in/out the gif.
- Sharpening.
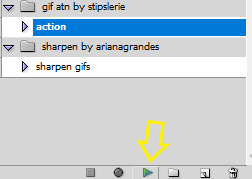
Some people use actions, some do their own thing, I use an action. I’m lazy. And I don’t look forward to just... You know. Clicking a lot. So I use this action. Download it, make sure you like or rb that post, and upload the action using this:
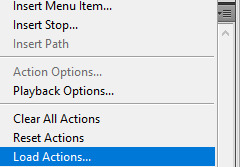
Find your action. Load. Choose it, click play.
So this is how the gif looks without:
and with the sharpening:
Magic, I know. Okay, you can have that beer. Or no, don’t mix alcohol with pills.
- Coloring.
This is the fun part. That’s where vodka comes in. The part with 390248 times you get frustrated and your laptop is in danger because it can never know when it will join the doves behind your window in a short fly. Anyhoo.
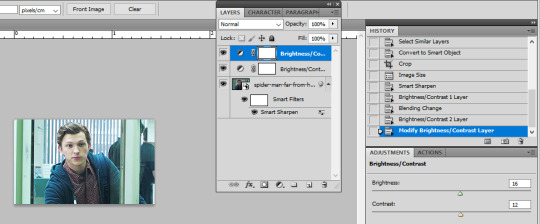
Start from brightness. This is one little trick I learned. You can use these options:
I start off with doing something else. I choose the first option, aka Brightness/Contrast, and when it appears on my layers window, I choose the ‘screen’ option.
So I’ve gone from this

to this
It’s clean. It’s cute. Brightens the whole gif.
Of course, you can do it traditionally and/or adjust the opacity of that ‘screen’ layer. I think I’m gonna brighten it just a tiny bit more and add some contrast.
Now cooolors. I’ll make a standard gif, nothing crazy. You can go crazy if you want to, just don’t make someone’s skin orange. It just... doesn’t look good, kay?
Kay.
Those are my options:
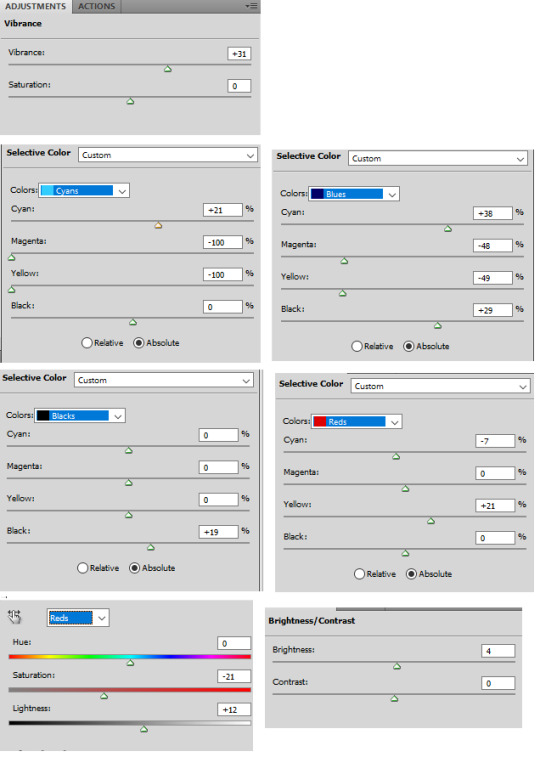
And this is the result:

Save your gif using this (once again you can see my shortcut)
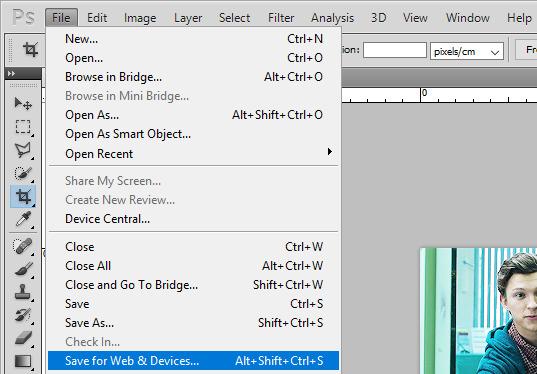
and your settings should look like this:
Click save, name the gif, save it wherever you want. And it’s done.
As a bonus we’ll go through...
4. Text on gif.
I use Arial Rounded MT Bold. You can use Calibri, it’s the one I used to use.
Choose this:
Click on the gif. Write your text. It looks like crap.
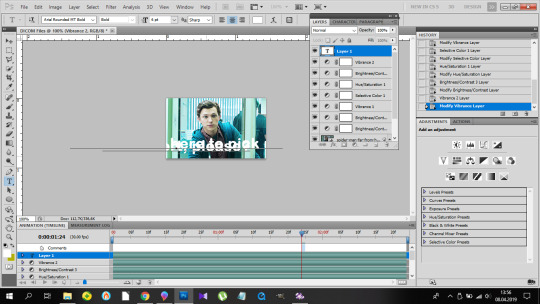
No worries. Choose the text (ctrl+a). Choose your character window. And manipulate until you get the result you’re happy with. Change the size of the font, the distance between letters and paragraphs (and choose the paragraph window to make the text centered).
My options:
and result:
Doesn’t look nice, we want it nice and clean and all that jazz. So. Back to the layers window. Choose that text layer and find this button
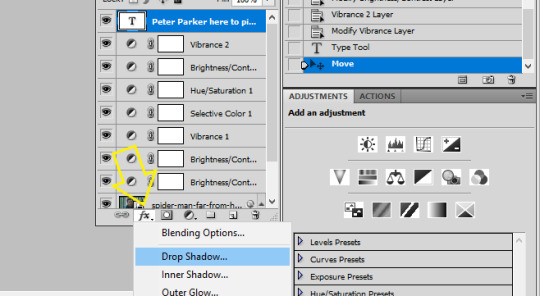
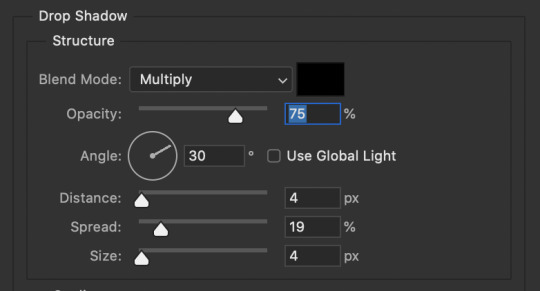
and choose drop shadow. When a window pops up, choose those settings (those are the ones I use:)
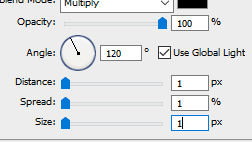
Then go to Stroke on your left and set it like this:
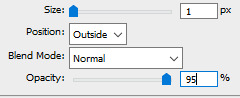
And click ok, and that’s the result:

Tips:
- create shortcuts. saves time,
- make gif actions. saves time,
- make sure you use the tumblr dimensions,
- don’t do orange faces, ok?
- when setting the text on your gif, you can do this little trick so it’s in the center:
x if my gif is 253x wide, the center is in 126,5, I make it 126px.
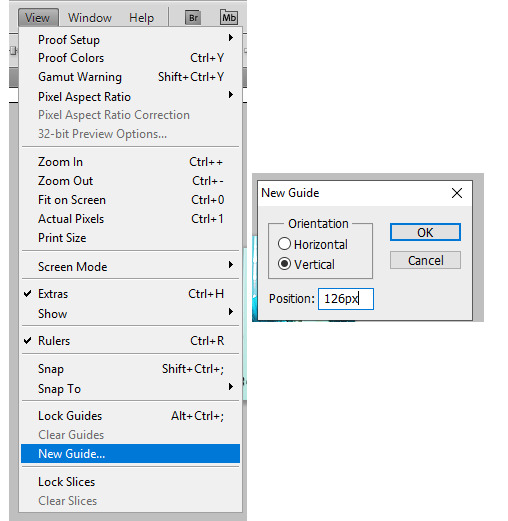
(make sure to write that ‘px’). click twice on your text layer, and this is the middle of that layer:
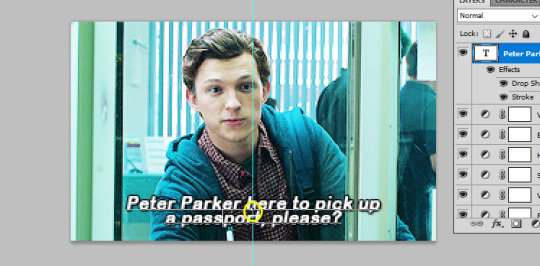
while moving that layer you should be able to see that tiny square and it’s the center of your text. Set it on the guide and you’re done. It’s centered.
- use these


to cut your gif.
- play with the opacity and layer settings. for example, if you use color selection or saturation, you can set the layer’s option to ‘color’ and have it 70% opacity.
- you can save the text layer only and reuse it by using ctrl+shit+s and saving it as psd

and then just open it again anytime with ctrl+o and duplicate it to the gif.
- have fun with it. don’t throw your laptop out of your balcony, they’re expensive.
If you have any questions or want me to make a different tutorial on coloring or something, don’t be scared, I don’t bite (for real, I have braces, biting hurts).
I hope I helped and making gifs doesn’t look like magic to you anymore.
#completeresources#fyeahps#userlance#userjessie#biafrnc#userariella#photoshop help#ps help#making gifs#gif tutorial
390 notes
·
View notes
Text
gif tutorial !! (feat. anamo)
for everyone asking how i get my gifs so crispy
note: this tutorial is made using photoshop cs5! and while it should still work for newer versions, not everything may be the same. sorry :(
programs
photoshop cs5 (this is the only version i’ve really ever used so sorry cs6 and cc users)
topaz clean & denoise (optional)
kmplayer
media downloaders
4k video downloader
twitch leecher (for clips longer than what twitch allows)
how to download twitch clips (I use the “slow” method) twitch update made this useless ! so now i just use this site to download clips :)
1. extracting your frames when you can’t do video frames to layers
I think you need QuickTime (i don’t, which is why i can’t use this method) for this, but if your version of photoshop allows you to do File > Import > Video Frames to Layers, here’s another tutorial to help with that!
Remember that the best, clearest gifs come from the highest quality sources! However, I don’t normally recommend downloading actual 4k videos because while your gifs may be super HD, the frame rate is almost always really weird and slow.
After downloading your video/clip using one those nifty programs listed above, we need to extract your frames! Personally, I’ve only ever used KMPlayer to do this, but I’m sure that other equivalents will work pretty much the same.
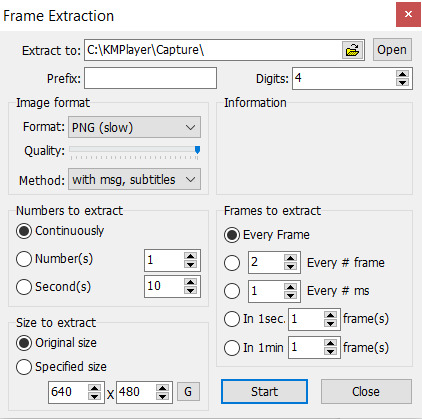
Anyways, after opening your video in KMPlayer, pause right before the scene you want to gif and right click. There should be a tall menu that pops up, and from there you click Capture > Frame: Extract. This brings up yet another menu, and here are the best settings (at least I think so) for extracting your frames!
Now, you need to click start and let your video play. Once you’ve captured all the frames that you want, they should all be in your Capture folder that KMPlayer made for you (mine is located under This PC > Windows (C:) > KMPlayer > Capture). Just organize the frames as you want - I usually separate the frames for each gif into separate folders, but do whatever you want.
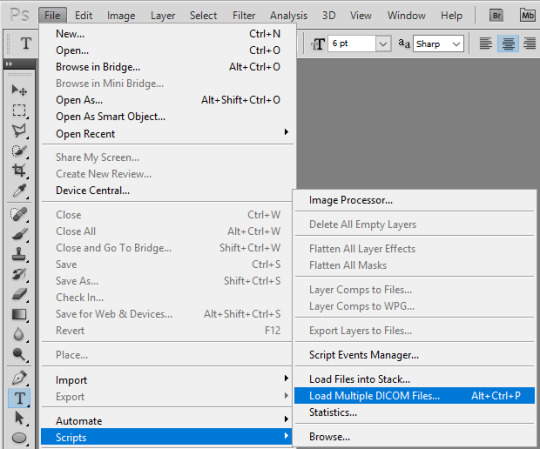
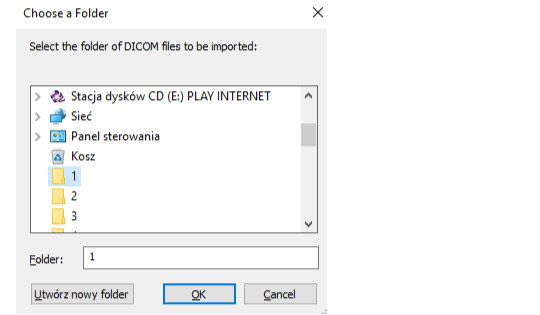
To actually get these frames into PS, start up the program and go to File > Scripts > Load Multiple DICOM Files and locate your Capture folder. Look, we have frames now. Cool.
2. actually making gifs
Make sure that your Animation window is open (it’s under Windows on PS if it’s not) so you can see what is likely only one frame, which is probably way less than the amount of frames that you captured (this will be different if you used Video Frames to Layers). To fix this, click on the symbol (a little upside-down triangle next to four lines) on the far right of the animation window and choose Make Frames From Layers.

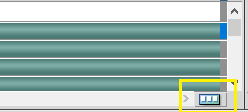
Since we now have a lot more frames in our timeline, you can click the play button and watch them scroll through. Decide how you want to crop your gif and then resize the cropped frames to fit Tumblr (sizes here). Once you’ve done this, click on the upside-down triangle again and select Convert to Timeline, then select all the frames in the Layers tab that’s probably on the right of your screen and right click > Convert to Smart Filters. This will make sharpening easier because you can sharpen every layer all at once like this.
3, sharpening
At the top of your PS window, there should be a Filter tab. From there, click Sharpen > Smart Sharpen. Using my fairly limited experience with PS versions other than CS5, I do know that not every version of PS sharpens the same, so if you’re using something other than CS5, settings may vary somewhat. But anyways, here’s what my Smart Sharpen settings look like:
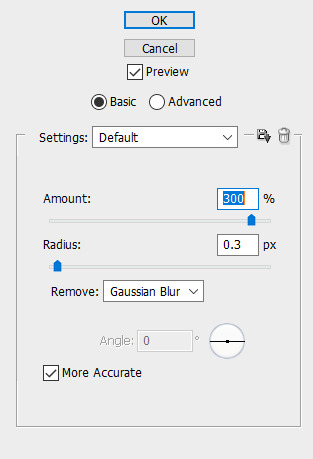
I then have my own personal sharpening action that I apply to the gif to somewhat smooth out the sharpness, but this tutorial has something towards the end that’ll give you a similar effect. And don’t forget to play your gif again to make sure that it works before you start coloring!
4. coloring
As a lot of players are POC, please be conscious of how you color the gif! Obviously, Obivously, it’s one thing to lighten up a dark scene because it’s hard to see what’s going on. However, when you purposefully and consciously make the decision to lighten (or darken) solely a player’s skin color, that’s gross! Stop!
This being said, there are 5.6 million gif coloring tutorials out there and 5.6 million ways to color a gif. Personally, I tend towards more “””natural””” and true-to-life colorings for my OWL gifs, but I’ve made vibrant and pastel and colorful gifs as well. Here’s what the base PSD for all my OWWC gifs looks like, and this is pretty representative of all my other OWL PSDs as well.
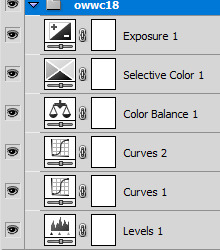
But as I said, there are so many different ways to color gifs - some of my gifs only have a total of three adjustment layers - and everyone has their own preferences for how they like their gifs to look. However, I will say that my first step in coloring is a gif is always use Levels and click the Auto option for a little color correction.
When you’re all done coloring your gif, select everything in your Layers tab (PSD + actual gif), then right click > Convert to Smart Filters again so that you only have one (1) layer in the tab.
5. using topaz to be extra (this is optional)
Is using Topaz necessary to make gifs? No, absolutely not. It also makes the giffing process take longer. It’s literally just to be extra yet I still use it on every single one of my gifs. Why? Because it makes them s m o o t h and I hate seeing pixels. Even if most OWL stages are pretty noiseless and nice overall.
To use Topaz, click on your single Smart Object gif layer and go to Filter > Topaz Labs.
While I do have both Topaz Clean and DeNoise, I typically prefer DeNoise over Clean, and that’s mostly because it’s a bit more difficult to mess it up. Topaz DeNoise does exactly what it sounds like it does - it removes noise from images. However, it also smoothes skin and hair and everything else, which is why you still need to be careful using it unless you’re going for an unrealistic, completely airbrushed look. Topaz Clean does the same, but with more emphasis on the smoothing (I guess), so it’s easier to accidentally go overboard with it.
I almost never use the two in conjunction, but a good thing about Topaz is that it also reduces your gif file size by reducing noise! Which is nice! Also here are some nice Topaz settings. I use these (for the most part)!
update as of jan. 6, 2019: I am a Big Liar and I use both Clean and Denoise together all the time now and have been doing so since pretty much immediately after writing this tutorial. Just be careful when using both otherwise your gif might start looking too smooth - as with anything else, Topaz should be used in moderation :)
6. saving your gif
This part is actually super important if you used Topaz on your gifs. After you’ve made everything into a Smart Object, click on the upside-down triangle on your Animation window and select Flatten Frames Into Layers. If you used Topaz and don’t do this before trying to save your gif for posting, you will crash PS.
This process might take a while for Topaz users, but at the end, once your Smart Object has been made into many layers, go back to the upside-down triangle, click Convert to Frame Animation, and then select Make Frames from Layers from that same menu.
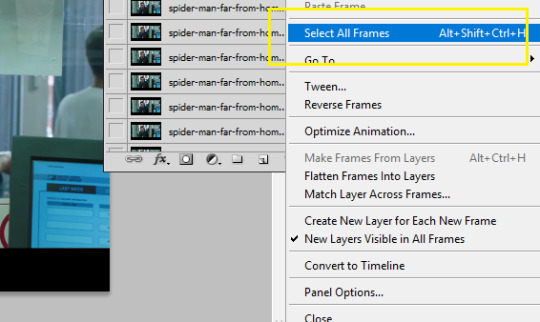
Now all your frames are visible on the timeline! Delete the very first one (otherwise the same frame will be repeated twice), select all of the frames on your timeline, then click on the little “0 sec” thing beneath the frames to set the gif timing. For this, I generally recommend using 0.03 or 0.04 seconds, but this depends on personal preference as well as the frame rate of the original video.
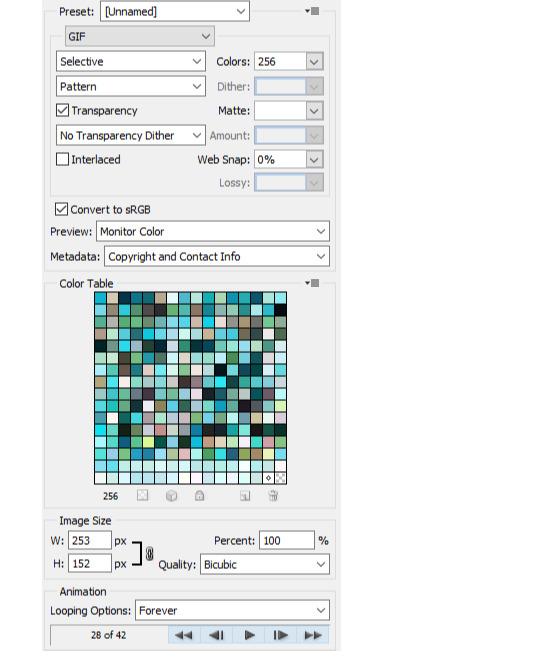
It’s time to finally save our gif. You just go to File > Save for Web & Devices and a big window will pop up. Honestly, the only save setting that really matters is that you have your gif set to loop for forever. Some people prefer using Diffusion over Pattern when saving, but this is what mine looks like right now:
If you go to save your gif and find that it’s above Tumblr’s 3MB gif limit, you are probably just going to want to delete frames if you don’t want to lose the overall gif quality. Otherwise, you can click on that Colors: 256 box and try to cut down the number of different colors in your gif - though I will warn you that this generally makes gifs look more pixelated. And once your good and settled, click save and your gif is ready to post!
12 notes
·
View notes
Photo
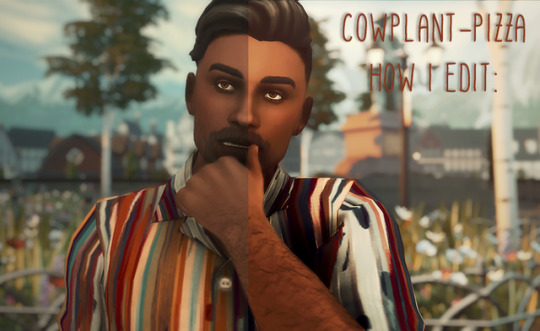
how i edit my photos!!
ok so, i know this is maybe not the exact tutorial people were looking for, as i literally just changed my editing style and it might not be up to peoples tastes as much as my old editing styles. to add to that, i do plan on making lil tutorials for how i edited in the past. that is, if i remember what i used lmao.
so erm yea. this is gonna be tagged as #tutorial and #how i edit. it’ll also be linked on my blog in my resources/faq so im really gonna throw my shit @ the screen if i get anymore asks about it lollll but ye, here goes!
note: everything that needs downloading is highlighted in bold + italic
a) u wanna start off with a nice pose or camera position!! a lot of editing is through where your focus is in the picture, and how it’s positioned. messing with different angles in your editing can make for more interesting posts!!

b) so here we are, all gross and without reshade. lets fix that:

yay! he’s already looking better right?? i use this reshade for my pictures right now! thanks to @fuchsiateasims for this beautiful preset honestly u r a god
c) so, from here, we use @ratboysims smart sharpen preset! you can create this preset by going to Filter > Sharpen > Smart Sharpen. here’s what it should look like
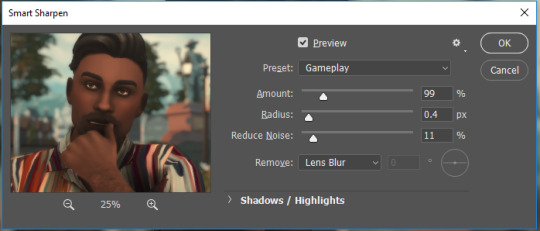
d) after this, you can, if u want to ofc, edit the curves by going to Adjustments > Curves. this is the easiest way to help brighten your image without whitewashing ur simmies!! imo, this pic didn’t need that soooo i didn’t bother
e) next i use this vintage-y preset by @wooldawn!! in this massive set of actions u’ll also find loads of sexy af presets that add mood to ur pics. tbh its a must have, no excuses
(sorry 4 the bad previews, burn me at the stake ;w;) ta daaaa. now it’s looking a lot more colourful!! yay!!
f) next i use the au’natural preset that tbh i live by??? its just the best thing out there. it’s by the amazing @complicite
adds a lil bit of colour and brightness while also making the shadows POP (wig)
g) now, if ur feeling like u wanna add a lil extra something to ur pics, i add another layer and choose a colour like this:
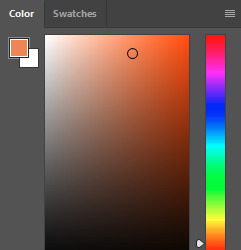
h) and then continue to paint over areas of the picture that would naturally have extra light. we’re basically making our own light leak rn, wow!! (if you want ur picture to look earlier in the morning, try a lighter orange. if u want it to look like its during the day, try a whiter colour!)

i) after i think i’m done (also, heads up, my brush normally doesnt lay on this thick?? so idk, just roll with it. urs might, urs might not. who knows), i double click the layer ive painted onto and choose these options!
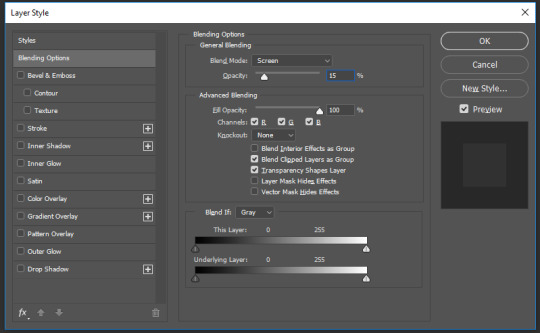
j) so as u can see, i change the Blend Mode from Normal to either Overlay or Screen. its totally up to you for which one looks better! in this one, i choose screen because the colour was painted on thicker, but in my previous posts, i used overlay to conserve the colour more... confusing ;o; if i use Screen, i set the Opacity to between 10 - 50%. whatever looks good tbh!!

k) and here is what we’re left with!! the only extra editing i did was to use the “A Bit More Brightness??” bit from my own action that u can find here!
i errr hope this helped u guys that are curious about how i edit!! its just mostly staying within my comfort zone using the same skills but also just going with what looks good yano??? feel free to message me if you have any trouble!!
335 notes
·
View notes
Note
hey rq!! could you tell me how u make ur beautiful static icons?

hello ! i’m sorry i was asleep when you sent this but first of all thank you for thinking my icons are beautiful?? fjdkjd. i’m gonna try my best to explain how i make them. firstly download this psd and open it up. it’s basically an icon template i created for making my icons rounded at the corners. just a warning, i’m an oldie that’s been using photoshop since i was like 10 so i’m using Photoshop CS5. I think the same steps can be applied to like cs6, cc etc. but i’m not sure :O
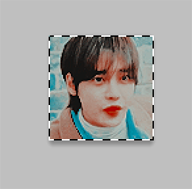
first, i open the image i want to use. personally, i copy and paste mine onto a new layer from pinterest. once you’ve got it open, crop it how you want in 80 x 80 px using the crop tool

next, you can add your psds. once you’re satisfied, flatten all of the layers. you can do this by going to layers > flatten image.
& sharpen however you please. i don’t use a sharpen actions anymore, i just go to filter > sharpen.
after that, select the entirety of the image. you can do this by pressing command + a / control + a ….or you can go over to the tool bar and use the first tool to select it. it’ll look like this
copy the image. you can do this by pressing command + c .. or by going the long way and using edit > copy
this is where it can either be confusing or really simple, it to me a minute to get the hang of this cause i’m not that bright, lmfao.
go to the tab with the psd from above, and paste your image above the one with rachel, and below the layer titled “shape 1” you can do this through using your keyboard with command + v / control + v or using edit > paste. it’ll look like this
and the layers will look like this
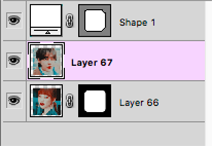
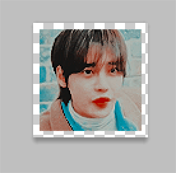
now, delete the layer with rachel. see this little white rounded square within a gray square next to “shape 1″? click that with your mouse, and press command at the same time. your mouse must be exactly on top of it for it to work.

right on top of this. the shape will outline on top of your icon when you’ve done it. it’ll look like this.
now, you’re almost done! over by layers, go back and select the layer of your icon. by this i mean just press on it so its highlighted like this
then the final step! create a layer mask! you do this by pressing this button on the bottom of the layers bar

once you do that, your icon should be complete! it looks like this in photoshop.

save it with whatever settings you’re used to! i prefer save > save for web and devices. and this is my final result!

whenever you wanna make a new icon, you just repeat the steps with the psd and a new image. your last icon will basically be in the place of my rachel one, so you just delete it when necessary! i hope this makes sense. i’m sure there’s likely much easier ways to do this out there but this way has always been quick and easy for me! i tried to make it super detailed just in case you might not know what i mean :)
#i tried to be as detailed as possible just in case :O some of it is pretty basic#if you wanna skip thru it#hope this helps!#lmk if not.#Anonymous#。 *. ✰ : ⊰ a hoe never gets cold : you know what the motto is.
1 note
·
View note
Photo


- ̗̀ How to Make Gifs with Photoshop and KMPlayer (Very Detailed) by quirkyresources © ̖́-
♡ All my tutorials ♡
Hi! I'm no expert, but I've been making gifs for at least like four or five years, and over that time I've learned a lot, so I want to share that stuff :) Also, someone requested that I teach them how to gif. I hope this helps!
This tutorial will teach you how to create simple but quality gifs, like the ones in the gifset above! Those gifs are all from TV shows, but it should apply to giffing almost anything. I’ll be using KMPlayer and Photoshop.
This is the gif I’ll be showing how to create, as an example:
If you have any questions at all, please feel free to message me here :) And I’m somewhat new to writing tutorials, so if you notice that I got something wrong, please let me know. Thanks!
Please like/reblog if this is at all useful to you. Thank you so much if you do!
You need:
KMPlayer (link below)
Photoshop (I'm using CC 2017, but I think any version with the timeline should work)
A video to gif (recommended source below)
A sharpening action (recommendations below)
A PSD / or to know how to color gifs (recommendations & tips below)
I'll go over:
How to buy/download PS, download KMPlayer, and download a video!
Taking screencaps in KMPlayer
Importing the screencaps into Photoshop
Cropping and timing the gif, organizing layers, etc.
Adding a PSD or tips for coloring it yourself
Adding subtitles & learning font settings
Saving for web
Posting to Tumblr
Various tips along the way!
The tutorial is under the cut. Have fun and good luck! ♥
[Note: If a photo looks too small, right click it and choose "open in new tab"]
Step 1: getting Photoshop, KMPlayer, and quality videos
Get Photoshop:
I was able to buy my Photoshop, so I don’t have any free downloads to recommend, I’m sorry! But there are plenty of other Photoshop blogs on tumblr that can help with this stuff :)
And there are some deals from adobe that might help you afford it if you want to buy it instead. They had a great one for college students that totally helped me.
Anyways, if you can get it somewhere/somehow, here are the next steps...
Download KMPlayer:
Here's the link (it's free!): kmplayer.com
You can use it to watch videos, but in this case we use it to take screencaps of them to use for gifs.
Get your video:
If you’re going to download a movie or show, I recommend getting torrents from thepiratebay.org and using μTorrent to download them. (Here's a tutorial for how to download stuff with it.) Be careful with viruses and stuff, though!
When you look for a video, try to get one that's as HD as you can find, meaning one that is 720p or 1080p! That tells you what the height of the frames will be, in pixels. They are usually big files, but should be much better quality than others.
Also, try to find videos that do NOT have network logos or ads on them!! They can make gifs look pretty bad, and it takes some serious cropping to get rid of them, which then makes it look even less quality.
Step 2: taking your screencaps
Open your video in KMPlayer. (Open KMPlayer and press CTRL O.)
Get to the exact scene/clip you want to gif. (Tip: it's hard to find the exact place you're looking for, so I recommend using your right/left arrow keys to skip through a little at a time.)
Once you're at the part of the video you want to gif, press CTRL G. This brings up the "frame extraction" window. This is where, as you can probably guess, you extract the frames for your gifs! Here are the settings I use:

I use these exact settings almost every time, except for the image format section. I go between JPEG and PNG. I use JPEG if I'm making a smaller gif (like 268px width or less) and I use a PNG if I'm making a larger gif (like 540px width.) This is because (or at least I've heard) PNGs are the highest quality option, JPEGs are the middle, and bitmaps are the lowest (don't use them!!) The only downside is that the higher the quality, the higher the screencap's file size. So use PNGs sparingly if that matters to you.
You can also change the "prefix" of the screencap filenames.
After figuring out all of these settings, click "start"! Then press play on the video, play until the end of what you're giffing, and press "stop" and pause it.
Then, in the frame extraction window, click the "open" button that’s to the far right of the "extract to" bar. This will open up the folder location of your new screencaps.
Step 2.5: organizing your screencaps
What you'll want to do now is organize the screencaps into separate folders for each individual gif. This is something that's good to do whether it's all from one scene or you're doing a compilation of different clips. This is because, when you upload the screencaps into PS, it's best to have them in their own little folders!
(Tip: Personally I use 75 frames or less in each gif. This is because that’s the limit on the sharpening action I use, but I also think it's a good amount to stop at.)
Step 3: importing your screencaps into Photoshop
Next, we're finally going to move the screencaps you took into Photoshop. Yay!
Open file > scripts > load files into stacks. (Tip: Sometimes this function doesn't work on certain Photoshop downloads. If this is the case for you, here's a tutorial on how to get around that!) This brings up this window:

Click "browse" and find the folder with the screencaps you want for your gif. Select all of them and click "open". Then click "ok" and wait for them to load. Each screencap will load as its own layer in the layers panel, which is what you want to start with.
Step 4: changing the screencaps from layers into frames in the timeline
Once they're all loaded as layers, go to window > timeline. This brings up the timeline!
At this point, things should look something like this:

Now we can start using the timeline! In this method we convert the layers into frames that live inside the timeline, which we’ll use to make the gif move.
First click on the button in the middle of the timeline panel that says "create frame animation" right here:

Then click on the little three bars icon on the top right corner of the timeline. Click "make frames from layers" on the thing that pops up .
It depends, but you might need to reverse the frames (if it imports them in backwards). So just click on that three bars icon again and click "reverse frames".
Step 5: cropping the gif
It's really important to know the Tumblr dimensions! If you have a gif that doesn't fit the dimensions most Tumblr users view it at it can get distorted.
So the width dimensions you should use are:
A row of just one: 540px wide
A row of two: 268px wide each
A row of three: 177px & 178px & 177px
A super helpful explanation of good dimensions to use is this one made by karazorel. It's very close to the way I do it.
So to crop it, go to the crop tool (duh, sorry) and enter in the dimensions you want into the area I highlighted here:
Here's what the gif looks like so far:
You'll probably notice it moves really fast and stops moving after playing once. That's because we haven't gotten to the step to fix that yet. But that's next!
Step 6: timing, looping, etc.
Timing:
Select all of the frames. You can do this by selecting the first frame, holding shift, and clicking on the last frame. Now click the little arrow next to where it says "0 secs." under any of the frame previews right here:

Click on "Other..." and type "0.14" into the text field. That represents the number of seconds, or usually the fraction of a second, that each frame will play for. (It's "0.14" in this case because of the way we entered the settings in KMPlayer in the "Frames to Extract" section. The number depends on what you enter there.) Press enter/okay.
Looping:
Next change the looping setting from "once" to "forever". Here's where I'm talking about:

Step 7: sharpening the gif frames
This step can either be done at this point (before coloring it) or later (right after coloring it.) I go back and forth on which is better, and different people say different things. So just play around with it!
I use this sharpening action. It can sharpen up to 75 frames, which is a really good amount in my opinion.
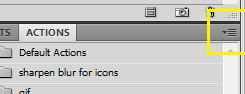
Once you have a sharpening action downloaded, go back to Photoshop and go to window > actions.
Click this little menu button, then click "Load Actions...".
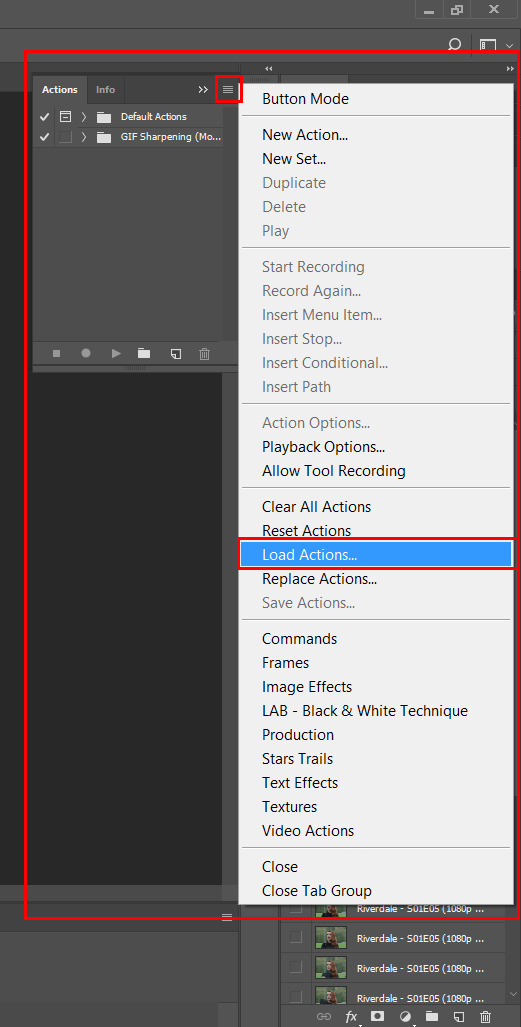
In the window that pops up, choose whatever sharpening action you downloaded and open it. This will load it into your actions panel!
Next, click the menu button on the upper right corner of the timeline panel and click "Flatten Frames Into Layers". Now there will be a new set of layers that are labeled Frame 1, Frame 2, Frame 3, etc. Keep those, and then you can delete the OLD set of layers. (That can significantly lower the file size, and it doesn’t mess anything up if you do it right!)
Now select the very first frame in the timeline, labeled "1", and select the corresponding layer, labeled "Frame 1".
Then open the sharpening action's folder within the actions panel and select the folder labeled with the number of frames you have in your gif. For example, I have 18 frames in my gif, so I selected the folder labeled "18 frames". Or at least that's the way they labeled things in the action I'm using. You may have to explore yours to figure it out.
Then click the play button on the actions panel:

Now that should have sharpened all of your frames/layers! Woohoo! Here's what the gif should look like by now, all cropped, timed, looped, and sharpened:

If this way of sharpening doesn't work for you, here are some other gif sharpening tutorials:
How to use sharpening actions in Photoshop CC by peacelovegifs
Gif sharpening tutorial by manofsteel.co.vu
Sharpening for Photoshop CC by completeresources
Sharpening all gif frames at once by thosetutorials
Sharpening masterpost by itsphotoshop
Gif sharpening action tutorial + download by themazerunnrs
Step 7.5: grouping your layers (a baby step!)
A bonus step that I recommend you do is to put all your layers into a group to keep things neat. Just select all of them and press CTRL G.
Step 8: adding a PSD and/or coloring it yourself!!
Here's the fun part! Now you can let out your creativeness with the coloring. It takes a LOT of practice to get good at this, trust me. I've been doing this for YEARS and I still hate my results sometimes. But if that happens to you, too, don't let that stop you from trying again! (God, I sound like a motivational speaker or something, sorry!)
Here’s some background on PSDs for beginners, but you can totally skip this bit...
"PSD" stands for "Photoshop document", meaning a file you make or edit in Photoshop (sorry, kind of self explanatory). On Tumblr, when people talk about PSDs, they're usually referring to a document with layers that add effects (mostly adjustment layers) to a gif/photo/graphic, etc. Also referred to as a "coloring". They usually include things like brightness/contrast, vibrance, curves, selective color, etc. People post these so you can download them and use them for your own work! (Just don't repost and claim as your own. Not cool, man.)
All you have to do is download the file, open it in Photoshop, make sure you have the layers panel open (windows > layers), and drag the PSD file's window on top of your file's window, but keep them separate so you see both at once. Then drag the PSD file's group of layers (but not the background!) over to your file.

(Then you can close the PSD window.) Then on YOUR file, mess around with the adjustment layers and stuff to change it to whatever you want it to look like. I usually edit mine like crazy!
Anyways, here are what your options are.
Finding a PSD (and then I recommend editing it to however you like it)
Here are places to find some great PSDs on Tumblr! (FYI, some are tag pages with sections for PSDs, with different types to choose from. So look around.)
QuirkyResources (Navigation) (Yup, shameless self-promo!)
QuirkyResources (My PSDs)
CompleteResources
ItsPhotoshop
ChaoticResources
YeahPS
DrunkandColoring
AresColoring
That's just a few of my favorite sources, so message me if you want more recs! :)
Coloring it yourself
I'm not going to do a full-on coloring tutorial right now, but here is my tag for those made by other people!
Basically you should learn how to use the most important adjustment layers: curves, brightness/contrast, selective color, color balance, hue/saturation, vibrance, levels, exposure, and gradient maps. At least those are the ones that I use the most and find super useful. Many of the tutorials in that coloring tutorial tag I just linked go over how to use those. So check them out!
In this case, I used my current fave PSD by dracoharry. (I’ve noticed it works on most shows I gif, so it’s super useful! I actually used it for all of the gifs in the gifset I made for this post.)
Here are the layers I kept hidden/showing:

FYI, I changed the layers' settings and whatnot a bunch.
And here’s what my result was:

Step 9: adding text & learning font settings (optional)
This is usually when I add text to the gif, if relevant.
There are various fonts and settings you can use for this, but to make things easier, here's a font PSD by adorkablelena. It’s for subtitles/quotes. I recently started using it. It's really cute! If you're not into it though, here's my tag for other font PSDs you can check out.
When you find a font PSD you like, open it and drag it into your document the same way you would with a regular PSD.
Select the text tool and replace the text with your quote. (Tip: Try not to misquote or misspell things if you can help it! I've done it and it sucks when that happens. Ugh.)
As far as colors go... For the primary quote I make the text white, and the secondary quote I usually make it yellow (#ffde00). And if there is a third I'll use some shade of orange, and anything after that I just use whatever I can make look the best. The stroke color I use varies sometimes, but I usually use black (#000000).
Finally, select the move tool (V) and make sure "smart guides" are turned on. To check this, go to view > show > smart guides, and make sure it's checked. Now when you drag around the text (select its layer first), you can see little purple vertical/horizontal guides pop up when you drag the text to the center of either direction. For the subtitle we're making, we want it to be centered horizontally and close to the bottom of the gif, but not too close. Also, if you have more than one line of text, just press enter somewhere in the text that splits it into similar-sized lines. Here's an example of all of this stuff put together:

Step 10: saving for web
There are a lot of settings to remember and play around with when saving for web, and specifically for Tumblr.
First, go to file > export > save for web (legacy).
Here you'll see a lot of settings to choose from, but they're not as intimidating as they may look!
Here are my usual settings:

Red highlight: There are multiple options in the top drop down list in the area I highlighted that are good to use. I usually use “Adaptive”, but “Perceptual” and “Selective” are good options too. In my experience, the rest make your gif look pretty gross. For the drop down list under that I choose "Pattern". This arranges the pixels in a pattern, and I like the look of that more than the two other viable options, ”Diffusion” and “Noise”.
Orange highlight: This is where you choose the number of color shades that are in the gif. I use the top amount allowed, 256, because this achieves the highest quality possible! If you need to make the gif's file size smaller, you can lower this amount, but I don't recommend it. If it's a B&W gif you can sometimes get away with using less and have it still look just as quality.
Yellow highlight: Looping options: Forever. Very important! Like I showed earlier, you can also set this setting before you get to the "save for web" option. Either way, this makes it so the gif loops forever.
Green highlight: Gif size! As I mentioned earlier, there is a limit for Tumblr. This example is a pretty small gif (592.9K) and the current file size limit on Tumblr is 3MB. Tumblr seems to change this limit a lot though, so you may want to look that up once in awhile to stay up to date.
Turquoise highlight: Always check the box next to “Convert to sRGB”. I just learned that this setting is important. It basically keeps the vibrance intact when you take it from Photoshop to Tumblr. Read a much better explanation here! :)
Then just click "Save...", choose the file location, and press "Save" again.
Step 11: uploading/posting to Tumblr
Now, last but not least, it's time to upload it to Tumblr! I probably don’t need to explain this, but I’m going to anyways. It's super-duper easy. Just go to your dashboard and click on this button:

Then the post creation window pops up, and just go on from there. Upload your images/gifs, drag them around to arrange them however you like, and add a caption if you want.
(Tip: Don't forget to add tags! It's super important to add tags if you want people to actually find your post. Only the first 5 tags show up in the main Tumblr tag-search results (ugh wtf, right?) but sometimes the other ones you add will show up on the general search page. I don't really get how to explain it or how it works tbh, sorry! But I do know that many fandoms have developed their own tagging-language to find people's posts more easily (and avoid spam) which is very useful once you figure it out. For example, if I was posting a gifset of Cheryl Blossom from Riverdale, I'd tag it with things like "riverdaleedit" and "cherylblossomedit" and maybe "madelainepetschedit". So basically the name of the show/character/actor/ship plus "edit", no spaces. Or an abbreviation of any of those, like "spnedit" or "dwinchesteredit". I hope that at least makes a little sense?
As far as the amount of tags that will show up on individual blogs, I'm not positive, but I believe you can use up to 30. After that the post won't appear on the tag's page. Grrr.)
Then, of course, just post it! I recommend saving it as a draft and then posting it at a time when a lot of people are likely to be on Tumblr. (There's research done on this timing!)
THE END! :D
I really hope that was at least somewhat helpful. Sorry if it was annoying that I went into sooo much detail, I just thought I should explain everything so it would make sense to most people, especially total beginners. Again, if anyone has any questions at all, you can absolutely ask me here! Or let me know if you think I got anything wrong, I would definitely want to fix it! Thanks for reading, and please like/reblog ♥ I’d really appretiate it!
#photoshop tutorial#completeresources#itsphotoshop#chaoticresources#yeahps#tutorials#gif tutorials#gif making#how to make gifs#gif making tutorial#mine#mine: tutorials#peachresources#riverdale#riverdaleedit#coloring tutorial#sharpening tutorial#photoshop tips#ps tips#photoshop 101#ps 101#500
626 notes
·
View notes
Text
I ’m making a tutorial for @victuuri-moonandsun on how I downloaded the YOI episodes and how to make a basic gif. I decided just to make a tutorial for everyone else who wants to learn? I’m like hella basic at making gifs so ill be providing resources in hopes it will help!
The tutorial includes:
How to download
Capturing Method: VLC vs KMPlayer
Importing + Making the gif (Timing, Cropping, Sharpening, Saving)
Ill teach u how to go from:

to this:

+ A shit ton of screencaps to make up for the fact i’m bad at explanation.
++ what is grammar n spelling?
+++ cursing a lot of it
its like legit 3 am and this tutorial is so bad good luck
You will need:
Vuze
Photoshop (I use CS6)
VLC Player or KMPlayer (I will later discuss the difference usage of these programs)
I. Downloading
Sup yo! Okay let’s start with downloading the actual episodes! I usually use torrents when i’m downloading the episodes. This is what Vuze is for. Like most things u wanna be careful when you download shit off the internet but idgaf i’ve been downloading shit off the interwebs for a while.
So you wanna either google “yuri on ice 1080p torrent”, but im gonna use HorribleSubs for my example. You wanna make sure you download the 1080p version of the episodes so you can have the clearest/more HQ gifs.
If you’re using the horriblesubs site then you wanna click on “1080p” for whatever episode you want and right click the magnet link.
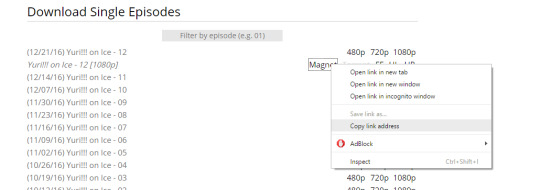
Yay! Now we gonna wanna open Vuze. First you gonna want to click the “add” folder > Add Magnet > Paste URL > Then hit okay.
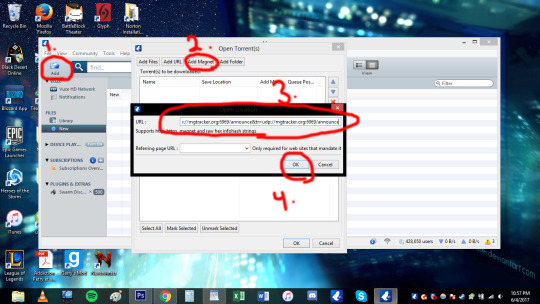
Okay. So once you hit ok this should pop up:
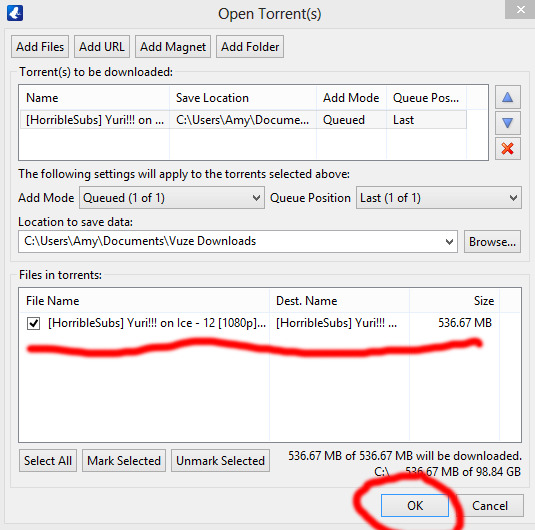
Then hit ok again! You can also change where you wanna save it at this stage too. Okay now your file is downloading and now we wait! The more seeds the faster the download.

Once the file is done downloading we can move on to actually capturing for gif making.
II. Capturing:
OKay. SO I personally use the VLC capturing way because it’s easier for me. With VLC you;re basically recording the scene you want so you can import it into Photoshop. With the KMPlayer you’re taking a shit ton of sceencaps and you’re importing each image into Photoshop. I used both methods and they both get the job done. The only time i use KMPlayer is when VLC is acting wonky. Ill show the VLC method first then the KMPlayer (cringes).
Yay VLC. My fav bby right here. OKay So you’re gonna wanna open that shit up. Okay, so the first thing you wanna do when you open the program is go to view > advance controls. This gives you the option to record!

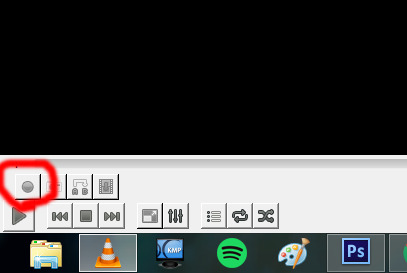
Hell yeah bro now we in business. Okay you’re gonna wanna open the episode you wanna be gif-ing. Since I showed how to download episode 12 i’m just gonna use episode 12 for this too cause fuck it man. You’re gonna wanna decide what scene you’re gonna want to make a gif of. I think for the purpose of the tutorial i’m just gonna do the scene where yurio finishes his program and creys cause hella yeha bro.
okay so for myself, i tend to start recording couple seconds (like 5-10 *my computer is really wonky ) before the actual scene because I want to make sure I record the whole scene without cutting anything out.
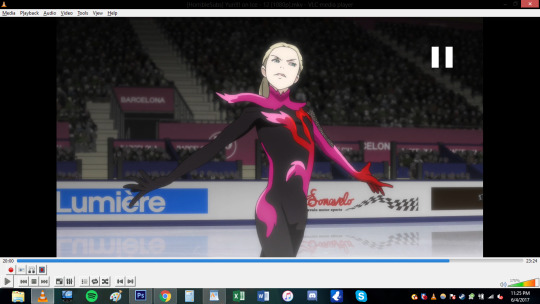
You also notice that the record button is red now. So you’re basically just gonna click it once and let it record until you want it to stop!
Where i began to record (actual a couple secs before becuz i forgot to screencap):
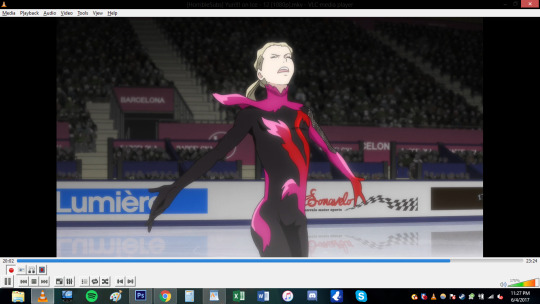
Where I ended:
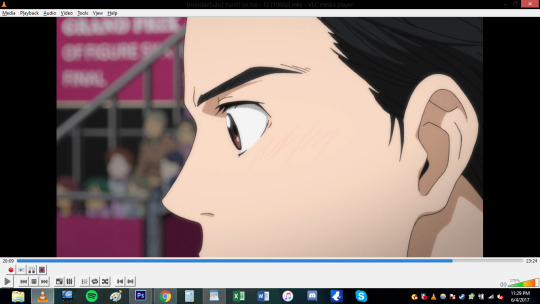
***note: Notice how the record button changes while you’re recording vs not recording! (i’ve done the dumb thing where i forgot to stop recording and watched the rest of the episode .-. )
Now that short clip will be saved. my video was saved in my video file im sure you can change where you want it saved but idk how. This is where it is saved on my computer. Probably can search “vlc” on your computer if it is absolutely lost (sorry I can’t help much in finding the file).

Basically after this step you’re done deezy. You can skip the KMPlayer and go directly to the gif making portion of this shit tutorial.
OKAY FOLKS HERE’S THE KMPLAYER TUTORIAL ON HOW TO DO GIFS HAHAHAhahaha *sobbing*
I need to explain this program a bit more. So unlike VLC you’re not recording or anything like that. This captures screencaps into jpg or png files. When you do the VLC method, photoshop will make the screencaps for u. This method you’re gonna have to load the each photo (This usually takes photoshop longer to load for me, but than again my computer is old as shit so it may not matter to you).
OKay u gonna wanna open that satan spawn and open the episode u wanna do. Again here im gonna do the same scene cause yeah. Basically just go to the scene you want.

Okay here the annoying shit happens. SO unlike VLC for me, I don’t have to a big gap of recording time. I can get closer to the actual scene and want and start capturing (ctrl+G).

When you hit ctrl+G, this window pops up and this where all the settings happen. 1. You decided where you all the pictures will be saved! 2. You can pic the image quality. I go for JPG because my computer just cant handle doing png. If you’re computer can do the png go for it. 3.) Seconds refers to how long you want the program to capture for. I just put 5 seconds to make sure i get the whole scene. You also want the images to be in the original size. 4.) I WILL DISCUSS THE TIMING THING MORE INDEPTH LATER, but for the time being i’ll do every 1 frame.
When you click start on the small window your video has to be playing to actually capture. I just hit start and hhit play cuz fuck it.
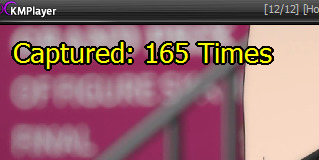
When the program finish capturing this will pop up in the corner. *note: I ended up doing 10 seconds because my computer hates me. So there’s a lot more caps than i needed. this is what you end up with!

A shit ton of fucking photos! YOU READy TO GO TO PHOTOSHOP.
III. IMPORTING-VLC
*if you need help downloading photoshop send me an ask and ill try my best to help you. I downloaded ps cs6 a long time ago and the link i used to download it doesn't exist anymore.
THis step is gonna be different depending on what method you used for the capturing. I’m going to begin with the VLC method. So you’re gonna wanna go to file > importing > video frame to layers.

Find the clip file and hit open. a window will open and now you can select what part of the video you want to actually gif! the two point thingies on the bottom are adjustable. FOr example maybe you recorded too much in the beginning? drag the 1st arrow thing to where you want the gif to start. Same with if you recorded to much at the tale end of the video. You can adjust the right one.
Make sure to have frame animation box is check.
And now we’re at the frames part.This is where I feel conflicted and you will see why when I get to the timing part of the video. (I use to make a lot of gifs for real action tv shows and this is the first anime I ever edited and I just feel like i haven’t found the best timing yet?). For this screencape i left the limit box and just do every frame.

So my video was too long at the end and decided to cut that unwanted shit out. (you can hit the play button just to make sure you’re happy with what you got. Hit ok when u done deezy
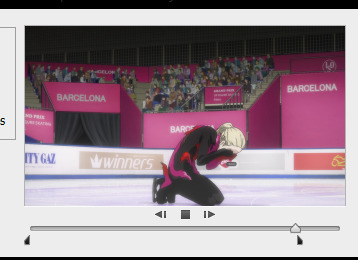
THEN BOOM THIS IS WHAT IT LOOKS LIKE. THAT BOOTIFUL ASS YURIO’S FACE HELL yeAH. Okay. So on the right hand side you have all your layers. but we missing the timeline bro. SO you go to window> timeline
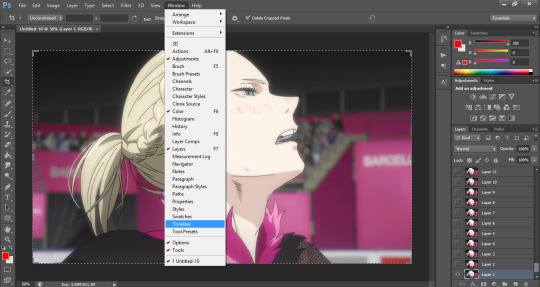
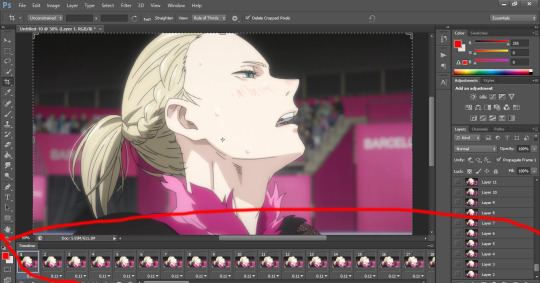
DAMN LOOK AT YOU YOU’RE READY TO MAKE A GIF. You can skip ahead and learn about timing. Keep reading for the KMPLAYER way.
III. IMPORTING- KMPLAYER
oKAY. You’re gonna wanna go to file> scripts > load files to stacks
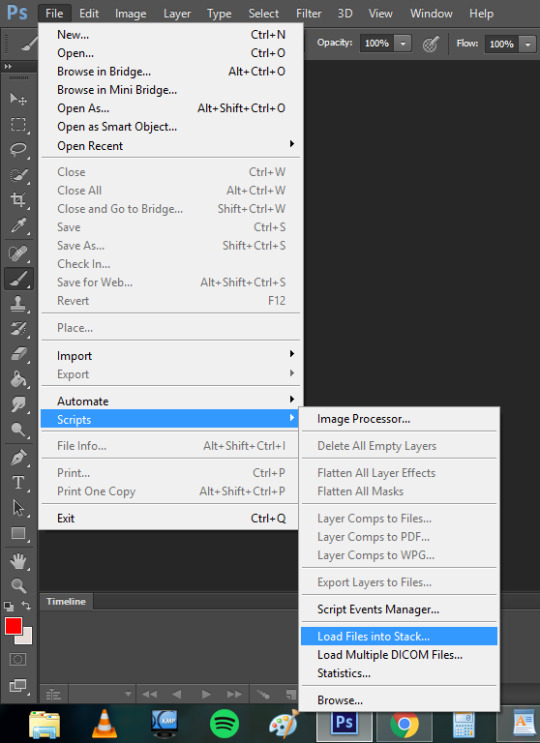
A window will pop up and basically you’re gonna select all the screencaps you want for the gif and hit okay.
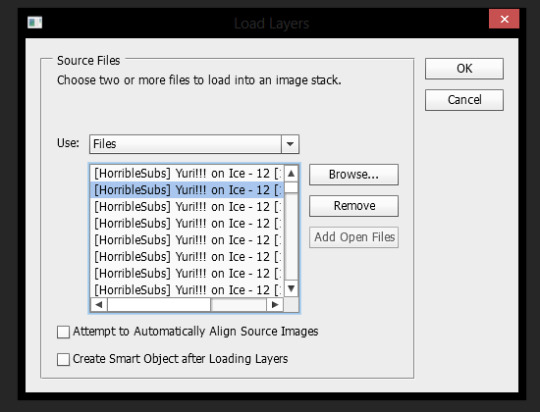
This shit takes my compouter f o r e v e r (compared to the VLC method.) to load and even longer afterwards when it’s being uploaded as layers. This method took my computer to load the files 3 minutes compared to the 5 seconds the VLC method took me. Like i’ve mentioned before it might just be my ancient ass computer’s fault. But this it what it looks like when it’s done loading
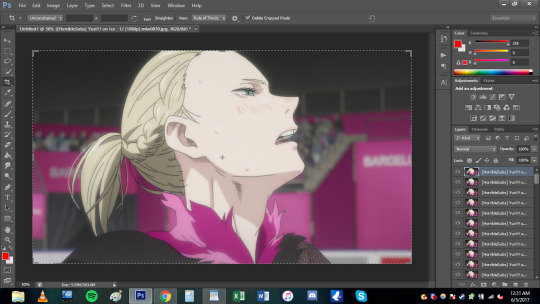
Okay you;re gonna wanna do the same step as VLC to create the timeline (Window>timeline).

But because this was loaded in differently the the stacks will not automatically have frames. You’re gonna want to click create timeline and you will notice you have one frame only.
So on the top right corner of the timeline you will have the option to make the layers into frames.
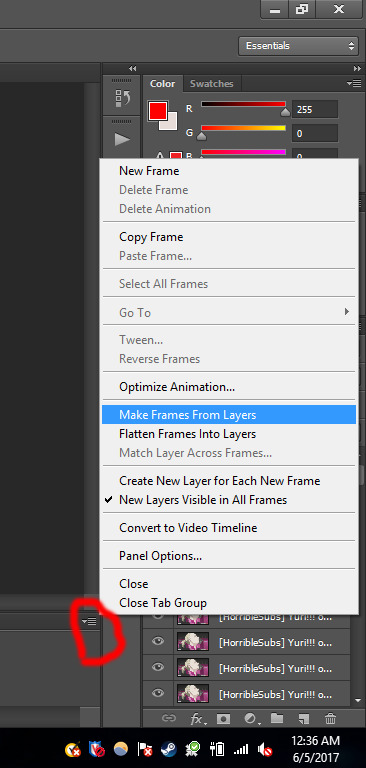
Now you maybe noticed that the frames are fucking backwards son like wtf man. a simple fix to that! in the list of options where you made the frames from layers, you can reverse the frames.
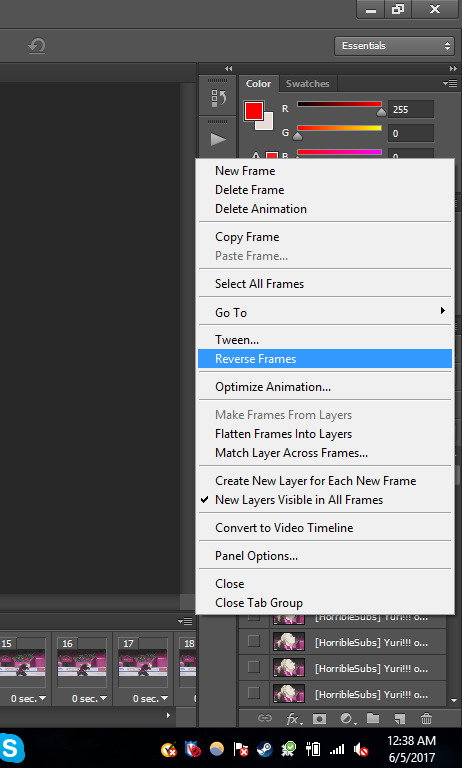
NOW YOU’RE DONE DEEZY. WE CAN MOVE ONE.
IV. TIMING
OKay this gets really iffy for me. I’ll just basically show you the times I use and what it may look if you capture every frame of you choose to do every 2 times (anything else isn’t recommended). In this section it’s what I use and probably not the best, but you can play around with photoshop and you can do whatever the fuck you want yo!
Anyways as you can imagine if you decide to do every frame youre gonna get a shit ton of layers(i’m gonna be working with the vlc method from this point on. any kmplayer question can be sent my way!). But it may look smoother! *will make a note on this*. Downside, the file is prob gonna be WAY bigger.
For ex: Every frame. 103 FRAMES FUCK MAN.
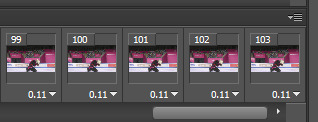
Every 2 frames: 53 frames
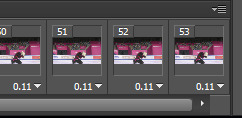
So it’s basically about half cuz u know math
OKay. so when i do gifs I usually set the time to “0.06″ but I put “0.07
for every 2 frames. To change the timing make sure you have all the frames selected (click the first frame then go to the last frame and Shift+click it). Now that all the frames are highlighted you want to hit the down arrow and click other. This is where you set the time and hit okay.
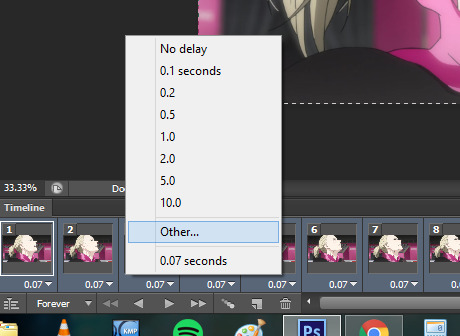
every frame @ 0.06 (No cropping/no coloring/no sharpening)

every 2 frames @ 0.07

So it’s really personal preference. I just have it so ingrained to do every frame at 0.06 since i started making gifs years ago, but i feel like the every 2 frames at 0.07 looks smoother for anime? Really guys experiment and see what you like better!
V. CROPPING
Yay lets get to cropping! These are the current dimensions for tumblr
one picture/gif: 540px width
two pictures/gifs: 268px
three pictures/gifs: 177px, 178px (middle), 177px
spaces: 4px
-itsphotoshop
I always crop my gifs. I just think they look nicer when they’re crop.To start cropping you either wanna hit “C” on your keyboard or clip the crop tool. Afterwards you can put a value of the dimensions (i tend to do 268x165 or 268x170 when I to he gifset with 8 different gifs). Now you can drag the box over the gif to position it where exactly you want the focus to be. You either double click the box or hit enter when you wanna crop.
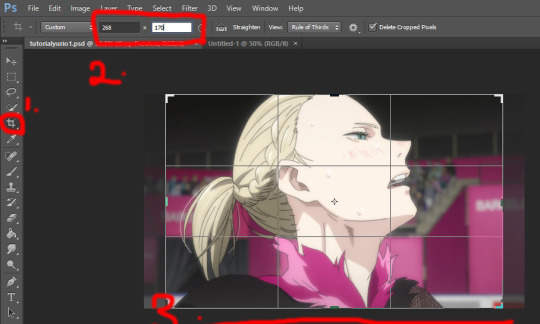
You might not want to have it dead center. so yeah this what it looks like if you just dragged it:
Damn yurio is looking good dead in center, but you noticed the 2nd half yurio isn’t in the middle no more. When you’re cropping you wanna keep this in mind. (you can always make two separate gif to have it all centered but i can make a dif tutorial for that).
This what it looks like if i decided to keep the cropping in the center:

Overall both scenes are more centered.
BUT WHAT IFF YOU JUST WANNA ZOOM IN ONTO YURIO’S FACE?? i got chu bro. I’m goning to delete the 2nd half of the gif for the purpose of this example. So what you’re gonan want to do is drag a side of the square until you’re happy with what you want.

Here i just dragged the bottom. Since I have my measure inplace from before, no matter what side i drag it it’s always gonna be the same ratio of 268x170 so no need to worry !
Regular crop:
Crop to zoom in on the face:
THE MORE YOU KNOW ABOUT CROPPING :D!!!
OKay. Once you’re done cropping you’re gonna want to resize that!
I’m going back to the original gif with both scenes.
To resize an image you either can hol the CTRL+ALT+i or go to image>image size
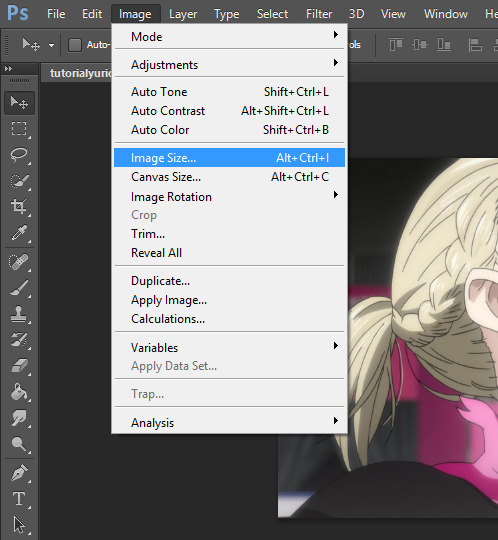
a window will pop up and youll type in what size you wanted. Because i had the dimensions typed in while i was cropping it will basically do the ratio for u

the original size was 1702x1080. Once i typed 268, the program kept the ratio and changed the height. SORRY IM NOT EXPLAINING THIS WELL I REALLY DONT KNOW HOW.
We went from this:
to this:

it’s not a HUGE change but there is a change!
VI. Coloring *bonus
I have no authority on color tbh It takes me to forever to color shit and i’m h o r r i b l e at it. so i aint gonna discuss this much but here what coloring can do for u!
original:
to this garbage:
I don’t really like it but i just did it quickly for the sake of this tutorial.
If you wanted an idea of what I did

The best way I learned to color was from PSDs others made or just fucking around in PS. Here are some resources:
PSDs: x x x
Tutorials: x x
VII: Sharpening:
Oh man okay so i use an action for my gifs but the thing is i downloaded a long ass time ago. It may be this, but im not entirely sure. This hella easy yo!
so you wanna select all the layers:

then you wanna convert the frame animation to a timeline (make sure you changed the time you want the frames to be before you convert!)

You will notice the frames changed on the bottom. Now you wanna go to filter>convert to smart layer

Now you only have one layer!
With this one magic layer you can sharpen all your goddamn layers all at once.
If you don’t have the action you can do the basic sharpening. Okay now go back to the filter tab>Sharpen>smart sharpen. I have use this option in YEARS but i believe the kinda go too was this:
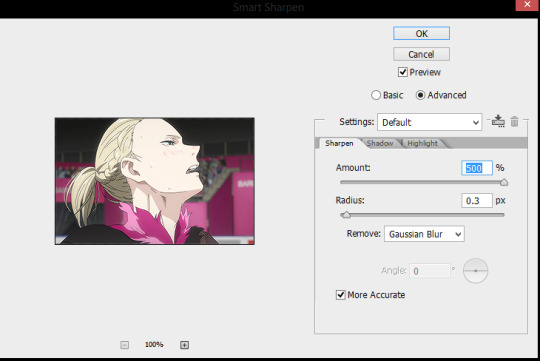
and hit okay!
Before sharpening:

After sharpening:

the lines are more defined in the 2nd gif, If you were able to download the action this is how you use it.
GO to Windows> actions.

WHere the red circle you click, and find the option for load actions. Once you load it you wanna make sure you selected the smart layer and hit th eplay button and the action should sharpen it for u
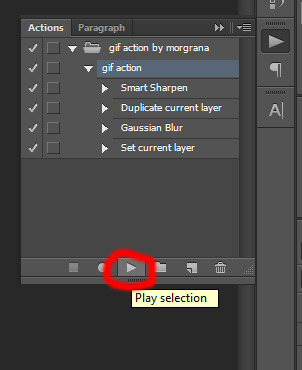
BOOM. your gif is sharpen. So lts compare all three now.
No sharpening:

Smart sharpening only:

Action (Smart sharpening + blur)

I like the action th most because it’s not as intense as the smart sharpening only. WOW U FINISH A GIF CONGRATULATIONS NOW YOU WANNA SHOW THIS BABY TO THE WHOLE WORLD RIGHT? WELL IMMA SHOW U HOW,
VIII. SAVING THAT SON OF A BTICH
So basically you either hold alt+ctrl+shift+S or file>save as for web
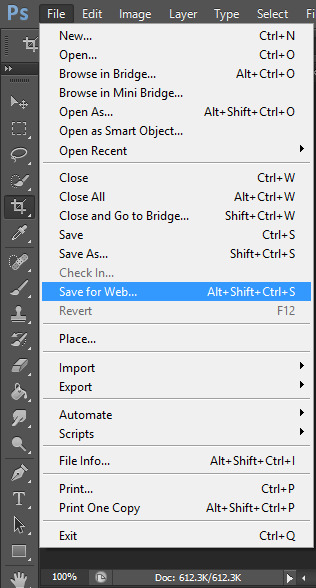
and a window aPPEARS. These are the settings i use to save:
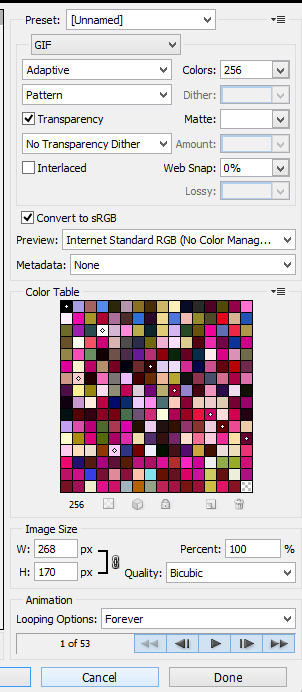
BE CAUTIOUS OF THE SIZE OF THE GIFS: I BELIEVE THE MAX SIZE IS 2MB
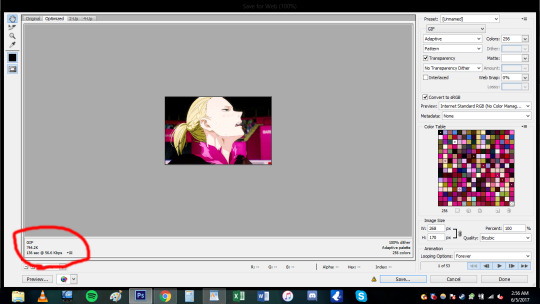

this gif is under 1mb so im safe yo! Some tips if gif is too large is to add a selective layer>black> then +5-10
another tip is to use optimize tool if yOU HAVE TO: go to the top right corner
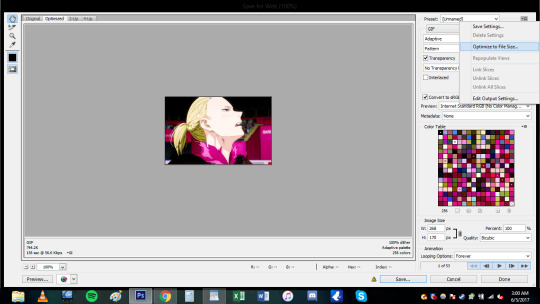

now u done deezy
u save that shit
and cry
send me an ask if you need shit cleared up.
125 notes
·
View notes
Text
sonic and the black knight wii
http://allcheatscodes.com/sonic-and-the-black-knight-wii/
sonic and the black knight wii
Sonic and the Black Knight cheats & more for Wii (Wii)
Cheats
Unlockables
Hints
Easter Eggs
Glitches
Guides
Get the updated and latest Sonic and the Black Knight cheats, unlockables, codes, hints, Easter eggs, glitches, tricks, tips, hacks, downloads, guides, hints, FAQs, walkthroughs, and more for Wii (Wii). AllCheatsCodes.com has all the codes you need to win every game you play!
Use the links above or scroll down to see all the Wii cheats we have available for Sonic and the Black Knight.
Genre: Action, Adventure
Developer: Sega of America, Inc.
Publisher: Sega
ESRB Rating: Everyone-10
Release Date: March 3, 2009
Hints
Make Swords
After unlocking the Three Knights of the Round Table in story mode, go to the blacksmith and click weapons. Click “craft” and if you have enough items you can craft a sword. Then click on “equip”. Press “Z” to go to a character and click the sword you made for the character. Note: when you build a sword, it will be for whatever person you build it for. You have no control over who you build the sword for.
Easy Way To Get On King Arthur’s Horse
While chasing king arthur jump and hold B and when caliburn glows swing the wii remote and if your in range sonic will fly forward and land on King Arthur’s horse.
Sharpen Weapon
To do a cool sharpen weapon glitch all you have to do is. #1 Go to shrouded forest. #2 Select the Don’t touch the ground challenge. #3 Select any character (besides sonic). #4 Make it to the first pink circle. #5 Instead of shaking the Wii Remote when it says so. Shake it early then before touching the ground pause the game quickly then restart the game. If done correctly, that character will act like they have hit the block.
Beat Dark Queen
To beat this boss, first dodge the attacks by pressing Z and A, keep doing that until you get close then shake the Wii Remote like it shows, you will get the soul gauge power then attack, for best results, fill the soul gauge until it is full then attack with perfect hits instead of constantly swinging. Repeat it all again. (note:watch out for the 2 swords)if you don’t get hit and do the best results you should get 5 stars, she has 3 lives (with best results). You will be almost done with the game if you beat her.
Beat King Authur
To beat this boss first use soul gauge even if there is nothing to hit swing the Wii remote, Sonic will run and jump on King Authur, wait to shake the Wii remote like it shows, if you wore him out long enough, swing the Wii remote constantly then Sonic will jump off then do it all again though his attacks will be stronger. If you have not done it you will lose 20 rings. He only has 2 lives. If you beat him, that isn’t all of the game. Note:It may take more than 1 try, though I have done it.
Easier Followers
First go to a mission, and complete it. After you complete it, on the bottom right, you should see a plus sign with a retry next to it. Press it, and you should do it again. Keep doing it, and when you complete it , you should get a lot of followers!
Easy Weapon Style Points
To get easy proficiency points, go to the boss you are the best at defeating and just keep on defeating him. Each time you beat him, you’ll get a point for every star you earn.
Defeat Will-o-Whisps
These are hard to defeat but to defeat Will-o-Whisps, do soul gauge on them but instead of swinging the wii-remote, swing the nunchuk and you will kick the will-o-whisp. You have to do this from far away though.
Cheats
Currently we have no cheats or codes for Sonic and the Black Knight yet. If you have any unlockables please feel free to submit. We will include them in the next post update and help the fellow gamers. Remeber to mention game name while submiting new codes.
Unlockables
Unlock King Arthur In Multiplayer Mode
To unlock King Arthur in multiplayer mode, get all 5 of his legends.
Unlock Jet In Multiplayer Mode
To unlock Jet in multiplayer mode, just unlock the Great Megalith and defeat the Beat the Clock mission winning 5 stars. Hint: find an item that lets you get more points from defeating enemies with soul gauge and defeat them quickly by using homing attack.
Unlock Sir Lancilot, Sir Gwain, And Lady Percival In Story Mode
To unlock Lancelot, Gwain, and Percival in story mode, beat their bosses.
Unlock Silver In Multiplayer Mode
To unlock Silver in multiplayer mode, beat Lancelot Returns.
Unlock Amy
Beat the dark queen in story mode.
Easter eggs
Currently we have no easter eggs for Sonic and the Black Knight yet. If you have any unlockables please feel free to submit. We will include them in the next post update and help the fellow gamers. Remeber to mention game name while submiting new codes.
Glitches
Currently we have no glitches for Sonic and the Black Knight yet. If you have any unlockables please feel free to submit. We will include them in the next post update and help the fellow gamers. Remeber to mention game name while submiting new codes.
Guides
Currently we have no guides or FAQs for Sonic and the Black Knight yet. If you have any unlockables please feel free to submit. We will include them in the next post update and help the fellow gamers. Remeber to mention game name while submiting new codes.
1 note
·
View note
Last Seen Blogs

emiilourae
silencefights
sammeimei
Untitled

lebague
Le Bague

scholarelectric-blog
FUTURE WALKER / PAST DWELLER
