#polymaker
Text
Made the coolest magical light!


25 notes
·
View notes
Text


Twitter is on fire and I'm bad at social media, have some yarn unicorns I printed up.
9 notes
·
View notes
Video
youtube
The latest video on customizing my 4-color 3D printer is up!
0 notes
Text
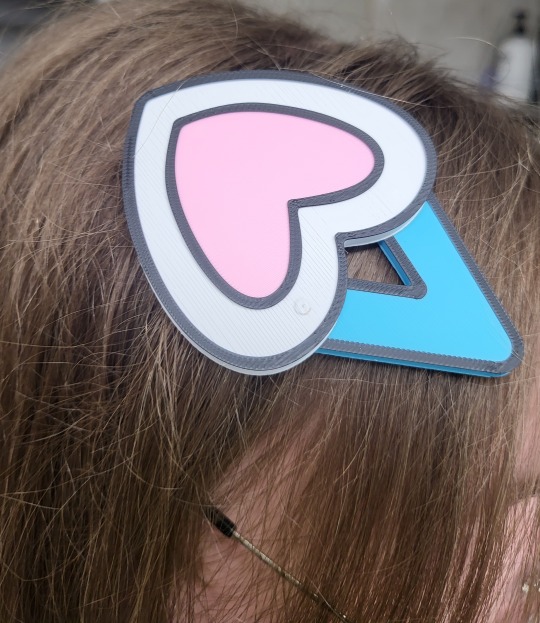
I made @brooke2valley 's iconic hair clip in real life!
here's a picture from her comic if you somehow haven't seen it:

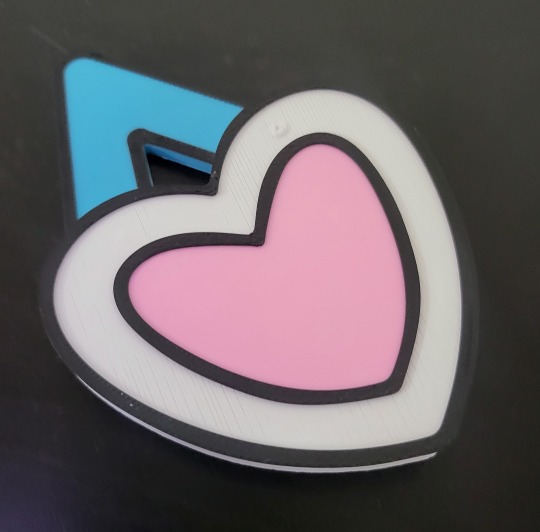
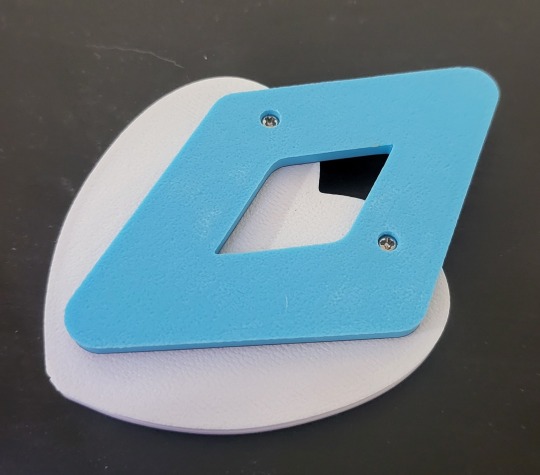
Here are close-ups of the front and back:
Unfortunately, I'm not a drawing, so it really fucks up my hair when I put it in, and it doesn't really stay in place. I should really redesign the clip part to actually be compatible with human hair (since it doesn't really matter for looks anyways as it's hidden behind the heart anyways. Also I don't know what it's even supposed to look like behind the heart, so I just mirrored the visible part.
Hopefully when I have some time I can redesign it a bit to make it actually wearable for more than the 30 seconds it took to take the photo for this one.
Details for nerds:
It's printed in two parts in 4 different filament colors (esun ABS+ light blue, white, and black, and PolyMaker ABS in pink) Each different color is a new layer, as it's much easier to print that way, when my printer (Voron 2.4 350mm) only has a single extruder. I left two holes in the heart for two M2 heat set inserts (that's why there's a weird dot on the top of the heart, I pushed too far with one of the inserts), and two more countersunk holes in the clip for two M2 screws to attach the two parts together.
920 notes
·
View notes
Text
Aziraphale’s Medallion Construction
Since apparently I couldn’t make any part of this costume simple, I documented the steps I took to make an accurate replica of Aziraphale’s fob.
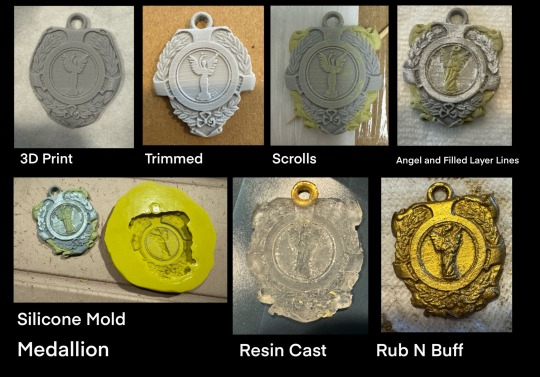
I started with a 3D print, having to try a number of different orientations to get the most detail, as I have a STL printer, not a resin printer. For anyone interested, I used an Ender 3 v2 printer with Polymaker CosPLA Version B filament.
I didn’t like how simple the file I used was, so I cut the sides, re-sculpted the scrolls, built up the details on the angel, and filled in the layer lines. For sculpting, I used Milliput 2-part putty. For the layer lines, I used AK Hard modeling white putty.
Then it was sand, sand, sand, until I felt comfortable making a mold and casting it in resin. I put a thick jump ring in the resin, as I felt the loop would be the most likely place to break, and wanted extra support.
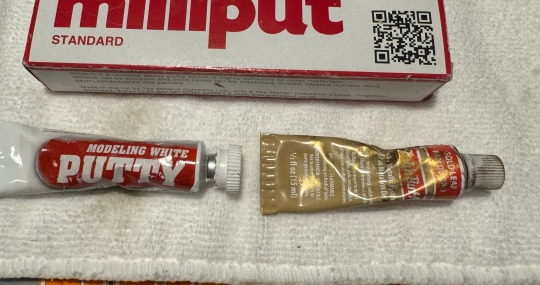
I then sanded the resin cast some more to smooth the edges and back, then used gold leaf Rub N Buff to color it.
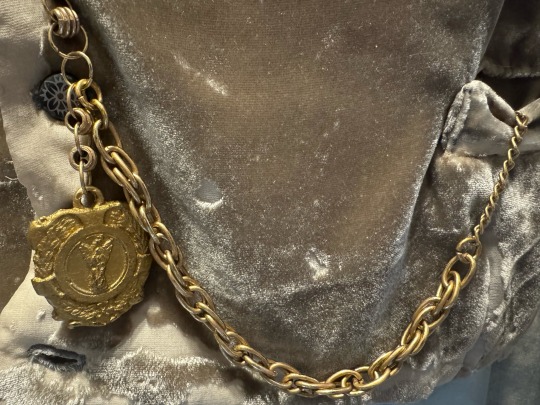
I’m pretty happy with the final result. I know there were simpler ways to go, but I’m glad I stuck it out on this route.
I have an entire post to make for the chain, as I essentially built it from scratch, so that will come later.
7 notes
·
View notes
Text
Scarab V2 in Polymaker Poly Lite PLA-CF.
18 notes
·
View notes
Text
silk PLA for fdm printing is either overhyped or overhated and it seems like good tips about how to use it properly get overshadowed.
this is everything I’ve learned the hard way from working with silk and similar filaments for a while + some general tips:
silk PLA needs to be dried often. it collects moisture quicker than regular PLA. I usually dry mine after long prints (12-24 hours) in a standard filament dryer for 8-12 hours.
biggest misconception I’ve seen is that you can’t sand silk. you can but most people don’t. I don’t think most companies expect it to be sanded either since it’s usually printed as-is. if the thing you’re printing is functional, printing in silk is a bad idea regardless.
if you’re going to sand it then I’d recommend starting with 200 grit first (I usually use 220), then increase gradually until 1200+ grit. the grit increments you can find at most auto parts stores will work fine. wet sand at 600 grit and up. you need to sand slowly and sand until all scratch marks for the current grit layer are no longer visible (you can’t sand out these scratches once increasing to the next layer unless you start the process over at your lowest grit.) sand the entire piece. use a file if you only need to sand a small part. afterwards, you’ll need polishing/heat treatment to restore the shine lost. you can use a polishing agent or lightly heat the surface with a heat gun. be very careful to not melt/warp the part. don’t hold the heat gun too close to the surface.
you don’t have to print it as high as 220°. some brands like matterhackers and hatchbox are better at the 210° to 215° range on direct drive machines if printing with a brass nozzle. silk becomes stringy at higher temps. this will be a problem if you’re printing too hot. on the other hand, higher temps will result in a shinier surface. if you have to or can print hotter, it’ll have a silkier finish.
partially related but brass nozzles have a shorter life expectancy than some other materials. if you’re printing at 215-220+ every print, it can wear them out faster. if your prints suddenly look like shit try changing your nozzle. your silver nozzle may not conduct heat as well as brass. if you upgrade to silver, you may need to raise your temp by 5-10°.
cooling for silk is different than regular PLA. you might not need 100% cooling. if you have a machine like a neptune 4 that has an auxiliary cooler, try turning it off. I usually print silk at 70% fans with no aux cooling.
retraction will vary based on your machine. direct drives generally don’t need more than 1-3 retraction. i keep my retraction speed between 25-30 (which is on the lower end) but your machine might need something faster. up to 60-70 could work, but if you see bubbles in the print, set it slower. air might be getting trapped when the filament retracts.
silks and a lot of other special PLA needs to print slow. even if you do opt for a higher temp (or have to), your safest bet would be a speed of 30-40. 50 might be too fast if your printer has a decent shake to it. I’d also recommend 15-20 for first layers if it’s a curved object or if the filament has bed adhesion problems.
I wouldn’t waste time working with cheap silk filaments. do some research on recommended brands and try out a few. the brand you prefer will ultimately depend on which ones your machine prefers. some brands have less diameter tolerance. i know matterhackers silk definitely has this issue and so do polymaker’s rainbow filaments.
I haven’t had to print with glue or tape in a long time. I use a default bed plate and haven’t had issues with bed adhesions since working out my z-offset. if your bed plate doesn’t have scratches or marks yet has bad adhesion issues, heat up the plate and clean it with alcohol. remove all the glue and tape marks. if it’s clean and your first layer still looks like shit, lower your z-offset. if you’re using cheap filaments, keep using the tape and glue. there’s only so much that machine can fix on its own.
if the silk prints with a ton of blobs on the surface and the filament is dry + you’re printing slow + your retraction is fine + the temperature is okay, your nozzle may be too low. first layers that contain solid surfaces are very good indicators of offset errors.
if your first layer contains a solid surface (like a filled in square or circle) and you can see line gaps in it, your nozzle is slightly too high. the surface should look smoothly filled in without gaps, bumps, or ripples. think of it like lines laying perfectly next to each other. if you see ripples or bubbles, either the filament is wet or your nozzle is too low. getting this first layer right is important for all filaments but a huge requirement for special filaments.
the same principle above applies to your brim. the lines of your brim shouldn’t contain huge gaps (not talking about the setting labeled “brim distance”) either because it defeats the purpose of it. for the best results, it should look like the lines are next to each other making a small flat surface. when you lift the brim, it should lift as one piece, not individual strands. if the lines are too far apart, your nozzle is probably too high.
the only gap that should be present if you’re using a brim is the brim distance itself: the distance from the actual print and the brim. I usually print with a distance of 0.4 for medium to large objects for personal preference. if the gap is too big, the brim isn’t doing much for the print. it might offer some adhesion benefits but not a lot. any benefits it may give might be better solved by checking if there’s something wrong with your other settings. you might want to try printing a skirt (good if you want to make sure the flow/adhesion is right) and saving yourself the material if a large brim distance is your preference.
edit: adding a few general ones
the area that connects to the supports will always look like shit compared to the rest of it if you're not using interfaces. the interface may leave a pattern behind once removed. printing something that needs supports in silks means you'll need to get better at working with supports if you don't want to sand the part. support z distance is typically twice the layer height you're using. density for tree supports is generally set at 0%. support interfaces are typically 70-100%.
you really don't need supports for everything. you can print a lot more without supports than you think. if a model doesn't contain floating parts or extreme overhangs, try printing without supports. the success of this will depend on things like your speed and cooling. printing curved areas slowly will help a lot when printing without supports. if you don't know how to edit your gcode to do this, you can manually change the speed when it's printing.
you shouldn't need to print a raft. rafts are for fixing problems like the plate having scratches. it makes a surface for you to print on when the actual surface you're printing on has issues. if you have to print a raft but your build plate is fine, it means
1) your plate isn't leveled -> manually adjust or let the machine adjust it
2) your nozzle is too high -> adjust your z-offset/learn how to adjust your z-offset
3) filament needs to be dried -> even if it's brand new, dry it (do not stick it in your oven. you can make a makeshift dryer by placing the filament on the heated build plate with a box on top of it to keep the heat in.)
4) you're printing too fast -> try 15-20 instead
5) your build plate isn't cleaned -> heat the plate and clean with alcohol
unless your build plate is fucked, printing a raft is a waste of material. it would be easier to figure out the reason you're needing a raft in the first place.
if your part just finished printing and it isn't coming off the plate, let the plate cool down completely. usually parts that are stuck will snap off on their own when the heat dies down. if it's still stuck, you probably printed way too close to the building plate. use a plastic scraper to remove it while pulling on the part. depending on how stuck it is, it might take a while. don't brute force it too much or you might rip off part of the build plate with it.
6 notes
·
View notes
Text


Since the goal is for Queen of Hearts to be a competition piece, it means I'm making everything. Including my prop! I modeled this in Fusion360, and printed it with interlocking pieces that slot in along a wooden dowel for durability. Printing this in Polymaker CosPLA for easy sanding, especially with all the little recessed areas. I also went back in with some resin coating for the areas I just couldn't sand.
(I may have devoted a whole chunk in one of my recent classes on how to make slotted parts).
Design by @noflutter
2 notes
·
View notes
Text
Doors that go hard 😂☠️🏴☠️ (this is on my 4 yo and 6 yo’s bedroom door and yes, they are now making everyone knock lol)
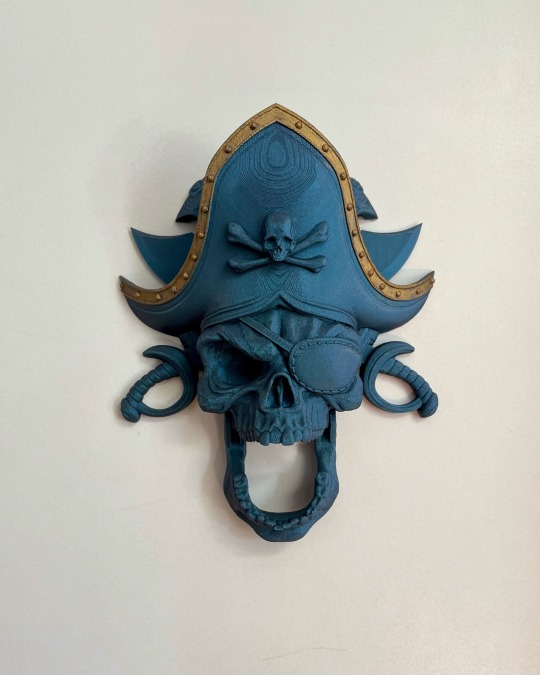
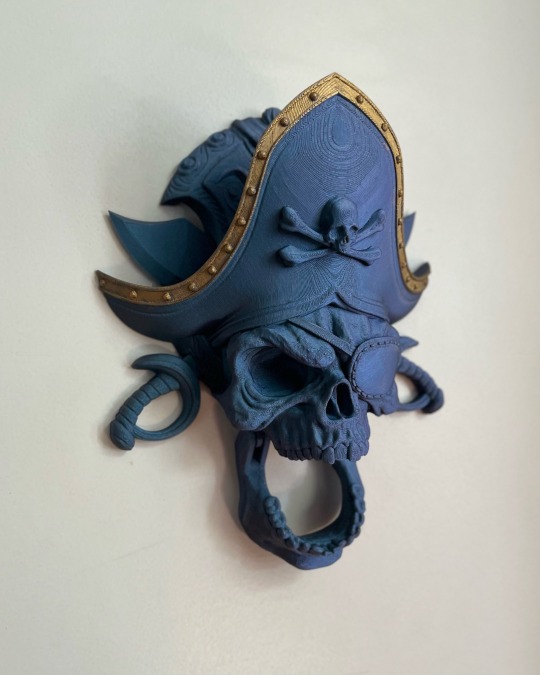
#pirate#piratecore#pirates#skull#skull art#scary#spooky#door knocker#3d printer#3dtumblr#3d printing#polymaker#PLA
4 notes
·
View notes
Text
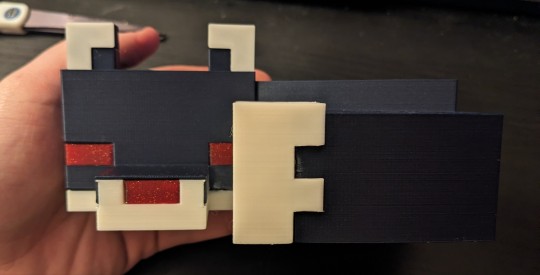
eepy edgy minecraft fop (real)
model: Minecraft Fox (Pieces) by 20Leunam
filaments:
body: polymaker polylite pla - dark blue
white parts: protopasta moonstruck white satin pla
eyes and nose: protopasta fleck n fire pla
back of ears (not visible in this shot): protopasta wonder black rainbow glitter pla
#its a little rough....#tbh i dont know how to clean up super glue residue#furry#3d printing#fox#minecraft#oc: night yan#not my model#barbeQueue#yan's prints#dec 2023
3 notes
·
View notes
Video
youtube
Recently finished this custom 4-color IDEX 3D printer dubbed the “IPEX” for it’s paired extruders. It’s built around two E3D Chimera dual hotends and the BigTreeTech Octopus control board. It’s capable of 4-material prints, or 2-material mirrored prints with minimal wasted filament. Printed in Polymaker ASA. Feedback welcome!
0 notes
Photo
SWATCH-TALITY! Polymaker's Starlight Mercury PLA is available!
0 notes
Text
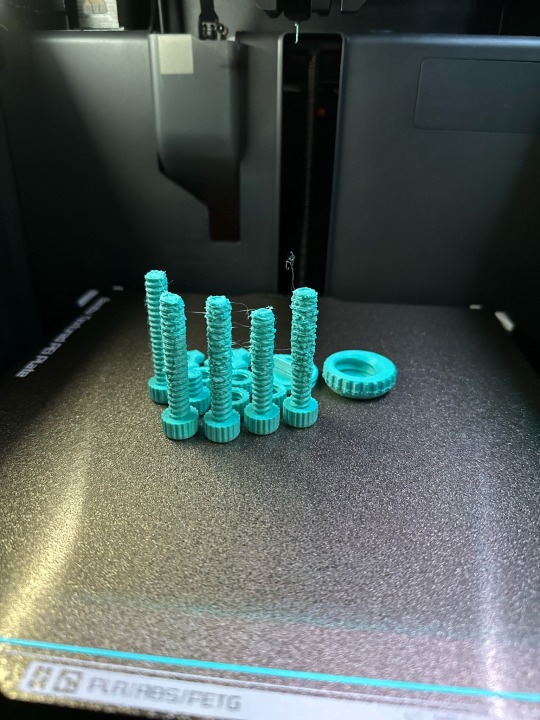
Beginning to discover printing ABS. Started off with this Polymaker ABS Galaxy Teal. Looks great except for the long tall bolts. I have some tuning to do.
0 notes
Text
Book Review: The Plastic Magician (The Paper Magician Book #4) by Charlie N. Holmberg | A New Sequel to an Old Favorite to Ease My Ever Aching Heart
Also, can be viewed at https://newbookcatsreads.blogspot.com/2018/07/book-review-plastic-magician-by-charlie.html
⭐⭐⭐⭐
"Material made by man, your creator summons you. Link to me as I link to you through my years until the day I die and become earth."
Polymer chemistry involves the synthesis, characterization, and the study of the properties of large molecules consisting of units of repeating chains, such as hydrocarbons. The polymerization of these large molecules are then used to synthesize plastics, rubbers, and so many of the materials we use in everyday life. Although Holmberg did not write a book solely to quench my ever aching heart for a story of an aspiring young chemist, I did thoroughly enjoy this addition to her Paper Magician series.
Our female protagonist Alvie Brechenmacher is an aspiring Polymaker, or a magician that focuses her craft on plastics and their properties. Alvie, like The Plastic Magician's Ceony, is extremely intelligent and courageous throughout the book. She is undoubtedly passionate in regards to her chosen skills in plastic, and I embraced returning to a world I adored.
The only things keeping this addition from a 5-star rating like the rest of the series was the slow pacing and predictable ending, particularly as Alvie had the answer to the plot's conflict in the beginning. There are instances in which a slower plot is necessary to build a world properly and sanely or to develop the plot thoroughly and without holes; however, when it gets so slow that I need to take a break, that means...

In conclusion, I am grateful for the opportunity to dive deeper into this magical world. Although this book is sorted into "Young Adult," I would also consider it to be "New Adult" since Alvie is a twenty-year-old woman, but Holmberg's writing style, easy-to-read plot, and relatable characters make this story a good addition to any reader's bookshelf. This magical adventure is surely a slam dunk that will forever keep me wondering what could happen next.
*Many thanks to Netgalley and the publisher for sending me an advanced copy in exchange for a honest review.
Thank you for reading, and I hope you enjoy!
Love,
newbookcats
#books#book review#book#blogger#reader#bookreader#reading#papermagician#fantasy#book tumblr#booktok#book talk#favorite books#bookblr#books & libraries#book community#winter reading#bookworm#books and reading#new books#ya books#young adult fantasy#chem posting#science fantasy#cnholmberg#bookblogger#booklover#book quotes#booklr#tbr list
0 notes
Last Seen Blogs
mateosc
Antes de rendirme ame, y eso es todo lo que cuenta

saurabhwords
Theworldforwrite

riacte
MCC9 Blue Bats Supremacy!

lupizora
The girl who cried wolf
fattestercat
rotund