
no-name-publishing
No-Name Publishing
A publisher of fanbound books. Not available for commissions.
A member of the Renegade Publishing community. https://ko-fi.com/nonamepublishing
34 posts
Last active 60 minutes ago
Don't wanna be here? Send us removal request.
Last Seen Blogs

danaboo3
Untitled

fanstuffrantings
Too invested in Fiction

ilovedisneycosplay
Who says dressing up is for kids?

matoki-project
~On A Secret Mission~

voicenotesltd
Untitled
Text
And it’s all mine!! 🙌🙌🙌
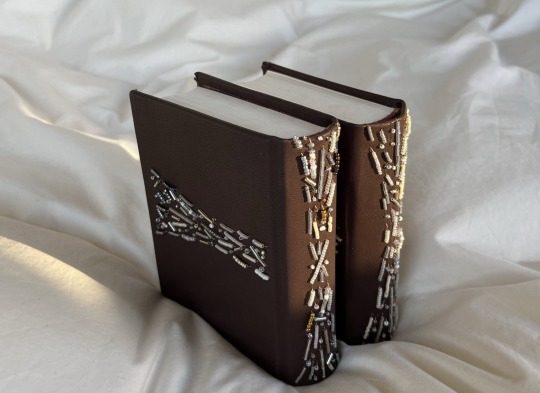

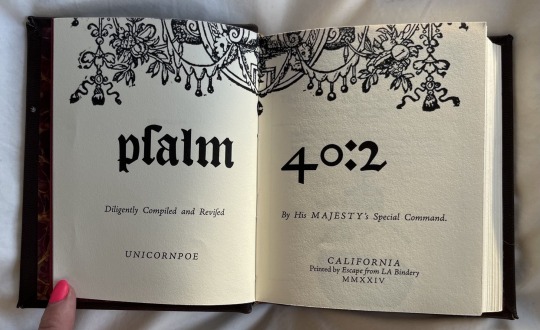
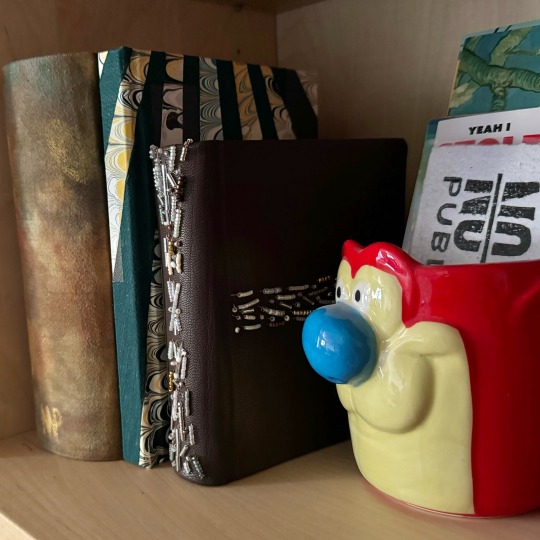
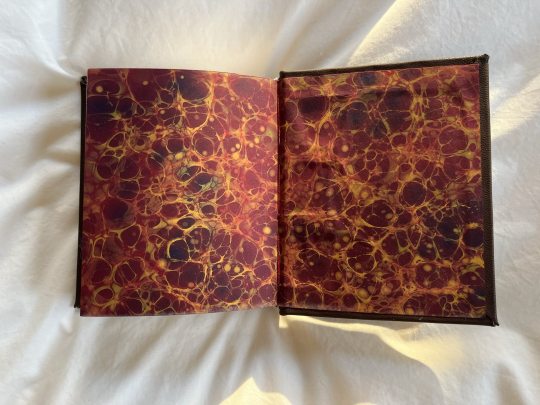
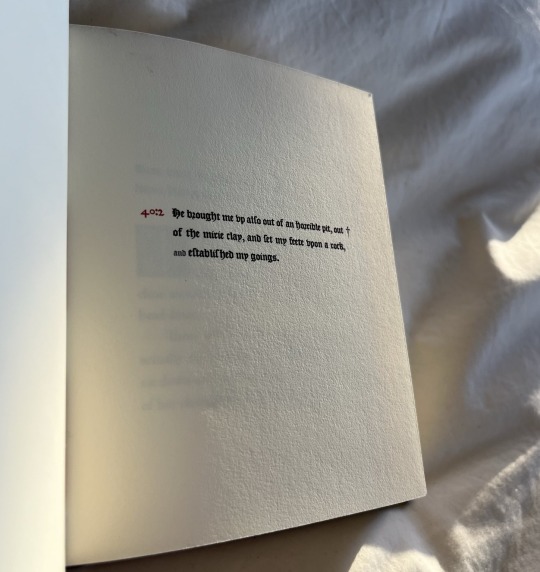
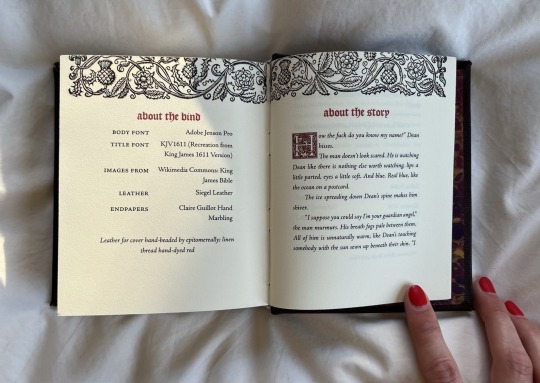
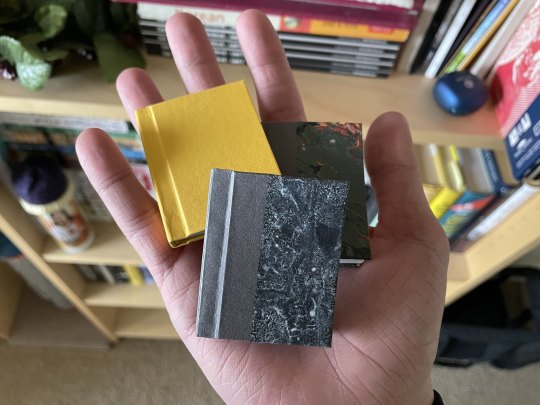
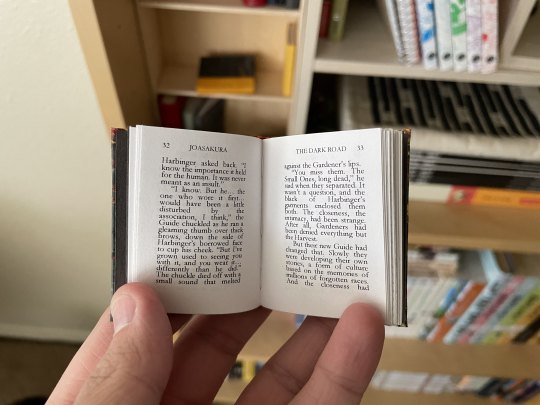
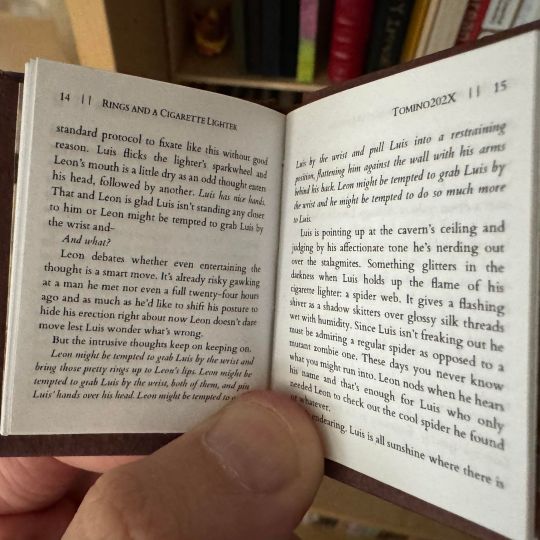
psalm 40:2 by unicornpoe
Dean meets an angel who says he's from the future. It all gets a lot more complicated from there.
Supernatural, Castiel
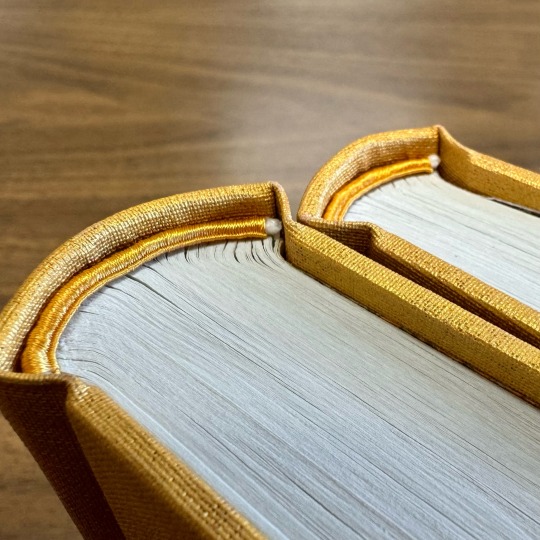
Here is my bind for @no-name-publishing in a Renegade Mini-Exchange! This is such a wistful and tender story about learning to accept and love yourself, even when you feel unlovable, and I was absolutely ecstatic when I peeped it on his wishlist.
Lots of firsts for me this bind: first time working with leather, first time CHISEL-TRIMMING (:elmo fire emoji: insert here please), only second time power sanding (which I love tbh), first time BEADING a cover. I absolutely loved working with leather and the effect of beading, and wish I could take a video to show how sparkly the beads are in the sunlight! I also used ~ * f a n c y * ~ endpapers by Claire Guillot that I just knew I had to have for this bind the second I saw them, and will absolutely be returning to her for future binds.

All the typesetting choices are inspired by the 1611 King James Bible, as well as the beading which forms a cross when the book is fully opened. It's my first Supernatural bind—what's a girl to do besides make Biblical references? (jk, @clovenhoofbindery made a totally non-Biblical bind of the same fic and I have been LOSING MY MIND at how perfect and gorgeous it is)

Materials:
Leather: Siegel leather pre-pared leather in espresso
Title font: KJV1611
Body font: Adobe Jenson Pro
Dropcap: Goudy Initialen
Decorative images: King James Bible 1611 (Wikimedia Commons)
Some more details, just for fun :)


#my jaw truly dropped when I opened the box and saw BEADS#such a brilliant bind and honestly Kate’s exactly the person who could have pulled it off#get to look at it every time I walk through my living room 😍
17 notes
·
View notes
Text
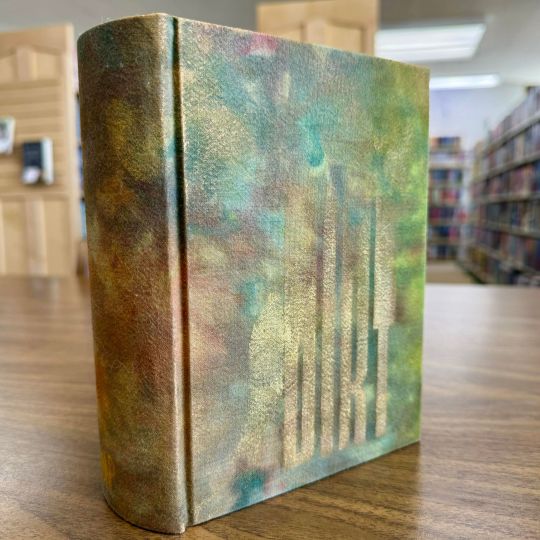
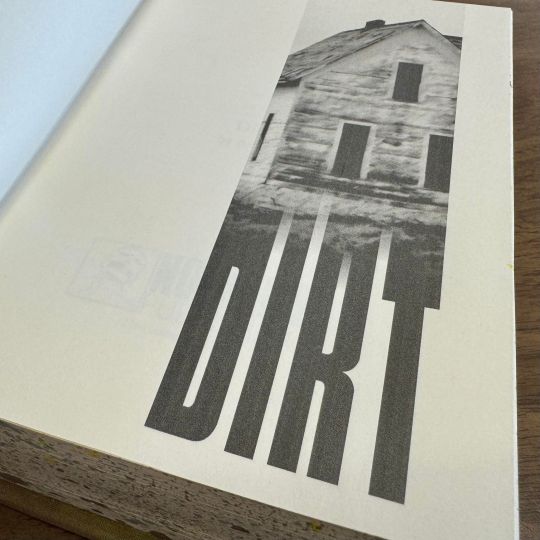
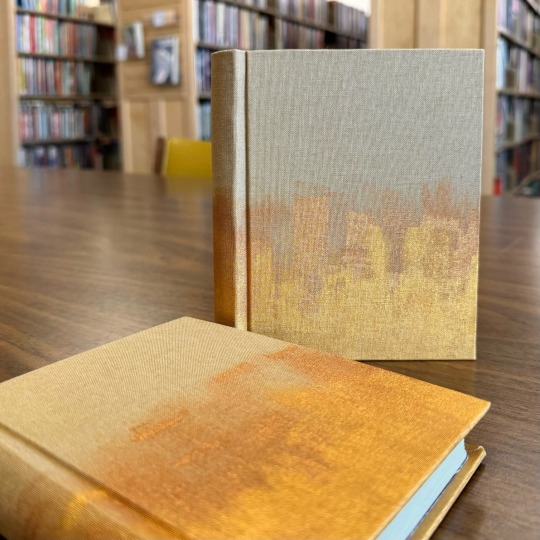
Dirt by Astern
Right off the bat not gonna tell you how long this took me to finish, cause it's embarrassing. But it's done, it's huge, and it's mine!! More glamour shots and process pics under the cut!
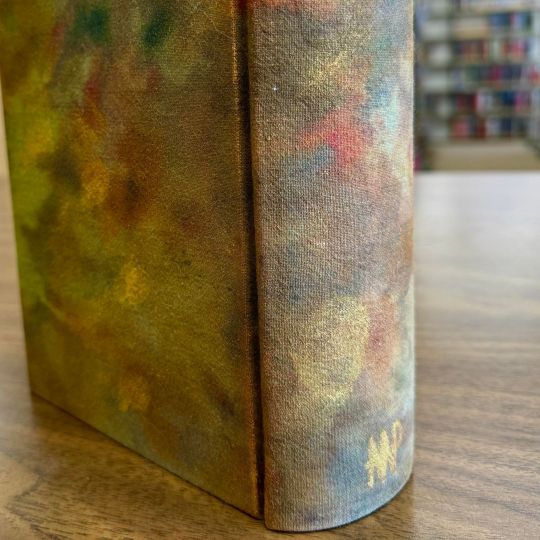

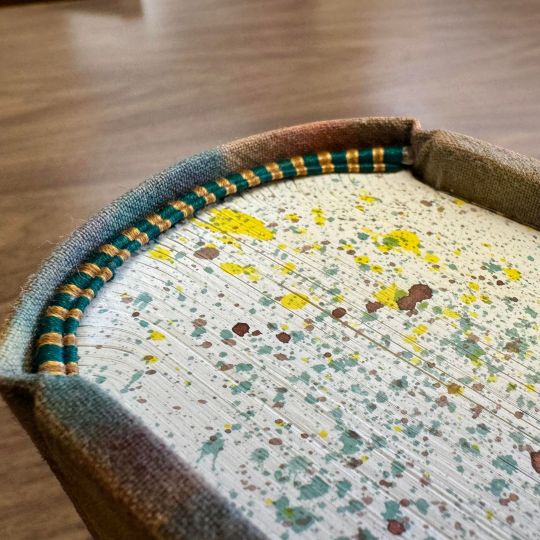
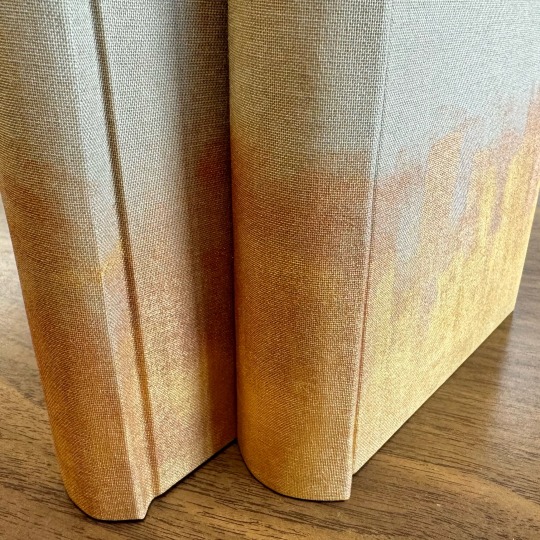
Hand dyed cloth, done with an ice dyeing method; title painted with gold paint, as well as the distressed areas; speckled edges done with acrylic ink and metallic bronze acrylic paint; handsewn endbands made from silk-finish cotton sewing thread; typeset and printed by myself all from Word.
Cheeky little video showing it all off together.
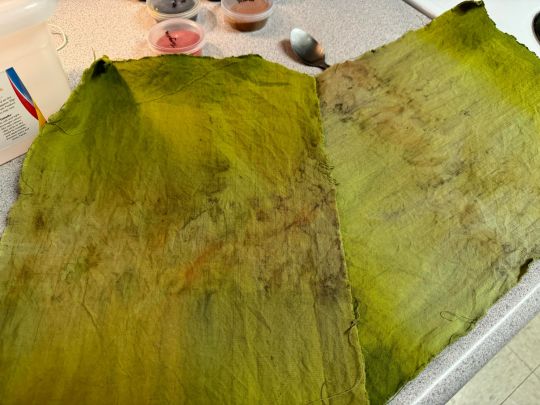
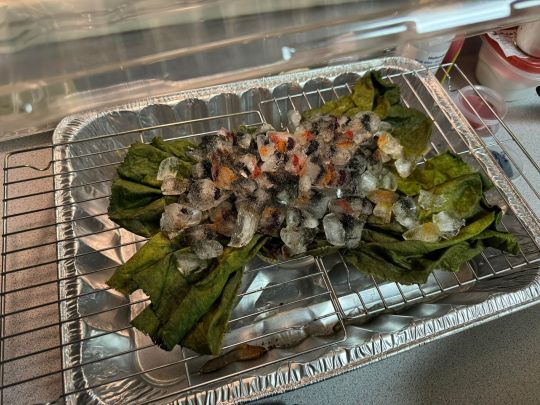
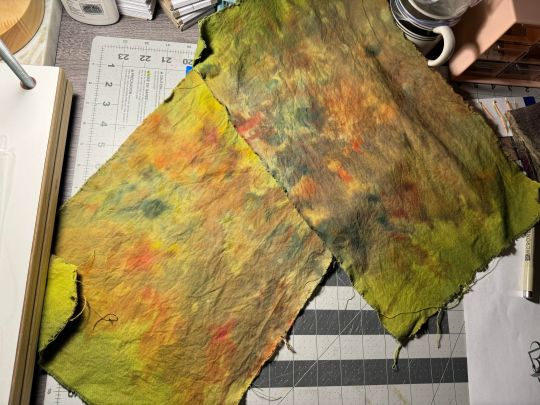
My first and sadly second ice dyeing attempts to get this looking right. First pass was not near what I wanted at all, so we stuck this bad boy back in the freezer.

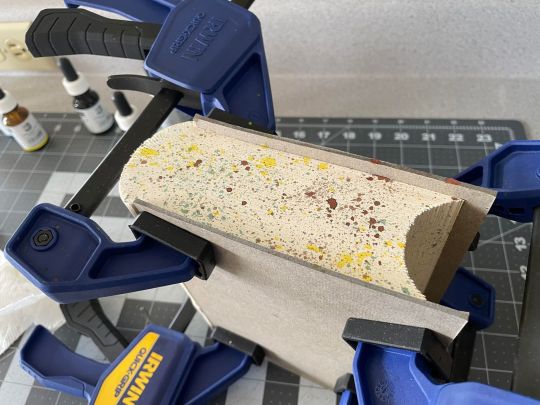


Steps from trimming the unruly head and tail, to splattering the edges, to sewing the endbands. Took me probably approx 3 hours for each one, and I did 2 copies, so four endbands RIP. (The keen-eyed will also notice the patterns do not match between the two photos of the endbands. That's because I wasn't paying close enough attention and inverted two of the colors between copies. But it's a feature not a bug!)
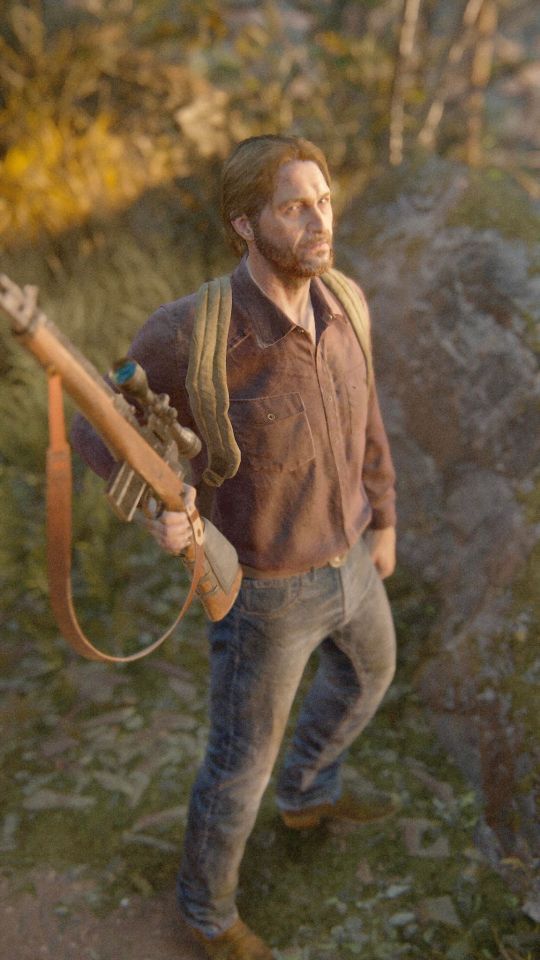
And Tommeh :3 Thank you for looking!
#dirt by astern#astern#tlou game#tlou#the last of us#fanbinding#fanfic bookbinding#no name publishing
114 notes
·
View notes
Text
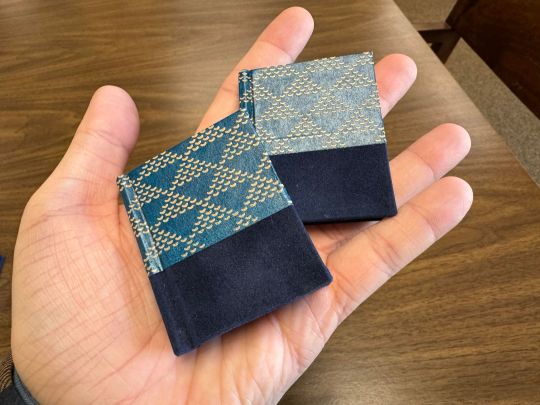
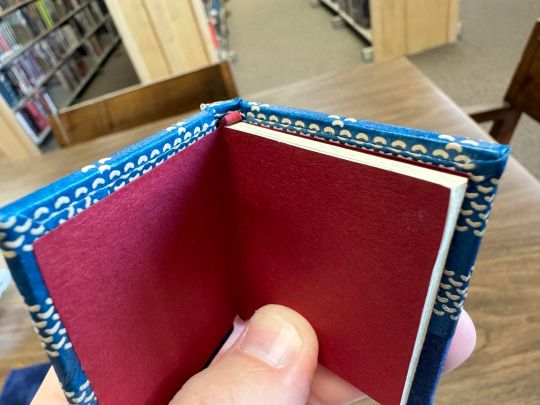
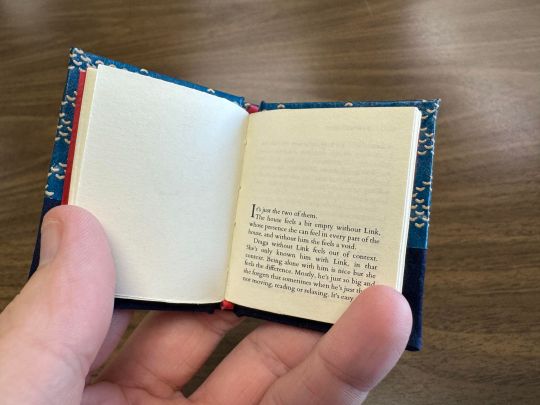
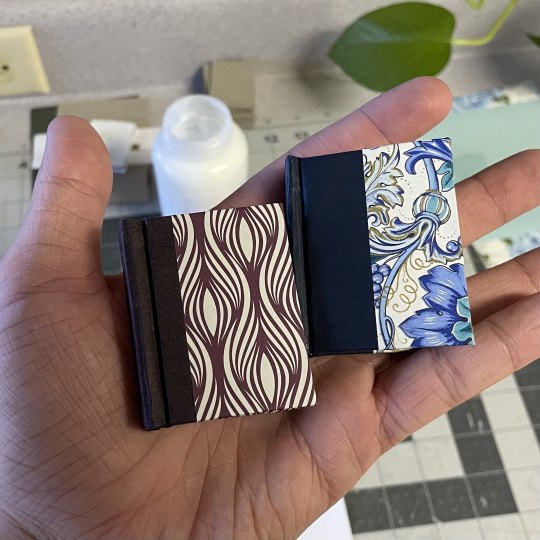
A tiny version of this bind finally out of the WIP pile, sliding it home onto my tiny shelf :3
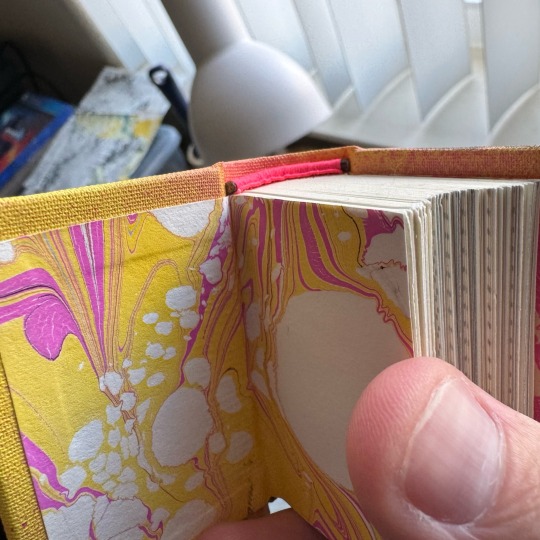

104 notes
·
View notes
Text
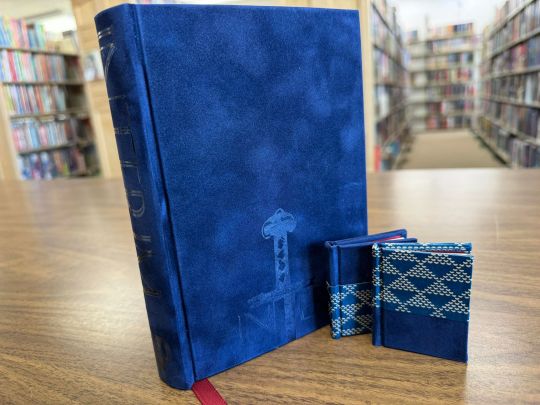

Interim (and company) by starkraving
After what has literally been a year and a month, I can call this project finished. The highs and lows of American football. You understand. Very grateful to the author for having written it and letting me bind them a copy! More photos and process pics under the cut.
The bookcloth material is faux suede, and the title decoration is cut from a glossy transparent HTV. The effect is completely swoon worthy, and exactly as I'd imagined it. That said I had a difficult time conceptualizing a design for the case at all; my only working idea was the endband, ribbon bookmark, and head and tail decoration. For 6 months everything I was coming up with for the cover was clashing very hard against these elements. So instead I took steps backwards, and thought how I could make something simple still visually interesting. I decided the difference in physical texture and appearance between the faux suede cloth and a glossy transparent HTV could be just what I was looking for, and I think it worked incredibly well.
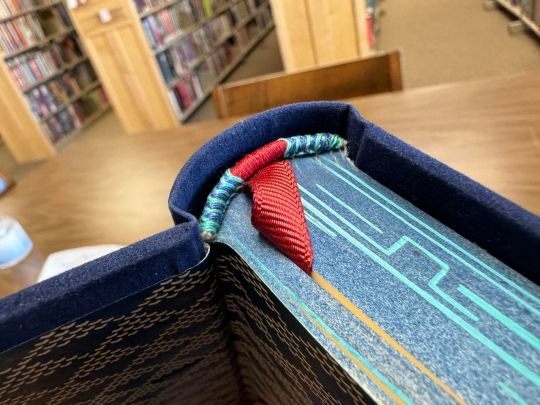
The endband is done with adapted renaissance endbands in opposing directions, with a simple wrap of red thread in the center. I don't think peek-a-boo is the right phrase but nonetheless. The head and tail are painted with spray paint, in a gradient pattern that fades as it nears the foredge. The light blue accent lines are also spray paint, applied with a stencil I drew and made myself.
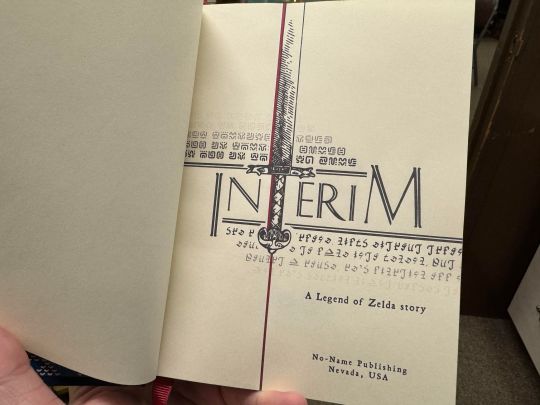
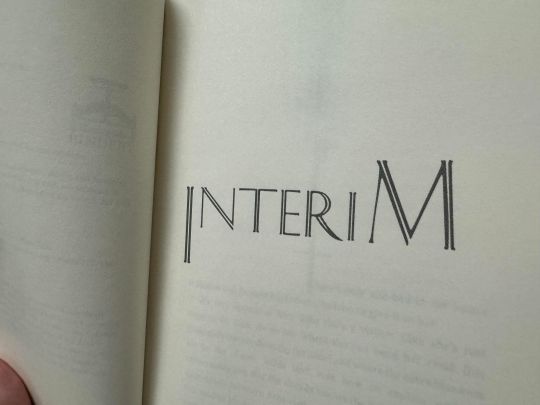
Typesetting shots. I use Word to typeset, and everything is designed and arranged within the program. Body font is Cochineal, the decorative title font is Caesar, as well as Sheikah and Hylian script.
The tiny books are simple, using elements from the main bind to tie them together. These are the spin-off short stories starkraving recently released as part of the Interim series. A testament to exactly how long this bind took me to complete, otherwise I would have included these in the main book. Oh well, it means I got to make tiny books.
Little video showing off the pieces. Particularly proud of the title page.

Process shots starting at my early test run of the my endband idea, to spraying the head and tail. Sewing the primary endband, and the completed bands on both books.
Very pleased altogether with how this came out. Also pleased to have it out of my WIP pile where I can take it off the shelf and fondle it whenever I want.
#fanbinding#fanficbookbinding#bookbinding#interim#starkraving#the legend of zelda#breath of the wild#botw#no name publishing
138 notes
·
View notes
Text
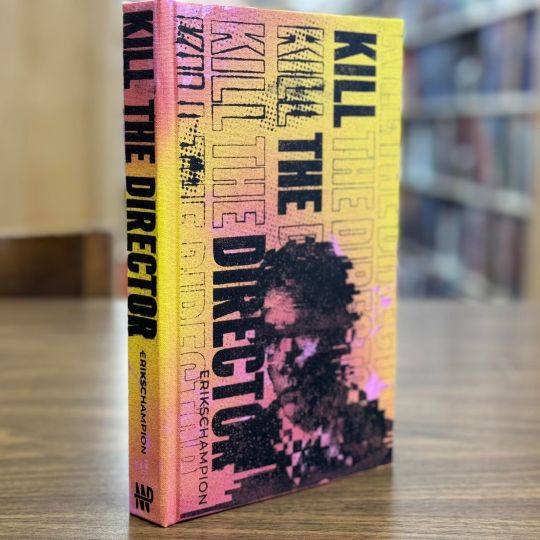

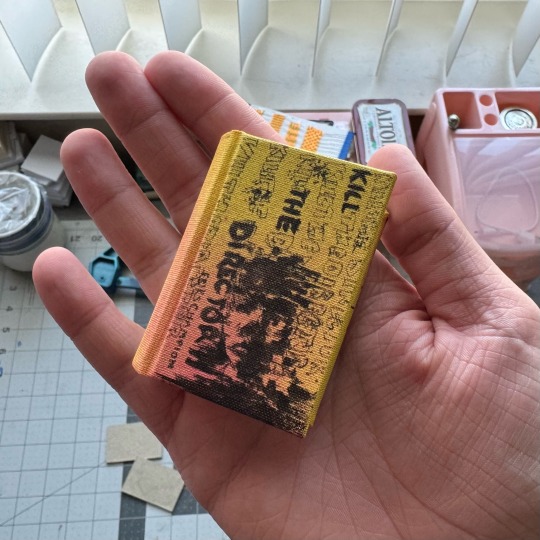
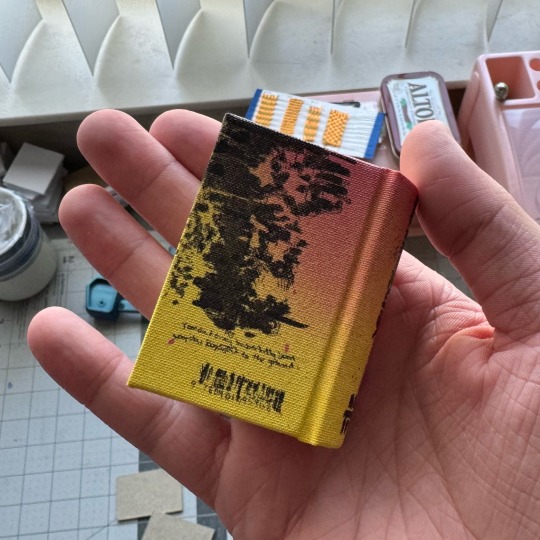
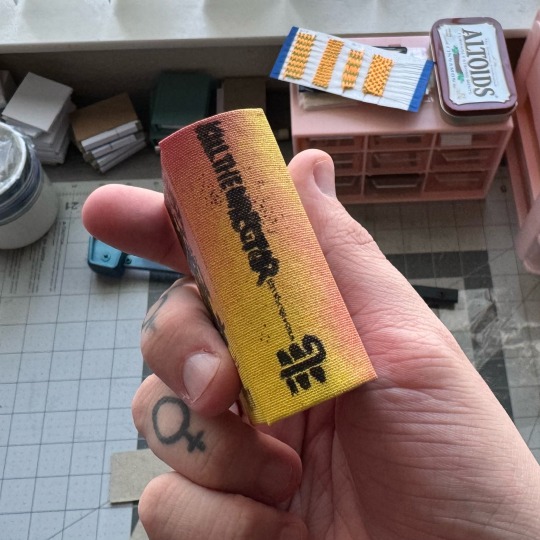
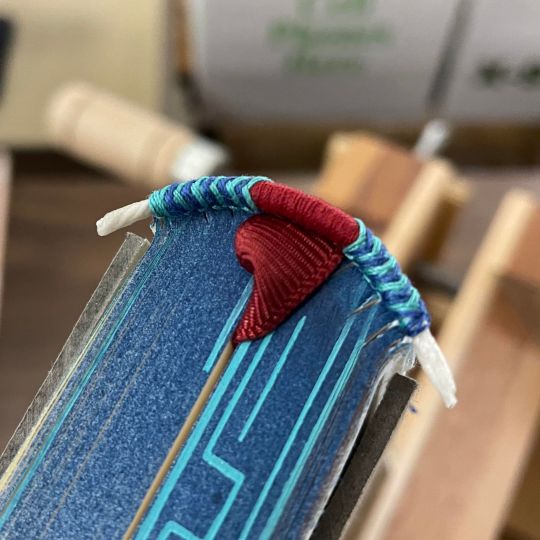
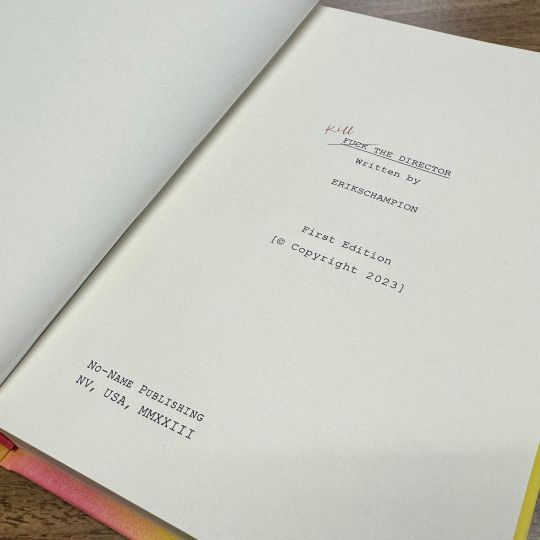
Kill the Director by erikschampion
My part in a gift exchange taking place in Renegade's California satellite server. This was a lot of fun and very experimental for me. My idea was to pursue something a little grunge, a little smudged, to go along with the early 2000s Brit punk vibe that the fic gets its title from. Spray paint, screen printing, some blood, some tears, and it's to its new home. Glamour and process shots under the cut!
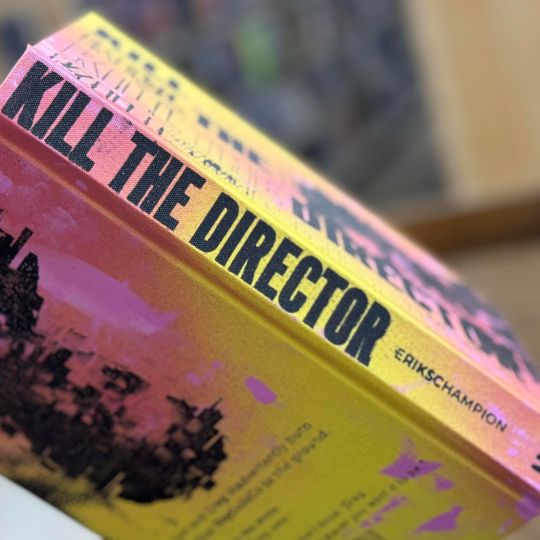


The yellow base is a plain linen bookcloth that's been coated with acrylic. The pink accent color is a combo of spray paint and smudges of pink Golden Fluid acrylic paint. The endbands are sewn with Gutermann polyester florescent sewing thread, and the endpages are my attempt at an italian vein marble with pink, yellow, and black paint.

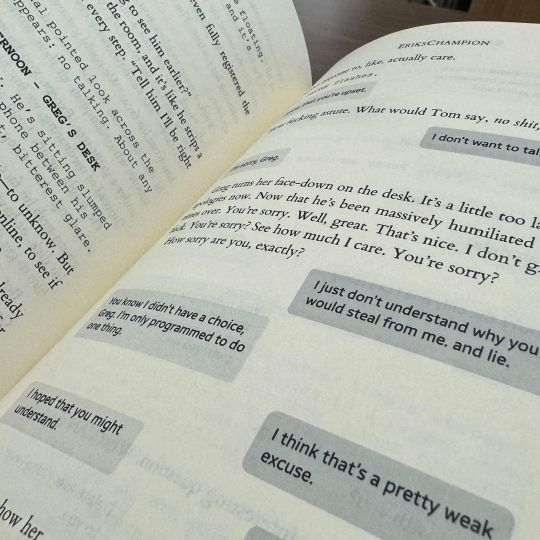
Some shots of the typesetting, and a video showing the book as a whole. The fic has some exposition written in a script format, so I typeset that to reflect. And it's always fun to include text message bubbles and emails and stuff.
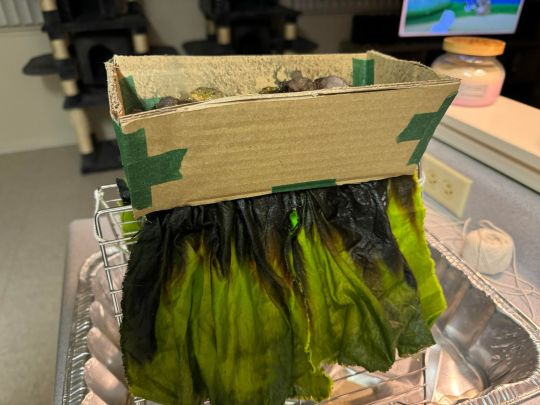
The graphics on the case were done with screens and waterbased screen printing ink! I went through a few iterations and even tried to set my kitchen on fire in order to get it right before settling on the screens. I'm very very pleased with the result. (The fire was from my DIY attempt at making my own gelli plate with gelatin, glycerin, and rubbing alcohol. All the instructions were telling me to be careful about how many bubbles I was stirring into the mix but I was like, it'll be fine. I'll use my heatgun or a lighter to pop whatever bubbles are there. It works with resin so it should here. Yall alcohol is flammable lmao. Why did I do that. I put my lighter up to those bubbles and lost my vision for a moment at the flash of light. I've never done something that stupid)
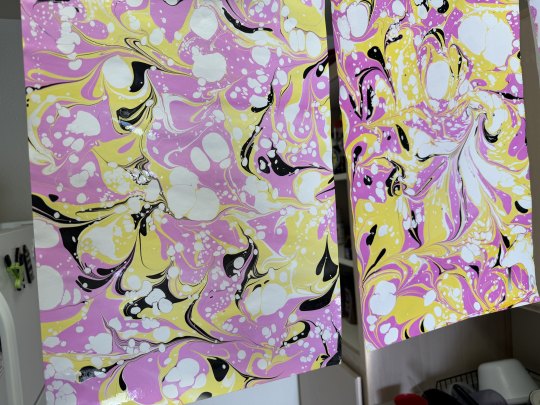


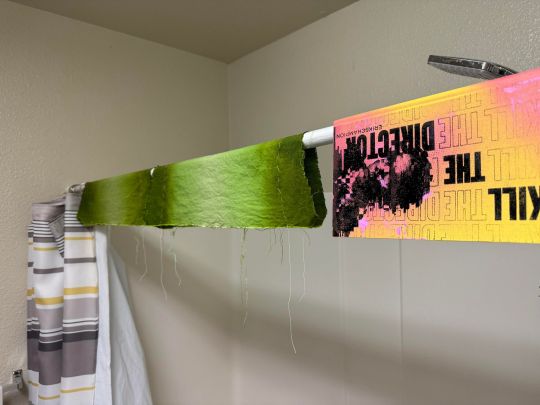
The freshly marbled paper hanging up to dry in my kitchen; the screen for the front of the case; my practice piece including the spine design; the case drying on my shower rod (along with some pieces of fabric for another project lol). I have fewer process pictures than I thought lol.
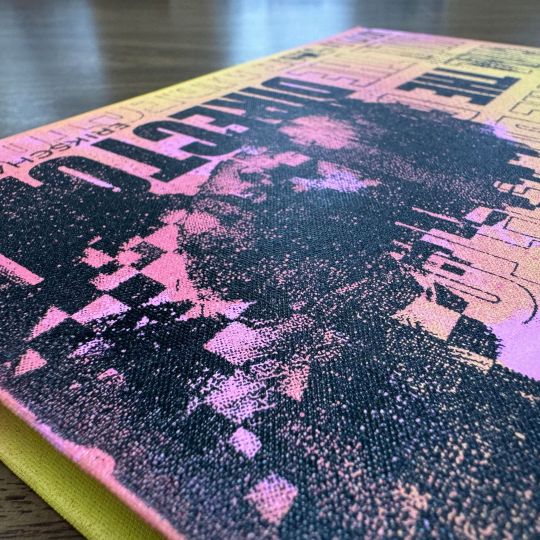
The graphics on the front and back were also partially designed by hand. I printed images of the characters then cut them vertically, and alternated the slices. Copied that, then did the same horizontally. Scanned that, and then did some cleaning up digitally on my computer. Here's some shots of the steps and the pieces themselves.
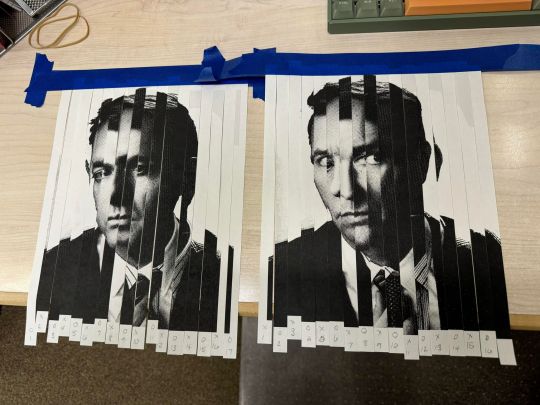


The third picture shows my first attempt, as I actually did this process twice. The first time I didn't feel like the first pass was pixelated enough, so I cut it again both vertically and horizontally and alternated them once more. This was a mess, and ultimately I didn't like the finished result. Round two (second image) was the final round, and what wound up using in the project instead.
Thanks for looking!
#fanbinding#fanficbookbinding#bookbinding#succession#kill the director#erikschampion#no name publishing
132 notes
·
View notes
Text
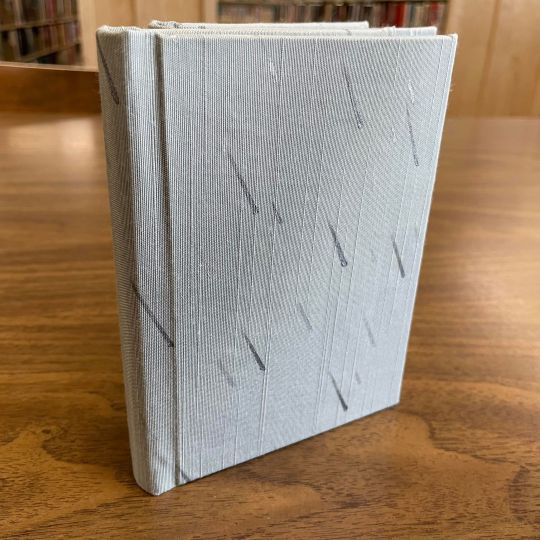
Found an old forgotten video on my phone showing the metallic raindrops that were a little hard to see in photos 🙌
White Noise by saltyfeathers
My binding of White Noise by saltyfeathers is finally complete! Wrapped in celadon Japanese bookcloth with hand-painted metallic raindrops, handsewn endbands, in an adorable A6 size. Check below the cut for more pictures!
Keep reading
143 notes
·
View notes
Text
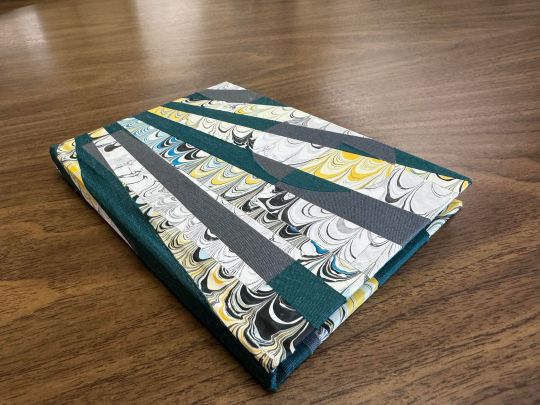
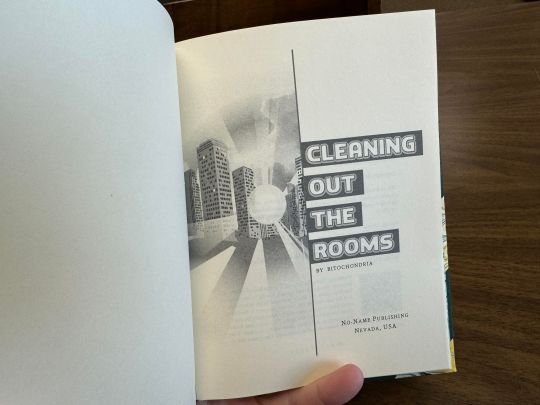
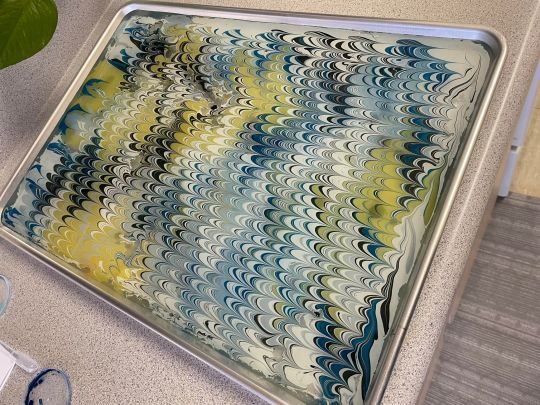
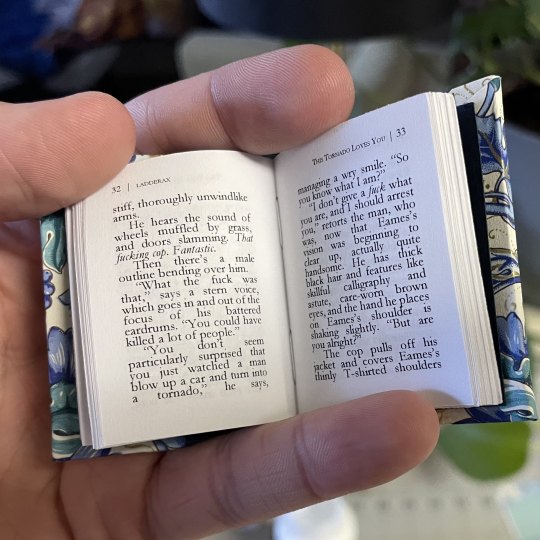
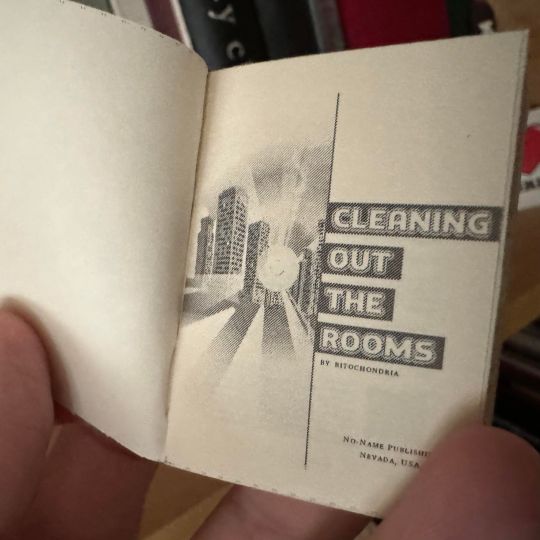
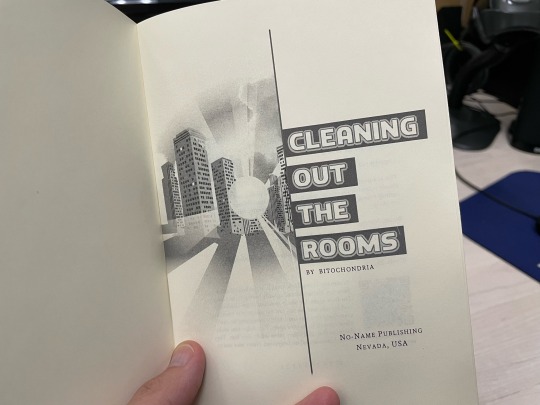
Cleaning Out the Rooms by bitochondria
After all this time I'm finally calling this bind complete. The concept was a radial pattern with intersecting shapes of desaturated materials in the same tone. I think it was mostly successful, but it was time to move on to other things and stop fucking around with this lol.
If you like Disco Elysium and Harry/Kim consider giving this fic a read if you haven't yet. More pictures of the final result and progress pics under the cut.
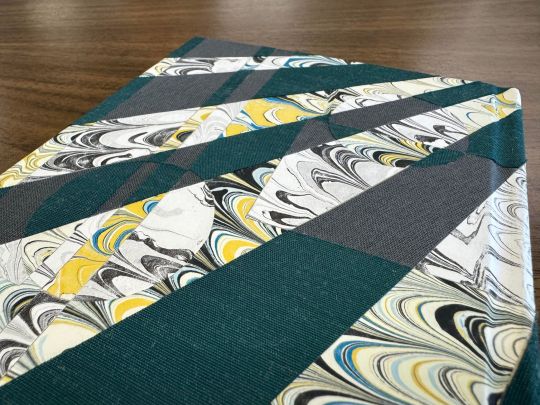
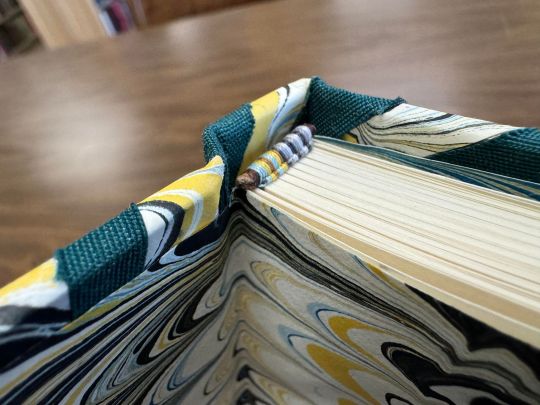
The colored marbled paper is mine own creation, marbled in my kitchen. I created the black and white version of it simply by scanning the image and printing it on a black and white laser printer lol. It gave me the truest transition into the desaturated colors of the marbled paper, and I used both as references in the endband, where the colored pattern of the threads transitions into it's base tonal iterations.
The body font is typeset in Sina Nova font. Decorative title font is Roti. Images were sourced from the Disco Elysium wiki. Everything was arranged and designed in Word.
Little video displaying the bind and the typeset.
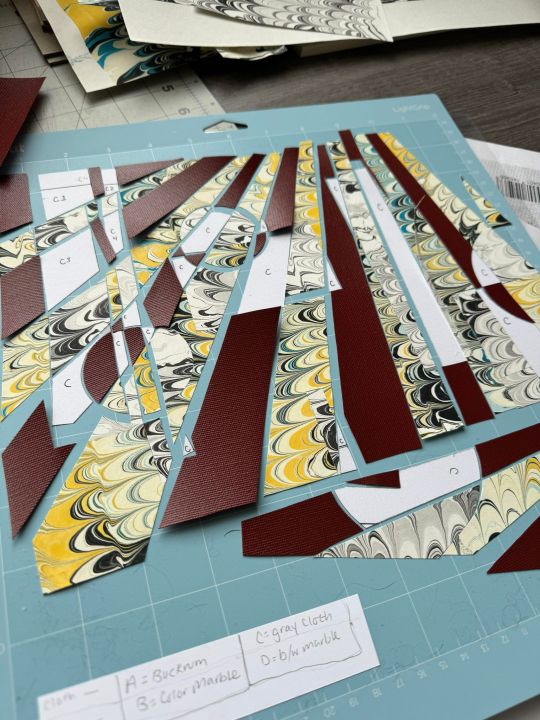
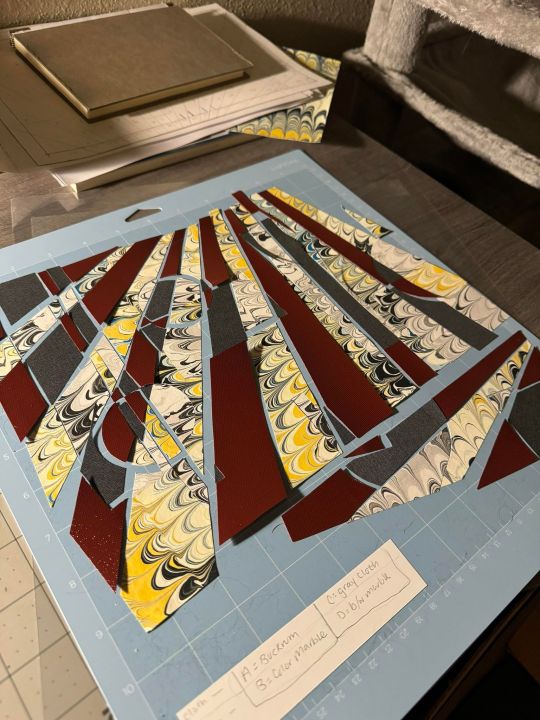
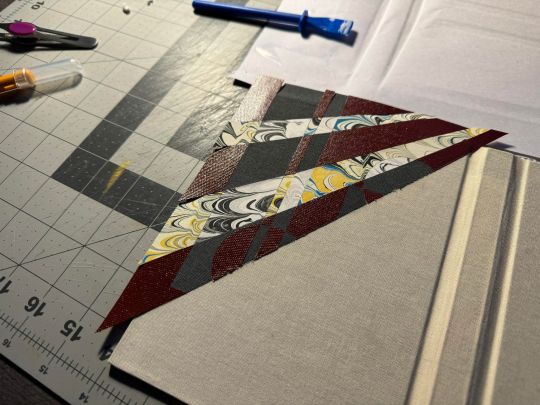
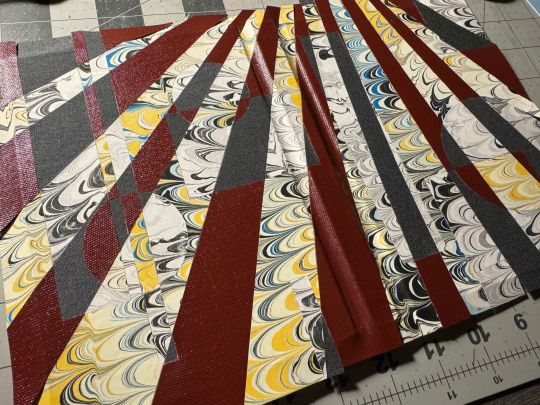
The order of events from laying the paint in the water for marbling the paper, to creating the template for the cover pieces, cutting each of those 91 pieces out, then cutting them out AGAIN from the cloth and the paper. Gluing it all on, to deciding I didn't like the buckram cloth I'd originally planned on, and tearing it off. Cutting out the pieces AGAIN and gluing them on AGAIN. Luckily buckram is so coated in acrylic that I was able to peel it up with next to no issues.
Overall this bind was very experimental for me, and I'm glad to have done it! Excited to move on to simpler projects though, I'm sure you understand.
#fanbinding#fanficbookbinding#bookbinding#cleaning out the rooms#bitochondria#disco elysium#harry/kim#no name publishing
122 notes
·
View notes
Text
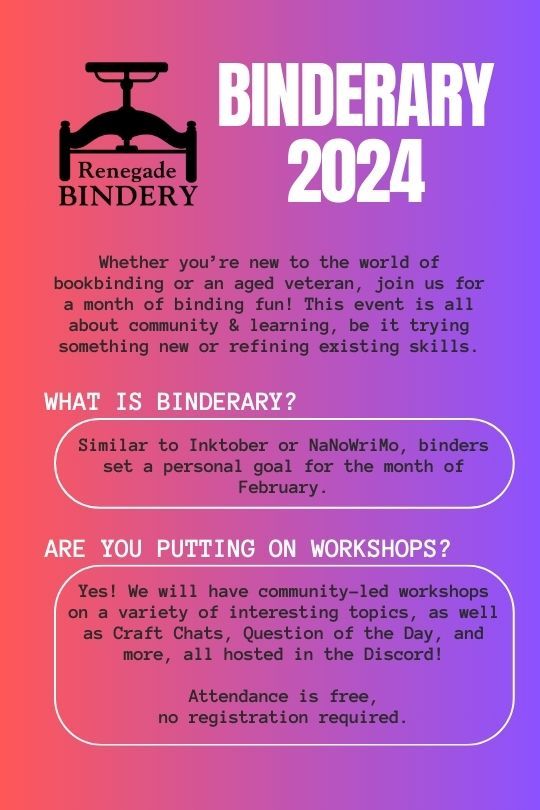
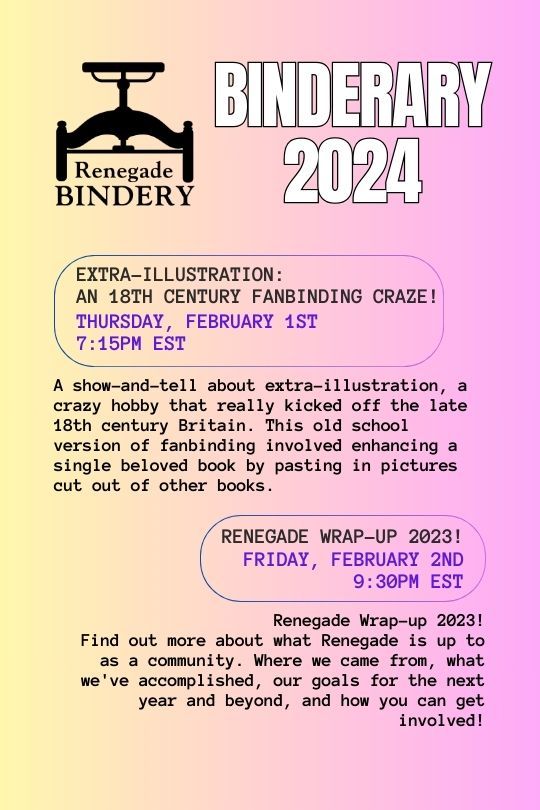
Binderary 2024: Week 1
In the Renegade Bindery Discord Server, we are once again running Binderary during the month of February. Attendance is free, and a link to the 18+ Discord Server can be found on our carrd.
Whether you’re new to the world of bookbinding or an aged veteran, join us for a month of binding fun! This event is all about community & learning, be it trying something new or refining existing skills.

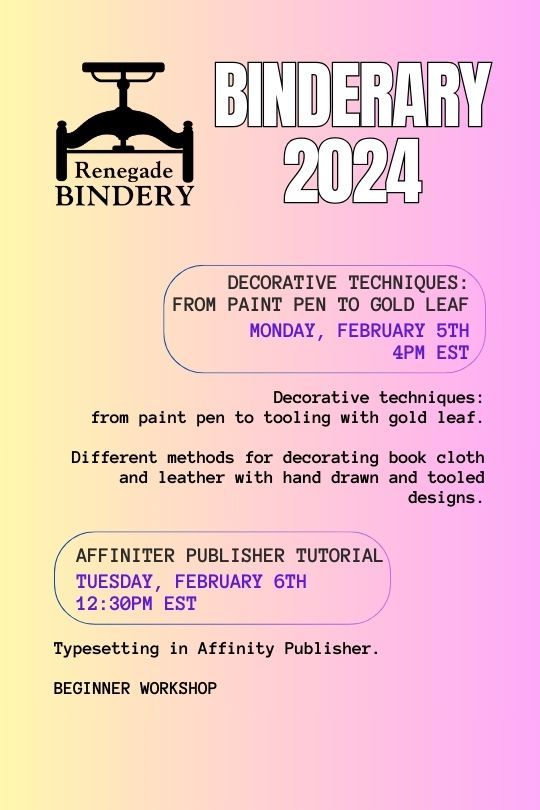

All our workshops are run by members of our fanbinding community, and some of them are even on Tumblr!
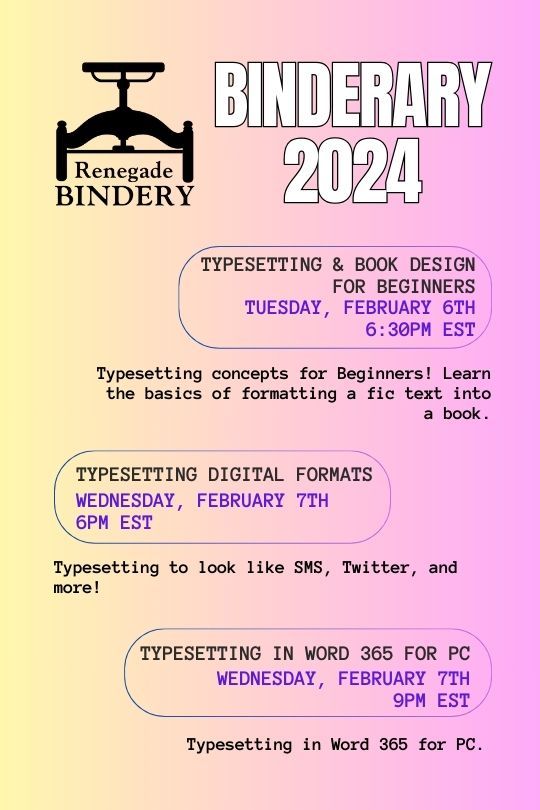
Here's the list of who's running the week 1 workshops:
Renegade Wrap-up 2023!: @robins-egg-bindery, @fanboundbooks, @celestial-sphere-press
Split Board Bindings!: @misanthropiczombie
Decorative techniques: from paint pen to gold leaf.: @blackoakbindery
Affinity publisher tutorial (Beginner Workshop): @kate2kat
Typesetting & Book Design for Beginners: @bearclubbooks
Typesetting Digital Formats: @sayornispress
Typesetting in Word 365 for PC: @no-name-publishing
528 notes
·
View notes
Text
so, you wanted to start bookbinding?
so @princetofbone mentioned on my post for "factory settings" about wanting to know more about the binding style that i used for it. so i thought i might make a post about it.
i was as terrible as i always am for taking in progress shots, but i can link you to the resources i used in order to make my book. i would also like to point out that "factory settings" is my 120th bind, and i have been doing bookbinding as a hobby for just over 3 years now. unfortunately this means some of the methods that i used for that bind aren't particularly beginner friendly, just in terms of the tools and methods i have used, but i would love to point you in the right direction when it comes to resources. i dont say this to sound pretentious which i fear i might come across, just so that youre fully informed. getting into this hobby is fun and rewarding, but it can definitely be intimidating.
with that caveat, heres a list of links and resources that i have used for bookbinding in general, with additional links to methods i used specifically in regards to this bind.
ASH's how to make a book document. it gives you a great introduction into typesetting fics (where you format the text of fics to look like a traditionally published books) and then turning them into a case-bound book (the style i used for "factory settings"). it is comprehensive, and explains how to use microsoft word to do your bidding. it was invaluable to me when i was just starting out! currently i use affinity publisher to typeset/format my fics for printing, but i only bought and learned how to use that after i had been binding books for a year and a half. i made some beautiful typesets with word, and some of my close friends use it still and design stuff that i never would be able to in my wildest dreams (basically anything by @no-name-publishing)
DAS Bookbinding's Square Back Bradel Binding. a great style to do your first bind in! this method requires, when making the case, to attach the cover board and the spine board to a connecting piece of paper, which makes it so much easier to match the size of the case to the size of the text block (your printed out and sewn fic). using this method is what allowed me to get much more accurately fitting cases, and made me much more confident with the construction of the books i was making. a well-made book is something that is so wonderful to hold in your hands!
DAS Bookbinding's Rounded and Backed Cased Book. This is the specific method that i used to create my bind for "factory settings"! even before i could back my books, i found that watching DAS's videos in particular helped me see how books were traditionally made, and i was able to see different tips and tricks about how to make nicer books.
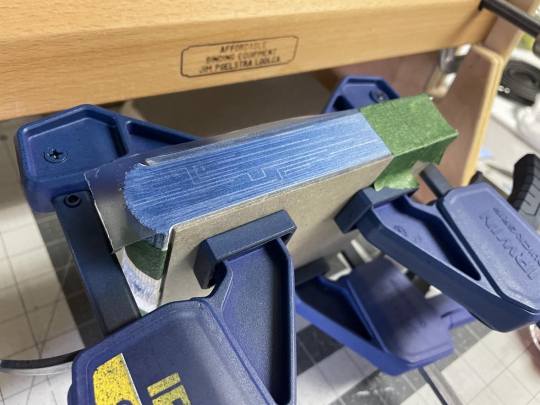
Book Edge Trimming Without... i trim the edges of my text block using my finishing press and a chisel i have sharpened using a whetstone and leather strop with buffing compound on it. i follow the method for trimming shown in this video!
Made Endpapers. i follow this method for my endpapers, as i used handmade lokta endpapers, and they can be quite thin, but they look beautiful! i used "tipped on" endpapers (where you have your endpaper and then put a thin strip of glue on the edge and attach it to your text block) i used for a very long time before this, but these feel like they are much more stable, as they are sewn with your text block.
Edge Sprinkling. this is the method that i used for decorating the edges of my text block. but the principle is basically clamping your text block tight and then sprinkling the edges. i do not believe you need to trim the edges in order to do sprinkles on the edges, and that's what makes it accessible! i personally just use really cheap acrylic paint that i water down and then flick it onto the edges with my thumb and a paint brush.
Double-Core Endbands. i sew my own endbands, which i followed this tutorial for. that being said, it's kind of confusing, and this video is a bit easier to follow, but it is a slightly different type of endband.
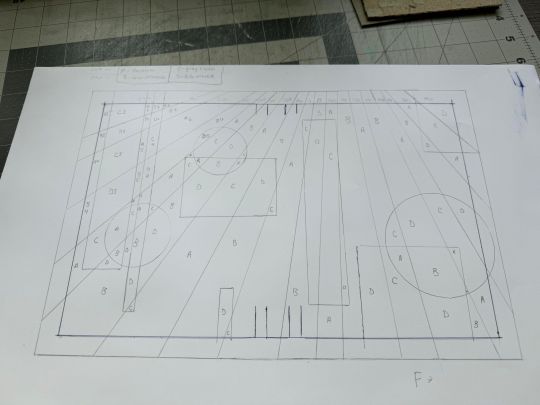
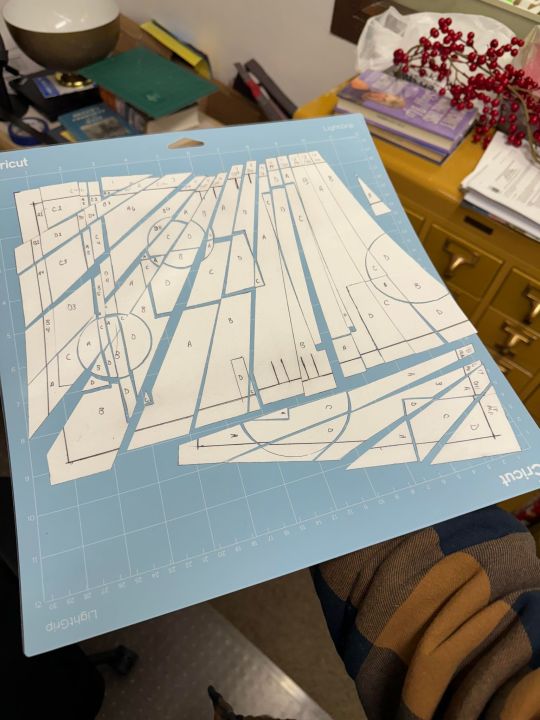
Case decoration. i used my silhouette cameo 4 to cut out my design for "factory settings" in htv (heat transfer vinyl). i also used my cameo 4 to cut out the oval of marbled paper on the front, as i honestly didn't want to try my hand at cutting an oval lol. i also glued some 300 gsm card with an oval cut out of the centre of it onto the cover before covering it with bookcloth, to get a kind of recess on the cover. i then glued the oval of marbled paper onto the top of the recessed area once it was covered with bookcloth, so that it was protected. the images i used were sourced from a mix of rawpixel, canva and pixabay. a more accessible way to get into cover decoration is by painting on a design for your cover as described in @a-gay-old-time's tutorial just here. or even doing paper labels, which look classy imo.
physical materials. sourcing these will depend on your country. i am located in australia, and have compiled a list with some other aussie bookbinders of places to buy from. here is a great post describing beginning materials for getting started binding.
@renegadepublishing. this tumblr is great! its what got me started bookbinding, and being in the discord has been inspiring, motivating, and honestly just one of the best online experiences i have ever had. it is full of resources, and most people in there are amateur bookbinders, with a couple of professionals thrown in. the discord is 18+, and anyone can join!
i'm sorry this post got so long, but i hope that this has a lot of information for you if you would like to get started bookbinding. its one of the best hobbies ive ever had, and i genuinely believe i will have it for the rest of my life.
3K notes
·
View notes
Text
El Dorado and Peregrine by @nigeltde-fic
Very excited to finally have these two incredible stories on my shelves, and grateful to the author for having written them. Some extra glamour shots and writing below the cut like always
The bookcloth is plain linen bookcloth that I've painted with gold and bronze fabric paint and set with an iron. I struggled for a while to decide what materials this should be done with, and ran some experiments that all kind of blew up in my face lol. Sometimes the tried and true is such for a reason.

The top endbands are sewn with a single strand of satin finish cotton sewing thread, around a worsted weight cotton yarn core coated with PVA glue. The bottom, 'golden' endbands are sewing with a single strand of yellow polyester thread, so that it can be kinda shiny looking.
And a cheeky little video to show the insides, including original art. The fonts used were Century for the main body, and Calfine for the decorative. Thanks for lookin!
191 notes
·
View notes
Text
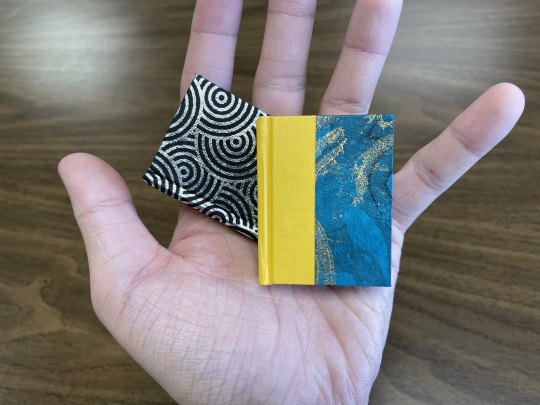
Tiny Book? Tiny Book. Pt3.
Previously we covered everything from typesetting and printing, to rounding and backing. Let's continue on with step 4, endbands!
Tiny books part 1; Tiny books part 2

Just like with regular ficbinding, there are layers, and they are:
1 - Typesetting and Imposing
2 - Printing
3 - Cutting, Folding, and Sewing
4 - Gluing, Rounding/Backing, Endbands
5 - Building the Case and Casing In
6 - BOOK
In this part we will be focusing on the rest of step 4, and we'll see how far we get before I run out of photo space tbqh. Please feel free to skip to the area you're interested in most.
4, pt2 - Endbands
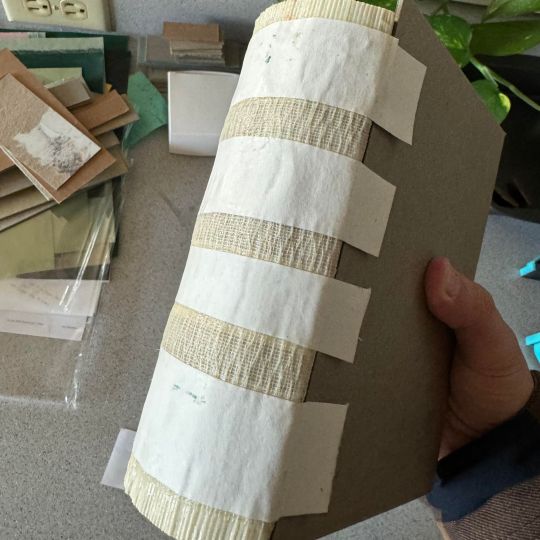
Endbands--there isn't anything overly exciting to say here, except that sewn endbands on tiny books isn't impossible, just ridiculously fiddly. For a core I recommend going with embroidery floss, stiffened with PVA. It's a nice relatable scale to the tiny book and will be perfectly firm-yet-flexible with the PVA coating. Because of the thickness I do not recommend using more than one strand of embroidery floss, if that's what you are using right now for your regular books. For all of the examples I include below, they've been sewn in a double core french style with a single strand of satin-finish sewing cotton sewing thread. Here are some examples of ones I've done:


Doable, but at what cost? My sanity. If you've got some to spare though, it will be very impressive to other bookbinders lol.
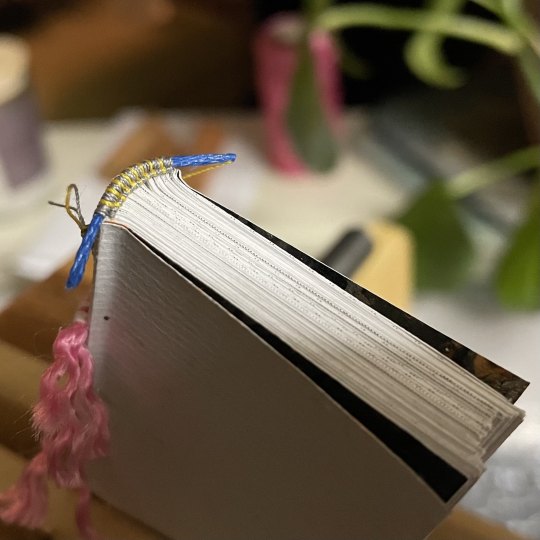
Don't be fooled into thinking tiny sewn endbands will be quicker or easier than their regular sized counterparts. And as a treat, here is how the tiny endband looked in my press while I sewed:
It's just 🧍♂️
In a sewn endband's stead I can recommend using prefab endbands, which will just be snipped to size and glued to the spine. Might be hard to do on tiny books with fewer signatures but not impossible, and it will look... as fine as a prefab endband can. Otherwise what I've really liked doing are paper endbands. I make these a bit wider than my textblock, so that I can trim them down later after they've been glued.
These are made from taking a strip of paper, applying glue around 15mm down the length, and laying down a piece of the PVA-coated embroidery floss. After a moment, to let the paper soften from the moisture and the core material stick a bit, you just roll it up a few times. Go slowly, as it can be finicky. Set aside to let it dry completely, then glue to your spine, as with the prefab ones. Let that dry, and trim to size carefully with your scissors.


(Imagine the pad of sticky notes is our tiny book lol, it's what I had on hand) Anywho it's that easy! I find these so preferable in part because the rolled up core sits forward and covers the folds of my signatures, where prefab endbands usually don't. A tip--while you're coating your floss in PVA, you can take advantage of any remaining glueyness to roll it between your fingers, to remove any hard edges or unevenness from the thread before it's totally dry, and won't transfer any lumps or bumps to your finished paper endband. Once you've glued and trimmed the paper endband to size, you can reshape it with your fingers to remove the pinched ends from the scissors. @simply-sithel got me onto this process and it changed the game for me. She's been my tiny-book mentor 🙏

Referencing this image again, the book on the right has the paper endband, compared to the left, which has a sewn endband. On a regular book endbands are protective, decorative, and offer some support; on a tiny book they are purely decorative. I like to use the accent paper of my case as the paper for the endband, to bring everything together.
5 - Building the case and casing in
SO! We've made it this far, to what I believe are the easiest steps of this whole thing, building the case and casing in. As with my regular sized books I do these tiny ones in a square back bradel binding method. This construction uses a piece of connecting paper across the spine stiffener and allows you to tailor the case to your textblock's unique shape, rather than fiddling with it's exact measurements.
Instead of making this a square back bradel binding tutorial, I will refer you to DAS's video where I learned it myself. The case construction begins around the 13 minute mark. There are no notable different between using this method between regular sized books and tiny books.
The first things to note in this step are your hinge measurements. Whereas on regular books they may be 9-12mm, depending, on tiny books anything much wider than 8mm is noticeable and not strictly necessary. The full range of motion gained from the hinge measurement isn't as important with tiny books, so I recommend staying within the 6-7-8mm range for the aesthetics.
My other note is that the 2mm overhang measurement surrounding the textblock is still preferable, even on this tiny size. Something in your heart will try to make it nearer to scale, like .5mm or less, but this will result in a tiny book that looks badly made. My recommendation is not to go any narrower than 1mm in your overhang measurement. But also this is purely for appearances' sake and I'm not your mom, and even if I was you're (hopefully) an adult. Go nuts and find out what works best for your tastes!
In my experience you also have a slight bit more freedom selecting your cover materials. I've never gotten full-paper cases to work where regular sized books are concerned, but it's been my preference for tiny books. I have so much decorative scraps of paper that otherwise wouldn't have a home with regular books. This is also a great place to use offcuts of bookcloth as well. No gods so rules!!
Here are some photos of the process of building my tiny case on a tiny textblock following the square back bradel method:


Now comes casing in. This part also couldn't be easier imo. I almost feel like I don't need to even say anything. I've found straight PVA, while having too short a worktime for full sized books, is perfect for casing in tiny books. You're brushing over like 2 square inches of paper?? You're using virtually no glue AND it takes 15 seconds?? I can only get so hard. As standard you should use some kind of moisture barrier between your endpages and your textblock while it dries in whatever your press situation looks like. For me these are sheets of plastic stolen from some plastic envelopes you use for archival work. These stop the moisture from going into your textblock and warping it. Some people have luck with parchment paper, but I am not one of them.
If you're using plain PVA, these babies will totally dry in maybe like, 3 or 4 hours. Take them out after an initial nipping time of like 20 minutes and let them dry open.
6 - BOOK

You've got a tiny book!!!

If you have any questions on something I've covered or didn't cover, please don't hesitate to ask!
113 notes
·
View notes
Text
Tiny Book? Tiny Book. Pt2.
Alrighty so we've progressed from daydreaming about tiny books to holding the beginning of the bones. In this one we'll cover as much as we l can before I run into the 30 image limit again.
Tiny books part 1; Tiny books part 3
Just like with regular ficbinding, there are layers, and they are:
1 - Typesetting and Imposing
2 - Printing
3 - Cutting, Folding, and Sewing
4 - Gluing, Rounding/Backing, Endbands
5 - Building the Case and Casing In
6 - BOOK
In this part we will be focusing on step 3 and partially step 4, since I ran out of picture space. Please feel free to skip to the area you're interested in most.
3 - Cutting, Folding, and Sewing
I've combined all these steps into one as they mostly happen in tandem with each other, and they aren't separately complicated enough to be an issue. Tools you will need are--

A cutting mat
A metal ruler
Any precision knife, I'm using a utility knife (for specific reasons I explain later on)
A bone folder, or some other means of creasing your folds
Paper clip(s)
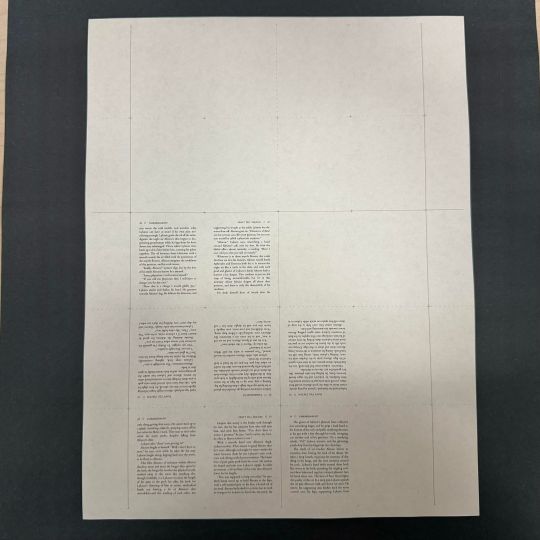
Now, you may be looking at your printed sheets of little pages and feeling overwhelmed. We've all been there. But here is how they are broken down.
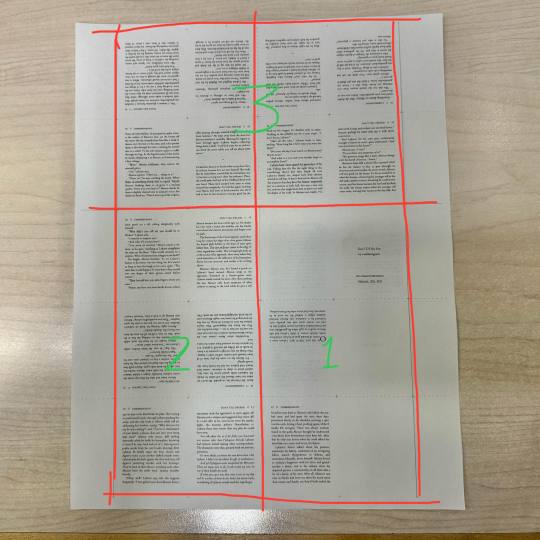
Each red line is where you will cut away the pages of the tiny book from the excess paper, and each green number is a signature. If you compare this to your actual printed sheet, see the cut lines are all solid, whereas the fold lines are dashed. Remember they are in a 3/3/4 folio configuration, and you'll notice that even though we are bisecting our 3rd signature, the pieces will still fold into one 4 folio sig, so try your best to keep them together. And if you auto duplexed your pages, this is the soonest step where you'll realize why the printer skew is pretty impactful on these tiny books. Anyway, go ahead and trim your pages, from this to this:

These pieces will fold in an accordion style, meaning they are imposed so that a back-and-forth fold will orient the pages in the correct reading order. If this is hard to conceptualize, check back to the Little option on the Renegade imposer. Underneath is a toggle for Instructions, with a static image to guide you.

Each Wacky Layout option has it's own folding configuration that the pages must be folded in to give you the correct reading order. If this is still confusing, don't let it stop you--you can also cut each individual pair of pages free, order them by page number, and then fold. So long as they are kept in the 3/3/4 folio and the page numbers ascend correctly, then you did it right.
So I'm going to look at my segment for signature 1 from my example image. I'm going to look for sequential page numbers as my clue for which direction to fold, because I was not paying attention as I cut and I included page numbers in my typeset.
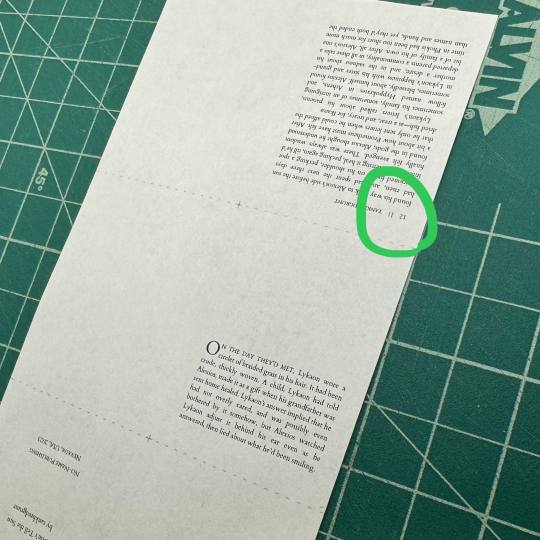
We see page 12 circled in green. However, maybe not as helpful, considering the page directly beneath it is unnumbered. I know from my memory of my typeset though that this is page 9, because I typeset my text to begin on page 9. 9 and 12 are not sequential numbers. So we flip it over.
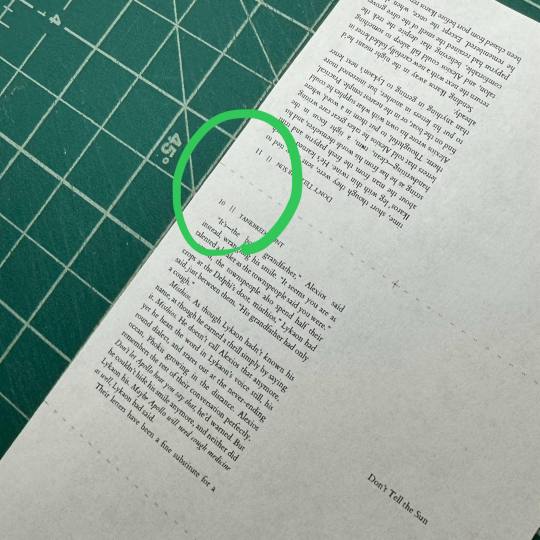
Ah-hah--sequential numbers, 10 and 11. As you'll notice by the dashed lines separating the pages, this segment will be folded to make up your 3 folio signature. The top portion, marked by 11, will fold along the dashed line over the second portion, marked by 10. The bottom portion folds along the dashed line in the opposite direction. Here is what that looks like--
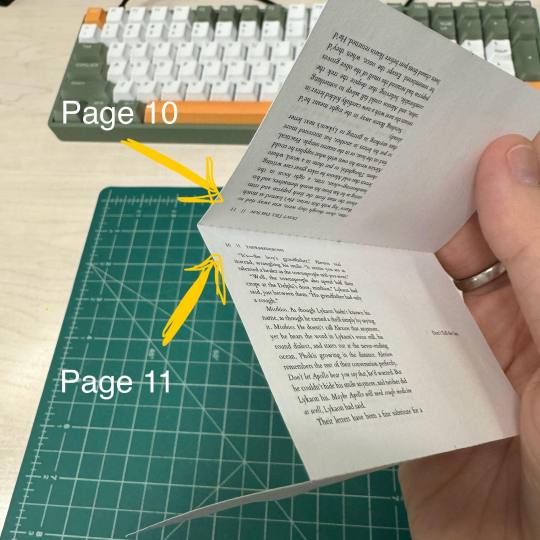

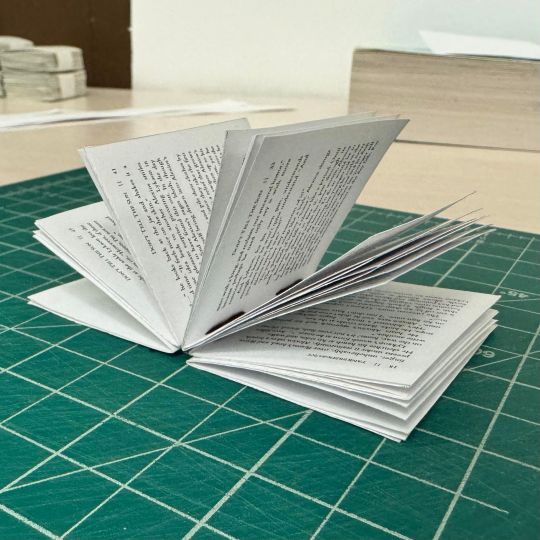
--this! And now you have a little signature. You will repeat this step for the second 3-folio segment, creasing the folds with your bone folder. The 4-folio segment has a slightly different configuration but the same concept applies, so I will not be taking a photo example of that. Just make sure your page numbers are sequential, and you're alright. Do not fold these signature down the middle yet, leave them as they are, because--
You'll notice now that should this be immediately sewn into a book you would not be able to turn the pages, as they are still connected at the tops and bottoms. Did you know this is how books used to be sold? And is why we have deckle edges on modern books? It's just aesthetics now, but back in the day it was a product of reading the fucking book, because you would cut them apart as you went. They were yet another point of ego for some people; look how many of my books have been cut, aren't I smart for reading so many?
Anyway for our purposes I recommend the use of a utility knife over Xacto knives or a letter opener. With a utility knife you can extend the blade and cut each seam easier, as it's longer than an Xacto and sharper than a letter opener. That's not to say you can't use other precision knifes, just be careful regardless of what you do since I'm not responsible for your fingertips.
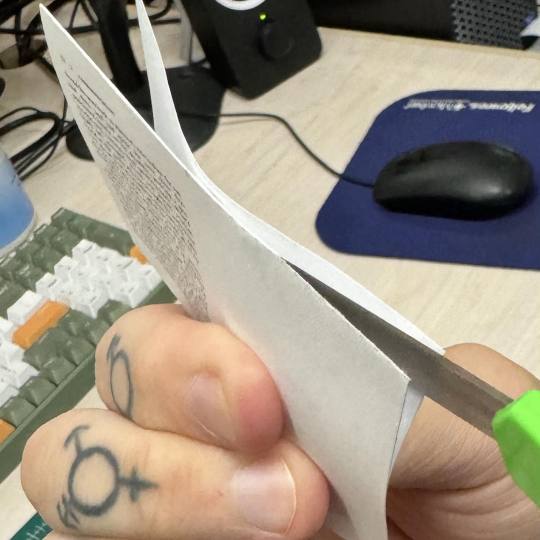
I find this method faster and as accurate as using a ruler. The blade goes in between the folded pages, and using the tension against the blade, I'm forcing the paper to the ultimate edge of the fold. To me this is different than CUTTING the paper, as I'm not doing any motions with the knife. This is forcing the paper to split against the edge of the knife. Again you might find this intimidating, and again, please don't risk yourself. You will get the same results if you take your time and cut out each page using a ruler. Regardless, you'll wind up with:

Your tiny book pages!! Now that they've all be cut, folded, and cut again, I can fold them down the center to create my individual signatures. This is when I begin using my paperclips, to hold the sigs together in one place before I punch the holes. Try not to put more than 3 sigs in one paper clip, this could leave indentations on your pages.
When it comes to punching the sewing holes on tiny books, there is the same key difference--the structure of the tiny book is not load-bearing. For this reason we can be a bit cavalier with this step. We don't have to use premium linen thread, we don't have to punch the holes equidistant, we don't have to use tapes, we don't have to love Steve like he's our real dad. Four holes per signature is adequate--one entrance hole, two to support the center, and one exit hole--and for my part I sew tiny books with regular cotton sewing thread and a regular ole sewing needle.
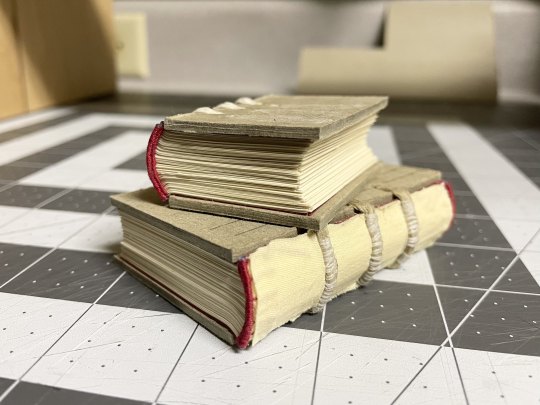
Sewn, my tiny spines looks like this, compared to a regular sized textblock:
On the left we have a tiny book, sewn through only 4 punched holes per signature, with black cotton sewing thread. On the right is a B6 book with the traditional french link method sewn over tapes, with carefully measured distances to account for load distribution and security.
For this part, first make the decision as to whether or not you will trim the edges of your tiny textblock when you're done. As with regular books, use this decision to gauge how far your entrance and exit holes will be from the top/bottom of your text block so that your holes are not dangerously close to the edge after trimmed. For the middle holes, find the center point of your spine. Punch two holes on either side of this middle, let's say, 7mm away. You likely aren't a stranger to this process, so it is hopefully simple to picture. Like this:

This isn't a science by any means. Use your better judgement. To keep things exciting I stuck with 7mm. My entrance and exit holes are 7mm away from the ends, as I'll only be trimming off maybe 1mm. I found my middle, then put a hole on either side 7mm away. They are not the most even or mathematical, but we don't have to fucks with that baybeeee. On full-size books I will use my finishing press to hold the signatures in place and saw along the spine with a hacksaw, like this. That's more troublesome than helpful on these tiny book in my experience, so I use a jig I've cut out of spare bookboard, since all my tiny books are the same size. However you decide to create your sewing holes, go ahead and do so now.
Like I mentioned already I will be using regular cotton sewing thread, doubled up, and a regular sewing needle. That looks like this:
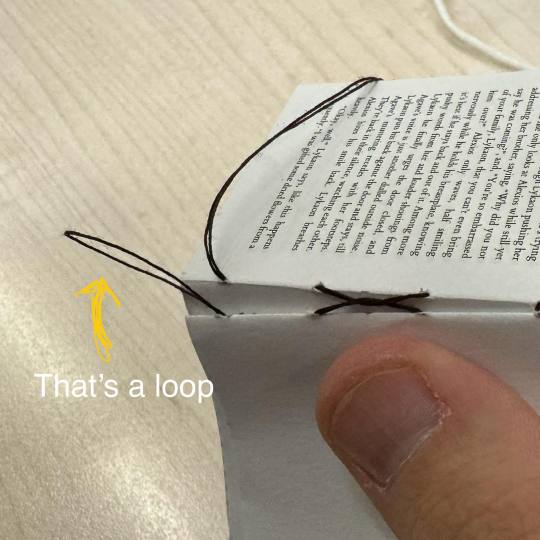
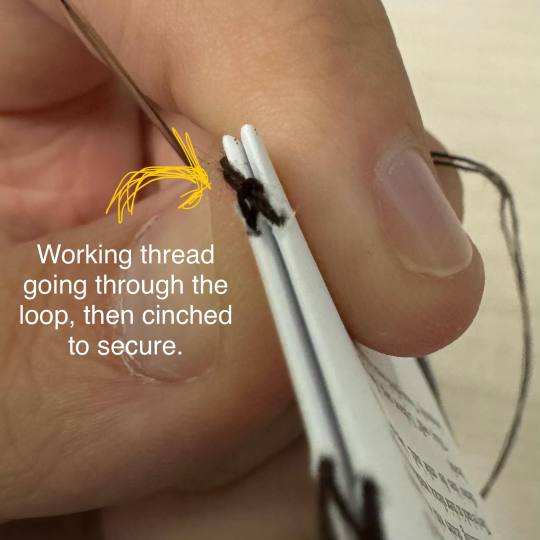
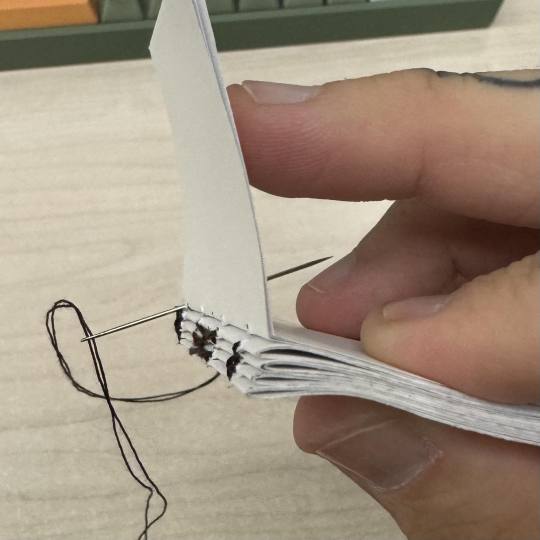
Notice in the first picture the labeled loop--for me that is intentional and functional. Rather than tying a knot, when I sew on the next signature I pass my working thread through the loop, then tighten the thread, cinching my working thread. Not tightly, but enough so things aren't flopping around. In the third picture you can see how I hold the textblock and signature open with one hand, and sew with the other. This lets me hold it up to my face, rather than my face down to my work area. The french link isn't for anything structural, since in this case you don't NEED the extra support, I just like it :3
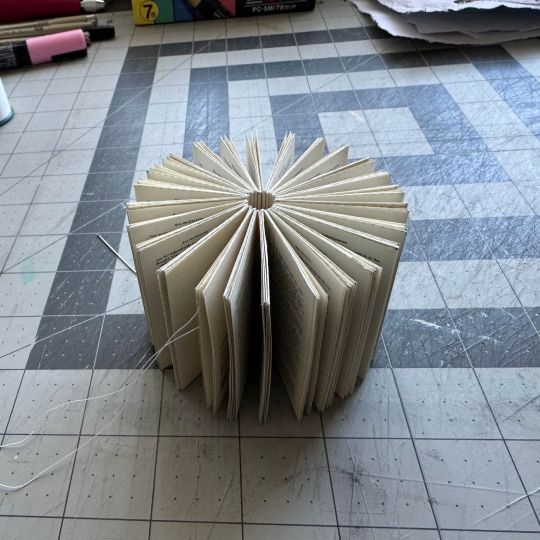
And then you're sewn baybee!! If the book is long enough it will also curl backwards on itself and make a little book sphincter.
Your thread is the reason your textblocks swell while you sew, and one thing to note about sewing your tiny book is that the swell is a bit of a different beast. The thickness of the thread + number of signatures = your swell. You can normally augment the amount of swell by using a thinner thread, but that risks the integrity of your book, OR you can make a typesetting with fewer pages, OR you change the folios of your signatures, thus making more or fewer signatures, thus influencing how many passes of thread will be in the final product. To spell it out,
A 20 signature textblock has 20 passes of thread, giving you 20 increases of volume. But let's say you don't want to do the added construction of rounding and backing, etc etc. So you change your 6 folio signatures to 8 folios, and have 5 fewer signatures as an end result.
Thus, your 15 signature textblock now has 15 passes of thread, giving you 15 increases of volume. This is less swell than 20 signatures, we can agree.
This is not a possibility with this tiny book configuration. If after you sew your tiny textblock you feel there is too much swell for your tastes, and would like to change that somehow--you can't. At least, not in the capacity we can with a regular book. The 3/3/4 folio Little layout of the Renegade imposer is immutable. The only way to influence your spine swell with making tiny books with this method is to use a thinner thread (one option is not doubling your thread, as I do), or have fewer pages in your typeset. But really truly, with using cotton sewing thread the swell is nigh negligible. It isn't noticeable at all until you're crossing the 150-age mark, in my experience.
Okay I'm up to 22 pictures. Let's see if we can cover step 4 in 9 pictures or fewer.
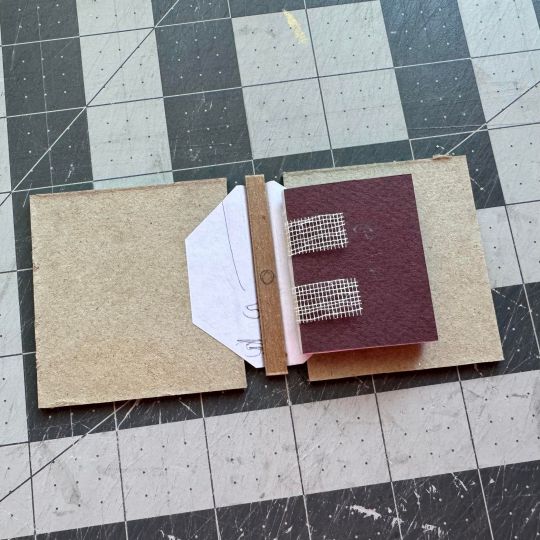
4, pt. 1- Gluing, and Rounding/Backing
The laws of gluing a tiny book are few.
1 - You glue it.
2 - Don't forget your endpages.
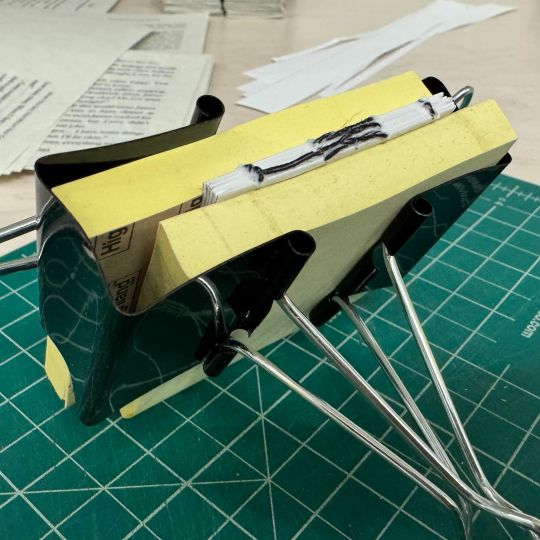
Here I am doing it at work with binder clips and sticky note pads for support.
To your discretion, feel free to omit or add mull along the spine as you feel comfortable. There may be times where your tiny book is weighty enough that you worry it will still tear at your endpages. As these tiny books aren't going to be read so regularly or vigorously, this is less likely to happen, but not impossible, I suppose. I like to add it regardless of the weight of my textblock because it makes me feel fancy, and like the book is wearing tiny underwear. Although since it's more of a specialized support garment, maybe we call it tiny jockstraps. The good news is you can save the mull offcuts from your regular books and use them here on your tiny ones.
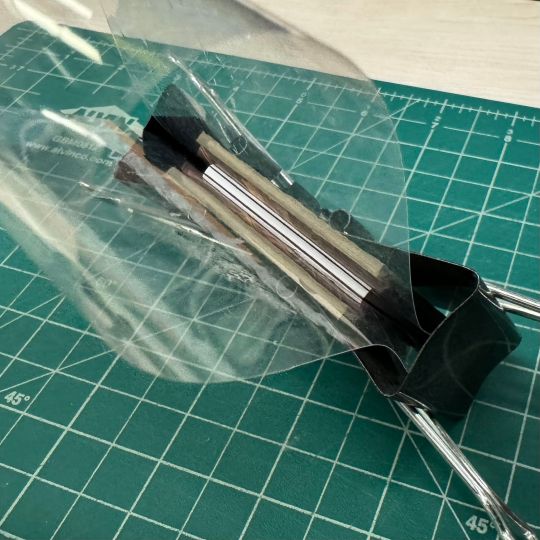
That's mostly all there is to say on the matter of gluing your tiny book. Another way to hold the book while gluing is to use a wood clamp, with the textblock sandwiched between some sturdy bookboard for support. Here are some tiny books of mine hanging out in my quick-grip clamps.
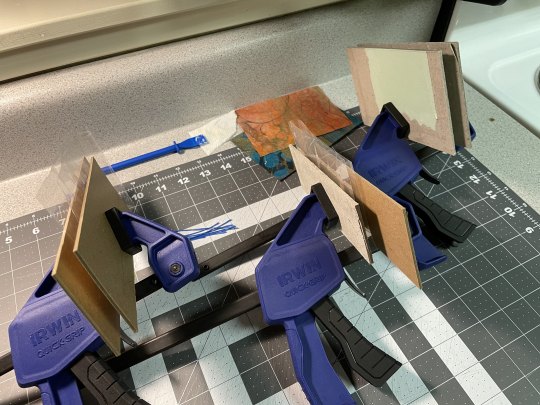
Any way that you can hold the textblock in place while the glue dries is the correct method. You likely won't have much luck with your regular pressing methods, being so large in comparison, but any small object of decent weight will work!
When it comes to rounding and backing, the same adage applies--these tiny structures are not load bearing. It is not necessary, but it is sexy! This requires us to talk about a few things in tandem, those being what material you will use for the covers in your tiny case, and your book hammering tools.
Normally, the function of rounding is a means to compensate for the swell of the spine, and the function of backing is to provide support for the rounding by way of 'shoulders'. These shoulders must be the same width as the thickness of the bookboard you are using in your case, so that they may rest on them. It is possible to round the spine without backing, but not advisable--those shoulders you're beating into your textblock are the only thing besides your endpages holding the weight of that textblock up. Without these shoulders, over time, as gravity does its thing, your textblock will sag, and it will tear at the joint of your endpages and you will lose your rounded spine. Double homicide.
As our tiny textblock weigh maybe a few ounces it's not imperative they have shoulders. Rounded the spine to accommodate the swell can be adequate. Gravity will not be so cruel to them, and you likely won't lose your rounded spine or tear at your endpages. But we work full-time at the Too Much Factory, so we're gonna round AND back our tiny books.
The process in practice isn't altogether too different from rounding and backing a regular book. I for one don't really use a hammer to round my regular spines, and they also aren't necessary for tiny books. Just use your hands, our grubby little fingers. For backing, however, I have to take a brief detour and talk about bookboard first, because as with regular books that will determine how thick we make our shoulders.
I have a few photos to show how it will look to use different thicknesses at this scale. On hand I have three different stuffs:

On the left we have two sheets of cereal box cardboard, with the glossy paper sanded off and glued together with PVA. In the middle is 2mm thick chipboard/Davy board (as they are comparable), and on the right I have salvaged 4mm thick Davy board, that I saved from some old encyclopedias. The comparison photo is slightly blurry, it decided to go out of focus literally as I hit the shutter :(
Anyway this is how they look actually used in little books.
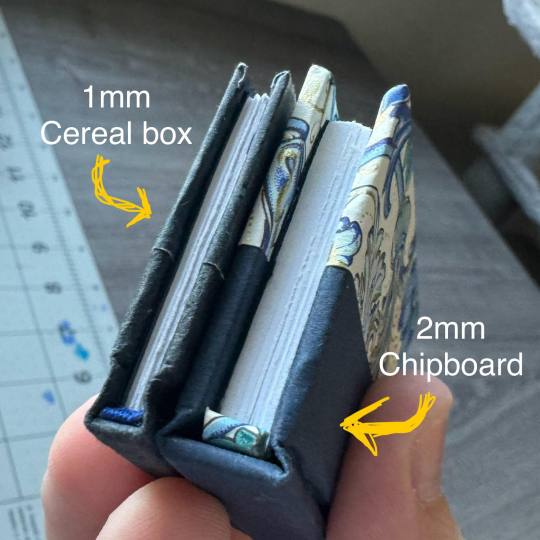
As you might be able to tell, the 1mm is plenty, and the 2mm leans towards a little chunky, though I think that one is my personal preference. I haven't been brave enough to experiment with the 4mm board yet, so I don't have an example image, but it might be excessive.
You might come across a particularly tasty piece of board that is very thin and deceptively sturdy, maybe something the bristol board equivalent of a brown board, and you might think, this would make for perfect tiny book material. It's ultra thin, yet feels sturdy. That is the devil talking. Put the thin-ass board down and walk away.

Like, maybe you think that looks fine and you'll be happy with the results? I only bring this up for caution's sake, that I've found it way too thin. The scale might be appropriate but the finished product loses a lot of its definition and novelty appeal, to me. And even heeding the grain direction of the board my corners curled in on themselves pretty badly. So I recommend sticking with the cereal box board or 2mm board.
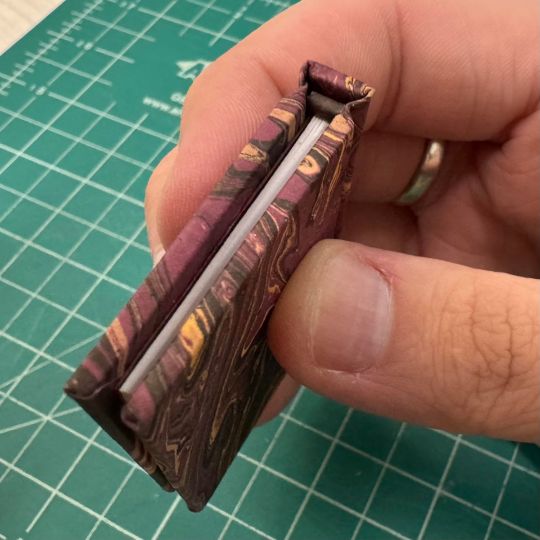
Anyway we were talking about backing. Decide what you'd like to use as your bookboard, measure the thickness, and get out your finishing press and backing boards. Like you would regularly, fit the tiny book in the backing boards, sticking out from the top juuuuust slightly more than the thickness of your board. Here, rather than using a hammer, I suggest using just your bone folder, and letting the residual tackiness of the glue on the spine do the work. Placing the flat of your bone folder on the spine of your tiny book, run it down the sides, and bend the outermost signatures over the backing boards. This is what would normally be done by the force of your hammer, however I've found the hammer way too large a tool for something this small, and only made mince meat out of my book rather than shoulders. Forming the shoulders with the bone folder in this way was actually quite easy, with these smaller signatures, and didn't take much force as all. Use another layer of glue to solidify the shape and let it dry, preferably overnight, or a few hours at least. You will hopefully arrive at something like this:

(Ignore that this one was sewn on cords and not as I've been describing, this was for a specific project.) Not the most perfect execution of backing a book but we got shoulders baybee! And something this small, this result will be just fine. You can even do some spare manipulation by hand after the fact--you are stronger than this tiny book.
You'll never believe it but I've run out of picture space. The rest of step 4--endbands--will be in the following post, here 💃
105 notes
·
View notes
Text
Tiny Book? Tiny Book. Pt1.
Idk yall I just felt like writing a little how-to of how-I-do my tiny A9 books! So if you've ever been interested, I hope this will be helpful. This will be neither a beginner typesetting nor beginner bookbinding tutorial; as I go through my process I will only be showing my process and providing a few tips, assuming you already have the basics understood. We can worry about the rougher technical skills in another post.
Also keep in mind that this guide includes images of fic I've bound, and you're zooming into these fics at your own discretion. I am not responsible if you read something yucky. I know you have a lot of options out there but thank you for flying No-Name Publishing.
Tiny books part 2; Tiny books part 3

Just like with regular ficbinding, there are layers, and they are:
1 - Typesetting and Imposing
2 - Printing
3 - Cutting, Folding, and Sewing
4 - Gluing, Rounding/Backing, Endbands
5 - Building the Case and casing in
6 - BOOK
In this part we will be focusing on steps 1 and 2. Please feel free to skip to the area you're interested in most.
1 - Typesetting and Imposing
Okay, so this area has some nuances that you don't have to consider so closely with typesetting for more traditionally sized books. To me, these tiny books are not about readability, they are about novelty. As such, I do not prioritize readability. Instead, I try to achieve something that is closer to scale. That said, neither do I want these illegible. But we'll begin from the top.
You want to make a tiny book, but you're wondering, what would be an appropriate word count for a tiny book? Tiny books are the perfect medium for the ficlettes, the shorties, the one-shots. They are also perfect for the mid-sized, 10-15-20k fics, in my opinion. Here we can see,

On the left we have a fic that is exactly 12,771 words, typeset on a 1.5" x 2" (37 × 52 mm) document, with .3" margins, 6pt Garamond font, and 5pt line spacing. This book is only approaching 1/2" (13mm) wide, and only took 5 sheets of Letter paper to print.
On the right we have a fic that is exactly 1,939 words, typeset to the same specifications. This book is only 4-5mm wide, and took only 1 sheet of Letter paper.
In my opinion this format of book begins getting unruly around the 300-page mark. However, making any combination of margins, fonts size, and line spacing will yield different page results for different word counts. For example:
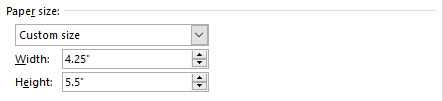
Like the above, in each of these examples I typeset in Garamond font @ 6pt size and 5pt line spacing. Typesetting on an A9 page, this is about as small as I felt comfortable sizing my font while still being legible. But notice the rivers between the words--the rivers of white space bisecting the lines, due to the Justified alignment battling the admittedly tiny work surface. At this scale, with the font at this size and alignment, those will be unavoidable. Over time I began disliking this in my own work, so I pursued a different method, which was typesetting on a quarter letter page (4.25" x 5.5" / 108mm x 140mm), and allowing my imposer to scale the PDF down.
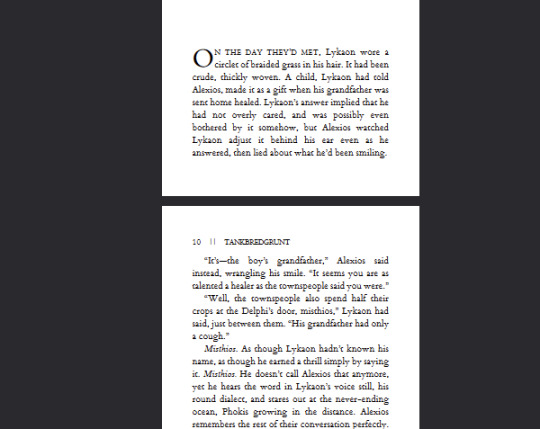
Have you ever seen anything sexier. THIS looks like a tiny book. Little to no rivers, still legible (hand-wobble), and preserves the novelty feel that I desire from a tiny book. This method of scaling down (specifically from quarter letter to A9) does change the final shape of the book, from A9 to A9-ish in this case. Specifically, from 1.5"X2" (37 × 52 mm) to 1.625"X2" (41.3mmX52mm). You're achieving something closer to a square shape, which is delightful to hold.
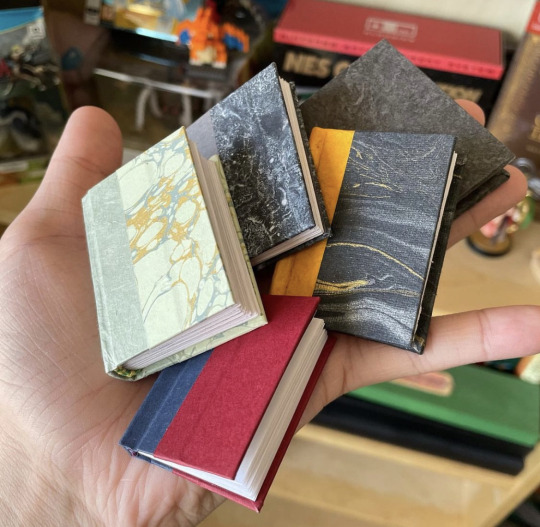
All this to say, you have some freedom with word count, with font size, with page size. I've done as many pages as 376 and as few as 17. The fantastic thing about tiny books--their structure will not be load-bearing, meaning--the only thing stopping you are your tastes.
Quickly, some more examples of features in a regularly sized typeset and their tiny counterpart after the imposer has scaled them down. First, scaling half-letter down to A9, a little-over 4X shrinkage:
And from B6 to B9, smaller by 3x:

You notice the compression of every element, and too how entirely unparcable the text in the first example is, sometimes not horrible, sometimes very. Make your decisions dependent on your tastes!
You have decided on the fic you'd like to bind into a tiny book. I will be using my own fic as the typesetting example, and I will be using Word 365 for PC. I'm sure many of my pointers during this process might not apply 1-to-1 if you are using a different word processing software, but hopefully you can adapt the concepts to your program of your choosing.
Kay, next you will do your typesetting. Since this is not a typesetting guide I'm trusting that you have your preferred methods, but I will go through my key steps for setting up a tiny typeset:
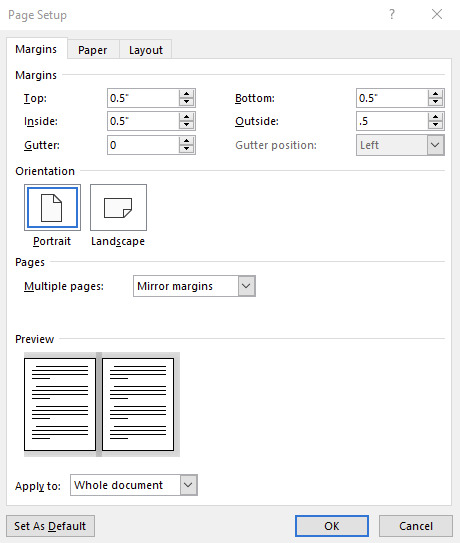
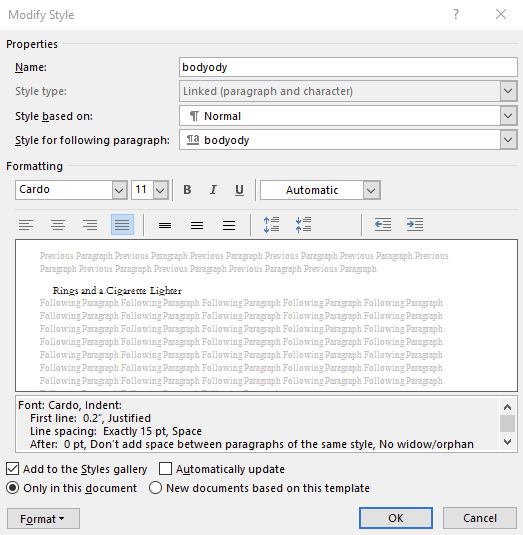
First, for every typeset I delete each default Style, create mine own, and dictate the document size. For this example I will be doing my preferred quarter letter method, setting the custom page size to 4.25" wide and 5.5" tall, and .5" page margins all around (except Gutter; leave 0"). On the Multiple pages dropdown I will select Mirror margins (however, as all my margins are the same size, this is redundant, though may not be the case for you). My body text style will be Cardo font @ 11pt size and Exactly 15pt line spacing, with a .2" first line indent and Justified alignment.
You can use whatever body font you like, I only encourage you to do many many test prints to refine your preferences. Your favorite font for half-letter books might not translate to tiny books. After ~30 tiny books I've found I like Cardo at this size and spacing. And if you're using A-paper sizes, consider doing quarter A4 instead of quarter letter, which is technically A6--4.1"X5.8", or 105mmX148mm. Follow your heart~~nyah 🐱♥
Now I will go to my fic and download the HTML file. I hugely prefer copying from the HTML file rather than the browser itself. It kind of standardizes any goofy formatting that might try to make its way over otherwise, while still preserving the italics and bolds, etc, and makes for an easier editing process. It was important I made my body Style in Word first, so that once I paste the text into my document that Style is automatically applied in one fell swoop (if not, you can change that in your Word settings. Advanced -> Cut, copy and paste -> Merge Formatting. It is a huge time saver.)
Now you've gone through your typesetting process, you have a liddle quarter letter Word document that you're happy with. Gets real close to you. Listen to me--listen, you're going to Export as PDF. Not Save As PDF. Not Print to PDF. Export. It's in--listen--it's in File, then Export, then Create PDF/XPS. You need to Export. Especially if you selected Bookfold instead of Mirror margins in your page settings because we need an unimposed PDF in order for this to work right and exporting to PDF is going to solve 99% of your pdf formatting woes with Word. Okay, I love you 👨❤️💋👨
Now, your EXPORTED pdf should look something like mine. Straight, unimposed.
Now what we're going to do is take this PDF back to my penthouse and freak it. Go to this link for the Renegade Bindery-created and -curated imposition tool. This has been will be is such an incredible FREE asset to you, maintained by a crew of intelligent, skilled Renegade Bindery members who understand the importance of community and accessibility. If you find someone hiding this link behind a paywall of any kind it is not with the creators' permission, so shame on them.
Anyway I will be assuming that you know what imposing your document means. If you've never used this site before, it's very straight forward, and here are my settings for making Tiny Books.
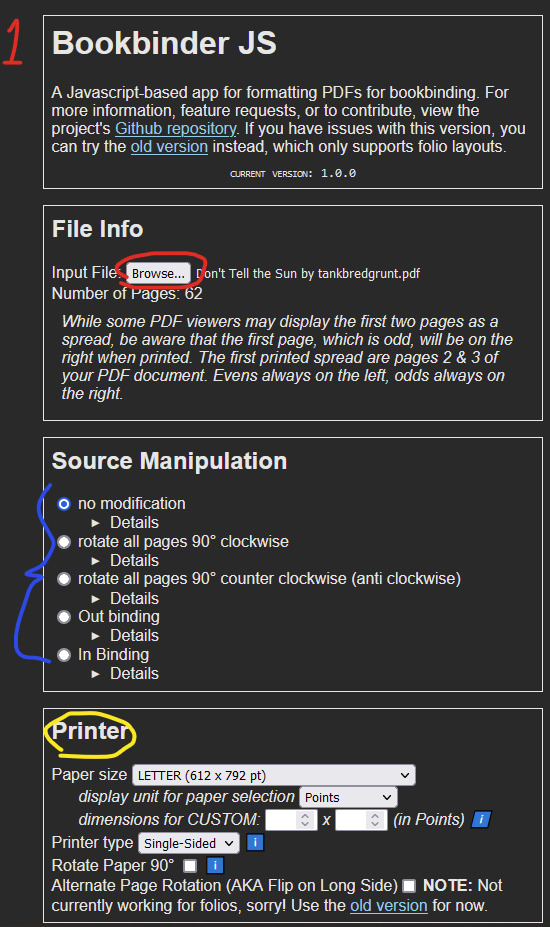
1 - Upload your unimposed exported pdf.
2 - ignore
3 - Select the paper size you will be printing on. This is not the FINAL size of the book, this is what paper you are printing on. These instructions are for Letter sized paper. Don't change any of the other settings right now, I will explain more about the Single-sided vs Duplex option in a bit.
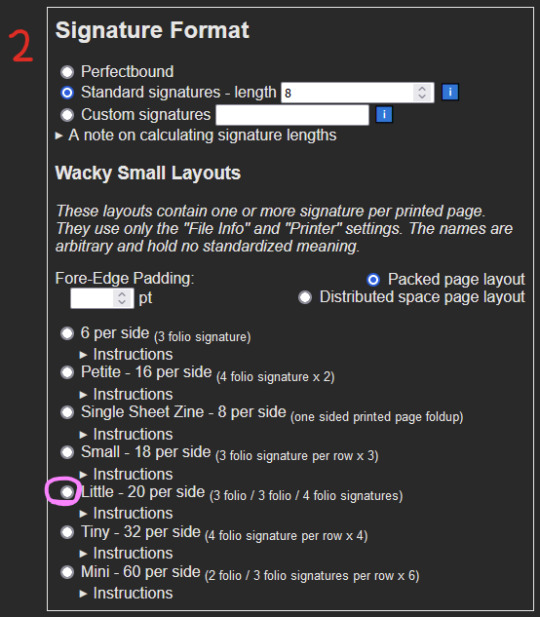
4 - Skip aaalllll the way down to Signature Format. Under Wacky Small Layouts, click on the bubble next to Little. You'll notice there are a lot of options here. I encourage you to play with these settings later on as well, there are so many things you can make with this tool.
Once that's done, scroll down to the very bottom. You'll see the Signature Info area, telling you the results of your imposition. In the case of using the Little option we've selected, 1 sheet of our paper will make 40 book pages. 3-signature-sets of 3/3/4 folio configuration. That's a lot of pages per page.
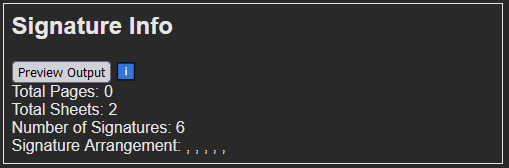
Anyway for our document today it will cost us 2 sheets of Letter paper, and will make 6 signatures. Math says that's 80 pages. Now, you may be concerned because your typeset PDF is not formatted in a number equally divisible by 40. And why would it be. The imposer is doing that math for you in the background, organizing your pages regardless. In my case, my finished typeset is 62 pages, which means that from my second page, I will only be using my 3 folio segments, and discarding the 4 folio segment. This will make more sense later. Click the Generate button, and save the zipped folder wherever you want. Don't change the name of it.
Unzip that baby, and inside you'll notice 2 files--(filename).pdf_little_packed_backs, and .pdf_little_packed_fronts. Appropriately named as one file contains one side of the sheet that will be printed, and the other file the other side.
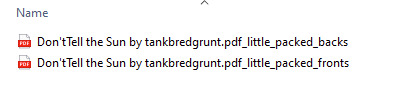
And when you open them up, they will look like:
2 - Printing
We are manually duplexing this bad boy, because working at this scale amplifies and compounds every millimeter of difference. Manual duplexing will keep printer skew to a minimum, as the printer will not have to perform gymnastics in order to print on the reverse side of your page. Here are some examples:

Two auto-duplexing examples of skew, one horizontal and one vertical, dependent on which direction my paper was loaded into the feeder. There is significant skew. Not a horrible issue on full-sized books but these will matter much more on our tiny books, the key issue being that we do not have much to work with in the margins department. Trimming 5-6-7mm of margins of your half-letter sized textblocks might not be much of an issue; however, here, in order to remove all the trim lines during the cutting process, you will be significantly impacting the margins of your tiny textblock.
Now here is an example of the skew from manual duplexing:
MUCH subtler. Your skew with manual duplexing will range from this--less than .5mm--to no skew at all, and you will have to cut off far less of each page to remove the trim lines, maintaining the consistency of appearance of your tiny, beautiful pages. This is why during step 3 of the imposing process we selected Single-sided (which is MANUAL duplexing), and not Duplex (which is AUTO duplexing) appropriately. This will result in you either getting two files for manual duplexing, or one auto duplexing file.
Your next consideration when it comes to printing your liddle book will be whether you want to use an inkjet printer or a laser printer. I've until recently only had a laser printer available to me. I can say after about 6 or 7 little books on an inkjet printer that I prefer the laser printing on tiny books. Here is an example of why:

On the left you have a tiny book printed from an inkjet printer printed on the highest quality setting, and on the right is a tiny book printed from a laser printer. These were both printed at the same scaling, same font size, same line spacing, everything. The inkjet printer, printing at this scale, introduces pretty glaring feathering on the letters, whereas the laser printer is crisp as can be. I've said before that to me tiny books are more for novelty rather than readability, however I do still want to make out the word I'm looking at, you know what I mean? For this reason I prefer printing my tiny books from a laser printer. Use what you got though, you'll get a tiny book regardless. Make sure you're flipping on the short edge with these tiny books too, and double check to make sure your page numbers line up. And when you're done you got...
BOOK(-adjacent).
Continue on to part duex.
230 notes
·
View notes
Text

Howdy yall, I’m hoping to stand on a soapbox for a second and encourage folks not to do this.
For context, the author of a fic I hoped to bind and gift a copy of did not share a social media username with their ao3 account, so I left a comment on the fic asking after the best way to contact them privately. This person has replied to my comment soliciting commissions of this and other works. They will be disappointed for two reasons: 1) I do not take commissions, as I only make personal copies or for the author of the work, and 2) this is hugely disrespectful to the author.
The author is going to get a notification that someone has commented on their fic, perhaps excited for feedback or communication, and find that it’s… this. Someone hoping to commercialize their work. This person as the commenter needs to understand the position they’ve put both the author and myself in by making this comment. Me, because my request for the author's permission is now a place through which people could abuse the author's work, and the author, standing on the side while they see this person reference them in the third-person on the work itself. That was not the function of my original comment to the author, so don't do shit like this to them.
14 notes
·
View notes
Text
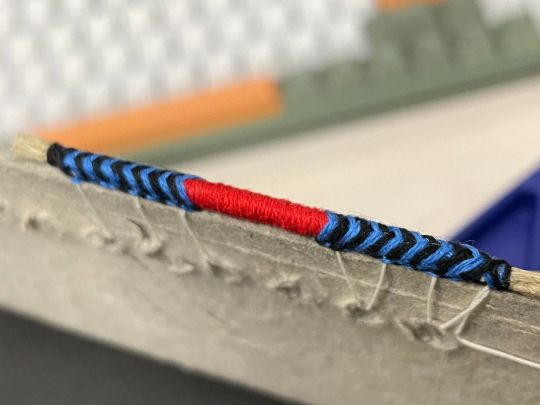
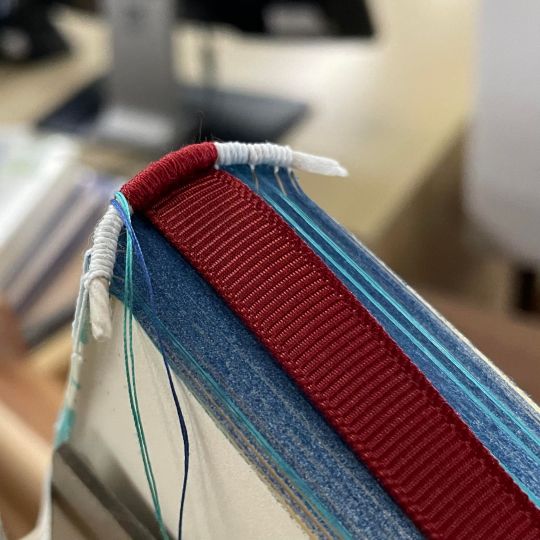
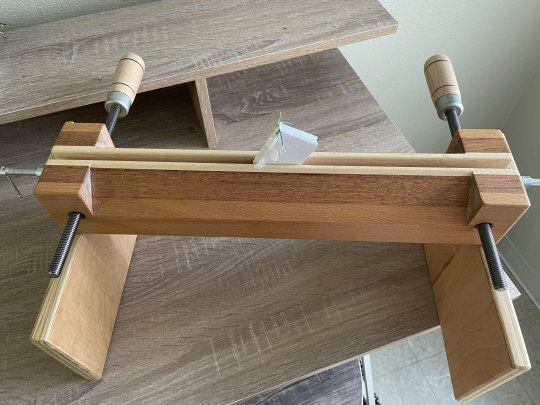
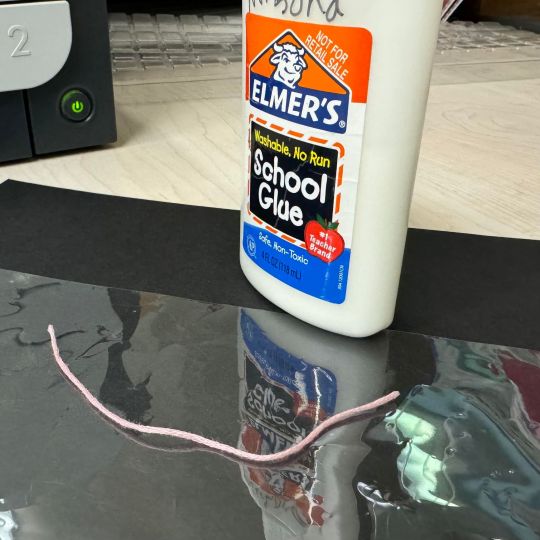
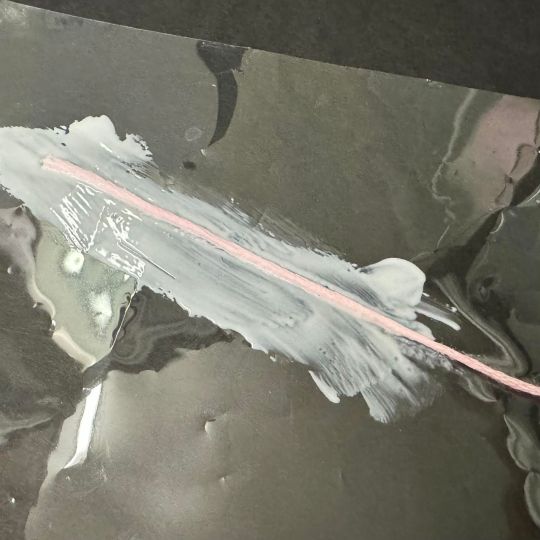
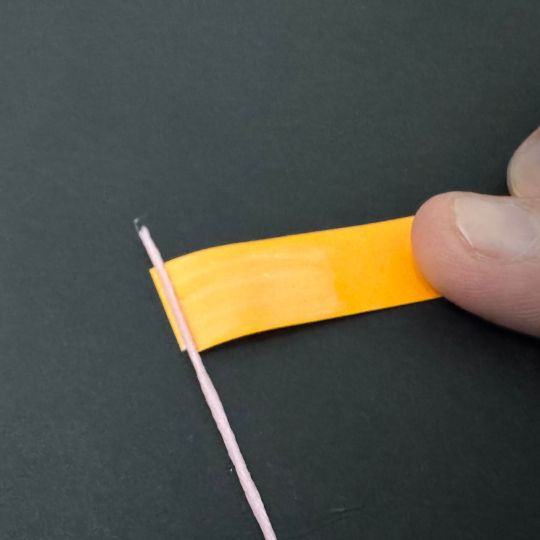
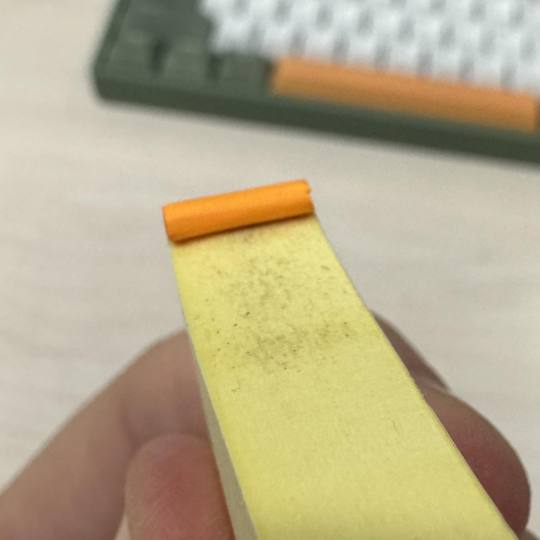
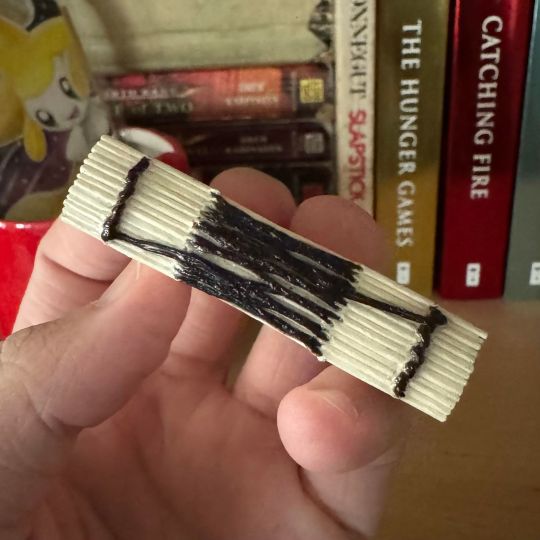
How to sew a front-bead endband! ✨
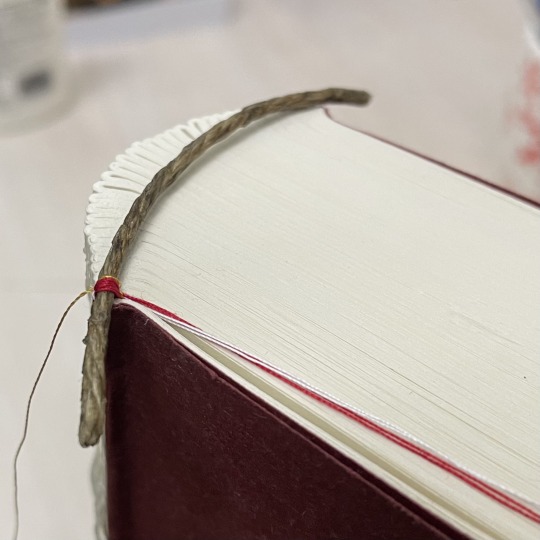

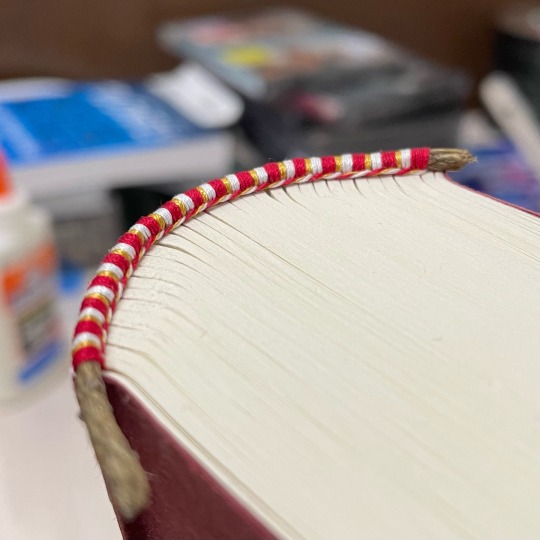
And you’re done 🙌
475 notes
·
View notes
Text
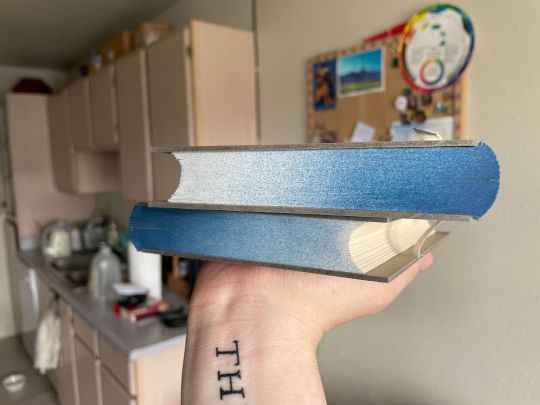
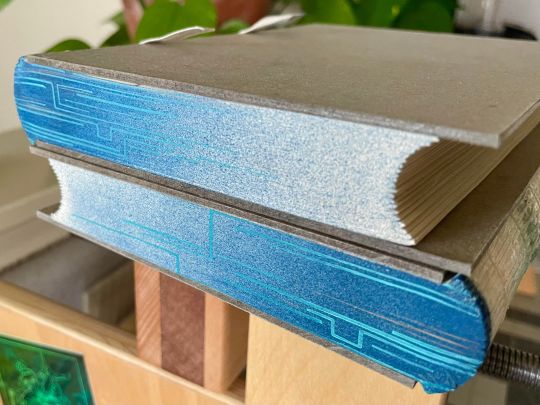
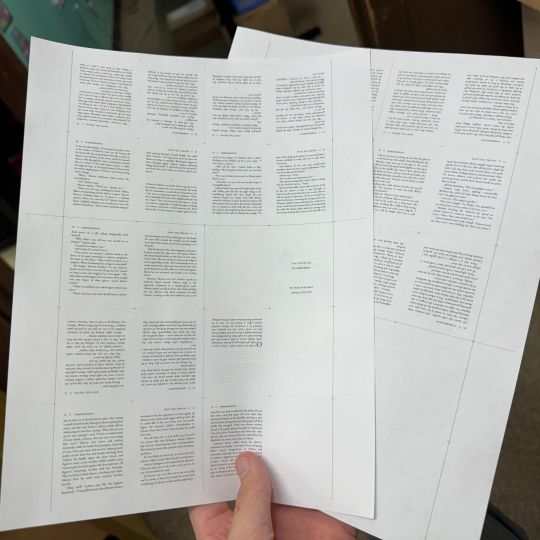
And it printed like a dream 💋👌
My hands looks like this

So hers can look like that

192 notes
·
View notes
Text
My hands looks like this
So hers can look like that
192 notes
·
View notes