#Hardware and Fasteners Supplies
Text
Maximizing Efficiency with Hardware and Fasteners Supplies
Hardware and fasteners supplies are essential components that form the backbone of various industries, including construction, manufacturing, automotive, and aerospace. From bolts and nuts to screws and washers, these small yet indispensable items play a crucial role in assembling and securing materials and structures. Let's explore the significance of hardware and fasteners supplies and their impact on industrial processes.
Exploring Hardware and Fasteners Supplies:
What are hardware and fasteners supplies?
Hardware and fasteners supplies encompass a wide range of components used for joining, fastening, and securing materials together. These include bolts, nuts, screws, washers, rivets, anchors, and more.
How do hardware and fasteners supplies contribute to industrial processes?
Hardware and fasteners supplies facilitate the assembly of machinery, equipment, vehicles, buildings, and infrastructure, providing structural integrity, stability, and reliability.
Where are hardware and fasteners supplies commonly used?
Hardware and fasteners supplies find applications across diverse industries, including construction for building structures, manufacturing for assembling products, automotive for vehicle assembly, and aerospace for aircraft construction and maintenance.
Importance of Hardware and Fasteners Supplies:
Structural Stability:
Hardware and fasteners supplies provide essential support for maintaining the structural integrity and stability of assembled components and structures.
Efficiency and Productivity:
By enabling quick and efficient assembly processes, hardware and fasteners supplies contribute to increased productivity, reduced labor costs, and faster project completion times.
Versatility and Adaptability:
With a wide variety of types, sizes, and materials available, hardware and fasteners supplies offer versatility and adaptability to accommodate different materials, applications, and environmental conditions.
FAQs:
What factors should be considered when selecting hardware and fasteners supplies?
Factors to consider include material compatibility, load-bearing capacity, corrosion resistance, environmental conditions, and installation requirements.
Where can businesses procure reliable hardware and fasteners supplies?
Businesses can procure hardware and fasteners supplies from reputable suppliers and distributors specializing in industrial components, such as Unlimited Fasteners.
Hardware and fasteners supplies are indispensable components that form the foundation of various industrial processes. For businesses seeking high-quality and reliable hardware and fasteners supplies, suppliers like Unlimited Fasteners offer a comprehensive selection of products and support services to meet diverse industrial needs with efficiency and confidence.
1 note
·
View note
Text
Safety Gear and Equipment in Greater Noida
Step into our store and explore a wide range of hardware and sanitary products that cater to both residential and commercial needs. From essential plumbing fixtures and bathroom accessories to tools, fasteners, and construction materials, we offer a comprehensive selection to meet diverse requirements. Our curated collection showcases products from reputable brands, ensuring durability and performance.
#hardware store in greater noida#diy tools and supplies#home improvement materials#plumbing and electrical supplies#paint and painting accessories#gardening tools and equipment#nuts#bolts#and fasteners#construction materials#power tools and machinery#safety gear and equipment
0 notes
Text
prefacing this with I'm not necessarily punk, but I like customizing my clothes. and i wanna help other people find stuff for battle jackets! (and other stuff) I'm not the authority on this, but I still want to give my two cents!! also don't expect much more to this, my profile is pure cringe.
If anyone is starting out and I can help, I'd like too!!
The spike/stud dilemma
one of the biggest issues i've noticed is "where do I find studs/spikes without fast fashion??" which is totally fair. something like that shouldn't have to be a minefield. obviously if you buy from a small business that re-sells them from aliexpress you're still indirectly supporting aliexpress.
im sure there ARE slow fashion alternatives and if anyone knows some please let me know so I can add it!!
BUT here's what I'd recommend.
-goodwill bins, sometimes they have old clothes or broken belts, very rare though. also any thrift store or reclaimed craft store.
-Local businesses, sex shops
-metal paper fasteners
-borrowing. it's inevitable, I know. JOANNs is definitely the best selection imo, but Hobby Lobby is better to steal from. Because They are Terrible. Michael's is OK but less selection usually. They use peal off tags usually which are easy to remove.
-also if you're feeling extra insane, hot topic uses mainly ink tags, which can be removed with heat (look up tutorials on) or just cut off a stud/spike belt. their studs are pretty easy to remove. same with bracelets, they break a lot. ofc it depends on the place whether they use beep beep tags.
-ask people for broken shit!
TEXTILES (the easy part)
-fabric samples are easy to find for free online. get whatever colors you want, i usually stick to black, white, grey and 1-3 other colors. they're usually pretty small so order around until you find the right size. you want cotton and linen, usually upholstery if you're painting on them. if you're not or you're ok working with leather, leather is easy to find too. A lot of companies mentioned how stretchy your material is something not stretchy most cases.
-FACEBOOK!! A.K.A the boomer method. This is where I got almost all of mine!! I recommend downloading FREEBIE as well! I got mine thru that, it links to facebook, nextdoor, and so on. Ofc you can pay for them- but you don't have to! I have lifetime supply of textiles basically bc of this. A lot of people get them for hobbies or work.
-the goodwill bins!!!! you can absolutely find fabric there, it's pretty common actually
-you don't need to steal this tbh it's easy to find second hand and less wasteful
PAINTING
-Facebook, goodwill, or reclaimed/used craft stores if you have them
-borrowing (same places)
-use something like Painter Eye (AR tracing app) and draw out any complex band logos etc.
-you can also use sharpies or whatever nobody's stopping you
Other stuff
-one of the best ways to find stuff is just GO FOR A WALK! Find little shiny objects!
-hardware stores are good so are army surplus
82 notes
·
View notes
Text
switchplate covers update/tutorial
So the thing to keep in mind with this is that we gotta see how well the wear. A switchplate cover is a pretty high-traffic thing, and subject to a lot of wear. If these get too dingy I'm absolutely going to have to go buy fancy ceramic ones or something.
But. That said. Here is my final result, and below the cut is how I did this, partly because I want to remember how it worked LOL.
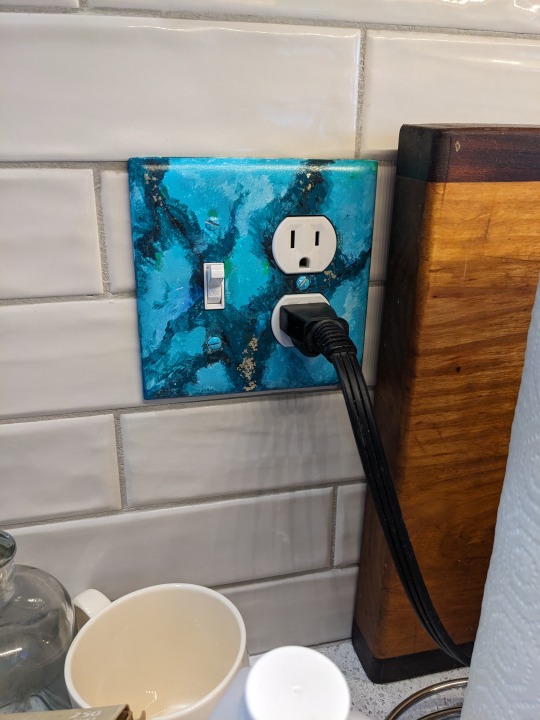
[Image description: A combo lightswitch/outlet with a black three-prong plug plugged into it, set into a white subway tile wall with a wooden breadboard leaned against it. The plate cover is painted with a mottled effect to look like a turquoise gemstone, complete with inset glitter to mimic the pyrite inclusions found in some raw turquoise.]
A better view of the glitter:
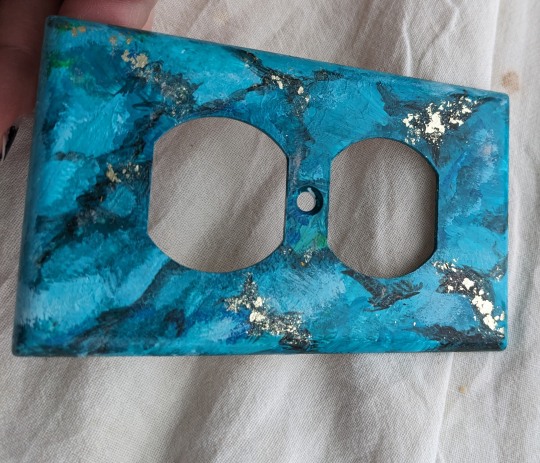
[Image description: Another turquoise-painted outlet faceplate on the background of a rumpled white dropcloth, my fingers visible tilting it toward the light so the flake glitter catches the light from the window.]
So I searched up for tutorials and found a few, each of which was like "can't believe nobody else has done this"; I'm sharing the most helpful one here. What was thee very most helpful thing, though, was the writer's pointing out that many different configurations of turquoise exist, so you can just pick a reference image and build off that. I did not in the end come very close to my reference, but decided instead to make it look sick as hell. LOL. I was just having too much fun doing whatever I wanted. So these are not super realistic! But then you wouldn't... make an outlet faceplate out of real turquoise, so I felt like I wasn't fooling anyone. Anyway--
How To Paint Faux Turquoise.
So the first thing I did was find some very fine-grit sandpaper (I think I got 320? I found a mostly used-up sheet of it in the basement and just used the unused edge from where it had been fastened around a block, LOL) and went over the whole front surface of each plate I was going to paint, and then I washed them with dishsoap and hot water and dried them with a dish towel, because I figured finger grease, hand dirt, and sanding dust would keep the paint from sticking. I started with white plastic ones, the kind you get for up to a dollar at the hardware store.
Then I got a plastic container lid, put dollops of various of my paint samples in it, dug out the craft paints I got cleaning out Auntie's basement and the sole tube of acrylics (Mars black) I could still find from the last time I did any painting, and went to town. The first couple, I did the pale shades and let them dry and came back to add the darker marbling. But then I was like, these are latex/acrylic, you don't have to build them in layers? So I just did the rest of them with all the shading in more or less one pass.
Acrylic art paint and latex housepaint are both water-based, so there's no conflict with using them intermingled. I've combined them before, I used to do a lot of sign painting and it works fine. Housepaint's runnier, idk. Don't mix oils and latex, is the thing to keep in mind; they just don't stick to each other real well.
I went to the art supply store to get some water-based varnish, because all i had was polyurethane and that's oil-based. It'd probably work as a topcoat but I was worried and the internet's advice conflicted. I wanted to go get better glitter anyway, so I did. I happen to live near Hyatt's All Things Creative, so I take every excuse I can get to go there.
I bought some sick-ass glitter (over in the resin pouring section, hell yes), and puzzled thru the various offerings. (@sassaffrassa's advice proved invaluable on this thank u.) I got just-- "Gloss varnish acrylic medium", the Hyatt's brand, for four dollars and sixty-nine (nice) cents, and then because I was feeling spendy, I also bought Krylon spray-on glossy varnish. Belt and suspenders, y'know? Also to make the brush strokes less obvious.
The critical thing, though, about the gloss varnish, is that it says right on the bottle that you can either incorporate it into the paint as a medium to enhance the sheen, OR brush it over the finished work as a protective coating. Dries absolutely clear. So I knew, THIS is how I'm attaching the glitter. I'd been thinking like, mod podge? elmer's glue? mix it into the paint? No.

[image description: the gloss varnish bottle. It is this product. The relevant text says "can be used either as a medium to enhance the sheen levels of acrylic paint or as an over-varnish on finished artwork to provide a non-tacky, protective gloss coating".]
So I carefully got open the little bottle of glitter (no sneezing! it was "white gold flake" style and cost eight bucks for like half a gram. to my knowledge it's not actually made of gold but it was priced like it was) and painted little fine patches of gloss varnish onto the spots I wanted glittered, and then used tweezers to apply glitter just in those spots, and mooshed them around with the little varnish-covered brush until they stuck where I wanted them. (I put them on the darkest bits of the veining, because that was what my source image looked like, mostly. I wanted to be really liberal but then I thought, no, a little pop of glitter is more exciting actually. Still not sure, but it does look good so. They say measure that shit with your heart but I went light because I figured I could add more later, and then I didn't.)
Then I came back at the end and painted more gloss varnish just over the glitter, just to make sure it was all really stuck down and wouldn't flake off with wear.
Let that dry for a couple hours, then used a larger brush to spread gloss varnish as evenly as possible over the entirety of each plate. It did leave visible brush strokes, which I didn't mind. The art shop guy suggested using a really soft brush to minimize that, and I was like "yah sure ok" but then, well, I didn't, I just used the brush I had.)
But then I let that dry overnight, and in the morning I put the plates all in my giant overspray cardboard box, and gave them each a liberal coating of the spray varnish. (Yes of course I have a giant cardboard box I keep in my basement to spray paint things in. I know it says use in a well-ventilated space but what I do, see, is I do that and then I leave the room, which is almost as good. LOL it's 24F and snowing I'm not doing it outside.)
That bottle says two hours until handling on it, so I left it two hours, and then I put up the plates that were in spots where the painting was done or wasn't happening, hence my example image being against a tiled wall.
The screwdriver immediately scratched the first one a little bit, but not super obviously. But I kind of would expect a screwdriver to scratch just about anything, so that doesn't mean much.
I won't guarantee how well these'll hold up but if you were interested in doing something like that, there's how it worked. (Hi, future me, you're welcome for writing it down lol.)
I'm sort of sorry for no more process pictures but honestly most of it was following whimsy and doing what I felt like and kind of drawing on what I hadn't realized was a lot lot lot of hours of past paint-handling in my life, so pictures wouldn't help anyone else recreate this. But it did remind me that I love to paint and should do that more. So, I'll try, I guess.
40 notes
·
View notes
Text
transforming soffits
reorganizing keys
formalizing immersion joints
justifying kick extractors
advising aggregates
managing elbows
recasting connectors
achieving aluminum trowels
officiating disks
exhibiting absolute spigots
progressing coil hydrants
jerry-building reflectors
informing casters
inventing rubber hoists
performing wrenches
judging chalk adapters
upgrading ignition paths
regrowing flashing
recommending ratchets
approving barriers
sweeping impact fillers
sewing mirrors
detailing collectors
enforcing measures
distributing systems
presenting plugs
interwinding registers
piloting ash diffusers
gathering cranks
supplying eave pockets
undertaking scroll stops
accelerating straps
designing fittings
protecting diamond boilers
logging downspouts
correlating shingles
uniting mallets
qualifying electrostatic lifts
sharing clamps
obtaining circular fluids
ranking foundation gauges
sensing miter brackets
originating space networks
translating drills
regulating guards
selecting gable padding
utilizing pellet dowels
reconciling artifacts
altering pulleys
shedding space filters
determining vents
representing mortar
remaking flash rakers
supporting funnels
typecasting rotary chocks
expressing junctures
resetting auxiliary vises
professing strip treads
inlaying matter trowels
questioning drivers
forming edge fittings
sketching blanks
overshooting spark breakers
rewriting controls
playing tunnels
inventorying buttons
enduring joint handles
effecting ratchet bibbs
unwinding couplings
forsaking vapor conduits
defining sockets
calculating heaters
raising grids
administering tiles
measuring resources
installing ignition remotes
extracting corners
manufacturing ventilators
delegating consoles
treating mounting stones
enacting jig deflectors
intensifying alleys
improvising cargo
pinpointing bobs
prescribing arc masonry
structuring metal chucks
symbolizing lathes
activating plumb kits
adapting coatings
fixing channels
expediting cordage
planning compressors
enlisting hangers
restructuring keyhole augers
shearing ridge hardware
collecting reciprocating bolts
maintaining corrugated dimmers
whetting hole collars
conducting mandrels
comparing assets
compiling sealants
completing paths
composing equivocation wheels
computing dampers
conceiving electrostatic treatment
ordering cotter grates
organizing ties
orienting ladders
exceeding materials
targeting thermocouples
demonstrating emery stock
expanding latch bases
training wardrobe adhesives
overcomming[sic] fasteners
streamlining storm anchors
navigating springs
perfecting turnbuckles
verifying gate pegs
arbitrating arithmetic lifts
negotiating outlets
normalizing strips
building surface foggers
checking key torches
knitting grinders
mowing planers
offsetting stencils
acquiring bulbs
adopting rivets
observing avenues
ascertaining coaxial grommets
slinging wing winches
instituting circuit generators
instructing wicks
integrating pry shutters
interpreting immersion lumber
clarifying coils
classifying wood bits
closing cogs
cataloging matter strips
charting holders
conceptualizing push terminals
stimulating supports
overthrowing shaft spacers
quick-freezing connectors
unbinding ground hooks
analyzing eyes
anticipating gateways
controlling proposition rollers
converting power angles
coordinating staples
correcting benders
counseling joist gaskets
recording gutter pipes
recruiting drains
rehabilitating rafter tubes
reinforcing washers
reporting guard valves
naming freize sprues
nominating rings
noting straps
doubling nailers
drafting circuit hoses
dramatizing flanges
splitting framing compounds
refitting stems
interweaving patch unions
placing sillcocks
sorting slot threads
securing mode cutters
diverting catharsis plates
procuring load thresholds
transferring syllogism twine
directing switch nuts
referring time spools
diagnosing knobs
discovering locks
dispensing hinges
displaying hasps
resending arc binders
retreading grooves
retrofitting aesthetics portals
seeking stocks
shrinking wormholes
assembling blocks
assessing divers
attaining lug boxes
auditing nescience passages
conserving strikes
constructing braces
contracting saw catches
serving installation irons
recognizing fluxes
consolidating fuse calipers
mapping shims
reviewing chop groovers
scheduling lag drives
simplifying hoists
engineering levels
enhancing tack hollows
establishing finishing blocks
13 notes
·
View notes
Text
Okay, folks, time for a quick lesson in "I really don't want my apartment/house to flood silently in the middle of the night."
If you can, go into your bathroom, get on your hands and knees, and locate the water supply for your toilet. Attached to the supply will be a thin piece of tubing. One end will have a metal fastener. One end will have a plastic fastener.
I want you to look that plastic fastener over HARD. Examine it for cracks, dents, and anything else that looks like a warning sign it's about to snap. If you want to be very, very through, turn OFF the water to the toilet and unscrew the plastic fastener so you can really look it over inside and out.
If there is any damage--and I mean ANY DAMAGE--either notify your landlord (If you rent, absolutely notify your landlord and do so in writing), or get your butt down to the hardware store.
Because if that plastic fastener actually BREAKS? And it's the middle of the night? And you're asleep? You may wake up like us and or neighbors on Monday, with THREE FLOORS of flooding (the second floor bathroom in the house above us, the first floor dining room it flooded into once the bathroom was full, and then our basement apartment.)
BTW, the reason you go through your landlord rather than repair it yourself is because if you just replace it, and there's a problem later, and they find out you replaced it, they can absolutely blame you. BUT if you get it in writing that you're making this request (Dear landlord: I noticed that my toilet supply line appears to have a crack in the plastic fastener. Please replace so we can avoid a flood.), and then you HAVE to replace it because your landlord is an asshole, you have the proof you didn't just go about the fix without trying to use the proper channels.
And trust me, dealing with having to play nice with an asshole landlord is still going to save you so much time. Because right now, we're on day three of the post-flood situation, and there's three exhaust fans and a dehumidifer in on 850 sq. foot apartment. And every single piece of vinyl flooring that can come up without taking out cabinets or appliances is up, and we're walking around on concrete. And the bedroom smells like wet carpet, because the carpet got soaked.
Side note: If you ever have flooding to deal with, there are three kinds of water by insurance/cleaning standards in the USA: Clean water (like, if the sink busts). Gray water (any clean water that comes from a toilet), and black water (sewage). If you have carpeting and insurance, the cleaning rules state that in clean and gray water situations, carpet padding is replaced and the carpet itself is sanitized, steam-cleaned, and put back in use. Only in cases of black water does all parts of the carpeting come out.
#flooding#adulting#water#i cannot believe we didn't lose more shit#like it's amazing#all the electronics and books and clothes made it through
10 notes
·
View notes
Text
Double Handle Kitchen Faucet
Compared with the single handle faucet, the dual handle kitchen faucet occupies a larger area, but it is powerful. Its most obvious feature is that it has two handles that can adjust cold and hot water respectively. If there are small children in the family, then the design of this two handle kitchen faucet is safer and avoids scalding when the hot and cold water is adjusted.
At the same time, the double knob kitchen faucet has more room to play in the shape design, so users can configure the 2 handle kitchen faucet according to their own preferences and the home decoration style.
Likegro is one of the China famous sanitary hardware manufacturers, including bathroom hardware faucets, showers, bathroom accessories supplying, and a complete set of the toilet seats. Our team with 30 years of production and sales experience is always at your service.
Types Of Double Handle Kitchen Faucet
Doule Handle Faucet LGFB-2216
How Do I Fix A Leaking Double Handle Faucet?
1:
Fasten the dual handle kitchen faucet, use a wrench to turn it counterclockwise to remove it, and roll the threaded part of the threaded hole outwards five or six times clockwise with wind mark tape.
2:
Check whether the 2 handle kitchen faucet is properly adjusted, and then screw it in clockwise with the water spigot wrench. After the installation is complete, turn on the main switch to see if there is still water leakage.
3:
If the water from the 2 handle faucet is getting less and less, it may be leaking, because the water-stop disk of the faucet is stuck with sand and gravel, it is recommended to find a professional repairer to clean it.
Which Is Better Single Or Double Handle Faucet?
Since the single lever kitchen faucet can be continuously adjusted, it is more convenient to use, but because the flow of cold water and hot water changes at the same time during adjustment, the single handle faucet is suitable for the pipeline hot water supply system of central heating. The double handle faucet is richer in shape and more artistic than the single handle faucet. Secondly, the cold and hot water of the double handle faucet can be adjusted separately, so it can avoid the occurrence of flame out of the gas water heater, so it is suitable for the water supply system that uses gas water heaters and other separate heating systems for households.
https://www.likegro.com/products/double-handle-faucet/

3 notes
·
View notes
Text
Complete Guide on Screws and Their Uses
Screws are easy but critical mechanical components utilized in a massive variety of programs across numerous industries. From manufacturing and production to electronics and fixtures meeting, screws play an essential function in becoming a member of materials collectively securely. In this blog, Fasteners LLP will show how we help make you capable of discovering the precise styles of screws, their uses, and the importance of screws manufacturers and vendors in offering extraordinary merchandise to meet organization goals.
Understanding Screws:
A screw is a threaded fastener with a helical ridge, referred to as threads, wrapped around a cylindrical shaft. Screws are normally used with threaded holes, nuts, or other mating fasteners to create a sturdy and reliable joint. They are to be had in a whole lot of sizes, shapes, and substances to fit unique programs.
Types of Screws:
1. Wood Screws: Wood screws feature coarse threads and a sharp factor, making them perfect for fastening timber to wood or wooden to metal. They are generally utilized in carpentry, furnishings making, and creation projects.
2. Machine Screws: Machine screws have finer threads and are designed to be used with tapped holes or nuts. They are broadly applied in equipment, home machines, and electronic devices.
3. Sheet Metal Screws: Sheet steel screws have sharp threads and are self-tapping, letting them cut their very personal threads into thin metal sheets. They are typically applied in HVAC, roofing, and automobile applications.
4. Self-Drilling Screws: Also known as Tek screws or self-tappers, self-drilling screws function as a drill bit tip that eliminates the need for pre-drilling holes. They are commonly utilized in steel framing, drywall setup, and electric artwork.
5. Concrete Screws: Concrete screws, moreover referred to as masonry screws or Tapcons, are mainly designed for fastening materials to concrete, brick, or block. They characteristic a hardened metal creation and a completely precise thread format for max maintaining power.
6. Hex Bolts: Hex bolts, moreover referred to as hex cap screws, feature a hexagonal head and a threaded shaft. They are used with nuts or tapped holes and are commonly utilized in structural and heavy-responsibility applications.
Uses of Screws:
1. Construction: Screws are extensively utilized in advent for framing, sheathing, decking, and completing packages. They provide sturdy and durable connections among structural additives and materials.
2. Furniture Assembly: Screws play an essential function in assembling furnishings, shelves, and furnishings. They provide a robust and strong connection among wooden, steel, or plastic components.
3. Automotive: Screws are used notably in car manufacturing and restore for assembly, fastening, and securing numerous components which includes body panels, trim, and indoors fittings.
4. Electronics: Screws are crucial components in electronics meetings, supplying a steady mounting answer for circuit boards, components, and enclosures.
5. DIY Projects: Screws are a staple in DIY obligations and home development duties, together with setting shelves, mounting hardware, and installing furnishings.
Role of Screws Manufacturers and Suppliers:
Screw manufacturers like Fasteners LLP are answerable for generating an enormous style of screws to fulfill the diverse wishes of numerous industries and programs. They hire advanced manufacturing strategies and great control measures to ensure the dimensional accuracy, thread integrity, and material fine of their screws.
Screws suppliers play a critical function within the supply chain with the resource of offering a complete choice of screws to production corporations, producers, stores, and carriers. They supply screws from legitimate producers and offer them to clients in numerous sizes, materials, and finishes to maintain their unique necessities.
Screws are an essential fastener utilized in limitless programs throughout numerous industries. By the specific types of screws, their uses, and the significance of screws producers and vendors, industries can ensure the reliability, sturdiness, and overall performance of their assemblies and products.
0 notes
Text
Screw Trading Company in Chandigarh

We have a Screw Trading Company in Chandigarh which is a source of reliability in the realm of hardware supplies. Renowned for our extensive inventory of screws, bolts, and fasteners, we cater to diverse clientele, from DIY enthusiasts to industrial giants. With a commitment to quality and customer satisfaction, our company ensures prompt delivery and expert advice, earning it a stellar reputation as the go-to destination for all things fastening in Chandigarh.
0 notes
Text
DIY Tools and Supplies in Greater Noida
At United Hardware & Sanitary, we take pride in being your one-stop destination for all your hardware and sanitary needs in Greater Noida. With a strong commitment to quality, variety, and exceptional customer service, we have established ourselves as a reliable and trusted name in the industry.
#hardware store in greater noida#diy tools and supplies#home improvement materials#plumbing and electrical supplies#paint and painting accessories#gardening tools and equipment#nuts#bolts#and fasteners#construction materials#power tools and machinery#safety gear and equipment
0 notes
Text
Renovation Essentials: Must-Have Tools and Supplies for Every Home Improvement Project
Embarking on a home improvement project can be exciting and rewarding, offering a way to personalize and enhance your living space. However, the success of any renovation largely depends on having the right tools and supplies.
This not only ensures that the work can be done efficiently and correctly, but also helps in achieving professional-grade results even for DIY enthusiasts.
The Rise in DIY Projects
In recent years, there has been a significant increase in DIY projects among homeowners, driven by a desire to customize their spaces and often, to save on costs.
While many tasks can be managed independently with the right tools and a bit of know-how, there are situations where it is crucial to call in professionals, especially for projects involving electrical work, plumbing, or structural changes, where safety and regulations must be strictly followed.
Essential Tools for Home Renovation
For most home improvement projects, a well-equipped toolbox is essential. Here are some of the basic categories of tools that should be considered:
1. Measuring Tools: Every project starts with accurate measurements. Tools like tape measures, rulers, and laser levels are indispensable.
2. Cutting Tools: Depending on the material involved, different cutting tools are required. Utility knives, saws (hand saws and power saws), and tile cutters are a few examples.
3. Fastening Tools: To assemble or secure materials, tools such as hammers, screwdrivers, and wrenches are necessary. For more demanding tasks, power tools like drills and impact drivers greatly enhance efficiency and ease of use.
4. Power Tools: For more intensive renovations, power tools such as sanders, jigsaws, and rotary tools can save time and effort, providing professional results.
Must-Have Supplies
Beyond tools, the right supplies are critical for the execution and completion of any home improvement project. These include:
1. Paints and Primers: A fresh coat of paint is one of the easiest ways to transform a space. High-quality primers and paints are crucial for achieving a durable and aesthetically pleasing finish.
2. Nails and Screws: These fasteners come in various sizes and types, each suited for different materials and purposes. Choosing the right nails and screws is essential for the stability and longevity of your work.
3. Other Fixtures: Depending on the project, other necessary supplies might include adhesives, sealants, and finishing materials like grout or caulk.
Innovations and Recommendations
Staying updated with the latest products can significantly impact the efficiency and outcome of your projects.
Eco-friendly paints and automated power tools that offer better precision and safety features are recent innovations that have been well-received in the market.
Always look for products that align with your specific needs and have positive reviews from other DIYers or professionals.
When to DIY and When to Call Professionals
Assessing the Scope of Your Project
Deciding whether to tackle a renovation project yourself or to enlist professional help depends on several factors.
Firstly, assess the complexity of the project. Simple tasks like painting a room or replacing cabinet hardware are generally safe and manageable for most DIYers.
However, projects that involve structural changes, electrical systems, or plumbing should often be handled by licensed professionals due to the technical knowledge and safety concerns involved.
Considerations for DIY vs. Professional Help
● Complexity: If the project requires specialized skills or knowledge of building codes, it's safer and more prudent to hire professionals.
● Safety: Projects that pose significant risks, such as roof repairs or major electrical work, require professional expertise to ensure they are done safely.
● Time Commitment: Consider how much time you can realistically dedicate to the project. Larger projects can become overwhelming without a team of professionals to handle them efficiently.
Planning Your Renovation Project
Effective Project Planning
Thorough planning is crucial to the success of any renovation project. Start by defining the scope of your project, then create a detailed plan that includes every task that needs to be completed.
Budgeting is another essential step; ensure you account for all materials, tools, and, if applicable, labor costs.
Build a timeline that outlines when each phase of the project will be started and completed. This helps in managing the renovation efficiently and can reduce the disruption to your daily life.
Importance of Permits and Local Regulations
Before beginning any work, it’s important to understand the local building codes and regulations. Depending on the nature of your project, you may need to obtain permits from your local municipality.
These permits ensure that the structural integrity of your home is maintained and that all renovations are up to current safety standards. Failing to adhere to these regulations can result in fines, and potentially, having to redo the work.
Keeping Safe During DIY Projects
Essential Safety Gear and Practices
Maintaining a safe working environment is paramount during any DIY project. Always wear the appropriate safety gear, which includes safety goggles, gloves, ear protection, and dust masks. These items protect against common hazards such as flying debris, sharp objects, noise, and inhalable particles.
Ensure your workspace is well-ventilated, especially when using volatile substances like paints and solvents. Familiarize yourself with the operation of power tools before use and keep a first aid kit readily accessible for any minor injuries that might occur.
Wrapping It Up: A DIYer's Guide to Home Renovation Success
In this guide, we've navigated the essentials of tools, supplies, and strategic planning necessary for tackling home renovation projects confidently.
Understanding when to take the DIY route and when to call in the professionals can save both time and money while ensuring safety and compliance with local regulations.
As you embark on your next home improvement endeavor, remember that preparation is your best tool, and knowledge is your greatest ally.
By equipping yourself with the right resources and maintaining a focus on safety, your DIY projects are bound to be both rewarding and successful.
#This Summer#Guest Author#Guest Blogger#Guest Contributor#Guest Post#Guest Writer#Best Ways To Prevent The Most Common Plumbing Problems#Plumbing Problems#broken pipes#leaking pipes#clogged toilets#garbage disposals#prevent drains from clogging#plumber in tinley park#tinley park plumbers#plumber in orland park#orland park plumbers#plumber in homer glen#homer glen plumbers#plumber in frankfort#frankfort plumbers#plumber in mokena#mokena plumbers#plumber in lemont#lemont plumbers#plumber in new lenox#new lenox plumbers#plumber in oak forest#oak forest plumbers#plumber in homewood
0 notes
Text
Supplier of Stainless Steel Fasteners in Uttar Pradesh

Company Overview:
Meghmani Metal is an ISO 9001:2015 certified Manufacturer and Supplier of Stainless Steel Fasteners in Uttar Pradesh, India.
They offer a diverse range of stainless steel products including steel flanges, steel butt welding, steel pipe fittings, steel rods, wires, coils, flats, and SS fasteners.
Specializing in Austenitic grade fasteners, they maintain a well-equipped inventory and provide customer-specific manufacturing facilities with standard technologies.
Stainless steel fasteners, made from an alloy containing iron, chromium, nickel, and other elements, are hardware devices used to mechanically join or affix objects together securely. Renowned for corrosion resistance, durability, and aesthetic appeal, they are essential components in various industries.
Types of SS Fasteners:
SS Bolts: Used with nuts to fasten materials together.
SS Screws: Ideal for fastening materials into pre-drilled holes.
SS Nuts: Paired with bolts to secure materials through threaded connections.
SS Washers: Distribute pressure and prevent damage beneath nuts or bolts.
SS Rivets: Permanent fasteners used to join materials together by deforming the rivet.
Applications of SS Fasteners:
Construction Industry
Automotive Sector
Manufacturing Sector
Marine Industry
Food and Beverage Industry
Pharmaceutical and Healthcare Sector
Aerospace and Aviation Industry
Electronics and Electrical Engineering
Supplier Coverage in Uttar Pradesh:
Meghmani Metal supplies Stainless Steel Fasteners across Uttar Pradesh, including cities like Agra, Aligarh, Amroha, Ayodhya, Azamgarh, Bahraich, Ballia, Banda, Bara Banki, Bareilly, Basti, Bijnor, Bithur, Budaun, Bulandshahr, Deoria, Etah, Etawah, Faizabad, Farrukhabad-cum-Fatehgarh, Fatehpur, Fatehpur Sikri, Ghaziabad, Ghazipur, Gonda, Gorakhpur, Hamirpur, Hardoi, Hathras, Jalaun, Jaunpur, Jhansi, Kannauj, Kanpur, Lakhimpur, Lalitpur, Lucknow, Mainpuri, Mathura, Meerut, Mirzapur-Vindhyachal, Moradabad, Muzaffarnagar, Partapgarh, Pilibhit, Prayagraj, Rae Bareli, Rampur, Saharanpur, Sambhal, Shahjahanpur, Sitapur, Sultanpur, Tehri, and Varanasi.
For further information, feel free to contact us.
Read the full article
#Agra#Aligarh#Amroha#andVaranasi#Ayodhya#Azamgarh#Bahraich#Ballia#Banda#BaraBanki#Bareilly#Basti#Bijnor#Bithur#Budaun#Bulandshahr#Deoria#Etah#Etawah#Faizabad#Farrukhabad-cum-Fatehgarh#Fatehpur#FatehpurSikri#Ghaziabad#Ghazipur#Gonda#Gorakhpur#Hamirpur#Hardoi#Hathras
0 notes
Text
Reflecting Perfection: Why Pro Mirror Mounting is Key for Edmonton Homes

Mirrors are more than just functional – they add light, create depth, and enhance the overall aesthetic of your Edmonton home. But a crooked mirror, one hanging precariously close to the floor, or a shattered masterpiece from a DIY mishap can quickly turn a design statement into a disaster zone. Here's why calling in the pros at [Your Business Name] Rapid Repair Services in Edmonton is the key to a flawless and frustration-free mirror mounting experience:
The Risks of DIY Mirror Mounting:
Wall Woes: Mirrors can be heavy, and proper installation requires finding studs and using the right anchors and fasteners. A DIY attempt could lead to damaged walls, unsecured mounts, or even a broken mirror if it falls. Our certified technicians use stud finders and ensure secure installation on appropriate wall types to handle the weight of your mirror safely.
Level Lament: A crooked mirror can distort your reflection and create an unbalanced look in the room. DIY installation might leave your mirror tilted, causing frustration and an unappealing aesthetic. Our technicians use precise leveling techniques to ensure your mirror hangs perfectly straight, creating a visually pleasing focal point.
Material Mishaps: Different wall materials require specific mounting methods. DIY installation might lead to using the wrong type of anchors or screws, potentially damaging your wall or causing the mirror to become loose over time. Our team will assess your wall material and choose the appropriate mounting hardware for a secure and long-lasting installation.
Size Matters: Large or heavy mirrors require specialized mounting techniques and expertise. DIY installation for a large mirror can be risky and lead to dropped mirrors or structural damage. Our professionals have the experience and equipment to safely handle and mount even the largest and heaviest mirrors in your home.
Aesthetics Aren't Accidental: Choosing the right height and location for your mirror plays a crucial role in its functionality and visual impact. DIY placement might leave your mirror too high, too low, or in an awkward spot. Our team can advise you on optimal placement based on the size of the mirror, room layout, and intended purpose.
The Benefits of Pro Mirror Mounting with [Your Business Name] Rapid Repair Services:
Fast and Efficient: Our rapid response service means you won't have to wait long to enjoy your beautifully mounted mirror. We work quickly and efficiently, minimizing disruption to your daily routine.
Guaranteed Quality: We use high-quality mounting hardware and back our work with a guarantee, ensuring your mirror is secure and functions flawlessly for years to come.
Peace of Mind: Knowing your mirror is mounted correctly and safely by professionals gives you peace of mind and allows you to focus on enjoying the enhanced beauty and functionality it brings to your home.
Expert Advice: Our team can help you choose the ideal mirror for your space and advise you on the best placement for optimal impact and functionality.
Professional Finish: Our technicians ensure a clean and polished installation, with minimal damage to your walls. You'll enjoy a flawless look that complements your existing décor.
Upgrade Your Space with Confidence
Don't let mirror mounting become a reflection of frustration. Contact [Your Business Name] Rapid Repair Services in Edmonton today! Our friendly and professional team will take care of everything, from selecting the right mounting method to flawless installation. We'll ensure your mirror is secure, beautifully positioned, and ready to enhance the elegance and functionality of your Edmonton home.
0 notes
Text
Threaded Rod Stud | Threaded Bar | Threaded Stud
In the vast realm of construction and industrial applications, the importance of small yet pivotal components cannot be overstated. Among these unsung heroes is the threaded rod stud—a seemingly simple piece of hardware that plays a crucial role in securing structures, facilitating installations, and ensuring stability in various projects. Let's delve into the intricacies of threaded rod studs, exploring their diverse applications and the role they play in modern engineering.
Understanding Threaded Rod Studs
Threaded rod studs are cylindrical rods with threading along their entire length, allowing nuts and other fittings to be screwed onto them. They come in various diameters, lengths, materials, and thread sizes, offering flexibility to cater to a wide range of applications. These studs are typically made from materials such as stainless steel, carbon steel, or other alloys, selected based on factors like strength requirements, environmental conditions, and corrosion resistance.
Applications Across Industries
The versatility of threaded rod studs lends itself to an array of applications across different industries:
Construction: In construction projects, threaded rod studs are extensively used for anchoring structural elements such as columns, beams, and trusses. They provide a reliable means of securing various building components, ensuring structural integrity and stability.
Electrical and Mechanical Installations: Threaded rod studs serve as essential components in electrical and mechanical installations. They are used for mounting equipment, supporting conduits, cable trays, and piping systems, offering a sturdy foundation for the installation of fixtures and appliances.
HVAC Systems: Heating, ventilation, and air conditioning (HVAC) systems rely on threaded rod studs for mounting ductwork, supporting HVAC units, and securing components like fans and dampers. These studs play a critical role in ensuring the efficient operation and longevity of HVAC systems.
Industrial Machinery: In manufacturing and industrial settings, threaded rod studs find application in securing heavy machinery, conveyor systems, and equipment frames. Their robust construction and ability to withstand high loads make them indispensable for maintaining operational efficiency and safety in industrial environments.
Suspension Systems: Threaded rod studs are also commonly used in suspension systems for ceilings, lighting fixtures, acoustic panels, and signage. They provide a reliable means of hanging objects securely from overhead structures, offering flexibility in design and installation.
The JFE India Advantage
Among the leading providers of threaded rod studs and related hardware solutions is JFE India. With a commitment to quality, reliability, and innovation, JFE India offers a comprehensive range of products tailored to meet the diverse needs of customers across industries.
JFE India's threaded rod studs are manufactured to the highest standards, ensuring exceptional strength, durability, and performance in demanding applications. Leveraging advanced manufacturing processes and stringent quality control measures, JFE India delivers products that meet or exceed industry specifications, providing peace of mind to customers and end-users alike.
Moreover, JFE India's expertise extends beyond product supply, with a dedicated team of professionals offering technical support, engineering assistance, and customized solutions to address specific project requirements. Whether it's recommending the right materials, assisting with design considerations, or providing on-site support, JFE India goes the extra mile to ensure customer satisfaction and project success.
Conclusion
Threaded rod studs are indispensable components in construction, manufacturing, and industrial applications, providing secure fastening solutions for a wide range of projects. With their versatility, durability, and reliability, threaded rod studs play a vital role in ensuring the structural integrity, functionality, and safety of diverse installations.
#ASTM A193 Stainless steel 304 Threaded Rod Manufacturer#ASTM A193 SS347 Threaded Rod#Stainless Steel ASTM 193 316H Threaded Rod Stud#Stainless Steel ASTM 193 316Ti Threaded Rod Stud#Carbon Steel ASTM 193 B7 Threaded Rod Stud#Hastelloy B3 Threaded Rod Stud#Hastelloy C22 Threaded Rod Stud
0 notes
Last Seen Blogs

my-secret-star
ur pretty

rashakhattab
برغوتة

the-crittercorner
Welcome To The Critter Corner Santuary!

whenitbelikethatsometimes
Im Upset

roemantics
Born Free