#crafting sorta
Text
switchplate covers update/tutorial
So the thing to keep in mind with this is that we gotta see how well the wear. A switchplate cover is a pretty high-traffic thing, and subject to a lot of wear. If these get too dingy I'm absolutely going to have to go buy fancy ceramic ones or something.
But. That said. Here is my final result, and below the cut is how I did this, partly because I want to remember how it worked LOL.
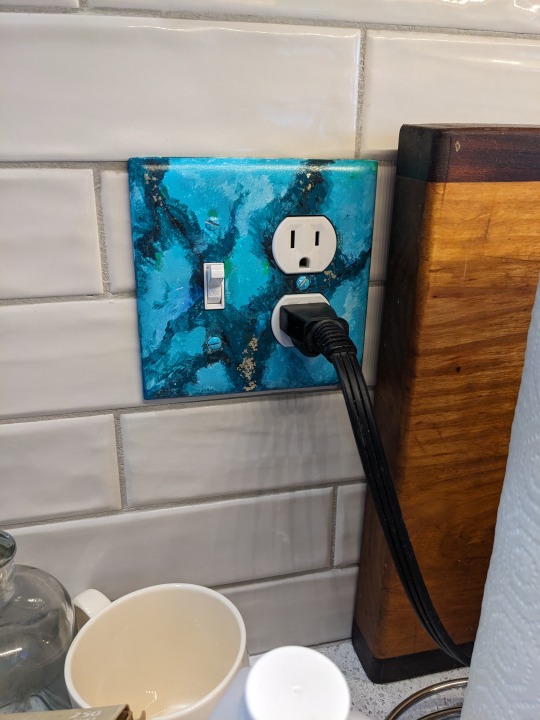
[Image description: A combo lightswitch/outlet with a black three-prong plug plugged into it, set into a white subway tile wall with a wooden breadboard leaned against it. The plate cover is painted with a mottled effect to look like a turquoise gemstone, complete with inset glitter to mimic the pyrite inclusions found in some raw turquoise.]
A better view of the glitter:
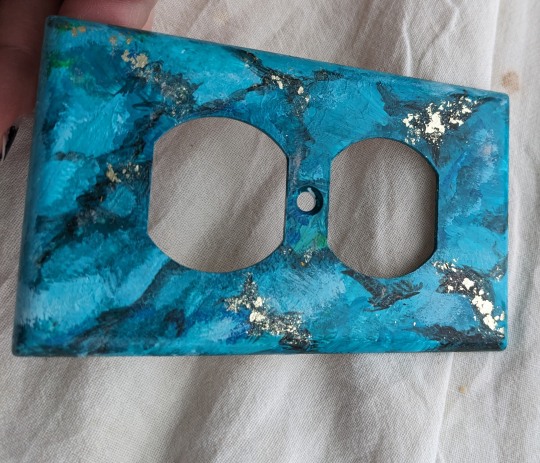
[Image description: Another turquoise-painted outlet faceplate on the background of a rumpled white dropcloth, my fingers visible tilting it toward the light so the flake glitter catches the light from the window.]
So I searched up for tutorials and found a few, each of which was like "can't believe nobody else has done this"; I'm sharing the most helpful one here. What was thee very most helpful thing, though, was the writer's pointing out that many different configurations of turquoise exist, so you can just pick a reference image and build off that. I did not in the end come very close to my reference, but decided instead to make it look sick as hell. LOL. I was just having too much fun doing whatever I wanted. So these are not super realistic! But then you wouldn't... make an outlet faceplate out of real turquoise, so I felt like I wasn't fooling anyone. Anyway--
How To Paint Faux Turquoise.
So the first thing I did was find some very fine-grit sandpaper (I think I got 320? I found a mostly used-up sheet of it in the basement and just used the unused edge from where it had been fastened around a block, LOL) and went over the whole front surface of each plate I was going to paint, and then I washed them with dishsoap and hot water and dried them with a dish towel, because I figured finger grease, hand dirt, and sanding dust would keep the paint from sticking. I started with white plastic ones, the kind you get for up to a dollar at the hardware store.
Then I got a plastic container lid, put dollops of various of my paint samples in it, dug out the craft paints I got cleaning out Auntie's basement and the sole tube of acrylics (Mars black) I could still find from the last time I did any painting, and went to town. The first couple, I did the pale shades and let them dry and came back to add the darker marbling. But then I was like, these are latex/acrylic, you don't have to build them in layers? So I just did the rest of them with all the shading in more or less one pass.
Acrylic art paint and latex housepaint are both water-based, so there's no conflict with using them intermingled. I've combined them before, I used to do a lot of sign painting and it works fine. Housepaint's runnier, idk. Don't mix oils and latex, is the thing to keep in mind; they just don't stick to each other real well.
I went to the art supply store to get some water-based varnish, because all i had was polyurethane and that's oil-based. It'd probably work as a topcoat but I was worried and the internet's advice conflicted. I wanted to go get better glitter anyway, so I did. I happen to live near Hyatt's All Things Creative, so I take every excuse I can get to go there.
I bought some sick-ass glitter (over in the resin pouring section, hell yes), and puzzled thru the various offerings. (@sassaffrassa's advice proved invaluable on this thank u.) I got just-- "Gloss varnish acrylic medium", the Hyatt's brand, for four dollars and sixty-nine (nice) cents, and then because I was feeling spendy, I also bought Krylon spray-on glossy varnish. Belt and suspenders, y'know? Also to make the brush strokes less obvious.
The critical thing, though, about the gloss varnish, is that it says right on the bottle that you can either incorporate it into the paint as a medium to enhance the sheen, OR brush it over the finished work as a protective coating. Dries absolutely clear. So I knew, THIS is how I'm attaching the glitter. I'd been thinking like, mod podge? elmer's glue? mix it into the paint? No.

[image description: the gloss varnish bottle. It is this product. The relevant text says "can be used either as a medium to enhance the sheen levels of acrylic paint or as an over-varnish on finished artwork to provide a non-tacky, protective gloss coating".]
So I carefully got open the little bottle of glitter (no sneezing! it was "white gold flake" style and cost eight bucks for like half a gram. to my knowledge it's not actually made of gold but it was priced like it was) and painted little fine patches of gloss varnish onto the spots I wanted glittered, and then used tweezers to apply glitter just in those spots, and mooshed them around with the little varnish-covered brush until they stuck where I wanted them. (I put them on the darkest bits of the veining, because that was what my source image looked like, mostly. I wanted to be really liberal but then I thought, no, a little pop of glitter is more exciting actually. Still not sure, but it does look good so. They say measure that shit with your heart but I went light because I figured I could add more later, and then I didn't.)
Then I came back at the end and painted more gloss varnish just over the glitter, just to make sure it was all really stuck down and wouldn't flake off with wear.
Let that dry for a couple hours, then used a larger brush to spread gloss varnish as evenly as possible over the entirety of each plate. It did leave visible brush strokes, which I didn't mind. The art shop guy suggested using a really soft brush to minimize that, and I was like "yah sure ok" but then, well, I didn't, I just used the brush I had.)
But then I let that dry overnight, and in the morning I put the plates all in my giant overspray cardboard box, and gave them each a liberal coating of the spray varnish. (Yes of course I have a giant cardboard box I keep in my basement to spray paint things in. I know it says use in a well-ventilated space but what I do, see, is I do that and then I leave the room, which is almost as good. LOL it's 24F and snowing I'm not doing it outside.)
That bottle says two hours until handling on it, so I left it two hours, and then I put up the plates that were in spots where the painting was done or wasn't happening, hence my example image being against a tiled wall.
The screwdriver immediately scratched the first one a little bit, but not super obviously. But I kind of would expect a screwdriver to scratch just about anything, so that doesn't mean much.
I won't guarantee how well these'll hold up but if you were interested in doing something like that, there's how it worked. (Hi, future me, you're welcome for writing it down lol.)
I'm sort of sorry for no more process pictures but honestly most of it was following whimsy and doing what I felt like and kind of drawing on what I hadn't realized was a lot lot lot of hours of past paint-handling in my life, so pictures wouldn't help anyone else recreate this. But it did remind me that I love to paint and should do that more. So, I'll try, I guess.
40 notes
·
View notes
Text


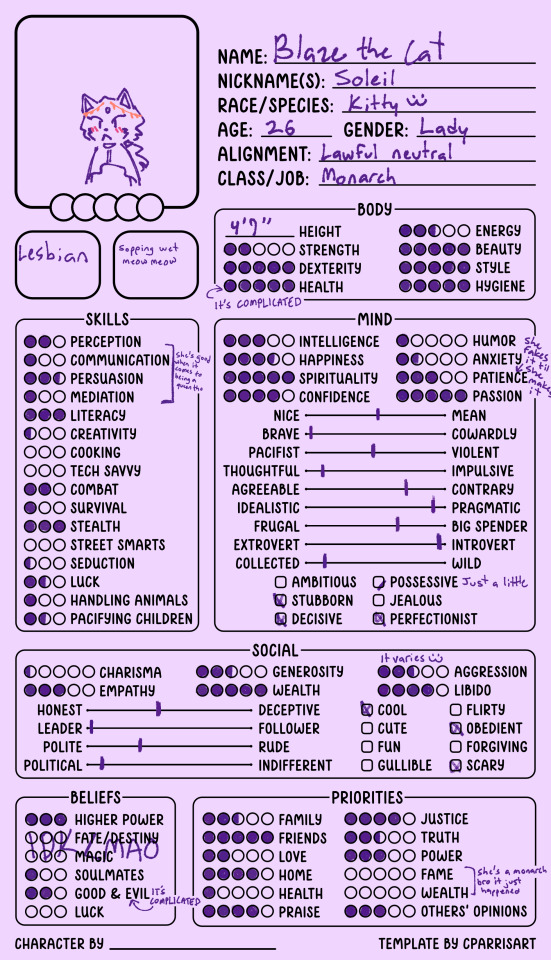
thinking about my little meow meow
sol emeralds and sol energy fucking her up 😱
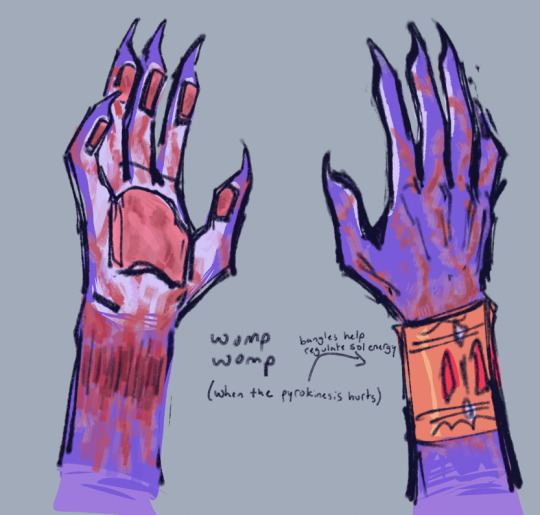
#sth#blaze the cat#au stuff#me n my friend have crafted lore for the sol emeralds#cuz there's literally nothing canonical lmao#they're like foils to the chaos emerald#and simultaneously reflecting blaze's personality vs sonic's#so they're like chaos vs order here#I luv the hc that chaos energy spurs the growth of plants and flowers#and it's important in this au#so the sol emeralds sorta do the opposite#cause destruction and wilt and kill any surrounding plantlife etc etc#sonic's beauty of chaos vs blaze's downfall via order#u feel me#and her powers are 'fueled' by sol energy ig#I'd need to dissect my brain to truly explain wtf I mean by all of this#but in essence the sol emeralds don't like anyone and barely tolerate blaze LMAO#must maintain the order and stability quite literally to a fault#so all that is fucking her up! caused scarring from using her powers!#so the bangles r to help regulate and disperse that energy so the scarring doesnt really go past the wrists#ok bye i'm talking too much here sry#luc arte
259 notes
·
View notes
Text
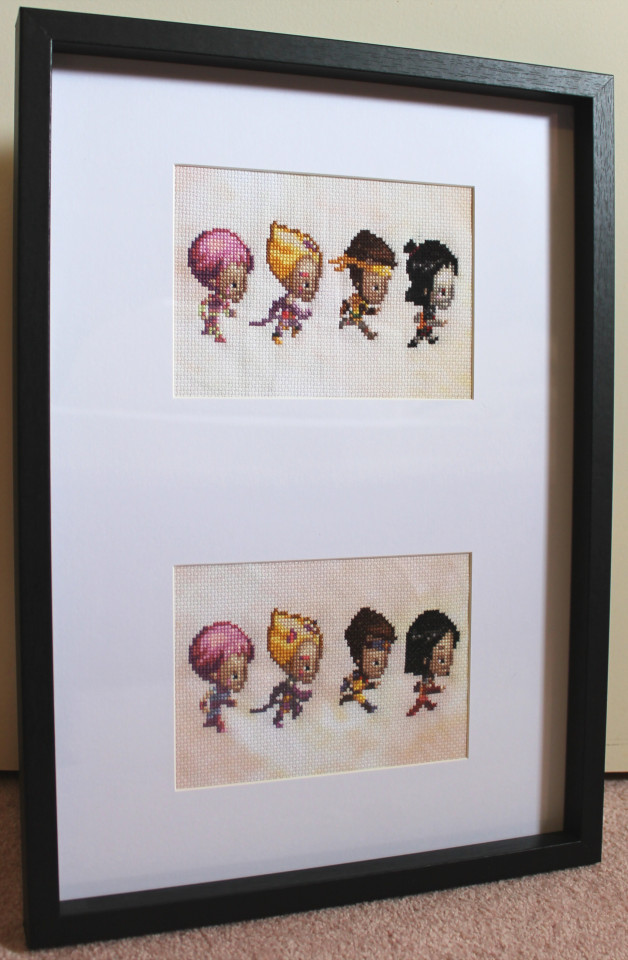
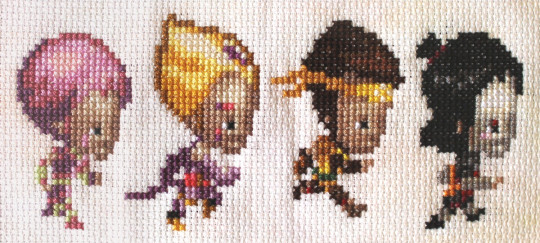
I made a season 1-3 version of my cross stitch pattern! (Season 4 one here.) I modified the original Fall of XANA sprites to look like the original Lyoko designs and then used FlossCross again to make the pattern. And then spent days agonising over which shades of purple to use for Odd. Picking colours isn't as easy as you'd expect. But I'm happy with the result!
You can find both patterns at the link below. I tried to reuse as many colours as I could from the season 4 pattern so if you want to make both, you shouldn't need many more extra colours. Same disclaimer as the season 4 one: the pattern uses DMC colours but for my one, I swapped several of them for similar Dimensions ones I already had. On 14 count aida, the finished design measures about 15.5x6.5cm (6.1x2.5in). The frame pictured is designed for 5x7in photos - each space is 4.5x6.5in.
#//this was the only frame I could find that was sorta what I was looking for. why does it need to have so much whitespace 😭#code lyoko#aqof crafts
66 notes
·
View notes
Text
Thoughts on working with the eclipse:
I still won’t say it’s bad or not to do it.
You should exercise extreme caution because eclipse energy is liminal and intense.
It might not feel good to you and if not, back off. It’s okay if you decide not to at the last minute.
It is THE stuff of pure cosmic change. I saw someone else on here refer to it as Tower energy and that’s not wrong.
That should also give you pause at least long enough to figure out how much dodge you have in you. When the Tower falls, it falls HARD.
On the same token: beware of electricity tomorrow and especially storms.
I think it’s a better day spent crafting things charged with eclipse energy that can be harnessed at a later date, but that’s just me.
If you are in the path of the totality, think about things that should never see the light of day. And (this should be obvious) only expose them to the totality. Yes that’s only four minutes (or so).
With luminary events: timing matters. If you want to use the eclipse energy, take your actions during the time that the sun is eclipsed. Otherwise you’re just working with a weak new moon.
Hydrate. Eat some food. Take care of yourself before and after you do eclipse magic because it’s likely to take a lot out of you.
And write it down. Write down if you do magic. Write down how this solar eclipse makes you feel. Write down any dreams you have tonight or tomorrow night. Write down every detail of your day tomorrow but most especially what happens while the sun is eclipsed.
See y’all on the other side.
Minx
30 notes
·
View notes
Text

spiked choker and bracelet i made out of leather for woofwood
#and two little chainmaille earrings you can sorta see#jellycat#leather crafts#wilf werewolf#plushblr#hehehe#wolfwood#crafts#this was a while ago but i forgot i took photos! i have to share the other ones i made as a gift too
51 notes
·
View notes
Text
#rook's craft#undertale yellow#uty#undertale yellow spoilers#uty starlo#starlo#starlo uty#appears starlo didn't listen to the instructions when he took 4 russian steroids. (The bottle said take 3 max)#also this sounds good sorta? maybe?
41 notes
·
View notes
Text


Laursen is so good with people. He's not even assigned to wardening as a high priority, but whenever he takes a turn at it, he succeeds. I love him so much.
I also love Euclid, she's cool. The psychopath trait will definitely help her fit right in with the cult, I reckon.
Her name is probably supposed to reference the ancient Greek mathematician of the same name, based on the whole "genies are the smart xenotype" thing, but... I can't help but think of it as her SCP object class, lmao.


Euclid immediately set to work proving herself as a capable new member of the cult, and now Vasso is dressed to the nines in his new masterwork cape.

Then poor Cecil got sick, so he's taking a break from helping around the colony and getting some well-deserved rest.


And finally, two bionic thrumbos wandered onto the map and I fell in love immediately. Nobody in the colony has an animal skill high enough to tame them, sadly.
Worry not, though! Our Drakonori prisoner, Magic Man, has a decent animal handling skill. When we recruit him, his first task to prove himself will be taming these thrumbos! No pressure, Magic Man.
First | Next | Previous
#rimworld#gracie plays#The Children of Ecthuctu#art#my art#traditional art#rimworld art#unpolished art#slightly more polished art than usual#Euclid had level 17 crafting skill when she was recruited#Over the course of making human leather capes she has mastered it#I am in awe#She is a god-tier colonist and I love her#I do find it fun that her name is a reference to a Greek mathematician#I sorta imagine Vasso is Greek so it's a cute coincidence#The SCP idea is more fun tho#Cecil is fine don't worry#Vasso is an excellent doctor#even for animals#I hope Magic Man joins us soon!! I want robot Thrumbos!!#have an awesome day everyone!! xoxo
25 notes
·
View notes
Text

holy fuck lol quilting is hard
#quilting#sewing#fiber arts#the idea is to do themed quilt squares for my family members (and maybe someday combine them lol)#this one is a little wonky (my center square... rip lol) but at least the points kinda sorta line up so ill take it for a 2nd attempt#also i mixed up which side was which so my cows are upside down :(#this one is for my grandma tho so she'll probably like it anyways haha#crafts
31 notes
·
View notes
Text
Little somewhat complete (I dont think I will be finishing it, I like this half done state) image from a tcd fic im writing that I couldnt get out of my head. :)
“When- If anyone visits us we can charge them for a ticket here! This is our home though, so you can have one for free.”
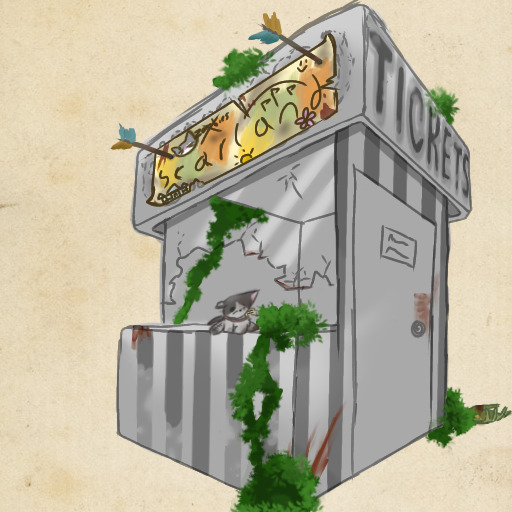
Aka I go hey what if during tcd scar lived in an abandonded amusement park and Jellie was a stuffed cat
#scar#goodtimeswithscar#hermitcraft#the crafting dead#tcd#Fivesays#Fiveart#Ive never done anything like this before I am not an artist#jellie#fanfic#sorta#help i dont know tags#enjoy??#Whats perspective who knows#if tumblr botched the quality ill cry#Z is for Zombie AU#gtws#gtwscar#gtws fanart#tcd au
115 notes
·
View notes
Text
You got games on your phone?

#athena thumbellina#catblr#black cat#polydactyl cat#pet blog#she’s!!! almost sorta out and about again! she moved her grief corner to under the craft supplies#I went on a trip which stressed her out More but I’m back and she’s like oh ok maybe life can move on
114 notes
·
View notes
Text
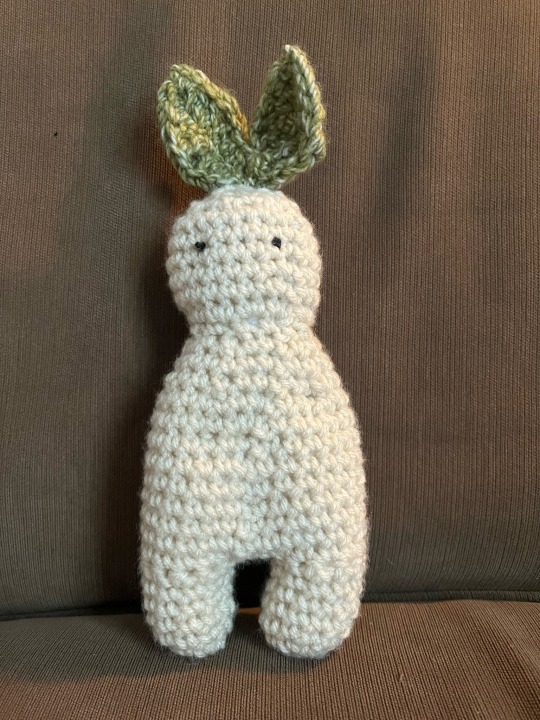
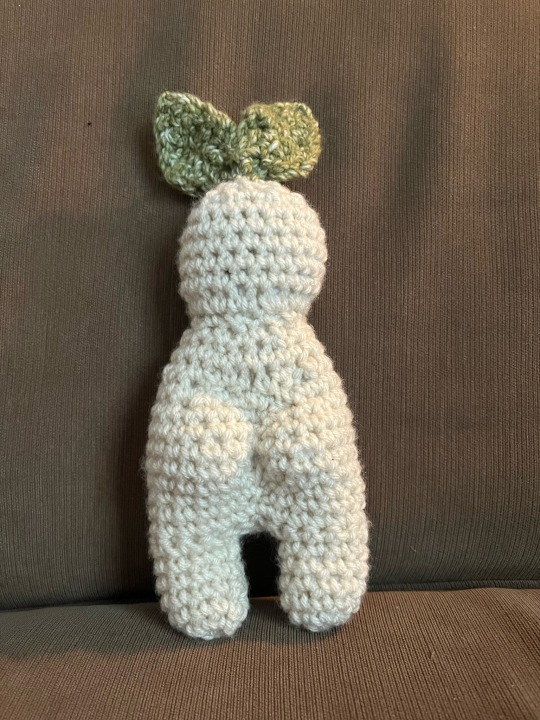
𖡼𖤣𖥧𖡼𓋼𖤣𖥧𓋼𓍊𖡼𖤣𖥧 sprout boy :^) 𖡼𖤣𖥧𖡼𓋼𖤣𖥧𓋼𓍊𖡼𖤣𖥧𖡼
#just sorta free handed this one lol#crochet#crochetblr#fiber crafts#yarn#yarnblr#goblincore#crowcore#dirtcore#gremlincore
29 notes
·
View notes
Text
Cross Stitch Negan
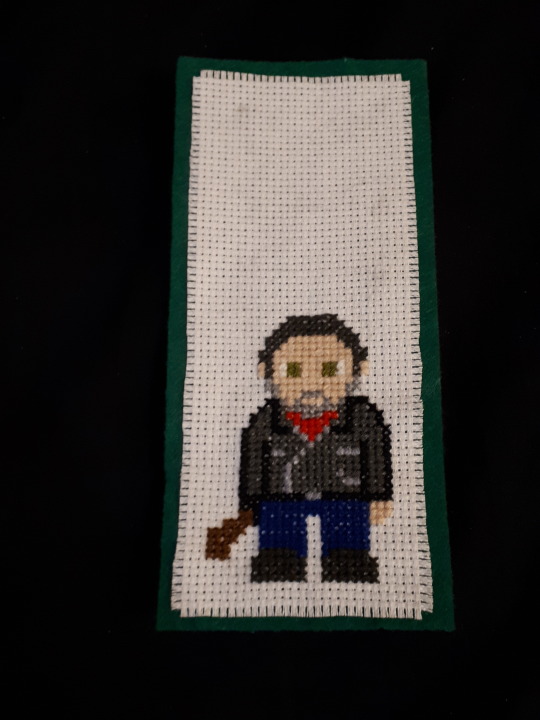
#Negan#negan smith#twd negan#Fudddge my glue ruined it sorta qWq...#I still like it#I will probably loose it the first time i use it..#Like the magnetic Loki bookmark i bought..#I am gonna just do random shapes for my next bookmark.#No more characters#cross stitch#Thread crafts#crafting#jdm character#jeffrey dean morgan#negans bat lucille
7 notes
·
View notes
Text


Project 23/33 for 2022!!
A few months ago, I saw this beautiful work of art by @checaria and was absolutely inspired to make the sweater Xie Lian is wearing! Behold the fruits of my labor!
Pattern is the Be Thankful Cardigan by Lily Kate France.
#knitting#fiber art#sweaters#slow fashion#fiber craft#knitblr#cardigans#kiki knits 2022#it is not an exact replica but the vibes are there!!#been lovingly calling this my blorbo sweater as i’ve worked on it#it took a while to get the right gauge#and even still#it is a bit larger than I’d like#maybe will try to shrink with hot water and intermittent drying#but overall is v cozy#and I am happy with it!!#xie lian#tgcf art#sorta!#not sure if this counts#but i want it to be able to be found later#finished objects#blorbo sweater
237 notes
·
View notes
Text
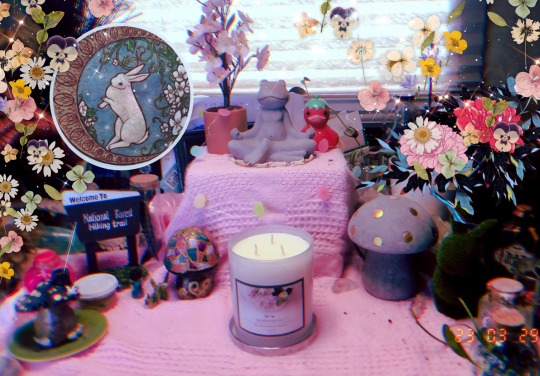
Mmm yea it’s late but here’s the beginnings of my ✨🌸 spring altar 🌸✨
#spring#Wicca#mine#altar#ostara altar#spring altar#wip#I’m a bad witch#it’s sorta hidden but there is a bunny hedge and it’s my favorite part of the altar#the craft#witchcraft
50 notes
·
View notes
Text
i dont think i ever posted my one (1) speedduo64 fanart i did whoops

#speedduo64#digital art#mspaint#kenopsias crafts#this is old (sorta) but eh#art#ask 2 tag#digital horror#fanart
6 notes
·
View notes
Text
🍂The Harvester🍂
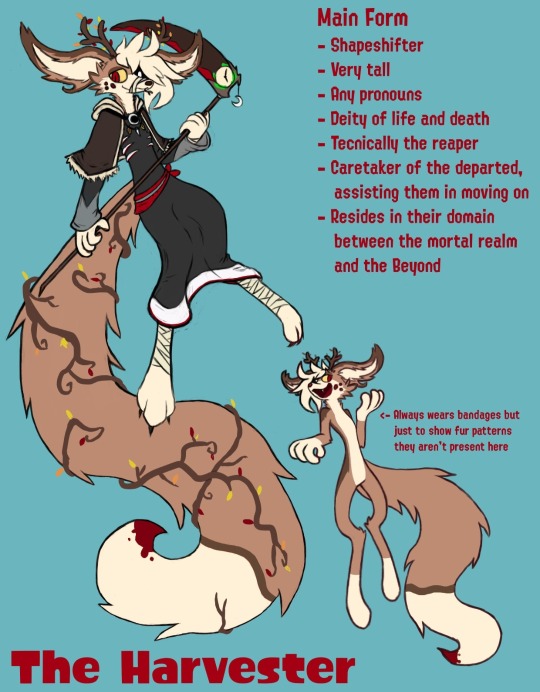
#pretend i drew the paws better#dreamypumpkinsart#sfw furry#also i don't usually show fur patterns since i prefer my characters to have clothing but figured i should try to#mostly an excuse to show what's inder the bandages#was gonna have like wounds but... nahh#wanted to do a more fancy fur pattern but went simple for my sanity#please ignore some inconsistencies and mistakes jdmsmdmd#going for a sorta... combination of their roles in the design#but this isn't their true form actually and their true form resembles a very menacing 🐦⬛raven#so they crafted this form themself as a form they're much more comfortable in#modeled after the mortals with their own spin#anyway runs away#pardon the ramble!!#HOPE IT LOOKS OKAY
11 notes
·
View notes
Last Seen Blogs

babygirlraven1998
Stoner Makeup Whore🖤

anime-sky
✧Anime Sky✧

ereviewsach
EREVIEWSACH

andreahot27
andrea hot27

six-333
Jonah/Mischa!!