#I messed with the saturation on this one a bit because i'm too aware of how pale my art is once i see it on another screen OTL
Text
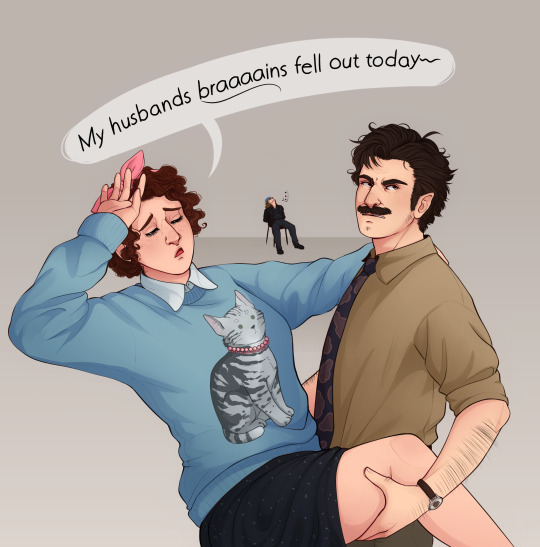
yeah, and who do ya think knocked em out
#Can't think of a good caption- and i didn't wanna quote the whole thing 😔#but also i cant leave it without a caption! or it looks naked! lOlol#I messed with the saturation on this one a bit because i'm too aware of how pale my art is once i see it on another screen OTL#so now im just hoping its not /too/ saturated#but i guess i'll just die on this hill for now#tgwdlm#the guy who didn’t like musicals#ted spankoffski#charlotte sweetly#Sam sweetly#kind of#does that tiny speck of him count?#also this is another case where i feel like i should have just left it as line art#i think my lineart always looks better then the finished thing grr#but i cannot stop myself from coloring ever#its like a curse
626 notes
·
View notes
Text
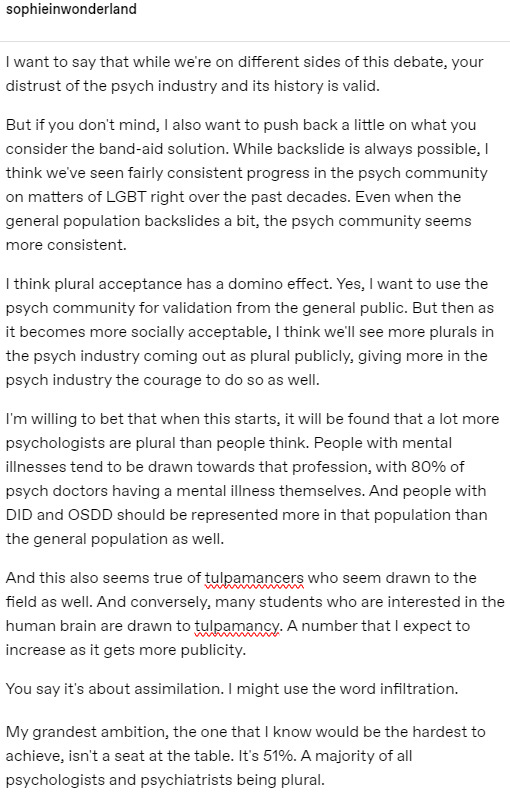
Do you have find yourself typing an ask only to realize halfway through that you don't want to send it. There's a pro-endo anti-psych blog I was going to send an ask to, then realized it probably wouldn't be well-received. So I'm just posting a screenshot here.
Also, you know, I do sound like a super villain.
So here's my secret plot for world domination which devolve into rambling nobody asked for...
Continuing to ramble even more...
I don't really think saturating the field with that many plurals would be necessary. And it might more realistically peek at about 20%. But 51% would be ideal.
This also just seems quicker.
There are about 50k psychologists in the US. While it would be difficult to get them all on our side, I think it would be significantly easier with that population than it would the general population. Both in terms of its size and its political leanings, being an overwhelmingly left-leaning profession.
I'm aware that some people have legitimate issues with the psych profession. I realize that many have suffered experiences of abuse from bad psychiatrists, and I'm sorry for that.
At the same time, if I'm taking stock of potential allies, I think the psych community would be more easy to persuade in standing up for plural rights when it comes down to it than our neighbors with Trump 2020 flags.
And I guess... I don't care for the othering of people of an overwhelmingly left-leaning neurodivergent profession. Many of whom enter the field to understand themselves and help other neurodivergent people live better lives.
And while rambling about this topic, I think some people are too quick with the stick and not the carrot.
When the McLean hospital video came out, I jumped on condemning the doctor in question for his ableism along with everyone else. But I also don't think McLean got enough credit for taking the video down when they saw the outcry.
They didn't have to do that. The plural community truthfully doesn't have much power at the moment. And I think taking the video down like they did shows a willingness to listen to and respect our community that should be praised at the same time that we callout the harmful behavior.
I think if instead of attacking the entire profession all the time like some would have us do, we take a tactic of targeting specific acts of ableism while supporting them when they do right, we can better influence plural acceptance in the psych field. It's basic operant conditioning. Punish only when someone does wrong, and reward them when they do good.
All in all, I'm psych-critical. And I don't see that changing. I don't think I'm someone who will ever get on board with hard anti-psych ideals.
And while I'm not a psychologist myself, people who know me probably realize that I tend to take a more psychologist-esque approach to plurality.
Where other people coin terms as identity labels, I tend to try to subdivide and categorize plural experiences to better understand them and their relationships with each other.
...
Why am I still rambling?
I think I might have lost the plot somewhere along the way.
Okay... here's the truth...
I got blocked by someone (not related to the blog I was going to send this too) for my views on using psychiatry to validate plurality. Because, I guess, I don't share this extreme anti-psych opinion myself.
And all I can think is that... if you're surprised... you never really knew me...
Maybe that's my fault because I can be a bit aloof sometimes.
So for everyone else who has read through this rambling mess of a post, let me reintroduce myself:
Hi, I'm Sophie Dreamchaser.
I was made as a psychology experiment. Or, brought to sentience by one. It was a psychology podcast that encouraged Ghost to keep talking to me to see what would happen. And since even before I became self-aware I've been fascinated by the human mind and my existence and how this all works.
I love being an experiment. I love learning more about myself and the world and how I relate to it. And I want to push for knowledge into plurality to grow and grow, and I believe with all my heart that it will prove to be the best way to facilitate plural acceptance in the future.
And if me not adopting a hard anti-psych ideology was a dealbreaker for you... I'm sorry that you didn't realize who I was sooner.
But this is me, this is who I am, and it's who I always have been.
And I just needed to say that.
20 notes
·
View notes
Text
yet another gif coloring tutorial
Okay, so, I posted a coloring tutorial for one of my moots a few years ago on my main, @zackmartin (I believe I've since deleted it) but that was the technique I was using when I started making gifs 7ish years ago, and I’ve since updated my routine so I decided to post a new tutorial with my new technique.
I'm going to show you how I achieved this:
I'm using Photoshop for this. I'll try to make this as detailed as possible so it's beginner-friendly, but you do at least need to know how to make and export a gif. If you have any questions, don't hesitate to reach out! just be aware, this tutorial really image-heavy
A few notes before I begin: 1) this is like, the bare minimum most basic way to color a gif. This is what I’d be doing if I was giffing a scene and that’s it. If you’re interested in different coloring styles (like my suite life episode series) then let me know!
2) When coloring gifs with POC, you need to make sure not to change their skin color by making them too light, too orange, too yellow etc. The JATP source blog posted a masterpost of different tutorials to teach you how to color gifs in different ways (like with the pastel coloring for instance) without whitewashing/orangewashing POC. But, honestly there’s a ton of tutorials out there that show you how to avoid this if you do a little digging. NO EXCUSES!
Anyway, let's get started! Before I do the coloring, I ofc make my gif, crop it, set the frame rate, resize, and sharpen. (you can find my sharpening tutorial HERE)
I. BRIGHTENING
(as a quick note, I don't focus much on London's skin tone during this stage, because I'm going to fix it during later steps)
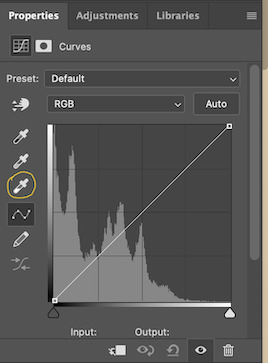
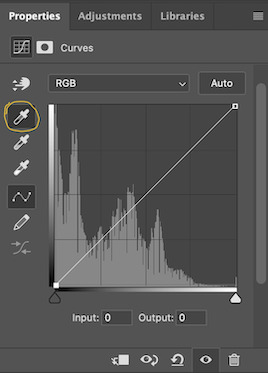
The first thing I do is white balance using a curves layer. To do this, I click the little circle thing in the toolbar below the layers, and then click curves like so (you'll do this every time you want to add a new layer):

And then I click the bottom eyedropper tool on the left-hand side:
Then I click the lightest white part of the gif. (I’m not sure how to explain this well, but it basically white balances that spot to make it pure white. Like, if I clicked on the gold part of London's bracelet, then the whole gif would turn out really blue because it would be trying to white balance the gold) (hopefully that makes at least a little bit of sense)
Anyway, there’s a trick I use to find the lightest part of the gif; hold down the option key (or alt if you’re on windows) and while you’re holding down the option key, drag the little white arrow on the right-hand side:
(i apologize for the quality of the screenshots, tumblr keeps destroying them :/ let me know if I need to clarify anything)
Then I use another curves layer to do the same thing with but with the blacks. So, I add another curves layer, and then click the eyedropper tool at the top this time:
And then I click the darkest, black part of the gif. You can use the same trick by holding the option/alt key and dragging the triangle on the left-hand side:

Next, I add a levels layer. I drag the middle lever thing to the left, and the left lever to the right. (I don’t usually touch the little lever thing on the far-right, but it’s really up to personal preference. I learned to color gifs by basically messing around with settings, so I’d recommend doing the same and just seeing what you like best):
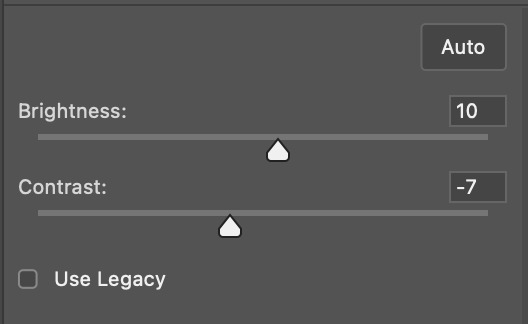
Finally, if I want to go even brighter, I usually add a brightness/contrast layer. I typically turn up the brightness a bit, and turn down the contrast. But, since I brightened a lot with the curves and levels, I usually don’t go that far. These were the settings I used for this particular gif (even though I'm going to share most of the settings that I used, I wouldn't recommend using the exact same ones on your own gif as it'll really depend on the scene you're using):
II. VIBRANCE
Now I add a vibrance layer. I like my gifs to be bright and vibrant, so I usually turn up the vibrance, and turn down the saturation a bit. These are the settings I used for this particular gif:
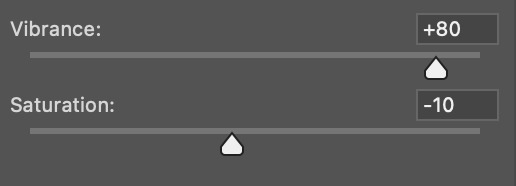
And this is what the gif looks like so far with just brightening it up a bit and adding vibrance (it might look a bit too bright right now, but I'm going to fix that in later steps):
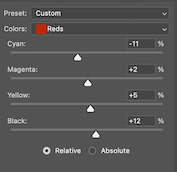
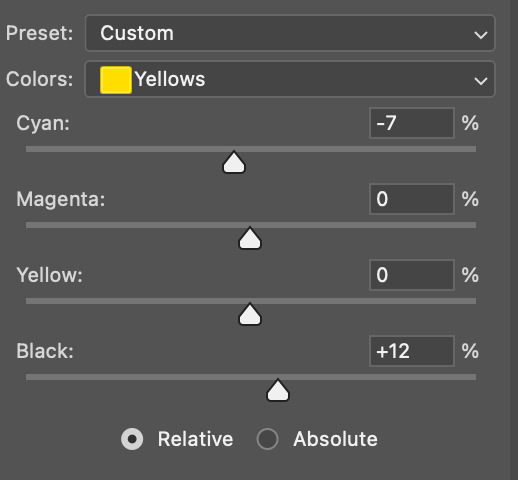
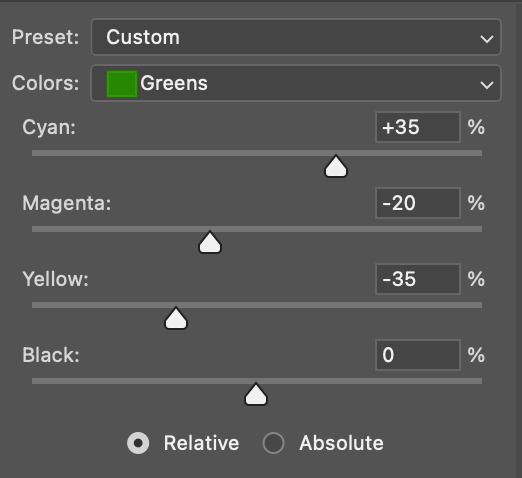
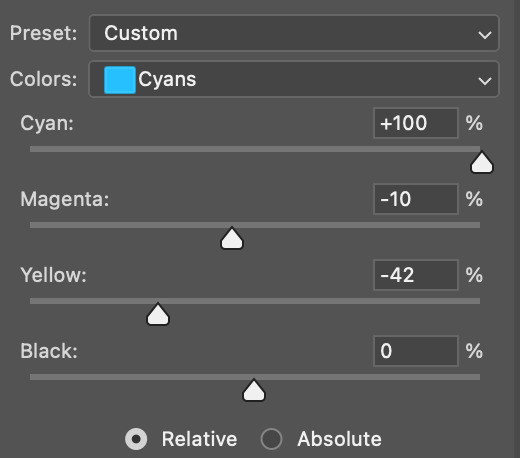
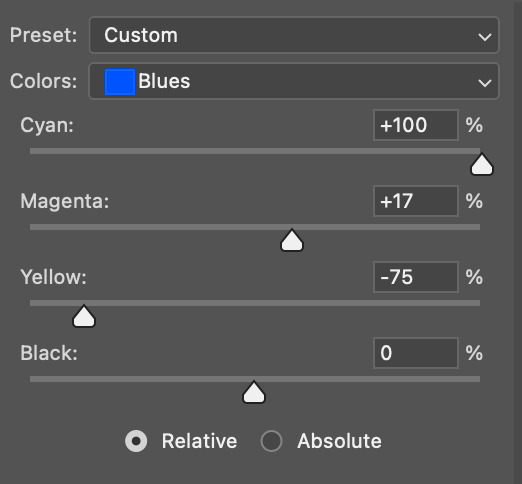
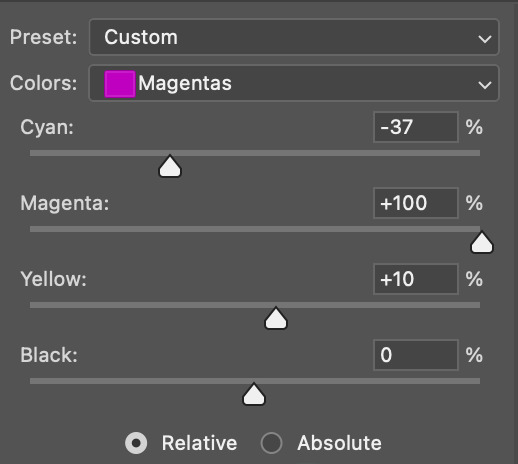
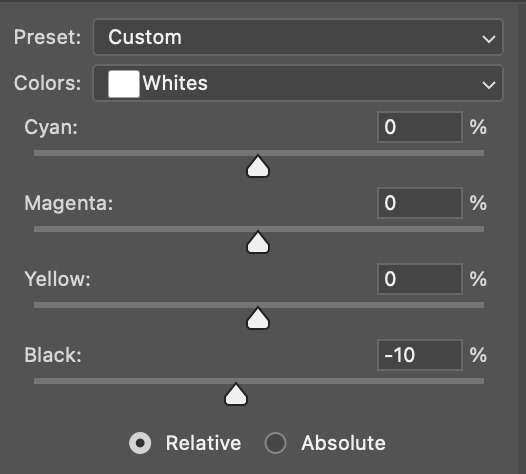
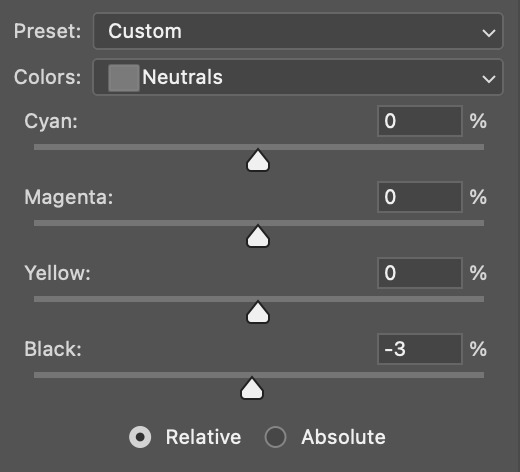
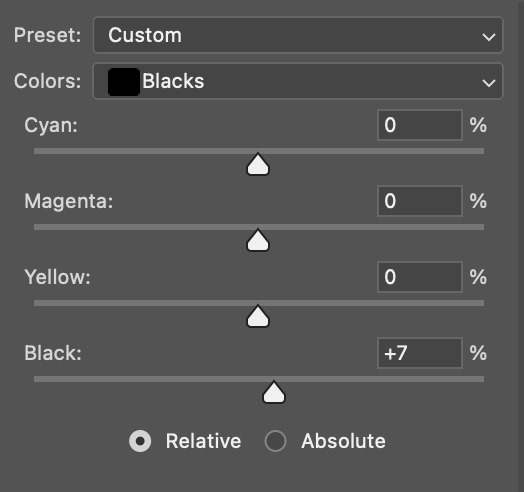
III. SELECTIVE COLOR
Now, I add a selective color layer. The reds and yellows typically affect skin tones, so this is where I'll start to fix London's. These are the settings I used for this gif (I usually wouldn't change all of the colors, but this is just one of those situations where they happened to be present in the scene I'm giffing):
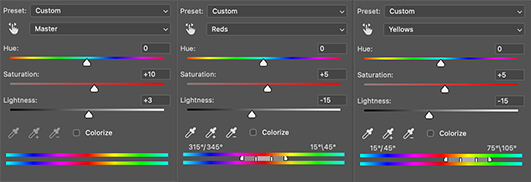
IV. HUE/SATURATION
now I add a hue/saturation layer. I typically turn up the master saturation to +10 and the lightness between +3 - +5 regardless of the gif. Then if I still need to fix skin tones, I'll mess around with the reds and yellows. These are the settings I used:
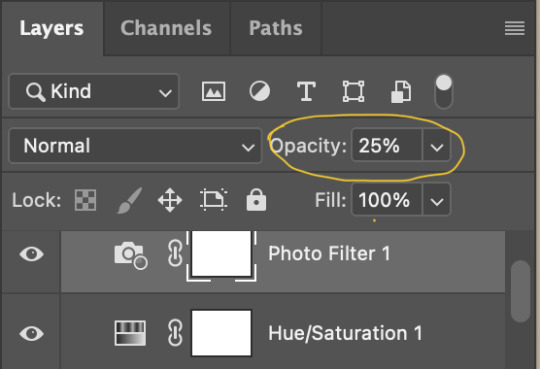
V. PHOTO FILTER
Next, I add a photo filter. I usually stick with the default one, I keep the layer set to normal, and I turn the opacity down to 25%:

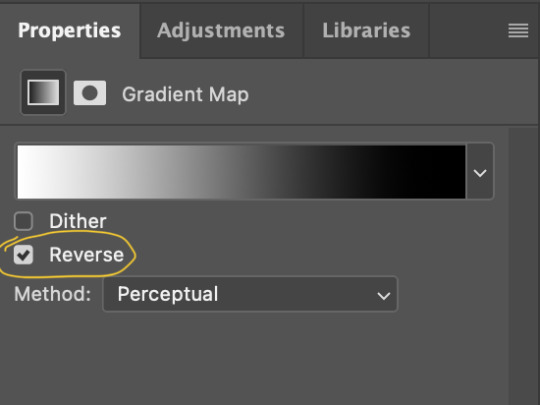
VI. B&W GRADIENT MAP
finally, I add a black & white gradient map, and I click the little box to reverse it:
Then I set the layer to soft light and I turn the opacity down, between 10% - 20% depending on the gif:
A lot of times, I'll stop here. If I'm satisfied with the way the gif looks, and London's skin isn't too pale/orange/yellow etc, then I could just add my watermark, export and be done. But, there a few other optional steps I might take if I'm still not quite happy with it.
VII. OPTIONAL
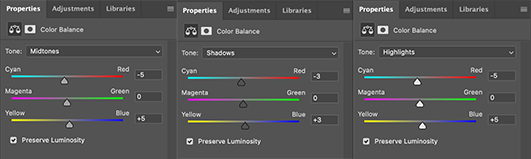
Usually the next thing I'll add if I've decided to keep going is a color balance layer. It obviously does as it says, helps balance out the colors, but some gifmakers also like their gifs to have like, a reddish tint or a bluish tint or what have you, so this can help with that too. I wanted to balance out the reddish/yellowish tint, so these are the settings I used:
and this was the gif before the color balance:
and after:
And if I want to play around with the colors a bit more, or fix the skin tones further, I might add another selective color layer or a hue/saturation layer (or both, depending).
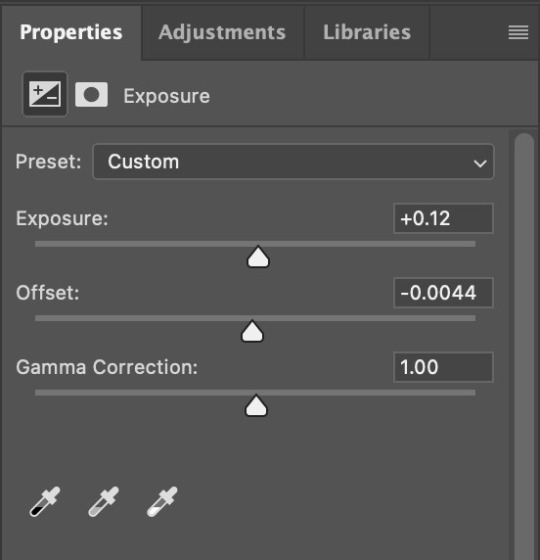
Rarely, I might add an exposure layer. (I added one to this gif for the purposes of this tutorial). These are the settings I used for that:
And if the gif came out a bit too bright, I might add another brightness/contrast layer, except this time I would turn down the brightness and turn up the contrast (again, I did that with this gif for the purposes of this tutorial).
And, that's pretty much it! This is my finished gif!
Like I said earlier, I pretty much learned how to color by messing around in photoshop, so I would really recommend playing with the different layers and settings for yourself, as well as checking out other coloring tutorials and other gifmakers methods and see what you like and what you don't. And finally, the best thing you can do is just,,, practice. I've been gifmaking for about seven years, but I feel like I didn't really become decent at it until this year
Again, If you have any questions let me know! and feel free to tag me in your creations! #userzackmartin 💕
#*tutorials#tutorials#gif tutorials#coloring tutorial#gif coloring tutorial#flashing gif#flashing gif tw#i'm not really sure it counts but just in case#flashing tw#dailyresources#photoshop tutorials#*
45 notes
·
View notes
Text
Fundamentals 1: Week 5
22nd March
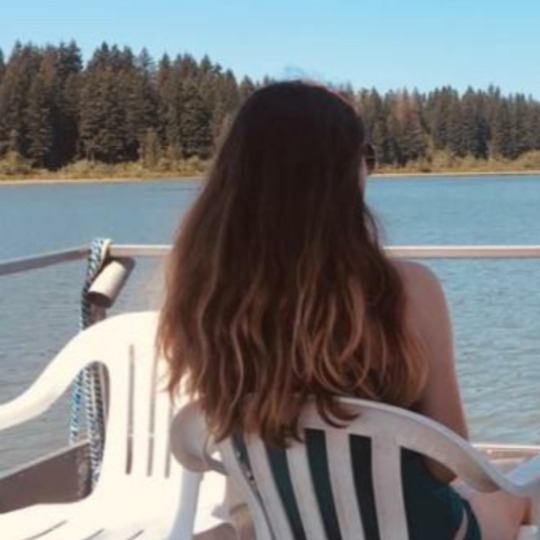
We were given a homework task this week to find two images, one that would be selected, cut out, and then superimposed onto the other one. Exactly what we just practiced with the hummingbird but now with the freedom to choose our own images. I really didn't know what to do for a while but then had the idea of finding a realistic dragon image and putting it onto a grassy landscape (game of thrones kind of stuff). Here are the two images I am going to use:


The first thing I do is work on selecting the dragon to create a cut out. I create a copy of the background image of the dragon and get to work. I used the magnetic lasso tool to help me quickly go over the outline of the dragon to create my selection. The magnetic lasso tool really helped me with the awkward edges and it was fairly easy to control and delete points if they went off track. Here's what I ended up with after creating my mask:

I knew it wasn't going to be super tidy so I placed the mask on a layer background that colour matched the mountains in the background landscape image so that I could see which areas I needed to erase/ blur out. Unfortunately I forgot to take a screenshot of what the dragon looked like before I erased all the white ares around the outline but here's what it looked like afterwards:

I'm ready to place the dragon onto the landscape photo so I copy and paste it onto the image:

I feel like it doesn't quite match the lighting of the landscape so I open up my curves palette, ensure that it will only effect the mask, and make slight adjustments to the brightness of the dragon by making the shadows slightly darker and the highlights slightly lighter. This creates some more intense shading on the dragon which suits the shading of the landscape a bit better. I also wanted to adjust the saturation of the dragon as the landscape is quite vibrant and I wanted to see if making the dragon slightly more saturated would help it fit into the picture (even though I'm very aware it's not going to look super realistic because it is a dragon). Here's how the adjustments turned out:


The image below is my final result. I am actually pretty happy with how this turned out. I knew it was going to be hard to make the dragon seem like it was actually flying around in the grassy landscape but I think I've done well given my new experience and skills that I learnt today with Photoshop. I think if I were to add more to this I would want to add a shadow on the grass that is underneath the dragon to make the image a little bit closer to appearing real. I did play around with trying to make a black copy of the dragon which I turned upside down but after fidgeting around too much and not being happy with how it looked I eventually called it a day and gave up. Overall, this was quite a fun homework task and it showed me how I can mess around with Photoshop tools in my own time to improve my skills.

0 notes
Note
Hey, baby gay here, wanting to dye my hair for the first time and I saw you were posting about hair dye, do you have stories about your experience with it and/or any good brand recommendations? I'm excited but also nervous, I don't want to screw it up. Sorry if this is weird for me to ask
No don't apologize I love talking about hair dye!! (I'm such a nerd lol)
The first time I ever dyed my hair was in fourth grade, I think. I was growing out a pixie cut at the time, so my hair was a shaggy mess, and me and my best friend put red streaks in our hair together. At the time, I thought it looked badass. I can tell you now that it did not. I looked like a ZhuZhu pet.
Since then, I have dyed my hair a LOT. I had it blue at one point in middle school, VERY briefly. I dyed it royal purple for a part in a show after that, decided I liked it, and stuck with varying shades of purple for several years. Gradually I shifted from purples to dark reds and pinks.
At the beginning of last year I had been planning on getting a haircut and reupping the dye because it was both fading severely and starting to grow out. Then quarantine happened. I figured no one would see it, so why bother? I let my hair grow out through the summer, got it cut when it started getting unmanageable, and by fall all I had left was a tiny bit of blonde at the tips. Almost all of my hair was back to its natural brown, and the small amount of pink left in the lighter ends was nearly invisible.
I didn't really realize how much having pink hair had become a part of me until I literally stopped recognizing myself in the mirror. It just felt wrong.
So I redyed my hair.
For a while, my hair was the right color and life was good. But, as inevitably will happen, it faded out again.
So I dyed it again! (which is what I'm assuming you saw my posts about)
So that's a kind of long story about what having dyed hair has been like for me. It's fun! I enjoy it! I hope you do too!
As for recommendations - if you're doing it in a salon you get whatever they have. If you're having an independent hair stylist do it they'll likely discuss all of this with you and have a much better idea of what they're doing than me. If you're doing it yourself at home, I have a few favorites for dye brands.
For a long time Splat was my go-to for quick and easy bright color. It's reasonably cheap, has straightforward instructions, and lasts a decent amount of time. I like to think of Splat as the working man of hair dye - nothing fancy, but solid quality that gets the job done. Unfortunately, it's a lot harder to find in stores now than it used to be. (You can still order it online if you're dedicated)
Punky Color is great for vibrancy, but it washes out almost completely in just a few weeks. Good for when you might be wanting something more temporary, not so great for someone like me. It's vegan though, if that's something that's important to you.
*just found out that Splat is vegan as well, I was not previously aware of that
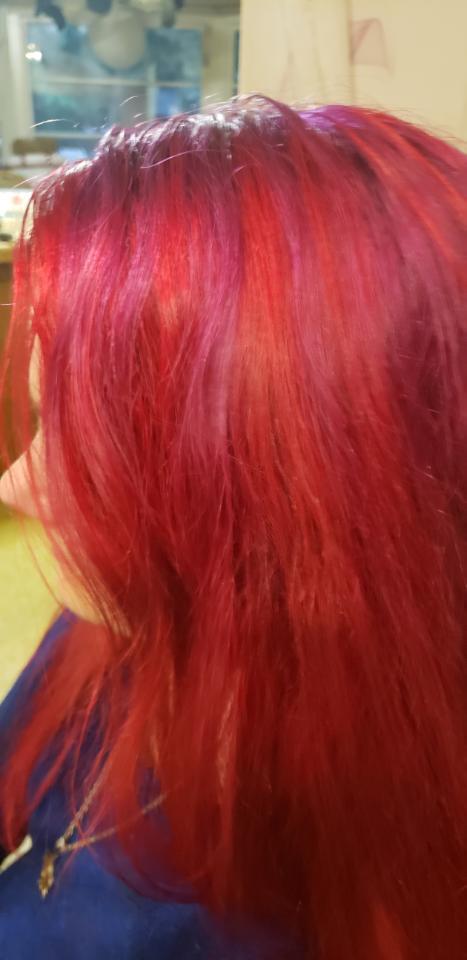
What I currently use is Arctic Fox (also vegan, apparently. i'm learning new things today), which I absolutely ADORE. It's what you see in the picture above, and it's the best hair dye I've encountered. It comes in an incredibly wide range of colors with various levels of saturation, it lasts longer than anything else I've tried, and IT COMES IN BOTTLES. I know you've never dyed your hair before anon, but this is a BIG DEAL. Most do-at-home hair dye kits come in bags inside boxes that you squeeze out and mix yourself. There's almost always dye left over, especially if you don't have a lot of hair. It's messy and you have to deal with the extra. Arctic Fox is RESEALABLE, EASILY STORED, AND REUSABLE MONTHS LATER.
Can you tell I love this dye brand?
The lack of damage compared to other products should also be noted - when I was redoing my hair the other day I got distracted and ended up leaving the dye in for almost three times the recommended waiting period. (Believe it or not, I was watching She-Ra. Yes. I know. We all know. I'm very gay. This post has thoroughly proven that. Moving on.) My hair is absolutely fine, still soft and fluffy, and hasn't started falling out (yet).
Also, it smells really good. I'm not kidding.
Some general notes on hair coloring: if you have dark hair, you're going to want to bleach it if you want the color to stand out at all. If you flat iron or curl your hair regularly, or if it's chemically straightened, this can cause a lot of damage to the hair. You have been warned. Also, if you're wanting the dye to last a long time, invest in color-support conditioner (I use Keracolor). It's worth it. I promise.
Other than that, I wish you luck in your hair coloring journey anon, and I apologize for how long this got. Hope some of this is helpful!
(tumblr gays feel free to add on to this post with your own hair dye experiences)
#ask box#thanks for the ask!#this was really fun i got to geek out about hair dye#long post#hair dye
1 note
·
View note
Last Seen Blogs

tbzonline
TBZ Online

nachanadia
nachanadia

damselofblueroses
il nome della rosa

zomacto
Untitled

so-tellmeimascrewedupmess-blog
So tell me i'm a screwed up mess..