#I'm gonna need to find a way to photoshop some icons if I wanna use them or w/e
Note
hi hi first of all I wanna say that i absolutely adore your icons! thank you som much for making them! i was going to ask how you make them if you don't mind? i wish you have an amazng day! <3
Hey Nonnie, thank you so much, I'm very happy you like them! 🥰 I wish I was eloquent enough for a proper tutorial, but I'm gonna try it for you 😌
If I don't make sense, there are a lot of helpful tuts around tumblr, here are some of them: x x x x 😅
Assuming that you know your way around the basic Photoshop tools, let me sum up in a nutshell what my process is:
REMOVING THE BACKGROUND
I usually get a picture or grab a screencap with a good enough quality, open it in Photoshop, and based on its complexity I select the object with my Pen tool, brush tool (on a layer mask), or some combinations of these with other selection tools (magic wand/quick selection tool) - most of the times it is a combination of all of the above. 😅 (watch this tutorial if you want to cut out a subject that is a more difficult shape e.g. messy hair, but there is a contrast between the subject and the background)
I don't erase the background: I cut the object using the layer mask, in case I need to add/get rid of some pixels after colouring and resizing the picture, and it’s also a tremendous help when I use different tools to remove the backgrund.

2. COLOURING
When I have my subject cut out, I create a new file in 150x150px, drag and drop the subject's layer and resize it with the Ctrl+T just to have the freedom to decide which parts to be included in the icon or in case I want more versions of the same picture, just like here (also don’t forget to delete the background by double clicking on it >> Enter >> Del) :

This is when I add/remove pixels on the layer mask if needed, and use some basic colouring on the picture, the layers added as a clipping mask so it will only affect the layer of the subject.

3. ADDING THE BACKGROUND + MORE COLOURING
Then I add some gradient and texture layers below my subject's layer, and in the blending options I add some drop shadow to my subject's layer. (If you're aiming for a more complex icon, there are icon textures around the internet too, here is one.)

To make the picture blend into the background more smoothly I usually add some adjustment layers as a clipping mask to the subject's layer to adjust the colours more to the background, and/or add some more adjustment layers on the top of all the layers (not as a clipping mask) that will affect the background and the subject as well.

+1 CHANGING THE COLOURS
If I want to blend my subject's clothes more with the background, I add a Solid color layer as a clipping mask somewhere over my subject's layer, using the Eyedropper tool I choose a colour from the background (or something around it), I set the mode to Colour, with the layer mask I remove everything I don’t want to colour, and if needed, I add another layer with Soft Light or another mode that works with my picture.
That's how I changed Javi's originally orange shirt for this set:

Sometimes I add a bit of a smart sharpen on my subject's layer with some fading, so it's not that aggressive, then I save the icon in a PNG format.
Hopefully the tuts and my description could help you a bit, but let me know if you need some more help with any of these steps... if anything, I can help you find a nice tutorial 😅
39 notes
·
View notes
Note
Hey hey! Hope you're doing well!
I feel a little dumb for asking this, but my knowledge on gdocs is very limited. But, regarding your #𝐔𝐒𝐄𝐑𝐘𝐄𝐎𝐍𝐉𝐔𝐍 template, is it possible to change all the red? 🤔 If so, do you mind giving a quick explanation on how?

I'm doing amazing, thank you ! Hopefully the week is treating you well. It's entirely possible to change the red on the document so there's no need to worry - some people who may not have a lot of experience with docs might get lost on how to do it and that's okay. luckily, i'm here to teach you.
the explanation will be below this read more line, and will include some images to help give visual aid on what i'm speaking about so it's not all letters. i'll slot this ask in my docs tag just so people who may have the same question can see. regardless, if there's some things that are still unclear after this ask don't be afraid to hit me up again.
firstly, i'm going to get the image out of the way just in case there's any misunderstanding - but you cannot change the red in this image as it was pre - made in photoshop with a colour isolation effect psd set to red. sorry !

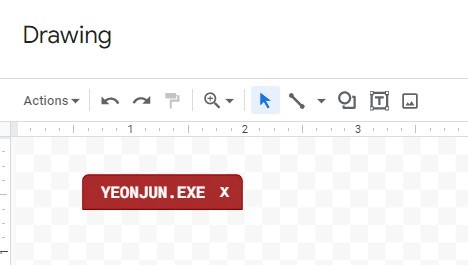
lets change the toolbar ! you're gonna wanna double click on yeonjun.exe for example, which should bring up a new window with the doodle inside like this.
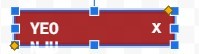
since the text is designed to take up the entire box and we want to change the box, you're going to have to click on it and drag one of the little blue squares on the side out of the way. now, you should be able to select the box like the image below.
with the box selected you're now going to look at the toolbar under the word "drawing" as seen above. you should see these two icons somewhere - a bucket and a pen. these are how you change the colours, but remember that the bucket will paint the entire box and the pencil will do the outline colour. if you don't like the colours provided, you can press the plus sign under the "custom" heading which is above all the colour swatches and input the hex code of the colour you'd LIKE to use. this is what the icons look like. remember to shift the text back and click save and close.

now repeat this for the other little toolbar headers - you can also do this method for the red status on the profile picture beside 11:04 am.
the hardest part is over, so lets go over dividers and heading titles.

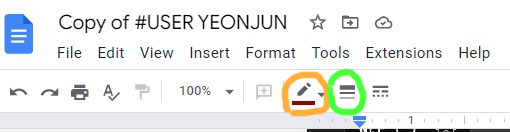
heading titles - just click on the red line and look for the pencil icon i've circled in orange and change the colour. additionally, if you want to change the chunkiness of the border you can refer to the green circled icon and adjust accordingly. you're going to unfortunately need to do this step for every divider - and be aware that some images may be nudged if you choose to mess with the divider size.
lets now change the meet the admin divider - this method is also going to apply to the positive & negative traits section.

we're just going to click on the box as if we're about to type and find the two circled icons again, which is circled below. change the colour there, easy as pie

but what about text?
don't worry little dude, i've got you. we're going to highlight our desired word - basics, for example, and look in the same place as the image above, but we're going to click the icon circled below.

and that's you ! everything should be changed. again, any more questions and you can just send me another ask - i'd show you how to change the background from black/grey to other colours but i think i'm running out of image space :((
7 notes
·
View notes
Note
So. This is something I desperately dunno what to do, but I saw you accept questions soooo... What's your tips for getting people to follow and write with you on Tumblr? I've never wrote here, I'm on Twitter primarily but I'm really scared because this is a whole new environment and I'm seeing a LOT of different things - Icons, promos, tags. . . It's a lot to take in for a newcomer. Much less to the Dead By Daylight RPC - Much less as an OC writer. Probably don't help I'm stuck on a phone as I don't have a computer. . . Tips for making friends or getting follows/interactions??? I know I'm repeating this but god, I'm scared because a lot of blogs here I peeked at are intimidating me with "selective" and stuff thrown everywhere...
hello my love!! okay, i'm gonna start by just. god, congratulating you, i guess, because tumblr is terrifying. like it's the most nerve wracking experience for people who haven't written here before!! so well done for reaching out, bc it's so so easy to bottle it up out of fear of people reacting badly, and i can promise you, anyone who reacts badly is NOT someone you want to be friends with. we've all experienced everything you're going through, and for someone to sneer at others for being brave and sensible enough to ask for help? we don't vibe with that.
now! i'm gonna be boring for a second and add a few handy definitions here, okay? okay!
selective: they only write with mutuals.
semi-selective: they write with mutuals, but also if a non mutual wants to send them a few things, they might respond.
highly selective: they only write with mutuals and they're very selective about who they become mutuals with
mutuals: someone that you follow who follows you also.
promos: promos are just banners that you reblog in order to find new followers. they have your url, maybe links to a rules page or bio, a cool quote maybe? again, not essential, but if you like using them, go for it! many people can commission you one if you don't fancy wrestling with photoshop!
tags: literally tags are just the hashtags you add at the bottom. see that little # button? that's where you throw in some tags! it's not very vital, but people usually put in the url of their writing partner, or any potentially triggering content in there. lots of people have special tags just to help them find their replies and wishlist stuff and all the rest!
triggers: basically any content that might trigger a strong negative response from someone. a few basic triggers that i always tag are guns, hospitals, blood. if they're visual or written, just hop them into a tag so new followers can blacklist them!
icons: icons are absolutely not necessary, but if you want to use them, they're basically screenshots of your character's fc that you crop down to a specific size, and you can change the lighting and stuff in photoshop! many people are starting to no longer use them though, so it's entirely up to you whether or not you wanna use them!
now. here's the main thing. this site is challenging on many levels. if you scroll through my rp advice tags, you'll find a lot of people who encounter these challenges and need advice or help in overcoming them. the most important thing is that you know you're not alone. everyone, including you, is always welcome to send me a message! but there will be good days and bad days with this site.
my best advice would be to make a post, introduce yourself, then ask if people might like to plot or chat with you! in your tags, put in things like "oc rp" or "dead by daylight rp". it DOES get easier, but it's like when a baby learns to walk. you'll trip over a lot, you might feel like you're crawling, you'll need a group of people there to help you along the way. but one day you'll be sailing through this! you'll be offering ME advice before you know it!
i hope this is helpful, and as always, if there's more i can do, feel free to shoot me a DM or an ask! i might be a bit late replying, but i'll be around as time and energy and schedules allow!
28 notes
·
View notes
Note
Hi! I'm sorry to bother you but I was wondering if you've ever done an icon tutorial? Your icons are really the most beautiful I've seen, and I'd love to know your secrets 😊. But if you aren't interested in posting them I totally understand. I hope you're having a great day!!
EXTENDED ICON TUTORIAL
Hey sorry this took so long to get around to but I finally felt inspired to make this. A couple things first. I want to give a special shout out to argetnallison cuz I learned how to make icons from her tutorials here. I picked up a few tips and tricks that aren’t included in other tutorials so we’re gonna call this an extended icon tutorial. I’ve also been told I explain things well but if there’s anything from this that needs clearing up later just send me a message and i will be happy to help guide you through it. This Is my first time making a tutorial so bare with me if I ramble.
we will be going from this:
to this
to this

Ok so things you willneed..
photoshop (i personally use the 2014 CC version or something like that but that’s just my preference for layout and stuff)
kmplayer (kmplayer is how i get most of my screencaps. Sometimes I go to google or screencapped.net or other sites that have precapped content when i feel lazy)
Alright so we start off with figuring out which screencap to use.
so basically here i open whatever movie/tv show episode file i want to use and skim in kmplayer till i find a scene that works. Then I hit start and play it until i have the scene i want and then stop,

these are my capture settings for kmplayer.
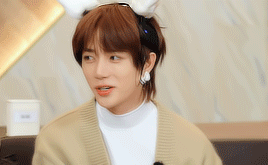
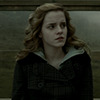
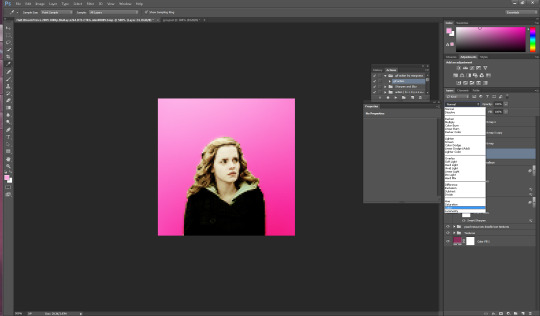
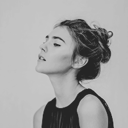
Alright so I picked this scene of Hermione in HBP (aka the hardest movie to color.
Okay disclaimer here, I don’t actually use anything on the left and rely totally on shortcuts on the keyboard so that’ll be how I explain things here.
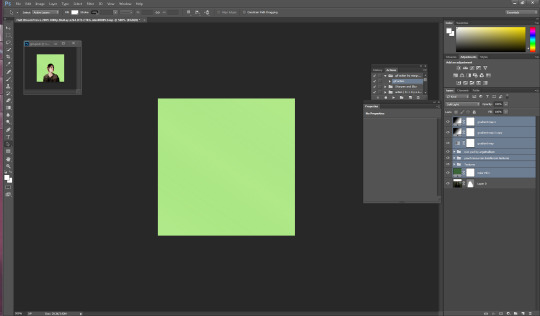
People do this step differently but what i tend to do is crop my image before i mask it. I hit “c” on my keyboard. I set my w x h at the top to 100 x 100. Then what i do is I take my mouse and click on the top bar of the crop box and extend it till Jyn is a more icon like size.
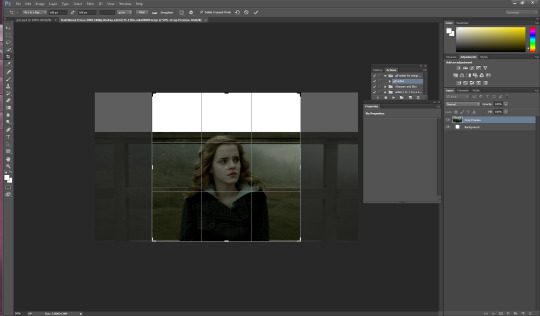
after she is at a size I think is ok for this icon i hit enter and it looks like this

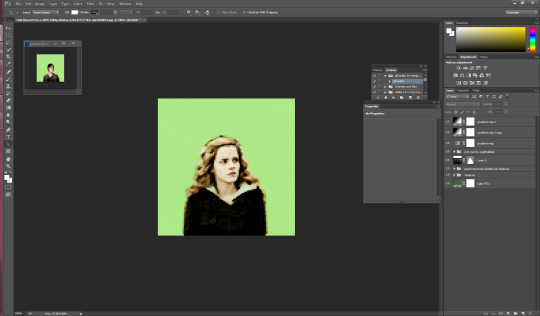
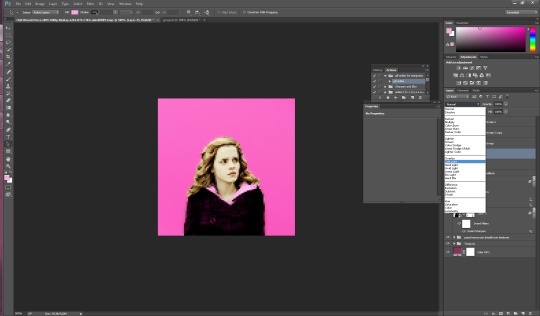
alright now for the fun part. this is honestly the hardest part of icon making, the rest is simple if you’ve used photoshop before. Its time to mask the image and get rid of the background around Hermione. So we start by pressing “p” on our keyboard, p for pen is how i remember, and then we start at one end of her shoulder and work our way around. Basically how this works is u click around the image of her and keep clicking until u have an outline around her like I have below. this does not need to be perfect because we’re gonna have to use the eraser tool anyways.
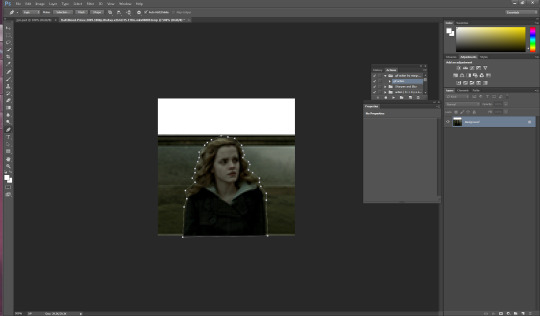
you should have something that looks like this. Also tip here is that you can use ctrl + and ctrl - to make the image bigger or smaller when doing this part.
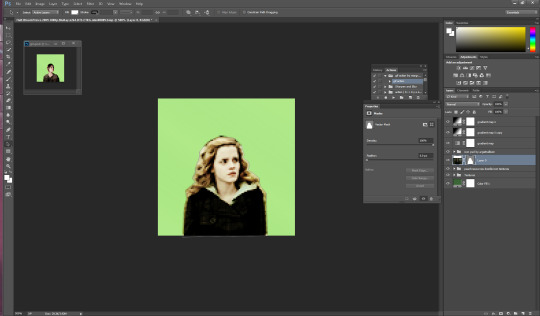
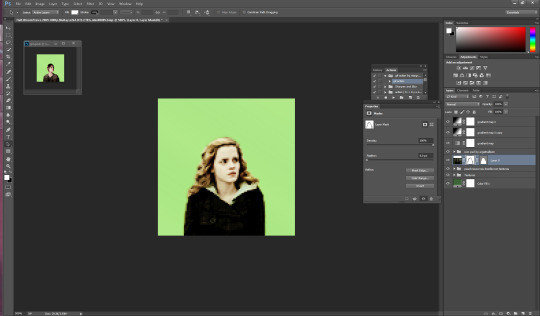
ok so now we have a rough outline of hermione and we wanna create this mask so we right click within the image somewhere and we hit “create vector mask” which should be the first option (i donno what its like in other versions of ps sorry)

ur image should now look like this
be sure your starting dot and your connecting dot come together at the end or it won’t let you do this part.
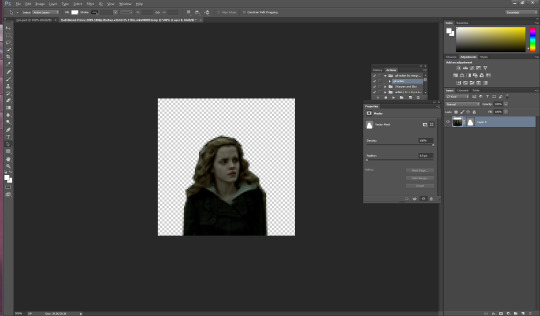
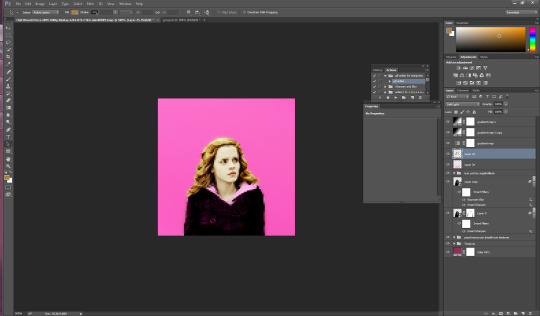
Alright so here is where i add my psd and my fancy textures and things. I use argetnallison’s psd (no claiming as ur own, give her credit if you use this) and adjust it as needed because i am really bad at making my own (seriously props to everyone who makes their own psds its hard and i salute you).
so how I do this next part is i take my psd file (this also contains my textures and stuff to make it easier and quicker to do stuff) I take the jyn file with the psd and i ctrl/alt/a toselect everything quickly like this and then drag it onto the hermione image.
i move some of my layers under the hermione image like the solid color layer and the texture pack so she’s visible again and keep going.
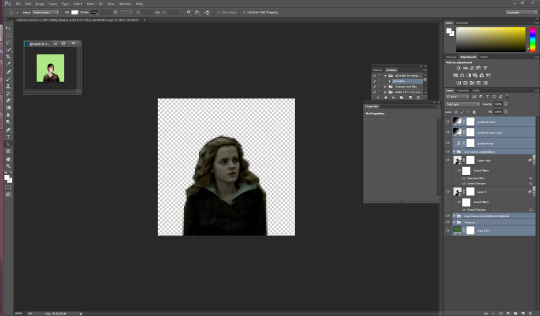
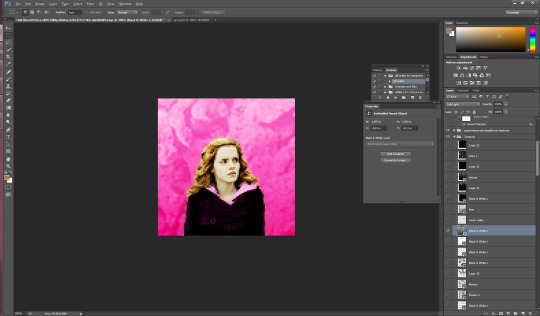
alright so another thing to note is if u click on the mask next to hermione you will get a box that has the vector mask and density and feather
you’re going to want to go to feather and where it says 0.0 make it 0.3 (some people do 2 or 1 just mess with it till it suits you).
so i have set mine to 0.3 and now its time to erase the stuff around hermione that’s still visible. i press e on my keyboard and zoom in on it a little Here it is also really helpful to create another layer mask so that it doesn’t mess with the mask of her you already have (ps weird and it’ll get messy trust me) so i go down to the bottom right and hit add layer mask its the third one from the left

the white square between the hermione picture and the mask is where you’re gonna wanna click and then start erasing.
if you mess up along the way and erase too much you can press b on your keyboard for brush and it’ll bring it back.
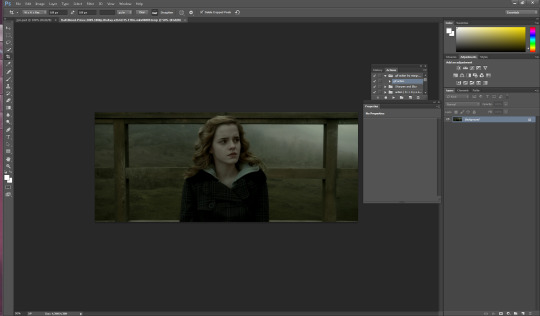
ok now its time to sharpen the image. i have an action i really like but its from a blogger who’s changed user since then and i donno her new one or i’d 100% credit. I will try and find it and add the link here. anyway I convert the hermione picture to a smart object (right click on the hermione picture and its on the left towards the middle) hit play and add the action to the image Mine looks like this now

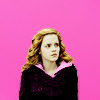
so for this next part i usually have green as my default layer but i wanna change the color so i’m gonna double click on the dark green box

i’ve settled for this pink. Now if you follow my icon making at all you know I like to match my background and clothes together so that’s what i’ll show you next.
so next its time to use the eyedropper tool (which was very confusing for me initially so if you have questions don’t hesitate to ask). We start by hitting “i” on our keyboard and finding a spot in our picture that we want her to match so I’m going to click some of the lighter pink in the top left corner.

as you can see in mine in the top right it now has that pink we just selected so now we get to add it to hermione’s jacket.I usually do it right above the psd so i make sure i have that clicked and then i make a new layer for the jacket by hitting ctrl/shift/n on my keyboard. with that layer selected, I hit ‘b’ for brush on my keyboard and set this new layer to “color” then i hit enter and begin to brush over the jacket (in my ps its the second to last one down). The default name is “normal” and its right next to opacity”)
now my picture looks like this: (you can use the “e” to erase if you brush over her skin by accident as well)

now its time to do the same with her hair so i do ctrl/shift/n again to create another layer but this time we’re going to set it to “soft light” instead of color.
just like with the jacket we are going to use the eyedropper tool again but we’re gonna click on a lighter part of her hair.
you can change the opacity here if you would like but for this image i am going to keep it at 100%.
You could honestly leave this image here and have a perfectly good icon but a lot of people have asked me how i do the circle ones like my current one so I will take this one step further. (i learned from this tutorial here in case that helps you better).
First i’m gonna add a texture by checking one of the boxes in my texture stash (feel free to hunt on yeahps and deviantart for some seriously amazing textures that’s where i get all of mine from).
now i’m going to do a duplicate image (so that i can use the original to edit it in different colors). to do this i go to “image” at the top (third option after “file” and “edit” and then i go down to where it says “duplicate”.

i hit ok and then i begin to make my circle icon
What i do here is i convert everything to a smart object so i hit ctrl/alt/a and right click and convert to smart object.

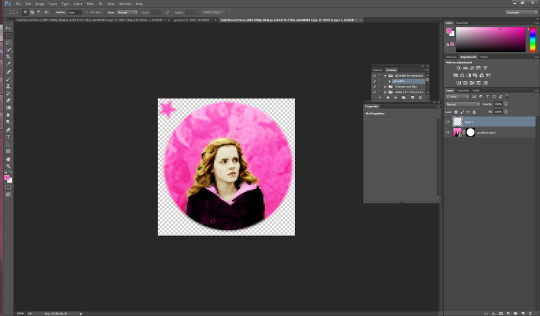
then i hit ctrl/shift/n and create a new layer where we create our circle.i make sure that the circle is white by going to the top right and setting it to white. Then i hit “b” and right click on the hermione picture
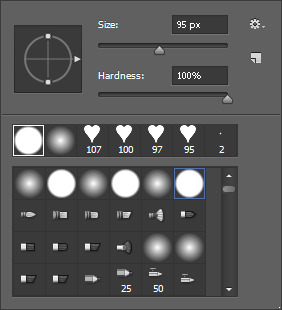
i use the selected brush and have the size at 95 px. Then I click in the middle of the image and it looks like this
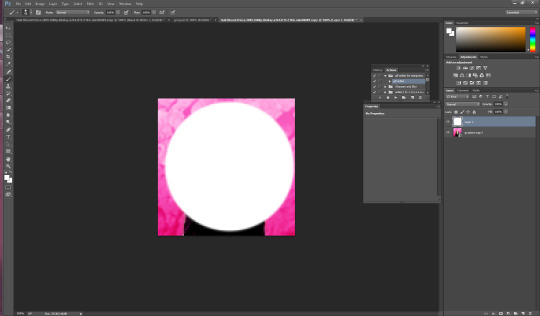
now what I want to do is make sure that the white circle is centered so i’m going to hit “m” on my keyboard Then i wanna right click and hit “free transform” in the middle. you’ll know its in the middle because there’ll be these two purple ish lines that create a plus.

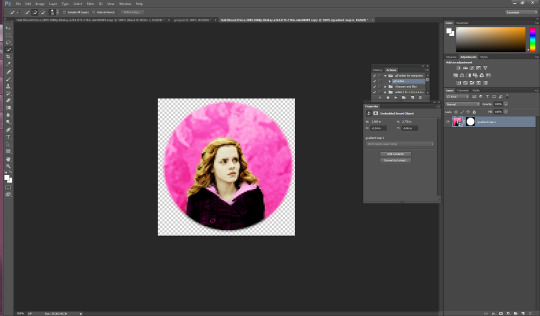
now you hit enter and you have your circle. Now what I do is hit “w” on my keyboard and click your mouse in the circle somewhere (very important to stay clicked on the circle layer here). now that you’ve selected the circle, select the pink hermione image. go to the bottom and click “create layer mask” which again is the third from the left, and you should have a circle next to the hermione picture. You should have something that looks like this

now i just click on the circle layer and delete it and it’ll look like so:
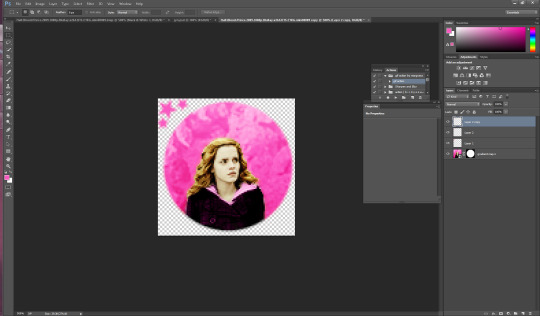
again. you could ctrl/s and save it here and leave as is but i’m a bit on the extra side so we’re gonna take it a step further and add little designs cuz it makes it look more fun.
So what I did in the beginning is I googled a ton of different types of brushes and used search things like “heart brushes for photoshop, deviantart” or “star brushes” or whatever i wanted and i just dug around until ifound what I was looking for. its a fun scavenger hunt but you can deff check out yeahps too or itsphotoshop for resources. Then you go to “edit” and all the way down to “presets” and a drop down will show up and you click “preset manager”. you will see something like this pop up
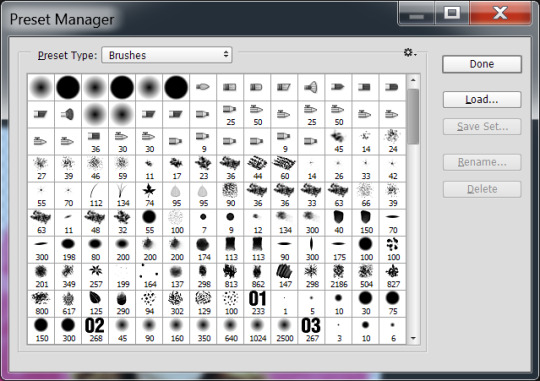
go to the right and hit load and then click on the file you’ve extracted from winrar (if you need help with this part just message me). Ok, once you’ve loaded some brush presets into your ps you can start the next part. once again you have to create a new layer ctrl/shift/n, i then click my star brush and set it to 14 px.

alrighty so before we start clicking and creating stars I want to make them the same color as the background so its time to bring out our “i” for eyedropper again and click somewhere on the pink, then hit “b” again and you should now have pink stars when you click. So Here i go to a transparent corner and i just create my star on the new layer. Sometimes i click it twice so that its more visible ut now i have something like this:

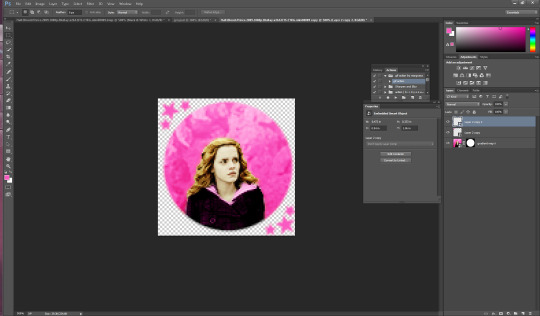
now I’m thinking i want it situated a different way so I use the “m” tool and use “free transform again” to adjust (using the corners like with cropping) to where i want the star to be.
now i have it here and i use the arrows on the keyboard as well sometimes to adjust it. Now what I usually do is create another layer for the smaller stars so i hit ctrl/shift/n again and then i set this new star to 9 px by right clicking on the picture. Then I repeat the steps above and have something like this

Now i just hit ctrl/j and duplicate the little star. then i hit “m” on my keyboard once again and move it to the opposite side of the big star.
now you have this picture:
Now what i do is i select all 3 star layers and right click and convert them to smart object so theyre easier to deal with. Then i hit ctrl/j and duplicate the stars.

now i hit “m” on the duplicate layer and click “free transform once again” now right click and hit “rotate 180″ and the result is like this

move the rotated stars to the opposite side of the picture with the mouse. Now it should look like this
and that’s it! just hit ctrl/s and save as a .png and you have yourself an icon. I hope this helps. If i need to clarify anything please don’t hesitate to ask me. This is my first tutorial so I hope I explained things ok. Feel free to tag me in ur new icons I’d love to see them!
1K notes
·
View notes
Last Seen Blogs
hanmas-hoe
butt
jesfaheys
maybe i dreamt you

writing-level
Writer (or Procrastinator, Whichever You Prefer)

ladywisteriatarot
Lady Wisteria
suzhoucobblers
Suzhou Cobblers