#Ill post pics when Im done
Text
i moved into a bigger place and now i actually have room to put up my figure collection and god its so much work fgsdd
8 notes
·
View notes
Text
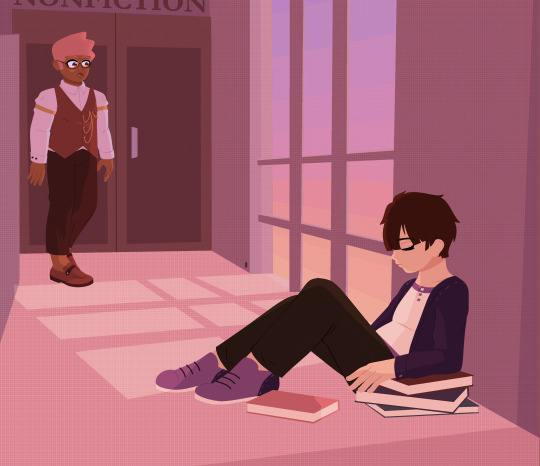
a friend who'd wait :)
#im posting this very late because i was sort of weary of how it came out and ended up messing w it until it was like 4am oops.#and i have plans tmrw so... oh well! i did my best and ill put it out while i can!#and i tried to make the scene match barnard's colors lol#finn's ocs#finn's art#i know i said id do more sillay stuff with the simpler screentone only style but i had a couple more of these in me#and this is the first piece im making thats like an actual part of the story too rather than just setting stuff for fun#i wanna write something to go with it too but for now ill just sort of briefly explain the context in the tags here:#barnard has a pretty bad case of OCD and his compulsions have made it difficult to make friends in the past#he was never outright bullied or anything but people just didnt really have the patience to deal with it#he has compulsions that include stuff like walking through doors until it feels right and needing things to be perfectly aligned#which in group settings has lead to people having to wait for him to finish his rituals and join them#they might find it tolerable at first but eventually they grow impatient and hes just... not invited to stuff anymore#but juno is a newer member of the guild who ends up frequenting the same library. hes also kinda a little weird#and they dont become fast friends or anything but just sort of naturally spend time in the same place#though they never plan meetups they eventually fall into a routine. around the same time theyd just both be at the library#and read next to each other. and maybe talk a bit. and eventually they end up walking back to the guildhall together#since theyre going to the same place after all. and juno always waits for barnard outside the door#eventually barnard asks if this bothers him. juno kinda just tells him 'of course it does' without any malice or anything. just a statement#barnard is surprised and apologizes and juno says not to. but the next day juno doesnt show up at the usual time.#barnard assumes hes committed somekinda more by bringing it up. he ends up staying there late reading to get his mind off it & not ruminate#but when he leaves juno is in fact still waiting for him down the hall (see pic) having collected a bunch of books literally abt ocd#he fell asleep bc barnard stayed later than expected. and hes an eepy guy generally. and also one very bad at expressing himself#but now barnard gets that juno's 'of course it [bothers me]' had the implication of 'but its worth it' which no friend has previously done.#and from the interaction juno was also able to understand that this isn't something barnard just does for the hell of it so. he studies.#and checks a bunch of stuff out because he thinks it could help his friend too (theres ocd workbooks and such- i remember working w them)#and thats the point where they became more ''friends'' than ''pleasant library acquaintances''#from there on they also do get into juno's problems. whole other bag of worms. but this specific scene is more about bernard from his pov#sorry about when i said briefly explain. i lied </3#but compared to the whole sequence im picturing its brief so shhh
18 notes
·
View notes
Text
time a flat circle why the hell am i usin the same loafers i bought for one cosplay of my fave antagonist for another fave antagonist
#snap chats#can i even call it cosplay. why are police sirens going off in the bg oh my god shut UP#anyway yeah ill elaborate. Super Snap Stalkers will remember my p4 era and will remember the time i did in fact do an adachi cosplay#i deleted the og post like an hour later. plus that blog's gone. but im sure some freak can find it if they dig hard enough#ew i think i was 17/18 in that pic (not at all that long ago) ok anyway.#i use the same loafers for my aoki outfit. and yeah i do Regularly wear my rgg outfits i TOLD YOU its functional cosplay i QUIT#just funny that like.... damn everything always goes back to square one LOL#these busted ass old ass loafers still rockin with me years later#if im feeling cheeky i think i will post all my rgg outfits actually. for halloween#hang on gotta be depressed and cringe for a moment#cause ive always liked cosplay but whenever i did it it never felt. Good Looking#like i always just felt like my face never worked for the charas i wanted to portray and so thats why i say with a heavy heart#that aoki's round-ass square-ass head is perfect LOL it makes me wanna throw up looking in the mirror#i got the same weird lips. ok not that squished Similar but Its Awful that he makes me feel comfortable with my face now#at least my eyebags arent double deckered... i at least look like i get sleep.. some days.#breaking !!!! objectively one of the most vile bitches in this franchise makes you feel comfortable with your body and existence#NAW to continue from last post if i had a webcam i prob coulda done a cosplay y7 stream LOL thatd be funny#anyway since this tag ramble is just pure cringe let me round it off with a final bit of cringe#the Forbidden Mention of my trans masato hc cause one reason why i have a Teehee over the thought is how raspy his voice is#and i only really now realized how right i was tonight because my prof called on me to speak and when i tried speaking DAWG.#the forbidden acknowledgement of Myself GROSS#BUT DAWG MY THROAT WAS FUCKIN CRUSTY it felt like sandpaper EW?? WATER FOR YOU?? christ. i hope that was just a one-time thing#ok im leaving now BYE
6 notes
·
View notes
Text
well its almost 5:30 am and I’m feeling accomplished af, changed my AO3 username & icon, made a new pinterest account to make boards for the new IF characters, and finally have picrews of all the IF ROs!
#also been editing willa's stuff again and ahhhh im just so happy with myself#not ignoring tags ill get to them sometime later when i have enough mental capacity to leave a good tag!#just so happy ewkrpgoihwerg now i just need to... find more pics and do a lot more hard work ugh#also already have like a background and concept for the story and yet my brain is like#'hey what if we scrapped that and... made it so it was on a boat??' like NO. bad brain. we're sticking with what we have and maybe LATER#we'll do some type of if with a boat#MAYBE#thats if this first one ever gets done and if i like it and how easy it was ughh#learning and lot and doing a lot of different stuff that pushes me out of my comfort zone and its... scary lmao#tbd#personal#also now i can finally comb through the first chap of willa's dark au and post it!!!!#who needs to fix a sleeping schedule when im getting stuff done eh?#also realized this means i need to create a fourth side blog.... halp. not now and probs not anytime in the future but eventually#PLUS picking names out my beloathed
5 notes
·
View notes
Text
Franken faceup (finally lol) under the cut :) very very long and text heavy because i had a LOT to say with the new stuff I tried :)
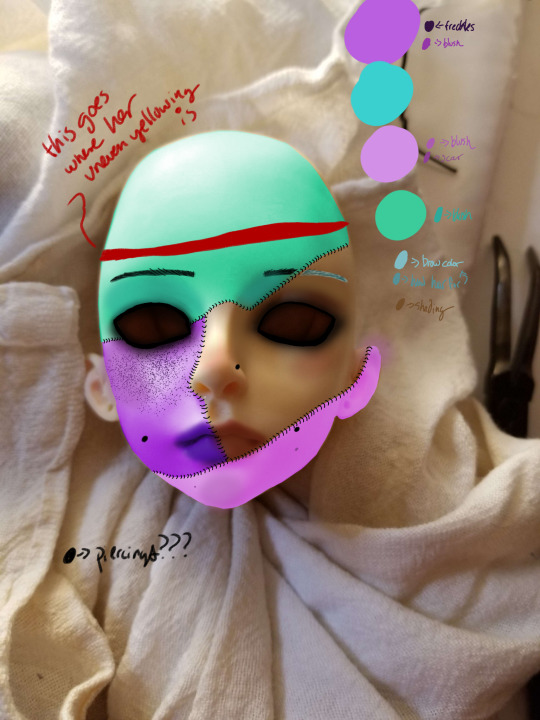
^ mockup :) you can see the placing of a lot of the stitches shifted slightly and that it was pretty dark makeup around the eyes! My big inspo for this was early pics of avril lavigne since I wanted to capture that vibe in the way of silly skater girl in this doll. I very much was kind of on the fence on this one, going back and forth on what I would do with the doll (which is why I um was postponing working on the head [outside of painting it] until now) but was convinced I would go with this.
I promise you I had plans to use this mockup. It just did not feel right when I *did* get around to the faceup so I went into it with my usual tactic of ehh it's fine I'll figure it out later which either goes really well or really bad from my experience. I had gotten some tips from a friend of mine who is a PHENOMENAL doll artist so was very hyped to put those into use as well!
I started with blushing the normal resin, not even touching the other colors until I had already gotten this layer sealed so there would be less color contamination (or that was the hope lol)
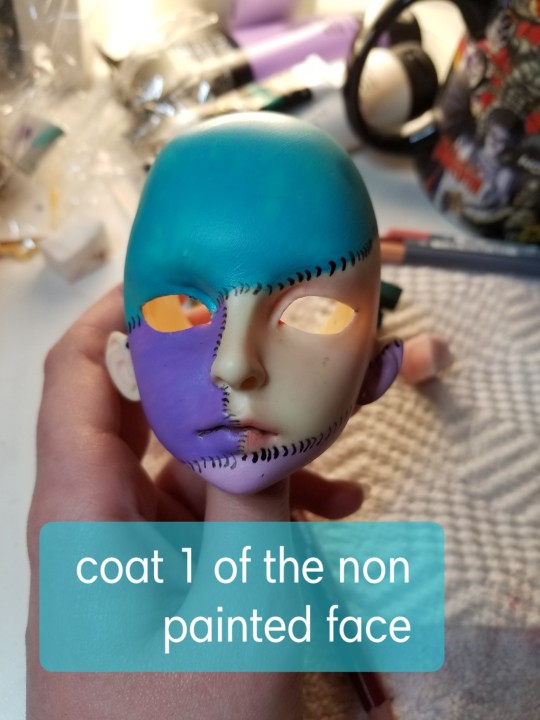
I just was focused on building up the pinks in the VERY yellowed resin to hopefully balance it out a little (with my experience with very yellowed dolls, this helps a lot in making the color a bit more balanced and life like instead of just. YELLOW. And with this head being from ~2006, she needed all the help she could get lol)
Next coat was the dark purple which shocker. This paint gave me even more issues lmao in the way that I struggled getting my pastels dark enough to really blush the cheeks and lips :/
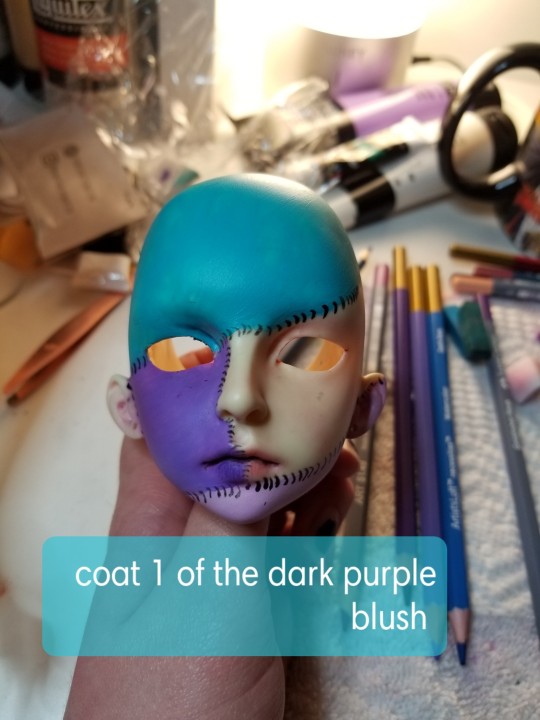
Like it's there a bit but not a ton and that was ok! My lip lines kept disappearing with my sealant so I added more and more each layer.
Eventually decided that the small areas I had to blush on the teal and the light purple could be done on the same layer, so did that next

Added a bit more of the lip lines and blush around the eye area on this layer too :)

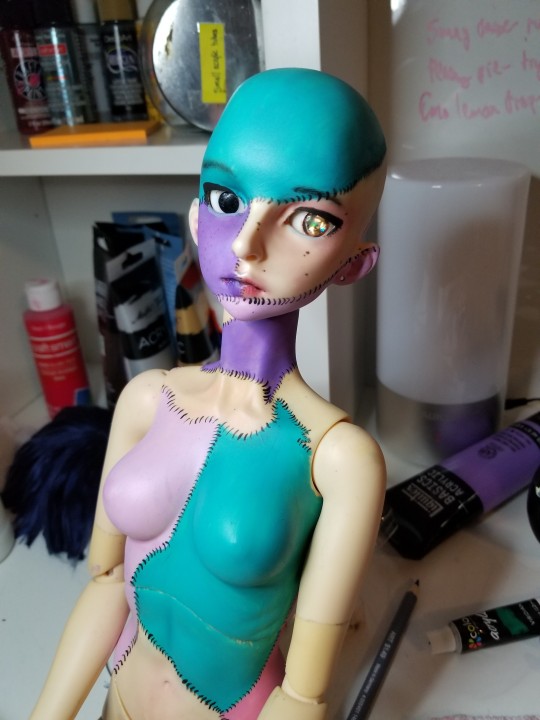
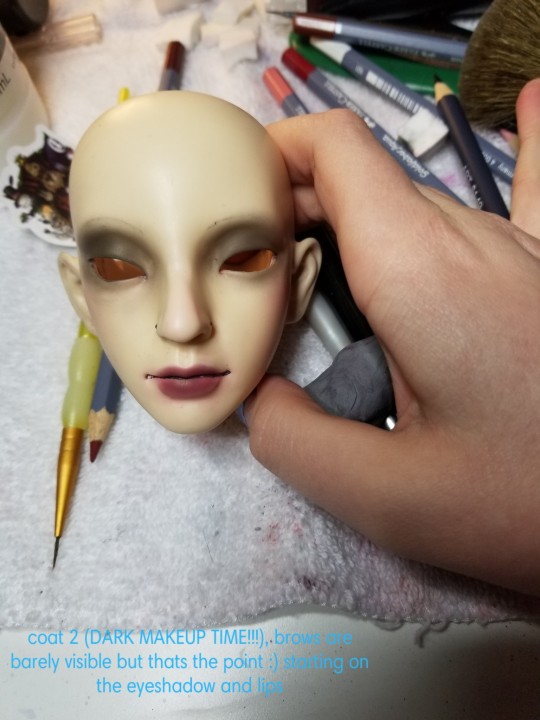
Brows were SCARY bc i was going to be trying new tactics next coat but for now, just a simple pastel outline was my goal! I was SUPER torn on how to proceed with eyeshadow (whether neutral, bright or dark) so focused on everything else (mainly getting the body blushed and getting things to look good there).
Then well. I would like to say i was just gonna do a TINY bit of watercolor to darken the purple side of the lips but then i got lost in the sauce of watercolors, adding moles, freckles, liner, and lashes with it! My favorite thing about this method of sealant (and this is a drawback to some people but to me it's a fun part) is that sometimes dust or small hairs get trapped in the sealant. And why I find this fun is that I can turn it into facial features on the doll, ie moles or scars. It's something where obviously I would prefer to NOT have it in there and I could pick it out but on this doll I wanted to gain as much skin texture as possible on each color so I let it be as messy of a sealant job as I wanted, which is why she's got the moles you see on the normal resin :)
I also used watercolors to add a bit of color where the pastels were not working well (the dark purple and teal parts of the head were giving me grief so I just got my brush wet, dipped it in my watercolors and placed it where i needed it, dabbing at it with a dry [or wet depending on what I needed] makeup sponge cut into small squares. It helped add a bit of color to the lips especially and I was very happy with how it turned out!
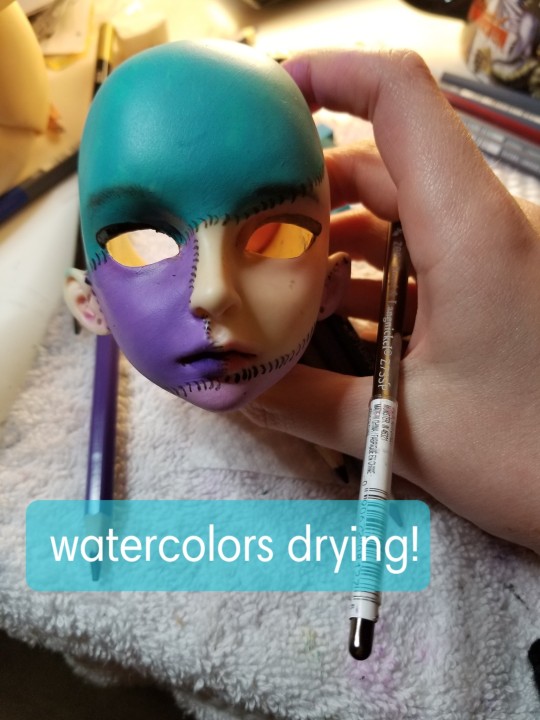
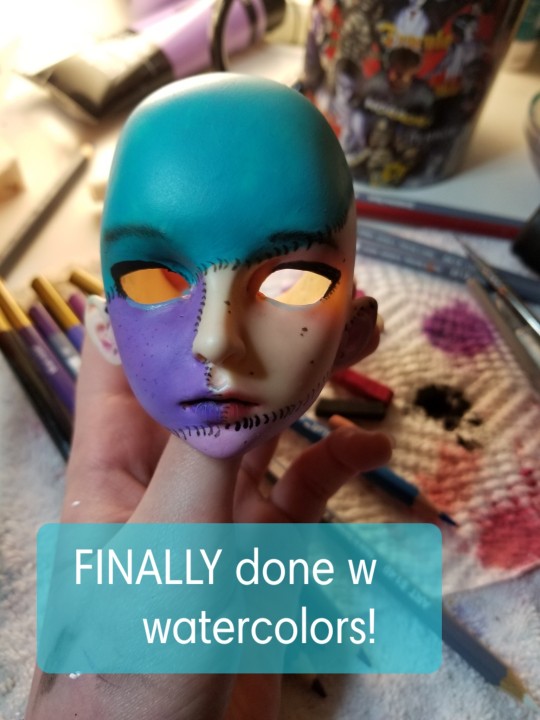
I am THRILLED with it so I'm letting it dry a bit and then sealant time! Honestly i do not think this faceup could have gone better :) i was NOT expecting it to go well but it came together and it feels very much like my doll announced her personality of hey. This is what I wanna look like and who am I to not follow those vibes!
Bonus pic w the eyes in (not perfectly aligned bc i didn't wanna budge the paint, I will be making them look a bit better later but I just was ready to get a pic and then put gloss on lol) :)
Also bonus bonus pic of the finished hand bc i am so so happy w it!!
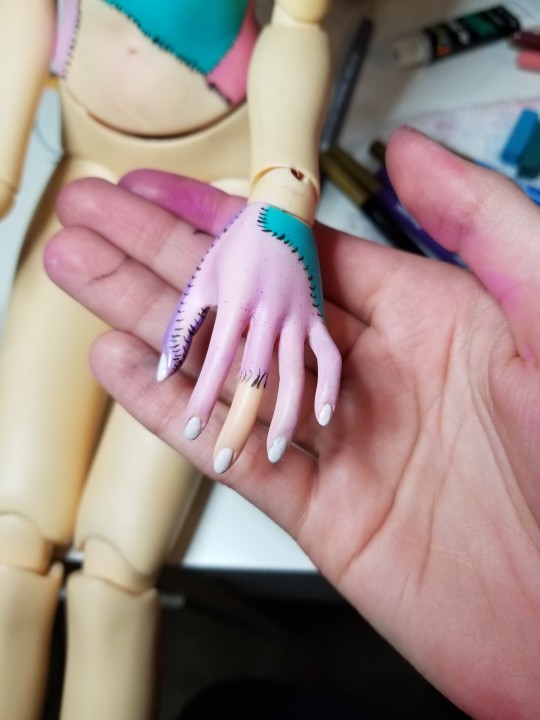
^ gloss is still drying but :)
I'll post pics once it's all dry and ofc more progress as the body comes along but I'm really happy with it!
#twist rambles#bjd posting#Frankenstein wip#i really feel shes coming together... hopefully ill get a name soon lmao#SO hyped to get her done like... i think its really really pushed me to get comfortable with a lot of new faceup techniques and materials#shes such a unique sculpt like honestly her personality just shown through the second i put the eyes in 🥺 im so excited#wig time soon. hopefully#my phone is SO weird about pinks like it really makes them 20x more pink so the last pic is the most true to irl pic in here :)#i have no clue why i was like hey. light blue under the eye but i really like it! i think it adds a bit of personality to an otherwise#kinda normal faceup. again minus the painting underneath lmao#realizing im gonna have to go back over the stitches on the brow oughhh it's ok i am so so so brave... might make it more of an obvious cut#w using some acrylic to make it have a bit of skin there but idk. thats future mes problem lmao#i feel the arms are SO badly making it look very unfinished rn but i think when theyre done it's gonna be like ohhh its all coming together
9 notes
·
View notes
Text
trying to go through the photos on my phone and sort them into dif albums to then have an easier time sorting through each album later and i didnt get em all done tonight, but. i got 10,120 out of 22,488 sorted into separate albums for tonight, i feel like thats not too bad?
#toy txt post#to be clear. 22488 is the amount in the camera album thats on the SD card. it is not the total amount of pics/vids i have saved on my phone#this is going to be extraordinarily tedious but if i can get it done and stay on top of it i think it might be worth it#i should still comb through at some point and delete some but! thay will hopefully be easier once i separate them into smaller piles!#part of the problem here is i take a bajillion pics of my pets and then also everytime i go to an aquarium i seem to average#over 1000 photos per visit that i never go through. so. yeah#idk maybe when im done sorting and tagging and combing i can actually fuckin post some places#even tho there aint a lot of places left that feel worth posting to :/#anyway#ALSO to clarify while the sd card camera album is not the total amount of pics on my phone it is. the Largest album#its the only one that broke into 5 digits#but i have like 6 others thats are 4digit numbers#2 of them pretty high. 4143 and 5583 respectively. so after i have the 2 camera albums sorted i think ill try to tackle those next#and i thought id tag right in my 'pets' album but idk? theres a lot so maybe it would be easier to give each pet their own at least til i#can get their pics tagged or whatever haha?
2 notes
·
View notes
Text
EEEEEEEEEEEEEEEEEEEEEEEEEEEEEEEEEEEEEEE
SORRY NOT AROUND MUCH TODAY
GOING TO SEE BABY METAL AND DETHKLOK!!!!!!!
5 notes
·
View notes
Note
please make one with the tommy hairline pic
you're crazy
1 note
·
View note
Text
im getting a tattoo for last nights show rn..
17 notes
·
View notes
Text
found a perfect enclosure for my isopods @ daiso the other day & today ill be setting it up and putting them in :3c
3 notes
·
View notes
Text
IM GONNA MAKE A MADOHOMU THEMED BRACELET ^_^
6 notes
·
View notes
Text
im building such a stupid house rn
#r.txt#no posts im making a conversation pit and a too short hallway#it is so inconvenient i love it#im just clicking the styles > mid century and just going with it#so much green#ill post pics when im done so probably tomorrow or thursday#depends on how much time i get
4 notes
·
View notes
Text
hi im painting a table rn
#cro zone#well not this exact second im waiting for the roller to dry bc i only have 2 but im doing 3 colors#i bought this vintage kitchen table set that had clearly been painted bright colors then left outside for 60 bucks#and am currently in the process of repainting + sealing it#the tabletop has to be done by thursday tho bc someone is coming over#hence starting it at midnight after josh is home from work#its sooooo cute tho ill post pics when its done
2 notes
·
View notes
Text
in other news i got the body of the first octokitten prototype done! gonna do the ears & tentacles tomorrow when hopefully im not tired and my back doesnt hurt like a bitch lmao
#tempted to call this test octokitten beta#or like. ver. 0.1#idk if anyone wants to name the fucked up test when im done w/ it ill post a pic and yall can send suggestions#shut up virgil#not looking forwards to sewing 8 identical tentacles#the mini sewing machine my mom bought my sister for her birthday (and also the only sewing machine we own) doesnt work atm!#so i gotta hand sew the entire thing!#tho tbh i kinda prefer hand sewing its genuinly fun just. tedious lmao#and also kinda strains my already shitty wrists and finger joints
4 notes
·
View notes
Text
Doll faceup under the cut (pic heavy)👍
I wanted to redo Clarimonde's faceup because after I had done the scar work on my last faceup, I felt I could do better + the lipstick just didn't suit the doll to me. So i wiped the faceup and got to work making a wip with the inspo of changing the vibes to a more stylized 1920s silent picture actress dramatic makeup inspired with a hint of traditional goth. As always I love to play by the doing stuff I have NO clue how to do rules which was definitely the case in this faceup (if only I knew just HOW much that would become the case later on)
I used my same mockup image as before but decided to go a slightly less sickly approach and do more dramatic makeup since I enjoyed that last time and then wiped the head clean (or as much as I could lol)


^ before and the mockup
I did what I've done in the past to build up subtle shadows, with doing 1 coat of sealant at a time and got to work laying a good foundation down for the work I was about to do. The part I was most nervous about was for SURE the brows as I would have to use a watercolor pencil and have very steady hands as I did so (I do NOT have steady hands) or use acrylic paint with an even steadier hand.

First layer was pretty basic as I just needed to start on the lip shades and getting the smallest amount of blush on there. My phone camera picks up more pink than there should be so it looks very heavy handed here :/
This was definitely the scariest part as I had predicted as not just getting the brows precisely thin but also pretty even was HARD.

Started on the acrylics and had noticed that i had a weird patch of lighter resin towards the nose where the eyeshadow just wasn't building up nicely and kind of panicked but decided to leave it for a bit later and try and press on

^ caption at this point was me being so so convinced i would not have to do something to fix the eye area. Unfortunately it was bothering me VERY badly
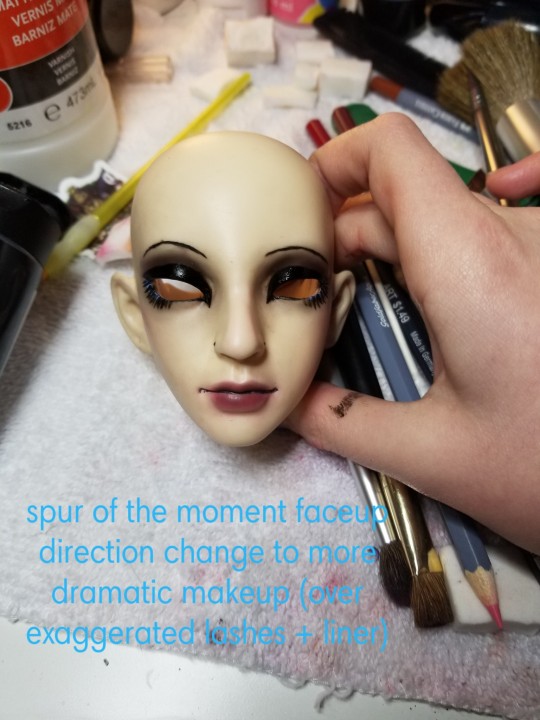
This was the first time I'd drawn on lashes other than VERY tiny ones so I went big and did very large and over exaggerating to match the upper eye which I ended up covering in acrylic to make it match better. There was no going back by this point and I was pretty scared I was going to have to wipe it all and try again until I put an eye in to see how it looked
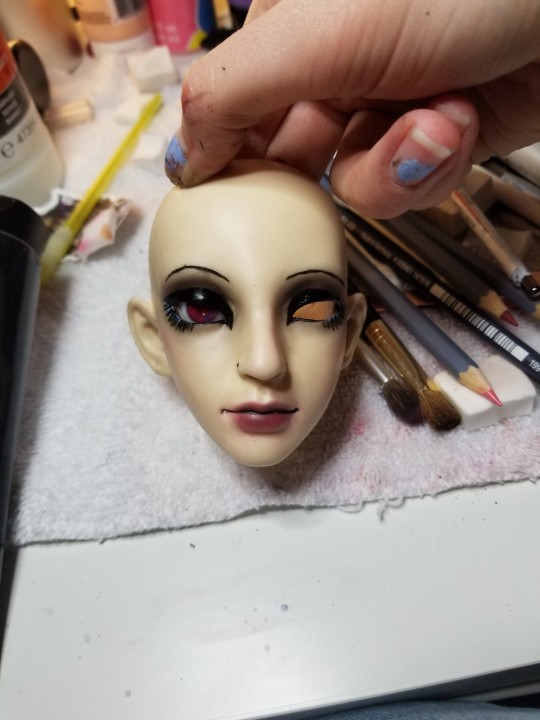
It had all kind of worked out as it made the eye pop a lot more and the blue under the eye really brought out the blue in the eyeball so I did my last bits of sealant and put the doll back together, as I needed to get the scar paint a bit later (ran out of red paint)

I was THRILLED as it finally felt i had gotten the vibes for my doll down and that was what I wasn't getting from the old faceup. The scar position had changed as well from my old faceup for this doll, so I was a bit nervous about trying to replicate my mockup lines as well as getting the scars to look ok.
I tried a new mix of paint for the scar color this time as I felt it came out too bright red in the past and mixed a more brick red into my already brighter red in a 1:1 ratio and got pretty much the perfect color! I did two coats on that (using cheap paint so it's VERY thin already which is honestly good for the scars since it adds texture to it with the brush)

^ scars finished and textured! All that's left is to seal and put the doll back together :)
#twist rambles#bjd posting#clarimonde#im very happy w this 👍 ill post pics when hes done and theos done bc im working on him too#i really feel i get happier w my faceups the more i do and i really worried id regret redoing this one but im VERY glad i did redo it#i really enjoy trying to mimic the umm very old bjd style faceups so it was fun to do something similar to how one of my fave flickr users#did their faceups (very dramatic and fun)#cannot wait to get this lil guy all back together like 👍
5 notes
·
View notes
Text
pspspspspses at all of my portal mutuals like theyre cats.. so guys. chell cosplay. :)
#i might be going to capercon this year and my mom is willing to buy me stuff for the cosplay#life is good ..#ill probably post pics when im done putting it together
1 note
·
View note
Last Seen Blogs

artbypontpilat
Без названия
deniseespositoart
Denise Esposito Art
ky-nails
Ky Nails As A Beginner
desireetanga
desi

mfujin
えむふじんがあらわれた