#embroidery though. thinking I’m gonna set it up on a big piece of cardboard so I can block pin etc in relative peace sjsjs. here’s to hoping
Text

HALFWAY BABY
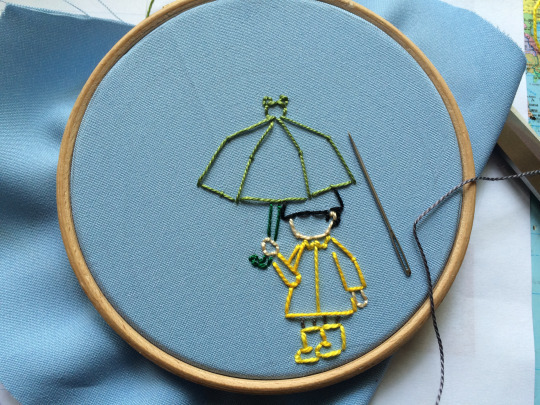
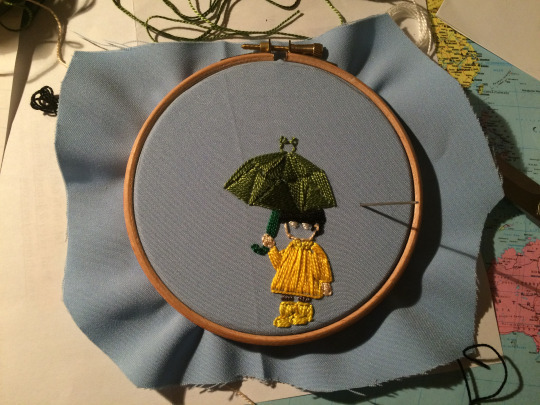
#id in alt#fucked up triangle!!!!!!! now we gotta bring it back around. fucked up square.#biggest thing I’ve done so far by a LOT and I’ve messed up a few squares accordingly hoping it’ll pull together once I start the actually#embroidery though. thinking I’m gonna set it up on a big piece of cardboard so I can block pin etc in relative peace sjsjs. here’s to hoping#at any rate.#netting#fiber arts#my work#trypophobia
10 notes
·
View notes
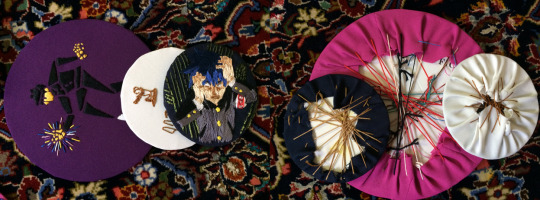
Photo
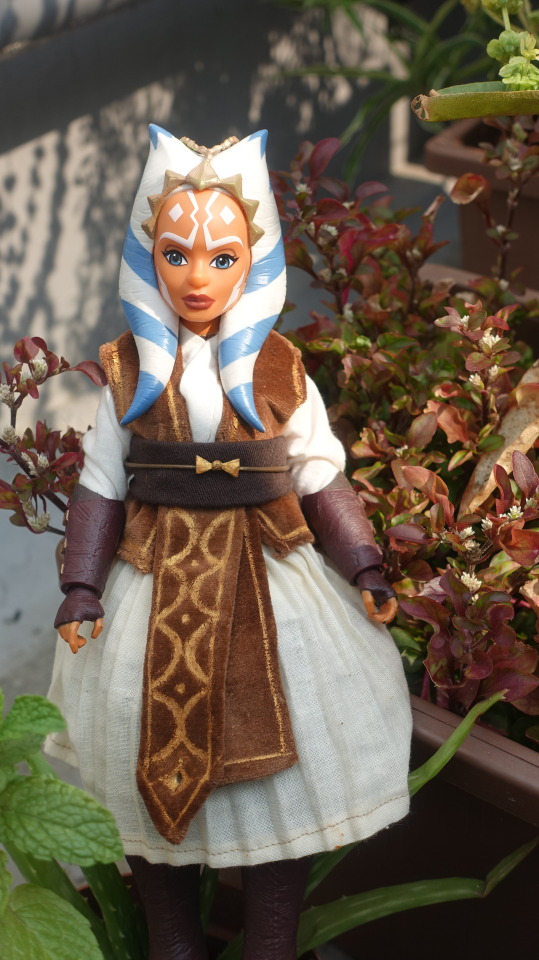
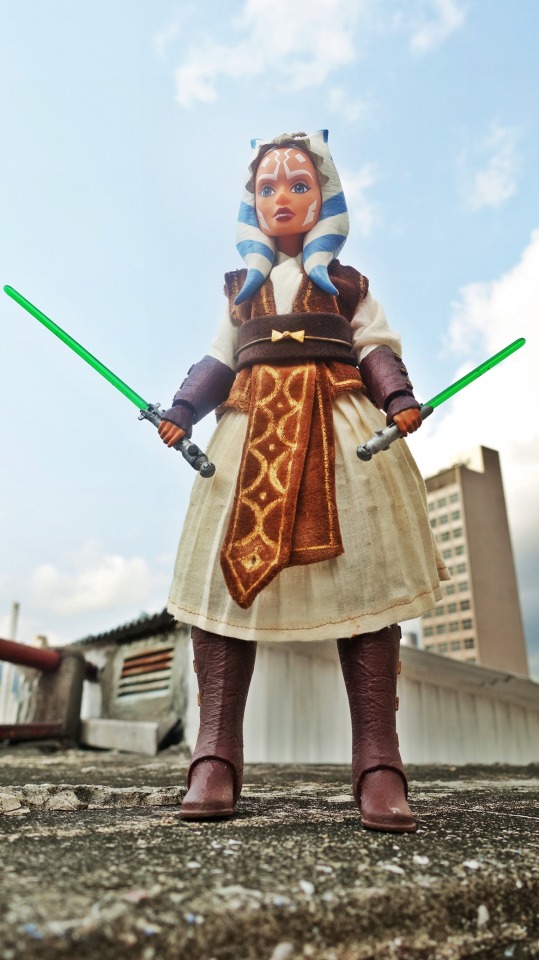
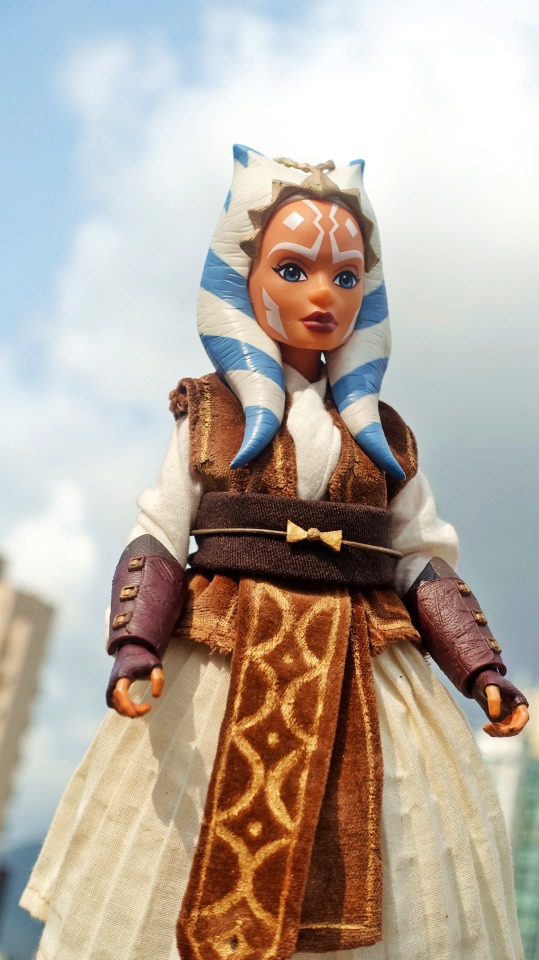
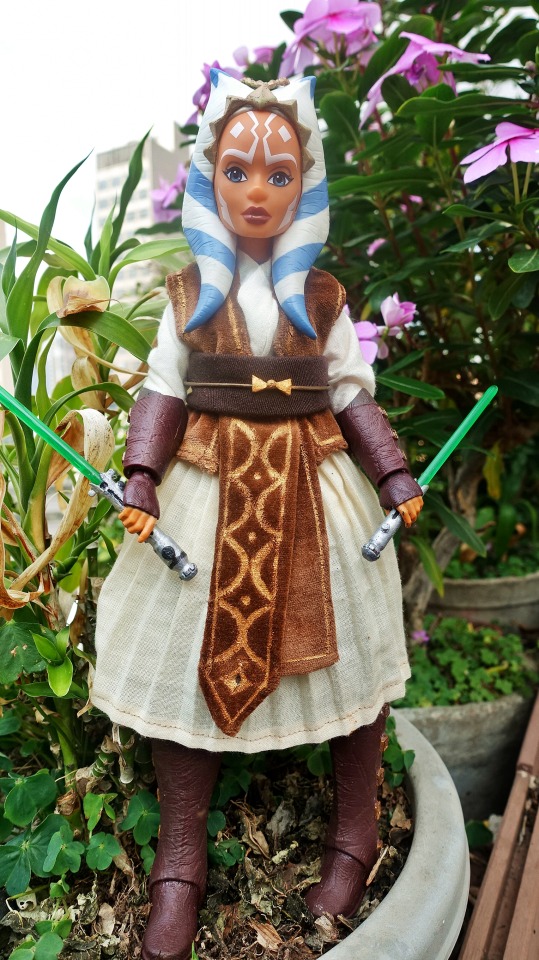
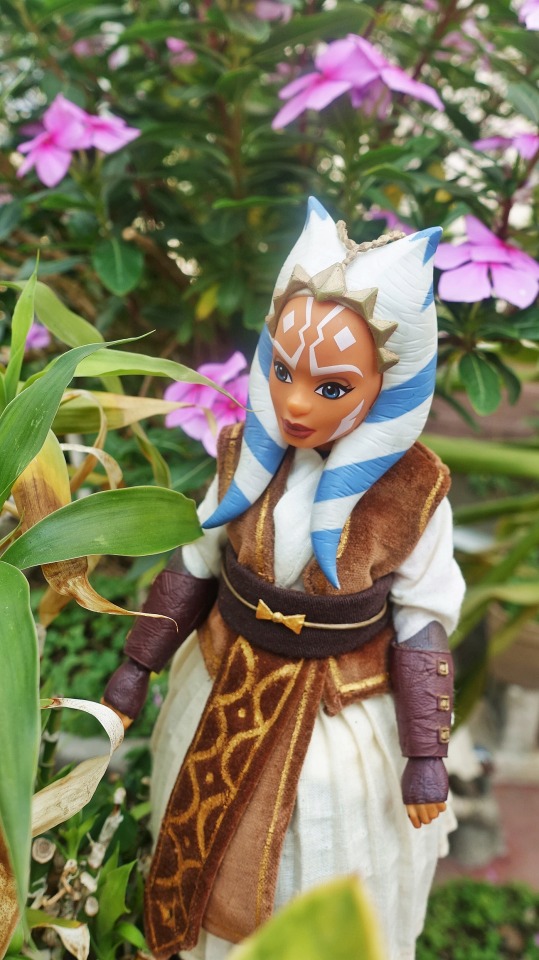
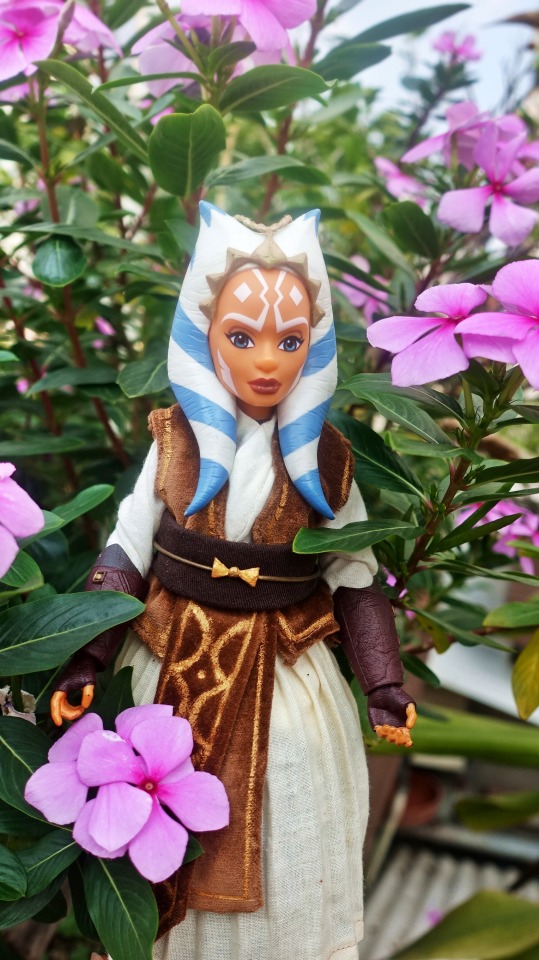
Ahsoka in Jedi robes, design by @rishi-eel
Love the recall to her original concept. Summer’s here so I took her to the garden :D
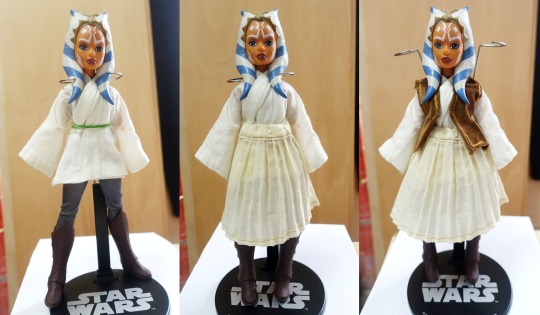
There has been so many wonderful Jedi robes designs for Ahsoka out on here and I just want them all for my doll! I don’t have a definitive vision for Ahsoka’s Jedi robes yet so this surely isn’t the only set I’m gonna make!
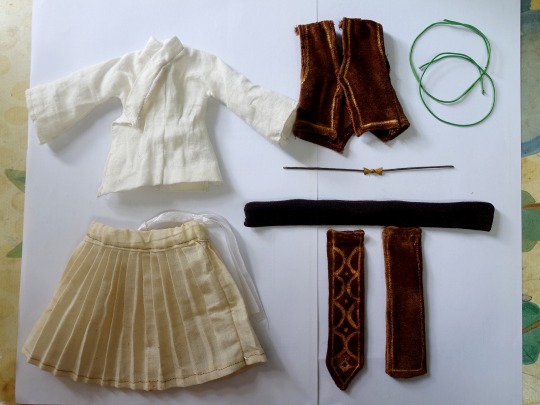
The outfit consists of five parts: undergarment, pleated skirt, vest, the sash and the belt. Construction-wise, they’re pretty basic and all something I’ve done before so it’s not too difficult. But dressing her! There are so many layers she barely has a waist anymore lol. However, it’s all worth it since the outdoor photoshoot is a lot of fun.
It’s not an exact recreation of the design sketch, to my discredit. There are a few details I could’ve pursued harder but I’ll give myself a 10% margin of inaccuracy? I obviously bypassed the gloves and shoes, or that pouch - haven’t unlock those skill trees yet. The undergarment was made earlier separately from a bleached cloth so it’s white, even as the same fabric as the skirt. (Yes have 1/5 part done is a huge motivation of starting this project). I used so many cheats holding it together, as you’ll discover.
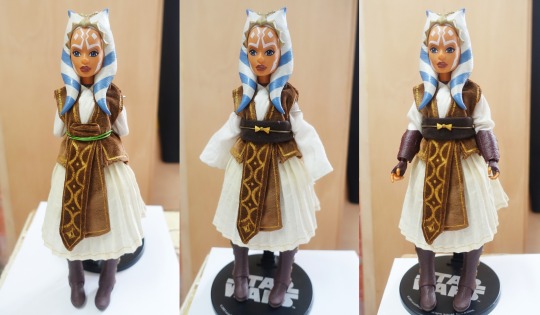
The Jedi part of this outfit. I debated whether it’s two strips of rectangles or should I make a vest. I chose the latter because it’s easier to manage in her pile of clothes and I’ve made Anakin’s before. Then I sewed two tubes and flipped them over for the sash, and painted in gold all over them. I’ve tried tying an obi with two long dangling dashes, but the giant knot just didn’t look good. So I took a book from the Shaak Ti figure and made two flat sash pieces.
I have three fixing wire in this look. Let me apologize: I totally should, at least glue, a hook and eye for the belt. But I’m an indecisive and like always, this is pinned together. (I’m always thinking maybe this can double for something else) Usually I tend to overestimate the sizes and likewise, the undergarment has no closing, so it is fixed in place with a craft wire a little below the waist. Then the skirt, tied at the back with a ribbon in the waistband. The sash pieces fixed with another wire, now higher up marking the natural waist. Finally it’s covered with the belt strip and the obi-dome - a polystrene particle with cardboard triangles glued on another craft wire.
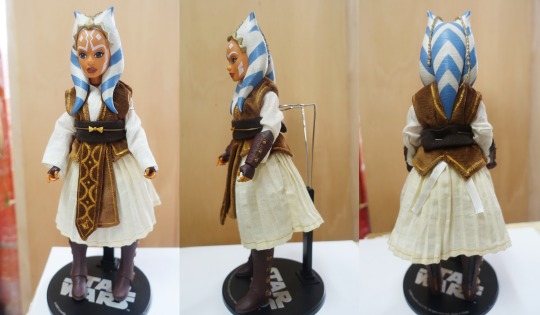
Even though the skirt’s a little big for this project, I do like it’s poofiness. The Obi-dome is my favourite part (god it’s finally over), since it’s the sort of lightbulb moment that told me to use something as simple as a poor ball torn off my sewing machine packaging. Well, that, and the shiny gold paint.
I do regret a little not using more embroidery or perhaps actual trimming for the gold accents. Still, I’m very pleased with the end results. Such an endearing look! Thanks again to rishi-eel for the blessing!
#ahsoka tano#ahsoka doll#forces of destniny#star wars#this outfit was fun to make and dress!#easter holiday i may be making something from the company h... u...
223 notes
·
View notes
Text
rosenmarille’s embroidery tutorial

hey anon you made my entire week and i love you
Let me preface this by saying that I’m in no way an expert and I’ve literally only been doing this for less than a month, so most of what I do is making it up as I go along. hopefully you find my tips helpful though!! <3
I wasnt sure which part you wanted to know about so i made a rundown of everything from start to end
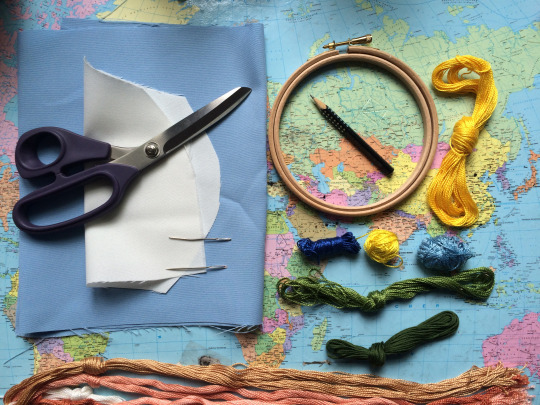
1) List of things you’ll need:
Embroidery frame (I just went to the nearest crafts store and got them in two sizes. Theyre quite cheap and sometimes also come in plastic or different shapes)
Fabric (the less stretchy the better, though if youre planning to decorate clothing I think it really depends on how determined you are. what ive got here is some leftover polyester fabric from cosplay and other sewing projects. you can even sew different pieces together if one isnt big enough for the frame but in that case you need to iron the sewed piece flat or else it will be very difficult to keep straight and neat)
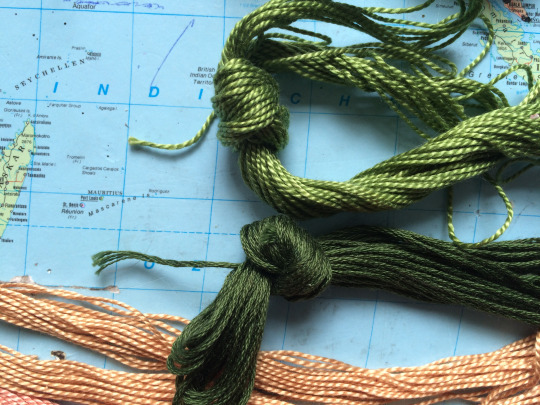
Embroidery yarn (see pic) (theres two types, and ive only used pearl yarn (top) so far but the other one allows for more precision since you can pick how many strands of yarn you need)
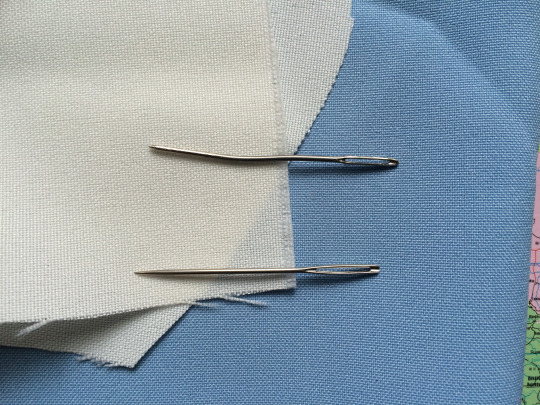
Needle (see pic) (properly pointy, not like the crappy one above. I mainly use that for crochet things because it actually bends and that’s NOT what you want here)
Scissors and a pencil
2) Sketch:
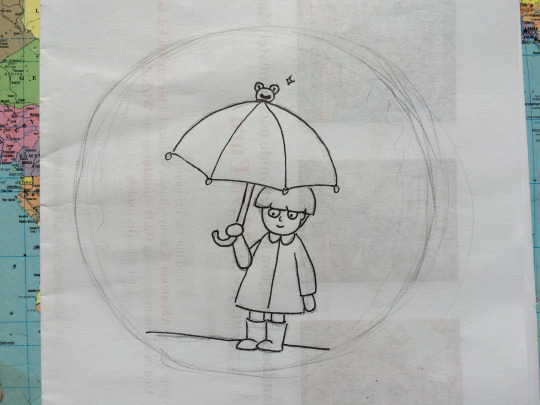
Pick an image of what you want to do. I’ve found that at first, practicing with basic shapes and colours is a lot easier to get used to the whole thing, it helps give you a feel of how the yarn ends up looking stitched to the fabric. So far I almost only did screenshots, and I didn’t have to draw something up myself. In mobs case, I based it off a doodle I did in class and added a little colour to it
3) Pick fabric and yarn:
That’s mainly up to you, depends on what youre going for, but as a fair warning, very light fabric colours will show the stitches and leftover yarn from behind, so you need to tuck them behind the main body of your embroidery later on
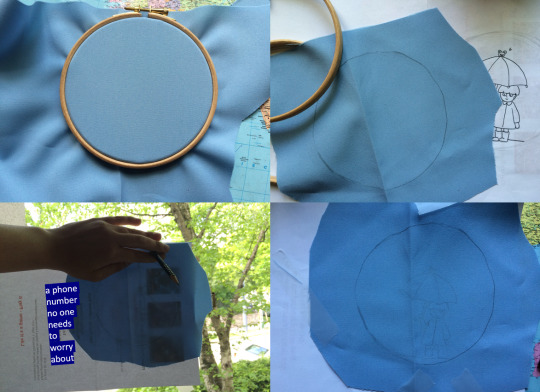
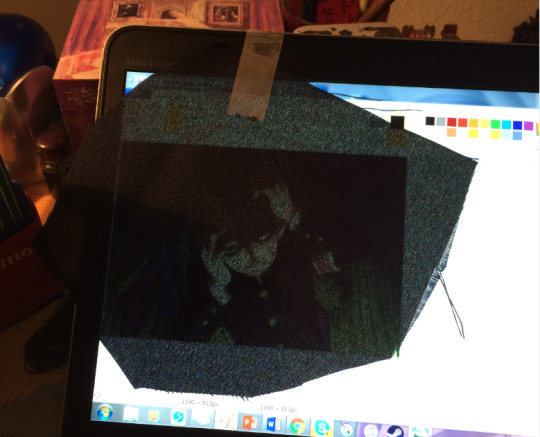
4) Apply to fabric:
2 ways, both pretty much self explanatory, only heres where the stretchiness of the fabric comes into play. As you can see ive developed a fool proof technique, ive had tape stuck to the top of my laptop for weeks now, im not about to waste it? (use more than one tape, this is an old pic i took because the concept was hilarious in the moment)
Pro tip: don’t draw your sketch on paper advertising dnd game sets because youre gonna have a hard time seeing the pattern through everything and youll curse yourself for doing that instead of paying attention in class
Pro tip 2: dark fabrics demand a white colour pencil, you literally wont be able to see anything else
5) Stitches:
heres a LINK to the page I use to find all the different stitches I could possibly use. Practice makes perfect, i spent about two hours trying each of these out on an irrelevant piece of fabric to see how theyd work and how difficult they are, and still use that bit as ref to consider how a stitch would look on my current piece. Of these, ive only used about three in my finished broids, since theyre mostly for decorative things I think. Don’t let that stop you though, get creative and use the things im too lazy to incorporate!! (ill be using these terms for the rest of the tutorial, so if you dont know a word its probably in there)
6) Outlines/shading:
Start by outlining your sketch with a few backstitches to get a feel for where everything needs to be. If theres shading then itd be useful to do those lines in the other colour already, or youre going to have to fix all that later and itll be a huge pain and make you want to stop altogether. It happens
Im not sure if that’s how its supposed to work but I fill in the shades first, it gives me a good sense of what direction the main colour stitches need to go to make it look dynamic.
7) Fill in mains:
This is where all those handy dandy stitches from that library probably wont help you too much if you want to do something relatively simple. Ive only used normal satin stitches to fill in colour so far, though what the link doesn’t mention is that it wastes a shitton of yarn. Yarn is expensive, so what you can do is come up for point 3 not back next to 1 but instead next to 2.
Warning: that does warp the way the yarn lies though, so use that one accordingly (for example: I do Not use it when doing small delicate places, or things that need to be detailed in general)
Mob was fairly simple as far as that went since i didnt add a lot of pattern, but ritsu is a little more complicated. Like i said earlier, adding shade before the main colour helps because now i know where the folds in his clothes are and how the fabric would bend to accommodate it.
8) Add details (like faces!):
Again, here I cant tell you exactly how you need to stitch to get everything looking good, just try to follow the way a face has its dynamics. Is it a long face, make lots of long vertical stitches, is it a round one, try to stick to the edges (but don’t spiral)
Facial features are a little more difficult because its hard to make a round nub or dots for pupils on something very small but its better to try 5 times and get it right the 6th instead of leaving the 1st try (i took ritsus entire face apart at least 3 times and t b q h i still think it doesnt look good but ¯\_(ツ)_/¯)
9) Background:
Get real fancy on that shit, heres where you can try out those cool rose shaped stitches from up there in the link, go wild lol
10) Lastly: PATIENCE
I cant stress this enough, this WILL take a loooot of time, the first ritsu I did took me a literal week, while the second one took me roughly four hours in total (and that was a rather simple design).
Accept the fact that it wont look as good as you imagined it. That may sound harsh but for me that’s been my main issue, imagining how a string would lie exactly and then looking on in disgust when that doesn’t work out. You’re not drawing, the medium doesn’t exactly translate, but that doesn’t have to be a bad thing! Try to figure out what methods work best for embroidery exclusively.
Don’t be afraid to undo, be careful about it though. I use those big scissors and it’s a bad idea, don’t do that. Unpicking from the back to save the yarn also works but it gets difficult (and at some point impossible) once the strands start getting woven together on their own
And there you have it, a finished piece of embroidery!!
You can now either hang it up in its frame and cut away the excess fabric at the sides or tie it around a piece of cardboard like so. it’s a little hard to get right at first but practice amiright
I hope i could be of help!! if you have any more questions feel free to come to my ask anytime!! ^^ <33
#embroidery#pari stickt#tutorial#i still cant believe someone actually asked me to do this#anon who are you i want to hug you omg#also i hope you see this??? id have tagged you :0
37 notes
·
View notes
Text
How to make a Tshirt quilt
So I just finished my first and second TShirt Quilts and I typed out how I did it to one of my very dear friends and then sent it to another of my very dear friends so now I’m posting it because maybe you want to know how as well. I’m posting that ramble right here under the cut. I think I’m funny, so even if you don’t want to make a blanket, you may enjoy reading along. If you are using this as a guide, keep in mind that my friend is better at sewing than me so while I explained a lot, it’s by no means perfect if you’ve never touched a sewing machine.
Alrighty I made two blankets with 5x5 blocks cut straight to about 14 inches. What I used was a rotary cutter and mat, a straight edge, scissors, interfacing, regular thread in whatever color you have, a sewing machine with regular needle and foot, quilting thread, a singer walking foot and 14/90 needle, an old blanket to use for a middle piece, and I went and got cotton flannel from joanns but honestly if you've got old cotton sheets or any sheets really you can use that as your back, and bias tape for finishing the edge. My finished measurements for one quilt was 65 by 65 in and for the alpha xi one was 67 by 66.5. It all depends on the length of the seams.
First you gotta gather your tshirts. Had I had the knowledge I do now, I might have done a 5x6 but the size on the 5x5 is good for short people. Tall people just have to suffer as per usual. For one blanket you'll need a minimum of 25 shirts. Find a piece of cardboard and measure out a 15x15 or 16x16 inch square. Cut your cardboard to size. It doesn't have to be perfect because you're going to have to cut again anyways. Lay your cardboard square centered over your design and mark around it with washable marker or felt tip marker or chalk. Whatever you have, you won't be able to see the lines when it's cut anyways more than likely. If youre using a rotary cutter, you can zip around the cardboard square with that, if you're not, scissors (and a friend to make it go faster) works too.
Once you've got your squares roughly cut, it's time to lay out your design for your quilt. Clear out enough space on your floor where the whole quilt face can lay. Then get at it figuring out what layout works best. If we were getting crazy with different size designs, the layout would require a lot of math. Since our quilt pieces are cut even, we get to avoid that shit. 🙌
When you get to a point where you love the design you've come up with, it's time to add interfacing. I stacked my quilt piecing by column and write down the overall design on a piece of paper. You can stack by row or column, it just depends on which way you'd like to sew them. We'll get to that. I got the 99¢ interfacing from Joanns at half off. I needed 20 yards (I ended up using scraps for my last 3 shirts though which was fine. You won't be able to see it and it sews the same regardless of whether it's Frankensteined to the back or not) but 10 dollars was easy to pay for that.
Interfacing is annoying. Don't worry about trimming it off just yet unless you need scraps to finish interfacing all your shirts. Once they are interfaced, the rotary cutter and straight edge becomes your best friend. You want to make all of your shirts as square and even in size as possible. If you pick a size the first time you square, you only have to cut once. Don't be like me and square and then pick a size or you will be crying over your rotary cutter as you try to cut to a certain size and realize you squared so small that you have to cut way shorter than you wanted and you end up cutting 50 shirts 3 times. If you rough cut to 16 inches, square to 15. If you rough cut to 15, square to 14.
Stack your pieces back into their rows or columns as you cut them. Then, after decades of cutting and cursing the elder gods (cutting alone took me 3 days) you're finally ready to start pinning and sewing. Get out your machine and test it on a scrap piece of fabric. You should have plenty of old decimated tshirt parts to use as testing. Find a straight stitch setting and tension you like. Then pick up your first stack of quilt squares.
If you sorted into rows, you're going to lay them out on a table how they would look horizontally. You'll flip the second in the row face down on the first in the row while the first in the row faces upwards. Pin where you want your seam on the right side and then go sew the seam. If you're doing columns like I did, you'll lay out the column vertically like how it would appear on the quilt face. You'll keep the first piece face up but flip the second piece so that it's top is face down and even with the bottom of the first. Pin across the bottom where you would want your seam. I used a half inch seam on my first blanket but ended up liking the 1/4 inch seam better. They both required the same amount of work so it's however you want to do it. You can use whatever foot and thread that you want. No one will see the thread when it's done anyways.
Continue to pin and flip pieces down the line, sewing them one at a time until all 5 rows or columns are complete.
I had a picture but it must have been on Snapchat cause it's gone. You're a competent seamstress though so I'm assuming you've followed up to this point. Now you're going to iron all the seams you made flat. Get out your iron and get to it.
Once your seams are ironed out, it's time to start attaching your columns or rows. You're going to use the same process you used for the squares but on a larger scale. Lay out the pieces on the floor or a table. Flip one piece onto the one beside it. Pin where you want your seam and sew away. On mine, I found it more manageable to see column E to column D then Column C to B then B to A and then attach the two pieces. Once you've got those sewn together, iron the seams flat on the back and give a whoop whoop because your quilt face is DONE and you're about 2/3 done with the entire quilt!
Here's where the quilt can get expensive if you don't have the equipment you need. You're going to want something for a middle layer. We had so many old blankets laying around that I didn't have to buy any middle fluff and it worked like a charm. The flannel cotton my mom made me get made this project relatively expensive (4.99 a yard and we got it at half off and I needed 10 yards, that's 25 dollars or 50 if you don't have a coupon, yikes) Instead, if you have old full or queen sheets laying around, just use them. Or, go to Walmart and get a jersey sheet in a full or queen. It's gonna cost WAY less and it's gonna work the same regardless.
Once you've assembled your three layers, you're going to want to cut everything relatively even. It doesn't have to be pretty, just even enough that you can sew it together.
Then you're gonna make a quilt sandwich. Put your middle piece on the bottom and your quilt face (facing up) on top of that. Then you wanna safety pin the shit out of those two pieces so nothing slides around. I pinned at every pin intersection and the middle of each piece, then about two inches in from all the edges. Once you're pinned to your discretion, take whatever fabric your back piece is and line it up face down on top of the other two pieces. You're going to be leaving one side open to flip your quilt right side out, so decide now where you want your bias tape to go. You'll pin where you want your seam on every side except that one. Then, it's time to sew your quilt. Here I used a half inch seam because my middle blanket was cut fractionally shorter than the other two and my mom was worried that I wouldn't get it sewn in (it's not a huge deal if this happens it turns out) but use discretion when picking your own seam.
I also used a walking foot, a heavier needle, and quilting thread. It made the process a little easier. I would recommend the quilting thread and a pack of needles (I ended up breaking 3 but didn't use more than one roll of thread) but it's really up to you whether you think you need the walking foot.
So then you sew your three sides. The magic happens when you flip your quilt the right way (reach in, grab the corners that are away from you of the quilt face and pull them until it's the correct way) and you fall in love with all the hard work you've done! But you can't stop here! Take your bias tape and pin it to the unfinished edge. You can use however big or small or colorful you want. I matched mine to my quilt backing. I used a zig zag stitch because getting both the front and the back of the bias without being able to see the back is tricky. Go slow and don't get frustrated if you need to use a seam ripper and start over a few times. Once it was done, I trimmed the bias and just stared at the glory for a moment. Only one step left: attaching the three layers better. You can do this in two ways and it's really up to the quilt maker how it goes. You can either sew across your seams on the front face to give the back the same boxy look. That's what I chose to do. Or, if you've got embroidery materials handy, you can sew individual knots in your seams to hold the pieces together. I was going to do this but my dad insisted I do the first one. It's really the same. And then you're done!! Your closet is cleaner, your bed is warmer, and you've leveled up your textiles skill! Pat yourself on the back!
2 notes
·
View notes
Last Seen Blogs

theparadoxx
philosophy&literature

yaoicrack
yaoi central

imouto-imouto
🧸 sweetpea 🧸

thedegrassidiaries
I love all of you - even the losery parts

sophiemcswag
sophie