#i once again used a mc screenshot as ref
Photo

is it gay to share body heat with your coworkers?
#pizza tower#gustavo#peppino#peppino spaghetti#brick the rat#i once again used a mc screenshot as ref#you cannot stop me#pepstavo
410 notes
·
View notes
Note
That Allister cosplay is outstanding!! How did you make the mask and the gym symbol+endorsements? I'm planning on doing an Allister cosplay in the future myself
Thank you so much, and happy to answer! I took lots of pictures through the process so I’ll answer this in two parts.
“How did you make the gym symbol/ endorsements?”
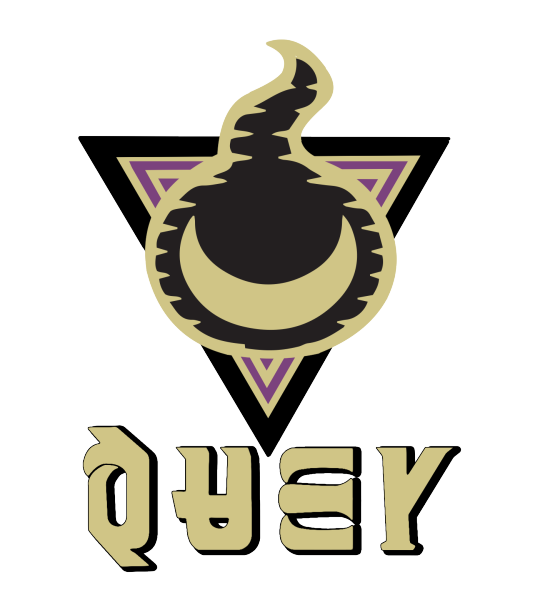
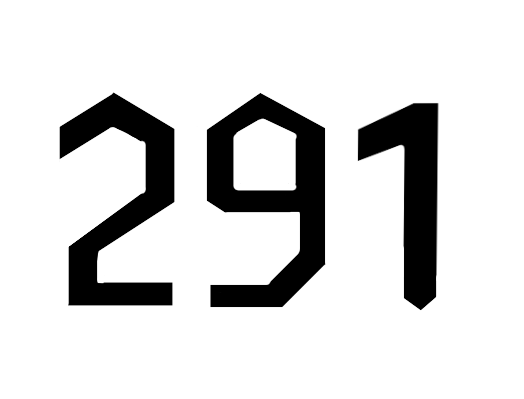
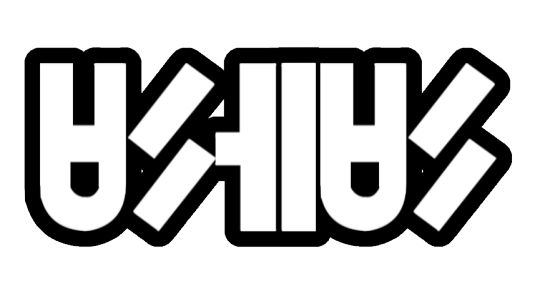
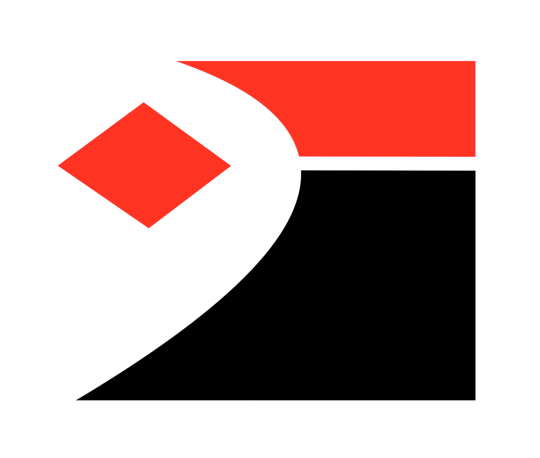
So the first thing I did is take a TON of screenshots I have almost 300 screenshots of reference images of allister and the gym league trainers and the pokejobs logos and so on to get good references for all the logos I needed.Once I was done taking all the screenshots I spent hours tracing them to the best of my ability to create these images: (Not all of these were the final versions which were modified right before printing, apologies)Gym Logo - QUAY/ Gym Logo
XXA - Sponsor (This is the logo for MC Insurance, Allisters Sponsor)

291 - Number
ASTSA - Name (This is the new pokemon language for Onion, Allister’s japanese name)
The square with the diamond - This I nicknamed the “NIKE” cause its the logo for the spotswear company in game
Galar league logo - Galar League logo (this is the logo thats the red and blue pokeball with white marks, and “galar league written underneath it)

And then I put together this ref sheet to make sure the logos looked good together color wise, and some of the colors were still altered later but it all looked pretty good

And then once the logos were all set, I printed them onto heat transfer vinyl and let me explain why I did that specifically. The fabric I used was polyester, which is the kind of fabric that sports jerseys are made of. I did that because the gym’s uniforms are based on soccer jersey’s so it felt fitting!IT WAS A HUGE PAIN I DONT RECOMMEND ITbut now because of the fact that it was polyester paint wouldnt’ work on that fabric because of how stretchy it is and the fact it doesn’t absorb moisture easily. So we printed it onto heat transfer vinyl with my cheap ink printer and then I ironed them onto my clothes! I made sure they were placed correctly by first taping them to my clothes and making a note of the location before ironing it, and then once I was happy with a placement I’d carefully iron it on. This vinyl seems kinda cheap and like the ink might come off with too much water so watch out if you choose to use it. There are also printable iron on paper for other types of fabric as well and are cheaper iirc!
Same goes for the dots, thos were all cut using a CNC/ off brand cricut (just a bunch of circles all at once) and I placed them by hand using painters tape and trimmed as needed to make the designs:

Hopefully that was helpful!
“How did you make the mask?”
So this ones a little more complicated to answer because its not complicated but its not something everyone can do.
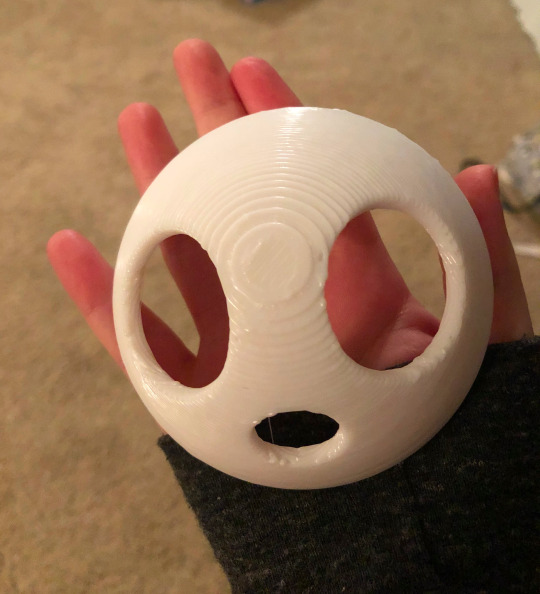
So we started on this one before the game came out, and before I’d gotten to Allisters battle in the game but we had enough reference material to figure out the general look of Allister’s mask, so we made a 3D model of it that we planned to 3D print (my bf has a 3D printer and a CNC and helped me a TON for this project) and did a test print of a tiny mask to start to make sure we were happy with the 3D model (here is the tiny mask in my tiny hand, we affectionally nicknamed it “mini mask”)
Now after we had the 3D model we had another issue of how big does it need to be? I have a round head on my own so I didn’t need to modify the shape of the mask thankfully (one time my fat head came in handy!) But we needed to figure out how big to make the mask to make sure it “fit” correctly.
So we tried cutting out a circle with paper in a few sizes until we thought we found a good size for my face (which for me was a little over 7 inches)
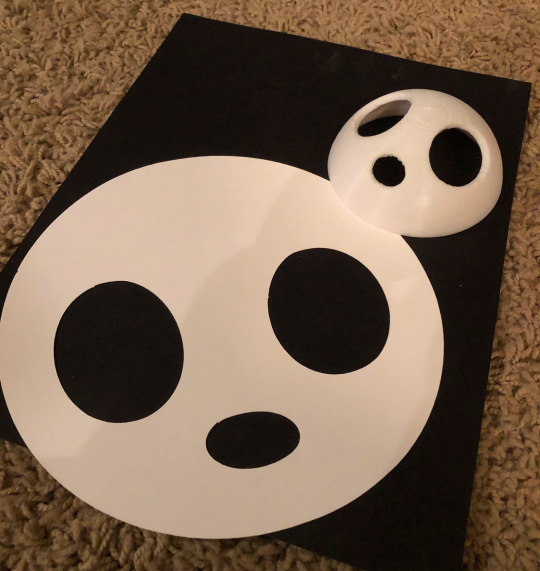
went and bought a styrofoam dome from the craft store in that size to make an EVA foam dome and then checked if that fit my face (later this worked fantastic as a way to transport the mask as a protective shell around it) I don’t have a picture of this EVA foam dome but all it was used for was putting it on my face and making sure it went over my chin and such. Once we had that we were ready to start printing the final mask.
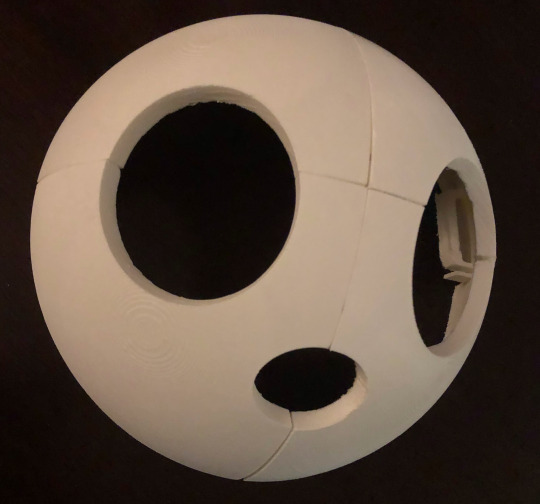
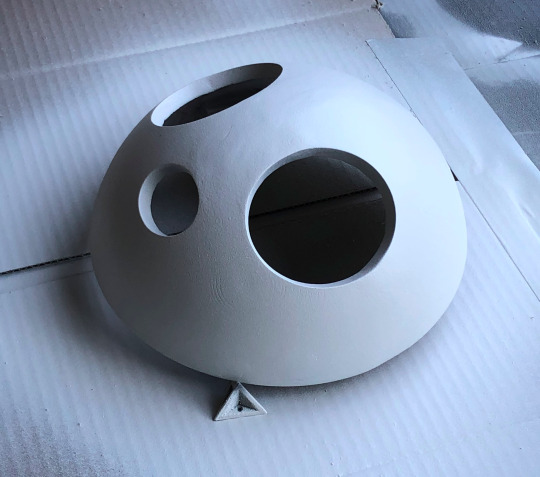
Once the 3D model was scaled for the final mask, it was too big for my bf’s printer to print all in one go so we split it into 4 pieces. Each piece took about 9 hours to print, and a few of the prints failed and had to be redone, so after a few days of printing it looked something like this:

for those who don’t know much about 3D printing all those beams are the supports that lets the printer print raised surfaces like that and have to all be removed. So after about 2 hours of pulling plastic with pliers it looked more like this:

so we left small gaps in the edges of the mask so that we could put metal pins between each piece to help hold it together so we cut our metal pins and assembled the mask and it was starting to come together!
So from here we melted some plasitc onto the seams (plastic welding!) with a wood burner and - wow that looks gross

but trust me its better than gaps in the mask. so after a bit of sanding here we entered the rounds of priming it with spraypaint primer and sanding it for like an hour and doing that again, occasionally using bondo putty to try and even out those seams and those rounds tended to look like allister just murdered a village:
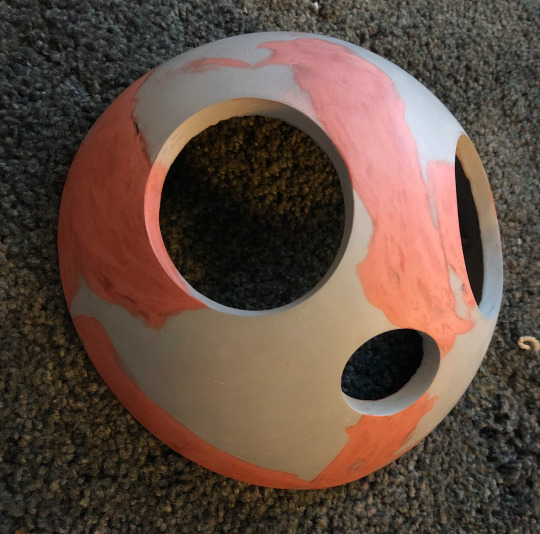
but you can see compared to the previous image that the mask is a lot smoother! This was the final round of sanding and you can tell that most of the layer lines from the printer have been sanded down! You can almost not see the seams anymore! (though now they’re also very red but they’re very smooth in comparison to the beginning trust me…I sat there sanding for many hours for this)
But after this all that needed to be done with a final priming in grey, and then painted it gray!
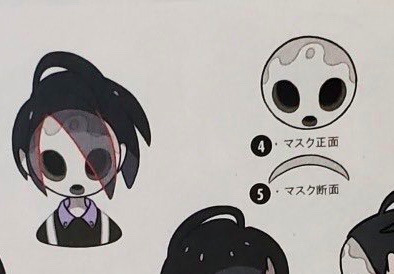
While the paint was drying, we prepared some masking in the design of allisters mask which if you don’t know what the full mask looks like I wanna reference this from the collectors guidebook (which I just now got my hands on today but saw these on twitter)
So we cut out a sticker sheet in that design and placed it down with some painters tape to keep that part of the mask gray and then it was painted white, and that was the painting done!
For the black in the eyes, I got a scrap of black fabric for cheap at joann’s that I picked up and pulled and it was a very soft polyester/spandex material that you’d use for pantyhose so i’m sure you could also cut up some of those for a similar effect. But when stretched you can see out of them.
So we made small rings the same shape as the inside of the mask behind the eyes, glued the fabric using super glue to that ring (and the mouth as well) and viola:
and then the final step was to get that mask on my face, and basically we had some rings on the left and right sides of the inside of the mask that I attatched some elastic too, and then needed to glue a third strap over the top of my head. and sewed it all in place and put some craft foam along the forehead and chin inside the mask for some cushioning and it was done!
I really hope that was helpful and I tried to make sure I took lots of photos along the way so I hope they were helpful. If you have other questions feel free to ask! Sorry for the novel but just wanted to be as detailed as I could be!
Thank you for your nice words and best of luck!! Allister is a detailed boy but he’s very fun!
#my cosplay#allister cosplay#allister#gym leader allister#cosplay help#cosplay reference#allister reference#galar#swsh cosplay#cosplay description#ask#answered#long post#if theres other tags I should add let me know#anon
101 notes
·
View notes
Last Seen Blogs

a3ys0
Aysu

lunarjingga
Selenophile

gamislebaranterbaruaulia
WA: 0852-1380-3535, Pusat Gamis Lebaran Terbaru AULIA

lingosynamia-hanna-suntinsk-blog
Hanna Suntinska Lingosynamia

volim-burek
Good vibes only