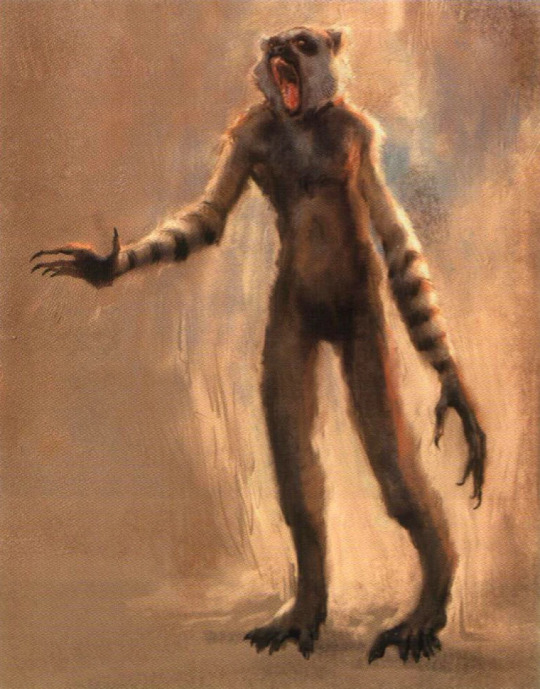
#mastiff phalone
Photo


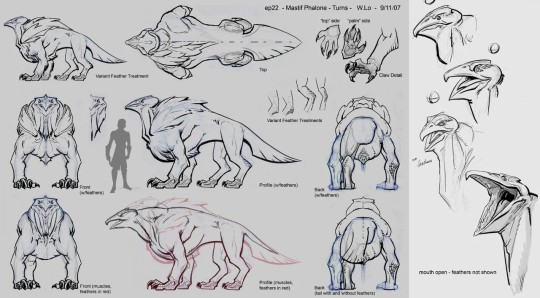
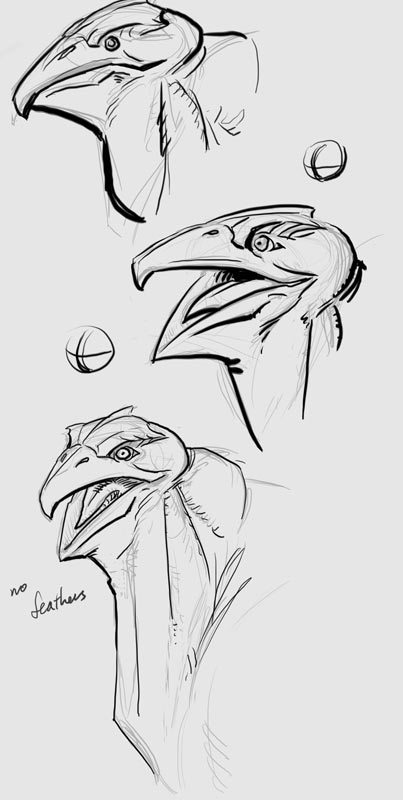
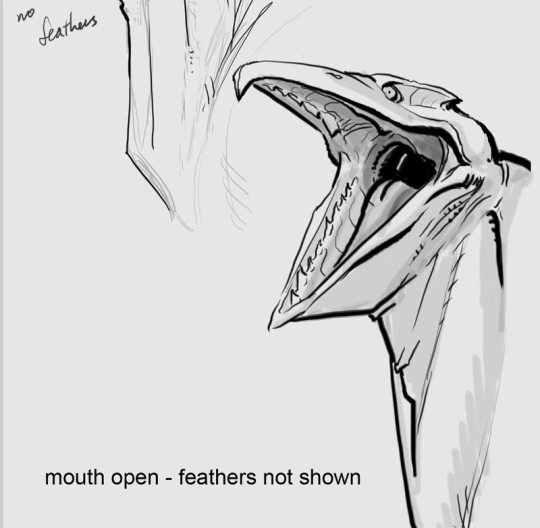
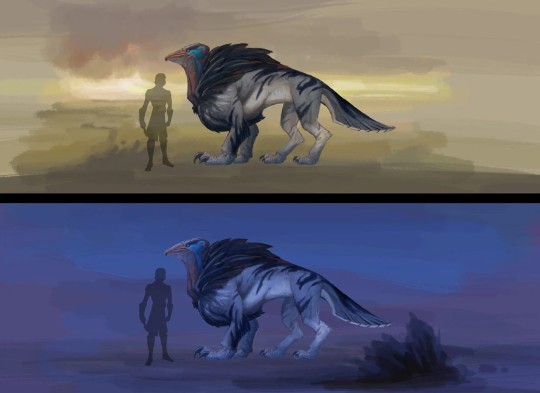
Mastiff phalones were a non-sentient species of avian quadrupeds that were native to the savannas of Maridun. As carnivores, they were dangerous predators.
1.13 Jedi Crash,
creature design by Wayne Lo.
68 notes
·
View notes
Text
Star Wars Alien Species - Lurmen
The Lurmen found on the planet Mygeeto lived in groups within the natural crystalline towers that covered the surface of the planet. Despite their prosperity, the Lurmen of Mygeeto were enslaved by the Muun of the InterGalactic Banking Clan, a faction of the Confederacy of Independent Systems, when it took over Mygeeto. Mygeeto then became a planet within the Confederacy, before it came under attack from the forces of the Galactic Republic.

During the Clone Wars, a group of Lurmen escaped war in known space and colonized the planet Maridun, a world that was uncharted at the time. After being attacked by the native Amanin, they were forced to abandon their ship, which was their only way off the planet. The Lurmen's reason for this was that they would have to fight to get the ship back, the Lurmen cultural ethos being pacifist in nature.
Jedi Generals Aayla Secura and Ahsoka Tano with Ahsoka's master, Anakin Skywalker, crash landed on Maridun after their ship was heavily damaged by Separatist forces. Several clone troopers were also with them. With Skywalker badly injured, and the group having come under attack by numerous mastiff phalones, Secura, Tano and several clones arrived in the Lurmen camp. Requesting aid and healing for Skywalker, the Lurmen leader Tee Watt Kaa refused to have anything to do with the Clone Wars, or violence in general.

Watt Kaa demanded that the Jedi leave before they bring violence to his village and people. Tano, desperate for Anakin to survive, pleaded with Watt Kaa to help Skywalker. Relenting, Watt Kaa sent his son, Wag Too, to heal Skywalker. As a gesture of faith, Watt Kaa demanded that a Jedi stay behind, to prove also that Wag Too would not be kidnapped. Agreeing, Secura stayed behind. Watt Kaa also made clear that no clones and their blasters would be tolerated. As they returned to the camp, they found the camp under attack by two mastiff phalones. Wag Too, staying true to the Lurmen pacifism ethos, tied the creature up and stopped Tano from killing it. Taking Skywalker to the Lurmen camp, Wag Too began his healing process on Skywalker.
Lok Durd, General of the Confederacy, eventually came to the planet with a number of troops and announced the occupation of Maridun. Hiding Skywalker and his allies, the Lurmen refused to fight or use any form of violence against the Separatists, despite the Separatists ransacking their village. Watt Kaa and his Lurmen were informed by Durd that such searches for Republic contraband may happen again in the future. Despite his father's wishes to remain neutral, Wag Too assigns a Lurmen scout, Tub, to aid the Jedi in getting off world.

Despite having already searched the village, the Separatists returned soon after their initial visit. The Separatists, under Durd, intended to use the Lurmen's known pacifism as a means to test an experimental weapon. As well as Skywalker, Secura and two clones soldiers, Rex and Bly, Wag Too and Tub witnessed the weapon's test firing. Skywalker recognized that the next target for the Separatists would be the Lurmen. Tub, having seen this and the Separatists returning to the village, sent word to Wag Too. Tee Watt Kaa, when he heard of this, stated that there was no reason to believe that the Separatists would attack them, to his son's frustration.
The Republic forces on the planet, having stolen a Separatist shuttle, arrive at the village and inform Tee Watt Kaa that the Separatists are planning to destroy them. Watt Kaa, however, refuses to use violence to fight them off, instead stating that he and the Lurmen would rather die than resort to violence. Despite Watt Kaa refusing to allow the Lurmen to fight, the Republic built defenses out of seed pods around the outside of the Lurmen village. Despite Watt Kaa's stance, many of the Lurmen, including Wag Too, wanted to fight. After the Separatists fired their weapon, Skywalker and the Jedi raised a shield around the village, preventing the weapon from causing damage. Durd, having seen this, orders the battle droids of the Confederacy to attack. The Lurmen, still remaining without violence, watch as the Republic defends their village.
As droids fight past Skywalker and his allies, however, the Lurmen became vulnerable to attack. Wag Too, gathering those who did not believe in Watt Kaa's absolute pacifism, attacked the droids and tied them up for the Republic to destroy. The droids, having been defeated, left the village. Despite his ideals conflicting with those of his son's, Watt Kaa thanked the Jedi. Wag Too and the rest of the Lurmen did the same.

The Lurmen that emigrated to Maridun used fallen seedpods from the giant trees as shelter and home. Living near the trees proved too dangerous, as the falling pods could be deadly. Instead, the Lurmen dragged the pods into a clearing and used them as huts. They also extracted essential oils from the pods for nutrition and healing medicines.
Most Lurmen were pacifistic by nature and refused to fight or run even in the face of death. They often would hide instead of using violence. As pacifists, they carried no weapons but carried farming tools or ropes. When some Lurmen fought the Separatists, they refrained from ever destroying or killing the enemy. Their farming tools were used mostly as a leverage tool in these tactics and to provide something to tie the rope to, though sometimes they were used as a weapon for striking an enemy.
The greatest native threat to the Lurmen on Maridun were the Amani and the mastiff phalones, raptor-headed quadrupeds that hunted in groups. However, even in defeating these beasts the Lurmen attempted to remain true to their pacifist ideals, and not inflict any injury to the creatures. Instead, when cornered by a mastiff phalone, an agile Lurmen would try to unbalance the creature by tying a rope around its stout legs. For speedy movement, Lurmen could curl into a wheel-shape and roll along the ground.
The Lurmen on Mygeeto had the intelligent ability to be able to make profit and be prosperous, until the time of the invasion and occupation by the Banking Clan and, later, the Separatists.
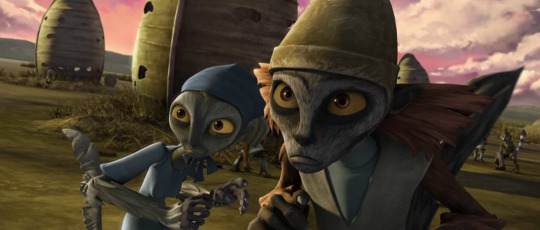
The Lurmen were a lemuroid mammalian species, far smaller than a Human. Their bodies were covered entirely in fur, which ranged in color from a dark brown to a white-gray, though they did wear garments. The Lurmen had heads protruding perpendicular from their chest, with two large golden orange eyes, a nose and a mouth. Each Lurmen had a tail.
They stood on two legs and had two arms, with five digits on each hand and foot. They could walk either upright on their two legs, and could also use their arms and legs for faster movement. Certain Lurmen had the ability to roll themselves into a wheeled shape; this allowed them to cover distances at great speed. They may have learned this ability from the native Amani on Maridun, on which a settlement of Lurmen was established. Wag Too was one Lurmen who possessed this rolling talent.
A typical Lurmen stands at 1.0 meter or 3.4 feet tall and weighs 20 kilograms or 44 pounds.
The Lurmen were derived from concept art for lemur-like inhabitants of Mygeeto that were slated to appear in Star Wars: Episode III Revenge of the Sith, but were ultimately cut.
Lurmen age at the following stages:
1 - 12 Child
13 - 18 Young Adult
19 - 35 Adult
36 - 60 Middle Age
61 - 75 Old
Examples of Names: Tee Wat Kaa, Tub, Wag Too.
Languages: Lurmen speak Basic and have their own tribal languages, collectively called Lurmese. They write in pictographs and glyphs that convey complex ideas. The Lurmen in "Jedi Crash" and "Defenders of Peace" speak with Irish and Scottish accents.
2 notes
·
View notes
Text
let’s talk: the clone wars rewatch!
This week is the second half of season 1 starting with s01 e11 (Dooku Captured).
There are 12 episodes in this half (11-22), with each episode being around 22 minutes each, which means around 4 hours, 40 minutes worth of clone wars. Bellow the cut is a list with summaries of the episodes in case you dont want to rewatch but still want to talk about some episodes. (Courtesy of Wookieepedia and my brain’s recollection):
Dooku Captured (s01 e11)
Having allowed himself to be captured, Anakin is rescued by Obi-Wan Kenobi onboard Count Dooku’s ship. The two then go to apprehend the Count. Dooku escaped in his solar sailer with the two Jedi on his tail in a transport shuttle. Direct hits on the solar sailer forced the Count to make an emergency landing in a wilderness on the nearest planet. When the Jedi suffered a hit from a droid fighter, they were forced to crash land, as well. In a nearby cave, the two Jedi began to hunt for Dooku, but he ambushes them by causing a sudden collapse in the cave ceiling, causing Anakin to lose his lightsaber, which Dooku retrieved. This distraction allowed Dooku an opportunity to exit and seal the cave with Anakin and Obi-Wan still inside. While the Jedi tried to find a way out, Dooku cames upon Hondo Ohnaka's pirate gang salvaging his ship. Outnumbered, the Count considers his options and chose to accompany the pirate gang on their ship off the planet as a ransom to the Separatists, or a prize to the Republic. The Jedi High Council assigns Anakin and Obi-Wan to meet with the pirates to verify that they do indeed have the Count in custody, agreeing to the condition that they must arrive unarmed. Upon arriving in the Twilight, the Jedi were met at gunpoint and escorted to Hondo, who arranged a meeting with their prisoner. After Anakin and Obi-Wan entered Dooku's cell and subtly mocked his current imprisonment the Jedi were "invited" to attend a banquet in the pirate gang's grand hall, which the Weequay had no intention of letting the Jedi miss.
The Gungan General (s01 e12)
While negotiating Count Dooku's ransom, Anakin and Obi-Wan are taken prisoner. The Jedi and Sith form an unlikely alliance in a bid to escape, with Jar Jar Binks as their only hope. With no choice but to work together, the two Jedi and the Sith try to escape to the hangar, but are caught and reincarcerated. Obi-Wan then uses a mind trick to compel the guard to let them out and go out drinking. Unfortunately, while trying to pole-vault over a wall, Dooku's line is shot; Obi-Wan grabs him, and Anakin is forced to hold onto both; they are re-captured by Hondo hanging from the wall. Meanwhile, Jar Jar Binks and Senator Kharrus fly to the Weequay pirates' lair with a bounty of spice on board as a ransom for Dooku. Unfortunately, Turk Falso decides to go behind Hondo's back, since he thinks dealing with the Separatists would have been more profitable, and has his men shoot down the shuttle to sack the ransom for himself. The pilots and Kharrus die in the resulting crash, and Jar Jar subsequently gets unintentional command of the surviving clone crew. Though the clones think of waiting for reinforcements, Jar Jar plans to go after the pirates, riding the skalders to catch up. They intercept and defeat the pirates, and with the spice back in hand, they follow a series of power supply lines straight to the pirate base. Meanwhile, Hondo becomes increasingly annoyed at the Jedis' attempts to escape and tortures Anakin and Obi-Wan with electricity, while Dooku remains locked in his cell. When the blackout hits the base, the Jedi and Dooku make their escape and go their separate ways: Dooku kills Turk and takes off in a ship; Anakin and Obi-Wan take Hondo hostage before meeting Jar Jar outside. Obi-Wan tells Anakin to let Hondo go, as they don't have any quarrel with him since Dooku had escaped. Hondo commends the Jedi on their honor, but Obi-Wan reminds him that Dooku is likely to seek revenge on him, before the Twilight takes off.
Jedi Crash (s01 e13)
When Anakin Skywalker is gravely injured in battle, Jedi General Aayla Secura must teach Ahsoka the Jedi philosophy of having no personal attachments -- while they brave a hostile planet in search of medical help for the Jedi Knight. Aayla's group finds a giant tree that was depicted in the tablet. However, giant seedpods come falling down on them from the trees but no one is hit/hurt by them. Aayla notices a trail made from dragged-away seedpods, and they follow the trail.Back at the camp, something is watching Rex and Anakin. Hearing rustling in the bushes, Rex goes to check it out. As Anakin finally comes to, he senses something and tries to get up but collapses. He manages to tell Rex that there is something behind him. He turns around and a mastiff phalone attacks him. He manages to scare it off with his blaster. Aayla, Ahsoka and Bly soon find a village of Lurmen who had settled on the planet, far away from the war. The village elder, Tee Watt Kaa refuses to aid them, fearing that destruction will break the peace they already have. However, at Ahsoka's request, he does allow his son, Wag Too, to help them bring Anakin back to the village for medical support. But he requests that only one Jedi is to go with him and that Bly should follow. Ahsoka and Bly go back with Wag Too in their company, while Aayla remains behind as insurance. At the camp, Anakin senses more creatures nearby and stands to fight. Two emerge from the bushes, ready to strike. As they charge, Rex shoots one of them, but the other rams between them. Luckily, the others arrive in time; Wag Too uses rope to bind the creature, but tells Ahsoka not to kill it, merely to topple it. They pull on the rope, bringing the creature down on its side. They then bring Anakin back to the village, where Wag Too uses healing oil on Anakin.
Defenders of Peace (s01 e14)
As Anakin recovers from his injuries obtained during the Battle of Quell, Rex spots a Separatist dropship which descends near the Lurmen village. Tee Watt Kaa goes to meet the newcomers, while the Jedi escape, to avoid the Lurmen having to pay the price for their presence. The Separatist commander, Lok Durd imposes his "protection" upon the Lurmens and orders the village to be ransacked to secure his "new colony". The Jedi, Rex and Bly retreat into the tall grass; Wag Too sends his friend Tub after them to watch their departure from the planet. Lok announces to his droids that he had developed a defoliator, capable of destroying organic life while leaving non-organics unharmed. Anakin predicts that the Separatists are headed for the Lurmen, so he tells everyone that they will take out the communications station, steal the shuttle and then return to help the Lurmen. Ahsoka points out that Tee Watt Kaa didn't want their help; Anakin justifies that there is a difference between pulling innocents into a war and leaving them to extinction. As night falls, the Jedi and clones infiltrate the base and take out any battle droids in their way, with Rex, Bly, and Anakin taking out three droids in a Separatist command center. The group eventually take the shuttle and two shield generators with them, and return to the Lurmen village, informing them about the impending attack. However, Tee Watt Kaa refuses to fight, holding onto their people's beliefs even if it means their death, despite Wag Too's pleas that they must at least defend themselves. Defying his father, Wag Too and his friends engage the droids, toppling them down to be decapitated. Meanwhile, Anakin destroys the defoliator cannon and slices his way to Lok, capturing him through levitation.As Anakin and his companions prepare to leave, Wag Too and Tee Watt Kaa offer their thanks.
Trespass (s01 e15)
While investigating the disappearance of a clone security force, Anakin and Obi-Wan get caught in the middle of an escalating conflict between the furry territorial inhabitants of a desolate ice world and the greedy representatives of a nearby moon. Despite the language barrier, Obi-Wan and Anakin manage to make clear that their mission is for peace, and they arrange a meeting between the Pantorans and the Talz. When they deliver the news, Chairman Chi Cho arrogantly refuses to believe that the Talz can be considered a sentient race and calls them trespassers and animals, stating that Pantora hasn't found a slight bit of life on the planet in all their history. Riyo Chuchi tries to mediate, telling that it is for the Senate to decide this matter, but to no avail. Chi Cho still refuses to accept the Talz as sentients and arrogantly declares Plutonia as sovereign Pantoran property, deliberately provoking a war. While returning to their base, Chi Cho and his escort are ambushed by a Talz war party, forcing them to fight, and Chairman Cho is severely weakened by a spear in his back. Anakin, Obi-Wan and Senator Chuchi just arrive in time to save Cho, Rex and the remaining escort from being overrun, but even with his last breath, Cho insists on killing the Talz for the 'good' of his people as his final command. Chuchi politely declines, informing him of the Assembly's decision. Dumbfounded that he was overruled and that his people prefer peace, claiming that he died for them, Chi expires. Senator Chuchi pursues a peaceful approach and manages to cease hostilities, conceding sovereignty of Plutonia to the Talz. As she and the Jedi board a gunship, Obi-Wan requests that to maintain peace, she should make it last.
Hidden Enemy (s01 e16)
Anakin and Obi-Wan discover evidence of a traitor amongst their ranks while attempting to lead Republic forces to liberate the planet of Christophsis from a Separatist siege. When the Republic is ambushed on Christophsis, it becomes clear that someone has set them up. The Jedi suspect the Sith, while Rex and Cody uncover information that points to a spy amongst them. Slick, knowing he's been discovered, escapes. Cody and Rex try chasing him down, but they are too late: Slick blows up most of the gunships and AT-TEs, as well as the weapons depot, with earlier-placed charges. The other clones inform Cody and Rex that Slick went into the command center, and they order the others to secure the perimeter while they go inside.In the meantime, as Anakin and Obi-Wan race to the Separatist base on BARC speeders, they notice an increasing number of droids spying on them, but still decide to continue the mission, despite the fact that it has been compromised. They arrive at the enemy base and inside, they meet Asajj Ventress again and begin to duel with her. The Jedi manage to overcome Ventress and demand her surrender, but as they edge closer to capture her, she creates a large hole in the floor beneath their feet with her lightsabers, pushing them one level down. Ventress taunts them and runs away, and the Jedi follow her, discovering that she has set up a whole army to invade Christophsis. Slick engages the commander and captain in physical combat, stating that he was tired of all the suffering and was offered freedom and money from Ventress. Cody manages to knock him out and they apprehended him. As they present Slick to the Jedi, Slick snaps that his brothers are enslaved by the Jedi, that he was striking a blow for all clones and that he loves his brothers, but Cody and Rex retort that he has now exposed them all to certain doom.
Blue Shadow Virus (s011 e17)
Padmé and Jar Jar are captured while searching for a secret Separatist bio-weapons lab, sparking Anakin, Obi-Wan and Ahsoka to try and save their friends and halt the release of a deadly virus. Upon arriving on Naboo, Anakin, Ahsoka and Obi-Wan learn of Padmé and Jar Jar's departure. Anakin sends Ahsoka with Peppi to find them, while the rest of them analyze the data from one of the lobotomized droids. Ahsoka and Peppi search the swamp, inadvertently find a spy cam and manage to hide from it. Ahsoka contacts Anakin and Obi-Wan, who instructs her to detonate a bomb in the south bunker while they enter through the hatches. Anakin then joins with Rex and his men to start the mission; Obi-Wan reminds him that the safety of the galaxy is worth more than Padmé's life and she may already be dead. Ahsoka levitates a thermal detonator, perfectly dropping it on the hatch and distracting many of the droids to her position; Rex and his team also arrive to assist her as they hack their way through droids before having to retreat with the entrance of droidekas. This allows the others to infiltrate the base unheard. But as Anakin enters Vindi's lab, he finds Vindi torturing his hostages with electricity, forcing him and his clones to surrender. As Vindi leaves Padmé and Jar Jar to suffer, he runs off with his virus bomb; Anakin breaks free and saves them. Obi-Wan arrives with the Bomb Squad. With Vindi and another droid each carrying a detonator, they split up between the two. Obi-Wan tries to catch Vindi, but the villain throws away a number of virus vials, forcing Obi-Wan to catch them while Vindi makes his escape. Meanwhile, Padmé and Jar Jar track down the droid, managing to prevent it from escaping. With the bomb squad's help, they are able to deactivate all the bombs, just as they capture Vindi.
Mystery of a Thousand Moons (s01 e18)
The fatal Blue Shadow Virus is released, infecting Ahsoka, Padmé and many Clone Troopers - and giving Anakin and Obi-Wan just 48 hours to find the antidote on a mysterious planet from which no visitor has ever returned. Anakin and Obi-Wan approach Iego, but not before passing through a massive ship graveyard in its orbit. As they land, they find strangely disfigured droids with mixed-up parts, all saying, "Welcome to Iego". A boy approaches them and introduces himself as Jaybo. Jaybo explains that when the Separatists left, they left a lot of their droids behind, and he simply reprogrammed them to serve him. When Obi-Wan and Anakin inquire about the Reeksa root, Jaybo mentions that the system is "haunted" and no one gets off the planet, since Drol, the phantom ruler of Iego, destroys anyone attempting to leave. Anakin and Obi-Wan descend a cliff, while Jaybo shouts down to not touch the vines, because the plants "don't like it" and have teeth. A Xandu appears, and the two Jedi grab ahold of it. It takes Anakin and Obi-Wan down to the bottom, and Anakin begins to hack away part of a root while the Reeksa plant awakens. Anakin and Obi-Wan manage to fend off the Reeksa and ascend the cliff. Anakin and Obi-Wan attempt to leave Iego in the Twilight, but as they pass through the debris field, sensors activate an energy field that prevents them from getting very far from Iego, and they return. Obi-Wan theorizes that the Separatists installed the energy field to prevent the inhabitants from leaving the planet. The Jedi call a meeting with the citizens of Iego. Obi-Wan tells them that Drol is not a ghost, but a Separatist security system. Obi-Wan notices Vulture droids in another room, and he asks Jaybo to reactivate them so that Artoo can fly them via remote control. The Vultures are activated, and after Jaybo transfers control of the droids to Artoo, they launch and follow the Twilight into the ship graveyard. The laser field activates, and Artoo attempts to send the Vulture droids into the laser emitter, but they are destroyed. Obi-Wan fires at the generator, and the energy field explodes. The Twilight immediately jumps into hyperspace for Naboo.
Storm Over Ryloth (s01 e19)
Ahsoka disobeys Anakin's orders and loses most of her squadron - prompting Anakin to help give his Padawan a lesson in a respect for authority, and the opportunity for redemption. Ahsoka sits with an unconscious Admiral Yularen and mournfully apologizes for her failure. Rex then calls her away to Anakin, whom she finds in the hangar bay, repairing her starfighter with the help of R2-D2. Anakin tells her they need to proceed with their attack on the blockade. Ahsoka, still shaken from her earlier failure, questions her readiness. Anakin receives a call from the Defender and orders Ahsoka back to her quarters to cool off. Alarms sound aboard the Resolute, and Ahsoka exits her quarters to find clone troopers running to stations. A clone reports to Ahsoka that the Defender is being evacuated for an unknown reason. When she arrives in the hangar, everything from the Defender is being loaded into the Resolute. Anakin leaves it to Ahsoka to command the remaining forces while he remains defenseless in an escape pod after destroying the Defender. Anakin leaves on a shuttle, and "Commander Ahsoka" is now in charge of the Resolute. The Defender emerges from hyperspace, and Anakin hails Captain Tuuk, offering to surrender himself and his vessel in exchange for safe passage of food and medical supplies to the people of Ryloth. Ahsoka details the battle plan after Anakin's collision with the battleship. She intends to tilt the Resolute in a maneuver away from the frigates, using it as a screen to launch fighters that would then defeat the remaining ships. The navigation officer is doubtful, and suggests taking time to come up with a better plan. Ahsoka asserts that these are her orders, and that Anakin is counting on her, but then corrects herself and says that he is counting on them. Admiral Yularen returns to the bridge and supports Ahsoka, giving her much-needed confidence. Anakin leaves the Defender with R2-D2 and boards an escape pod. Captain Tuuk orders all cannons to fire at the Defender. The Defender pierces the center sphere of the battleship. The battle droids, leaderless and confused, manage to order a basic attack on the Resolute, but the Republic Y-wings and V-19 Torrents manage to rip apart the remaining ships in the blockade. Following this, three Acclamator-class transgalactic military assault ships carrying Obi-Wan, Mace Windu, and their troops emerge from hyperspace. Obi-Wan contacts Ahsoka, wryly commenting on the state of Anakin's invasion fleet, and Rex dispatches a shuttle to pick up Anakin's escape pod.
Innocents of Ryloth (s01 e20)
To sabotage a powerful Separatist weapon, Obi-Wan and a small clone force enter an occupied town, and discover that its residents are being used as a living shield. Obi-Wan dispatches Cody, Wooley, Waxer and Boil to scout ahead. Waxer and Boil stumble across the young Twi'lek orphan Numa, who at first is fearful of them. After they remove their helmets, Numa relaxes a bit; she calls them both “Nerra”, and takes a ration bar that they give her. Numa somehow gets ahead of them and leads her to a shattered building that was once her home. Waxer and Boil, moved by the losses the war has inflicted upon the child, take it upon themselves to keep her safe. Meanwhile, Ghost Company is attacked by the gutkurrs. Obi-Wan uses the Force to lure the creatures into an alley bordered by a bridge. Cody and his men fire at the bridge, and the gutkurrs are trapped, while Obi-Wan leaps out. Though the clones defeat the creature, TX-20 knows that their numbers are very thin. Suddenly, Waxer and Boil emerge from a hatch in the street nearby, with Numa in tow. Obi-Wan converses to Numa in Twi'leki, who agrees to lead them to the prisoners while Cody and his men create a diversion, with Obi-Wan, Waxer and Boil freeing the Twi'lek prisoners. Obi-Wan takes control of a proton cannon, and with the help of Waxer and Boil, he manages to destroy the other cannons. The Acclamator transports land, and Mace Windu commends Obi-Wan on his victory. However, their new objective is much harder: to take the Ryloth capital of Lessu and free this world. Waxer and Boil say goodbye to Numa. As the army heads toward the capital, Numa calls “Nerra!” out to Waxer and Boil again, and Obi-Wan translates: “Nerra” means “brother”. Smiling, Waxer and Boil turn and wave back at Numa, before moving out toward the sun, intent on freeing this world.
Liberty on Ryloth (s01 e21)
As Mace Windu and his forces head to Lessu along a cliffside path with AT-TE walkers, they are ambushed by several AATs. The tanks incapacitate the first walker in the line and then target the rear walkers, seeking to trap and destroy the Republic forces. Mace saves the gunner, and then Commander Ponds comes up to him and informs Windu that they're pinned down. Windu and Ponds orders Lightning Squadron to the front while Windu Force-pushes the first fallen walker off the cliff, clearing the path. With republic forces stretched thin, Mace decides to enlist the help of the Twi'lek Resistance under the command of Cham Syndulla. Mace, Razor and Stak accompany Cham to his hideout under a wrecked C-9979 landing craft. Mace mentions that they can stop another massacre from happening, but Cham states that when the droids invaded, the Republic was unable to help, and they were forced to surrender. Meanwhile, battle droids escort the civilians of Lessu to the outer wall to slow Windu down. As Mace and Cham discover this, they spot two MTTs making their way toward the city. Cham reports that his spies say that they are filled with stolen treasure, and they decide to use them to get across and activate the bridge despite the chance of being scanned. Mace, Razor and Stak slice a battle droid on a STAP and enter the rear transport, while Cham prepares to lead the attack. Mace orders Ponds to create a diversion and get Lightning squadron ready. The plasma bridge is activated for the transports, and they begin to cross. The bridge is deactivated, and Mace uses the Force to push Razor and Stak across. Mace uses an STAP to get to the other side, and battle droids begin to attack the three. Mace orders the troopers to get the bridge back up while he holds the droids off, and Cham begins his charge. Mace takes out an entire droid squad and a tank on his own, while Razor and Stak get the bridge up just in time for Cham, Ponds and their forces to cross. The citizens of Lessu wave happily at the passing freedom fighters; Mace instructs Cham to take care of the droids while he finds Tambor. The freedom fighters and Lightning Squadron take out the AATs and the droids quickly.
Hostage Crisis (s01 e22)
To free crime lord Ziro Hutt, bounty hunters seize control of the Senate Building and take hostages—completely unaware at first that Jedi Knight Anakin Skywalker is still inside. Anakin manages to elude his pursuers and hot-wires a terminal to communicate with Palpatine. The Chancellor advises Anakin to get to the central power core to contact for help. Anakin managed to disconnect and hide before the bounty hunters find him. Anakin managed to locate the power core, but a panicked Robonino shut the door behind him. Alama then come up behind Anakin. Though Anakin grabbed his gun, Aurra Sing then attacked Anakin, and Robonino shocked him into unconsciousness.Bane then gave Palpatine instructions to give a pardon chip to Orn Free Taa to be transported to the prison where Ziro was being held. HELIOS-3D then came in to take the Senator. They arrived at the prison and shipped Ziro away. An unconscious Anakin was dragged into the lobby, where the bounty hunters started to plant bombs that will go off if their laser detectors are triggered. This enabled the hunters to leave the Senate unhindered, despite an attempt by Orn Free Taa, Palpatine and Clone Commander Fox's detachment of the Coruscant Guard to have them arrested. Anakin woke up and Padmé gave him back his lightsaber, playing it off as that Anakin had dropped it. He then managed to save everyone by cutting a hole in the floor and dropping everyone one floor down, just before Bane triggered the bombs anyway for the clone troopers' interference. Padmé thanked Anakin for his daring escape.
#this half of season 1 is just sooo goood#lets talk#the clone wars#season 1#s01e11#s01e12#s01e13#s01e14#s01e15#s01e16#s01e17#s01e18#s01e19#s01e20#s01e21#s01e22
8 notes
·
View notes
Last Seen Blogs

rosesformark
love, mark

cap-sweet-and-salty-sadness
Dying is easy, it's living that's hard

rainbowheart-bear
Kanny Cries

dcugifs
DCUGIFS

nemjoonsficlibrary
BTS Fanfic Recs