#punycode
Text
Para bios no Twitter/X
Para deixar a bio centralizada: (⠀⠀)
Para tirar o "traduzir bio": ( ͏ ͏ ͏ ͏ ͏ ͏ ͏ ͏ ͏ ͏ ͏ ͏ ͏ ͏ ͏ ͏ ͏͏ ͏ ͏ ͏ ͏)͏
Para deixar o nome invisível: ( ؘ ) ( ִֶָ ) ( ً )
Blank Spaces:
(⠀⠀ ⠀) bios
(⠀ ) locs

Site para fazer seu próprio website personalizado para Twitter/X.
#x#spaces#locs#twitter#kpop#messy bios#messy locs#twitter bios#bios random#bios meme#asthetic symbols#soft bios#cute symbols#kpop locs#random bios#symbols#headers#carrd bios#kpop long bios#random locs#soft icons#soft locs#twitter headers#x headers#X help#tweeter help#punycode#blank space
873 notes
·
View notes
Text

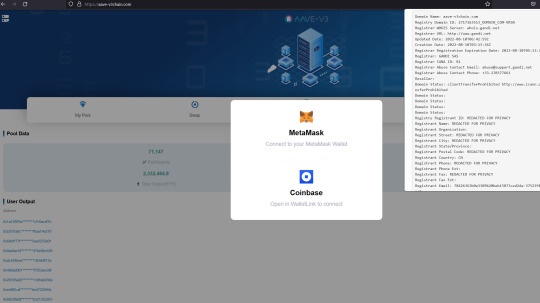

Fake AAVE scams
aave-v3.org
aave-v3block.com
aave-v3chain.com
aave-v3transaction.com
aave.xn--cobase-c9a8p.com
aavega-interactive.agencyanalytics.app
aavegotchi.pet
aavegotchi.vercel.app
Warning!
The real website is https://AAVE.COM
All those others are fakes.
2 notes
·
View notes
Note
seokie, como você colocou o link assim? e poderia liberar essa bio, por favor?

pra ficar com a estrelinha azul, coloque a bio assim:
⠀⠀⠀⠀𝗅𝖺𝗅𝗂𝗌𝖺 의 xn--q3h.xn--6ii 🐚 𝗀𝗂𝗋𝗅
e o website eu faço pelo punycoder.
34 notes
·
View notes
Note
eemi, vc ainda tem aquele espaço do punycode ? Eu preciso MUITO dele
aqui amor !
⠀⠀
39 notes
·
View notes
Text
Tumblr handles certain punycode urls in a weird way so people think my main blog contains a virus?
Despite using this site for over a decade, I no longer know how to use it (but apparently I can break it)
The rest of the school term is actually looking pretty good, I want to reorganize my room with the added time
I think I'm having a mental breakdown
3 notes
·
View notes
Text
0 notes
Text
How Malvertisers are Exploiting Google Ads
A malvertising campaign that manipulates Google Ads to divert users seeking popular software to fraudulent landing pages and deliver subsequent-stage payloads has come to light. Malwarebytes, the firm that unearthed this activity, described it as “distinctive in its methodology of fingerprinting users and distributing time-sensitive payloads.”
This attack specifically targets users looking for Notepad++ and PDF converters to display counterfeit ads on Google’s search results page. When these ads are clicked, the system weeds out bots and other unintended IP addresses by presenting a decoy website. If the visitor is considered valuable to the threat actor, they are rerouted to a cloned website promoting the software, while the system quietly fingerprints the system to ascertain if the request is coming from a virtual machine.
The Intricacies of the Malvertising Campaign
Users who fail the verification are directed to the official Notepad++ website, while a potential target is given a unique ID for “tracking purposes and also to make each download unique and time-sensitive.” The terminal-stage malware is an HTA payload that establishes a connection to a remote domain (“mybigeye[.]icu”) on a custom port and delivers subsequent malware.
Jérôme Segura, Director of Threat Intelligence, stated, “Threat actors are successfully employing evasion strategies that circumvent ad verification checks and enable them to target specific victim types.” He added, “With a dependable malware delivery chain at their disposal, malicious actors can concentrate on enhancing their decoy pages and creating custom malware payloads.”
Overlap with Similar Campaigns and the Use of Punycode
This revelation coincides with a similar campaign that targets users searching for the KeePass password manager with harmful ads that direct victims to a domain using Punycode (keepass[.]info vs. ķeepass[.]info), a unique encoding used to convert Unicode characters to ASCII.
The Role of Decoy Sites and Malicious Installers
Users who arrive at the decoy site are duped into downloading a malicious installer that ultimately triggers the execution of FakeBat (also known as EugenLoader), a loader designed to download other malicious code.
The misuse of Punycode is not entirely new, but its combination with rogue Google Ads indicates that malvertising via search engines is becoming increasingly sophisticated. The objective is to execute a homograph attack and entice victims into installing malware by using Punycode to register domain names similar to a legitimate site.
The Constant Evolution of Threats
Multiple threat actors such as TA569 (also known as SocGholish), RogueRaticate (FakeSG), ZPHP (SmartApeSG), ClearFake, and EtherHiding have been noticed exploiting themes related to fake browser updates to disseminate Cobalt Strike, loaders, stealers, and remote access trojans, indicating that these attacks are a persistent, evolving threat.
Dusty Miller, a researcher at Proofpoint, stated in an analysis published this week, “Fake browser updates exploit end user trust with compromised websites and a lure customized to the user’s browser to legitimize the update and fool users into clicking.” He warned, “The threat is only in the browser and can be initiated by a click from a legitimate and expected email, social media site, search engine query, or even just navigating to the compromised site.”
https://www.infradapt.com/news/how-malvertisers-are-exploiting-google-ads/
0 notes
Link
Los analistas de Malwarebytes informaron que el anuncio malicioso se publicó en respuesta a consultas de búsqueda de "keepass". Era particularmente engañoso porque mostraba el logotipo y la URL oficiales de KeePass, apareciendo antes de los resultados de búsqueda orgánicos. Esta apariencia engañosa lo hacía casi indistinguible del sitio legítimo. Cuando los usuarios hacían clic en el anuncio, eran redirigidos a una página web aparentemente segura (HTTPS) diseñada para imitar el sitio web oficial de KeePass.
0 notes
Text
the discord change haters are so silly calling everyone an anglocentrist and throwing a tantrum over it because 1. everyone using discord knows what is a latin alphabet regardless of their background 2. they need to get creative with their fucking usernames instead of having 400 jasons or using fancy fonts
and the scariest of them all..
3. youre gonna fucking die when you realize all urls are made out of mostly latin alphabet glyphs. this is so #anglocentrist i know very scary. yes even the punycode urls are at the core made out of latin glyphs
#rant#im pretty sure none of you actually give a fuck about anglocentrism#you guys are still american imperialists at heart no matter how big of a mask you put on
1 note
·
View note
Quote
日本語で記されているドメインは、そのまま使われているわけではありません。実際には日本語を英数文字に変換して使っています。Punycode(ピュニコード)と呼ぶ変換方式を使うのが一般的で、日本語をPunycode表記へと変換すると、通常はまったく意味を成さない英数の文字列へと置き換えられます。
日本語ドメインとは|ドメインの基礎知識|名づけてねっと
0 notes
Link
0 notes
Text
Why did the OpenSSL punycode vulnerability happen?
https://words.filippo.io/dispatches/openssl-punycode/
Comments
0 notes
Text
[Media] CVE−2022-3602
CVE−2022-3602
This document and repository is a write-up of CVE−2022-3602, a punycode buffer overflow issue in OpenSSL. It's an "anti-POC" (the issue does not appear to exploitable) intended for folks who maintain their own OpenSSL builds and for compiler maintainers.
There is a seperate CVE in the same release, CVE-2022-3786, which also leads to buffer overflows but an attacker can't control the content in that case. There is no reproduction for that issue here, but that issue can lead to a Denial of Service due to crash.
Crashes and Buffer overfllows are never good and if you are using OpenSSL 3.0.x, it is prudent to update as soon as possible.
https://github.com/colmmacc/CVE-2022-3602
#cve #poc

0 notes
Text


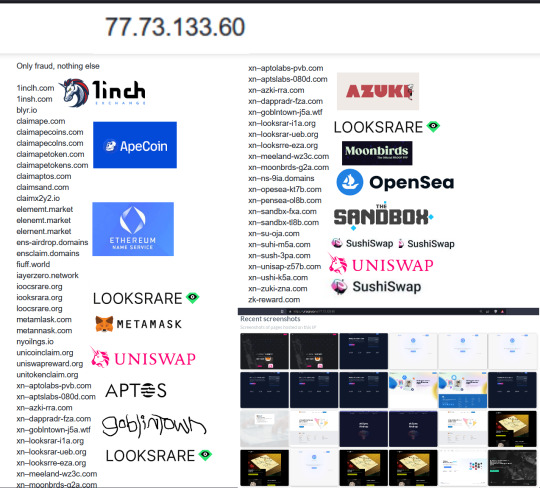
Scam Uniswap "giveaway"
Punycode IDN
xn--unisap-z57b.com | unisẃap.com
🛑 Remember, the real UniSwap website is https://app.uniswap.org/ (also accessible via https://uniswap.exchange/)
☣ Never visit ANY site from a message you received, no matter what is the fake reason.
💸 There is no Airdrop. Ignore any scam tokens you might have received that have URLs in their name. All those are scams.
Bad IP hosting the fraud:
77.73.133.60 (77.73.133.0/24)
AS 204603 ( Partner LLC )
0 notes
Text
PowerDNS is a server software written in C++ to provide both recursive and authoritative DNS services. The Recursor DNS does not have any knowledge of domains and consults the authoritative servers to provide answers to questions directed to it while the Authoritative DNS server answers questions on domains it has knowledge about and ignores queries about domains it doesn’t know about. Both products are provided separately but in most cases combined to work seamlessly.
PowerDNS was developed in the late 90s and became an open-source tool in 2002. PowerDNS has been deployed throughout the world to become the best DNS server. The rapid growth of PowerDNS is mainly due to the following features offered.
It offers very high domain resolution performance.
Offers Open Source workhorses: Authoritative Server, dnsdist and Recursor
It provides a lot of statistics during its operation which not only helps to determine the scalability of an installation but also spotting problems.
Supports innumerable backends ranging from simple zonefiles to relational databases and load balancing/failover algorithms.
Has improved security features.
To make management of the PowerDNS server easier, a tool known as PowerDNS Admin was introduced. This is a web admin interface that allows one to create and manage DNS zones on the PowerDNS server. It offers the following features:
Support Google / Github / Azure / OpenID OAuth
User activity logging
Multiple domain management
Domain templates
DynDNS 2 protocol support
Support Local DB / SAML / LDAP / Active Directory user authentication
Edit IPv6 PTRs using IPv6 addresses directly (no more editing of literal addresses)
Full IDN/Punycode support
Limited API for manipulating zones and records
Dashboard and pdns service statistics
Support Two-factor authentication (TOTP)
User access management based on domain
This guide provides the required steps to run PowerDNS and PowerDNS Admin in Docker Containers. There are other ways to run PowerDNS and PowerDNS Admin such as:
Install PowerDNS on CentOS 8 with MariaDB & PowerDNS-Admin
Install PowerDNS and PowerDNS-Admin on Ubuntu
These methods contain quite a number of steps. Using Docker is the easiest of them all.
Step 1 – Prepare your Server
Begin by preparing your server for the installation. There are packages required that can be installed as below:
## On RHEL/CentOS/RockyLinux 8
sudo yum update
sudo yum install curl vim
## On Debian/Ubuntu
sudo apt update && sudo apt upgrade
sudo apt install curl vim
## On Fedora
sudo dnf update
sudo dnf -y install curl vim
Disable system resolved service which runs on port 53 and provides network name resolution used to load applications. This port will be used by PowerDNS instead.
sudo systemctl stop systemd-resolved
sudo systemctl disable systemd-resolved
Remove the symbolic link.
$ ls -lh /etc/resolv.conf
-rw-r--r-- 1 root root 49 Feb 23 04:53 /etc/resolv.conf
$ sudo unlink /etc/resolv.conf
Now update the resolve conf.
echo "nameserver 8.8.8.8" | sudo tee /etc/resolv.conf
Step 2 – Install Docker and Docker-Compose on Linux
I assume that you already have Docker Engine is installed on your system, otherwise install Docker using the dedicated guide below.
How To Install Docker CE on Linux Systems
Before you proceed, ensure that your system user is added to the docker group.
sudo usermod -aG docker $USER
newgrp docker
Start and enable Docker.
sudo systemctl start docker && sudo systemctl enable docker
You may also need Docker-compose installed to be able to run the container using the docker-compose YAML file. Install Docker Compose using the below commands:
First, download the script using cURL.
curl -s https://api.github.com/repos/docker/compose/releases/latest | grep browser_download_url | grep docker-compose-linux-x86_64 | cut -d '"' -f 4 | wget -qi -
Make it executable and move it to your path using the commands:
chmod +x docker-compose-linux-x86_64
sudo mv docker-compose-linux-x86_64 /usr/local/bin/docker-compose
Verify the installation.
$ docker-compose version
Docker Compose version v2.2.3
Step 3 – Create a Persistent Volume for the PowerDNS Container.
Create a persistent volume for PowerDNS with the right permissions as below.
sudo mkdir /pda-mysql
sudo chmod 777 /pda-mysql
The above volume will be used to persist the database and configurations. On Rhel-based systems, you need to set SELinux in permissive mode for the Path to be accessible.
sudo setenforce 0
sudo sed -i 's/^SELINUX=.*/SELINUX=permissive/g' /etc/selinux/config
Step 4 – Run PowerDNS and PowerDNS Admin in Docker Containers
There are two options on how to proceed:
Directly from Docker Hub
Using Docker-Compose
Option 1 – From Docker Hub
This is so simple since few configurations are required. The PowerDNS Docker image consists of 4 images namely:
pdns-mysql – the PowerDNS server configurable with MySQL backend.
pdns-recursor– contains completely configurable PowerDNS 4.x recursor
pdns-admin-uwsgi – web app, written in Flask, for managing PowerDNS servers
pdns-admin-static – fronted (nginx)
We will run each of these containers and link them to each other.
The Database Container.
We will use MariaDB as the database container with the PowerDNS database created as below.
docker run --detach --name mariadb \
-e MYSQL_ALLOW_EMPTY_PASSWORD=yes \
-e MYSQL_DATABASE=pdns \
-e MYSQL_USER=pdns \
-e MYSQL_PASSWORD=mypdns \
-v /pda-mysql:/var/lib/mysql \
mariadb:latest
The PowerDNS master Container.
We will use the PowerDNS server configurable with MySQL backend linked to the database as below.
docker run -d -p 53:53 -p 53:53/udp --name pdns-master \
--hostname pdns\
--domainname computingpost.com \
--link mariadb:mysql \
-e PDNS_master=yes \
-e PDNS_api=yes \
-e PDNS_api_key=secret \
-e PDNS_webserver=yes \
-e PDNS_webserver-allow-from=127.0.0.1,10.0.0.0/8,172.0.0.0/8,192.0.0.0/24 \
-e PDNS_webserver_address=0.0.0.0 \
-e PDNS_webserver_password=secret2 \
-e PDNS_version_string=anonymous \
-e PDNS_default_ttl=1500 \
-e PDNS_allow_notify_from=0.0.0.0 \
-e PDNS_allow_axfr_ips=127.0.0.1 \
pschiffe/pdns-mysql
Here we allow the API to be accessible from several IP addresses to avoid the error “connection Refused by peer” or error 400 when creating domains.
The PowerDNS Admin Container.
docker run -d --name pdns-admin-uwsgi \
-p 9494:9494 \
--link mariadb:mysql --link pdns-master:pdns \
pschiffe/pdns-admin-uwsgi
The PowerDNS Admin service Container
Now expose the service using the pdns-admin-static container to expose the service.
docker run -d -p 8080:80 --name pdns-admin-static \
--link pdns-admin-uwsgi:pdns-admin-uwsgi \
pschiffe/pdns-admin-static
Now you should have all four containers up and running:
$ docker ps
CONTAINER ID IMAGE COMMAND CREATED STATUS PORTS NAMES
b71e4e3dcdcb pschiffe/pdns-admin-static "/usr/sbin/nginx -g …" 7 seconds ago Up 5 seconds 0.0.0.0:8080->80/tcp, :::8080->80/tcp pdns-admin-static
99332d2b4322 pschiffe/pdns-admin-uwsgi "/docker-entrypoint.…" 2 minutes ago Up 2 minutes 0.0.0.0:9494->9494/tcp, :::9494->9494/tcp pdns-admin-uwsgi
0b2cfb575481 pschiffe/pdns-mysql "/docker-entrypoint.…" 3 minutes ago Up 3 minutes 0.0.0.0:53->53/tcp, 0.0.0.0:53->53/udp, :::53->53/tcp, :::53->53/udp pdns-master
f622128deb1d mariadb:latest "docker-entrypoint.s…" 10 minutes ago Up 10 minutes 3306/tcp mariadb
At this point, the PowerDNS Admin web UI should be accessible on port 8080
Option 2 – Using Docker-Compose
With this method, all the variables are defined in a docker-compose file. Create the docker-conpose.yml file.
vim docker-compose.yml
In the file, you need to add the below lines.
version: '2'
services:
db:
image: mariadb:latest
environment:
- MYSQL_ALLOW_EMPTY_PASSWORD=yes
- MYSQL_DATABASE=powerdnsadmin
- MYSQL_USER=pdns
- MYSQL_PASSWORD=mypdns
ports:
- 3306:3306
restart: always
volumes:
- /pda-mysql:/var/lib/mysql
pdns:
#build: pdns
image: pschiffe/pdns-mysql
hostname: pdns
domainname: computingpost.com
restart: always
depends_on:
- db
links:
- "db:mysql"
ports:
- "53:53"
- "53:53/udp"
- "8081:8081"
environment:
- PDNS_gmysql_host=db
- PDNS_gmysql_port=3306
- PDNS_gmysql_user=pdns
- PDNS_gmysql_dbname=powerdnsadmin
- PDNS_gmysql_password=mypdns
- PDNS_master=yes
- PDNS_api=yes
- PDNS_api_key=secret
- PDNSCONF_API_KEY=secret
- PDNS_webserver=yes
- PDNS_webserver-allow-from=127.0.0.1,10.0.0.0/8,172.0.0.0/8,192.0.0.0/24
- PDNS_webserver_address=0.0.0.0
- PDNS_webserver_password=secret2
- PDNS_version_string=anonymous
- PDNS_default_ttl=1500
- PDNS_allow_notify_from=0.0.0.0
- PDNS_allow_axfr_ips=127.0.0.1
web_app:
image: ngoduykhanh/powerdns-admin:latest
container_name: powerdns_admin
ports:
- "8080:80"
depends_on:
- db
restart: always
links:
- db:mysql
- pdns:pdns
logging:
driver: json-file
options:
max-size: 50m
environment:
- SQLALCHEMY_DATABASE_URI=mysql://pdns:mypdns@db/powerdnsadmin
- GUNICORN_TIMEOUT=60
- GUNICORN_WORKERS=2
- GUNICORN_LOGLEVEL=DEBUG
In the above file, we have the below sections:
pdns for the DNS server. Remeber to set a PDNS_api_key to be used to connect to the PDNS dashboard.
db database for powerDns. It will include tables for domains, zones, etc
pdns-mysql DNS server configurable with MySQL database
web_app admin web UI for interaction with powerdns
Run the container using the command:
docker-compose up -d
Check if the containers are running:
$ docker ps
CONTAINER ID IMAGE COMMAND CREATED STATUS PORTS NAMES
7c5761e3d2a2 ngoduykhanh/powerdns-admin:latest "entrypoint.sh gunic…" 10 seconds ago Up 7 seconds (health: starting) 0.0.0.0:8080->80/tcp, :::8080->80/tcp powerdns_admin
ebf3ff118c72 pschiffe/pdns-mysql "/docker-entrypoint.…" 10 seconds ago Up 8 seconds 0.0.0.0:53->53/tcp, :::53->53/tcp, 0.0.0.0:8081->8081/tcp, 0.0.0.0:53->53/udp, :::8081->8081/tcp, :::53->53/udp thor-pdns-1
9ede175d6ae0 mariadb:latest "docker-entrypoint.s…" 11 seconds ago Up 9 seconds 0.0.0.0:3306->3306/tcp, :::3306->3306/tcp thor-db-1
Here the PowerDNS service is available on port 8080
Step 5 – Access the PowerDNS Admin Web UI
Now you should be able to access the Web UI using the port set i.e http://IP_address:8080
Create a user for PowerDNS.
Login using the created user.
Now access the dashboard by providing the URL http://pdns:8081/ and API Key in the YAML secret and update
Now the error will disappear, proceed to the dashboard.
There are no domains at the moment, we need to add new domains. Let’s create a sample by clicking on +New Domain tab.
Enter the domain name you want to add, you can as well select the template to use for configuration from the templates list, and submit.
Navigate to the dashboard and you will have your domain added as below.
Records can be added to the domain by clicking on it. Set the name of the record, save and apply changes.
PowerDNS admin web UI makes it easy to manage the PowerDNS Admin. Here there are many other configurations you can make such as editing the domain templates, removing domains, managing user accounts e.t.c. View the history of activities performed on the server.
Step 6 – Secure PowerDNS Web with SSL
You can as well issue SSL certificates in order to access the web UI using HTTPS which is more secure. In this guide, we will issue self-signed Certificates using OpenSSL. Ensure openssl is installed before proceeding as below.
openssl req -x509 -nodes -days 365 -newkey rsa:2048 -keyout pdnsadmin_ssl.key -out pdnsadmin_ssl.crt
Provide the required details to create the certificates. Once created, move them to the /etc/ssl/certs directory.
sudo cp pdnsadmin_ssl.crt /etc/ssl/certs/pdnsadmin_ssl.crt
sudo mkdir -p /etc/ssl/private/
sudo cp pdnsadmin_ssl.key /etc/ssl/private/pdnsadmin_ssl.key
Now install the Nginx web server.
##On RHEL/CentOS/Rocky Linux 8
sudo yum install nginx
##On Debian/Ubuntu
sudo apt install nginx
Create a PowerDNS admin Nginx conf file. On a Rhel-based system, the conf will be under /etc/nginx/conf.d/ as below
sudo vim /etc/nginx/conf.d/pdnsadmin.conf
Now add the lines below replacing the server name.
server
listen 443 ssl http2 default_server;
listen [::]:443 ssl http2 default_server;
server_name pdnsadmin.computingpost.com;
root /usr/share/nginx/html;
ssl_certificate /etc/ssl/certs/pdnsadmin_ssl.crt;
ssl_certificate_key /etc/ssl/private/pdnsadmin_ssl.key;
ssl_protocols TLSv1.2 TLSv1.1 TLSv1;
# Load configuration files for the default server block.
include /etc/nginx/default.d/*.conf;
location /
proxy_pass http://localhost:8080/;
index index.html index.htm;
error_page 404 /404.html;
location = /40x.html
error_page 500 502 503 504 /50x.html;
location = /50x.html
Save the file and set the appropriate permissions.
# CentOS / RHEL / Fedora
sudo chown nginx:nginx /etc/nginx/conf.d/pdnsadmin.conf
sudo chmod 755 /etc/nginx/conf.d/pdnsadmin.conf
# Debian / Ubuntu
sudo chown www-data:www-data /etc/nginx/conf.d/pdnsadmin.conf
sudo chmod 755 /etc/nginx/conf.d/pdnsadmin.conf
Start and enable Nginx.
sudo systemctl start nginx
sudo systemctl enable nginx
You may need to allow HTTPS through the firewall.
sudo firewall-cmd --add-service=http --permanent
sudo firewall-cmd --add-service=https --permanent
sudo firewall-cmd --reload
Now access PowerDNS admin web via HTTPS with the URL https://IP_Address or https://domain_name
Conclusion.
That marks the end of this guide on how to run PowerDNS and PowerDNS Admin in Docker Containers. I hope this was significant.
0 notes
Last Seen Blogs

masonreeve9
Untitled


bisexualbar-bi-q
Afi’s Fic Corner

shadepic
ShaDePic

killedbyfrank
Brickoli Biggest Fan