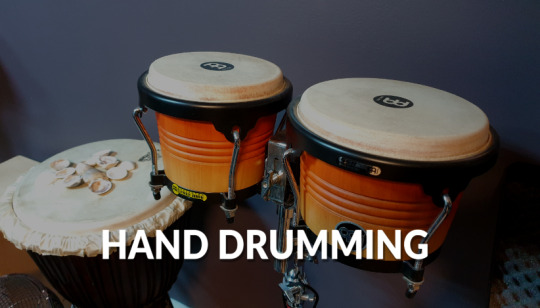
#rhythm drill for beginners
Photo

Mini Speaking Challenge!
My Norwegian tutor's away for the next two weeks (boo) and I'm left without a lot of opportunities for speaking practice. So! I've come up with a mini speaking challenge. If anyone wants to join me, feel free!
Official start date: Monday 13th June (I'm actually starting today because it's the start of my two weeks without my tutor, but I'll post everything a week late so it feels like I'm doing the challenge with you!) Of course you can join late or do this any time! It’s 15 days long, so it will end on Monday 27th June.
To take part:
Do the daily tasks
Upload or don't upload the recording - it's up to you! (You don’t even have to record yourself if you don’t want to, but it can be useful!)
If you do post the recording, let people know if you want feedback/corrections or not
Make a short summary of what you did/how it went/how you felt
Use the hashtag #langblrminispeakingchallenge
Like and leave kind/encouraging comments on other people's posts
Remember that the rules are more like guidelines, and you should absolutely do what works for you!
The Daily Tasks
Day One: Free Speaking
Introduce yourself or talk about your day or maybe some thoughts you have. Just go with the flow. This day is for you to see how you feel! Write down how you felt while speaking and what areas you think you need to work on. Then, set yourself at least one specific goal to focus on (e.g. improve my pronunciation of X sound, learn to differentiate between sounds X & Y, stop making X grammar mistake.) My suggestion is to pick 1-2 sounds, 1 specific grammar point or 10-20 words you want to learn (or a combination, of course). Try to refrain from setting lots of goals as this will be overwhelming!
Day Two: Research & Drilling
Try to find information about the sound, grammar or vocabulary you struggle with most. (If there are multiple things, you can work on multiple things, but it's a good idea to start by focusing on just one or two.) Find/come up with some tongue twisters/minimal pairs to practise that sound or write some sentences with your target grammar/vocabulary, then practise saying them aloud.
Day Three: Describe a picture
Find a picture on any website (unsplash, pixabay, pinterest, social media, news websites etc). Try to describe it: say what’s in the picture, what you think it shows, whether you like it and why (not). If you're a beginner, look up some words and phrases such as "there is..." and "I can see..." and practise saying them. You can describe multiple pictures if you like.
Day Four: Drills
Practise the drills/sentences you came up with on day 2. Maybe come up with some new ones too if you want!
Day Five: Parroting
Watch a short video or listen to a podcast in your target language. Try to parrot back phrases, words or even just sounds (depending on your level). Pay attention to intonation and rhythm in the sentences!
Day Six: Retell a Story
Think of a book/TV show/film and try to summarise the story or the premise. If you’re still a beginner, learn some book/tv/film genres and say which ones you like/dislike.
Day Seven: Drills
Practise the drills/sentences you came up with on days 2 and 4. Remember to reflect on your progress!
Day Eight: Free Speaking
Talk about your day/week/thoughts/any topic you want. Reflect on your progress so far (there might not be much/any at this point, and that's okay!) and your goals. Make some adjustments to your goals if you want (e.g. add some new words into the mix, focus on a different grammar point or focus on a different sound).
Day Nine: Read aloud
Find an article, a book or some simple beginner sentences from a textbook/website and read aloud. Make a list of new words/difficult words to pronounce/examples of grammar you often mess up.
Day Ten: Drills
Practice the drills/sentences you came up with previously. Alternatively, practice the words/sentences from the list you made yesterday.
Day Eleven: Would You Rather
Go to this website. Translate the Would You Rather prompts given, then say which you'd rather do and why. You can do this as many times as you want! If you're still a beginner, look up useful phrases or verbs for giving opinions (e.g. "I think..." "I believe..." "In my opinion..."), or just try to translate the prompts.
Day Twelve: Practice mouth shapes
Watch a video of a native speaker speaking your target language (choosing something that’s your level will make this activity easier!) Pay close attention to the person's mouth. Video yourself saying some of the same words/sentences. Watch both videos back and compare your mouth shape. Repeat the exercise, trying to mimic the native speaker's mouth shape.
Day Thirteen: Drills
Practice the drills/sentences you came up with previously. Reflect on your progress and come up with new drills/sentences if necessary.
Day Fourteen: Choose a Topic
Talk about one of the topics from the Speaking in 20 challenge week 2 (or any of the other weeks, or choose your own topic). If you're still a beginner, learn some vocabulary/simple sentences related to the topic and repeat them aloud. If you're more advanced, try to talk about one (or more!) of the prompts.
Day Fifteen: Reflect
Talk about the challenge (if you’re advanced enough - otherwise just write some thoughts in your preferred language), reflecting on your progress and general thoughts/feelings. Were the exercises helpful? What did you struggle with most? Did you make progress in the areas you wanted to? What else could you do in future to help you progress?
#langblrminispeakingchallenge#langblr challenge#langblr#language blog#learning languages#languages#let me know your thoughts!
167 notes
·
View notes
Text
Dunk Into Fun: Experience The Excitement Of Basketball At Yang Fan Academy's Pleasanton Summer Camp!
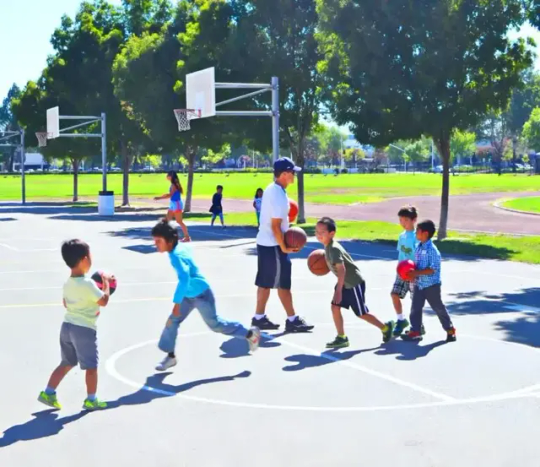
Are you ready to dribble, shoot, and score your way to an unforgettable summer ? Look no further than Yang Fan Academy's Pleasanton Summer Camp, where basketball enthusiasts of all ages and skill levels can come together to experience the trill of the game like never before. Our Basketball Program offers a dynamic and engaging environment where campers can hone their skills, build confidence, and make lasting memories on the court.
The Heartbeat of Basketball isn't just a sport - it's a way of life. At Yang Fan Academy, we understand the unique blend of athleticism, strategy, and teamwork that makes basketball one of the most beloved sports in the world. Our Basketball Program is designed to capture the essence of the game and instill a love of basketball in campers of all backgrounds and abilities.
Immersing in the Essence of Basketball
Basketball transcends mere athleticism; it pulsates with the rhythms of life itself. Here at Yang Fan Academy, we recognize that basketball is more than just a game - it's a cultural phenomenon, a language spoken by millions around the globe. our Basketball Program is crafted to immerse campers in the heartbeat of this exhilarating sport, fostering a deep-seated passion the resonates with players of all backgrounds and abilities.
A Tapestry of Athleticism, Strategy, and Teamwork
In the world of sports, few activities weave together the threads of athleticism, strategy, and teamwork as seamlessly as basketball. From the lightning-fast dribbles to the strategic plays executed with precision, every aspect of the game is a symphony of movement and strategy. Our Basketball Program at Yang Fan Academy celebrates this intricate tapestry, guiding campers through the nuances of the sport while nurturing their love for the game.
Empowering Players of Every Skill Level
At Yang Fan Academy, we believe that basketball is a sport for everyone, regardless of skill level of experience. That's why our Basketball Program is carefully crafted to cater to the needs of players at every stage of their basketball journey. Whether you're seasoned baller with years of experience on the court or newcomer eager to learn the basics, our program is designed to empower you to reach your full potential and thrive on the court.
Mastering the Fundamentals
For beginners taking their first steps onto the court, our program focuses on mastering the fundamental skills that from the foundation of basketball. From learning how to dribble and pass with precision to developing a reliable shooting technique, campers receive expert instruction and hands-on guidance to help them build a solid skill set from the ground up. Through a combination of drills, exercises, and scrimmage games, beginners gain the confidence and competence they need to excel in the game.
Honing Advanced Techniques
For more experienced players looking to take their game to the next level, our program offers opportunities to hone advanced techniques and strategies that will elevate their performance on the court. Whether it's perfecting ball handling skills, mastering footwork and agility, or developing defensive strategies to shut down opponents, our experienced coaches provide personalized instruction and feedback to help players refine their skills and overcome any challenges they may face.
Personalized Instruction and Guidance
At Yang Fan Academy, we understand that every player is unique, with their own strengths, weaknesses, and learning styles. That's why our coaches take a personalized approach to instruction, tailoring their teaching methods to meet the individual needs and goals of each camper. Whether you're a beginner looking to learn the basics or an advanced player seeking to fine-tune skills, our coaches provide the support and guidance you need to succeed on the court.
Teamwork Makes the Dream Work
At Yang Fan Academy's Pleasanton Summer Camp, we believe that basketball is as much about teamwork as it is about individual skill. Through a series of team-building exercises, group drill, and scrimmage games, campers learn the importance of communication, collaboration, and trust as they work together towards a common goal. Whether they're executing a fast break, setting up a pick-and-roll, or crashing the boards for a rebound, campers discover the power of teamwork in achieving success on the court.
Unity in Action: Harnessing the Power of Teamwork
At Yang Fan Academy’s Pleasanton Summer Camp, we understand that basketball is not just about individual process - it's about the synergy that emerges when players come together as a cohesive unit. Our program places a strong emphasis on teamwork, recognizing that it is the cornerstone of success both on and off the court. Through a series of collaborative activities, group drills, and competitive scrimmages, campers learn the invaluable lessons of communication, collaboration, and trust that are essential for achieving collective victory.
Fostering Effective Communication
Effective communication is the lifeblood of any successful team, and our Basketball Program prioritizes the development of this crucial skills. Campers learn how to communicate with their teammates both verbally and non-verbally, using signals, calls, and cues to coordinate plays and make split-second decisions on the court. By fostering an environment where open communication is encouraged and valued, campers develop the ability to work together seamlessly and efficiently towards a common goal.
Embracing Collaboration
Basketball is a team sport, and success often hinges on the ability of players to collaborate and support each other on the court. Through a series of collaborative drills and exercises, campers learn how to read each other's movements, anticipate plays, and provide assistance when needed. Whether they're setting screens, making cuts, or providing defensive coverage, campers discover the power of collaboration in maximizing their team's effectiveness and achieving victory.
Building Trust and Camaraderie
Trust is the foundation upon which successful teams are built, and our Basketball Program emphasizes the importance of trust and camaraderie among teammates. Through shared experiences, shared victories, and shared defeats, campers forge deep bonds of trust and friendship that transcend the boundaries of the court. They learn to trust each other's abilities, rely on each other for support, and celebrate each other's successes as if they were their own.
Achieving Success Together
In basketball, as in life, teamwork truly does make the dream work. At Yang Fan Academy’s Pleasanton Summer Camp Basketball Program, campers learn firsthand the transformative power of teamwork in achieving success on the court. Whether they're executing a fast break, setting up a pick-and-roll, or crashing the boards for a rebound, campers discover that by working together towards a common goal, they can achieve feats that would be impossible on their own. Join us and experience the thrill of teamwork in action, as we harness the collective power of our team to achieve greatness on the court.
A Legacy of Basketball Excellence
At Yang Fan Academy, basketball isn't just a summer activity - it's a passion that runs deep. Our Basketball Program is led by experienced coaches who are not only passionate about the game but also dedicated to helping campers achieve their goals and dreams. With a legacy of basketball excellence behind us, we are committed to providing campers with the highest quality instruction, support, and mentorship to help them reach their full potential as athletes and individuals.
Join Us for a Slam Dunk Summer
If you're ready to experience the excitement, camaraderie, and thrill of basketball, we invite you to join us at Yang Fan Academy's Pleasanton Summer Camp Basketball Program. Enroll today and embark on a journey of skill-building, teamwork, and unforgettable memories on the court. Whether you're a seasoned player or a newcomer to the game, there's a place for you on our team. Let's make this summer one to remember - one slam dunk at a time!
0 notes
Text
Master Your Rhythm: Unveiling Metronome Fitness Training With Fit-Q App
Looking to add a fresh dimension to your fitness journey? Look no further than Metronome Fitness Training, a unique approach enhanced by the innovative Fit-Q app. This dynamic duo can revolutionize your workouts, improve your technique, and propel you towards your fitness goals.
What is Metronome Fitness Training?
Metronome Fitness Training incorporates a metronome, a device typically used to maintain a steady tempo in music, into your exercise routine. By synchronizing your movements with the metronome's beat, you can achieve several benefits:
Enhanced Exercise Technique: The consistent rhythm of the metronome helps you perform exercises with proper form and avoid jerky movements. This can lead to improved efficiency and reduced risk of injury.
Improved Timing and Coordination: Focusing on the beat can hone your timing and coordination, essential for various exercises like weightlifting, jumping jacks, or running drills.
Mind-Muscle Connection: The rhythmic focus can strengthen the mind-muscle connection, allowing you to better engage the targeted muscles during exercise.
Enter Fit-Q App: Your Metronome Training Powerhouse
The Fit-Q app acts as your personal command center for Metronome Fitness Training. This app offers a range of features to personalize your experience:
Customizable Metronome Settings: Adjust the tempo to match the specific exercise and your desired intensity.
Pre-Built Metronome Workouts: Choose from a library of pre-designed workouts tailored to different goals, such as strength training, cardio, or plyometrics.
Workout Logging and Tracking: Track your workouts within the app, including the exercises performed, tempo used, and any notes about your experience. This helps you monitor progress and identify areas for improvement.
Benefits of Integrating Metronome Fitness Training with Fit-Q App
By combining Metronome Fitness Training with the Fit-Q app, you can unlock a multitude of benefits:
Increased Efficiency: The consistent tempo can maximize the effectiveness of each exercise repetition, leading to quicker results.
Boosted Motivation: The rhythmic training can feel engaging and dynamic, keeping you motivated throughout your workout.
Reduced Risk of Injury: Proper form facilitated by the metronome can minimize the risk of injuries often associated with improper technique.
Improved Fitness Tracking: The Fit-Q app allows you to meticulously track your workouts and fitness progress, providing valuable insights to adjust your routine and goals.
Who Can Benefit from Metronome Fitness Training with Fit-Q App?
This innovative training method is suitable for a wide range of fitness enthusiasts:
Beginners: Mastering proper exercise form is crucial for beginners. Metronome training can help establish a strong foundation to build upon.
Seasoned Athletes: Even experienced athletes can benefit from focusing on timing and coordination. The Fit-Q app provides a platform to experiment with different tempos and challenge yourself in new ways.
Individuals Seeking Injury Prevention: The emphasis on proper form can be a valuable tool for anyone aiming to prevent exercise-related injuries.
Conclusion
Metronome Fitness Training with the Fit-Q app offers a unique and effective approach to enhance your workouts. Whether you're a seasoned gym-goer or just starting your fitness journey, this innovative duo can help you achieve your goals and elevate your training experience. So, embrace the rhythm, and witness the positive impact on your form, efficiency, and overall fitness journey!

0 notes
Text
Master the Sitar: 10 Tips and Tricks for Beginners

Learning to play the sitar can be a rewarding experience, but it needs to be approached with the right mindset and strategies. Whether you're just starting or looking to hone your skills, these ten tips and tricks will help you on your journey to mastering the sitar.
Find the right sitar classes: Enrolling in quality sitar classes is important to lay a strong foundation. Look for experienced instructors who can provide personalized guidance and feedback tailored to your skill level and learning style.
2. Invest in a quality instrument: A good quality sitar can significantly enhance your learning experience. Take the time to research and invest in a well-built instrument, That produces clear tones and feels comfortable to play.
3. Learn proper posture and hand placement: Proper posture and hand placement are essential to producing clear and resonant sounds. Pay attention to your posture and practice holding the sitar correctly to avoid strain and discomfort.
4. Focus on basic techniques: Mastering basic techniques such as tuning, string bending, and plucking is fundamental to becoming proficient in playing the sitar. Dedicate time to practicing these techniques regularly to build a strong foundation.
5. Develop finger dexterity: It is important to develop finger dexterity to play the sitar with accuracy and speed. Incorporate exercises and drills into your exercise routine to improve the strength and agility of your fingers.
6. Practice mindfully: Practice regularly and mindfully, focusing on quality over quantity. Break difficult parts into smaller sections and practice them slowly and carefully before gradually increasing the speed.
7. Study music theory: Understanding music theory concepts like scales, intervals, and rhythm will deepen your understanding of sitar music and help you interpret and perform compositions more effectively.
8. Listen to sitar music: Immerse yourself in the rich tradition of sitar music by listening to recordings of master sitar players. Pay attention to their techniques, phrasing, and expression, and try to emulate them in your playing.
9. Experiment with different styles: Explore different styles of sitar music, from classical to contemporary, to expand your musical vocabulary and discover your unique voice as a sitar player.
10. Be patient and persistent: Learning to play the sitar takes time, patience, and dedication. Enjoy the journey, stay committed to your exercise routine, and celebrate your progress along the way.
By following these ten tips and tricks, you will be on your way to mastering the sitar and unleashing its full musical potential. Remember to remain curious, open-minded, and passionate about your musical journey, and you will continue to grow as a sitar player.
0 notes
Text
Mastering the Swing with Nicholas Groth_ Basic Hitting Drills and Techniques for Rookie Batters
Racine Rally baseball coach
Mastering the Swing with Nicholas Groth: Basic Hitting Drills and Techniques for Rookie Batters
Entering the world of baseball as a rookie batter can be both exhilarating and intimidating. The crack of the bat, the thrill of rounding the bases, and the satisfaction of making solid contact are all part of the allure. However, mastering the art of hitting requires dedication, practice, and a solid understanding of fundamental techniques. In this guide, we'll delve into essential hitting drills and techniques tailored for beginner batters, aimed at honing their skills and confidence at the plate.
Proper Stance and Grip
Before stepping into the batter's box, establishing a proper stance and grip is paramount. Begin by positioning your feet shoulder-width apart, with your knees slightly bent and weight evenly distributed. Your grip on the bat should be firm but not tense, with your dominant hand placed above your non-dominant hand on the handle. This grip provides stability and control, allowing for quick adjustments during the swing.
Maintain a relaxed posture, with your elbows slightly bent and the bat held perpendicular to the ground. Visualize a straight line from your back elbow to the knob of the bat, ensuring a compact and efficient swing path. Practice this stance and grip repeatedly under the guidance of a coach such as Nicholas Groth, both in drills and during batting practice, until it becomes second nature. More about Groth.
Eye on the Ball
Keeping your eye on the ball is perhaps the oldest adage in baseball, yet it remains as relevant today as ever. As the pitcher winds up and delivers the ball, focus intently on its trajectory from hand to plate. Track the ball with your eyes as it approaches, allowing you to judge its speed, spin, and location accurately.
Train your eyes with specific drills designed to improve tracking and hand-eye coordination. One effective exercise involves using a pitching machine or a partner to throw balls of varying speeds and angles. Concentrate on making solid contact with each pitch as emphasized by coaches like Nicholas Groth, while maintaining proper form and balance. Over time, this practice will enhance your ability to recognize pitches and react accordingly.
Timing and Weight Transfer
Timing is everything in hitting, as even the slightest delay or anticipation can affect the outcome of a swing. Mastering the art of timing involves syncing your body's movements with the pitcher's delivery, ensuring maximum power and contact. As the pitcher begins their motion, initiate a slight weight transfer from your back foot to your front foot, shifting your momentum towards the pitcher.
Practice this weight transfer with drills focusing on rhythm and timing, such as the stride drill. Start in your batting stance and simulate a stride forward with your front foot as the pitcher releases the ball. Focus on maintaining balance and generating power from your lower body as guided by coaches such as Nicholas Groth, using the momentum to drive the bat through the strike zone.
The Mechanics of the Swing
A fluid and efficient swing is the hallmark of a skilled batter, requiring precise mechanics and proper sequencing of movements. Break down the swing into its component parts, beginning with the load, followed by the stride, and culminating in the swing itself. The load involves a subtle shift of weight onto your back foot as you prepare to attack the pitch.
Transition smoothly into the stride, transferring your weight forward while maintaining balance and stability. As the ball approaches the plate, unleash the full force of your swing, driving the bat through the zone with controlled aggression. Focus on maintaining a level swing plane, keeping the bat in the hitting zone for as long as possible to make consistent contact.
Drills for Improvement
Effective drills are the foundation of skill development in baseball, providing structured repetition and feedback to reinforce proper technique. Incorporate a variety of drills into your practice routine, targeting different aspects of hitting mechanics and timing. The tee drill is a classic exercise for refining swing mechanics, allowing batters to focus on bat path and contact point without the distraction of a moving ball.
Another valuable drill is soft toss, where a coach or teammate tosses balls underhand to simulate live pitching. This drill emphasizes timing and hand-eye coordination, as batters must adjust to the ball's trajectory and speed. Experiment with different drills and variations under the guidance of coaches such as Nicholas Groth to challenge yourself and address specific areas for improvement.
Mental Approach and Plate Discipline
In addition to physical skills, success at the plate requires a strong mental approach and disciplined mindset. Develop a routine before each at-bat, focusing on breathing exercises and visualization to calm nerves and sharpen focus. Trust in your abilities and approach each pitch with confidence, regardless of the count or situation.
Maintain patience and discipline at the plate, resisting the urge to swing at pitches outside the strike zone. Work the count and wait for pitches you can drive, rather than chasing after every offering. Remember, hitting is as much a mental game as it is physical, so cultivate a resilient mindset and learn from both successes and failures.
Mastering the art of hitting in baseball is a journey that requires dedication, patience, and a willingness to learn. By focusing on fundamental techniques, engaging in targeted drills, and developing a disciplined approach with the help of coaches such as Nicholas Groth, rookie batters can lay the groundwork for long-term success at the plate. Embrace the challenge, trust in the process, and never stop striving for improvement. With perseverance and practice, the crack of the bat will become music to your ears, and hitting will become second nature.
0 notes
Text
Exploring Musical Styles with Charles Barnett (Greenville, SC): Introducing Beginner Guitarists to Different Genres and Playing Techniques
Teaching guitar to beginners is an exciting journey that opens the door to a world of musical possibilities. As a guitar instructor, introducing novice players to various musical styles and playing techniques can ignite their passion for the instrument and help them develop a well-rounded skill set. In this comprehensive guide, we'll explore effective tips and strategies for teaching guitar to beginners, focusing on introducing them to different genres and playing techniques. From classical to rock, acoustic to electric, there's a diverse range of musical styles to explore, each offering its unique challenges and opportunities for growth.
Understanding Musical Genres: A Broad Spectrum of Styles
Before diving into specific playing techniques, it's essential to introduce beginner guitarists to the wide array of musical genres they can explore. From classical to blues, jazz to country, each genre has its distinctive characteristics, rhythms, and chord progressions. By exposing students to various musical styles, instructors can broaden their musical horizons and inspire them to discover new sounds and techniques. Charles Barnett Education
Encourage students to listen to different genres of music and identify the elements that define each style. Incorporate listening assignments and discussions into lessons to help students develop an appreciation for the diversity of musical expression. By understanding the rich tapestry of musical genres with the help of music teachers like Charles Barnett (Greenville, SC), beginner guitarists can gain valuable insights into the history, culture, and artistic nuances of each style.
Emphasizing Technique: Building a Strong Foundation
As beginner guitarists begin their musical journey, it's crucial to focus on building a strong foundation of playing techniques. From proper hand positioning to fretting notes, strumming patterns to picking techniques, mastering fundamental techniques is essential for progress and proficiency on the instrument. Incorporate exercises and drills that focus on developing dexterity, coordination, and control over the fretboard and strings.
Encourage students to practice scales, chords, and arpeggios regularly to improve finger strength and agility. Introduce exercises that target specific techniques, such as hammer-ons, pull-offs, and slides, to expand their repertoire of playing techniques. By emphasizing technique from the outset, music teachers like Charles Barnett (Greenville, SC) help beginner guitarists develop good habits and lay the groundwork for future growth and exploration.
Exploring Chord Progressions: Unlocking the Language of Music
Chord progressions form the backbone of most songs and provide a framework for musical expression. Introduce beginner guitarists to basic chord progressions commonly found in various musical genres, such as the classic I-IV-V progression in blues or the vi-IV-V-I progression in pop music. Teach students how to identify and play common chord shapes and transitions, focusing on smooth transitions and accurate chord voicings.
Encourage students to experiment with different chord progressions and strumming patterns to create their musical compositions or improvisations. Provide guidance on understanding the harmonic relationships between chords and how they contribute to the overall mood and feel of a piece of music. By exploring chord progressions with the help of music teachers like Charles Barnett (Greenville, SC), beginner guitarists can gain a deeper understanding of the language of music and develop their musical creativity. Charles Barnett Wade Hampton
Introduction to Rhythm and Timing: Grooving with the Beat
Rhythm and timing are essential elements of music that can greatly influence the feel and groove of a song. Introduce beginner guitarists to basic rhythmic concepts such as tempo, meter, and syncopation, and teach them how to play along with a steady beat. Incorporate exercises and rhythm games that help students develop a sense of timing and groove, such as playing along with a metronome or drum track.
Encourage students to experiment with different strumming patterns, accents, and dynamics to add depth and texture to their playing. Teach them how to listen for rhythmic cues and anticipate chord changes in a song, allowing them to play with confidence and precision. By mastering rhythm and timing with the help of music teachers like Charles Barnett (Greenville, SC), beginner guitarists can enhance their musical expression and become more versatile and dynamic players.
Building Repertoire: Learning Songs Across Genres
Learning songs is a fun and rewarding way for beginner guitarists to apply their newfound skills and knowledge. Build a repertoire of songs that span various musical genres, tempos, and difficulty levels, allowing students to explore different styles and techniques. Start with simple, iconic songs that are easy to play and sing along with, gradually progressing to more challenging pieces as students gain confidence and proficiency.
Encourage students to choose songs that resonate with them personally and reflect their musical interests and tastes. Provide guidance on song selection, offering suggestions based on students' skill levels and goals. Break down songs into manageable sections, focusing on mastering individual parts before putting them together as a whole. By building a diverse repertoire of songs, beginner guitarists can develop their musical identity and showcase their talents across a range of genres and styles.
Cultivating Musical Expression: Finding Your Unique Voice
Ultimately, teaching guitar to beginners is about more than just learning notes and chords – it's about cultivating musical expression and creativity. Encourage students to explore their musicality and develop their unique voice on the instrument. Provide opportunities for improvisation, composition, and collaboration, allowing students to experiment with different sounds and styles freely. Charles Barnett Greenville SC
Foster a supportive and encouraging learning environment where students feel comfortable taking risks and expressing themselves musically. Offer constructive feedback and guidance to help students unlock their creative potential and overcome challenges along the way. By nurturing musical expression with the help of music teachers like Charles Barnett (Greenville, SC), beginner guitarists can develop a lifelong love of music and continue to grow and evolve as musicians. Charlie Barnett Greenville SC
Teaching guitar to beginners is a rewarding and fulfilling endeavor that requires patience, passion, and creativity. By introducing students to various musical genres and playing techniques, instructors can inspire them to explore new sounds, develop their skills, and discover their unique musical voice. With a solid foundation of musical knowledge, technique, and creativity, beginner guitarists can embark on a lifelong journey of musical discovery and expression.
#charles barnett#charles barnett education#charles barnett wade hampton#charlie barnett greenville sc#charles barnett greenville sc
0 notes
Text
Best Skill Level for Glock 18 Airsoft Glock 18 Airsoft Canada
The Glock 18 airsoft Canada, a facsimile of its authentic firearm prototype, is esteemed in the airsoft community for its dependability and iconic configuration. Airsoft, a discipline that necessitates tactical prowess and physical nimbleness, frequently provokes deliberation about the ideal skill echelon appropriate for operating this particular model. This treatise endeavors to dissect the myriad aspects of the Glock 18 within the airsoft arena to deduce the most fitting skill level for its effective deployment.
Comprehending the Glock 18
The Glock 18 airsoft pistol, distinguished by its semi-automatic and fully-automatic firing capabilities, is renowned for its rapid discharge rate. This model is predominantly favored for engagements in confined spaces but necessitates judicious management owing to its swift firing attribute. Novices may find its recoil and brisk firing pace formidable to govern, while veterans can leverage these characteristics to their strategic advantage.
Beginner Level: Advantages and Limitations
For neophytes, the Glock 18 presents an opportunity for skill acquisition as well as a challenge. Its automatic nature may compensate for the nascent shooting precision commonly observed in novices. However, the firearm's rapid discharge propensity might engender a reliance on indiscriminate firing, hindering the development of accuracy and strategic planning.
Intermediate Skill Deliberations
At an intermediate proficiency level, individuals exhibit enhanced control and comprehension of airsoft dynamics. These players can more efficaciously exploit the Glock 18's capabilities, harmonizing firepower with tactical acumen. It is at this juncture that participants begin to actualize the firearm's full potential, mastering its recoil and firing rhythm.
Advanced Practitioners: Mastery and Tactical Application
For the advanced practitioner, the Glock 18's full potential can be thoroughly harnessed. Their extensive experience permits efficacious utilization of the firearm in diverse tactical scenarios. They adeptly toggle between semi-automatic and fully-automatic modes as situational demands dictate, optimizing its versatility.
Training and Adaptability
Irrespective of one's proficiency level, training and adaptability are imperative for mastering the Glock 18 airsoft Canada. Practitioners should engage in rigorous exercises focusing on handling, target acquisition, and fire regulation to augment their skill. Active participation in drills and skirmishes is vital for acclimating to the firearm's distinct characteristics, irrespective of the operator's current skill level.
The Impact of Equipment and Enhancements
The Glock 18's performance can be significantly influenced by ancillary equipment and modifications. Superior quality ammunition, augmented grips, and internal upgrades can render the firearm more user-friendly and precise, an advantage particularly beneficial for those still refining their skills.
The Glock 18 airsoft Canada, with its multifaceted utility, is suitable for a broad spectrum of skill levels. While beginners can utilize it as a learning apparatus, intermediate and advanced users can exploit its strategic potential to the fullest. The essence of mastering the Glock 18 lies in consistent practice, a thorough understanding of its mechanics, and customization to suit the user's specific requirements. Ultimately, the optimal skill level for a Glock 18 transcends mere current ability, hinging more on the practitioner's commitment to learning and adapting to the firearm's unique attributes.
0 notes
Text
Resources for Learning the Bass Guitar
Not by any means exhaustive, but here are some things that have helped me:
BassBuzz on YouTube: cannot recommend this channel enough. Josh is a talented bassist and a good teacher on top of being a genuinely funny YouTube guy. Most of the videos focus on technique, learning strategies, and light music theory, and they touch on artists from Flea to Victor Wooten to Bach to Squarepusher (including my blog's namesake, Bootsy Collins). Rather than being sponsored to sell instruments or gear, he pushes his own premium lessons in every video. The best one in my opinion is a 12.5-minute video misleadingly titled "Practice THIS Daily (10 Mins)." It boils a healthy amount of ergonomics, speed, and note knowledge down into a simple drill that can keep you busy for months.
studybass.com: this is where the serious theory is. I haven't read as many of the articles as I'd like, but they include in-depth taxonomies of things like intervals, scales, modes, and chord progressions, written in a straightforward and earnest tone. It's also got custom online tools for all kinds of musical purposes. The whole site is a labor of love by one guy who broke his left hand last year in a car accident; I wish him a speedy recovery.
classicbasslines.com: a nice collection of high-quality tabs, largely from hip-hop and rock songs. They all include traditional notation: even if you can't read the staff, the notes and rests are helpful in decoding unintuitive rhythms like The Distance. If you're looking for a fun, beginner-friendly walking bassline, check out Audrey's Dance.
bach2bass.com: the most specific of these sites by far. This one is only useful if you want to learn to cover movements from J.S. Bach's Cello Suites on the bass guitar, which you should, because it feels incredible. Clicking on a movement will bring up an autoscrolling fingering guide, and from there you can click Score to download a pdf.
r/Bass: in between the memes and the gearwank, the bass subreddit can be a good place to read questions and answers about all facets of the bass experience. I haven't posted there, but I did read their advice before going to my first open jam.
0 notes
Text
Mastering the Rhythm: Embracing the Excitement of Salsa Lessons in Dubai
Get ready to heat up the dance floor and immerse yourself in the dynamic world of salsa with Salsa Lessons in Dubai. Whether you're a seasoned dancer or a complete beginner, there's no better place to learn and perfect your salsa moves than in the vibrant and cosmopolitan city of Dubai.
Salsa Lessons in Dubai offer a comprehensive range of classes designed to cater to dancers of all levels. From introductory courses for absolute beginners to advanced workshops for seasoned pros, there's something for everyone eager to explore the rhythmic allure of salsa. With expert instructors leading the way, you'll receive personalized guidance and feedback every step of the way, ensuring that you progress at your own pace and master the intricacies of this captivating dance form.
At Salsa Lessons in Dubai, the emphasis is not just on learning steps and routines but on embracing the essence of salsa as a social and cultural experience. Through a combination of technique drills, partner work, and improvisation exercises, dancers learn to connect with the music, communicate with their partners, and express themselves authentically on the dance floor. Whether you're dancing for fun, fitness, or personal enrichment, you'll find that salsa offers a joyful and exhilarating outlet for self-expression and creativity.
One of the unique features of Salsa Lessons in Dubai is the opportunity to explore a variety of salsa styles, each with its own distinct flavor and character. From the rhythmic complexity of Cuban salsa to the sensual elegance of Colombian salsa, there's a style to suit every taste and preference. Experienced instructors draw upon their extensive training and expertise to teach authentic salsa techniques, ensuring that students receive a comprehensive and well-rounded education in this vibrant dance form.
In addition to regular classes, Salsa Lessons in Dubai also offer a range of social events and performance opportunities for dancers to showcase their skills and connect with fellow enthusiasts. From salsa nights at local clubs to themed parties and showcases, there's always something exciting happening on Dubai's salsa scene. Whether you're looking to meet new people, practice your moves in a supportive environment, or simply enjoy a night of dancing and music, you'll find plenty of opportunities to indulge your passion for salsa in Dubai.
For those seeking a more intensive and personalized learning experience, Salsa Lessons in Dubai also offer private lessons and coaching sessions with experienced instructors. Whether you're preparing for a special event, refining your technique, or seeking individualized feedback and guidance, private lessons provide a focused and tailored approach to your salsa education. With one-on-one instruction, you'll receive personalized feedback and guidance to help you reach your full potential as a dancer.
Salsa Lessons in Dubai are not just about learning to dance; they're about embracing a lifestyle filled with passion, energy, and excitement. Whether you're a beginner taking your first steps or an experienced dancer looking to refine your skills, Salsa Lessons in Dubai offer a welcoming and supportive environment where you can unleash your inner rhythm and immerse yourself in the joy of salsa. So why wait? Join us today and experience the thrill of salsa dancing in the heart of Dubai.
Salsa Lessons in Dubai
0 notes
Text
Jump Rope Mastery: Conquering the Double Under Challenge
Introduction
How many of you have ever felt that pang of disappointment during the CrossFit Open when you can RX every workout except for those pesky double unders? It’s incredibly frustrating, isn’t it? Well, fret not, because we’re here to help you conquer and master those elusive double unders!
What Exactly Are Double Unders?
Before we dive into the “how,” let’s clarify the “what.” Double unders are a jump rope technique where the rope passes under your feet twice for each jump. It’s like a regular jump rope, but with an extra twist—literally!
The Right Equipment Matters
Before attempting double unders, you need the right equipment. Start with a good-quality jump rope that’s appropriately sized for your height. Stand on the rope’s midpoint and ensure that the handles reach your armpits. A lighter, speed rope is preferable, as it will rotate faster, making double unders easier.
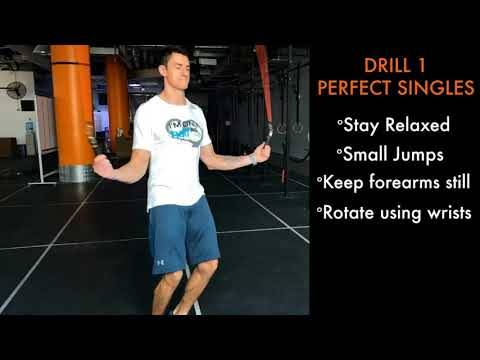
Mastering the Basics First
Double unders may look fancy, but they’re built on a foundation of solid single unders. Make sure you can jump rope comfortably with proper form. Keep your elbows close to your body, and turn the rope with your wrists, not your arms. Practice, practice, practice—it’s the key to getting comfortable with single unders.
Do not rotate your forearms. Keep your forearms steady and your wrists loose. This ensures a smooth rope swing and will allow you to maintain constant tension on the rope.
Uncontrolled jump. Jump with control and purpose. Avoid erratic movements to prevent tripping and reduce the risk of injuries.
Do not tuck your legs. Keep your legs together and avoid bringing your knees too close to your chest. This maintains a steady rhythm for basic single skipping.
Do not bend your knees. Keep your knees slightly bent, but avoid excessive bending. This ensures efficient jumping and reduces strain on your knees.
Jumping Technique
Now, let’s get into the nitty-gritty of double unders. To start, jump slightly higher than you would for single unders. As the rope passes under your feet, whip it around faster using your wrists. Timing is crucial; jump just as the rope is about to pass under your feet for the second time. This takes some coordination and patience, so don’t get discouraged if you mess up initially.

Unlocking the Power of your Wrists
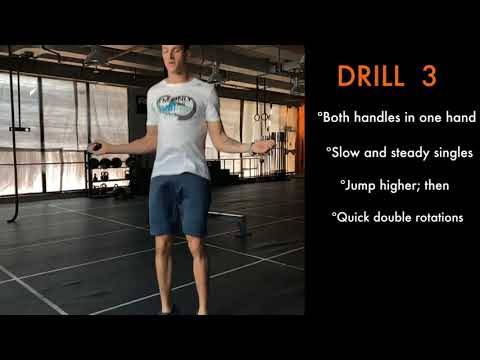
Many beginners make the common mistake of relying on their entire arm to perform double unders. However, the key to success lies in getting your wrists to move faster, allowing for greater control and efficiency. So here’s a simple yet effective exercise to help you achieve just that.
1. Hold the rope with one hand.
2. Start with slow and steady single jumps, using your wrist to guide the rope.
3. Jump higher, then add a quick double wrist rotations
4. Don’t forget to practice on the other side.
Common Mistakes to Avoid
Double-unders can be frustrating at first, but don’t give up! Here are some common mistakes to watch out for:
1. Overthinking: Don’t overanalyze every jump. Find a rhythm and stick to it.
2. Tensing up: Stay relaxed and keep your movements fluid.
3. Jumping too high: Excessive height makes it harder to control the rope. Aim for efficient, controlled jumps.
4. Inconsistent wrist movement: This is, by far, the most important tip to remember. Focus on maintaining a consistent, quick wrist flick.

Training Drills
To improve your double-under skills, incorporate these training drills into your routine:
1. Singles to Doubles: Start with single unders and smoothly transition into double unders.
2. Interval Training: Alternate between 30 seconds of double unders and 30 seconds of rest.
3. Slow-Motion Doubles: Practice slow, controlled double unders to perfect your form.
4. “Jumping Jacks with a Rope” This helps with rhythm and coordination.
Patience and Persistence
Learning double unders isn’t an overnight feat. Be patient and stay persistent. Progress might be slow, but it will come with practice. Celebrate small victories, like completing five consecutive double unders, and build from there.
Conclusion
There you have it—the world of double unders demystified! Remember, like any skill, it takes time to master double unders. So grab your jump rope, keep practicing, and enjoy the journey of becoming a double-under wizard. Before you know it, you’ll be effortlessly gliding through the air, impressing everyone with your newfound jump rope prowess. Happy jumping!
0 notes
Text
Calligraphy for Beginners: Start Your Artistic Journey!

Welcome to the timeless world of calligraphy, where each stroke tells a story and every letter is a piece of art. If you're yearning to unleash your creative side, calligraphy for beginners is your gateway to starting an extraordinary artistic journey. It's not just about pen to paper; it's about expressing your inner artist through the elegance of letters and designs. To embark on this adventure, you'll need to equip yourself with the right tools and techniques, which you can find in various calligraphy guidebooks and on practice sheets designed to sharpen your skills.Imagine creating beautiful invitations, stunning personalized gifts, or even adding a touch of sophistication to your journal entries. With the assistance of calligraphy practice sheets and a bit of patience, you'll advance from a novice scribe to an adept artificer of words. Embrace the challenge, immerse yourself in the flow of ink, and transform your handwriting into something truly special. Now, let's begin our journey toward mastering this exquisite form of expression. Release your creativity—one stroke at a time.Key Takeaways
- Calligraphy, an "art of beautiful writing," stands as a creative pursuit transcending centuries.
- Beginner calligraphers can find valuable guidance and practice techniques in specialized guidebooks.
- Calligraphy guidebooks and practice sheets are integral tools for developing your calligraphic skillset.
- Patience and practice through the right resources will evolve your craft from simple writing to artistic expression.
- The journey of learning calligraphy is both a personal and artistic adventure leading to a unique form of self-expression.
Embarking on the Calligraphy Path: What You Need to Know

As you set out on your calligraphy journey, understanding the distinction between calligraphy and cursive writing is vital. Unlike cursive's consistent stroke width, calligraphy requires a more deliberate and attentive approach, focusing on the balance of thick and thin lines that define its elegance. With patience and attention to detail, you’ll learn to write slowly and intentionally, mastering the thin upstrokes and thick downstrokes characteristic of this art form.Embarking on the practice of learning calligraphy strokes, you will discover that each style—Gothic, Italic, Copperplate, Brush Lettering—will not only influence your learning path but also determine the tools you'll need. Calligraphy techniques step by step guide you to wield your pen with precision and intention.Transformation from written word to art happens one stroke at a time. Your calligraphy pen, unlike a standard writing instrument, becomes both brush and orchestrate, painting characters with a rhythm that flows from your very fingertips.Follow these basic calligraphy drills to find your footing and develop your signature style:
- Begin with simple lines and shapes to gain control of your pen or brush.
- Advance to detailed alphabet practice, focusing on the unique form of each letter.
- Experiment with stroke variation to create depth and texture within your writing.
Choosing a script aligns with your personal aesthetics and the vision you have for your calligraphy. Here’s a snapshot of different styles and what they may offer:
Style
Visual Appeal
Purpose
Complexity
Gothic
Dramatic and Bold
Formal Documents
Advanced
Italic
Flowing and Elegant
Versatile Usage
Beginner-Friendly
Copperplate
Ornate and Precise
Invitations and Diplomas
Intermediate
Brush Lettering
Modern and Expressive
Creative Artwork
Varied
As you advance, mixing and merging elements from different scripts can become a signature of your unique calligraphy handwriting style. Every calligrapher's journey starts with the first stroke, and the path unfurls from there. Embrace the process, and watch as your lines and loops transform into works of art.
Essential Calligraphy Tools for the Novice Scribe

As you dip your toes into the flowing world of calligraphy, certain tools are indispensable for your growth and success as a beginner. Taking the first step can be as simple as investing in Starter Calligraphy Kits, which are specifically curated to include a range of equipment suited for those new to this art form. Let’s explore what essentials you should consider adding to your novice toolkit.Starter Calligraphy Kits often provide a variety of Beginner-Friendly Calligraphy Pens, such as brush pens, which are excellent for practicing basic strokes due to their flexible tips and ease of use. Beyond the pen, high-quality ink is a non-negotiable for ensuring a smooth, uninterrupted flow that complements your every stroke.Selecting the right paper is another crucial step. You'll want to opt for paper that prevents ink bleeding and feathering, traits that can mar your beautiful letterforms. To help maintain consistency in your lettering, consider using guidelines. Whether printed directly onto your practice sheets or drawn in with a ruler, these will keep your letters uniform in size and spacing.
Tool
Purpose
Budget Range
Why It’s Essential
Brush Pens
Basic Stroke Practice
$ - $$
Beginner-friendly, flexible tips for variable stroke widths
Quality Ink
Smooth Writing Experience
$ - $$$
Ensures vibrant, consistent color without clogging
Quality Paper
Foundation for Your Art
$ - $$
Prevents bleeding and feathering for a clean look
Guidelines
Letter Consistency
$
Assists with uniform letter size and spacing
As you hone your skills, Calligraphy Tools for Beginners become not just instruments, but partners in your artistic journey. These items will serve as your foundational pillars, allowing you to develop the necessary muscle memory and confidence required to flourish in this elegant craft.Remember, the nib dances to your command, so equip yourself with tools that feel like extensions of your own hands. Finesse in your toolkit heralds the elegance in your script.While the allure to invest in every calligraphy gadget may be strong, sticking to these vital basics will provide a solid platform without overwhelming you. As your prowess grows, so too can your array of tools. Start simple, practice diligently, and watch your calligraphy blossom from elementary letterforms to intricate compositions.
Grasping the Basics: Understanding Calligraphy Strokes
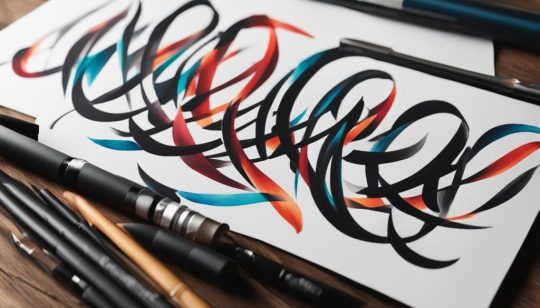
Delving into the realm of calligraphy can be both exhilarating and challenging. As you embark on this path, the cornerstone of your learning experience resides in understanding basic calligraphy strokes. Mastering these fundamentals is akin to a musician practicing scales; they are the melodies from which the beauty of calligraphy is composed. Let's take a closer look at how you can effectively harness these foundational skills to elevate your handwriting and begin with brush pen calligraphy basics.Light and Shadow: Mastering Stroke WeightThe essence of calligraphy brush techniques lies within the contrast of light and shadow—represented by the variance in stroke weight. Stroke weight is the thickness of a line which adds depth and emotion to each character. When you learn to adjust the pressure applied to the brush pen with a relaxed but attentive grip, you'll create delicate upstrokes and bold downstrokes that are visually striking.Forming the Foundations: Essential Stroke TechniquesHandwriting improvement starts with a solid grasp of essential stroke techniques. These techniques underpin the elegance of calligraphy and consist of the following basic movements:
- Light upstrokes
- Heavy downstrokes
- Entrance/exit strokes
- Underturn and overturn strokes
- The compound curve
- Oval shapes
- Ascending and descending stem-loops
Forging these skills is paramount, as they lay out the blueprint from which you'll construct each letter and word, allowing you to engage fruitfully with calligraphy practice exercises.Creating Contrast: Upstrokes vs. DownstrokesAmong the most vital fundamental calligraphy techniques, creating contrast stands out. The dance between thin, delicate upstrokes and thick, robust downstrokes defines the characteristic look of calligraphy that we all admire. Mastering this contrast comes from consistent practice and a familiarity with the tactile response of your tools.To aid in your learning, consider the following table of stroke types and how they contribute to the element of contrast in your writing:
Stroke Type
Description
Pressure Level
Calligraphic Impact
Upstrokes
Thin, delicate lines achieved by a gentle, upward motion of the pen
Light
Adds finesse and elegance to letters
Downstrokes
Bold, strong lines produced by pressing down on the pen as you move it downward
Heavy
Creates weight and body in characters
Oval Shapes
Forms built through a combination of upstrokes and downstrokes to create rounded characters
Variable
Contributes to the fluidity of overall word structures
Stem-Loops
Ascenders and descenders that require both light and heavy pressure transitions
Light to Heavy
Introduces rhythm and movement within words
As you progress with learning calligraphy strokes, remember that patience is your ally. Each session of practice takes you a step closer to mastering the captivating art of calligraphy. Immerse yourself in the process, and you'll soon find the marks on the page embodying basic flourishing in calligraphy, bringing an element of personal flair to your craft. Begin with simple calligraphy exercises for starters, and watch as your control and confidence soar to new heights.With every stroke, you're not just writing—you're creating. Embrace the graceful flow of the brush pen, and let the journey of improving your calligraphy unfold in each and every character you form.
Choosing the Right Scripts: A Guide to Calligraphy Styles
Embarking on your journey through the intricate world of calligraphy begins with choosing the right script. Whether you fancy easy calligraphy scripts that flow with a few simple strokes, or you're aiming to master the elegance of more formal beginner calligraphy fonts, the right choice can have a profound impact on your learning curve and enjoyment. By understanding the overarching characteristics and utilities of various calligraphy alphabets for beginners, you can make an informed decision that aligns with your personal style and goals.Easy calligraphy scripts are a wonderful starting point. They allow you to obtain gratifying results relatively quickly, which can boost your confidence and eagerness to continue practicing. Popular options include the timeless Italic script, distinguished for its straightforward letterforms and accessibility to beginners.But what about when you're ready to move beyond basic designs and onto more complex calligraphy? By that point, you may have developed a taste for certain looks and purposes. It is not just about beauty; formality, casualness, and distinctiveness play their roles. Copperplate, with its elegant flourishes, might be your script of choice for a wedding invitation, while a looser modern calligraphy would suit a rustic cafe's chalkboard menu.Below is a table to help you compare and select the script that best matches your aspirations and skills:
Script
Attributes
Suggested Use
Difficulty Level
Recommended Tools
Italic
Straightforward and graceful
Personal correspondence, essays
Beginner
Basic fountain pen or calligraphy marker
Copperplate
Elegant and formal
Invitations, certificates
Intermediate
Pointed nib pen and smooth ink
Modern
Free-form and casual
Greeting cards, slogan art
Beginner to Intermediate
Brush pen, dip pen
Spencerian
Ornamental and precise
Envelopes, place cards
Advanced
Flexible pointed nib and fine ink
Your chosen calligraphy script isn't just a style; it's a statement of your aesthetic and your intentions. It reflects both the mood you wish to convey and the dedication you bring to your craft.Choosing a script to learn is not just about picking a style; it's also about considering which tools you're going to need to practice it. Italic might require just a simple nibbed pen, but diving into Copperplate or Spencerian could lead you into the world of oblique holders, pointed nibs, and a variety of inks. Take stock of the tools you have, or invest in what will best serve your chosen script.Whatever script you decide to begin with, remember that practice and perseverance are your steadfast companions. The script you choose will guide your hand, but your passion for the art will shape your journey to mastery.
Introductory Calligraphy Workshops and Online Courses
If you're eager to learn the art of calligraphy, introductory workshops and online courses can offer the ideal starting point. For beginners, understanding the basics forms a critical foundation for developing your calligraphy skills. In a world where communication is increasingly digital, calligraphy brings a personal touch to every stroke, connecting you to centuries-old traditions of beautiful writing. Kick-start your calligraphy journey by immersing yourself in the shared experiences of a workshop or the tailored independence of online learning.Workshop Wonders: The Value of Community LearningAt the heart of calligraphy community for beginners lies the vibrancy of learning together. Introductory calligraphy workshops offer more than just skill enhancement; they provide the opportunity to connect with like-minded enthusiasts. Imagine a space where every squiggle and line bring strangers together, transforming them into a supportive network of budding calligraphers. These gatherings foster an atmosphere of collaboration and collective growth crucial for any newcomer.There is something profoundly magical about ink meeting paper in the company of fellow learners—it's where passion finds company.Learning in a workshop setting gives you the unique benefit of receiving real-time feedback from expert instructors, allowing a tangible boost in your learning trajectory. The table beneath outlines the benefits of engaging in a calligraphy community for beginners:
Benefit
Description
Direct Instruction
Guidance from seasoned calligraphers to help you grasp calligraphy techniques step by step.
Personalized Feedback
Immediate critiques on your work can fast-track improvements and refine your skills.
Networking
Connect with others who share your interest, expanding your calligraphy network.
Motivation
Watching your peers learn and grow alongside you gives that extra push to persevere.
Collective Experiences
Shared experiences foster a sense of belonging and a tighter-knit learning circle.
Anywhere, Anytime: The Convenience of Online LearningWhile face-to-face workshops are invaluable, not everyone can access them easily. Enter online calligraphy courses—the flexible solution to learning on your own terms. These digital classes are designed to accommodate your lifestyle, whether you're a morning person or a night owl, you can practice calligraphy at the time that suits you best.With a plethora of quality calligraphy instructional videos available, the online realm is an ever-expanding trove of knowledge. From detailed tutorials to handy practice sheets, online resources are at your fingertips, waiting to be utilized. Not to mention, the online community flourishes with forums and platforms where you can share your progress and gain inspiration.Create your personal calligraphy hub right at home with these tips for online learning:
- Define your learning goals and align them with the course offerings.
- Establish a practice routine and stick to it for consistent improvement.
- Utilize online forums and social media to connect with fellow beginners and exchange tips.
- Review and repeat lessons as needed—online courses offer the benefit of replaying instructional content for mastery.
In the digital age, the beauty of calligraphy doesn't have to be a solitary pursuit. Through online platforms, you can enjoy the flexibility while still being part of a global calligraphy community for beginners. Whether you choose to engage in a vibrant workshop or take advantage of the plethora of online calligraphy courses, your calligraphic adventure awaits. Grasp the pen and let the timeless dance of ink and paper become your guide in the mesmerizing world of calligraphy.
Beginner-Friendly Calligraphy Pens: A Comprehensive Guide
https://www.youtube.com/watch?v=wBlPJqUCMwsFinding the right tools is your first step in the captivating world of calligraphy. The pen, being the most essential tool for any aspiring calligrapher, can make or break your calligraphy penmanship journey. In this guide, we’ll delve into Beginner-Friendly Calligraphy Pens, highlighting those that are not only comfortable to hold but also make mastering the basic strokes a more achievable goal for you.As you explore the options, you'll find that pens like the Tombow Fudenosuke with its Hard and Soft tip options, and the versatile Tombow Dual Brush Pen, often come highly recommended for beginners. These pens are known for their ease of use and ability to produce consistent lines—both thick and thin—with relative ease.Calligraphy Nib Care and Use is also a critical part of your calligraphy tools knowledge. Understanding how to properly insert and clean your nibs will ensure the longevity and performance of your pens. Now, let’s take a closer look at some of the options that can help launch your calligraphy journey to new heights.
Read the full article
0 notes
Text
Hello There,
I'm going to be sharing some of my favorite solo ball handling drills that will help you improve your basketball skills and take your game to the next level. From beginners to advanced players, these drills are designed to benefit anyone who wants to develop their ball handling ability. The drills demonstrated in this video are easy to follow and can be done alone, so you don't need any extra equipment or a partner to train.
By practicing these drills daily, you'll improve your hand-eye coordination, reaction time, and ball control, helping you to become a better basketball player. In addition to the drills, I'll be sharing some of my tips and tricks for successful ball handling. For example, how to use your fingertips to control the ball better or how to alternate between your weak and strong hand effectively.
These techniques are essential for every player who wants to master ball handling and become a pro. So whether you're a beginner or an experienced player, this video is for you! Try out these drills and watch as your ball handling skills improve with time. Don't forget to like and subscribe for more videos like this one!
STATIONARY DRIBBLING LOW BOUNCE MEDIUM BOUNCE HIGH BOUNCE CROSSOVERS SAME ROUTINES OTHER HAND SAME-HAND CROSSOVERS IN & OUT CROSSOVERS ROCKER DRIBBLE '' ADD HESITATION '' BEHIND THE BACK GALLOP DRIBBLE 2-BALL DRIBBLING 2-BALL ALTERNATING 2-BAL SIMULTANEOUSLY CHANGE DIRECATION ( THROUGH LEGS ) BEHIND THE BACK SPIN TRIO-WRAP COMBO HARDAWAY CROSSOVERS WITH A RHYTHM BOUNCE DOUBLE CROSSOVER THRU LEGS RETREAT IN & OUT CROSS AND IN & OUT WRAP
basketball, ballhandling, basketballtraining, basketballskills, basketballdrills, solotraining, ballcontrol, dribbling, basketballtips, basketballcoach, basketballlove, basketballislife, basketballplayer, basketballgame, basketballneverstops, basketballmotivation, basketballtrainingtips, basketballtrainingdrills, ballhandlingdrills, ballhandlingpractice, ballhandlingworkout, dribblingdrills, dribblingpractice, dribblingworkouts, ballhandlingexercises, ballhandlingfundamentals, handeyecoordination, reactiontime, basketballtutorial #basketballtraining #basketballskills #basketballdrills #basketballcoach #solotraining #trainlikeapro #hoopsdevelopment #ballhandling #dribblingdrills #shootingdrills #agilitytraining #conditioning #basketballworkouts #basketballfitness #bballtraining
0 notes
Text
Building Your Guitar Technique: Exercises and Drills for Developing Your Skills
Playing the guitar is a fulfilling and rewarding experience, but developing a strong technique is crucial for becoming a skilled guitarist. Whether you're a beginner or an experienced player, practicing targeted exercises and drills can significantly enhance your playing abilities. In this blog post, we will explore a range of exercises and drills designed to improve your guitar technique. By incorporating these practice routines into your daily routine, you can elevate your playing to new heights and unlock your full musical potential.
Warm-up Exercises:
Just like any physical activity, warming up is essential before diving into intense practice sessions. Begin by gently stretching your fingers, wrists, and arms to increase flexibility and prevent injuries. Next, perform basic finger exercises, such as chromatic scale runs, finger stretches, and finger independence exercises. These warm-up exercises prepare your hands and fingers for more demanding practice sessions.
Finger Independence and Dexterity:
Developing finger independence and dexterity is crucial for playing complex chords, scales, and intricate melodies. Practice exercises such as spider crawls, finger rolls, and finger combinations on each string. Start slowly and gradually increase the tempo as you become more comfortable. Focus on maintaining accuracy, clarity, and evenness of sound across all fingers.
Scale and Arpeggio Practice:
Scales and arpeggios are fundamental building blocks of guitar playing. They enhance your fretboard knowledge, finger coordination, and improvisation skills. Practice major, minor, and modal scales in different positions and keys. Combine scale practice with arpeggio exercises to strengthen your finger positioning and picking techniques. Explore various patterns and rhythms to expand your musical vocabulary.
Chord Progressions and Strumming Patterns:
Developing a solid foundation in chord progressions and strumming patterns is essential for rhythm guitar playing. Practice common chord progressions in different styles, such as pop, rock, blues, and folk. Focus on smooth chord transitions, clean strumming, and rhythmic accuracy. Gradually increase the complexity of the progressions and experiment with different strumming patterns to enhance your musicality.
Alternate Picking and Speed Building:
Alternate picking is a technique that involves alternating between downstrokes and upstrokes to achieve fast and precise picking. Start with simple alternate picking exercises on a single string, gradually increasing the speed and incorporating string changes. Practice scales, arpeggios, and licks using alternate picking to develop speed, accuracy, and fluidity in your playing. Utilize metronome practice to maintain consistent timing and gradually increase your speed over time.
Fingerstyle Technique:
If you're interested in fingerstyle guitar playing, dedicate time to develop your fingerpicking technique. Begin with basic fingerpicking patterns on open strings and gradually progress to more complex patterns involving chord changes and melodic lines. Experiment with different fingerpicking styles, such as classical, folk, or percussive fingerstyle. Incorporate exercises that target finger independence, thumb control, and coordination between the fingers.
Ear Training and Transcription:
Ear training and transcription are invaluable skills for any guitarist. Train your ear by practicing interval recognition, chord progressions, and melodic dictation. Start by transcribing simple melodies or solos from your favorite songs and gradually tackle more challenging pieces. Transcription not only improves your musical ear but also helps you understand the techniques and phrasing of your favorite guitarists.
Rhythm and Timing Exercises:
Solid rhythm and timing are essential for playing in a band or jamming with other musicians. Practice rhythmic exercises such as strumming along to a metronome, playing along with drum loops, or jamming with backing tracks. Focus on maintaining a steady tempo, playing in sync with the beat, and executing precise rhythm patterns. Gradually introduce more complex rhythms, syncopations, and accent patterns to further refine your sense of timing.
Bend and Vibrato Techniques:
Bends and vibrato add expressiveness and emotion to your guitar playing. Practice bending notes accurately and smoothly, focusing on pitch control and consistency. Experiment with different types of bends, such as whole-step bends, half-step bends, and pre-bends. Similarly, work on developing your vibrato technique by practicing controlled and expressive vibrato on sustained notes. Use a combination of wrist and finger movements to achieve different styles of vibrato.
Articulation and Dynamics: Articulation and dynamics are crucial for adding nuance and musicality to your playing. Practice techniques such as hammer-ons, pull-offs, slides, and palm muting to articulate your notes and create smooth and connected phrases. Experiment with different dynamics, such as playing softly (pianissimo) and gradually increasing the volume (crescendo) or vice versa (decrescendo). Focus on playing with intention and expressing the emotions behind the music.
Incorporating Music Theory: While technique exercises are essential, it's equally important to understand music theory concepts. Learn the basics of scales, chords, chord progressions, and key signatures. Apply this knowledge to your practice by improvising, composing melodies, or analyzing songs you enjoy. Understanding music theory empowers you to make informed musical decisions and enhances your overall musicianship.
Consistent and Structured Practice: Consistency is key when developing your guitar technique. Set aside regular practice sessions and establish a structured practice routine. Divide your practice time between different techniques, exercises, and musical concepts. Set specific goals and track your progress to stay motivated. Remember to take breaks, listen to your body, and avoid practicing with tension or strain. Quality practice, even in shorter durations, yields better results than sporadic and unfocused practice.

0 notes
Text
The Ultimate Guide to Mastering Basic Drum Beats in No Time
Introduction: What Exact are Basic Drum Beats and How Can You Learn Them?
Learning drums can be a challenging yet rewarding experience. If you're just starting out, getting the basics down can be difficult. That's why we've put together this beginner drum beat tutorial. We'll provide simple drum beat patterns and explain the fundamentals of drumming so that you can get off to a great start on your journey towards becoming a master drummer!
Learning the basics of drum beats can be a great way to get started with playing drums. It is important to understand the fundamentals of drum beats and how they are used in music. This article will provide an introduction to basic drum beat patterns and a beginner tutorial on how to learn them. We will discuss the different types of drum beat patterns, their uses, and some tips for mastering them. With this knowledge, you can begin your journey into becoming an experienced drummer!
5 Tips for Learning Basic Drum Beats Quickly & Easily
Learning to play the drums is an exciting and rewarding experience. It requires dedication, practice, and patience. But with the right tips, you can learn basic drum beats quickly and easily. Here are five tips that will help you learn basic drum beats quickly so that you can start playing faster. These tips include understanding the basics of rhythm, practicing regularly, listening to other drummers for inspiration, using a metronome to keep time, and focusing on one beat at a time. With these five tips in mind, you'll be able to master basic drum beats in no time!
6 Exercises To Perfect Your Timing When Playing Basic Drum Beats
Learning to play drums is an exciting journey, but it can be daunting for beginners. Fortunately, there are practice exercises and timing drills that can help drummers of all levels improve their skills and take their playing to the next level. These exercises focus on developing coordination and accuracy with the sticks, as well as timing and rhythm. With regular practice, these drills will give any drummer a solid foundation for creating amazing music!
Learning to play the drums is an exciting journey, and having the right practice exercises can make a big difference in improving your timing and technique. Fortunately, AI-driven practice tools are now available to help beginners build foundational skills and improve their timing. These tools provide drumming exercises that are specifically tailored to each individual's needs, allowing them to focus on specific techniques and work on their timing with precision.
How To Practice & Develop Your Technique To Play Basic Drum Beats with Style
Playing the drums is one of the most rewarding musical experiences. With practice and dedication, you can develop your technique and style on basic drums to achieve a unique sound. With the right tools and guidance, you can learn how to produce beats that will capture the attention of your audience.
If you’ve ever wanted to learn how to play the drums, now is the time. Practicing and developing your technique on drums can help you develop your own unique style and sound. With a few simple exercises, some dedication, and of course practice, anyone can become a master drummer in no time. Learning how to play the drums is an incredibly rewarding experience that will not only provide you with hours of entertainment but also help improve your coordination and musicality. So if you’re ready to start learning how to rock out on the drums, get ready – it’s time to practice and develop your
3 Expert Tips From Professional Musicians On How To
Professional musicians have a wealth of experience and knowledge to share. They can offer invaluable advice on how to become a better musician, from the basics of playing an instrument to the finer details of composition and performance. In this article, we will look at three expert tips from professional musicians on how to improve your music-making skills. From honing your technique to developing your own unique style, these tips will help you become a better musician and take your music career further.
0 notes
Text
Cnc Router Bits Glossary Toolstoday Com- Your Source For Industrial Chopping Instruments
The most difficult half was getting the linear rails lined up appropriately. When marking the precise hole places, I clamped two items of aluminum profiles to the sides of the plate to line up the rails. Once I had marked the opening places, I drilled and tapped them with an M5 thread. When attaching the rails to the gantry, you want to ensure that the space between the rails over the entire size is completely even . For the Z-axis I used top quality stainless steel M10 threaded rod, with a selfmade delrin nut. You can save a lot of money by buying a package that includes linear rails and ball screws.
CNC wood cutting machines are extensively used within the woodworking trade to supply practical and ornamental components for fantastic furniture. Should you run into any bother along with your CNC router machine, you’ll be pleased to know that we now have a free remote entry assist service that can assist you out in pressing situations. DIY CNC router, additionally called do-it-yourself CNC router, principally applies to the mini CNC machines, just like the desktop CNC router, pastime CNC router, and so forth. DIY CNC router requires you to have a comparatively high stage of CNC basic knowledge, good hands-on functionality, and likewise enough time and vitality. It also requires you to buy all the wood CNC machine elements, together with the CNC router bits, by yourself.
CNC wood router machines for sale
The firm ShopBot Tools, Inc. is predicated in North Carolina, and all of the machines are designed and constructed in the USA. In addition, you get a VCarve Pro license that is price $700 to make use of as your design software program. VCarve is a beginner-friendly design software program for CNC machining and is really easy to use. If an error is detected, the motor is stopped, and a warning is displayed on the monitor.
If you propose to routinely reduce lengthy parts, get an envelope massive enough to minimize tiling. Let Mother Nature be your co-designer as you construct dazzling tasks with wavy edges, bristly burrs, bark inclusions, and different “flaws” that give wood a look of unrefined beauty. The Rover B FT machining center for nesting raises the quality and productivity standards on this sector. Thanks to its structure and the variety of potential configurations, it could hold abreast of the work rhythm of medium and enormous companies for the production of pieces for each sort of application. Browse 438 skilled cnc router wood stock pictures, photographs & pictures available royalty-free.
You may use the body to enclose the outer edges of a mirror, portray, or picture. At the same time, utilizing a CNC machine to create a stand ensures that the frame and base fit completely. It eliminates unnecessary wobbles that may be witnessed if unskilled carpenters made the stand. You can use CNC machines to carve out a automotive, truck, ship, or airplane from a block of wood. You can also rest assured that the CNC product might be accurate.
I have seen wooden CNC routers that may cut aluminum , however this went very gradual and the machines should be very well constructed. Because I wanted to chop aluminum with this CNC router, I built it out of aluminum. I might have used metal, but that is more difficult to machine and I didn’t have the proper instruments for that.
The CNC router table 4x8 is sturdy and can withhold the strain of even the toughest materials. Our wood CNC machine 4x8 is assured to serve you well for the years to come. Every 4x4 CNC router purchase additionally comes with a lifetime of technical help so you can all the time rely on our experts that can assist you out in instances of need. Tork's SS-3 sequence forty four is a cost-effective, space-saving 4x4 CNC router machine. It’s a conveniently sized working platform that delivers on worth.
#CNC wood router machines#CNC machine wood router#CNC router wood#CNC wood router machine#CNC wood router machines for sale
1 note
·
View note
Text
A Day in the Life
as told by Marguerite Adélie Chrysanthe.

Summary: A day in Adélie’s life.
2022,
Tokyo, Japan.
The beginning of
PHASE 1,
Ep. 2
Tags:
Every morning, Adélie walks to her beloved creative arts space, unlocking the space and cleaning up before the teachers even arrive.
Before 9 o’clock, all of the staff have filled in, chattering among themselves and getting ready in the locker room, before the first class starts.
Warmups and stretches is done, never forgotten as she relishes in the empty space for herself, a small window of time.
There are a few classes she teaches every day, mostly in a group. The beginners’ class is handled by a different teacher she hired.
Intermediate to advanced, that is where she mostly teaches. Choreography made by her, although she is open to suggestions.
Not only she teaches the dancers, but they also aid her in something new every day. It is a mutualism symbiosis.
“Five, six, seven, eight.”
From their start position, then a simple pirouette before getting into the faster rhythm, constant and consistent. There is no room for error.
Adélie’s gaze finds each student moving along the floor, lights illuminating their faces and each movement they make.
A clap of her hand's echoes. Then, she twists and turns with her students, her eyes staring at each and one of them.
“One more time!”
They seem to haven’t been able to get it quite right. Adélie heaves a breath. At this point, her sweat is not only dripping, but squeezing out of her hair kind of drenched.
Considering herself to be a hands-on teacher, she implements what she thinks with what she does, hence the same exhaustion inhibiting her joints.
“If you get the last part wrong, we are going to try this five more times.”
Before she heads out, Adélie makes sure everyone is out of the building. Locking up behind herself, she starts the journey home.
Dark skies with only the moon above, stars obscured by clouds, as the city is lively with crowds of couples and friends going downtown is a stark contrast.
There were days when she was a student, and her teacher used to make her repeat it countless times, until her fellow dancers would cry and sob. She did cry, in a more subtle, quiet way.
Hiding in the restroom or the locker room, to be precise. Sometimes she had to blink it away and pretend there is dust in her eyes.
Walks home used to be filled with listening to the current song used for the choreography, she either dances her heart out or taps her fingertips according to the beat.
Hair tied back into a bun, having to wash it by tomorrow, she makes the walk back home. The distance from her dance studio to the place she shares with Evelyn is not that far.
Blisters and bruises often mark her skin, mostly her feet and knees. Worn as a mark of honour, and considered usual with the amount of work they went through.
Adélie likes to use the way back home as her chance to reflect or simply clear her head, sometimes she would recite the dance routine she is working on.
Sacrificing her weekends and occasionally, weeks before a competition or an important show, they would increase the amount of practice to almost every day.
Gym bag sling over her shoulder, she clutches it with one hand, sneakers hitting the pavement with a dull thud. Her light jacket is zipped up with a little gap left to feel the evening breeze.
Often, she has to pick: to study for her next dance routine, or her actual exam, especially during school days.
A warm shower and a nice dinner. The promise of those things put ease in her steps, hoping the night is clear enough she won’t be rained out.
Each step echo against her ears and out of her paranoia, or perhaps it has just been drilled into her mind, she occasionally glances back to make sure no one is following her.
People come and go, heading home from a day of work or kids after intensive classes catching a break in the bright supermarkets for snacks and coffee.
終劇。
Glancing at her shoes, she takes note of how she needs to wash them, and how she has been putting them off.
⠀⠀⠀
0 notes
Last Seen Blogs

honorary-knight-of-favonius
Favonian Archive

justgamingaround
Just Gaming Around

marikdraw
Marik

lovelysocrown
Untitled

sweetlandpaperartisan
shivar