#thats right i kicked adobe! finally
Text
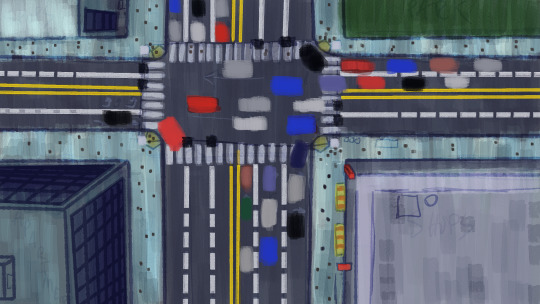
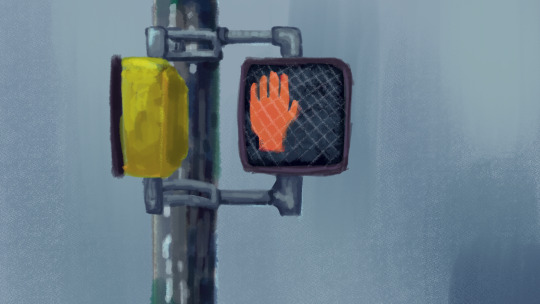
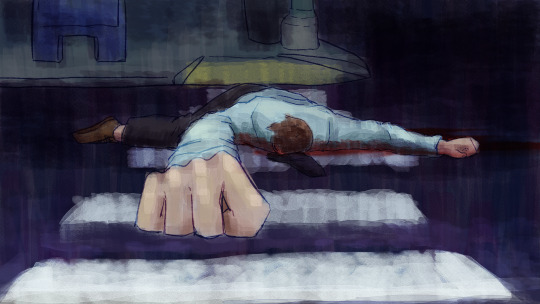
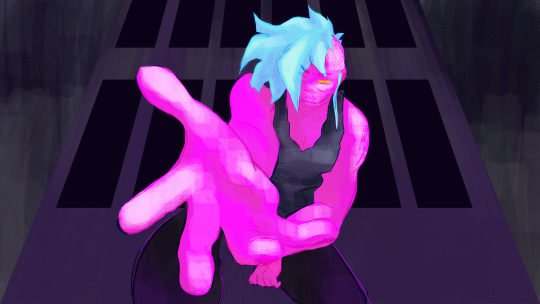
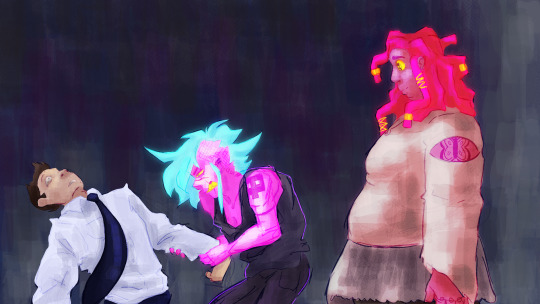
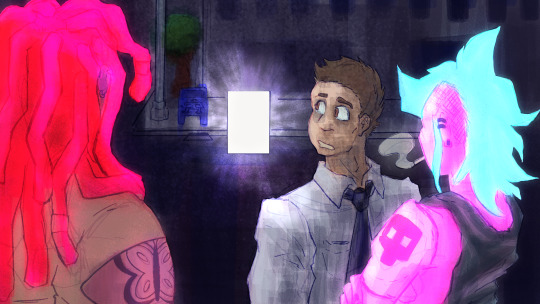
Beatboards for my upcoming graduate thesis film, Red|Blue (2026)
#animation#concept art#digital art#clip studio paint#thats right i kicked adobe! finally#art#illustration#artists on tumblr#film#graduate film#thesis film#visual development#visdev#beatboards#storyboards#beatboard#storyboard#beat board#story board#character design#narrative design#Red|Blue (2026)
9 notes
·
View notes
Text
a complete gif tutorial
hi! so i was requested by @popalice007 to make a tutorial on how to make gifs and i am very happy to oblige! this will cover pretty much everything, from capturing frames to saving the final product. this is just how i personally do it, and there are loads of other ways to gif, and i recommend looking at other gifmakers’ tutorials to get a more well rounded view on how to gif. please continue reading if you are interested, and please like/reblog if you find it useful!
disclaimer this is going to get really wordy as i try to explain where to find things and how to do them and my thought process behind why i do them, but please send me a message/ask if something needs clarified!
also some of the pictures can be viewed in full size by clicking on them!
part 1: required materials and other tips
just another heads up, i have a pc, and while i believe most of this should be the same whether you have a mac or a pc, i could be very wrong as i’m not a computer expert and have never really used anything besides windows.
so the two programs i use are kmplayer and adobe photoshop cs5 portable. kmplayer can be downloaded for free here. i have the 32 bit version for windows, so that is what i’m going to be providing the instructions for, since the 64 bit version seems to be a little different. photoshop is pretty expensive, but thepiratebay has several torrents for it, and other downloads and torrents for it do exist. i downloaded mine quite awhile ago so i don’t remember exactly where and how i did it so it might require some researching. i would just double check the comments and instructions to make sure the download will work. there are also dedicated photoshop tumblrs that will probably have links to downloads.
if you are giffing a scene from a tv show, movie, video, etc, you also need to have the video saved somewhere on your computer/flashdrive/whatever. hd-source is a good source for tv shows, and there are tons of other sources. i download a lot from thepiratebay using a program called utorrent (i just use the free version) but beware because since you are downloading copyrighted materials it isnt legal, and while i have never had a problem, i have heard of people getting warning letters from their internet providers. you can also download youtube videos and videos from other places and there are lots of other ways to get videos that i won’t cover.
no matter where you get your video, you want it to be pretty high quality, since the higher quality the video is, the clearer and nicer the gif will turn out to be. most of the time you want 720p if you can get it. 1080p is nice and if you can get your hands on it without the video size being enormous you can certainly utilize it, but it isn’t a necessity and usually i don’t bother. anything lower than 480p can get to looking pretty grainy especially if you are doing full size 540 px gifs, but if you are giffing something from a convention panel video taken by a phone, for example, you don’t really have an option.
additionally, if you are giffing dialogue, find a script online somewhere or find subtitles. you can transcribe it yourself if you want, but if a character is mumbling or has an accent or something i like to be sure of what they are saying.
and finally, have some patience! a lot of the popular gifmakers have been doing this for years and have streamlined their process so it doesn’t take hours, but as a beginner it takes time to get everything right,so it is totally normal if you get to feeling frustrated.
part 2: capturing the frames
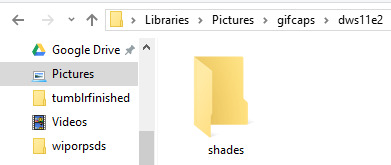
first you will want to have an idea of what scene you would like to gif. before i get started i create a new folder where i want the captured frames to go, and i name it something memorable so i can find it again later. kmplayer does also automatically create a folder called capture that you can use if you want. if you are doing a gifset like this, i would have 8 different folders and gave each of those gifs/scenes their own folders.
however, the example i’m going to be using throughout this tutorial is going to be a dialogue scene, specifically this one here, just because they can get a little more complicated imo (plus i want to show how i use the text tool etc). if i’m giffing a scene where characters are talking, even if the scene is a long one with back and forth dialogue, i usually like to cap it all at once and put it in the same folder, and then i separate it out later in photoshop. you can also plan ahead and put all the different bits in different folders, thats up to you and your personal preference.
next i open up kmplayer. kmplayer likes to update pretty regularly and will let you know when you open it if it wants to update. it doesn’t usually hurt to ignore it if you are in a rush, but i usually let it do its thing and make sure i don’t also download whatever browser service, etc. it also wants to install. sometimes ads show up on the right side, you can close them by hitting the little arrow between the ads and the video screen
to open the video, click on “kmplayer” in the upper left hand corner and then click on “open files”. search for your video file and double click it to open it

kmplayer will then open the video, and if its 720p often i have to make the window smaller because it fill up the entire screen and i need to be able to see other windows besides the video. if i remember correctly when you first download kmplayer it isnt automatically set to keep the aspect ratio the same, so if you need to, hit the f2 key to open the preferences or click the lightning bolt on top next to kmplayer, and then click on preferences. under general and then screen on the sidebar, and then under general again i have my settings like so, and hopefully that resolves that issue if you have it. you might have to reopen the video again for that to kick in but i’m not positive. if it still doesn’t work try to google it. i’ve had the problem a couple times and the answer is out there but i’m no tech pro.

anyway, i then locate the beginning of the scene that i want to gif. you can click around on the bottom along the progress bar, as well as using alt+left or right to jump forward and back a minute, the left or right arrow key to jump 5 seconds, or the f key to go forward a single frame. every frame counts, and it is preferable to have too many frames and have to delete them later than to find out your gif will only be 10 frames long because you started capping in the middle of the scene, or because you stopped capping too early. i typically will watch the clip a few times so that i have a set idea of where i want to start and stop.
once you are paused at the beginning of the scene you want to gif, press ctrl+g to open kmplayer’s frame extraction window. click on the folder icon so that you can locate that empty folder you had made earlier. this is where kmplayer will save the screencaps. i then set my settings to png, continuously, original size, and every frame, like so

now we are ready to start capturing! click start on the frame extraction window, and then click back over to the video (this is why i make the video window smaller, so that i can see the video and the frame extraction window at the same time). once i’m back on the window, i hold down and/or tap the f key. kmplayer will capture the frames as you go along. the audio plays along with it albeit choppily which is why i watch the clip several times beforehand, because it can be hard to follow and is disorienting. you can also click the play and pause button, but, again, the audio tends to play at a different rate and it gets confusing, so for me frame by frame is the way to go. keep tapping f until you get to end of the scene/wherever you want to stop. i keep the folder where the caps go open usually so if i mess up or change my mind on where to start/end, i can delete the whole folder and create a new empty one to start over again. this process takes practice and is often dependent on what you are trying to gif and its not a big deal if you have to try it a couple times to get it right.
once you have reached the end of the scene, click back over to the frame extraction window and click stop. if you are giffing multiple scenes from the same video you can click the folder icon and select a different folder to save frames into and then repeat the process of finding the scene and capping it, or if you want to cap from a different video, you can open a new video and cap from there. then if you are satisfied and have all your caps, you are free to exit out of kmplayer.
part 3: making the gif
now it is time to actually make the gif! go ahead and open photoshop, and if it is your first time you can play around and familiarize yourself with where things are. basic gifs don’t require a lot of the tools that photoshop has, and you can customize some as to what windows and panels are open. below is what my workspace typically looks like so that i can get to certain things quicker, but i will explain as i go along where the controls normally are found in the toolbar. also, if you hover over a control photoshop will tell you what it is and what it does.


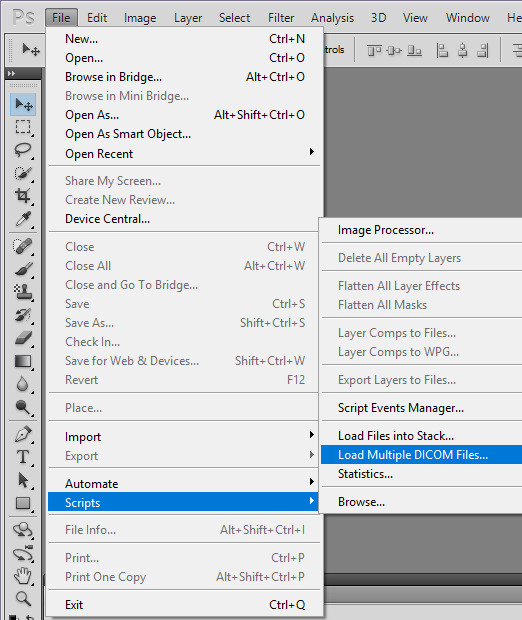
to open the frames, go to file, then scripts, then load multiple dicom files. then find your folder of caps, select it, and then click OK to open
be aware that depending on the number of frames in that file and the size of the images it sometimes can take awhile to fully load. once they are loaded, you should be able to see all those screencaps as layers on the right hand side of the screen. if not, go to the top where it says windows and click on layers. i frequently accidentally cap a couple extra frames where the scene shifts and i go ahead and delete those layers by highlighting them (use the shift or ctrl key to highlight several at a time) and then clicking on the trashcan at the bottom of the layers sidepanel.
next we are going to turn these layers into gif frames! i have combined this step into an action that i use to automatically do this for me to save time since i gif on a semi regular basis, but the steps are as follows.
first, make sure the animation bar is open. if it is not then go up to window and click animation, and then it should open at the bottom of the screen. you also have to be in frame animation mode. on the upper right hand corner of that panel is an icon with four lines and and an arrow. click on that and then click on convert to frame animation. then in the same menu click make frames from layers.

this can also sometimes take some time if there are a lot of caps but when its done loading there will be frames in the animation bar. in the animation menu click select all frames. then, underneath any of the frames, there will be an arrow beside where it says 0 sec. click it and change the frame delay. what you set it to can be up to personal preference. i typically set mine to 0.07 or 0.08 which seems a bit slow, but i find when i convert the gif to a smart object (we’ll get to that) that seems to speed it up a little so i’ve just stuck with it. feel free to change the delay if you find later that that is too slow for your taste. also in lower left corner of the animation bar is where you set how many times the gif loops. change it from once to forever. the controls to play the gif are also below the frames.

since i gif a scene like this all in one big long take, it is now time to separate it into separate gifs if need be. if you are making a gifset like this you can skip this part because you most likely capped frames from different scenes and gave them their own folders, so they shouldnt need separating.
sometimes you have to get creative on how you split apart the scene, and there arent really any hard and fast rules. here are some things i like to keep in mind:
the camera angles - this is the most important for me. if the camera goes from showing one character to another, or from one angle to another, i separate those into separate gifs pretty much no matter what.
the length of the gifs - this is dependent on the size you are going to crop to, how much movement the scene has, how much color, etc., but i typically try not to go over 80-100 frames in a 265px width gif. they can be trimmed down later, but if it takes 200 frames for the camera to switch to the other character, don’t make that one gif
the dialogue - if there is a natural break in the dialogue, that is a good place to end a gif. you don’t need 50 frames of no one speaking if you are doing a gifset with dialogue.
how many gifs you are making/size - at some point you have to decide how wide your gifs will be and how many of them. if your gifs will be 268 px wide (2 columns of gifs) then you have to have an even number of gifs, and you will need to separate to account for that
going along with the first tip, i’m going to separate the frames by camera changes. i do this first so that way when i crop the gifs, i get things centered how i like.
you can see here by looking at the thumbnails of the layers what i mean by the camera changing angles.
first, press ctrl+n to open a new blank image. if the preset doesn’t say dicom files, click on that menu and click dicom files, that way the new image will be the same size as the original. hit ok.
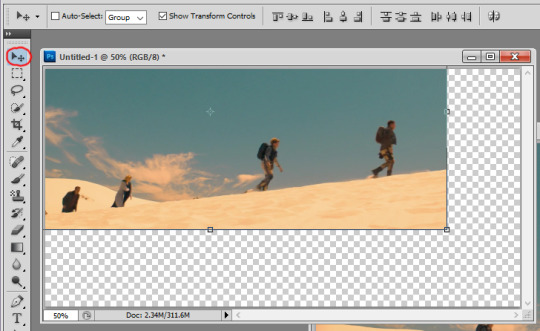
next, highlight the layers in the original that are going to be the new gif. hold shift while clicking the first and last layer that you want to be in the new gif to do that. click on them, hold, and drag them over to the new document. they will probably be off center and/or invisible. if the layers are invisible click an empty box next to one of the layers so that an eye appears and the layer shows up. then click the move tool and move the layers around til the fill the document correctly. be sure not to stretch/transform the layers by dragging on the edges and corners. as long as all the layers are still highlighted they should all move at once.

next, scroll to the bottom of the layers and delete the blank layer. then repeat the steps to make frames and set the time delay and there is your new gif!
the layers for that new gif are still in the original document, so go ahead and hit the trashcan to delete them, as well as the now blank frames. continue opening new documents and splitting up the scene until you have a new gif for every camera change. the last gif i leave in the original document. i ended up with 5 camera changes so 6 gifs to start with
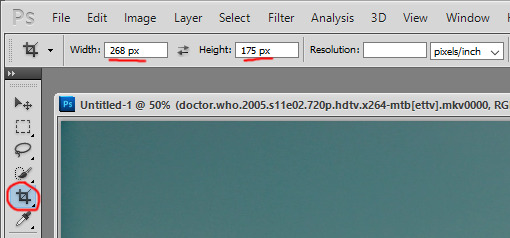
at this point i crop each gif. tumblr has a guide for image sizes, and the width is the most important thing to follow there. the height is really up to you. if i’m only doing two or four gifs i tend to make them taller than if i do 8 or 10 gifs just because it looks better to me. i’m going to probably end up with 8 gifs because a couple bits are a little long, so i’m going to go with 268 px as the width and 175px as the height. again, the 268 part is the important part to get right since i’m doing two gifs across. to crop, find the crop tool on the left and set your dimensions at the top. make sure when you enter your dimensions, it is in pixels/px and not inches or centimeters.
click, hold, and drag to stretch to create a shadow for what you cropping. i usually go as big as the edges of the image will allow, and then bring the corners in a tad, since occasionally i get a video that has a black outline and i don’t like to have that in the gif. either hit enter or the checkmark in the upper right corner of the toolbar to crop.

you might have to zoom at this point and resize your window. in the bottom left corner there is a percentage you can change, and now that the gif is cropped it will be small enough that you can set it to 100% if it isn’t that already. continue to crop the remaining gifs to the same size. after this i usually play through each one to make sure i have everything in the frame and roughly centered. if you need to undo, press ctrl+z or ctrl+alt+z and recrop or redo whatever needs redone. there is also a history you can pull up under windows, and you can use that to backtrack multiple steps.
next i figure out if i need to break up any of the gifs because of their length. with a gif this size i can probably get away with having more frames and i can trim them later, but if a gif has more than 100 frames i look and see if i can either trim it down now because there is a lot of frames without talking or movement, or if there is a natural break in dialogue where i can split it into two gifs. there are also times when the gifs are really short that you can sometimes combine with a gif before or after that one. that’s your perogative ultimately and what you think looks good but will fall under the 3mb limit, and takes practice and experience to get an idea if a gif is going to be too large. sometimes i go back and rewatch the scene to figure out where to split things up. i also keep in mind that i want 8 gifs for this scene and right now i have 6, so i need to create 2 more, whether i separate two gifs in half, or separate one gif into three new ones.
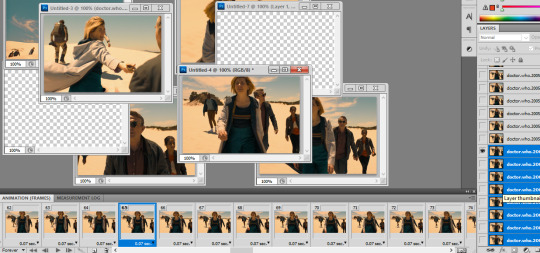
ultimately i decided to split my largest gif of 180 frames into 3 gifs because it has quite a bit of dialogue, and the other gifs are either already under 80 frames or can easily have some frames deleted out of it. between using the script, rewatching the scene a few more times, and trying to lipread what the doctor was saying, i decided to separate between frames 65/66 and 120/121 so that way they were roughly the same number of frames. the process to separate them is the same as it was when we had the big original gif. i selected the last frame i wanted to include in the new gif so that way the eye appears next to the corresponding layer in the layer panel, and this is how i know which layers to drag to the new document. for example, in the picture i’m moving frames 1-65 to the new document, so i select frame 65, then find that layer and select all the layers below and including that layer and drag them. then repeat the steps to make the frames, etc.
go ahead and delete the empty frames, as well as any frames on the other gifs you may want to delete to trim them up.
so now we should have all of our gifs laid out! my next step is to sharpen them, and i do this using smart objects, and the steps are as follows. (i also made this into an action.)
first, select all the frames and all the layers in the gif. if you deleted some frames but didn’t delete the corresponding layers, don’t worry about it, it doesn’t matter and doesn’t affect the final product.
next, click on convert to timeline animation. this is in the animation menu where we earlier found convert to frame animation.
then, at the top go to filter and click on convert for smart filters. this creates a smart object and turns all of the frames and layers into just a single layer/object. this allows us to sharpen the whole gif at once instead of having to sharpen each frame one at a time (trust me that takes forever if you don’t have an action or do it this way).

next under filter again, then under sharpen, click on smart sharpen. this brings up a window with a bunch of settings. these are what mine are:
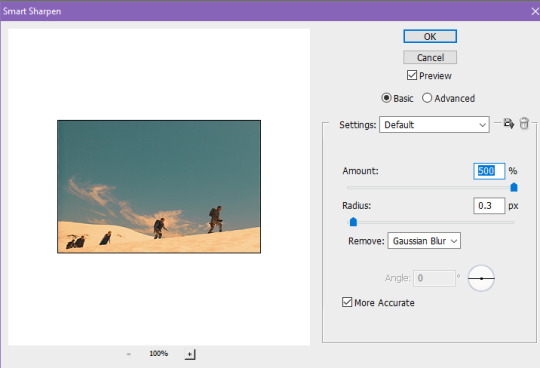
repeat this for every gif. look how much better they look already!
at this point, if you haven’t saved yet, do it now! this is a good time to save and take a break. go to file and then save. the format should be set as photoshop/.psd. i go ahead and rename the files too, for example, dwshades1 and so on. i number them too so i can get the order right when i upload them. with it saved as a psd, you could close out and reopen it later and the layers will all be there.
next is coloring! this is technically optional, but is usually the most fun part of giffing in my opinion, and i tend to find uncolored gifs rather boring and bland. this is where you can do some brightening, color correcting, make gifs black and white, and more! its time to get creative with those adjustments.
as there are so many ways to color things, and whole tutorials dedicated just to coloring, i’m only going to show the basics of where to find the adjustments and some of the different adjustment layers that i use most. my first step always though is to create a group just for the coloring layers. the button to create a group is at the bottom of the layer panel and looks like a folder. the button to the left of that is the one that contains the different adjustments you can make.

the black and white circle contains a list of different adjustments you can make. the two i like to use most are curves and vibrance. curves is really useful to brighten gifs and vibrance obviously adds vibrance. my advice is to just play around with all the settings, and look at coloring tutorials. a lot of gifmakers also have psds that you can download. you can either use them as is to apply to your gifs and credit the maker, or just study what they did and learn from it.
anyway, i went ahead and colored my gifs. here is a before and after look, as well as a list of adjustment layers i added:


in this case the before gif doesn’t look bad, but that isn’t always the case, sometimes they start out super dark and colorless. and i like the tone and colors of the colored gif better (you can see how much i like purples and blues lol). again, all personal preference.
whether you color or not, if you have dialogue in your gifs, the next step is adding it in! if the gif doesn’t have a dialogue or if you don’t want to add text, you can skip this next bit.
first, select the text tool on the left side toolbar, it looks like a T. next i choose my font, font size, and color at the top. here are my settings, the key thing is to make it easy to read.

there are more settings like bold and italics under window and then character. these are my settings.

after these are set, click in roughly the middle of the gif and start typing the text that goes with that gif. i usually start with white for the first person to speak, and then change to yellow for the second person and so on, so that way its clear who is speaking, but that’s up to you. when the text starts to go off the edge of the gif, i hit enter to start the next line until i’m out of text. otherwise photoshop will allow you to type right off the edge of the gif.
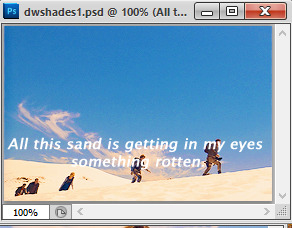
a little hard to read, right? that’s why i add stroke, which outlines the text. to do this, make sure the text layer is highlighted, and then click the fx button at the bottom of the layer panel, and then click stroke.
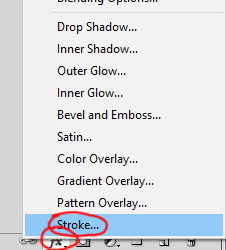
these are the settings i use. usually i only have to change the size from 3 to 1px. hit ok.
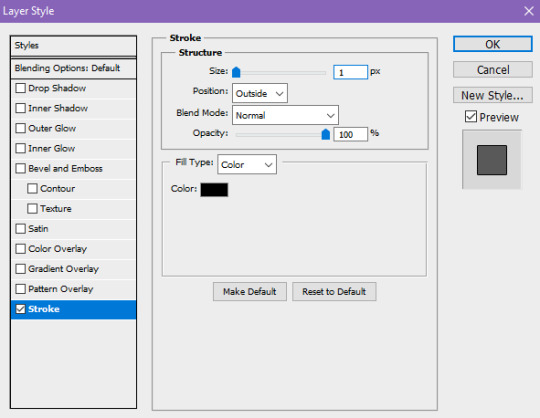
so much easier to read! also, double check to make sure that the text layer is above the coloring layers.
next, i want to move the text to where i want. select the move tool on the left, and first move the text layer all the way to the bottom. photoshop has it so that it is kind of magnetized to the edges. i then go back to the character menu and change the baseline shift setting to 5 pt.
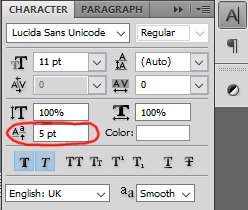
however, when you click to a different gif it doesn’t reset back to 0, so manually reset it back to 0 before moving your text layer, then change it to 5 again.
next, to center it on the gif. first select the gif layer, then hold ctrl while you select the text layer. the order is important, if you select the text then the gif, the gif will be moved to center itself around the text. then, with the move tool still selected, click this button on the top tool bar to align horizontal centers.

great! now save your gif again, and repeat all these steps for the text for every gif that you are adding text to. most of the time i type the text on each gif first, and then move the text that way i’m not switching tools a dozen times, but it really doesn’t matter.
your gifs are officially done! time to save them in a format that you can upload to tumblr. go up to file, and click save for web and devices. these are my settings, but you can play around with some of the ones on the upper right side. however, you want to make sure that it is a gif, and that it is set to loop forever. those are circled. hit save, name your gif however you want, and save it somewhere you can find it later. do this for all of your gifs.

the other thing i circled in the document size. tumblr does not allow you to upload images that are above 3mb. if yours is above this, you have a few options to cut down on the size. changing the settings on this window such as going from diffusion to pattern, or reducing the number of colors can change the size, but if you reduce the number of colors, you lose some quality. you can also change your coloring layers around, because making a bright gif with a lot of colors can increase the size. black and white gifs tend to be smaller.
the option i tend to go for if i want to keep the colors and quality, is to reduce the number of frames you have. its a little trickier to do in timeline mode than it is when the frames are all there, but this is how to do it. if your gifs are all under 3mb, you can skip ahead to uploading.
in the timeline animation bar, there are blue rectangularish sliders you can move at the beginning and end, as well as a triangular one that shows where you are within the gif. decide the new place where you want the gif to start and end, and move the rectangle sliders there, like so. one tick over does not equal a frame, so i use the triangle indicator to figure out how many frames over i’m moving.

then in the animation bar menu, click trim document duration to work area. this will set your gif to begin and end where those sliders were. at this point you can try saving again to see if your gif is below 3mb. if so, then save it! if not, continue to move the sliders and trim until your gif is below the limit.
so now all your gifs are saved and ready to be uploaded! upload them like you would any other photo post. i always save as a draft first so i can make sure they upload right and so i can look them over again to be sure they are looping correctly and have no typos. only then do i close out of photoshop. tag with the appropriate edit tags (for example, dwedit for doctor who) or tag popular blogs for maximum exposure, but be aware that only the first 5 tags count and will appear in the tags. post and you are done! congrats!
#popalice007#yeahps#completeresources#chaoticresources#gif tutorial#hey look something original#my resources
47 notes
·
View notes
Text
These boys.
Matt said he wanted his tree to go first but I didn't. So, I told him to tell me in my head
Then i told him he cheated he had to say it out his mouth.
Wonder why our trees play pranks? Don't.
So Barbarian Frankenstein couldn't handle not having me or that his soulmate was dead. So he claimed his dad made his tree and he was just claiming the rest of the techs for him Because he was busy.
Matt and him got into it because barbarian Frankenstein totally slipped up.
Anyways so tonight Matt's tree got the huge Sahara job by himself
And it's the only one I've told to grow plants.
And so this little mastermind...
Played them all!!
Matthew says hes fucking embarrassed.
Tom tells me "well played" and that "his face is so red he looks like a pickle"
BF: I would never imagined she would done that. Sent me first to save Matt. But it's cause she thinks you're weak you know that.
Me: i thought he went with the tree and didn't want him to get hurt. I knew he was my soulmate.
Tom: busted!
BF: oh you know you are too fun! But thank you. I still get to be the American hero and you're the chump
Me: he's the gardner
BF: oh my bad he gardens with tender hands
Me: like your abe Lincoln one.
BF: well shit fuck I got nothing to say. Except I got my woman at my house.
Matt: I don't get into piddly shit with tots.
Me: that was the wrong time to say that.
Matt: I didn't mean you i meant him
Me: I know but it didn't look right typed.
BF: is that why you don't talk? Because you don't know how
Matt: because the truth hurts and I'm not gonna hurt you just because you're being a sore loser
BF: Uh okay I get to go first and you get to garden.
Me: let me review my typing. Please hold your tongue. See. First barbarian Frankenstein you lied to every one. Then you attacked Matt in multiple ways. So it seems you're a control freak bully, sir.
BF: So I'll go with being red faced there's nothing wrong with being embarrassed in comparison to what I've said.
Matt: there bravo. Thats a good man
Me: he's being sincere
BF: Tom don't laugh
Tom doesn't obey the control freak bully
And Barbarian Frankenstein offers hugs to every one including Matt who accepts. I don't. My back hurts.
Edit: in 2008 they had the same fight but i didn't say anything. Neither did Matt. Barbarian just kept making me madder and madder. So for 1 hour and 42 minutes it went on until Saint Luches said "we don't have to let this continue" and finally I let my tears fall.
So Saint Luches tried to talk to the Barbarian who just yelled back "I'm not!!" So Saint Luches punched his jaw and walked away.
I told matt to come on about it and he told us two to go first because it was him Barbarian wanted to fight.
So he fucking tackled him from behind and pinned him down and said all kinds shit and Matt spit in his face and Saint Luches kicked him off Matt and pulled him up but he was knocked out so i went and slapped him around a bit and told him let's go.
So then I took him to the bedroom. Stripped him down told him not to move on the bed. Said "im sorry I don't know what else to say or do. But that was so goddam sexy while I ripped off my clothes" inside he screamed i was crazy.
But when I said "cant you get up, come on let's fuck" he understood i was crazy about him
A few strokes later the bedroom door swung open and the Barbarian bellows "I thought I won!!"
Saint Luches and Roger are trying to pull him back out of the room "nope! Don't apologize!!"
Barbarian breaks free "Sabrina you don't need to hold your tits I've seen them before"
Matt tells him he can get a real good look if he got closer. Matt hit him in the head witha pillow 2 times soft. While barbarian annoyed me with his face parallel to my tits so I elbowed it down and away which was perfect for Matt to knock out punch him then throw me to the side before thr Barbarian slammed into me.
So we went on the other side of the bed on the floor to fuck.
And Saint Luches said "explain to me why h3 didn't win for Pete's sake"
"Who's Pete?" Im fucking my man but I can hold a conversation
"Just people in general"
"Because Matt actually cared about me. Thats why we sat out there so long and let him ramble on because first i got really mad but i noticed Matt didn't care. Like he thought it was funny. So then it started to hurt my heart because it was so bad. Like i didn't want him on the planet anymore and so Matt told me to chill"
"But he didn't say anything!!!" Barbarian was looking under the bed at Matt's Dick being rode hard.
"Uhm yes he did you doofus! But you didn't listen and think you were king of nothing!!"
"You!!!" He looked up over the bed at my face then back down under the bed to see sex
"Oh you wanna look at his Dick?!? You really wanna see how big it is?!?!" I got onto my feet and raised myself real high a few times nice and slow.
"YOU NEED TO QUIT!!!!"
"You need to fuck off. You can fuck yourself you know that. I can't. Neither can he"
"How much is he paying you? I got money. Come see me next!" And he threw $3,000 in the bed and walked out.
"Im keeping it but I ain't fucking you. You can fuck yourself im taking it as apology money that I'm not a hermaphrodite!!!"
So the next day... Matt always sat on this ledge in the Adobe wall outside... And the Jesse's liked to sit there too So they would share sitting or get down if they wanted to lay down.
And Barbarian went and punched Matt in the face and his head cracked open on the wall behind. But there was cactus and I wasnt going over there so tree fixed him and slapped barbarian then punched him in the stomach and used a pressure point to,make him pass out and told us to go in and lock the door.
So we did.
Then we had a nap and lunch and then matt on top sex and guess which sexual intercourse police man walked in. Barbarian. So I threw Matt off me and walked up the the barbarian who thought he had an award. Shoved him out the door, closed it as the barbarian screamed "WHAT?!?!?" and had Matt help me push the bed against the door and the dresser against the bathroom door which had a lock.
We stayed that way for 3 days after sneaking off to buy a cooler with ice and food while my 4 year old daughter camped with Dan. Declan and Sara's kids and 2 of Declan's assumed cousins at the lake.
Sometimes ya gotta do what ya gotta do.
But Matt didn't fight back. But he comforted me with body language and all as he saw my emotional face.
That was more of a man to me than someone who could use mean words to show his favor.
Sure it may look like i don't want Matt to get hurt makes me think hes weak. But i have a heart condition and i need someone who can pay attention to that by me when there's crazy going on. Not look at a tree that is symbolic of him and make the intensity worse.
This shit is scary. Its sad. It's not healthy for me.
So I need someone paying attention to what's inside me, like Matt does.
I love the Barbarian. I do. But hes not my soulmate. Pure and simple.
And Matt always forgives him Because Matt understands him. But Matt will fight him when Matt feels it's appropriate.
But sometimes his attitude hurts me too much and makes me too sad that it's hard to forgive and forget right away.
And Matt will defend me that I don't want him around.
And apparently y'all all seen a whole show the other night on TV.
0 notes