
Last Seen Blogs

shiorimia
¯\_(ツ)_/¯

championsofthewest-blog
Champion Softhewest

pajamalove10
Unbetitelt

cyrusbug
bug/electric

1truefyf
fuck your feelings
Link
0 notes
Text
How to Use Local Storage with JavaScript
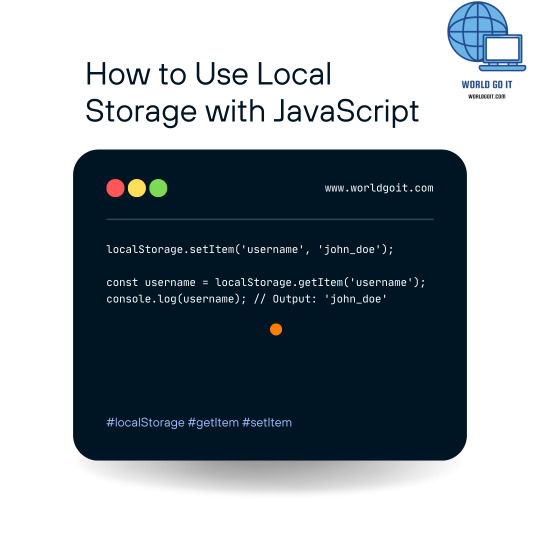
In today's digital age, web developers are constantly seeking efficient ways to enhance user experiences on websites. One essential tool in their arsenal is local storage, a feature offered by JavaScript. Local storage allows developers to store data locally on a user's browser, making it accessible even after the user closes their browser or navigates away from the webpage. In this article, we will explore how to use local storage with JavaScript, step by step.
Origin : https://worldgoit.com/archives/posts/software-development/how-to-use-local-storage-with-javascript/
Understanding Local Storage
What is Local Storage?
Local storage is a web storage solution that enables websites to store key-value pairs locally in a web browser. Unlike session storage, which is temporary and cleared when the browser is closed, local storage persists even after the browser is closed and reopened. It provides a way to store data for extended periods, making it a valuable tool for web developers.
When to Use Local Storage
Local storage is particularly useful for storing small amounts of data that are needed across different sessions or pages on a website. Common use cases include storing user preferences, login tokens, shopping cart items, and other data that should persist between visits.
Getting Started with Local Storage
Checking Browser Support
Before using local storage, it's important to ensure that the user's browser supports it. Most modern browsers support local storage, but it's a good practice to check for compatibility to provide a seamless user experience.
if (typeof(Storage) !== "undefined") { // Local storage is supported. } else { // Local storage is not supported. }
Storing Data
Storing data in local storage is straightforward. You can use the localStorage object to set key-value pairs.
localStorage.setItem('username', 'john_doe');
Retrieving Data
Retrieving data from local storage is equally simple. Use the getItem method to retrieve the stored value.
const username = localStorage.getItem('username'); console.log(username); // Output: 'john_doe'
Managing Local Storage Data
Updating Data
To update data in local storage, simply set a new value for an existing key.
localStorage.setItem('username', 'new_username');
Removing Data
To remove data from local storage, use the removeItem method.
localStorage.removeItem('username');
Clearing All Data
If you want to clear all data stored in local storage, use the clear method.
localStorage.clear();
Best Practices for Using Local Storage
Limit Data Size
Keep in mind that local storage has a size limit (usually around 5-10 MB), so avoid storing large amounts of data.
Data Security
Be cautious when storing sensitive information like passwords. Always hash or encrypt such data before storing it.
Conclusion
Local storage with JavaScript is a powerful tool that allows web developers to enhance user experiences by persistently storing data in the user's browser. It provides a convenient way to improve website functionality and user interactions. By following best practices and understanding its limitations, developers can harness the full potential of local storage.
FAQs
- Is local storage supported in all web browsers? Local storage is supported in most modern web browsers, but it's essential to check compatibility for older browsers.
- What is the key difference between local storage and session storage? Local storage persists data even after the browser is closed, while session storage is cleared when the browser session ends.
- Can I store large files in local storage? Local storage is not suitable for storing large files due to its size limitations. Consider other storage solutions for that purpose.
- Is data stored in local storage secure? Local storage is not inherently secure for sensitive data. It's recommended to encrypt or hash sensitive information before storing it.
- How can I clear all data from local storage? You can clear all data from local storage by using the localStorage.clear() method in JavaScript.
Read the full article
0 notes
Text
Apple Moves to Defuse French iPhone 12 Dispute as EU Scrutiny Steps Up

Apple has released a software update for iPhone 12 users in France to address concerns about high radiation emissions. The update reduces the maximum power output of the iPhone 12's transmitter when it is used in France.
The move comes after the French government suspended sales of the iPhone 12 earlier this week, following tests that showed it exceeded radiation exposure limits. Apple has contested the findings, saying that the iPhone 12 is certified by multiple international bodies as compliant with global standards.
However, the company has agreed to release the software update as a gesture of goodwill. The update is expected to be available in the next few days.
The French iPhone 12 dispute is part of a broader trend of increased scrutiny of big tech companies by the European Union. The EU is currently investigating Apple and other companies for potential antitrust violations.
It is unclear whether Apple will have to take similar action in other European countries. However, the company has said that it is working with regulators to ensure that its products meet all applicable safety standards.
Analysts say that the French iPhone 12 dispute is a minor setback for Apple, but it is unlikely to have a significant impact on the company's overall business. Apple is still the world's leading smartphone maker and its products are in high demand.
Read the full article
0 notes
Text
Recommend CMS for Next.js in 2023

In the digital age, having a strong online presence is essential for businesses and individuals alike. A Content Management System (CMS) is a critical tool in creating and managing a website. When it comes to combining the power of Next.js with a CMS, you have several options to consider. In this article, we will explore some of the top CMS choices for Next.js and help you make an informed decision for your web project.
Origin : https://worldgoit.com/archives/posts/software-development/web-development/recommend-cms-for-next-js-in-2023/
Introduction to Next.js
Next.js is a popular open-source JavaScript framework that allows developers to build server-rendered React applications. It provides features like server-side rendering, automatic code splitting, and efficient routing, making it an excellent choice for building high-performance web applications.
The Importance of Choosing the Right CMS
Selecting the right CMS is crucial as it can significantly impact your website's performance, flexibility, and user experience. Let's explore some of the top CMS options that work seamlessly with Next.js.
Popular CMS Options for Next.js
WordPress
WordPress is a household name in the CMS world. Known for its ease of use and extensive plugin library, WordPress is a popular choice for many website owners. With Next.js, you can harness the power of WordPress as a headless CMS, allowing you to use it as a content backend while enjoying the benefits of Next.js for frontend development.

Strapi
Strapi is a headless CMS that provides developers with complete control over their content and presentation. With Strapi and Next.js, you can build highly customizable websites and applications. Strapi's API-first approach makes it a flexible option for those who want to structure their content independently.

Contentful
Contentful is another strong contender in the headless CMS space. It offers a content infrastructure that allows you to create, manage, and distribute content to various platforms seamlessly. Integrating Contentful with Next.js can lead to blazing-fast websites with a well-structured content management system.

Advantages and Disadvantages of Each CMS
CMSAdvantagesDisadvantagesWordPress- Vast plugin ecosystem- Can be resource-intensive- User-friendly interface- Customization limitations- Strong community supportStrapi- Complete content control- Learning curve for beginners- Highly customizable- Ideal for developersContentful- Scalable and flexible- Pricing can be a concern for large projects- Content distribution to multiple platforms- Robust API
WordPress: A Familiar Choice
Advantages:
- Vast plugin ecosystem
- User-friendly interface
- Community support
Disadvantages:
- Can be resource-intensive
- Customization limitations
Strapi: A Headless CMS Solution
Advantages:
- Complete content control
- Highly customizable
- Ideal for developers
Disadvantages:
- Learning curve for beginners
Contentful: API-First Approach
Advantages:
- Scalable and flexible
- Content distribution to multiple platforms
- Robust API
Disadvantages:
- Pricing can be a concern for large projects
How to Integrate Your Chosen CMS with Next.js
Integrating your CMS with Next.js requires some technical expertise. You'll need to set up APIs, routes, and data fetching to ensure smooth communication between your CMS and frontend. Detailed documentation and community forums are valuable resources during this process.
Factors to Consider When Making Your Decision
When deciding on a CMS for your Next.js project, consider the following factors:
Scalability
Ensure your chosen CMS can scale with your website's growth. The ability to handle increased traffic and content is crucial.
Customization
Evaluate how easily you can customize the CMS to meet your specific needs. Customization options can vary significantly between CMS platforms.
SEO-Friendliness
Search engine optimization (SEO) is essential for online visibility. Choose a CMS that allows you to optimize your content effectively.
Community and Support
A strong community and reliable support are essential for troubleshooting issues and staying updated with the latest features and security patches.
Case Studies: Successful Next.js Websites with CMS Integration
To inspire your decision-making process, let's look at some real-world examples of websites that have successfully integrated Next.js with various CMS platforms.
Best Practices for Content Management and SEO
When managing your content with a CMS, follow best practices for SEO. This includes optimizing images, using descriptive meta tags, and creating high-quality, engaging content.
Conclusion
Choosing the right CMS for your Next.js website is a decision that will impact your online presence significantly. Whether you opt for the familiarity of WordPress, the flexibility of Strapi, or the scalability of Contentful, ensure that your choice aligns with your project's goals and requirements. With the right CMS and Next.js, you can create a high-performing website that engages your audience effectively.
Frequently Asked Questions (FAQs)
- Which CMS is the best choice for an e-commerce website built with Next.js?
- The best CMS for an e-commerce site depends on your specific needs. WooCommerce for WordPress, or headless CMS options like Strapi or Contentful, can be suitable choices.
- Is it possible to migrate content from one CMS to another when using Next.js?
- Yes, it's possible to migrate content between CMS platforms. However, the process may vary depending on the CMS systems involved.
- Are there any free CMS options that work well with Next.js?
- Yes, there are free CMS options available, such as WordPress and Strapi. However, keep in mind that additional costs may be associated with hosting and customization.
- How can I improve the performance of my Next.js website when using a CMS?
- To enhance performance, optimize images, use a content delivery network (CDN), and leverage caching mechanisms. Additionally, ensure that your CMS is well-optimized.
- What are the security considerations when integrating a CMS with Next.js?
- Security is crucial. Regularly update both your CMS and Next.js, use secure APIs, and follow best practices for web security to protect your website from threats.
Now that you have a better understanding of the CMS options available for Next.js, you can make an informed decision based on your project's unique requirements.
Read the full article
0 notes
Text
[React,Next.js] - How to solve "window is not defined" errors
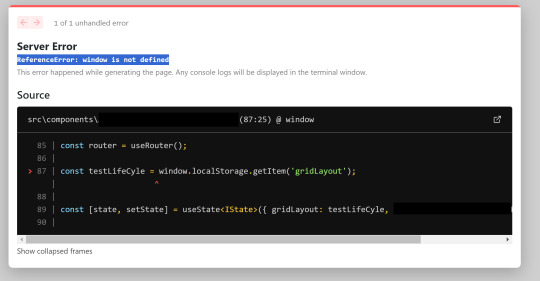
In the ever-evolving world of web development, React.js has established itself as a go-to library for building dynamic and responsive user interfaces. When coupled with TypeScript, React becomes even more powerful, providing type safety and improved code maintainability. However, like any technology stack, React.js with TypeScript can present its own set of challenges. One common issue that developers often encounter is the "window is not defined" error. In this article, we'll delve into the causes of this error and explore effective solutions with code examples.
1. What is the "window is not defined" Error?
The "window is not defined" error is a runtime error that occurs when attempting to access the window object in a context where it is not defined. This error commonly surfaces when working with server-side rendering in React.js applications, as well as in scenarios where the code is executed outside a web browser environment.
2. Common Causes of the Error
To effectively resolve the "window is not defined" error, it's crucial to understand its underlying causes. Some common reasons for encountering this error include:
- Server-Side Rendering (SSR): React applications using SSR may face this issue because the window object is not available on the server side.
- Importing Browser-Specific Code: When importing libraries or modules that depend on the window object in a server-side context, the error can occur.
- Conditional Rendering: In some cases, rendering components conditionally based on the availability of the window object can lead to this error.
3. Understanding the Window Object
Before diving into solutions, it's essential to understand the window object. In a web browser environment, window represents the global object and provides access to various properties and methods related to the browser window. However, when working with React.js on the server side, this object is not defined, leading to the error.
4. Solving the Issue: Using Conditional Rendering
One effective way to resolve the "window is not defined" error is by using conditional rendering. You can conditionally render components that depend on the window object only in the client-side context, ensuring that they are not executed during server-side rendering.
Here's an example of how to implement conditional rendering:
Code Example 1: Conditional Rendering
import React from 'react';
function MyComponent() {
// Check if the window object is defined (client-side)
if (typeof window !== 'undefined') {
// Access window-specific functionality here
return Rendered on the client side;
} else {
// Handle server-side rendering or non-browser environments
return Rendered on the server side or in a non-browser environment;
}
}
export default MyComponent;
Read the full article
0 notes
Text
Elon Musk Says Twitter Deal Is 'Temporarily on Hold'

Elon Musk, the world's richest man, said on Friday that his $44 billion deal to buy Twitter is "temporarily on hold" while he awaits more information about the number of fake accounts on the platform.
Musk has previously expressed concerns about the number of bots on Twitter, and he has said that he wants to make sure that the platform is not being used to manipulate public opinion. In a tweet, Musk said that he is "still committed to the acquisition" but that he needs more information to "make an independent assessment of the prevalence of fake or spam accounts on the platform."
Twitter has said that it estimates that false or spam accounts represent fewer than 5% of its daily active users. However, Musk has said that he believes the number is much higher.
It is unclear what impact Musk's announcement will have on the Twitter deal. The deal is currently subject to regulatory approval, and it is possible that Musk could walk away from the deal if he is not satisfied with the information that Twitter provides.
The news of the Twitter deal being put on hold sent Twitter's stock price down by more than 10% in after-hours trading.
The deal between Musk and Twitter was announced in April, and it was expected to close later this year. However, the deal has been met with some resistance from Twitter's shareholders, who have raised concerns about Musk's ability to manage the company.
It remains to be seen whether Musk will be able to get the information he needs from Twitter and whether the deal will be able to close. However, his announcement on Friday has certainly cast a cloud over the future of the social media platform.
Link : https://worldgoit.com/archives/posts/news/elon-musk-says-twitter-deal-is-temporarily-on-hold/
Read the full article
0 notes
Text
Javascript console.log : 5 Q&A
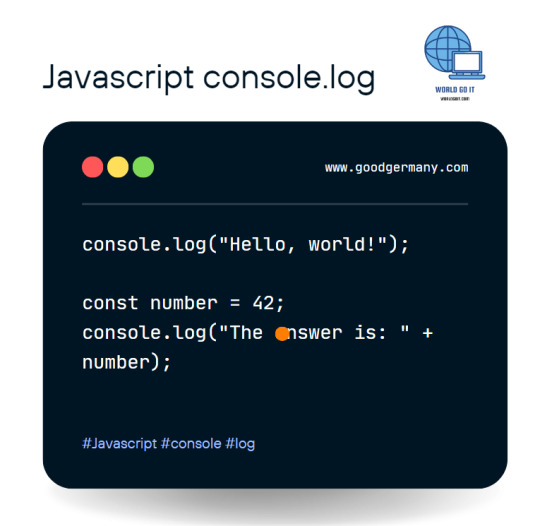
In the world of web development, JavaScript plays a pivotal role in making web pages interactive and dynamic. One of the most fundamental tools in a JavaScript developer's arsenal is the console.log() function. In this article, we will delve into the depths of console.log() and explore its various aspects, use cases, and how it can be a developer's best friend.
Link : https://worldgoit.com/archives/posts/software-development/javascript-console-log-5-qa/
1. Introduction to console.log()
The console.log() function is a built-in JavaScript method that allows developers to log messages, variables, and other data to the browser's console. It is a versatile tool that aids in debugging, monitoring code execution, and providing valuable insights during development.
2. Basic Usage
To use console.log(), you simply call it with the message or variable you want to log. For example:
console.log("Hello, world!");
3. Logging Variables
Developers often use console.log() to inspect the values of variables during runtime. This is particularly useful when debugging code. Here's how you can log variables:
const number = 42;
console.log("The answer is: " + number);
4. Debugging with console.log()
When something goes wrong in your JavaScript code, console.log() becomes your trusty companion. You can strategically place log statements in your code to track the flow and values of variables, helping you identify and fix issues quickly.
5. Custom Messages
console.log() allows you to add custom messages to your logs, making it easier to understand the context. For instance:
const username = "JohnDoe";
console.log("User logged in:", username);
6. Styling Console Output
Did you know that you can style your console output? With CSS-like styling, you can make your logs stand out and draw attention to important information.
7. Console Timing
console.time() and console.timeEnd() are methods used to measure the time it takes for a specific portion of your code to execute. This is invaluable when optimizing your JavaScript for performance.
8. Console Grouping
When dealing with complex objects or multiple logs related to a particular task, you can group them together using console.group() and console.groupEnd(), creating a cleaner and more organized console output.
9. Console Warnings and Errors
In addition to regular logs, you can generate warnings and errors using console.warn() and console.error(). These are particularly helpful when dealing with potential issues in your code.
10. Using console.log() with Objects
console.log() can handle objects and arrays as well. It provides a structured view of their properties and values, aiding in the inspection of complex data structures.
11. Performance Optimization
Learn how to use console.log() judiciously in production code to avoid unnecessary overhead. Discover best practices for logging in different environments.
12. Browser Compatibility
Not all browsers handle console.log() the same way. Understand the nuances and ensure your logs work seamlessly across various browsers.
13. Javascript Console API
console.log()Outputs a message to the console.console.info()Outputs an informational message to the console.console.warn()Outputs a warning message to the console.console.error()Outputs an error message to the console.console.clear()Clears the console, removing all previous messages.console.group()Groups subsequent console messages together, creating a collapsible group in the console.console.groupEnd()Ends the current group created with console.group().console.table()Displays tabular data as a table. Useful for arrays of objects, providing a structured view of the data.console.count()Counts the number of times console.count() has been called with the same label.console.time()Starts a timer that can be used to measure the duration of an operation.console.timeEnd()Ends a timer started with console.time() and logs the elapsed time.console.trace()Outputs a stack trace of the current call stack, helpful for debugging and understanding the flow of execution.console.assert()Tests if a specified expression is true. If not, it logs an error message.console.dir()Displays an interactive list of the properties of a specified JavaScript object. Useful for exploring complex objects.console.profile()Starts recording a performance profile in the console.console.profileEnd()Stops recording a performance profile and displays the results in the console.javascript console api
14. Conclusion
In conclusion, console.log() is an indispensable tool for JavaScript developers. It simplifies debugging, improves code quality, and enhances the overall development experience. Embrace it, experiment with its features, and let it be your guiding light in the world of JavaScript development.
FAQs
1. How do I clear the console in JavaScript?
To clear the console, you can use the console.clear() method. Simply call it, and the console will be empty.
2. Can I log objects and arrays with console.log()?
Yes, console.log() can handle objects and arrays. It provides a structured view of their contents, making it easier to inspect complex data structures.
3. What is the difference between console.log(), console.warn(), and console.error()?
console.log() is used for regular logs, console.warn() generates warnings, and console.error() is for error messages. They differ in how they are displayed in the console.
4. Is it safe to leave console.log() statements in production code?
It's not recommended to leave console.log() statements in production code, as they can impact performance and may expose sensitive information. Consider using a logging library for production-ready logs.
5. How can I format the output of console.log()?
You can format the output of console.log() by using string interpolation and concatenation to include variable values and custom messages.
Console.log() is not just a debugging tool; it's a developer's window into the inner workings of JavaScript. By mastering its capabilities, you can become a more efficient and effective developer. So, embrace the power of console.log() and elevate your JavaScript skills.
Read the full article
0 notes
Text
Next.js vs. React: Choosing the Right Framework for Your Web Development Project

In the fast-paced world of web development, choosing the right framework can make or break your project's success. Two popular options that often find themselves in the spotlight are Next.js and React. Both are JavaScript-based, but they serve different purposes and come with their own set of features and advantages. In this comprehensive guide, we'll delve into the differences between Next.js and React to help you make an informed decision for your next web development endeavor.
Table of Contents
Link : https://worldgoit.com/archives/posts/software-development/next-js-vs-react-choosing-the-right-framework-for-your-web-development-project/
- Introduction
- Understanding React
- What is React?
- Key Features of React
- Exploring Next.js
- What is Next.js?
- Key Features of Next.js
- Comparing Performance
- Server-Side Rendering (SSR)
- React's Approach
- Next.js SSR
- Routing
- Data Fetching
- SEO Friendliness
- Developer Experience
- Community and Ecosystem
- When to Choose React
- When to Choose Next.js
- Case Studies
- Conclusion
- FAQs
1. Introduction
When embarking on a web development project, the choice between Next.js and React is a critical one. React is a JavaScript library primarily used for building user interfaces (UIs), while Next.js is a framework built on top of React, providing additional capabilities like server-side rendering and routing. Let's explore both in detail.
FeatureNext.jsReactTypeFramework built on ReactJavaScript LibraryServer-Side RenderingSupported (SSR)Not supported (Client-Side Rendering)RoutingBuilt-in routingRequires external routing librariesData FetchingServer-side data fetching possibleClient-side data fetchingSEO FriendlinessSEO-friendly due to SSR and SSGMay require additional SEO effortsPerformanceEnhanced performance with SSR and SSGGood performance in client-side renderingDeveloper ExperienceStreamlined development with built-in featuresFlexible development with extensive ecosystemLearning CurveSlightly steeper due to added featuresEasier for beginnersNext.js vs. React
2. Understanding React
What is React?
React, developed and maintained by Facebook, is a popular open-source JavaScript library for building user interfaces. It allows developers to create reusable UI components and manage the state of an application efficiently.
Key Features of React
- Component-Based: React encourages the creation of modular UI components, making code more organized and maintainable.
- Virtual DOM: React uses a virtual representation of the DOM, optimizing updates and improving performance.
- Large Community: A vast community of developers and libraries support React, offering solutions to various challenges.
3. Exploring Next.js
What is Next.js?
Next.js, on the other hand, is a framework for building React applications. It adds essential features like server-side rendering (SSR), automatic code splitting, and routing to React projects, streamlining the development process.
Key Features of Next.js
- Server-Side Rendering (SSR): Next.js pre-renders pages on the server, enhancing SEO and initial page load times.
- Routing: Next.js provides built-in routing capabilities, simplifying navigation within your application.
- Automatic Code Splitting: Code is split into smaller bundles, reducing initial load times.
- Static Site Generation (SSG): Next.js can generate static sites for even better performance.
4. Comparing Performance
Performance is a crucial factor when choosing a framework. React performs well in client-side rendering (CSR), but Next.js takes it a step further with SSR and SSG capabilities.
5. Server-Side Rendering (SSR)
React's Approach
React primarily focuses on CSR, where the initial rendering is done on the client side. While this is fast, it may affect SEO and user experience during the initial page load.
Next.js SSR
Next.js excels in SSR. It renders pages on the server, delivering a fully rendered HTML page to the client, which significantly improves SEO and load times.
6. Routing
React requires additional routing libraries like React Router for navigation, while Next.js provides built-in routing, simplifying the development process.
7. Data Fetching
Both React and Next.js support data fetching, but Next.js offers server-side data fetching, which is beneficial for SEO and initial load times.
8. SEO Friendliness
With its SSR and SSG capabilities, Next.js is inherently more SEO-friendly than React, as search engines can easily crawl and index the content.
9. Developer Experience
React offers a fantastic developer experience, but Next.js enhances it further with built-in features and a streamlined development process.
10. Community and Ecosystem
React boasts a vast community and a plethora of libraries, while Next.js, being a framework built on React, inherits these benefits.
11. When to Choose React
React is an excellent choice when:
- You need a lightweight solution for building user interfaces.
- SEO is not a primary concern.
- You prefer full control over routing and data fetching.
12. When to Choose Next.js
Next.js shines when:
- You require server-side rendering for SEO purposes.
- Performance and initial load times are critical.
- You want a simplified routing and development experience.
13. Case Studies
Explore real-world case studies of projects built with React and Next.js to see how each framework performs in different scenarios.
14. Conclusion
Choosing between Next.js and React depends on your project's specific requirements. React is excellent for building user interfaces, while Next.js adds powerful features like SSR and SSG for enhanced performance and SEO. Consider your project's needs and priorities to make the right choice.
15. FAQs
Q1: Is Next.js a replacement for React? No, Next.js is not a replacement for React. It is a framework built on top of React, adding features like server-side rendering and routing.
Q2: Can I migrate a React project to Next.js? Yes, you can migrate a React project to Next.js by incorporating Next.js features and adjusting the project structure.
Q3: Does Next.js require a server for SSR? Yes, Next.js requires a server to perform server-side rendering, but it offers options for deployment, including serverless deployments.
Q4: Is SEO crucial for all web projects? SEO is essential for most web projects, as it impacts your website's visibility in search engine results.
Q5: Which framework has a steeper learning curve: React or Next.js? React is generally easier to learn initially, while Next.js adds complexity with its server-side rendering and routing features.
Read the full article
0 notes
Text
Bard can now connect to your Google apps and services

Google Bard Extensions: AI Assistant Gets More Powerful with Integration with Google Apps
Google Bard, the company's artificial intelligence chatbot, is getting a major update with the launch of Bard Extensions. This new feature allows Bard to connect to a user's Gmail, Google Docs, and Google Drive accounts, giving it access to their personal data and emails.
With Bard Extensions, users can ask Bard questions about their own data and get personalized responses. For example, users can ask Bard to search their Gmail for all emails from a specific sender, or to summarize their Google Drive documents. Bard can also be used to generate new content based on a user's data, such as writing a blog post based on their Gmail inbox or creating a presentation based on their Google Docs documents.
Bard Extensions is still under development, but it has the potential to make Bard a much more powerful tool for users. By integrating with Google's core apps and services, Bard can now provide users with more personalized and helpful assistance.
Here are some examples of how Bard Extensions can be used:
A salesperson can ask Bard to generate a list of potential leads from their Gmail inbox.
A student can ask Bard to summarize their class notes from Google Drive.
A writer can ask Bard to research a topic and generate a draft of a blog post.
A customer service representative can use Bard to answer customer questions about their accounts and orders.
Bard Extensions is currently only available in English and for personal Google accounts. Google says that it is working to make Bard Extensions available to business accounts and in more languages in the future.
Overall, Bard Extensions is a significant update that makes Bard a more powerful and useful tool for users. By integrating with Google's core apps and services, Bard can now provide users with more personalized and helpful assistance.
Link : https://worldgoit.com/archives/posts/data-science-and-analytics/bard-can-now-connect-to-your-google-apps-and-services/
https://youtu.be/lr87yrvK86w?si=MopFn1F8OYdLHGFi
Read the full article
0 notes
Text
Create React App and TypeScript: How-To

Introduction
Linkdddddfsdf
In the fast-evolving landscape of web development, staying up-to-date with the latest tools and technologies is crucial. One such advancement that has gained immense popularity is Create-React App with TypeScript. In this article, we'll explore how this powerful combination can streamline your web app development process, making it more efficient and maintainable.
What is Create-React App with TypeScript?
Before delving into the benefits and practical aspects, let's start with the basics. Create-React App (CRA) is a tool that helps you set up a new React project with zero configuration. It simplifies the setup process and provides a solid foundation for building React applications.
Getting Started with Create-React App TypeScript
Installing Create-React App with TypeScript
To get started with Create-React App (CRA) using TypeScript, you'll need to follow a few straightforward steps. This installation process ensures you have all the necessary tools to begin building modern web applications.
Prerequisites
Before installing Create-React App with TypeScript, make sure you have the following prerequisites in place:
- Node.js: Ensure you have Node.js installed on your machine. You can download it from the official website: Node.js Downloads.
- npm (Node Package Manager): npm is usually included with Node.js, so after installing Node.js, you should have npm as well. You can verify this by running npm -v in your terminal.
Step 1: Create a New React App
To start, open your terminal and navigate to the directory where you want to create your new React app. Once you're in the desired directory, run the following command:
npx create-react-app my-react-app --template typescript
Replace my-react-app with the name you want to give to your application. This command creates a new React app with TypeScript configuration using Create-React App.
Step 2: Navigate to Your App's Directory
After the installation process is complete, navigate to your app's directory using the cd command. For example:
cd my-react-app
Step 3: Start the Development Server
Now that you're inside your app's directory, you can start the development server by running the following command:
npm start
This command will compile your TypeScript code and launch a development server. Your Create-React App with TypeScript is now up and running, and you can access it in your web browser at http://localhost:3000.
Step 4: Start Coding
You're all set! You can now start building your modern web application using React and TypeScript. You'll find your project's source code in the src directory, and you can make changes to the code using your favorite code editor.
Remember to refer to the official documentation for Create-React App and TypeScript for more detailed information and advanced configurations.
That's it! You've successfully installed Create-React App with TypeScript and are ready to embark on your web development journey. Enjoy coding!
Creating Your First React Application
Once you have Create-React App TypeScript installed, it's time to create your first React application. We'll guide you through the process and explain the structure of a basic CRA project.
Advantages of Using Create-React App with TypeScript
Type Safety and Code Predictability
TypeScript, a statically typed superset of JavaScript, enhances code quality by providing type safety. We'll show you how TypeScript catches errors at compile time, reducing bugs and improving code predictability.
Improved Developer Experience
Developers love efficiency. Discover how Create-React App and TypeScript work together to offer a superior developer experience with features like hot reloading, a built-in development server, and more.
Scalability and Maintainability
As your project grows, so does the complexity. Learn how TypeScript helps in scaling your React application while keeping it maintainable through the use of interfaces and strong typing.
Enhanced Tooling and IDE Support
Effective tooling can significantly boost your productivity. We'll highlight the excellent tooling and IDE support available for Create-React App with TypeScript, making your coding experience smoother.
Real-World Applications
Building a To-Do List Application
Let's put theory into practice. We'll guide you through building a simple To-Do List application using Create-React App with TypeScript. You'll see firsthand how easy it is to get started with this powerful combination.
Integrating Third-Party Libraries
In the world of web development, you often need to leverage third-party libraries. We'll demonstrate how to seamlessly integrate popular libraries into your Create-React App TypeScript project.
Challenges and Best Practices
Handling API Requests
When dealing with APIs, proper data handling is crucial. We'll discuss best practices and common challenges when making API requests in your React application.
Testing and Debugging
Quality assurance is essential for any web app. Learn how to effectively test and debug your Create-React App TypeScript project to ensure a robust final product.
Conclusion
In conclusion, Create-React App with TypeScript is a game-changer in the world of web development. It offers an efficient and maintainable way to build modern web applications. By harnessing the power of TypeScript and the simplicity of Create-React App, you can create robust and scalable projects with ease.
If you're ready to embark on your journey of web development excellence, give Create-React App with TypeScript a try. Your future self will thank you for the decision.
FAQs
- Is TypeScript difficult to learn for beginners?
- TypeScript may seem intimidating at first, but it offers great benefits. Learning resources and community support are abundant, making it accessible for beginners.
- Can I use Create-React App TypeScript for large-scale projects?
- Absolutely! Create-React App TypeScript is designed to scale with your projects, ensuring maintainability and efficiency even for complex applications.
- What are the key advantages of using TypeScript in React development?
- TypeScript provides type safety, improved developer tooling, and enhanced scalability, all of which contribute to a better development experience.
- Are there any performance considerations when using Create-React App TypeScript?
- While TypeScript adds type checking, the impact on runtime performance is minimal, and the benefits in terms of code quality outweigh any minor overhead.
- Where can I find more resources to learn about Create-React App with TypeScript?
- You can find tutorials, documentation, and community discussions online to help you master this powerful combination for web development.
Read the full article
0 notes
Text
React Slider Tutorial

1. Introduction
React Slider is an extremely useful tool for web design. It allows visual representation of images or content on a web page, providing users with an enhanced user experience. React Slider is commonly used in mobile apps and desktop apps, making it popular among web developers.

2. Benefits of React Slider
There are several advantages to using React Slider. Here are some key benefits:
2.1 Visual Effects
React Slider allows the application of visual effects to web pages. By presenting images or content in a slide format, users are more engaged and can better comprehend the information.
2.2 Enhanced User Experience
React Slider enhances the user experience by enabling users to easily navigate and interact with content. Animation effects and touch gestures can further enhance user interaction.
2.3 Responsive Design Support
React Slider supports responsive design. It can automatically adjust the slider for various screen sizes, ensuring optimal performance even on mobile devices. This provides a good user experience for mobile users.
3. Installation of React Slider
To use React Slider, it needs to be installed first. Here is how you can install the React Slider library:
npm install react-slider
By using the above command, you can install the React Slider library. Once the installation is complete, you can import it into your project and start using it.
4. Using React Slider Components
To use React Slider, you need to create and configure the components. Here is a simple example:
import React from 'react';
import Slider from 'react-slider';
class MySlider extends React.Component {
render() {
return (
);
}
}
export default MySlider;
In the above example, the Slider component is used to create the slider, and properties such as min, max, and defaultValue are set. By configuring the component in this way, you can display the React Slider on your web page.
5. Customizing React Slider
React Slider can be customized in various ways. You can adjust the colors, styles, and animation effects to create the desired appearance and behavior. For detailed customization options, refer to the React Slider documentation.
6. React Slider and SEO
While React Slider enhances the visual effects on web pages, it can also have an impact on SEO. Search engines typically analyze the content of web pages to determine rankings, but dynamically loaded content within sliders may be challenging for search engines to recognize.
Therefore, when using React Slider, attention should be given to SEO. Utilize appropriate meta tags, URL structures, and alternative text to ensure that search engines can recognize the content within the slider.
7. Future Outlook of React Slider
React Slider continues to evolve and is expected to provide more features and flexibility. It is anticipated that React Slider will offer a wider range of options and customization capabilities to align with the changing trends in web design.
React-slider npm
https://www.npmjs.com/package/react-slider
8. Conclusion
React Slider is a modern tool used in web design to enhance visual effects and improve user experience. Once you understand the installation process and how to use the components, you can implement unique and appealing designs on your web pages. Pay attention to SEO and customize the slider appropriately to enhance the overall quality of your web page.
9. Frequently Asked Questions (FAQs)
Q1. What types of projects are suitable for React Slider?
React Slider is suitable for various types of projects. It can be used in portfolio websites, event introduction pages, product promotions, and more, where visual content needs to be effectively conveyed.
Q2. What is the performance of React Slider?
React Slider is optimized and generally provides excellent performance. However, when using a large number of slides or complex animations, performance may be affected, so caution is advised.
Q3. Can React Slider handle user input?
Yes, React Slider can handle user input. Users can interact with the slider by moving or clicking, enabling interactive experiences.
Q4. Can React Slider be used on multilingual websites?
Yes, React Slider can be used on multilingual websites. It supports the display of content in various languages, allowing for language-specific content to be displayed within the slider.
Q5. What types of data can be displayed with React Slider?
React Slider can display various types of data, including numbers, images, and text. By structuring the data appropriately, you can present different types of content within the slider.
Read the full article
0 notes
Text
React Intersection Observer: Enhancing Web Development with Scroll-Based Interactions

origin: https://worldgoit.com/archives/posts/software-development/react-intersection-observer-enhancing-web-development-with-scroll-based-interactions/
Table of Contents
Introduction
What is the Intersection Observer API?
How does the Intersection Observer API work?
Implementing the Intersection Observer API in React
Benefits of using React Intersection Observer
Examples of scroll-based interactions
Best practices for using React Intersection Observer
Conclusion
FAQs
1. Introduction
In the ever-evolving world of web development, creating engaging and interactive user experiences is essential. One technique that has gained popularity is scroll-based interactions, where elements on a webpage respond or animate based on the user's scrolling behavior. To achieve this functionality efficiently in a React application, developers often turn to the React Intersection Observer library. This article will explore the ins and outs of the React Intersection Observer and how it can enhance web development.
2. What is the Intersection Observer API?
The Intersection Observer API is a browser API that allows developers to efficiently track and handle changes in the intersection of an element with its parent or the viewport. It provides a way to detect when an element becomes visible or hidden as the user scrolls the page. The Intersection Observer API is particularly useful for implementing scroll-based interactions, lazy loading of images, infinite scrolling, and other similar behaviors.
3. How does the Intersection Observer API work?
The Intersection Observer API works by creating an observer object that watches specified target elements. When the target element intersects with the viewport or its parent element, a callback function is triggered. This callback function can then be used to perform specific actions, such as adding CSS classes, animating elements, or loading additional content.
The Intersection Observer API is designed to be performant and efficient. It uses a separate thread to observe elements and provides optimized methods for tracking intersections. This allows developers to create scroll-based interactions without impacting the overall performance and user experience of the website or application.
4. Implementing the Intersection Observer API in React
To leverage the power of the Intersection Observer API in a React application, developers often utilize the React Intersection Observer library. This library provides React components and hooks that simplify the integration of scroll-based interactions into React projects.
To get started, you can install the React Intersection Observer library using npm or yarn:
npm install react-intersection-observer
# or
yarn add react-intersection-observer
Once installed, you can import the necessary components or hooks from the library and start using them in your React components. The library offers a range of options and configurations to customize the behavior of the Intersection Observer in your application.
5. Benefits of using React Intersection Observer
Using React Intersection Observer in your web development projects offers several benefits:
Improved performance: The Intersection Observer API is designed to be highly efficient, ensuring smooth scrolling and interactions without causing performance bottlenecks.
Simplified implementation: React Intersection Observer provides intuitive components and hooks that abstract away the complexities of working directly with the Intersection Observer API. This makes it easier to implement scroll-based interactions in React applications.
Browser compatibility: The React Intersection Observer library includes polyfills to ensure compatibility with older browsers that may not support the Intersection Observer API natively.
Flexibility and customization: The library offers various configuration options, allowing developers to fine-tune the behavior of the Intersection Observer based on their specific requirements.
6. Examples of scroll-based interactions
Scroll-based interactions can significantly enhance user engagement and create memorable experiences on websites. Here are a few examples of what can be achieved using React Intersection Observer:
Example 1: Animated elements
With React Intersection Observer, you can animate elements as they come into view. For instance, you can fade in text or images, slide in sections, or apply creative animations to catch the user's attention.
Example 2: Infinite scrolling
Implementing infinite scrolling becomes straightforward with React Intersection Observer. As the user scrolls to the bottom of a page, you can dynamically load more content, providing a seamless browsing experience.
Example 3: Lazy loading of images
Loading images only when they enter the viewport is a common optimization technique. React Intersection Observer simplifies this process, ensuring that images are loaded precisely when they are needed, reducing unnecessary network requests.
7. Best practices for using React Intersection Observer
To make the most out of React Intersection Observer, consider the following best practices:
Fine-tune threshold values: Experiment with different threshold values to trigger the intersection callback at the desired scroll positions.
Debounce expensive operations: If the intersection callback involves expensive operations, debounce them to avoid performance issues caused by rapid scroll events.
Optimize for mobile: Take into account the smaller screen sizes and touch interactions when designing scroll-based interactions for mobile devices.
Test across browsers and devices: Ensure that your scroll-based interactions work smoothly across different browsers and devices to provide a consistent user experience.
8. Conclusion
React Intersection Observer opens up a world of possibilities for creating engaging scroll-based interactions in React applications. By leveraging the power of the Intersection Observer API, developers can enhance user experiences, improve performance, and create visually stunning effects. With the React Intersection Observer library, implementing these interactions becomes more accessible and intuitive, allowing developers to focus on crafting unique and interactive websites.
FAQs
Q1: Can I use React Intersection Observer with other JavaScript frameworks?
Yes, React Intersection Observer can be used alongside other JavaScript frameworks or libraries. It provides React components and hooks that can be integrated seamlessly into different project setups.
Q2: Is the Intersection Observer API supported in all browsers?
The Intersection Observer API is supported in most modern browsers. However, for older browsers, the React Intersection Observer library includes polyfills to ensure compatibility.
Q3: Are there any performance considerations when using React Intersection Observer?
React Intersection Observer is designed to be efficient and optimized for performance. However, it's essential to fine-tune your scroll-based interactions and avoid costly operations within the intersection callback to maintain smooth performance.
Q4: Can I customize the appearance and behavior of elements with React Intersection Observer?
Yes, React Intersection Observer allows you to customize the appearance and behavior of elements as they intersect with the viewport or parent element. You can apply CSS classes, animations, or any other desired effect.
Q5: Is React Intersection Observer suitable for mobile web development?
Absolutely! React Intersection Observer is well-suited for mobile web development. However, when designing scroll-based interactions for mobile devices, it's crucial to consider smaller screen sizes and touch interactions for optimal user experiences.
Read the full article
0 notes
Text
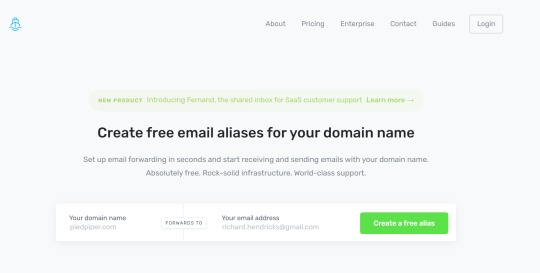
Free Domain Email improvmx: Free Mail Forwarding Service

Business communication is very important in the online business environment. Email is one of the key tools to keep your business running smoothly and to enhance communication with your customers. However, the address or domain from which you send your emails represents the professionalism and credibility of your business.
Let's see how you can improve your business communications with "improvmx", a free domain email service.
Importance of free domain email
Free domain email means that you create your business email with a free domain. For example, "[email protected]" instead "[email protected]". This gives you the following benefits:
1. Professionalism and reliability
With free domain email, you can highlight the professionalism of your business. Customers and partners trust email with official domains more, increasing the credibility of your business.
2. Branding opportunities
Free domain email helps brand your company. The domain name is associated with the company name, which further emphasizes the credibility of the business to customers.
3. Available for free
You can set up your domain email for free with improvmx. This gives you the opportunity to use a professional email address while saving money.
How to set up Free domain email
Setting up your free domain email is simple. Below is a step-by-step description of how to set it up.
Step 1: Access the improvmx website
First,improvmx Access to the website.
Step 2: Register domain and email to forward (forward)
After accessing the website, enter the registered domain address on the left and the email address to be forwarded when you receive the mail on the right.
improvmx
Step 3: Email Verification and Alias Creation
If you have registered, an improvmx verification email will be sent to your email. After clicking to authenticate, if necessary, an alias (example:[email protected]) please create

Step 3: Check MX and TXT and Copy Paste to DNS

MX and TXT
For MX, depending on the DNS provider, you may need to put 10 or 20 in front, or you may need to subtract it. In my case, I used AWS, but I had to put 10 and 20 in front.

Record
What is MX and TXT Record?
MX and TXT records are important record types used in Domain Name Service (DNS) setups.
- Mail Exchanger (MX) records: For example, the MX record settings for the domain "example.com" might be:
- Priority 10: mailserver1.example.com
- Priority 20: mailserver2.example.com
With this set up, email will first be tried to "mailserver1.example.com", and if there is a problem with that server, it will be sent to "mailserver2.example.com".
- MX records are responsible for which servers receive email from that domain when sending email. This means that when you send an email, it is sent to the server specified in your MX record. Each MX record has a priority and hostname. If you have multiple MX records, the record with the highest priority (lower number) will process the email first, then the record will move on. It is used as a backup mail server in case the server goes down or there is a problem while sending emails.
- TXT (Text) record: For example, a TXT record for SPF settings might look like this: With this setup, sending email from domain "example.com" must follow the SPF rules of "spf.example.com". indicates that
- "v=spf1 include:spf.example.com -all"
- TXT records are used to store textual information related to a domain. It is primarily used to contain email authentication mechanisms such as Sender Policy Framework (SPF) and DomainKeys Identified Mail (DKIM) settings, authentication information about domain owners, domain-related metadata, and more. It can be used to verify that the server sending the email is the valid owner of the domain, or to prevent spam.
MX and TXT records play an important role in your domain's email handling and security. Properly setting up these records can improve email sending and receiving and security.
Step 5: Complete the setup
Once everything is set up, your new free domain email address is ready to go. After completing the setup, it will take approximately some time.
https://youtu.be/DXe6tSg78Jw?si=v_xAWBRK7DIarn37
Grow your business with advantage
By using free domain email, businesses can enhance their professionalism and credibility and improve communication with their customers. It also helps with branding and provides an opportunity to reduce costs. It is very important to actively utilize free domain email to grow your business.
conclusion
Improve your business communication with improvmx, a free domain email service. Professionalism, reliability, branding, cost savings, and more to help your business grow. Build success by actively leveraging free domain email in your business environment.
Frequently Asked Questions (FAQs)
1. How do I create an improvmx account?
To create an improvmx account, simply go to the improvmx website, enter the required information and follow the sign-up process.
2. How to register a domain?
After creating an account, all you have to do is find and select the option to register a domain on the improvmx website.
3. Does it cost anything to set up a free domain email?
You can set up your domain email for free with improvmx, and there are no charges.
4. How do I create a new email address?
After registering your domain, you can create a new address by selecting the Create email address option in improvmx.
5. How does free domain email support business growth?
Free domain email enhances your business' professionalism and credibility, helps with branding, and helps your business grow by improving communication with customers while reducing costs.
Read the full article
0 notes
Text
Next.js Router asPath, query, and route: The Difference

Next.js is a popular framework that allows developers to build modern and efficient web applications quickly using React. The routing system in Next.js enables navigation between different pages within the application. asPath, query, and route are important concepts in the Next.js router. In this article, we will delve into their differences and understand their respective purposes.
Table of Contents
Overview of Next.js Router
Introduction to asPath
Introduction to query
Introduction to route
Differences between asPath and query
Differences between asPath and route
Differences between query and route
Use Cases of asPath, query, and route
Considerations
Conclusion
Frequently Asked Questions (FAQs)
1. Overview of Next.js Router
The routing system in Next.js facilitates page navigation within Next.js applications. The router renders the corresponding page based on the URL path and allows dynamic data passing and manipulation as required.
Next.js Doc
https://nextjs.org/docs/pages/building-your-application/routing
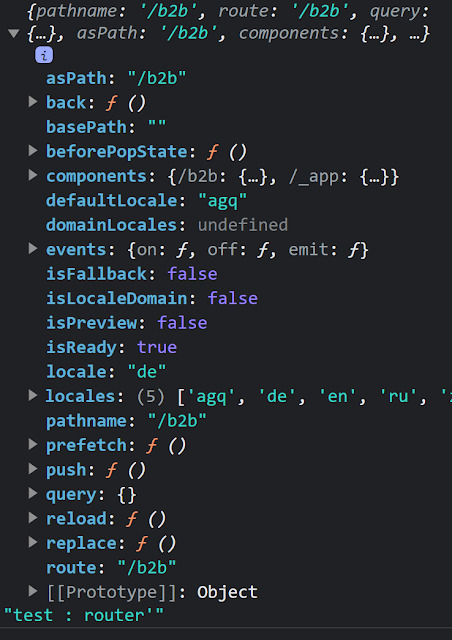
2. Introduction to asPath
asPath is a property of the Next.js router that represents the complete URL path of the current page. This path may include query parameters and fragments. It is represented as a string and is useful for handling the current path within the page.
3. Introduction to query
query is another property of the Next.js router that represents the query parameters of the current page. Query parameters are appended to the URL path and follow the format of key=value. The query object contains key-value pairs of the query parameters and allows for passing dynamic data to the page.
4. Introduction to route
route is a property of the Next.js router that represents the path of the current page. This path corresponds to the file path within the pages directory and remains identifiable even with dynamic routing applied.
5. Differences between asPath and query
Both asPath and query provide information about the URL of the current page, but they differ in terms of usage and the format of the returned value. asPath returns the complete URL path as a string, including any query parameters. On the other hand, query returns the query parameters as an object. Therefore, asPath is useful when dealing with the complete path, while query is useful when handling individual query parameters.
6. Differences between asPath and route
Both asPath and route provide information about the path of the current page, but they differ in terms of the format of the returned value and their usage purposes. asPath returns the complete URL path as a string and is primarily used for handling the current path within the page. On the other hand, route corresponds to the file path within the pages directory and remains identifiable even with dynamic routing.
7. Differences between query and route
Both query and route provide information about the path of the current page, but they differ in terms of the format of the returned value and their usage purposes. query returns the query parameters as an object and is primarily used for passing and handling dynamic
data. On the other hand, route corresponds to the file path within the pages directory and is primarily used for retrieving static information about the page.
8. Use Cases of asPath, query, and route
asPath: Useful when conditionally rendering specific components based on the current path or retrieving different data.
query: Useful for passing and processing dynamic data to the page using query parameters.
route: Useful for retrieving static information about the page or conditionally rendering different components based on the path.
9. Considerations
When using router properties in Next.js, it is important to be mindful of their usage. Improper usage or misuse of these properties can lead to unexpected behavior in the application. Therefore, it is crucial to refer to the documentation and examples and implement them carefully.
10. Conclusion
In this article, we explored the differences between asPath, query, and route in the Next.js router. Each property provides information about the path of the current page and serves different purposes. Understanding their characteristics and usage is essential for effectively managing the routing system in Next.js applications.
11. Frequently Asked Questions (FAQs)
Q1. What is the difference between asPath and route?
asPath returns the complete URL path of the current page, while route returns the file path within the pages directory. Therefore, asPath is used for handling URL paths, while route is used for retrieving static information about the page.
Q2. What is the difference between query and route?
query returns the query parameters of the current page as an object, while route returns the file path within the pages directory. query is used for passing and handling dynamic data, while route is used for retrieving static information about the page.
Q3. Can asPath, query, and route be used together?
Yes, asPath, query, and route can be used together based on their respective purposes. For example, you can use asPath to get the current path, query to pass dynamic data, and route to retrieve static information about the page.
Q4. What should I consider when using Next.js router properties?
When using Next.js router properties, it is important to refer to the documentation and examples and implement them correctly. Improper usage can lead to unexpected behavior in the application.
Q5. How can I leverage Next.js router properties?
Next.js router properties can be leveraged for page navigation, passing dynamic data, conditionally rendering components, and more. Understanding their differences and purposes will help you effectively develop web applications using Next.js.
Link : https://worldgoit.com/archives/posts/software-development/next-js-router-aspath-query-and-route-the-difference/
Read the full article
0 notes
Text
Tailwind CSS: Leveraging !important with @apply
In the realm of modern web development, styling plays a pivotal role in creating visually appealing and user-friendly websites. Tailwind CSS has emerged as a powerful utility-first framework, streamlining the process of designing web interfaces. One of the lesser-known but incredibly useful features of Tailwind CSS is the !important directive when used in conjunction with @apply. In this article, we will delve into the intricacies of using !important with @apply in Tailwind CSS, exploring its benefits, use cases, and potential caveats.
Origin Source : https://worldgoit.com/archives/posts/software-development/tailwind-css-leveraging-important-with-apply/
Table of Contents
- Understanding Tailwind CSS
- The Role of !important in CSS
- Introduction to @apply in Tailwind CSS
- The Magic of !important with @apply
- Use Cases for !important with @apply
- Customizing Third-Party Components
- Handling Responsive Design Quandaries
- Overriding Theme Styles Safely
- Best Practices for Using !important and @apply
- Potential Drawbacks and Considerations
- Boosting Performance while Using !important
- Embracing a Hybrid Approach: When to Use !important vs. Utility Classes
- Future Compatibility and Updates
- Incorporating !important with @apply: Step-by-Step Tutorial
- Common Mistakes to Avoid
- Troubleshooting Unexpected Behavior
- Overcoming Specificity Challenges
- Conclusion: Amplify Your Tailwind CSS Workflow with !important and @apply
1. Understanding Tailwind CSS
Tailwind CSS is a utility-first CSS framework that provides pre-designed utility classes, enabling developers to swiftly create custom and responsive designs. Unlike traditional frameworks, Tailwind CSS doesn't impose a specific design philosophy, allowing for a flexible and personalized approach to styling.
2. The Role of !important in CSS
The !important declaration in CSS is used to give a particular style rule the highest priority, ensuring that it overrides other styles even if they have higher specificity. It's often employed when you need to forcefully apply a style that shouldn't be easily overridden.
3. Introduction to @apply in Tailwind CSS
The @apply directive is a key feature of Tailwind CSS that enables developers to create reusable utility classes, thereby promoting a more modular and organized stylesheet. It allows you to define custom utility classes by grouping existing classes, improving code readability and reducing redundancy.
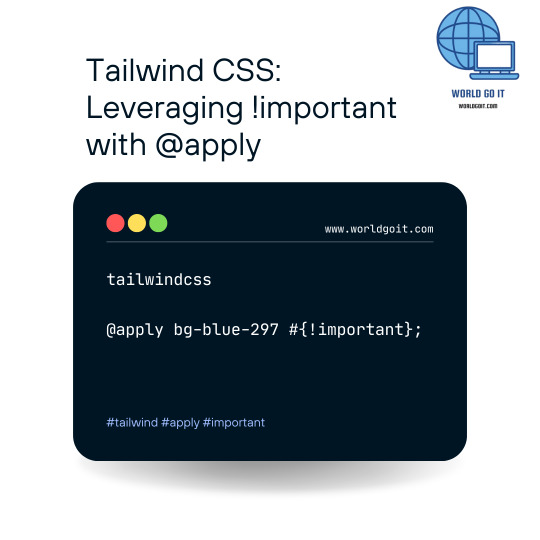
4. The Magic of !important with @apply
Combining !important with @apply in Tailwind CSS brings a new level of control to your styles. This combination allows you to ensure that your custom utility classes take precedence over other conflicting styles, without sacrificing the benefits of a utility-first approach.

important
5. Use Cases for !important with @apply
5.1 Customizing Third-Party Components
When integrating third-party components into your Tailwind CSS project, achieving a cohesive look can be challenging. By judiciously using !important with @apply, you can harmonize component styles with your project's design language.
If you want to use !important with @apply in Tailwindcss, use #{!important}
@apply !important
Read the full article
0 notes
Text
WordPress: Eliminate Render-Blocking Resources for a Faster Website
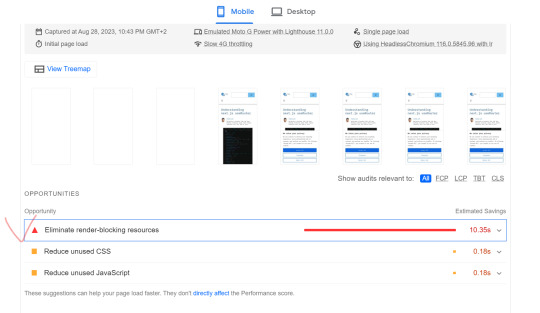
In today's fast-paced digital world, a slow website can be a major turn-off for visitors. It's not just user experience that's at stake – search engines like Google also consider website speed as a ranking factor. One common issue that can slow down your WordPress website is render-blocking resources. In this article, we'll delve into what render-blocking resources are, why they matter, and most importantly, how to eliminate them to ensure your WordPress website performs at its best.
Originhttps://worldgoit.com/archives/posts/software-development/wordpress-eliminate-render-blocking-resources-for-a-faster-website/
Table of Contents
- Introduction
- Understanding Render-Blocking Resources
- Impact on Website Performance
- Identifying Render-Blocking Resources
- Best Practices for Elimination
- 1. Asynchronous Loading
- 2. Deferred JavaScript
- 3. Browser Caching
- 4. Content Delivery Networks (CDNs)
- 5. Minification and Compression
- 6. Prioritize Above-the-Fold Content
- 7. Modern Web Development Tools
- Implementing Solutions Step-by-Step
- Conclusion
- FAQs
Introduction
When a user visits your WordPress website, their browser needs to load various resources like HTML, CSS, and JavaScript. Render-blocking resources are JavaScript and CSS files that prevent the page from loading until they are fully processed. This can significantly slow down the rendering of your web page, leading to a poor user experience.
Understanding Render-Blocking Resources
Render-blocking resources act as roadblocks for your website's rendering process. Browsers pause rendering to fetch and process these resources, delaying the display of the page content. JavaScript files, especially those placed in the header, are major culprits. CSS files can also impact rendering if not handled properly.
Impact on Website Performance
Website speed matters more than ever in a world where attention spans are shrinking. Studies show that visitors tend to abandon sites that take more than a couple of seconds to load. Additionally, search engines consider page speed as a ranking factor, meaning slower websites might rank lower in search results.
Identifying Render-Blocking Resources
To tackle this issue, you must first identify which resources are causing the delay. There are various online tools and plugins available that can analyze your website and provide a list of render-blocking resources. This step is crucial in understanding what needs to be optimized.
Best Practices for Elimination
1. Asynchronous Loading
By loading resources asynchronously, you allow the browser to continue rendering the page while fetching the resources in the background. This can greatly improve the perceived loading speed.
2. Deferred JavaScript
Deferring JavaScript means postponing its execution until after the initial rendering. This prevents JavaScript from blocking other resources and speeds up the page load.
Recommendation Plugin and Youtube
Async JavaScript
Autoptimize
https://youtu.be/ElpcjGBgTGk?si=ue1rvzQPs0YI971R
3. Browser Caching
Leverage browser caching to store static resources locally. Returning visitors will then have these resources cached, resulting in faster load times.
4. Content Delivery Networks (CDNs)
CDNs distribute your website's resources across multiple servers worldwide. This reduces the physical distance between the user and the server, leading to quicker resource retrieval.
5. Minification and Compression
Minify your CSS and JavaScript files by removing unnecessary characters. Additionally, compressing these files reduces their size, making them quicker to load.
6. Prioritize Above-the-Fold Content
Load essential resources first, especially those needed for above-the-fold content. This way, users can see and interact with the main content sooner.
7. Modern Web Development Tools
Consider using modern build tools like Webpack or Rollup. These tools can bundle and optimize your resources, reducing the number of requests made by the browser
Implementing Solutions Step-by-Step
- Start by analyzing your website's current performance using online tools.
- Identify the specific resources causing the delay.
- Update your WordPress theme and plugins to their latest versions.
- Utilize asynchronous loading for non-essential resources.
- Defer JavaScript where possible and optimize CSS delivery.
- Leverage browser caching and consider a reliable CDN.
- Minify and compress CSS and JavaScript files.
- Prioritize above-the-fold content for faster initial rendering.
- Explore modern web development tools for advanced optimization.
Conclusion
A fast-loading website is a key factor in retaining visitors and achieving higher search engine rankings. By understanding and addressing render-blocking resources, you can significantly improve your WordPress site's performance. Implementing the strategies mentioned in this article will help you create a smoother, more enjoyable user experience while boosting your website's SEO efforts.
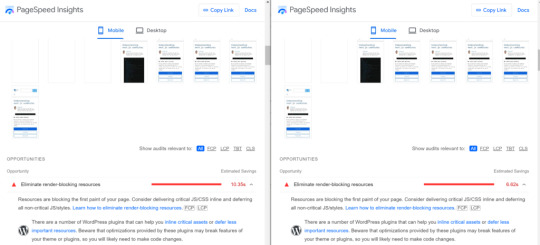
before after
FAQs
Q1: What are render-blocking resources?
Render-blocking resources are JavaScript and CSS files that prevent a webpage from rendering until they are fully loaded and processed.
Q2: How do render-blocking resources affect my website?
Render-blocking resources can slow down your website's loading speed, leading to a poor user experience and potentially lower search engine rankings.
Q3: How can I identify render-blocking resources on my WordPress site?
There are various online tools and plugins available that can analyze your website and provide a list of render-blocking resources.
Q4: What is asynchronous loading?
Asynchronous loading allows the browser to continue rendering a webpage while fetching resources in the background, improving perceived loading speed.
Q5: Can using a Content Delivery Network (CDN) help with render-blocking resources?
Yes, a CDN can distribute your website's resources across multiple servers, reducing the distance between the user and the server and speeding up resource retrieval.
Read the full article
0 notes
Text
Understanding next.js useRouter

Next.js is a popular framework for building React applications. It provides many features that make developing web applications easier, including client-side routing. One of the key tools in Next.js for handling routing is the useRouter hook. In this article, we will explore what useRouter is and how it can be used effectively in Next.js applications.
1. Introduction to useRouter
The useRouter hook is a built-in hook provided by Next.js. It allows us to access and manipulate the current page's routing information. With useRouter, we can extract data from the URL, handle dynamic routing, process query parameters, and perform page redirection.
https://nextjs.org/docs/pages/api-reference/functions/use-router
2. Benefits of using useRouter
Using the useRouter hook in Next.js offers several benefits:
Simplified routing setup: useRouter simplifies the process of setting up routing in Next.js applications. It provides an intuitive interface for handling routing-related tasks.
Dynamic routing support: With useRouter, implementing dynamic routing becomes straightforward. You can use dynamic parameters in the URL to generate pages dynamically.
Query parameter handling: useRouter makes it easy to extract and process query parameters from the URL.
Page redirection: useRouter enables seamless page redirection based on specific conditions or user interactions.
3. Handling dynamic routing with useRouter
Let's explore how to implement dynamic routing using the useRouter hook. First, create a file named .js in the pages directory. Here, represents the dynamic part of the URL. Inside this file, you can use useRouter to handle dynamic routing.
Origin : https://worldgoit.com/archives/posts/software-development/understanding-next-js-userouter/
Read the full article
0 notes