#tes 3
Text
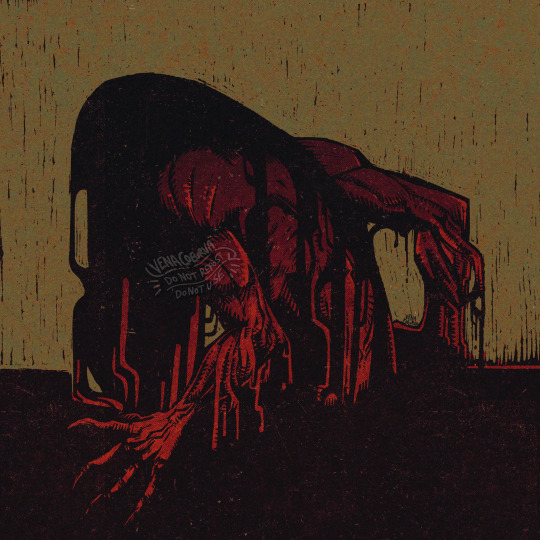
reconstituting and waking up
-Please do not reupload/edit/use without proper credit or linking back— ask first please.-
#dagoth ur#voryn dagoth#morrowind#tes#tesblr#tes 3#tes3#body horror#artsyfartsyness#real tar man moment
66 notes
·
View notes
Text

I love seeing people’s first contact with this game
#we all had that same reaction at some point#morrowind#tes 3#elder scrolls#vivec city#vivec#tes 3 morrowind
6K notes
·
View notes
Text
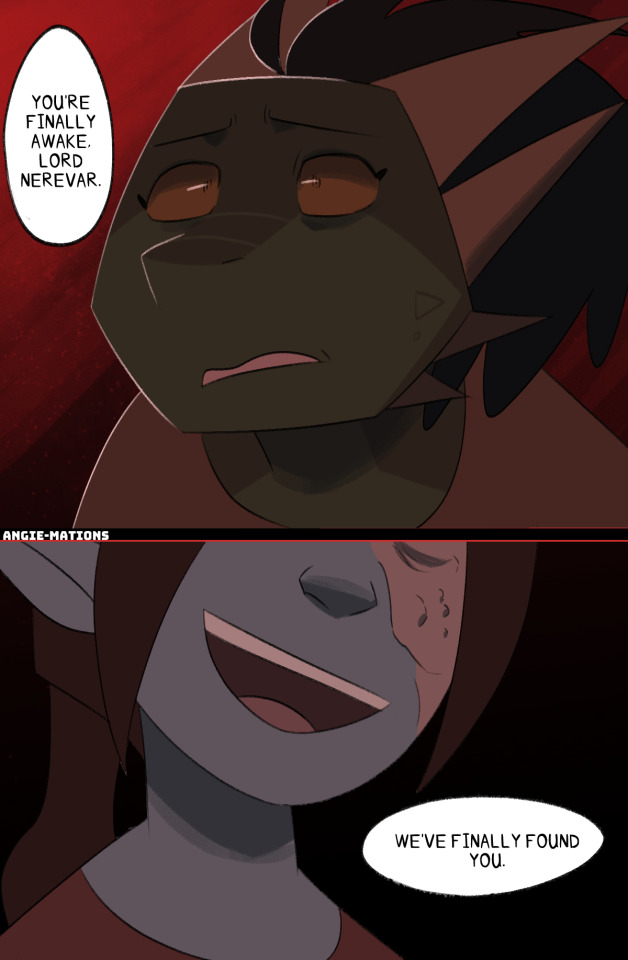
The reason there are no children in Morrowind
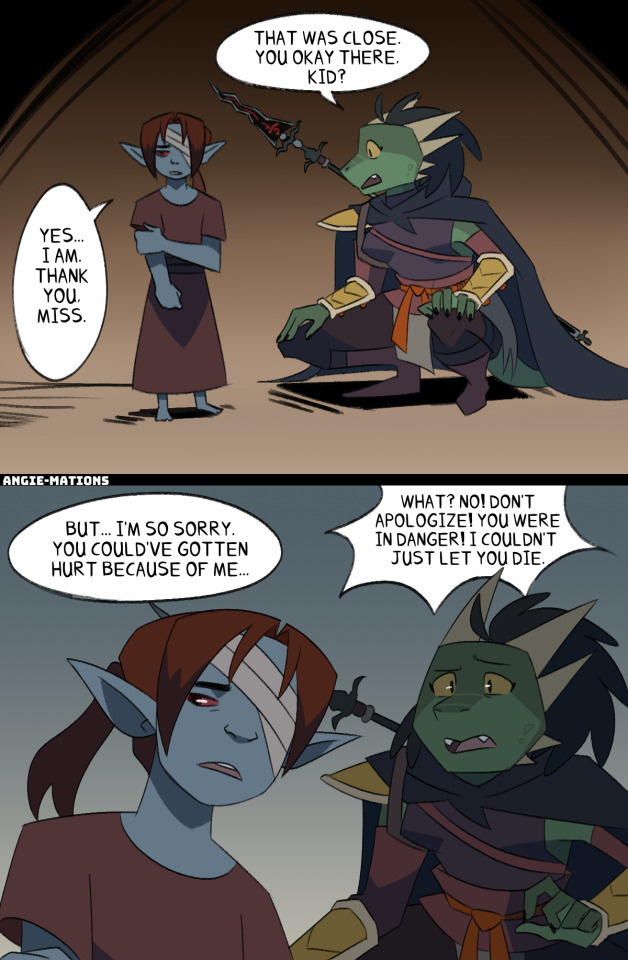

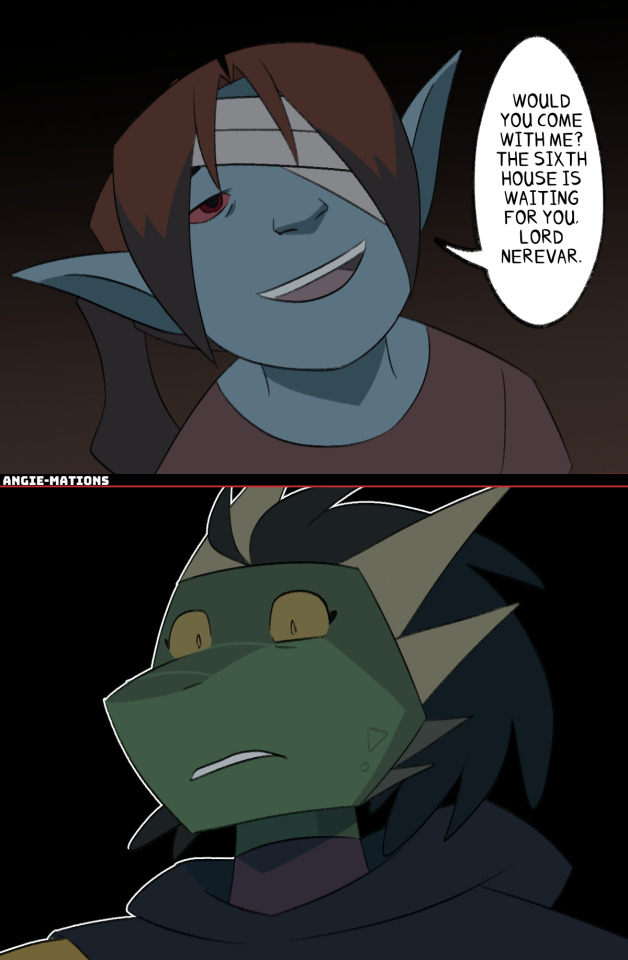


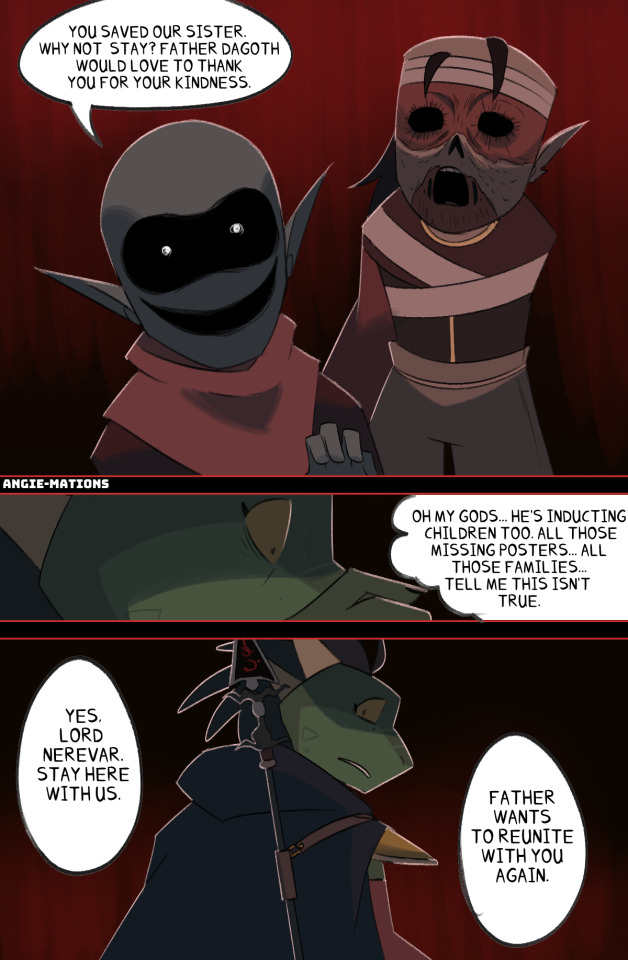
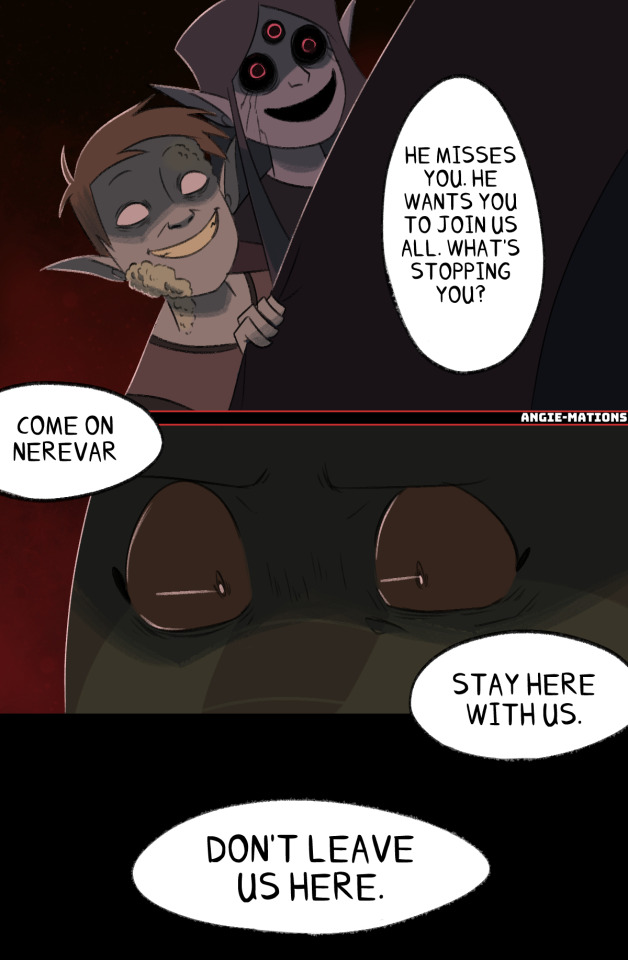


I may have wanted to make something for Spooky Month.
I like to imagine that the children of Morrowind are there, but a bunch of them go missing and end up serving the Sixth House in one big dysfunctional family cult.
I'd honestly be terrified too if I had a child that ended up like this too.
#morrowind#tesblr#dagoth ur#nerevarine#tes morrowind#tes 3 morrowind#tes iii#tes 3#tes art#tes#elder scrolls#the elder scrolls#indoril nerevar#voryn dagoth#dunmer#tes fanart#art#fanart#oc#oc: vakkah lah#vakkah lah#argonian
1K notes
·
View notes
Text
Sorry, I can't hang out tonight. I'm busy playing Hallway Simulator 9000.


#morrowind#tes#tes 3#Vivec City#morrowind screenshots#These are not from the same building#Bethesda please#I am lost and I do not know the way home#It looks like a Star Wars game or something#my first morrowind playthrough#bench post
1K notes
·
View notes
Text

eternal love
#indoril nerevar#nerevar#almalexia#my art#sketch#tes 3 morrowind#tes 3#tes#morrowind#the elder scrolls
220 notes
·
View notes
Text

#fallout new vegas#fallout#morrowind#the elder scrolls#tes 3 morrowind#TES 3#TES III#fallout: new vegas#fallout shitpost#fnv#fucking insufferable#me included lol#if i see one more big iron meme istg#make a new joke PLEASE
316 notes
·
View notes
Text
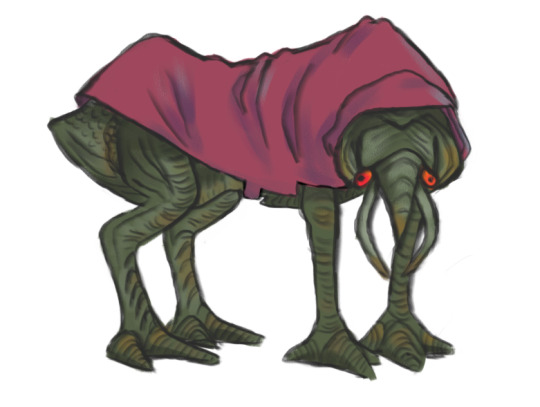

spiritual successor to my guar dlc post from awhile ago - pet nix hounds ready for rain walkies
252 notes
·
View notes
Text
I just found out about this adorable little fella -- a Brown Armored Cricket. He looks like something straight out of Morrowind!


Just scale him up about 10x and give him to a little Dunmer kid as a pet!
Link to info page->
123 notes
·
View notes
Photo

voryn at the dreamsleeve
if you want to support me - im making some extra stuff like speedpaints and step by step guides here: (´༎ຶ ͜ʖ ༎ຶ `)♡
#voryn dagoth#dagoth ur#morrowind#tes#tesblr#morrowind fanart#the elder scrolls#elder scrolls#tes 3#i exist solely for drawing sad tes fanart so i can cry over it
2K notes
·
View notes
Text
okay here is my beginner’s guide to morrowind! it talks about some of the mechanics you’ll want to know, but it’s also a little bit of a walkthrough to get you a good start on your journey. note that i originally wrote this for somebody specific: i don’t think it does, but if it seems like it’s talking at somebody in particular, that’s why. anyways, i hope this is helpful!
before you start the game:
there is only one mod i absolutely recommend you play with, and it’s not quite a mod at all.
when you download morrowind from steam or gog or whatever, you have the game! congratulations! however, what you really own is the assets of the game and a horribly broken engine. that’s where openmorrowind (openmw) comes in.
openmw is a remake of the original engine of morrowind. you see, morrowind’s original engine fucking sucks. this is for a multitude of reasons, but for me, the reason i switched was because at the later stages of a playthrough, the game will literally start corrupting your saves. don’t have that problem with openmw!
i can’t really give you a guide on how to install it and get it running better than the one on the openmw website (https://openmw.org/en/). go install it and you will have a much smoother experience overall.
before you start a new game:
before we start talking about PLAYING the game, though, let’s also take a peek through the options.
in the first page of the options, “prefs,” you’ll find some things you’ll want to switch on. namely, subtitles, always use best attack, and auto-save on rest. i’m not sure which of these are enabled by default, but enable them all.
in the “controls” section, you’re likely going to want to swap the “activate” and “jump” buttons. for some reason, the default control scheme has “activate” set to “spacebar” and “jump” set to “e”. this is, of course, counterintuitive to anyone who plays modern pc games. go ahead and just swap those around.
in the “video”-“video” section, go ahead and set your game to the highest resolution, and maybe increase the field of view a bit (i play with 75 fov, but you may prefer higher. idr what the default is, probably stupid low). in the “video”-“detail” section, crank up that view distance as high as it’ll go. i’m not sure what the default is, and i’ve fiddled with my set-up to maximize it for openmw. also turn on trilinear texture filtering and the anisotropy to the highest setting. also raise all the “video”-”water” settings to their maximum values. trust me, you can run this. it’s a new engine but the game itself came out in 2002. not the most graphics-intensive game out there.
tutorial and creating your character:
okay, that’s the options out of the way. now let’s hit that “new” button and make a new game.
watch the intro cutscene, talk to jiub, and tell him your character’s name. follow the instructions of the guards until you get to the one who asks you where you’re from. this is how the game asks you for your race. there’s no bad options here - pick whichever race you like best. you can take into account the bonuses each race gets, and compared to later games in the series these bonuses are more significant, but you can really play any character with any race in this game. it’s worth noting, however, that the beast races (argonians and khajiit) can’t wear full helms or boots/shoes. for a first timer, i would probably recommend dunmer (dark elf).
after that, go into the census office. this is where you build your class properly. you CAN take the class quiz, or pick from the premade classes. i would not recommend this. i’ve come up with a custom class that i think covers pretty much all the bases and gives a fairly enjoyable experience for a newcomer:
specialization: magic
attributes: endurance, intelligence
major skills:
long blade
light armor
conjuration
restoration
marksman / destruction
minor skills:
short blade
medium armor
spear
mysticism
alteration
now let me explain my choices here, to give you an idea where i’m coming from, and what those choices mean.
your specialization gives you +5 to all nine of the skills that fall under that specialization, and makes those skills increase more quickly. i’m giving you magic because magic skills don’t always increase the fastest, and every little bit helps.
your chosen attributes get +10 each. endurance determines your starting hp, which is obviously important, among other things, such as how much health you gain on level up. intelligence increases your maximum magicka. when you level up, you get to pick three attributes to increase, and depending on what skills you increased to get to your new level, you get multipliers on how much you can increase certain attributes. i recommend always increasing endurance, even if you don’t get a multiplier for it. speed, which affects your, well, speed, and strength, which affects your physical damage done as well as your carry weight, are good choices for leveling up as well. but you can increase other attributes as you think is necessary - i won’t elaborate on what each one does here, you can look it up on uesp.
your major and minor skills are what you need to increase in order to level up your character level. major skills get +25, minor skills get +10.
i always recommend at least one weapon skill and at least one armor skill for your major skills. i’m giving you long blade, bc it’s the most ubiquitous and useful weapon skill in the game, and light armor, bc it’s generally speaking the best armor skill in the game, and is also lighter to carry around as well.
i’m giving you conjuration and restoration bc having a magic skill as a major gives you a starting spell from that school. conjuration gives you bound dagger, which summons a daedric dagger for you to use for 60 seconds (and gives you the requisite skill to use it effectively), and restoration gives you hearth heal, which is a very effective heal, albeit a somewhat costly one to cast.
i’m giving you two options for your last major skill: either marksman or destruction for ranged capabilities. note, however, that marksman is not as good in this game as in later titles, and not all destruction spells are at range. destruction gives you the starting spell fire bite, a decent on touch (melee range) fire spell.
just like you have a weapon skill and armor skill in your major skills, i recommend doing the same thing with your minor skills. so i’m giving you short blade, the second most ubiquitous and useful weapon skill, and medium armor, which is almost as good as light armor, albeit a bit heavier. you can mix and match your armor pieces to great effect in this game, and wearing at least one piece of a type of armor (a medium armor gauntlet, for example) will increase that skill when you get hit.
i’m giving you spear mostly bc it’s a fun weapon to play with, and not in the other games. mysticism is an important skill for a few reasons: 1) telekinesis, which we’ll mostly use to disarm traps from a distance, and 2) teleportation spells like almsivi/divine intervention, which lets you teleport to the nearest tribunal temple or imperial shrine respectively, and mark/recall, the former of which lets you set a point the latter can teleport you to from anywhere. alteration gives you access to a lot of good spells, like feather, shield, levitate, water breathing, water walking, and open.
okay, that’s enough about your class. next you’ll be asked what your birthsign is. i’m going to recommend either the steed, which gives you +25 speed and makes walking around at the beginning of the game more bearable, or the lady, which gives you +25 personality and +25 endurance. up to you whether you value the speed or the endurance more. there are other options, of course, but i think these are best for a first-time player.
okay, after you pick your birthsign and confirm your character, you’re free! kind of. not really yet. you’ll be notified you now have an inventory menu, and instructed to pick up the papers on the table to your right. do so. then, we’re going to do something a little sneaky. on the shelf against the rightmost wall is a limeware platter, which costs like 650 gold. you want that platter. so you’re going to take it. now, you just did this in full view of a guard. but you’re fresh off the boat, so he won’t arrest you - he’ll just confiscate what you stole. BUT, if you drop the platter before he gets to you, he won’t have anything to confiscate. and since YOU dropped it, it’s technically YOURS now, so you can pick it up without any ramifications. congrats! you just got like, 300 gold (note: your mercantile skill affects how much gold you get from selling things. very rarely will you ever get full asking price for anything).
(how do you drop the platter, you may ask? well, to open your menu/inventory, you need to right-click. very counterintuitive, i know. but you’ll get used to it. to drop an item, click it and drag it outside of any of the menus. you can either drop it directly beneath you, which usually happens, or you can place things directly onto surfaces like tables or shelves if you’re close enough to them.)
now you’re expected to go out the door across from the platter shelf. go out, and close the door behind you. there’s nobody in this side of the building, so with the door closed, you’re free to just jack anything you see without ramifications. there’s a lot of ingredients to take, if you want to get into alchemy (which can be useful, for either making beneficial potions or for making a quick buck), but most of what you want is the expensive stuff you’ll find. there’s a book you can take (books can be very expensive in this game), some silverware, a bottle of liquor called flin, a lockpick, and a shitty dagger. you’ll want to sell everything you get here except for the lockpick, and maybe the ingredients if you want to do alchemy. there’s a little chest on the bottom of the shelf by the exit that’s locked. you should be able to pick it with ease with the lockpick you just got, even though your security skill sucks atm. there’s like, 31 gold in there i think? worth taking regardless. to pick the lock, equip the lockpick (click and drag it onto the little portrait of your character in the left of your inventory screen), and “attack” (left-click) over and over while pointing your cursor at the chest until it unlocks. there’s a couple of torches you might want downstairs, as well.
after you’re done looting, leave the building. you’ll find yourself in a little courtyard. the game’ll tell you to look in the barrel by the next door, and take the enchanted ring you find inside. don’t get too attached to this ring. go into the next door and talk to sellus gravius, the guy inside. this is your first real encounter with morrowind’s dialog system. it is not like skyrim’s. at all. get used to it. this weird wikipedia like structure is going to be your best friend. you have a list of all available options on the right, and you can click highlighted options in the text itself. you can talk about whatever to sellus, but you have to say a couple specific things to progress. i can’t remember what it is exactly, but he doesn’t have much to say outside of it, so it shouldn’t be hard to figure out. he’ll give you some money, a package for caius cosades, and a note with instructions on how to find caius cosades. don’t accidentally sell the package. don’t try to open the package. just leave it in your inventory until you’re ready to go find caius.
seyda neen:
after that, you’re free to go! and this time you’re really free, and you can do whatever you want now! but that’s a bit overwhelming, so i’m going to let you know what there is to do in this town, seyda neen.
first off, almost right outside the door there’s a bosmer (wood elf) named fargoth. he’s lost his ring. yes, that ring. give it to him. that’ll earn you better prices with the local merchant, who happens to be fargoth’s friend. don’t worry, if you want the ring, we’ll be getting it back later.
now to go make some money with all the shit we stole. go to arrille’s tradehouse, which is the building with the little raised platform adjacent. the “front” door is locked, it’s actually arrille’s house, so you have to go around on the platform to the real front door. go inside and talk to arrille. in the right pane of the dialog, you’ll see the option to barter with him. click that and get to selling your shit.
here’s what you want to buy with the money you just got (around 500-600 gold). buy all the chitin armor pieces you can. it’s very good light armor for this stage in the game. buy the iron saber for now; you’ll be replacing it soon but you need something, and it’s cheap. buy one of the journeyman’s probes - you need these to disable traps - and one of the journeyman’s lockpicks, since the one you stole from the census office only has 10 uses. buy 3 bottles of sujamma - it’s a regional liquor that gives you +50 strength and -50 intelligence for 60 seconds. it’s VERY powerful for dealing with foes you normally shouldn’t be able to handle at a lower level. note the intelligence drop though: if you need to cast a spell, cast it before you drink the sujamma. buy 2 scrolls of almsivi intervention - like i said earlier, this teleports you to the nearest tribunal temple. lastly, buy 2 scrolls of ondusi’s unhinging. sometimes you need to open something that you just can’t pick with your too-low security skill. that’s where this scroll comes in.
yes, you just spent like, all of the money you just earned. it’s okay. we’re going to make it back and then some, soon.
before you leave arrille’s, go upstairs (behind him). talk to the guy, hrisskar flat-foot, at the top of the stairs. he’ll offer you a topic about recovering gold. he wants you to find out where fargoth (the ring guy) is hiding his gold and valuables. you’re going to help him find it, because YOU want those valuables as well. we’ll get back to this quest later, though.
next, talk to elone, the redguard behind the counter. she’s a scout, which means she knows a lot about the land. you can ask scouts all sorts of interesting questions about geography. but what you want from elone is directions to balmora. ask her about balmora and she’ll give you said directions in the form of a note.
finally, talk to the wizard lookin’ fella in the corner. ask him about the latest rumors. keep in mind what he says about mentor’s ring - we’ll be pursuing this later.
now, let’s make sure we equip all the armor and weapon we just bought. right-click to bring up your inventory/stats/map/magic menu, click on each piece of armor and weapon, and drag them onto the little portrait of your character to the left. that’s it! you’re equipped and ready to face the wilderness.
the wilderness, plus notes on combat:
leave arrille’s tradehouse from the door you came in from. jump off the corner of the platform into the water below, and cross that little river, heading west. on the far shore, you’ll find your first foe: a mudcrab! very scaaaaary! this is your introduction to combat. it works a little differently in this game. first of all, just because you SEE your weapon connect with an enemy, doesn’t mean it’s going to HIT necessarily. this game plays off of dice-rolls, and a lot of factors contribute to whether or not you’re gonna actually do damage. but the two most important factors are: 1) your level of skill with the weapon you’re using, and 2) your fatigue. that’s the green bar in the bottom left of your screen, what you’d call in skyrim your “stamina”. if your fatigue is low when you enter an encounter, you’re going to really struggle to fight!
here’s a somewhat annoying thing about fatigue: running at full speed diminishes it! so when you’re out in the wilderness, you’re going to want to conserve your fatigue by walking. it’s slow, but hopefully bearably so if you picked the steed as your birthsign. and it’s better than dying to a mudcrab because you were too tired to properly swing your weapon.
fortunately, there’s this thing called resting! if you’re out in the wilderness, you can press “t” to rest for as long as you’d like, or “until healed” (until your hp, magicka, and fatigue are completely restored). unfortunately, this close to seyda neen, you can only “wait” - all this does is restore your fatigue. it’s illegal to rest inside of most settlements, or even in their outskirts.
anyways, hopefully you’ve completely dominated that first mudcrab of yours. should go down in one hit, so long as you can connect. another thing to note: you may have noticed when you bought your saber that its damage stats are ranges. for instance, its chop stat (the one you’ll be using with your “always use best attack” enabled) is 5-18. to maximize your damage on the high end of that range, you’ll need to hold down your click for a second or so to wind up the attack. you’ll do a lot more damage this way rather than just mashing left mouse button!
anyways, after you’ve gotten your first kill, proceed along the coast, making sure to head between the rocks just up the way. you’ll find either a rat or a kwama forager (worm thing), and that’s how you know you’re going the right way. it’ll attack on sight, but there’ll be another critter there, a little grey insect looking thing called a “scrib” that thumps its tail on the ground and squeals. it’s not going to attack you when you get close, so don’t attack it. be nice. it’s just a little guy! if you do decide to attack it, though, you might be in for a nasty surprise: it has a paralyzing bite! a scrib can really catch you off guard at this low level. so leave the little guy alone!
across from the scrib, to the left, you’ll find a corpse. if you’ve been talking to the residents of seyda neen (i highly recommend you do) you may have heard that the local tax collector is missing. this is him. take the tax record and 200 gold from him. let’s read the tax record! to read any note or book from your inventory, click and drag it over your character portrait! this is really how you interact with anything in your inventory. note who has the highest unpaid tax to find a motive, but we’ll get back to that later. we’ve got some other stuff to do in the swamp.
proceed northwest, killing any little critters (except scribs!) that get in your way. pretty quick you’ll find yourself with a mountain on your right and the ocean on your left. follow the coast along those mountains. you’re going to find pretty quick a weird looking door on your right. that’s an ancestral tomb door! they all look like that. make a note of where this is, we’re coming back to it. keep progressing along the coast.
eventually you’ll find a little shipwreck. yes, that’s a ship, albeit a local, kinda weird-looking one. just before you get to the ship itself, there’ll be a chest next to a log that’s sticking up out of the water. there’s a silver longsword in there! take it, it’s your new weapon of choice, slightly better than your saber. now let’s explore the ship! get on board and take the trapdoor down to your right. at the end of the interior, next to the next trapdoor down, there’s a crate in the water with moon sugar in it! you may be familiar with skooma, the narcotic? moon sugar is what it’s made from. it’s very valuable, but also very illegal, so we’re going to have to be careful with how we sell it. we’ll get to that eventually.
take the trapdoor further down, and immediately swim up, bc you’re gonna be underwater! at the end of this section of the ship, you’ll find a little chest on the floor with 3 diamonds in it! woohoo! now let’s get out of here, that skeleton’s freaking me out. there’s nothing of note in the cabin section of the ship, so don’t worry about it. let’s go back to that tomb!
samarys ancestral tomb:
okay, right outside the tomb, SAVE! you need to save a LOT in this game if you want to make progress! i recommend having multiple running saves going as well as your quicksave. my most recent playthrough has 5 different saves that i cycle through. it’s a good way to make sure you don’t get stuck in untenable positions! make sure you have your silver longsword equipped and head on in.
once you’re in, open the door right across from you. in the next chamber, you’ll see these little raised things with jars on them. those jars have dead people in them! you don’t really want what’s in those jars, though - you want what’s next to them. always check next to these jars in ancestral tombs for valuables. most of the time it’s just clothes or ingredients, but sometimes, like in the case of the first jar on the right, there’s valuable scrolls! take it, and proceed down the corridor and turn right.
here’s your first challenge! a ghost! this is why we got the silver longsword first, because only silver weapons (or higher quality) or enchanted weapons can actually hit ghosts! this ghost knows a nasty little fire spell that can do quite a bit of damage if you don’t kill him quickly. just keep up your consistent, charged hits until he goes down. across from the entrance to this chamber is another jar-plinth with another scroll, this time an offensive one! take it, it might prove useful. save again!
on the other side of the next door is either a greater challenge or an even greater challenge. sometimes it’s just a skeleton, and sometimes it’s a lesser bonewalker, which can be very dangerous! take him down as quickly as you can, because bonewalkers often know very detrimental curses that can lower your attributes. save again after you kill it!
next, you want to disarm the trap on that urn in the bonewalker room. equip your journeyman’s probe and start clicking on that urn, just like you did with the chest in the census office! once the trap is disarmed, take mentor’s ring! told you we were gonna get that. it’s a very useful ring that increases your intelligence and willpower by 10 points each. go ahead and equip that. there’s a weird named ash in the urn, and a key to the chest next to it, but don’t bother. the chest never has anything valuable in it. don’t forget to reequip your silver longsword after you disarm the trap!
speaking of, here’s another little tip. press f1. this gives you the quick-select menu, where you can assign items or spells to your number keys. i’d put your main weapon (right now the silver longsword) on number 1, then put your most used spells on the next few numbers, in whatever order or fashion you prefer. makes swapping between items and spells much easier.
heading back to seyda neen:
leave the tomb and hug the mountains going east until you hit the road. then follow the road east some more until you see a man fall from the sky. yes, that just happened. he’s dead and free-game, so let’s loot him. take his nice enchanted sword (it’s slightly better than your current weapon, so long as it has a charge), equip his nice conical hat, and either equip his robes and shoes (you can wear robes over your equipped armor in this game! isn’t that so cool) or take them to sell later. take any gold he might have on him, and take those weird “scrolls of icarian flight” he has. do NOT use those scrolls. sell them. you will DIE if you try to use those scrolls. also, take a gander at his journal underneath him, and then take it to sell as well.
alright, from here, follow the road east and south back to seyda neen. let’s head back to arrille’s to sell some of the stuff we got. note that you are now carrying moon sugar, which as i said, is illegal. honest merchants won’t trade with you if you have moon sugar or skooma in your inventory. we’ll find some dishonest merchants later, don’t worry. but for now, you’ll have to simply drop the moon sugar on the floor before you start selling. don’t forget to pick it up when you’re done!
next, remember that guy you noted from the tax record, the one with the highest unpaid tax? we’re going to pay him a visit, ask what happened to the tax collector. i won’t tell you where he is; check the houses around seyda neen until you find the one with his name on the door. before you go in, save, and make sure your fatigue is up.
talk to him. he’ll confess to killing the tax collector, giving you the option of letting him go, or doing justice right then and there. do the justice. he’ll immediately attack you - with his fists. this might not sound scary to you at first. in later games, hand-to-hand combat merely does a little bit of damage to your health. in this game, hand-to-hand hits do damage to FATIGUE. and remember how important fatigue is? it affects everything, from physical combat to your chance at casting spells. so you’re gonna wanna take this guy down before he does too much damage to your fatigue. if your fatigue reaches zero, you get knocked out, falling to the floor. at this stage, hand-to-hand hits actually do damage to your HEALTH. and it’s easy to get trapped in a loop of getting knocked down. so don’t let that happen and kill him quickly. this fight is probably actually harder than the bonewalker, since this guy does a lot of damage to your fatigue with each hit, and you’re draining your own fatigue by swinging at him. but keep up with your consistent charged hits and you should be able to take him down.
be sure to take the ring he’s wearing! it’ll come in handy later. then loot the place - it’s effectively your house now, a decent starter shack. especially important is the book on the floor, which is a skill book increasing your mercantile skill, and sells for a pretty penny. there’s also some ingredients in the various barrels and sacks, if you’re into alchemy.
next, let’s go back to the census office. yes, the place you started at. talk to the old dude who set up your class and birthsign. there’ll be an option to report the murder. do so, and he’ll give you 500 gold. nice!
next, head on to the lighthouse on the coast. you should be able to see it from anywhere in seyda neen. step inside and talk to the lady immediately on your right. ask her about the ring you picked up from the murderer and she’ll give you two pretty high-quality healing potions! nice. now, head upstairs. there’s a very valuable book at the top you can take (the lady downstairs can’t see you now) which increases your unarmored skill.
now head outside to the top of the lighthouse. stand at the corner facing the rest of the town, and wait until 10pm. if you’ve spent a lot of time resting/waiting, you might have missed your first 10pm, and will have to wait almost a day for the next one. don’t worry about it, you don’t have a time limit. now watch that little torch-wielding gremlin fargoth crawl around for a little bit. he’ll make a few stops along his way, but don’t worry, he can’t see you from up here (even though he does approach and stop in front of the lighthouse at one point). eventually he’ll stop by a tree-stump in a mucky pool - that’s where you need to go. once he walks away from there, head back down the lighthouse and go there. inside the stump you’ll find a bunch of gold, fargoth’s old healing ring, and a nice lockpick. take it all.
now, hrisskar wanted you to return with the money so he could split you a cut. instead, we’re just going to never talk to him again and keep all the money. there’s no repercussions for this at all, unless you’re a completionist who wants to finish every quest completely. but there’s not really a tracker for your completed quests, so it doesn’t really matter.
one last thing to do in seyda neen. we’re going to talk to an altmer (high elf) named eldafire. she can usually be found across the bridge towards the silt strider (the big bug thing you probably saw when you got off the boat), although she tends to roam a bit. ask her for a little advice. she’ll recommend you take out the bandits in the addamasartus cave nearby. let’s do that.
addamasartus cave:
the cave is right across from the silt strider landing, hiding behind a big boulder. save and rest until healed right outside the cave, then head on in. the first enemy shouldn’t be much of a problem to you at this point. she should go down in a few hits, and not get much of a chance to hurt you. take any valuables she might have, especially the addamasartus slave key.
the next enemy, who is beyond the door down to the right, is going to be much more challenging. he’s a mage who will cast a weakness to fire spell at you, and then cast a fire spell at you. you’re a dunmer, so you have some resistance to fire, but this guy can still fuck you up if you’re not careful. try to dodge his spells until he runs out of magicka and is forced to attack you in melee. or be brave and try to take some swings as you dodge. up to you. don’t be surprised if he kills you a time or two - he’s pretty tough. if you need to, go outside (or close to the front door) to rest to heal your wounds after he’s dead. or before he’s dead - no shame in running to fight another day.
okay, now that the hard part is done, we can explore the rest of the cave. go down the stairs to where that mage came from, and turn left when you get to the water. there’ll be another enemy, this one throwing throwing-stars at you. you can try to dodge them - they’re kind of small so it’s difficult to see them - or you can just tank the hits as you rush her down. they don’t do much damage. she’ll go down pretty easy, too. she’ll have a lockpick and probe - take them. if you picked marksman as your ranged skill, you can take the throwing stars as well, although they’re not as effective as a bow would be.
now, loot the room - the crates, sacks, chests, etc. the crates near where the throwing-star lady was should have a total of 8 moon sugar and 2 bottles of skooma in them. the chest will have a random leveled item (that is, an item suited to your level) - you might get lucky with this! in my test run, i got a steel daikatana, which is better than my silver longsword (except against ghosts). don’t forget the crates and barrel over by the water! sometimes the crates can have scrolls, potions, or soul gems in them.
next, go behind the rocks to the left of where the throwing-star lady was. you’ll find a door the slave key will unlock. on the other side of the door you’ll find a little stretch of water. at one point you’ll have to dive under to get to the next chamber - just watch your breath meter! but you shouldn’t have a problem, it’s not a very long dive. at the bottom of the water in the next chamber, you might be able to find a skull to the right. if not, don’t worry about it! but there is a rising force (levitation) potion right next to the skull. don’t drown yourself looking for it though, it’s not that important.
in this chamber, you’ll see a spiral pathway rising out of the water. find where you can clamber onto the pathway and follow it up. there’ll be a rat up there - but nothing you can’t handle. up there you’ll also find some glowing mushrooms. in between them there’s a few pieces of gold, a netch leather pauldron (don’t worry too much about that part - your chitin pauldron is better), and the important part, a “thief ring”! it’ll give you a decent buff when you need it. it’s a little tricky to see against the stone floor of the cave, but try your best to find it.
follow the rest of the passage until you come out near the beginning of the cave. you may have wondered why we went down (to where the mage was) instead of up to where there was a door earlier. we’re going to go up there now. your addamasartus slave key will open the door, and you’ll find two argonian slaves and a khajiit slave. talk to them and offer to let them go free, and unlock their bracers. congrats, you’re an abolitionist now! the game tracks how many slaves you’ve freed for a hidden faction you’ll find eventually. you need to free quite a few to join that faction, so try to free every one you can if you want to join.
now you’re done with addamasartus! feel free to leave. we’re done with seyda neen, now, as well, unless you want to head by arrille’s first to sell off some stuff before you leave. don’t forget to drop your moon sugar and skooma before you barter, and then don’t forget to pick it up before you leave!
onward!:
next stop, balmora, where the imperials wanted you to go. there’s a couple of ways we can get there. the first and easiest is to just hire a silt strider to take you there. those big bug things are basically giant buses, and they have routes all over the western half of the island. but i recommend you walk to balmora, following the directions elone the scout gave you. a big part of this game is exploration, and you’d better get used to it quick. don’t be afraid to get a little sidetracked here and there. explore the occasional cave or mine or tomb on your way - but always save before entering one, and know your limits. the dungeons in this game are largely not leveled to you, and if you enter the wrong one too early, it can really ruin your day. so don’t be afraid to turn around and leave, or load the save you made before entering, if things get too tough.
there’s a little town called pelagiad between seyda neen and balmora. feel free to stop there to restock if you need to. otherwise, just follow the road signs and elone’s directions. you’ll get to balmora in no time. and don’t forget! conserve your fatigue. you don’t want to be running everywhere, run out of fatigue, and then run into even a basic enemy you suddenly can’t handle because you can’t connect any of your hits.
once you get to balmora, go to the south wall cornerclub like you were told in your directions to caius cosades, and ask around to find out where caius lives. i’m not going to hold your hand on quest instructions any more! figure it out on your own. it’s not too hard, so long as you just remember to talk to people about important topics - usually “latest rumors,” “little secret,” “little advice,” and “morrowind lore.” but peruse the other topics, too! you might learn something about the people and place you’re in.
before caius gives you your first official orders, he’ll tell you to join a guild to establish a cover identity. there’s a lot of factions in this game you can join. you’ve got the imperial guilds: the fighter’s guild, the mage’s guild, and the thieves’ guild; the morag tong (essentially the dark brotherhood of this game, but a bit different flavor-wise, as well as in how it works); the religious guilds: the tribunal temple and the imperial cult; the imperial legion; and the great houses: house redoran, house hlaalu, and house telvanni. i won’t go into detail about all of these, but i will mention a few.
factions, and a bit on fast travel:
even if you don’t plan on playing through the questline, i recommend joining the mage’s guild. it gives you a couple of invaluable services: spellmaking, enchanting, and the guild guide. the first is self-explanatory: it lets you use any magic effects you’ve already learned to make custom spells from them. enchanting as a service is what it sounds like - you pay somebody to enchant items for you (you still need to bring a filled soul-gem, though). the guild guide is probably the most important, however. basically, it’s a teleportation service between the mage’s guilds of vvardenfell.
morrowind doesn’t have a fast travel system per se, but there are quicker ways to get around than just walking everywhere. we’ve mentioned the spells that can do this, like almsivi/divine intervention and mark/recall. but you can also take the bus (silt strider) across most of western vvardenfell, or a boat across most of eastern vvardenfell. but those two systems are largely disconnected; the only real way to trade off is to silt strider to vivec, walk (or divine intervention) to ebonheart, then take a boat to sadrith mora or tel branora, or vice versa.
but the mage’s guild guild guide solves this problem rather nicely! you can teleport from anywhere in the west to sadrith mora in the east much more quickly than the silt strider-boat trade off in vivec and ebonheart. so join the mage’s guild, i’m serious.
the only other factions i’m going to mention are the houses. they’re very important, and you’re going to want to join one. and only one, i might add - once you join one, you’re locked into it. so make your choice wisely. here’s a brief description of each house:
house redoran is a house of noble warriors, whose capital is ald’ruhn, literally inside the hollowed out remains of an ancient giant crab. they are most favored by the local warrior-poet god, vivec, and most of the buoyant armigers (vivec’s personal army) are from redoran.
house hlaalu is a house of sneaky merchants, whose capital is balmora. they’re the most closely affiliated house to the empire, whereas the other two are distrustful of the empire - and therefore distrustful of house hlaalu.
house telvanni is a house of arrogant wizards, whose capital is sadrith mora (literally translates to “mushroom forest”). they live in settlements built around giant fungal wizard towers, and are most distant and distrustful of the new forces (like the empire) in vvardenfell. they’re also most likely to own slaves, although they will accept argonian and khajiit as members all the same.
there is a bit of a disparity when it comes to the rewards you get from quests from these houses. telvanni gifts you with powerful spells and enchanted items; hlaalu gives you gold; redoran gives you, um. “honor.” which doesn’t sell for much in this economy. that might affect your decision here, but really, choose whichever faction appeals to you most. you’ll be able to get your hands on lots of money and powerful artifacts regardless of which house you choose.
i think that’s about all you really need to know to get started in this game! really, the best piece of advice i can give you is: take your time. take in the atmosphere, the lore, the books, the dialog. absorb yourself into this game and you will have the most amazing experience with it, i think. if you have any questions, let me know!
P.S. i’m going to add things to the end of this as i think of them:
a lot of the time, you’re going to run into people you need information from who won’t give it to you. every npc has a disposition stat, basically how much they like you, and if it’s too low, they won’t discuss certain topics. there’s a few ways to increase their disposition. 1) use the speechcraft skill to admire, intimidate, or taunt the npc. (taunting actually serves a different purpose to the other two, but we’ll get to that shortly.) 2) use a spell, namely the “charm” effect from the illusion school of magic, to temporarily raise their disposition with you. 3) increase your personality attribute, like with telvanni bug musk (always a good item to have around). and 4) bribe the hell out of them. you can bribe in 10 gold, 100 gold, and 1000 gold increments. 100 gold tends to be the most efficient way to bribe, and most people will open up to you after about 200 gold spent this way. money isn’t exactly difficult to come by in this game, especially after the first few levels, so this greasing of the wheels of commerce won’t hurt your wallet too much.
okay, that’s about how to increase a npc’s disposition. how about the scenario where you need (or want) to kill an npc without getting a bounty on your head? simple: either 1) take them out into the wilderness where there are no witnesses (this only works in cases where you can get this person to follow you, such as by using the conjuration school’s “command humanoid” effect), 2) use the “frenzy humanoid” effect from the illusion school to get them to attack you (this shouldn’t trigger a bounty, or for their friends to attack you as well), or 3) “taunting” them to get them to attack you. if your speechcraft is low, this will take many tries, because most of the time your attempt to taunt will fail, and also because it generally takes several successful taunts to get an npc to actually attack you. but you don’t have to worry about using a spell this way, and if you’re patient it’ll work out just the same.
another thing to note: if you’re on an assignment from the morag tong to kill somebody, you’ll get what’s called a “writ” with their name on it. the morag tong, unlike the dark brotherhood, is a government-sanctioned entity - using the tong to have someone killed is completely legal. this writ is your permission to kill that person. you don’t have to worry about incurring a bounty when you have a writ - you can just straight up merk somebody in broad daylight. watch out, though - sometimes that person’s nearby friends will attack you too. most of the time, though, although they might shout about it, nobody will report the crime. if somebody does, expect to be approached by a guard. in that instance, just present your writ to them, and they’ll be forced to let you go. (if this appeals to you, consider joining the morag tong. although every major city has a morag tong chapterhouse, you can only join the tong from the headquarters in vivec city. i won’t tell you exactly where those headquarters are in vivec - it’s actually fun trying to figure out on your own. just ask around and you’ll figure it out.)
okay, i forgot to mention. once you’ve leveled up your major or minor skills 10 times (repeats of the same skill count as well), you’ll get a notification saying it’s time to level up. to do this, you need to sleep in a bed. simply resting won’t do it. you need some kind of bed. make sure it’s a bed you’re allowed to sleep in! i recommend saving before trying to sleep in a bed. sometimes you’ll find a bed in like a mages guild and assume it’s free game but it’s actually someone in particular’s bed and you get expelled from the guild for trying to sleep in it. not a fun time.
since you’ll have the goty edition of the game, you’ll have tribunal enabled. that means sometimes when you rest you’ll get attacked by a dark brotherhood assassin. they’re not too tough, though, and they have very useful and very expensive armor and usually a decent weapon. if you want the attacks to stop, talk to a guard about them. but why would you, it’s free money.
i forgot to mention in the main body of this guide, but there are only a handful of places where you can pawn off your skooma and moonsugar. there are two in balmora: there is ajira, the resident alchemist of the balmora mage’s guild, and ra’virr, a merchant whose store is right next to the mage’s guild. in general, if a merchant is a khajiit, and normally deals in ingredients or potions, they’re likely to buy skooma and moonsugar.
another thing: you do have a journal! your character automatically records most important information in it about your quests. now, this is an actual journal, with entries in chronological order. so it can be difficult to find relevant information by just looking through it normally. if you have the goty edition (which you should) you have the option to categorize by topic and quest! should be a button on the right. not all quests are marked, but most are.
657 notes
·
View notes
Text
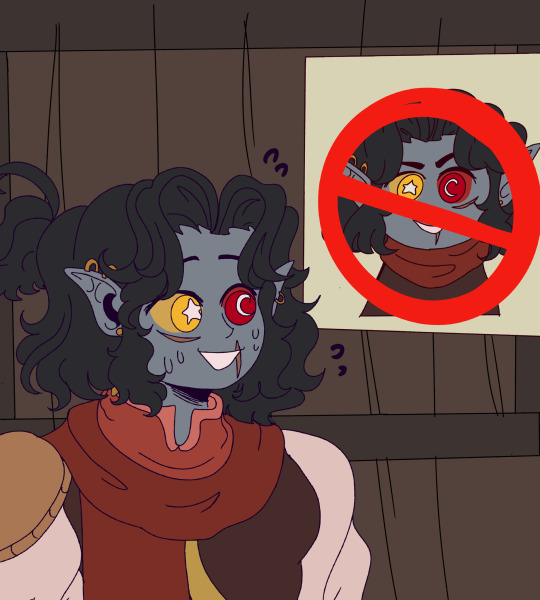
Nerevarine whenever he wants to visit Vivec and walking to the door of vivec palace

#oc:nerevarine/outlander#tes#the elder scrolls#doodle#elder scrolls#dunmer#nerevarine#tesblr#vivec#he is banned by vivec#for some reason#tes 3 morrowind#morrowind#tes 3#vivec is just a little hater
75 notes
·
View notes
Text

hey
-Please do not reupload, edit, or use without proper credit or linking back. Ask first.-
#dagoth ur#voryn dagoth#house dagoth#morrowind#tes#the elder scrolls#tes 3#tes iii#tesblr#artsyfartsyness
2K notes
·
View notes
Text
i created a monster.
1. the setup


2. the example

3. the madness.


#shiveringscrolls#the elder scrolls#morrowind#skyrim#oblivion#tes#tes oblivion#daggerfall#tesblr#elder scrolls#tes v skyrim#tes skyrim#tes v#tes morrowind#tes 3#tes iii#tes iv: oblivion#elder scrolls online#esofam#teso
34 notes
·
View notes
Text
VOLUME WARNING
Don't worry. She gets used to it. Anyways, yeah, I got lost in Vivec more times than I'd like to admit when I first played.
This'll be the last semi-consistent post I'll have, before I gotta be a member of society and deal with bills and everything. But I'll still be making arts : )
#morrowind#animation#2d animation#tesblr#tes#tes 3#tes iii#tes morrowind#argonian#tes art#tes oc#nerevar#nerevarine#vivec#vivec city#tes memes#elder scrolls#the elder scrolls#tes 3 morrowind#oc: vakkah lah#vakkah lah#shes got no sense of direction
911 notes
·
View notes
Text

WHAT I BRING IS A STAR
#dagoth ur#sharmat#morrowind#tes iii#tes 3#tes morrowind#tes#the elder scrolls#6th house#sixth house#digital art#fan art#tes fanart
560 notes
·
View notes
Text
Personally I love the concept of a nerevarine whos unable to move on from the prophecies and is both bitter about the role they were molded into fulfilling yet still feels obligated to bear the burden of a nerevarine
The nerevarine gets manipulated by multiple people and groups and the notion that they are aware of it later but have become resigned to it. Theyve been stuck in it for too long and feel they cant escape from it so they continue to serve as hortator and nerevarine but become increasingly bitter and hostile to the factions they feel manipulated by
39 notes
·
View notes
Last Seen Blogs

jamonscones
The Land Of Tea & Scones...

sunitmusic
S U N I T M U S I C

maxersss
boy my tumblr is so edgy

delreykenn-punk
daddy's little girl

papaenojado1-blog
lisa simpson