
dinamicostudio
DinamicoStudio
DinamicoStudio is a world class graphic design, image editing and website development offshore firm in Bangladesh which is a USA based company, currently working for Newspapers, Magazines, Digital Photographers, Advertising Agencies and Printing &...
27 posts
Don't wanna be here? Send us removal request.
Last Seen Blogs

readkaijuno8
Kaiju No. 8


weather-and-dogs
Trey's Weather Blog

outlookposts-fan-blog
Outlook number+1800-565-7782
Text
How to mask hair in Photoshop
How to mask hair in Photoshop
There are more ways to mask hair in Photoshop than you may have thought possible. When I first started out with Photoshop, I had never heard of feathering and was only aware of the quick selection tool (which sometimes works well), and the magic wand tool which only works well on images where the hair was black and white or not so similar in tone to the background.
I used to regularly mask out my model’s hair by using an airbrush set to 50% opacity at 2-3% hardness, painting over the top of her hair. It worked for me at that time but looking back now, it taught me some bad habits: it didn’t really matter how accurate I was when masking out her hair because I could easily clean up these unwanted edits with a paintbrush at a later stage. This didn’t build up my technique or develop my ability as an artist (and therefore a retoucher)…you could say instead it was an exercise in laziness!
So, I’ve done a few tests for this tutorial and wanted to share with you the most efficient and accurate ways of masking hair.
Hiding hair with the Quick Selection tool
If your subject’s hair is quite light in tone then the Quick Selection tool can be very useful in selecting it. Brush over the top of her hair (or tap on the Q key) then once you have got a selection, hold down Ctrl+Shift on your keyboard while using an airbrush set to 50% opacity at 2-3% hardness and paint over her hair. This should mask out the majority of her hair but if there are any stray strands left behind then use a small soft brush (B) to brush over these areas. If you find that Photoshop automatically tries to expand your selection too much then hold down Option (Alt) on your keyboard while brushing over unwanted areas. This will add to these areas instead of expanding.
Hiding hair with the Pen tool
If your subject has very dark hair then using a quick selection may not work as effectively but in that case, the Pen tool could be ideal for selecting her hair. Press P on your keyboard to select it and then make a series of points around her hair, avoiding the background and any skin if possible. Once you have done this, hold down Alt while clicking one of the first points you created and then drag over the rest of her hair until it is selected. Use a small feathered brush (B) to paint over any ‘stray’ strands. If you find that Photoshop automatically tries to expand your selection by connecting all of your points too much then hold down Option (Alt) on your keyboard while brushing over unwanted areas. This will add to these areas instead of expanding.
Using Quick Mask
You can also use Quick Mask with either of these methods for more accurate masking (this works in Photoshop and Elements).
Method 1: Using Quick Mask
Open the image that you wish to mask, click on the Quick Mask icon in the Toolbox and then select a large, soft-edged brush from the Brush Picker. Press D on your keyboard to reset the foreground and background colors to black and white. Paint over any areas of your subject that you want to be in front of your background. Use something like an A15 brush for most of her body; this is a big brush with soft edges. If you want to paint around her hair or in tight areas then choose a smaller brush such as an A5.
Pressing D resets the foreground and background colors.
Click on the Quick Mask icon again when you are done. This will show a Quick Mask selection instead of whatever was selected before (if anything was selected before). If it didn’t work, click on Refine Edge again and carry out a similar procedure but this time use the Quick Mask option.
When you are happy with your mask, hide the Quick Mask panel by clicking on the eye icon at the top right of the panel.
Method 2: Using Smart Brush
Open your photograph and then follow these very simple steps:
1. Click on the Brush Picker icon in the Canvas Dock at the top of your screen. Select a small soft-edged brush from this menu and press D to reset all the colors to black and white (see Figure 9-14).
Figure 9-14: Setting up for Smart Brush
2. Click once in an area where you would like to add a background or foreground element that will be removed from your image when finished painting. This will be referred to as your “reference point” in this book. For example, you could click directly over her face using a soft-edged brush to create an image mask for this part of the photo
#photoshop mask hair#photoshop hair masking#masking hair in photoshop cc#mask hair in photoshop#photoshop masking hair#hair masking#maskng hair#photoshop hair mask#how to mask hair in photoshop
0 notes
Text
The Guidelines For Ensuring Compliance With Amazon Image Requirements
The most important element of the Amazon digital photo album is images. Fortunately, the Amazon photo requirements are quite easy to understand. You should adhere to all rules, even if your intention is to modify product photos. Even the product photos don't just display on the product page, they also appear on related search results.
📷
The second section of Amazon image requirements states that a primary listing image must be used for every 100 instances of an extended title/description. A first image is required for each new listing and it's possible to use other images in the first listing if you want. It's important to note that neither of these images is supposed to take up a full width on any part of the page. Any image which looks stretched out or jerky is immediately rejected.
Another important requirement is that you should provide different types of photo editing tools to create the images. You can crop or expand the image to create additional images. It is important to consider what effect you want on the background. In general, images that are created using the photo editing tools provided by the photo-sharing site will be displayed as white. Black should be used for the main and any additional images.
The third and final section consists of some general information. It contains information about the location and dimensions of the images. The Amazon image requirements also indicate whether the images may be used in combination with other graphics. You may have to include a picture of a bow, or flower in your product description.
Amazon photo uploaders set out specific guidelines for which images can be combined. A photo book that only shows the product as one item is impossible to make. Resized images that do not meet the requirements will be refused. You will instead need to link to the page which contains your selection. It is recommended that you allow the viewer to modify the images as well.
The type of the Amazon image uploading service you are using will determine the photo-editing tools required to achieve the desired results. The Amazon image requirements will specify the minimum number of pixels that need to be present on the main image file. The number of additional images that you can include in the project will depend on the product description that you have provided. You will need to specify the dimensions and size of each image.
These guidelines give specific guidance on what colors you may use for your product photos. You may want to consider the proper formatting of your images before uploading them. To avoid any problems when uploading files, you should make sure you read all instructions. Amazon allows you to upload product images in two file formats. The JPEG and PNG formats are available.
The Amazon image guidelines will inform you that images can only be viewed in color mode if the product photos are uploaded in the JPEG format. Amazon color mode ensures that colors appear natural in the uploaded photos. Only certain web browsers can access the Amazon color mode, like Safari. It is important that you have an Internet browser capable of switching to color mode whenever it is needed.
#amazon image requirements#amazon photo requirements#amazon image policy#amazon photo editing#photoshop shadow
0 notes
Photo

Understanding Photoshop Shadow Creation
#drop shadow photoshop#drop shadow in photoshop#photoshop drop shadow#how to make a shadow in photoshop#how to add shadows in photoshop#Add Shadow in photoshop#Using Photoshop To Add Shadow#photoshop shadow#shadow photoshop#create shadow in photoshop
0 notes
Link
Photoshop shadow effects are the method of digitally changing an original image in its original form to give it either a specified or desired appearance. With the right Photoshop tools, you too can add a shadow to an image to provide it with realistic and perceived depth. The Photoshop shadow effect adds realism to anyone who looks at the photo and, as such, is very popular among designers. There are several ways by which one can add shadow to a photograph.
#drop shadow photoshop#drop shadow in photoshop#photoshop drop shadow#how to make a shadow in photoshop#how to add shadows in photoshop#Add Shadow in photoshop#Using Photoshop To Add Shadow#photoshop shadow#shadow photoshop#create shadow in photoshop
0 notes
Text
5 Tips For Jewelry Clipping Path
5 Tips For Jewelry Clipping Path
Are you interested in the jewelry business? Do you want to have a website and enter into the E-commerce world to sell jewelry?
Well, for that you need to have a catalog, full of original and professionally clicked jewelry pictures.
Jewelry photography can be a bit difficult in the start, but once you master the art, there is no stop.
Jewelry is a tough product to photograph. It is shiny and reflects light which makes the camera unable to focus.
There are a few things you need to keep in mind while shooting a jewelry piece.
· Don’t point the light directly on the image.
· Make sure it is not out of focus.
· Look for the best angles.
· Try to hang the piece with an invisible thread not to make it droop. It will give it a professional look.
· Try to add a shadow to the image.
· Retouching and clipping path.
The above mentioned all are the basics of photography which every photographer should know. Then, what is new in jewelry photography?
Clipping path and editing techniques are mostly used in jewelry photography.
What Is Clipping Path?
Clipping path is the editing technique used mostly for jewelry images to remove the background.
What is the difference between clipping path and background removing?
Background removing and clipping path, both are used to remove the backgrounds. But the clipping path is used to do it with more precision. It is used to remove every extra bit of background and to help the details of the jewelry look more prominent.
Tips For Jewelry Clipping Path
You sure don’t want to look unprofessional with the newly started business venture. You have to prepare the best set of images to upload on the website, to catch buyers’ attention. Jewelry clipping path will not only make the image look professional but it will also add aesthetics to the image.
Here are a few tips.
Use The Tools Of Clipping Path
You can use the tools of the clipping path for the jewelry clipping path. It will let you have an image without background. Clipping path will help you remove even the tiniest of the excess background. This clipping path tool will make the image look aesthetically pleasing. It will make the image prominent without any distracting background.
Retouching
Once the photography is done, the image is raw. Retouching the image is always needed. You can not have a perfect image, ready to use, soon after clicking. Retouching will adjust the light, opacity, brightness, and exposure of the image. It will make your image look appealing.
Remove Blemish Or Stain
Jewelry can have a blemish or stain. If the image is taken with a high-quality camera, even the tiniest of the stain can look bigger. You don’t need to worry. You can easily remove that blemish or stain using the editing techniques.
Color Correcting
Most of the jewelry pieces have a shiny and sparkly surface. Which is why, when photographed in light, the color can be changed. You can not put up a photo with the wrong color. You can bring it back to the original color by editing.
Formatting
This is an important tip. You cannot upload a large file on most websites. For that, you need to keep in mind, to choose the correct formatting and resize the image according to your needs.
0 notes
Link
A picture may worth a thousand words but it can also cost a thousand dollars in revenue. The most successful eCommerce brands are not just unique, high-quality images. You, as the owner needs to learn how to take professional shots, or at least how to convert ordinary shots into extraordinary photos.
As a website design company owner, I know what it feels like to develop a product and not getting the traffic, you deserve. This usually happens due to the lack of product photography.
Here are some tips that can help you make your photos look like real.
0 notes
Link
Wearables are an important part of the men’s appearance when it comes to fashion and style. It helps a man to present himself better and good-looking. So these are some of the best outfits for men which are according to the trend of #fashion and for grooming of #men’s #appearance. I am sure you will definitely love this article because it has all the required content with useful and knowledgeable information which will help you choose the #best #outfit for men.
0 notes
Link
Photo Editing Guide For Amazon Listing
There are many web pages where you can advertise your product, for it, these pages have certain criteria and recommendations for the publication that you are going to realize. When we talk about Amazon, the series of steps to complete for the product photos are a bit more extensive and strict.To avoid your publication being rejected and you can be successful in your sales online here is an Amazon Photo Editing Guide.
0 notes
Video
youtube
Clipping path & photo editing for eCommerce store
0 notes
Link
#amazon products#editing#photoshop#photography#background remove#clipping path#product photo retouch
0 notes
Link
Would be amazing to hire a photographer to let him make the magic, but if you have small and counted resources, or if you are good enough with the camera, then you can do it on your own, following this suggestion we’ll give you.#tips #photography #photographer #tips #tips for #photo #shoot #dslr #photography #digital #photography #tips
https://dinamicostudio.com/tips-highlight-product-photography.html
0 notes
Link
#Value of #Photoshop #Ghost #mannequin service
With the passage of time, the value of Photoshop mannequin service is indeed increasing. This is highly due to the cost effectiveness and the efficiency which the usage of mannequins brings about for your product images. The main factor that adds value of photo shop to ghost mannequin service is that it is a profitable way to promote your products.
Ghost mannequin services are also known as invisible mannequin or neck joint services. This is because in delivering these services, plastic mannequins or models are used instead of human figures to create 2D or 3D shape of garment items. Various types of pants, jackets, swim suits and shirts are worn by the mannequins using Photoshop and thus the value of Photoshop ghost mannequin service is indeed great.
0 notes
Photo
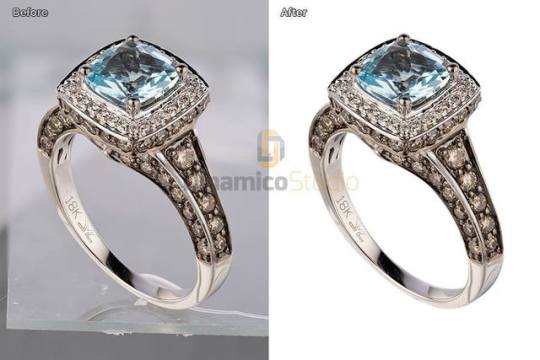
Image Background remove by Photoshop Pen tool.
https://dinamicostudio.com
0 notes
Link
Best Photo editing service
0 notes
Video
vimeo
How to Submit Job for Quote | Pricing request for Photo editing o
#Vimeo#howto#submit#job#requestforquote#jobpricing#photoediting#askforquote#product#pricing#ecommerce
0 notes
