dreamsinombre
A Collection Of Colorway Inspirations
1028 posts
Don't wanna be here? Send us removal request.
Last Seen Blogs

littlebigafterdark
please do not reblog
any of these posts!

quotes-motivational
Inspirational Quotes

ziyatalk
ZiyaTalk

atom-writings
𝕴'𝖑𝖑 𝕶𝖓𝖔𝖜, 𝕴'𝖑𝖑 𝕶𝖓𝖔𝖜

Text
Hey friends!
I've started up an instagram! Come and join me over there if you're on it.
1 note
·
View note
Text
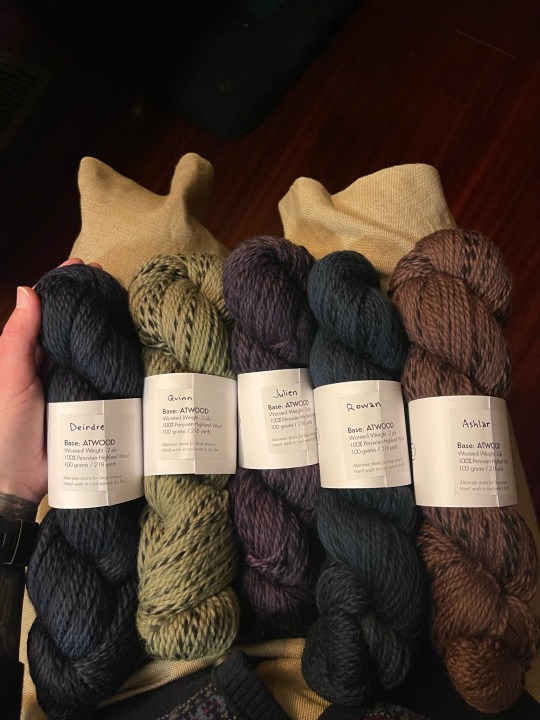
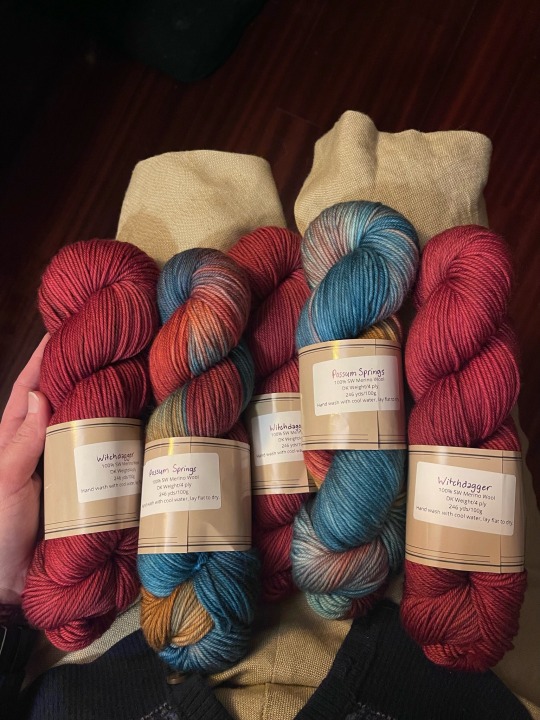
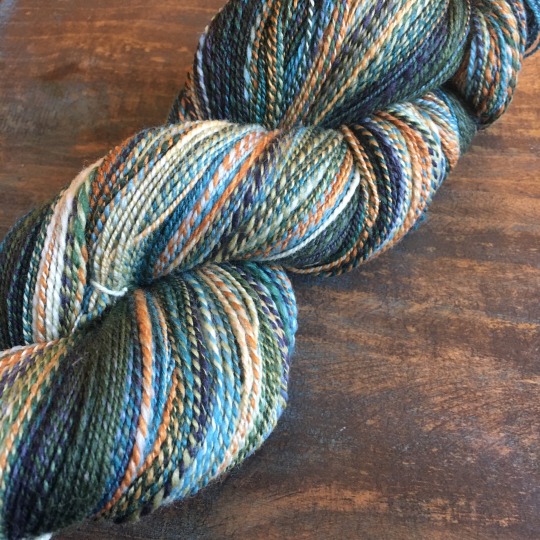
Just a quick end of the year love letter to two old and new favorite dyers, since I recently got more yarns from them:
Ex Libris Fibers!! I saw the Atwood base and immediately was struck by heady visions of a striped sweater. All that's missing is the wayward Morrigan (I'll get them in good time). (This also doesn't include the sweater quantities I've gotten from Rita before, like the Stale Patchouli+Drawing Blood/Early Grave combo from her Fin de Siècle collection, or Varney the Vampire, or the previous ones (Leviathan and Antiquarian) I've gotten from years ago—needless to say, big and longtime fan.

Nerdy Knits Yarn!! I quickly have come to absolutely adore her yarns and absolutely HAD to get sweater quantities for some Night in the Woods-inspired yarns (this doesn't include the OOAKs and marled Spiritfarer, Stray, and Ganondorf colors I got which may also all end up becoming sweaters lmao). I also can't stop thinking about her whole Gris collection and have visions of a fingering+mohair design, but I want to solidify that more in my head before I leap (I might leap first anyway, knowing me).
Anyway, I love all these yarns and the people behind them are just wonderful human beings whom I appreciate being able to not only support but get to know! I just wanted to show some appreciation and love because they deserve it 💜💜
ps - I love a whole lot more dyers than just these two, but I just got the Atwood colors in today and recently got more Witchdagger, and realized I have been super remiss in sharing the wonderful yarns I've been getting to work with, so I decided to start with these
#yarn#yarncraft#yarn craft#knitting#crochet#yarnblr#fiber art#fiber arts#fiber artist#future sweaters#indie dyed yarn#indie yarn dyers#hand dyed yarn#exlibrisfibers#nerdyknitsyarn
11 notes
·
View notes
Text
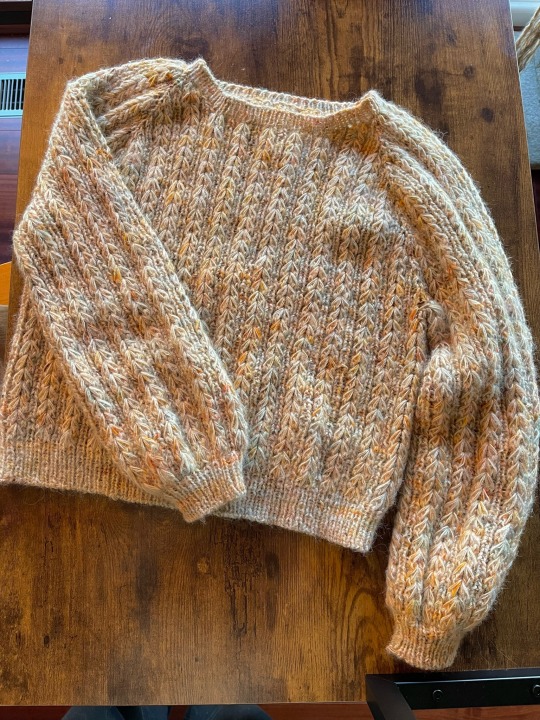
Fourth sweater this season done! (I have plans to make a compilation post with them since I haven't been keeping up with good photos, so we'll see if I can hold myself to do that.)

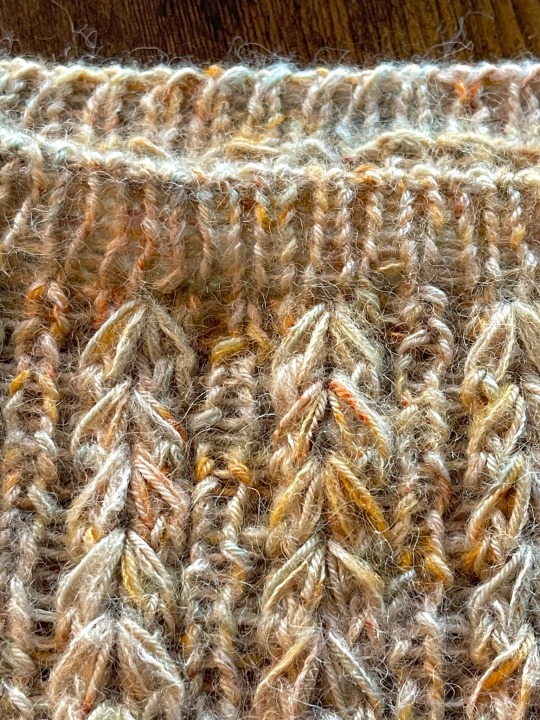

Made it with a few inches positive ease, and it's amazingly comfortable. The yarn is just so soft and dreamy and the halo is perfect. Heavy, too! But also light and airy! I actually even like the slight puff to the sleeves too! So many exclamation points!
A lot of firsts for this sweater, actually: first time making a garment holding yarn double (I am absolutely hooked and am already dreaming about another) and first time accounting for positive ease.
The pattern was absolutely amazing—simple repeat to follow, worked perfectly, written out clearly and while at first it seemed like it would be really complex, was delightfully straightforward to follow. I am looking forward to making other sweaters from this designer, and I highly recommend, 11/10.
Slowly building out a slow fashion wardrobe and leaning into my dark academia* Ghibli style dreams ✨📚🖋️🧶
yarn: classic sock + suri alpaca in Pumpkin Patch from Oakwood Knits (her first autumn collection!)
pattern: Cargill Sweater by The Creabea
*look even dark academia needs some light colors in the wardrobe right? You can't look at a colorway like this and tell me you'd pass it up
#knitting#yarn#handmade#yarnblr#fiber art#fiber arts#fiber artist#knit#handmade sweater#sweater#knit sweater#handmade knit sweater#slow fashion#cargill sweater#oakwood knits
24 notes
·
View notes
Note
I saw your scrap blanket post and wanted to ask: how do you knit a scrap blanket? how do you knit several rectangles together? My aunt crocheted several knitted stripes that are about 1,20m x 20cm together, but the difference in texture between the knitted parts and the crocheted rows is .. difficult.
Do you mean this post?
I actually ended up scrapping this scrap blanket because the yarn weights were getting just too different from one another. I also just wasn't working on it, and decided the yarn would be better used in other scrap blanket projects anyway.
I tend to crochet my blankets overall (I can't imagine that many live stitches), so they're a little bit more wieldy to put together… but I also abhor seaming and avoid it absolutely as much as possible, so my scrap blankets tend to be continuously growing monstrosities.
Because you used two different fiber arting techniques ("my aunt crocheted several knitted stripes") I'm not sure which craft your aunt actually did! If the stitches you can see in the stripes look like little v's (or little horizontal bars), then she knitted (and purled) them. If it looks like a wide variety of stitches you find difficult to accurately describe, she probably crocheted them.
Texture differences aren't necessarily a bad thing in a scrap blanket, unless you really happen to really dislike one of the textures. At that point, if you're making the blanket for yourself, I would just omit those pieces.
In either case, whether the stripes are crocheted or knit, seaming pieces together is essentially the same concept: you just use some kind of seaming technique either with a tapestry needle or by using a crochet row to attach them to one another. The tricky part comes with trying to line the stitches up—which! if you're making a scrappy, patchworky blanket, you don't have to do, and it just adds character to it, imo!
The other tricky part comes in if the stripes your aunt made are of different yarn weights. In that case, I would probably advise picking up stitches along the border and then knitting or crocheting (your craft of choice) at least one row of border around each piece you want to use, individually, all in the same weight yarn. So all your borders will be the same weight even if your individual pieces aren't. That should make your seaming process a bit easier.
If you've got different size pieces to put together, you'll have to do a little planning before seaming them all together so you can arrange them in a way where they all fit to form the shape you want. This may mean making and adding in new scrap pieces to make up any different in length or width—but again, that just will add to the patchwork charm.
It's hard to say anything more specific without seeing what the pieces look like, so I hope this was somewhat helpful!
#yarn#handmade#knitting#yarnblr#fiber art#fiber arts#fiber artist#knit#crochet#crocheting#anon#anonymous#anon ask#scrap blanket
12 notes
·
View notes
Text
past me: I calculated exactly how many skeins we need
present me: positive ease?
past me: what
present me: oh no
35 notes
·
View notes
Text
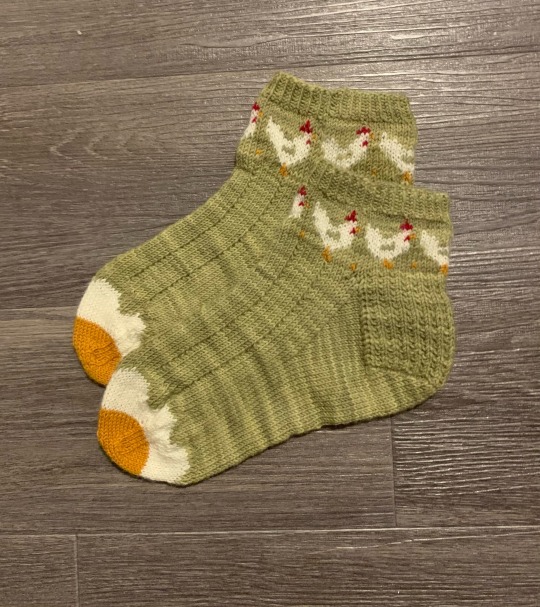
@tinycottagebythewoods
Wow, they are amazing ❤️ kudos to you! I am just at the beginning of my knitting career and haven't progressed to knitting socks yet but I am hoping to get there one day
You'll get there! I've been knitting for over 20 years now and I am still learning a lot about making socks (and in general)! The Stardew Summer socks were my first colorwork socks and my first stranded colorwork like that and at that complexity. I learned a whole lot of new skills from making them! I also don't typically do a lot of socks, but they're not always super difficult. There are some really good vanilla socks out there that are beginner-friendly, and some heel types that are also beginner friendly (probably the most daunting thing about socks, imo!). Oakwood Knits' heel for her Stardew socks is actually among my favorite; I'd be willing to bet her other sock designs have it, as well, so I definitely recommend checking out her patterns for some non-colorwork socks (or just omit the colorwork) when you're ready to give them a try!
#tinycottagwbythewoods#replies#reply#ask reply#because this is a sideblog i can't reply to replies with it
1 note
·
View note
Text
That happy feeling I get whenever I remember that decorative practices like embroidery and fair isle knitting were actually developed to thicken clothing to make it warmer and then developed into something that accomplishes that while showing our inherently human self-expression and creativity. That the strands twisted along behind my work aren’t annoying wastes of thread, they’re literally the reason my ancestors developed these crafts.
Go ahead and rb with any cool examples you have of these or any other fiber crafts which use double layering to increase warmth or stability!

317 notes
·
View notes
Text
I wish people really understood how much effort, time, and money is takes to knit something.
Even if it's small!
Like yeah no sorry dude I'm not going to make 30 pumpkins for you for free. I'm honored you think I have enough time and generosity for that.
505 notes
·
View notes
Text
if you knit or crochet you need to know math. "oh, because you have to count the stitches?" you'd think so wouldn't you. well it's actually because sometimes the yarn gets so messed up you can't untangle it without becoming an expert in the field of topology
6K notes
·
View notes
Text
hey, fellow fibre nerds, if you've always wanted to take classes about fibre stuff but hate going places (or learning in front of people or whatever), here's your chance.
abby franquemont runs an online school called franquemont university. there are real-time classes (usually at 5pm gmt), but there's also a ton of recorded classes about spinning and andean backstrap weaving, and the real-time classes are recorded and posted so those of us who can't make that can watch them. there's also a discord with channels for every class where you can talk about it and get help.
we signed up the other day and y'all, it's so fucking great. i'm a pretty adequate spinner, but we started watching spinning one, which is... you know, spinning for beginners, and i'm incredibly annoyed but also pleased to report that i've already learned things that are making me a better spinner. i also started watching the spinning for socks class, which is four hours of discussion about spinning for socks!
they have a whole learn to spin series, several levels of andean weaving classes that teach you both how to do the weaving and also present it in the appropriate cultural context, a course about drafting styles, one on yarn design, on ply structures, on using bast fibres...
there's a *ton* of stuff, and i can already tell i'm gonna learn so much. it's $45 usd a month, which is a lot if you think of it as a streaming service, but is an incredible deal if you think if it as unlimited access to classes, which is really what it is. there are even office hours, where you can drop in and ask about specific stuff.
it's all on discord, zoom, and youtube, so it's pretty easy to use, and i'm really, really liking it.
i'm not affiliated with them or anything, i just think it's cool and thought some of you might be into it.
594 notes
·
View notes
Text


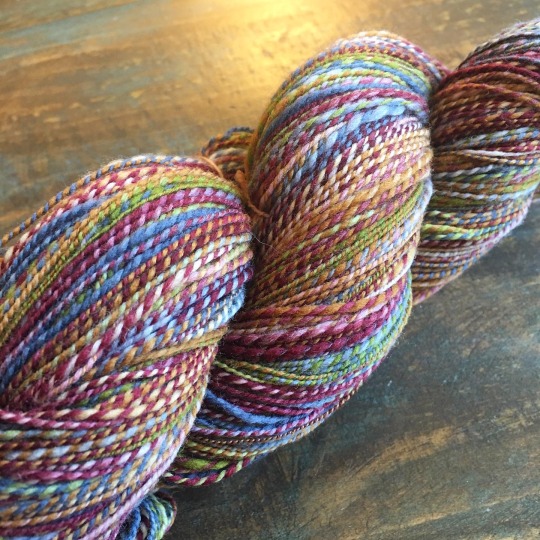
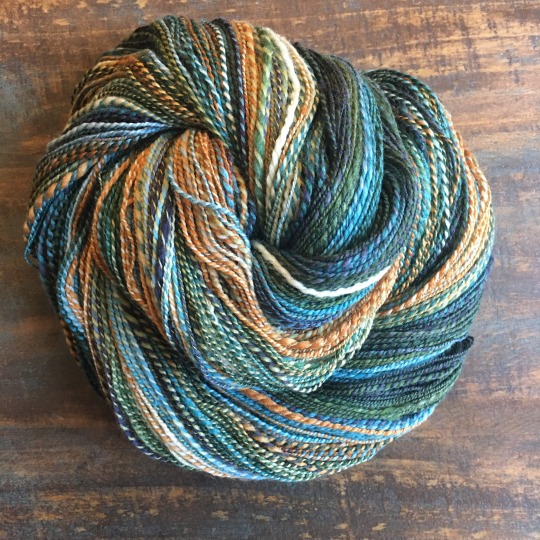

My two most recent spins! Both were braids from Apothefaery, the first being a fine merino in the colorway “gathering” and the second a fine wool/silk blend that I got at a wool market and did not have a name on the label. Pretty sure both of these are destined for my loom eventually
429 notes
·
View notes
Text
Lifesaving tip for anyone flat-knitting a sweater:
The width of the sleeve panel (assuming it wraps all the way around) is usually half the body width. So if the front of your sweater is 120 stitches wide, make the sleeves 60.
You’re welcome
2K notes
·
View notes
Text
Something amusing I've learned: my fitbit counts both knitting and crochet as steps
3 notes
·
View notes
Photo

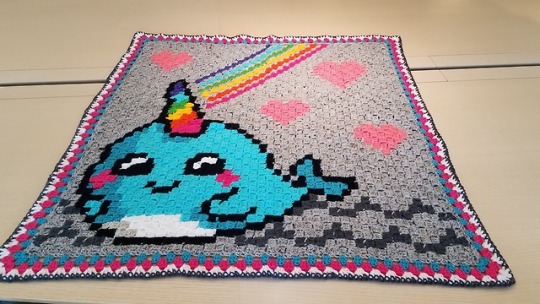
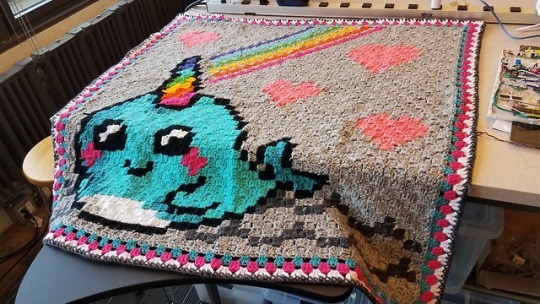
it’s done! the most freaking cute baby blanket to date using c2c and a pattern i made in google sheets. hit me up if you want a copy of the pattern!
216 notes
·
View notes
Text
How to Use Dye Plants
Humans have been coloring fabric, fibers, and wool for thousands of years and we can use many of the same plants they used to dye today. Using these leaves, flowers, and roots carries on cultural traditions, deepens our connection to nature, and encourages experimentation and creativity.
Dye plants come in all types. Sometimes you'll use the entire plant, sometimes just a part of it, sometimes you'll compound dyes or overdye to create the color you're wanting. You can dye with kitchen scraps, local plants you can forage for free, or dye plants you purchase. Just be sure you don't use any toxic plants and always research before tossing plants into your dye pot!
Basic Dyeing Process:
Two main ingredients are needed to start dyeing: your fabric/fibers and the plants you're using to color them.
Your dyeing results will differ if you're working with cellulose fibers like cotton, linen, or hemp or if you're working with protein fibers like silk or wool. Your process will also differ depending on what colors you're wanting to create so research specifics for the plants you intend to use. You may also want to mordant your fibers to get deep and long-lasting color.
Mordanting: treating the fiber with a substance to make the dyes last.
Some plants are direct dyes and don't need any mordants to attach to the fiber: indigo (best on cellulose fibers) or walnut, cutch, safflower (best on protein fibers) are a few direct dye plants.
Metal mordants like aluminum, iron, copper, tin, or alum create a chemical bond between the fiber and the dye. This fixes the color so it'll stay put through washing, sun exposure, and wear. Metal mordants can also subtly or dramatically change the end result color which is great for experimenting or more precise color needs. I'm not experienced in metal mordants (yet!) but there's tons of guides online if this sounds like the right treatment for your needs!
Soy milk isn't really a mordant but a binder. It enhances color uptake and makes cellulose fibers act more like protein fibers, but doesn't form any chemical bond between the fiber and dye. If you pretreat your fibers with soy milk and wash them gently you can still have lovely colors for years. This is my favorite method because it's easy and cheap!
If you dye protein fibers you can also choose to skip pretreating. Wool and silk take up dyes pretty well without mordants, they just won't be the longest lasting colors. It works plenty well if you're dyeing for fun or don't mind to overdye your fibers if the color fades too much.
*Don't get too caught up in mordanting and finding the perfect recipe if you're new to this. Half the fun of botanical dyeing is experimentation, creativity, and not knowing exactly what colors you'll end up with!*
Preparing Dye Plants and Dyeing
The specifics on prepping and dyeing will depend on what you're using, but you can generally use fresh or dried plants as long as they're in good condition.
You'll create your dye bath by either simmering the plant material, infusing it in hot water like tea, or soaking it in water for a period of time.
The exact amounts vary but a good rule of thumb is equal weights of your dye plants and your fibers to get a good color. More dye plants = richer colors and less = lighter colors. The dye potential in a plant will also vary from year to year and even season to season. This all just means that whatever you dye will truly be one of a kind.
Once your dye bath is prepared you'll add your fibers to it. Most plants use a hot dyeing method where you simmer the fibers in the dye bath for around an hour or until you're happy with the material's color. Remove it from the dye bath, rinse it, and dry it!
Some natural dye plants to try: eucalyptus, ivy, onion, avocado, elderberries, calendula, madder, coffee grounds. I also have this post listing dye plants and the colors they create if you want to check that out!
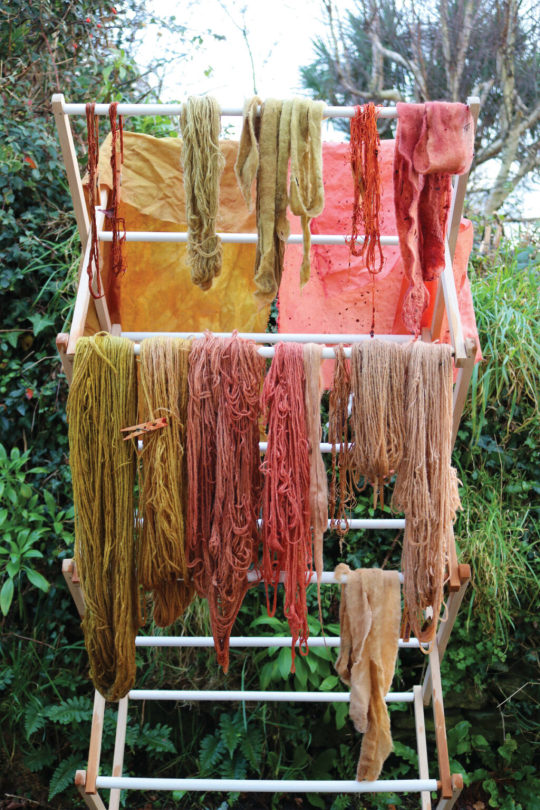
Drying wool, silk, and hemp fabrics dyed with madder root (dark pink), avocado skins (soft pink), and red onion skins (green).
Sources: 1, 2
2K notes
·
View notes